Nexus Switch Intersight Device Connector

This chapter contains the following sections:

Nexus Switch Intersight Device Connector Overview

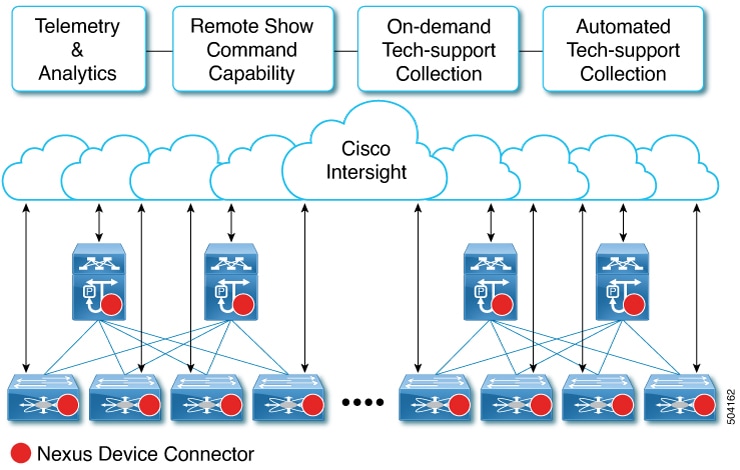
Devices are connected to the Cisco Intersight portal through a Nexus Switch Intersight Device Connector (NXDC) that is embedded in the Cisco NX-OS image of each system.

Beginning with Cisco NX-OS Release 10.2(3)F, the Device Connector on NX-OS feature is supported which provides a secure way for the connected devices to send information and receive control instructions from the Cisco Intersight portal, using a secure Internet connection.

The NXDC is enabled by default on all Cisco Nexus series switches and it starts at boot by default, and attempts to connect to the cloud service. Once a secure connection has been established and the device connector is registered with the Intersight service, the device connector collects detailed inventory, health status and sends the adoption telemetry data to the Intersight database. Inventory is refreshed once in a day.

The NXDC supports the AutoUpdate feature where it gets automatically updated to the latest version through a refresh by the Intersight service when you connect to Intersight.

The NXDC also supports the Connected TAC feature to collect tech-support data from devices that are claimed.

The NXDC feature integration was done to resolve the standalone Nexus switches with the following capabilities:

  • It provides fast and quick solution to gather basic data from standalone Nexus switches.

  • It stores and manages private data securely in the cloud.

  • It is flexible for future capabilities and enables the ability to upgrade NXDC.

Guidelines and Limitations

NXDC has the following guidelines and limitations:

  • You must configure DNS.

  • You must ensure svc.intersight.com gets resolved and allow outbound initiated HTTPS connections on port 443.

    If a proxy is required for an HTTPS connection to svc.intersight.com, the proxy can be configured in the NXDC user interface. For proxy configuration, see Configuring NXDC.

Configuring Nexus Switch to Intersight

By default the Nexus switch attempts to connect to Cisco's Intersight. If your Nexus device does not have the ability to reach Intersight, a specific proxy for Intersight must be configured.


Note


By default the Intersight feature (also known as Nexus Device Connector) is enabled.


To configure the optional parameters for the Intersight feature, follow the below steps:

SUMMARY STEPS

  1. configure terminal
  2. (Optional) intersight proxy <proxy-name> port <proxy-port>
  3. (Optional) intersight use-vrf <vrf-name>
  4. (Optional) intersight trustpoint <trustpoint-label> [host-name]
  5. (Optional) intersight source-interface <interface>
  6. (Optional) no feature intersight

DETAILED STEPS

  Command or Action Purpose

Step 1

configure terminal

Example:

switch# configure terminal
switch(config)#

Enters global configuration mode.

Step 2

(Optional) intersight proxy <proxy-name> port <proxy-port>

Example:

switch(config)# intersight proxy proxy.esl.cisco.com port 8080
(Optional)

Configures the proxy server for Intersight connection.

  • proxy-name: IPv4 or IPv6 address or DNS name of proxy server.

  • proxy-port: Proxy port number. The range is 1-65535. The default value is 8080.

Note


If Proxy is enabled with the smart license configuration on Cisco Nexus switches, the NXDC inherits this configuration and attempts to connect with Cisco Intersight Cloud.

Step 3

(Optional) intersight use-vrf <vrf-name>

Example:

switch(config)# intersight use-vrf blue
(Optional)

Modifies the VRF of NXDC, if connectivity is through the specified VRF.

Note


By default Intersight is started in management VRF/namespace.

Step 4

(Optional) intersight trustpoint <trustpoint-label> [host-name]

Example:

switch(config)# intersight trustpoint test test
(Optional)

Configures certificates for Intersight connection.

trustpoint-label: Crypto ca truspoint label. For more information refer to Cisco Nexus 9000 Series NX-OS Security Configuration Guide.

Step 5

(Optional) intersight source-interface <interface>

Example:

switch(config)# intersight source-interface mgmt 0
(Optional)

Configures the source interface for communication.

Step 6

(Optional) no feature intersight

Example:

switch(config)# no feature intersight
(Optional)

Disables the Intersight process and removes all NXDC configuration and logs store.

Verifying NXDC configuration and status

To verify the NXDC configuration, use the following Bash commands:

To display the NXDC configuration and status information, enter one of the following commands:

Command

Purpose

show system device-connector claim-info

Displays the device Serial Number, Token and Intersight claim state.

Note


Token will be displayed when connectivity to Intersight is established and the device is not claimed. In the scenario that a device is claimed, a Token will not be displayed and the message section will display "Cannot fetch claim code for already claimed device".

Duration for valid token is reported in seconds.

show system device-connector log [dc|dcgrpc|cnmi|nae|sim|compliance]

Displays device connector log messages.

The following example shows sample output for the show system device-connector claim-info command before device is claimed:
Switch# show system device-connector claim-info
SerialNumber: FDO23021ZUJ
SecurityToken: 9FFD4FA94DCD
Duration: 599
Message:
Claim state: Not Claimed
The following example shows sample output for the show system device-connector claim-info command after device is claimed:
Switch# show system device-connector claim-info
SerialNumber: ABCD12345E6
SecurityToken:
Duration: 0
Message: Cannot fetch claim code for already claimed device
Claim state: Claimed
Claim time: 2024-02-18T12:00:01.77Z
Claimed by: user@cisco.com
Account: dc- customer
Site name:
Site ID:

Claiming Nexus Switches in Intersight

To get started with using the features and functionality, you must claim the switch in an Intersight User Interface (UI).

To claim the switch in Intersight UI, use the following procedure:

  • Claim Nexus switches using Intersight UI.

    To claim the connected devices in Intersight, follow the process as described in Target Claim.

  • Claim multiple Nexus switches with Ansible playbook.

    To claim multiple Nexus switches in an automated manner using Ansible, check the details in the Ansible playbook.