Configuring MSDP

This chapter describes how to configure Multicast Source Discovery Protocol (MSDP) on a Cisco NX-OS device.

About MSDP

You can use the Multicast Source Discovery Protocol (MSDP) to exchange multicast source information between multiple Border Gateway Protocol (BGP) enabled Protocol Independent Multicast (PIM) sparse-mode domains. In addition, MSDP can be used to create an Anycast-RP configuration to provide RP redundancy and load sharing. For information about BGP, see the Cisco Nexus 9000 Series NX-OS Unicast Routing Configuration Guide.

MSDP is supported on all Cisco Nexus 9000 series switches.

Beginning with Cisco NX-OS Release 10.3(1)F, MSDP is supported on Cisco Nexus 9808 platform switches.

When a receiver joins a group that is transmitted by a source in another domain, the rendezvous point (RP) sends PIM join messages in the direction of the source to build a shortest path tree. The designated router (DR) sends packets on the sourcetree within the source domain, which can travel through the RP in the source domain and along the branches of the sourcetree to other domains. In domains where there are receivers, RPs in those domains can be on the sourcetree. The peering relationship is conducted over a TCP connection.

The following figure shows four PIM domains. The connected RPs (routers) are called MSDP peers because they are exchanging active source information with each other. Each MSDP peer advertises its own set of multicast source information to the other peers. Source Host 2 sends the multicast data to group 224.1.1.1. On RP 6, the MSDP process learns about the source through PIM register messages and generates Source-Active (SA) messages to its MSDP peers that contain information about the sources in its domain. When RP 3 and RP 5 receive the SA messages, they forward them to their MSDP peers. When RP 5 receives the request from Host 1 for the multicast data on group 224.1.1.1, it builds a shortest path tree to the source by sending a PIM join message in the direction of Host 2 at 192.1.1.1.

Figure 1. MSDP Peering Between RPs in Different PIM Domains

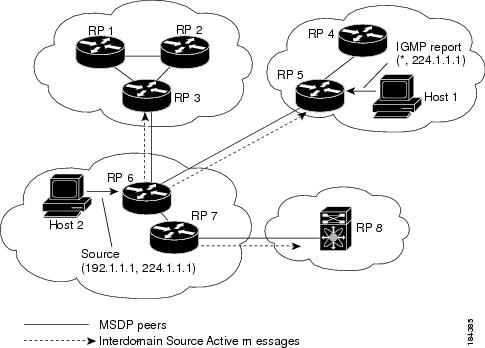
When you configure MSDP peering between each RP, you create a full mesh. Full MSDP meshing is typically done within an autonomous system, as shown between RPs 1, 2, and 3, but not across autonomous systems. You use BGP to do a loop suppression and MSDP peer-RPF to suppress looping SA messages.


Note


You do not need to configure BGP in order to use Anycast-RP (a set of RPs that can perform load balancing and failover) within a PIM domain.

Note


You can use PIM Anycast (RFC 4610) to provide the Anycast-RP function instead of MSDP.

For detailed information about MSDP, see RFC 3618.

SA Messages and Caching

MSDP peers exchange Source-Active (SA) messages to propagate information about active sources. SA messages contain the following information:

  • Source address of the data source

  • Group address that the data source uses

  • IP address of the RP or the configured originator ID

When a PIM register message advertises a new source, the MSDP process reencapsulates the message in an SA message that is immediately forwarded to all MSDP peers.

The SA cache holds the information for all sources learned through SA messages. Caching reduces the join latency for new receivers of a group because the information for all known groups can be found in the cache. You can limit the number of cached source entries by configuring the SA limit peer parameter. You can limit the number of cached source entries for a specific group prefix by configuring the group limit global parameter. The SA cache is enabled by default and cannot be disabled.

The MSDP software sends SA messages for each group in the SA cache every 60 seconds or at the configured SA interval global parameter. An entry in the SA cache is removed if an SA message for that source and group is not received within the SA interval plus 3 seconds.

MSDP Peer-RPF Forwarding

MSDP peers forward the SA messages that they receive away from the originating RP. This action is called peer-RPF flooding. The router examines the BGP or MBGP routing table to determine which peer is the next hop in the direction of the originating RP of the SA message. This peer is called a reverse path forwarding (RPF) peer.

If the MSDP peer receives the same SA message from a non-RPF peer in the direction of the originating RP, it drops the message. Otherwise, it forwards the message to all its MSDP peers.

MSDP Mesh Groups

You can use MSDP mesh groups to reduce the number of SA messages that are generated by peer-RPF flooding. By configuring a peering relationship between all the routers in a mesh and then configuring a mesh group of these routers, the SA messages that originate at a peer are sent by that peer to all other peers. SA messages received by peers in the mesh are not forwarded.

A router can participate in multiple mesh groups. By default, no mesh groups are configured.

Prerequisites for MSDP

MSDP has the following prerequisites:

  • You are logged onto the device.

  • For global commands, you are in the correct virtual routing and forwarding (VRF) mode. The default configuration mode shown in the examples in this chapter applies to the default VRF.

  • You configured PIM for the networks where you want to configure MSDP.

Default Settings

This table lists the default settings for MSDP parameters.

Table 1. Default MSDP Parameters

Parameters

Default

Description

Peer has no description

Administrative shutdown

Peer is enabled when it is defined

MD5 password

No MD5 password is enabled

SA policy IN

All SA messages are received

SA policy OUT

All registered sources are sent in SA messages

SA limit

No limit is defined

Originator interface name

RP address of the local system

Group limit

No group limit is defined

SA interval

60 seconds

Configuring MSDP

You can establish MSDP peering by configuring the MSDP peers within each PIM domain as follows:

  1. Select the routers to act as MSDP peers.

  2. Enable the MSDP feature.

  3. Configure the MSDP peers for each router identified in Step 1.

  4. Configure the optional MSDP peer parameters for each MSDP peer.

  5. Configure the optional global parameters for each MSDP peer.

  6. Configure the optional mesh groups for each MSDP peer.


Note


The MSDP commands that you enter before you enable MSDP are cached and then run when MSDP is enabled. Use the ip msdp peer or ip msdp originator-id command to enable MSDP.


Note


If you are familiar with the Cisco IOS CLI, be aware that the Cisco NX-OS commands for this feature might differ from the Cisco IOS commands that you would use.


Enabling the MSDP Feature

SUMMARY STEPS

  1. configure terminal
  2. feature msdp
  3. (Optional) show running-configuration msdp
  4. (Optional) copy running-config startup-config

DETAILED STEPS

  Command or Action Purpose

Step 1

configure terminal

Example:

switch# configure terminal
switch(config)#

Enters global configuration mode.

Step 2

feature msdp

Example:

switch# feature msdp

Enables the MSDP feature so that you can enter MSDP commands. By default, the MSDP feature is disabled.

Step 3

(Optional) show running-configuration msdp

Example:

switch# show running-configuration msdp
(Optional)

Shows the running-configuration information for MSDP.

Step 4

(Optional) copy running-config startup-config

Example:

switch(config)# copy running-config startup-config
(Optional)

Copies the running configuration to the startup configuration.

Configuring MSDP Peers

You can configure an MSDP peer when you configure a peering relationship with each MSDP peer that resides either within the current PIM domain or in another PIM domain. MSDP is enabled on the router when you configure the first MSDP peering relationship.

Before you begin

Ensure that you have installed the Enterprise Services license and enabled PIM and MSDP.

Ensure that you configured PIM in the domains of the routers that you will configure as MSDP peers.

SUMMARY STEPS

  1. configure terminal
  2. ip msdp peer peer-ip-address connect-source interface [remote-as as-number]
  3. Repeat Step 2 for each MSDP peering relationship by changing the peer IP address, the interface, and the AS number as appropriate.
  4. (Optional) show ip msdp summary [vrf [vrf-name | all]]
  5. (Optional) copy running-config startup-config

DETAILED STEPS

  Command or Action Purpose

Step 1

configure terminal

Example:

switch# configure terminal
switch(config)#

Enters global configuration mode.

Step 2

ip msdp peer peer-ip-address connect-source interface [remote-as as-number]

Example:

switch(config)# ip msdp peer 192.168.1.10 connect-source ethernet 2/1 remote-as 8

Configures an MSDP peer with the specified peer IP address. The software uses the source IP address of the interface for the TCP connection with the peer. The interface can take the form of type slot/port. If the AS number is the same as the local AS, then the peer is within the PIM domain; otherwise, this peer is external to the PIM domain. By default, MSDP peering is disabled.

Note


MSDP peering is enabled when you use this command.

Step 3

Repeat Step 2 for each MSDP peering relationship by changing the peer IP address, the interface, and the AS number as appropriate.

—

Step 4

(Optional) show ip msdp summary [vrf [vrf-name | all]]

Example:

switch# show ip msdp summary
(Optional)

Displays a summary of MSDP peers.

Step 5

(Optional) copy running-config startup-config

Example:

switch(config)# copy running-config startup-config
(Optional)

Copies the running configuration to the startup configuration.

Configuring MSDP Peer Parameters

You can configure the optional MSDP peer parameters described in this table. You configure these parameters in global configuration mode for each peer based on its IP address.

Table 2. MSDP Peer Parameters

Parameter

Description

Description

Description string for the peer. By default, the peer has no description.

Administrative shutdown

Method to shut down the MSDP peer. The configuration settings are not affected by this command. You can use this parameter to allow configuration of multiple parameters to occur before making the peer active. The TCP connection with other peers is terminated by the shutdown. By default, a peer is enabled when it is defined.

MD5 password

MD5-shared password key used for authenticating the peer. By default, no MD5 password is enabled.

TCP keychain

TCP keychain is used for MSDP peering authentication.

SA policy IN

Route-map policy for incoming SA messages. By default, all SA messages are received.

Note

 
To configure route-map policies, see the Cisco Nexus 9000 Series NX-OS Unicast Routing Configuration Guide.

SA policy OUT

Route-map policy for outgoing SA messages. By default, all registered sources are sent in SA messages.

Note

 
To configure route-map policies, see the Cisco Nexus 9000 Series NX-OS Unicast Routing Configuration Guide.

SA limit

Number of (S, G) entries accepted from the peer and stored in the SA cache. By default, there is no limit.

Before you begin

Ensure that you have installed the Enterprise Services license and enabled PIM and MSDP.

SUMMARY STEPS

  1. configure terminal
  2. ip msdp description peer-ip-address description
  3. ip msdp shutdown peer-ip-address
  4. ip msdp password peer-ip-address password
  5. ip msdp sa-policy peer-ip-address policy-name in
  6. ip msdp sa-policy peer-ip-address policy-name out
  7. ip msdp sa-limit peer-ip-address limit
  8. (Optional) ip msdp keychain peer-ip-address name
  9. (Optional) show ip msdp peer [peer-address] [vrf [vrf-name | all]]
  10. (Optional) copy running-config startup-config

DETAILED STEPS

  Command or Action Purpose

Step 1

configure terminal

Example:

switch# configure terminal
switch(config)#

Enters global configuration mode.

Note


Use the commands listed from step-2 to configure the MSDP peer parameters.

Step 2

ip msdp description peer-ip-address description

Example:

switch(config)# ip msdp description 192.168.1.10 peer in Engineering network

Sets a description string for the peer. By default, the peer has no description.

Step 3

ip msdp shutdown peer-ip-address

Example:

switch(config)# ip msdp shutdown 192.168.1.10

Shuts down the peer. By default, the peer is enabled when it is defined.

Step 4

ip msdp password peer-ip-address password

Example:

switch(config)# ip msdp password 192.168.1.10 my_md5_password

Enables an MD5 password for the peer. By default, no MD5 password is enabled.

Step 5

ip msdp sa-policy peer-ip-address policy-name in

Example:

switch(config)# ip msdp sa-policy 192.168.1.10 my_incoming_sa_policy in

Enables a route-map policy for incoming SA messages. By default, all SA messages are received.

Step 6

ip msdp sa-policy peer-ip-address policy-name out

Example:

switch(config)# ip msdp sa-policy 192.168.1.10 my_outgoing_sa_policy out

Enables a route-map policy for outgoing SA messages. By default, all registered sources are sent in SA messages.

Step 7

ip msdp sa-limit peer-ip-address limit

Example:

switch(config)# ip msdp sa-limit 192.168.1.10 5000

Sets a limit on the number of (S, G) entries accepted from the peer. By default, there is no limit.

Step 8

(Optional) ip msdp keychain peer-ip-address name

Example:

switch(config)# ip msdp keychain 192.168.1.10 5000 mykeychain
(Optional)

Enables the keychain authentication for the peer. Where <keychain> is the name of a keychain.

Note

 
  • Authentication can be configured with specific keychain name before the keychain is configured, but authentication will pass only if the keychain is present with a valid key.

  • If keychain authentication is configured, the old password based authentication will be ignored if present.

Step 9

(Optional) show ip msdp peer [peer-address] [vrf [vrf-name | all]]

Example:


switch(config)# show ip msdp peer 192.168.1.10
(Optional)

Displays detailed MSDP peer information.

Step 10

(Optional) copy running-config startup-config

Example:


switch(config)# copy running-config startup-config
(Optional)

Copies the running configuration to the startup configuration.

Configuring MSDP Global Parameters

You can configure the optional MSDP global parameters described in this table.

Table 3. MSDP Global Parameters

Parameter

Description

Originator interface name

IP address used in the RP field of an SA message entry. When Anycast RPs are used, all RPs use the same IP address. You can use this parameter to define a unique IP address for the RP of each MSDP peer. By default, the software uses the RP address of the local system.

Note


We recommend that you use a loopback interface for the RP address.

Group limit

Maximum number of (S, G) entries that the software creates for the specified prefix. The software ignores groups when the group limit is exceeded and logs a violation. By default, no group limit is defined.

SA interval

Interval at which the software transmits Source-Active (SA) messages. The range is from 60 to 65,535 seconds. The default is 60 seconds.

Before you begin

Ensure that you have installed the Enterprise Services license and enabled PIM and MSDP.

SUMMARY STEPS

  1. configure terminal
  2. ip msdp originator-id interface
  3. ip msdp group-limit limit source source-prefix
  4. ip msdp sa-interval seconds
  5. (Optional) show ip msdp summary [vrf [ vrf-name | all]]
  6. (Optional) copy running-config startup-config

DETAILED STEPS

  Command or Action Purpose

Step 1

configure terminal

Example:

switch# configure terminal
switch(config)#

Enters global configuration mode.

Step 2

ip msdp originator-id interface

Example:

switch(config)# ip msdp originator-id loopback0

Sets a description string for the peer. By default, the peer has no description.

Sets the IP address used in the RP field of an SA message entry. By default, the software uses the RP address of the local system.

Note


We recommend that you use a loopback interface for the RP address.

Step 3

ip msdp group-limit limit source source-prefix

Example:

switch(config)# ip msdp group-limit 1000 source 192.168.1.0/24

Maximum number of (S, G) entries that the software creates for the specified prefix. The software ignores groups when the group limit is exceeded and logs a violation. By default, no group limit is defined.

Step 4

ip msdp sa-interval seconds

Example:

switch(config)# ip msdp sa-interval 80

Interval at which the software transmits Source-Active (SA) messages. The range is from 60 to 65,535 seconds. The default is 60 seconds.

Step 5

(Optional) show ip msdp summary [vrf [ vrf-name | all]]

Example:


switch(config)# show ip msdp summary
(Optional)

Displays a summary of the MSDP configuration.

Step 6

(Optional) copy running-config startup-config

Example:


switch(config)# copy running-config startup-config
(Optional)

Copies the running configuration to the startup configuration.

Configuring MSDP Mesh Groups

You can configure optional MSDP mesh groups in global configuration mode by specifying each peer in the mesh. You can configure multiple mesh groups on the same router and multiple peers per mesh group.

Before you begin

Ensure that you have installed the Enterprise Services license and enabled PIM and MSDP.

SUMMARY STEPS

  1. configure terminal
  2. ip msdp mesh-group peer-ip-addr mesh-name
  3. Repeat Step 2 for each MSDP peer in the mesh by changing the peer IP address.
  4. (Optional) show ip msdp mesh-group [mesh-group] [vrf [vrf-name | all]]
  5. (Optional) copy running-config startup-config

DETAILED STEPS

  Command or Action Purpose

Step 1

configure terminal

Example:

switch# configure terminal
switch(config)#

Enters global configuration mode.

Step 2

ip msdp mesh-group peer-ip-addr mesh-name

Example:

switch(config)# ip msdp mesh-group 192.168.1.10 my_mesh_1

Configures an MSDP mesh with the peer IP address specified. You can configure multiple meshes on the same router and multiple peers per mesh group. By default, no mesh groups are configured.

Step 3

Repeat Step 2 for each MSDP peer in the mesh by changing the peer IP address.

—

Step 4

(Optional) show ip msdp mesh-group [mesh-group] [vrf [vrf-name | all]]

Example:

switch# show ip msdp mesh-group
(Optional)

Displays information about the MSDP mesh group configuration.

Step 5

(Optional) copy running-config startup-config

Example:

switch(config)# copy running-config startup-config
(Optional)

Copies the running configuration to the startup configuration.

Restarting the MSDP Process

Before you begin

You can restart the MSDP process and optionally flush all routes.

SUMMARY STEPS

  1. restart msdp
  2. configure terminal
  3. ip msdp flush-routes
  4. (Optional) show running-configuration | include flush-routes
  5. (Optional) copy running-config startup-config

DETAILED STEPS

  Command or Action Purpose

Step 1

restart msdp

Example:

switch# restart msdp

Restarts the MSDP process.

Step 2

configure terminal

Example:

switch# configure terminal
switch(config)#

Enters global configuration mode.

Step 3

ip msdp flush-routes

Example:

switch(config)# ip msdp flush-routes

Removes routes when the MSDP process is restarted. By default, routes are not flushed.

Step 4

(Optional) show running-configuration | include flush-routes

Example:

switch(config)# show running-configuration | include flush-routes
(Optional)

Displays flush-routes configuration lines in the running configuration.

Step 5

(Optional) copy running-config startup-config

Example:


switch(config)# copy running-config startup-config
(Optional)

Copies the running configuration to the startup configuration.

Verifying the MSDP Configuration

To display the MSDP configuration information, perform one of the following tasks.

Command

Description

show ip msdp count [as-number] [vrf [vrf-name | all]]

Displays MSDP (S, G) entry and group counts by the autonomous system (AS) number.

show ip msdp mesh-group [mesh-group] [vrf [vrf-name | all]]

Displays the MSDP mesh group configuration.

show ip msdp peer [peer-address] [vrf [vrf-name | all]]

Displays MSDP information for the MSDP peer.

show ip msdp rpf [rp-address] [vrf [vrf-name | all]]

Displays the next-hop AS on the BGP path to an RP address.

show ip msdp sources [vrf [vrf-name | all]]

Displays the MSDP-learned sources and violations of configured group limits.

show ip msdp summary [vrf [vrf-name | all]]

Displays a summary of the MSDP peer configuration.

Monitoring MSDP

You can display and clear MSDP statistics by using the features in this section.

Displaying Statistics

You can display MSDP statistics using these commands.

Command

Description

show ip msdp policy statistics sa-policy peer-address {in | out} [vrf [vrf-name | all]]

Displays the MSDP policy statistics for the MSDP peer.

show ip msdp {sa-cache | route} [source-address] [group-address] [vrf [vrf-name | all]] [asn-number] [peer peer-address]

Displays the MSDP SA route cache. If you specify the source address, all groups for that source are displayed. If you specify a group address, all sources for that group are displayed.

Clearing Statistics

You can clear the MSDP statistics using these commands.

Command

Description

clear ip msdp peer [peer-address] [vrf vrf-name]

Clears the TCP connection to an MSDP peer.

clear ip msdp policy statistics sa-policy peer-address {in | out} [vrf vrf-name]

Clears statistics counters for MSDP peer SA policies.

clear ip msdp statistics [peer-address] [vrf vrf-name]

Clears statistics for MSDP peers.

clear ip msdp {sa-cache | route} [group-address] [vrf [vrf-name | all]]

Clears the group entries in the SA cache.

Configuration Examples for MSDP

To configure MSDP peers, some of the optional parameters, and a mesh group, follow these steps for each MSDP peer:

  1. Configure the MSDP peering relationship with other routers.

    switch# configure terminal
    switch(config)# ip msdp peer 192.168.1.10 connect-source ethernet 1/0 remote-as 8
    
    
  2. Configure the optional peer parameters.

    switch# configure terminal
    switch(config)# ip msdp password 192.168.1.10 my_peer_password_AB
    
    
  3. Configure the optional global parameters.

    switch# configure terminal
    switch(config)# ip msdp sa-interval 80
    
    
  4. Configure the peers in each mesh group.

    switch# configure terminal
    switch(config)# ip msdp mesh-group 192.168.1.10 mesh_group_1


The following example shows how to configure a subset of the MSDP peering that is shown below.

RP 3: 192.168.3.10 (AS 7)


configure terminal
  ip msdp peer 192.168.1.10 connect-source ethernet 1/1
  ip msdp peer 192.168.2.10 connect-source ethernet 1/2
  ip msdp peer 192.168.6.10 connect-source ethernet 1/3 remote-as 9
  ip msdp password 192.168.6.10 my_peer_password_36
  ip msdp sa-interval 80
  ip msdp mesh-group 192.168.1.10 mesh_group_123
  ip msdp mesh-group 192.168.2.10 mesh_group_123
  ip msdp mesh-group 192.168.3.10 mesh_group_123

RP 5: 192.168.5.10 (AS 8)


configure terminal
  ip msdp peer 192.168.4.10 connect-source ethernet 1/1
  ip msdp peer 192.168.6.10 connect-source ethernet 1/2 remote-as 9
  ip msdp password 192.168.6.10 my_peer_password_56
  ip msdp sa-interval 80

RP 6: 192.168.6.10 (AS 9)


configure terminal
  ip msdp peer 192.168.7.10 connect-source ethernet 1/1
  ip msdp peer 192.168.3.10 connect-source ethernet 1/2 remote-as 7
  ip msdp peer 192.168.5.10 connect-source ethernet 1/3 remote-as 8
  ip msdp password 192.168.3.10 my_peer_password_36
  ip msdp password 192.168.5.10 my_peer_password_56
  ip msdp sa-interval 80

Related Documents

Related Topic

Document Title

Configuring MBGP

Cisco Nexus 9000 Series NX-OS Unicast Routing Configuration Guide

Standards

Standards

Title

RFC 4624

Multicast Source Discovery Protocol (MSDP) MIB