Configuring RADIUS

This chapter describes how to configure the Remote Access Dial-In User Service (RADIUS) protocol on Cisco NX-OS devices.

This chapter includes the following sections:

About RADIUS

The RADIUS distributed client/server system allows you to secure networks against unauthorized access. In the Cisco implementation, RADIUS clients run on Cisco NX-OS devices and send authentication and accounting requests to a central RADIUS server that contains all user authentication and network service access information.

RADIUS Network Environments

RADIUS can be implemented in a variety of network environments that require high levels of security while maintaining network access for remote users.

You can use RADIUS in the following network environments that require access security:

  • Networks with multiple-vendor network devices, each supporting RADIUS. For example, network devices from several vendors can use a single RADIUS server-based security database.

  • Networks already using RADIUS. You can add a Cisco NX-OS device with RADIUS to the network. This action might be the first step when you make a transition to a AAA server.

  • Networks that require resource accounting. You can use RADIUS accounting independent of RADIUS authentication or authorization. The RADIUS accounting functions allow data to be sent at the start and end of services, indicating the amount of resources (such as time, packets, bytes, and so on) used during the session. An Internet service provider (ISP) might use a freeware-based version of the RADIUS access control and accounting software to meet special security and billing needs.

  • Networks that support authentication profiles. Using the RADIUS server in your network, you can configure AAA authentication and set up per-user profiles. Per-user profiles enable the Cisco NX-OS device to better manage ports using their existing RADIUS solutions and to efficiently manage shared resources to offer different service-level agreements.

RADIUS Operation

When a user attempts to log in and authenticate to a Cisco NX-OS device using RADIUS, the following process occurs:

  • The user is prompted for and enters a username and password.

  • The username and encrypted password are sent over the network to the RADIUS server.

  • The user receives one of the following responses from the RADIUS server:

    ACCEPT
    The user is authenticated.
    REJECT
    The user is not authenticated and is prompted to reenter the username and password, or access is denied.
    CHALLENGE
    A challenge is issued by the RADIUS server. The challenge collects additional data from the user.
    CHANGE PASSWORD
    A request is issued by the RADIUS server, asking the user to select a new password.

The ACCEPT or REJECT response is bundled with additional data that is used for EXEC or network authorization. You must first complete RADIUS authentication before using RADIUS authorization. The additional data included with the ACCEPT or REJECT packets consists of the following:

  • Services that the user can access, including Telnet, rlogin, or local-area transport (LAT) connections, and Point-to-Point Protocol (PPP), Serial Line Internet Protocol (SLIP), or EXEC services.

  • Connection parameters, including the host or client IPv4 or IPv6 address, access list, and user timeouts.

RADIUS Server Monitoring

An unresponsive RADIUS server can cause a delay in processing AAA requests. You can configure the Cisco NX-OS device to periodically monitor a RADIUS server to check whether it is responding (or alive) to save time in processing AAA requests. The Cisco NX-OS device marks unresponsive RADIUS servers as dead and does not send AAA requests to any dead RADIUS servers. The Cisco NX-OS device periodically monitors the dead RADIUS servers and brings them to the alive state once they respond. This monitoring process verifies that a RADIUS server is in a working state before real AAA requests are sent its way. Whenever a RADIUS server changes to the dead or alive state, a Simple Network Management Protocol (SNMP) trap is generated and the Cisco NX-OS device displays an error message that a failure is taking place.
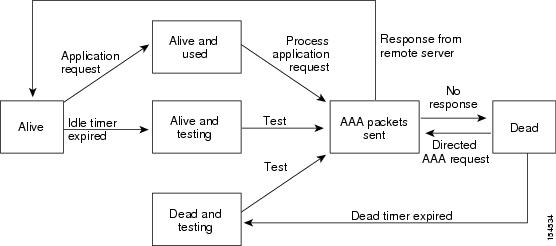
Figure 1. RADIUS Server States. This figure shows the states for RADIUS server monitoring.

Note


The monitoring interval for alive servers and dead servers are different and can be configured by the user. The RADIUS server monitoring is performed by sending a test authentication request to the RADIUS server.


Vendor-Specific Attributes

The Internet Engineering Task Force (IETF) draft standard specifies a method for communicating VSAs between the network access server and the RADIUS server. The IETF uses attribute 26. VSAs allow vendors to support their own extended attributes that are not suitable for general use. The Cisco RADIUS implementation supports one vendor-specific option using the format recommended in the specification. The Cisco vendor ID is 9, and the supported option is vendor type 1, which is named cisco-av-pair. The value is a string with the following format:

protocol : attribute separator value *

The protocol is a Cisco attribute for a particular type of authorization, the separator is = (equal sign) for mandatory attributes, and * (asterisk) indicates optional attributes.

When you use RADIUS servers for authentication on a Cisco NX-OS device, the RADIUS protocol directs the RADIUS server to return user attributes, such as authorization information, with authentication results. This authorization information is specified through VSAs.

The following VSA protocol options are supported by the Cisco NX-OS software:

Shell
Protocol used in access-accept packets to provide user profile information.
Accounting
Protocol used in accounting-request packets. If a value contains any white spaces, you should enclose the value within double quotation marks.

The Cisco NX-OS software supports the following attributes:

roles
Lists all the roles to which the user belongs. The value field is a string that lists the role names delimited by white space. For example, if the user belongs to roles network-operator and network-admin, the value field would be network-operator network-admin. This subattribute, which the RADIUS server sends in the VSA portion of the Access-Accept frames, can only be used with the shell protocol value. The following examples show the roles attribute that is supported by the Cisco Access Control Server (ACS):

shell:roles=network-operator network-admin 

shell:roles*“network-operator network-admin

The following examples show the roles attribute that is supported by FreeRADIUS:


Cisco-AVPair = shell:roles=\network-operator network-admin\

Cisco-AVPair = shell:roles*\network-operator network-admin\


Note


When you specify a VSA as shell:roles*"network-operator network-admin" or "shell:roles*\"network-operator network-admin\"", this VSA is flagged as an optional attribute and other Cisco devices ignore this attribute.


accountinginfo
Stores accounting information in addition to the attributes covered by a standard RADIUS accounting protocol. This attribute is sent only in the VSA portion of the Account-Request frames from the RADIUS client on the switch. It can be used only with the accounting protocol data units (PDUs).

About RADIUS Change of Authorization

A standard RADIUS interface is typically used in a pulled model, in which the request originates from a device attached to a network and the response is sent from the queried servers. Cisco NX-OS sofware supports the RADIUS Change of Authorization (CoA) request defined in RFC 5176 that is used in a pushed model, in which the request originates from the external server to the device attached to the network, and enables the dynamic reconfiguring of sessions from external authentication, authorization, and accounting (AAA) or policy servers.

When Dot1x is enabled, the network device acts as the authenticator and is responsible for processing dynamic COA per session.

The following requests are supported:

  • Session reauthentication

  • Session termination

Session Reauthentication

To initiate session reauthentication, the authentication, authorization, and accounting (AAA) server sends a standard CoA-Request message that contains a Cisco VSA and one or more session identification attributes. The Cisco VSA is in the form of Cisco:Avpair=“subscriber:command=reauthenticate”.

The current session state determines the response of the device to the message in the following scenarios:

  • If the session is currently authenticated by IEEE 802.1x, the device responds by sending an Extensible Authentication Protocol over LAN (EAPOL)-RequestId message to the server.

  • If the session is currently authenticated by MAC authentication bypass (MAB), the device sends an access request to the server, passing the same identity attributes used for the initial successful authentication.

  • If session authentication is in progress when the device receives the command, the device terminates the process and restarts the authentication sequence, starting with the method configured to be attempted first.

Session Termination

A CoA Disconnect-Request terminates the session without disabling the host port. CoA Disconnect-Request termination causes reinitialization of the authenticator state machine for the specified host, but does not restrict the host’s access to the network.

If the session cannot be located, the device returns a Disconnect-NAK message with the “Session Context Not Found” error-code attribute.

If the session is located, but the NAS was unable to remove the session due to some internal error, the device returns a Disconnect-NAK message with the “Session Context Not Removable” error-code attribute.

If the session is located, the device terminates the session. After the session has been completely removed, the device returns a Disconnect-ACK message.

Prerequisites for RADIUS

RADIUS has the following prerequisites:

  • Obtain IPv4 or IPv6 addresses or hostnames for the RADIUS servers.

  • Obtain keys from the RADIUS servers.

  • Ensure that the Cisco NX-OS device is configured as a RADIUS client of the AAA servers.

Guidelines and Limitations for RADIUS

RADIUS has the following guidelines and limitations:

  • You can configure a maximum of 64 RADIUS servers on the Cisco NX-OS device.

  • If you have a user account configured on the local Cisco NX-OS device that has the same name as a remote user account on an AAA server, the Cisco NX-OS software applies the user roles for the local user account to the remote user, not the user roles configured on the AAA server.

  • Only the RADIUS protocol supports one-time passwords.

  • For N9K-X9636C-R and N9K-X9636Q-R line cards and the N9K-C9508-FM-R fabric module, RADIUS authentication fails for usernames with special characters.

  • Cisco Nexus 9K Series switches support the CLI command, aaa authentication login ascii-authentication, only for TACAAS+, but not for RADIUS. Ensure that you have disabled aaa authentication login ascii-authentication switch so that the default authentication, PAP, is enabled. Otherwise, you will see syslog errors.

  • Beginning with Cisco NX-OS Release 10.3(1)F, RADIUS is supported on the Cisco Nexus 9808 platform switches.

    • Beginning with Cisco NX-OS Release 10.4(1)F, RADIUS is supported on Cisco Nexus X98900CD-A and X9836DM-A line cards with 9808 switches.

  • Beginning with Cisco NX-OS Release 10.4(1)F, RADIUS is supported on the Cisco Nexus 9804 switches, X98900CD-A, and X9836DM-A line cards.

Guidelines and Limitations for RadSec

RadSec has the following guidelines and limitations:

  • Beginning with Cisco NX-OS Release 10.3(1)F, the RADIUS Secure (RadSec) support is provided on Cisco Nexus switches to secure the communication between RADIUS/TCP peers at the transport layer.

  • RadSec must be enabled/disabled at the switch level, as the combination of servers having different transport protocols (i.e. UDP and TCP-with-TLS) is not possible.

  • radius-server directed-request command is not supported along with the RadSec feature.

  • test aaa server radius command is not supported for the RadSec servers, only test aaa group command is supported with the RadSec.

  • Dot1x is not officially supported with RadSec.

  • RADIUS server monitoring is not supported along with the RadSec servers.

  • RADIUS server re-transmit and timeout are applicable to UDP based RADIUS mode and not supported for RadSec servers.

  • Beginning with Cisco NX-OS Release 10.4(3)F, TLS version 1.3 and 1.2 is supported on Cisco Nexus switches. TLS v1.1 is deprecated.

Guidelines and Limitations for RADIUS Change of Authorization

RADIUS Change of Authorization has the following guidelines and limitations:

  • RADIUS Change of Authorization is supported on FEX.

  • RADIUS change of Authorization is supported for VXLAN EVPN.

Default Settings for RADIUS

This table lists the default settings for RADIUS parameters.

Table 1. Default RADIUS Parameter Settings

Parameters

Default

Server roles

Authentication and accounting

Dead timer interval

0 minutes

Retransmission count

1

Retransmission timer interval

5 seconds

Authentication port

1812

Accounting port

1813

Idle timer interval

0 minutes

Periodic server monitoring username

test

Periodic server monitoring password

test

Configuring RADIUS Servers

This section describes how to configure RADIUS servers on a Cisco NX-OS device.


Note


If you are familiar with the Cisco IOS CLI, be aware that the Cisco NX-OS commands for this feature might differ from the Cisco IOS commands that you would use.


Note


Cisco Nexus 9K Series switches support the CLI command, aaa authentication login ascii-authentication, only for TACAAS+, but not for RADIUS. Ensure that you have disabled aaa authentication login ascii-authentication switch so that the default authentication, PAP, is enabled. Otherwise, you will see syslog errors.


RADIUS Server Configuration Process

  1. Establish the RADIUS server connections to the Cisco NX-OS device.

  2. Configure the RADIUS secret keys for the RADIUS servers.

  3. If needed, configure RADIUS server groups with subsets of the RADIUS servers for AAA authentication methods.

  4. If needed, configure any of the following optional parameters:

    • Dead-time interval

    • RADIUS server specification allowed at user login

    • Timeout interval

    • TCP port

  5. (Optional) If RADIUS distribution is enabled, commit the RADIUS configuration to the fabric.

Configuring RADIUS Server Hosts

To access a remote RADIUS server, you must configure the IP address or hostname of a RADIUS server. You can configure up to 64 RADIUS servers.


Note


By default, when you configure a RADIUS server IP address or hostname of the Cisco NX-OS device, the RADIUS server is added to the default RADIUS server group. You can also add the RADIUS server to another RADIUS server group.


Before you begin

Ensure that the server is already configured as a member of the server group.

Ensure that the server is configured to authenticate RADIUS traffic.

Ensure that the Cisco NX-OS device is configured as a RADIUS client of the AAA servers.

Procedure

  Command or Action Purpose

Step 1

configure terminal

Example:

switch# configure terminal
switch(config)#

Enters global configuration mode.

Step 2

radius-server host {ipv4-address | ipv6-address | hostname}

Example:

switch(config)# radius-server host 10.10.1.1

Specifies the IPv4 or IPv6 address or hostname for a RADIUS server to use for authentication.

Step 3

exit

Example:

switch(config)# exit
switch#

Exits configuration mode.

Step 4

(Optional) show radius-server

Example:

switch# show radius-server
(Optional)

Displays the RADIUS server configuration.

Step 5

(Optional) copy running-config startup-config

Example:

switch# copy running-config startup-config
(Optional)

Copies the running configuration to the startup configuration.

Configuring Global RADIUS Keys

You can configure RADIUS keys for all servers used by the Cisco NX-OS device. A RADIUS key is a shared secret text string between the Cisco NX-OS device and the RADIUS server hosts.

Before you begin

Obtain the RADIUS key values for the remote RADIUS servers.

Configure the RADIUS key on the remote RADIUS servers.

Procedure

  Command or Action Purpose

Step 1

configure terminal

Example:

switch# configure terminal
switch(config)#

Enters global configuration mode.

Step 2

radius-server key [0 | 6 | 7] key-value

Example:

switch(config)# radius-server key 0 QsEfThUkO

Example:

switch(config)# radius-server key 7 "fewhg”

Specifies a RADIUS key for all RADIUS servers. You can specify that the key-value is in clear text format (0 ), is type-6 encrypted (6), or is type-7 encrypted (7 ). The Cisco NX-OS software encrypts a clear text key before saving it to the running configuration. The default format is clear text. The maximum length is 63 characters.

By default, no RADIUS key is configured.

Note


If you already configured a shared secret using the generate type7_encrypted_secret command, enter it in quotation marks, as shown in the second example. For more information, see Configuring the Shared Secret for RADIUS or TACACS+.

Step 3

exit

Example:

switch(config)# exit
switch#

Exits configuration mode.

Step 4

(Optional) show radius-server

Example:

switch# show radius-server
(Optional)

Displays the RADIUS server configuration.

Note


The RADIUS keys are saved in encrypted form in the running configuration. Use the show running-config command to display the encrypted RADIUS keys.

Step 5

(Optional) copy running-config startup-config

Example:

switch# copy running-config startup-config
(Optional)

Copies the running configuration to the startup configuration.

Configuring a Key for a Specific RADIUS Server

You can configure a key on the Cisco NX-OS device for a specific RADIUS server. A RADIUS key is a secret text string shared between the Cisco NX-OS device and a specific RADIUS server.

Before you begin

Configure one or more RADIUS server hosts.

Obtain the key value for the remote RADIUS server.

Configure the key on the RADIUS server.

Procedure

  Command or Action Purpose

Step 1

configure terminal

Example:

switch# configure terminal
switch(config)#

Enters global configuration mode.

Step 2

radius-server host {ipv4-address | ipv6-address | hostname} key [0 | 6 | 7] key-value

Example:

switch(config)# radius-server host 10.10.1.1 key 0 PlIjUhYg

Example:

switch(config)# radius-server host 10.10.1.1 key 7 "fewhg”

Specifies a RADIUS key for a specific RADIUS server. You can specify that the key-value is in clear text format (0 ), is type-6 encrypted (6), or is type-7 encrypted (7 ). The Cisco NX-OS software encrypts a clear text key before saving it to the running configuration. The default format is clear text. The maximum length is 63 characters.

This RADIUS key is used instead of the global RADIUS key.

Note


If you already configured a shared secret using the generate type7_encrypted_secret command, enter it in quotation marks, as shown in the second example. For more information, see Configuring the Shared Secret for RADIUS or TACACS+.

Step 3

exit

Example:

switch(config)# exit
switch#

Exits configuration mode.

Step 4

(Optional) show radius-server

Example:

switch# show radius-server
(Optional)

Displays the RADIUS server configuration.

Note


The RADIUS keys are saved in encrypted form in the running configuration. Use the show running-config command to display the encrypted RADIUS keys.

Step 5

(Optional) copy running-config startup-config

Example:

switch# copy running-config startup-config
(Optional)

Copies the running configuration to the startup configuration.

Configuring RadSec

RadSec is a protocol for transporting RADIUS datagrams over TLS.

This procedure describes how to enable/disable the RadSec on a switch.

Before you begin

  • Ensure that the client identity certificate and CA certificate of the server are installed on the switch.

  • Ensure that the subject name in the server certificate is matching with the server host name/IP address that is configured on the switch.

  • Before configuring AAA authentication and accounting to use RadSec servers, use test aaa group command and ensure RadSec authentication is success.

  • Configure TLS idle-timeout to maximum value on RadSec server to avoid frequent TLS sessions retries from switch.

Procedure

  Command or Action Purpose

Step 1

configure terminal

Example:

switch# configure terminal

Enters configuration mode.

Step 2

radius-server secure tls

Example:

switch# radius-server secure tls

Enables the RadSec at global level.

Note


This CLI will not change or affect the port numbers that is used for RadSec.

Step 3

radius-server host t {ipv4-address | ipv6-address| hostname} key {key} auth-port 2083 acct-port 2083 authentication accounting

Example:

switch# radius-server host 10.105.222.161 key radsec auth-port 2083 acct-port 2083 authentication accounting

Configures the RadSec server with shared secret key along with the authentication and accounting ports.

Note


For server, the default RadSec port for authentication and accounting is "2083" and the key is “radsec”. For switch, there is no default configuration for RadSec port and key, please add this configuration explicitly as defined on server.

Step 4

radius-server host {ipv4-address | ipv6-address | hostname} tls client-trustpoint trustpoint

Example:

switch# radius-server host 10.105.222.161 tls client-trustpoint rad1

Configures the TLS client trustpoint where the client identity certificate is installed.

Step 5

radius-server host {ipv4-address | ipv6-address | hostname} tls idle-timeout value

Example:

switch# radius-server host 10.105.222.161 tls idle-timeout 80

Configures the TLS idle-timeout. The default value is 600 seconds.

Note


If there are no transactions from the RadSec client, server can close the connection based on its timeout value. The TLS idle-timeout on the client is not supported in this release. Client does not close connections on its own.


Note


When remote user logs-in, you can notice delay in login for approximately 20 seconds i.e when TLS session establishment is happening for the first time between switch and RadSec server, Once TLS sessions are up no delay will be seen for consecutive remote log-ins.


Note


When a RadSec client is facing certificate related issues such as no certificate or invalid certificates are being exchanged with the server, you may experience delay in show run commands.


About RADIUS with DTLS

From Cisco NX-OS Release 10.4(1)F, RADIUS with DTLS protocol is introduced. This protocol is for transporting RADIUS datagrams over a secure channel using UDP.

RADIUS with DTLS provides secure communication between RADIUS peers at the transport layer. This protocol helps secure RADIUS packets transfer through different administrative domains and suspicious, and unsafe networks.

Configuring RADIUS with DTLS

Before you begin
  • Ensure that you create client identity certificate with subject and alternative name same as the IP address/DNS hostname of the switch. Install the client identity certificate on the switch using a trustpoint.

  • Ensure that the server certificate of ISE server used for DTLS/RADIUS is installed on the switch.

  • Make sure that the CA certificate used to sign client identity certificate is installed in trusted certificate store of ISE server.

  • Ensure that the subject name in the server certificate is same as the server hostname/IP address that is configured on the switch.

  • Before configuring AAA authentication and accounting groups to use RADIUS servers, check with test aaa group command and ensure that the RADIUS authentication is successful.

  • You must enable RADIUS with DTLS protocol at the switch level.

  • Configuring combination of RADIUS servers to use different transports protocols such as DTLS and TLS is not supported. You can configure one protocol at an instant.

Procedure
  Command or Action Purpose

Step 1

configure terminal

Example:
switch# configure terminal
switch(config)#

Enters configuration mode.

Step 2

radius-server secure dtls

Example:
switch(config)# radius-server secure dtls

Enables the RADIUS with DTLS protocol on the switch.

Step 3

radius-server host {ipv4-address | ipv6-address| hostname} key {radius/dtls} auth-port 2083 acct-port 2083 authentication accounting

Example:
switch(config)# radius-server host 10.105.222.161 key radius/dtls auth-port 2083 acct-port 2083 authentication accounting

Configures the RADIUS server with shared secret key along with the authentication and accounting ports.

Note


The default destination DTLS port for authentication and accounting is UDP/2083. There is no default server key for DTLS as per RFC. Ensure that you add this configuration explicitly as defined on server. The ISE server must be pre-set with the "radius/dtls" key at that instant. Check and add the key on the Nexus switch while configuring DTLS with an ISE server.

Step 4

radius-server host {ipv4-address | ipv6-address | hostname} dtls client-trustpoint trustpoint

Example:
switch(config)# radius-server host 10.105.222.161 dtls client-trustpoint rad1

Configures the DTLS client-trustpoint parameter with a trustpoint where the switch identity certificate is installed. The rad1 is a trustpoint on the switch which must have the client identity certificate.

Step 5

radius-server host {ipv4-address | ipv6-address | hostname} dtls idle-timeout value

Example:
switch# radius-server host 10.105.222.161 dtls idle-timeout 80

Configures the DTLS idle-timeout. The default value is 600 seconds.

Note


If there are no transactions from the RADIUS client, server can close the connection as per defined timeout value. The DTLS idle-timeout on the client is not supported in this release. Client does not close connections on its own.


Note


  • When a remote user logs in, you may notice a delay of approximately 20 seconds, which occurs when the TLS session is being established for the first time between the switch and the RADIUS server. Once the TLS sessions are up, no delay will be seen for consecutive remote logins.

  • When a RADIUS client is facing certificate related issues such as no certificate or invalid certificates are being exchanged with the server, you may experience delay in the show run commands.


Configuring RADIUS Server Groups

You can specify one or more remote AAA servers for authentication using server groups. All members of a group must belong to the RADIUS protocol. The servers are tried in the same order in which you configure them.

You can configure these server groups at any time but they only take effect when you apply them to an AAA service.

Before you begin

Ensure that all servers in the group are RADIUS servers.

Procedure

  Command or Action Purpose

Step 1

configure terminal

Example:

switch# configure terminal
switch(config)#

Enters global configuration mode.

Step 2

aaa group server radius group-name

Example:

switch(config)# aaa group server radius RadServer
switch(config-radius)#

Creates a RADIUS server group and enters the RADIUS server group configuration submode for that group. The group-name argument is a case-sensitive alphanumeric string with a maximum length of 127 characters.

To delete a RADIUS server group, use the no form of this command.

Note

 
You are not allowed to delete the default system generated default group (RADIUS).

Step 3

server {ipv4-address | ipv6-address | hostname}

Example:

switch(config-radius)# server 10.10.1.1

Configures the RADIUS server as a member of the RADIUS server group.

If the specified RADIUS server is not found, configure it using the radius-server host command and retry this command.

Step 4

(Optional) deadtime minutes

Example:

switch(config-radius)# deadtime 30
(Optional)

Configures the monitoring dead time. The default is 0 minutes. The range is from 1 through 1440.

Note


If the dead-time interval for a RADIUS server group is greater than zero (0), that value takes precedence over the global dead-time value.

Step 5

(Optional) server {ipv4-address | ipv6-address | hostname}

Example:

switch(config-radius)# server 10.10.1.1
(Optional)

Configures the RADIUS server as a member of the RADIUS server group.

Tip


If the specified RADIUS server is not found, configure it using the radius-server host command and retry this command.

Step 6

(Optional) use-vrf vrf-name

Example:

switch(config-radius)# use-vrf vrf1
(Optional)

Specifies the VRF to use to contact the servers in the server group.

Step 7

exit

Example:

switch(config-radius)# exit
switch(config)#

Exits configuration mode.

Step 8

(Optional) show radius-server groups [group-name]

Example:

switch(config)# show radius-server groups
(Optional)

Displays the RADIUS server group configuration.

Step 9

(Optional) copy running-config startup-config

Example:

switch(config)# copy running-config startup-config
(Optional)

Copies the running configuration to the startup configuration.

Configuring the Global Source Interface for RADIUS Server Groups

You can configure a global source interface for RADIUS server groups to use when accessing RADIUS servers. You can also configure a different source interface for a specific RADIUS server group. By default, the Cisco NX-OS software uses any available interface.

Procedure

  Command or Action Purpose

Step 1

configure terminal

Example:

switch# configure terminal
switch(config)

Enters global configuration mode.

Step 2

ip radius source-interface interface

Example:

switch(config)# ip radius source-interface mgmt 0

Configures the global source interface for all RADIUS server groups configured on the device.

Step 3

exit

Example:

switch(config)# exit
switch#

Exits configuration mode.

Step 4

(Optional) show radius-server

Example:

switch# show radius-server
(Optional)

Displays the RADIUS server configuration information.

Step 5

(Optional) copy running-config startup config

Example:

switch# copy running-config startup-config
(Optional)

Copies the running configuration to the startup configuration.

Allowing Users to Specify a RADIUS Server at Login

By default, the Cisco NX-OS device forwards an authentication request based on the default AAA authentication method. You can configure the Cisco NX-OS device to allow the user to specify a VRF and RADIUS server to send the authentication request by enabling the directed-request option. If you enable this option, the user can log in as username@vrfname:hostname , where vrfname is the VRF to use and hostname is the name of a configured RADIUS server.


Note


If you enable the directed-request option, the Cisco NX-OS device uses only the RADIUS method for authentication and not the default local method.


Note


User-specified logins are supported only for Telnet sessions.


Procedure

  Command or Action Purpose

Step 1

configure terminal

Example:

switch# configure terminal
switch(config)#

Enters global configuration mode.

Step 2

radius-server directed-request

Example:

switch(config)# radius-server directed-request

Allows users to specify a RADIUS server to send the authentication request when logging in. The default is disabled.

Step 3

exit

Example:

switch(config)# exit
switch#

Exits configuration mode.

Step 4

(Optional) show radius-server directed-request

Example:

switch# show radius-server directed-request
(Optional)

Displays the directed request configuration.

Step 5

(Optional) copy running-config startup-config

Example:

switch# copy running-config startup-config
(Optional)

Copies the running configuration to the startup configuration.

Configuring the Global RADIUS Transmission Retry Count and Timeout Interval

You can configure a global retransmission retry count and timeout interval for all RADIUS servers. By default, a Cisco NX-OS device retries transmission to a RADIUS server only once before reverting to local authentication. You can increase this number up to a maximum of five retries per server. The timeout interval determines how long the Cisco NX-OS device waits for responses from RADIUS servers before declaring a timeout failure.

Procedure

  Command or Action Purpose

Step 1

configure terminal

Example:

switch# configure terminal
switch(config)#

Enters global configuration mode.

Step 2

radius-server retransmit count

Example:

switch(config)# radius-server retransmit 3

Specifies the retransmission count for all RADIUS servers. The default retransmission count is 1 and the range is from 0 to 5.

Step 3

radius-server timeout seconds

Example:

switch(config)# radius-server timeout 10

Specifies the transmission timeout interval for RADIUS servers. The default timeout interval is 5 seconds and the range is from 1 to 60 seconds.

Step 4

exit

Example:

switch(config)# exit
switch#

Exits configuration mode.

Step 5

(Optional) show radius-server

Example:

switch# show radius-server
(Optional)

Displays the RADIUS server configuration.

Step 6

(Optional) copy running-config startup-config

Example:

switch# copy running-config startup-config
(Optional)

Copies the running configuration to the startup configuration.

Configuring the RADIUS Transmission Retry Count and Timeout Interval for a Server

By default, a Cisco NX-OS device retries a transmission to a RADIUS server only once before reverting to local authentication. You can increase this number up to a maximum of five retries per server. You can also set a timeout interval that the Cisco NX-OS device waits for responses from RADIUS servers before declaring a timeout failure.

Before you begin

Configure one or more RADIUS server hosts.

Procedure

  Command or Action Purpose

Step 1

configure terminal

Example:

switch# configure terminal
switch(config)#

Enters global configuration mode.

Step 2

radius-server host {ipv4-address | ipv6-address | hostname} retransmit count

Example:

switch(config)# radius-server host server1 retransmit 3

Specifies the retransmission count for a specific server. The default is the global value.

Note


The retransmission count value specified for a RADIUS server overrides the count specified for all RADIUS servers.

Step 3

radius-server host {ipv4-address | ipv6-address | hostname} timeout seconds

Example:

switch(config)# radius-server host server1 timeout 10

Specifies the transmission timeout interval for a specific server. The default is the global value.

Note


The timeout interval value specified for a RADIUS server overrides the interval value specified for all RADIUS servers.

Step 4

exit

Example:

switch(config)# exit
switch#

Exits configuration mode.

Step 5

(Optional) show radius-server

Example:

switch# show radius-server
(Optional)

Displays the RADIUS server configuration.

Step 6

(Optional) copy running-config startup-config

Example:

switch# copy running-config startup-config
(Optional)

Copies the running configuration to the startup configuration.

Configuring Accounting and Authentication Attributes for RADIUS Servers

You can specify that a RADIUS server is to be used only for accounting purposes or only for authentication purposes. By default, RADIUS servers are used for both accounting and authentication. You can also specify the destination UDP port numbers where RADIUS accounting and authentication messages should be sent if there is a conflict with the default port.

Before you begin

Configure one or more RADIUS server hosts.

Procedure

  Command or Action Purpose

Step 1

configure terminal

Example:

switch# configure terminal
switch(config)#

Enters global configuration mode.

Step 2

(Optional) radius-server host {ipv4-address | ipv6-address | hostname} acct-port udp-port

Example:

switch(config)# radius-server host 10.10.1.1 acct-port 2004
(Optional)

Specifies a UDP port to use for RADIUS accounting messages. The default UDP port is 1813. The range is from 0 to 65535.

Step 3

(Optional) radius-server host {ipv4-address | ipv6-address | hostname} accounting

Example:

switch(config)# radius-server host 10.10.1.1 accounting
(Optional)

Specifies to use the RADIUS server only for accounting purposes. The default is both accounting and authentication.

Step 4

(Optional) radius-server host {ipv4-address | ipv6-address | hostname} auth-port udp-port

Example:

switch(config)# radius-server host 10.10.2.2 auth-port 2005
(Optional)

Specifies a UDP port to use for RADIUS authentication messages. The default UDP port is 1812. The range is from 0 to 65535.

Step 5

(Optional) radius-server host {ipv4-address | ipv6-address | hostname} authentication

Example:

switch(config)# radius-server host 10.10.2.2 authentication
(Optional)

Specifies to use the RADIUS server only for authentication purposes. The default is both accounting and authentication.

Step 6

exit

Example:

switch(config)# exit
switch#

Exits configuration mode.

Step 7

(Optional) show radius-server

Example:

switch# show radius-server
(Optional)

Displays the RADIUS server configuration.

Step 8

(Optional) copy running-config startup-config

Example:

switch# copy running-config startup-config
(Optional)

Copies the running configuration to the startup configuration.

Configuring Global Periodic RADIUS Server Monitoring

You can monitor the availability of all RADIUS servers without having to configure the test parameters for each server individually. Any servers for which test parameters are not configured are monitored using the global level parameters.


Note


Test parameters that are configured for individual servers take precedence over global test parameters.


The global configuration parameters include the username and password to use for the servers and an idle timer. The idle timer specifies the interval in which a RADIUS server receives no requests before the Cisco NX-OS device sends out a test packet. You can configure this option to test servers periodically, or you can run a one-time only test.


Note


To protect network security, we recommend that you use a username that is not the same as an existing username in the RADIUS database.


Note


The default idle timer value is 0 minutes. When the idle time interval is 0 minutes, periodic RADIUS server monitoring is not performed.


Before you begin

Enable RADIUS.

Procedure

  Command or Action Purpose

Step 1

configure terminal

Example:

switch# configure terminal
switch(config)#

Enters global configuration mode.

Step 2

radius-server test {idle-time minutes | password password [idle-time minutes] | username name [password password [idle-time minutes]]}

Example:

switch(config)# radius-server test username user1 password Ur2Gd2BH idle-time 3

Specifies parameters for global server monitoring. The default username is test, and the default password is test. The default value for the idle timer is 0 minutes, and the valid range is from 0 to 1440 minutes.

Note


For periodic RADIUS server monitoring, the idle timer value must be greater than 0.

Step 3

radius-server deadtime minutes

Example:

switch(config)# radius-server deadtime 5

Specifies the number of minutes before the Cisco NX-OS device checks a RADIUS server that was previously unresponsive. The default value is 0 minutes, and the valid range is from 0 to 1440 minutes.

Step 4

exit

Example:

switch(config)# exit
switch#

Exits configuration mode.

Step 5

(Optional) show radius-server

Example:

switch# show radius-server
(Optional)

Displays the RADIUS server configuration.

Step 6

(Optional) copy running-config startup-config

Example:

switch# copy running-config startup-config
(Optional)

Copies the running configuration to the startup configuration.

Configuring Periodic RADIUS Server Monitoring on Individual Servers

You can monitor the availability of individual RADIUS servers. The configuration parameters include the username and password to use for the server and an idle timer. The idle timer specifies the interval during which a RADIUS server receives no requests before the Cisco NX-OS device sends out a test packet. You can configure this option to test servers periodically, or you can run a one-time only test.


Note


Test parameters that are configured for individual servers take precedence over global test parameters.


Note


For security reasons, we recommend that you do not configure a test username that is the same as an existing user in the RADIUS database.


Note


The default idle timer value is 0 minutes. When the idle time interval is 0 minutes, the Cisco NX-OS device does not perform periodic RADIUS server monitoring.


Before you begin

Enable RADIUS.

Add one or more RADIUS server hosts.

Procedure

  Command or Action Purpose

Step 1

configure terminal

Example:

switch# configure terminal
switch(config)#

Enters global configuration mode.

Step 2

radius-server host {ipv4-address | ipv6-address | hostname} test {idle-time minutes | password password [idle-time minutes] | username name [password password [idle-time minutes]]}

Example:

switch(config)# radius-server host 10.10.1.1 test username user1 password Ur2Gd2BH idle-time 3

Specifies parameters for individual server monitoring. The default username is test, and the default password is test. The default value for the idle timer is 0 minutes, and the valid range is from 0 to 1440 minutes.

Note


For periodic RADIUS server monitoring, you must set the idle timer to a value greater than 0.

Step 3

radius-server deadtime minutes

Example:

switch(config)# radius-server deadtime 5

Specifies the number of minutes before the Cisco NX-OS device checks a RADIUS server that was previously unresponsive. The default value is 0 minutes, and the valid range is from 1 to 1440 minutes.

Step 4

exit

Example:

switch(config)# exit
switch#

Exits configuration mode.

Step 5

(Optional) show radius-server

Example:

switch# show radius-server
(Optional)

Displays the RADIUS server configuration.

Step 6

(Optional) copy running-config startup-config

Example:

switch# copy running-config startup-config
(Optional)

Copies the running configuration to the startup configuration.

Configuring the RADIUS Dead-Time Interval

You can configure the dead-time interval for all RADIUS servers. The dead-time interval specifies the time that the Cisco NX-OS device waits after declaring a RADIUS server is dead, before sending out a test packet to determine if the server is now alive. The default value is 0 minutes.


Note


When the dead-time interval is 0 minutes, RADIUS servers are not marked as dead even if they are not responding. You can configure the dead-time interval for a RADIUS server group.


Procedure

  Command or Action Purpose

Step 1

configure terminal

Example:

switch# configure terminal
switch(config)#

Enters global configuration mode.

Step 2

radius-server deadtime minutes

Example:

switch(config)# radius-server deadtime 5

Configures the dead-time interval. The default value is 0 minutes. The range is from 1 to 1440 minutes.

Step 3

exit

Example:

switch(config)# exit
switch#

Exits configuration mode.

Step 4

(Optional) show radius-server

Example:

switch# show radius-server
(Optional)

Displays the RADIUS server configuration.

Step 5

(Optional) copy running-config startup-config

Example:

switch# copy running-config startup-config
(Optional)

Copies the running configuration to the startup configuration.

Configuring One-Time Passwords

One-time password (OTP) support is available for Cisco NX-OS devices through the use of RSA SecurID token servers. With this feature, users authenticate to a Cisco NX-OS device by entering both a personal identification number (or one-time password) and the token code being displayed at that moment on their RSA SecurID token.


Note


The token code used for logging into the Cisco NX-OS device changes every 60 seconds. To prevent problems with device discovery, we recommend using different usernames that are present on the Cisco Secure ACS internal database.


Before you begin

On the Cisco NX-OS device, configure a RADIUS server host and remote default login authentication.

Ensure that the following are installed:
  • Cisco Secure Access Control Server (ACS) version 4.2

  • RSA Authentication Manager version 7.1 (the RSA SecurID token server)

  • RSA ACE Agent/Client

No configuration (other than a RADIUS server host and remote authentication) is required on the Cisco NX-OS device to support one-time passwords. However, you must configure the Cisco Secure ACS as follows:

  1. Enable RSA SecurID token server authentication.

  2. Add the RSA SecurID token server to the Unknown User Policy database.

Manually Monitoring RADIUS Servers or Groups

You can manually issue a test message to a RADIUS server or to a server group.

Procedure

  Command or Action Purpose

Step 1

test aaa server radius {ipv4-address | ipv6-address | hostname} [vrf vrf-name] username password

Example:

switch# test aaa server radius 10.10.1.1 user1 Ur2Gd2BH

Sends a test message to a RADIUS server to confirm availability.

Step 2

test aaa group group-name username password

Example:

switch# test aaa group RadGroup user2 As3He3CI

Sends a test message to a RADIUS server group to confirm availability.

Enabling or Disabling Dynamic Author Server

Procedure

  Command or Action Purpose

Step 1

configure terminal

Example:

switch# configure terminal
switch(config)#

Enters global configuration mode.

Step 2

aaa server radius dynamic-author

Example:

switch(config)# aaa server radius dynamic-author

Enables the RADIUS dynamic author server. You can disable the RADIUS dynamic author server using the no form of this command.

Configuring RADIUS Change of Authorization

Procedure

  Command or Action Purpose

Step 1

configure terminal

Example:

switch# configure terminal
switch(config)#

Enters global configuration mode.

Step 2

[no] aaa server radius dynamic-author

Example:

switch(config)# aaa server radius dynamic-author

Configures the switch as an AAA server to facilitate interaction with an external policy server. You can disable the RADIUS dynamic author and the associated clients using the no form of this command.

Step 3

[no] client {ip-address | hostname } [server-key [0 | 7 ] string ]

Example:

switch(config-locsvr-da-radius)# client 192.168.0.5 server-key cisco1

Configures the IP address or the hostname of the AAA server client. Use the optional server-key keyword and string argument to configure the server key at the client level. You can remove the client server using the no form of this command.

Note

 
Configuring the server key at the client level overrides the server key that is configured at the global level.

Step 4

[no] port port-number

Example:

switch(config-locsvr-da-radius)# port 3799

Specifies the port on which a device listens to the RADIUS requests from the configured RADIUS clients. The port range is 1 - 65535. You can revert to the default port using the no form of this command.

Note

 
The default port for a packet of disconnect is 1700.

Step 5

[no] server-key [0 | 7 ] string

Configures the global RADIUS key to be shared between a device and the RADIUS clients. You can remove the server-key using the no form of this command.

Verifying the RADIUS Configuration

To display RADIUS configuration information, perform one of the following tasks:

Command

Purpose

show radius {status | pending | pending-diff}

Displays the RADIUS Cisco Fabric Services distribution status and other details.

show running-config radius [all]

Displays the RADIUS configuration in the running configuration.

show startup-config radius

Displays the RADIUS configuration in the startup configuration.

show radius-server [hostname | ipv4-address | ipv6-address] [directed-request | groups | sorted | statistics]

Displays all configured RADIUS server parameters.

Verifying RADIUS Change of Authorization Configuration

To display RADIUS Change of Authorization configuration information, perform one of the following tasks:

Command

Purpose

show running-config dot1x

Displays the dot1x configuration in the running configuration.

show running-config aaa

Displays the AAA configuration in the running configuration.

show running-config radius

Displays the RADIUS configuration in the running configuration.

show aaa server radius statistics

Displays the local RADIUS server statistics.

show aaa client radius statistics {ip address | hostname }

Displays the local RADIUS client statistics.

clear aaa server radius statistics

Clears the local RADIUS server statistics.

clear aaa client radius statistics {ip address | hostname }

Clears the local RADIUS client statistics.

Monitoring RADIUS Servers

You can monitor the statistics that the Cisco NX-OS device maintains for RADIUS server activity.

Before you begin

Configure one or more RADIUS server hosts.

Procedure

Command or Action Purpose

show radius-server statistics {hostname | ipv4-address | ipv6-address}

Example:

switch# show radius-server statistics 10.10.1.1

Displays the RADIUS statistics.

Clearing RADIUS Server Statistics

You can display the statistics that the Cisco NX-OS device maintains for RADIUS server activity.

Before you begin

Configure RADIUS servers on the Cisco NX-OS device.

Procedure

  Command or Action Purpose

Step 1

(Optional) show radius-server statistics {hostname | ipv4-address | ipv6-address}

Example:

switch# show radius-server statistics 10.10.1.1
(Optional)

Displays the RADIUS server statistics on the Cisco NX-OS device.

Step 2

clear radius-server statistics {hostname | ipv4-address | ipv6-address}

Example:

switch# clear radius-server statistics 10.10.1.1

Clears the RADIUS server statistics.

Configuration Example for RADIUS

The following example shows how to configure RADIUS:

radius-server key 7 "ToIkLhPpG" 
radius-server host 10.10.1.1 key 7 "ShMoMhTl" authentication accounting 
aaa group server radius RadServer
    server 10.10.1.1

Configuration Examples of RADIUS Change of Authorization

The following example shows how to configure RADIUS Change of Authorization:

radius-server host 10.77.143.170 key 7 "fewhg123" authentication accounting
aaa server radius dynamic-author
    client 10.77.143.170 vrf management server-key 7 "fewhg123"

Where to Go Next

You can now configure AAA authentication methods to include the server groups.

Additional References for RADIUS

This section describes additional information related to implementing RADIUS.

Related Documents

Related Topic

Document Title

Cisco NX-OS Licensing

Cisco NX-OS Licensing Guide

VRF configuration

Cisco Nexus 9000 Series NX-OS Unicast Routing Configuration Guide

Standards

Standards

Title

No new or modified standards are supported by this feature, and support for existing standards has not been modified by this feature.

MIBs

MIBs

MIBs Link

MIBs related to RADIUS

To locate and download supported MIBs, go to the following URL:

ftp://ftp.cisco.com/pub/mibs/supportlists/nexus9000/Nexus9000MIBSupportList.html