Cisco HyperFlex HTML Plugin for VMware vCenter

Cisco HyperFlex vCenter Plugin

Cisco HyperFlex offers the flexibility of monitoring and managing content via Cisco HX Connect, Cisco HyperFlex Plugin, or Storage Controller VM command line. This chapter describes managing and monitoring content through the Cisco HyperFlex Plugin. The installation workflow is the same for single and linked mode vCenter instances.

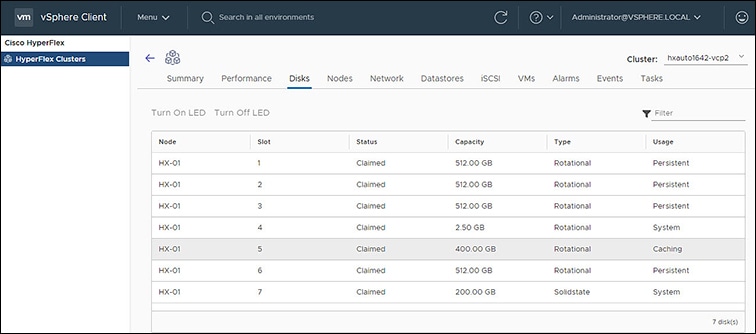
The Cisco HyperFlex vCenter Plugin is integrated with the vSphere Web Client and supports all of the HX Data Platform post-installation management and monitoring functions. Access the Cisco HyperFlex vCenter Plugin directly through the vSphere Web Client Navigator.

Cisco HyperFlex HTML5 Plugin for VMware vCenter

This section describes how to monitor and manage your HyperFlex clusters from the VMware vCenter using the Cisco HyperFlex HTML5 plugin.

Cisco HyperFlex HTML5 Plugin Prerequisites

The following hardware and software prerequisites apply to the Cisco HyperFlex HTML5 Plugin:

  • Cisco HyperFlex HTML5 plugin for VMware vCenter support was introduced in Cisco HX Release 4.0(2a) and later on vCenter 6.5U2 and later.

  • Browser compatibility: The Cisco HyperFlex HTML plugin works with Chrome, Firefox and IE.

  • Cisco HyperFlex HTML5 plug-in 2.2.0 is the minimum version supported. If the running version is 2.1.0 or 1.0.1, upgrade to the latest version.

  • HTML-Plugin v2.2 supports vCenter Linked Mode.

  • The installation workflow is the same for single and linked mode vCenter instances.

  • Administrative Privileges are required for managing users and roles.

  • Beginning with HX Release 5.0(1a) full HTML5 plugin feature functionallity requires the license status to be In-compliance.

  • HXDP Release 4.5(2a) and 5.0(x) does not support Cisco HyperFlex Flash Plugin (the original plugin).

Install and Register the vCenter HTML5 Plugin

Install the Cisco HyperFlex HTML5 plugin with the VMware vSphere web client. During the plugin installation process, enter the required information that matches your HX release:

HX Release 4.5(1a)

HX Release 4.5(2a) and later

vCenter Server FQDN/IP

HX Storage controller VM admin password

vCenter server Username and Password

vCenter Username & Password

HX Controller VM Password

-

Storage Controller VM root password

-

Storage Controller VM admin password

-

Table 1. CLI Arguments

Option

Required or Optional

Description

-h, --help

Optional

Shows the help message relative to the listed command and exits.

-u, --unregister

Optional

Unregister Cisco HyperFlex vCenter plugin.

-s, --show

Optional

Displays the HTML5 vCenter plugin details.

-v, --verbose

Optional

Make the operation more verbose.

Before you begin

  • Check and confirm the HTTP (port 80) and HTTPS (port 443) connectivity between vCenter and Controller VMs.

  • For deployments using Cisco HX Release 4.5 and later, review the Secure Admin Shell feature.

  • HTML-Plugin v2.2 supports vCenter Linked Mode.

  • The installation workflow is the same for single and linked mode vCenter instances.

Procedure


Step 1

Download the Cisco HyperFlex HTML plugin for VMware vCenter from the Cisco Software Download site.

Step 2

Copy the HyperFlex-VC-HTML-Plugin-2.2.0.zip file into a temporary directory in one of the controller VMs and unzip.

  1. The file transfer may be completed by using sftp cli or any file transfer app such as winscp or filezilla.

    To use sftp transfer via a file transfer app copy the file to the /tmp folder on SCVM, using HX admin account.

  2. SSH to that SCVM and login with admin account.

  3. Change to the /tmp directory using the command "cd /tmp".

    Example:

    "cd /tmp"
  4. Unzip the plugin file HyperFlex-VC-HTML-Plugin-2.2.0.zip using the command unzip.

    Example:

    unzip HyperFlex-VC-HTML-Plugin-2.2.0.zip
Step 3

Execute the python install_vc_plugin script and enter:

  • vCenter FQDN/IP address

  • Administrator username and password of vCenter server

  • Controller VM root password

Example:

root@SampleController59FDELZQJT:~/build# python install_vc_plugin.py
Initiating installation of Cisco HyperFlex vCenter plugin...
Enter vCenter FQDN/IP: cs-vc67-1.eng.storvisor.com
Enter administrator vCenter username: administrator@user.local
Enter password for administrator@user.local:
Enter storage controller password:
Copying plugin to storage controller VMs...
  Copying plugin to 172.16.0.157
  Copying plugin to 172.16.0.159
  Copying plugin to 172.16.0.161
Cisco HyperFlex vCenter Plugin version '2.0.0' is registered successfully with vCenter server cs-vc67-1.eng.storvisor.com
Step 4

Log on to vCenter and a blue banner message appears to confirm that the new plugin is installed.

Step 5

Log out and log in again to vCenter to see the Cisco HyperFlex menus for HTML5 plugin.


Verifying the Cisco HyperFlex HTML5 Plugin Installation from the vSphere Client

To verify Cisco HyperFlex plugin installation from the vSphere Client UI.

Before you begin

The HTML5 plugin should be installed on vCenter server.

Procedure


Launch the vSphere client, select Menu > Administration > Solutions > Client Plug-Ins


Uninstalling the HyperFlex HTML5 Plugin

To uninstall the HX Data Platform HTML5 Plugin, perform the following steps.

Procedure


Step 1

Execute the uninstall script as python install_vc_plugin.py -u and enter the following credentials:

  • vCenter FQDN/IP address

  • Administrator username and password for the vCenter server

Step 2

Restart vSphere UI service of vCenter server.


Upgrading the HTML5 Plugin

When you want to upgrade to the latest HTML plugin, download the Cisco HyperFlex HTML plugin for VMware vCenter from the Cisco Software Download site.

Before you begin

Use this task only if the version of the HTML Plugin installed on the vCenter server is before 2.2.x.

Procedure


Step 1

Download the Cisco HyperFlex HTML plugin for VMware vCenter from the Cisco Software Download site.

Step 2

Copy the HyperFlex-VC-HTML-Plugin-2.2.x.zip file into a temporary directory in one of the controller VMs and unzip.

  1. The file transfer may be completed by using sftp cli or any file transfer app such as winscp or filezilla.

    To use sftp transfer via a file transfer app copy the file to the /tmp folder on SCVM, using HX admin account.

  2. SSH to that SCVM and login with admin account.

  3. Change to the /tmp directory "cd /tmp"

  4. Unzip the plugin file HyperFlex-VC-HTML-Plugin-2.2.x.zip

Step 3

Execute python install_vc_plugin script and enter:

  • vCenter FQDN/IP address

  • Administrator username and password of vCenter server

Step 4

Select Y to continue the Upgrade process with controller root and admin password.

Step 5

Logout and log in again into vCenter to see Cisco HyperFlex listed in the vCenter menus.


Using the Cisco HyperFlex HTML5 Plugin

The following table defines feature support by plugin version:

Table 2. HTML5 Plugin Feature Support

Feature

Plugin Version 2.0.0

Plugin Version 2.1.0

Plugin Version 2.2.0

Discover the Registered HX Cluster

✓

✓

✓

Rename Clusters

1

-

✓

✓

View HX Cluster Summary

✓

✓

✓

View Cluster and Datastore Performance Charts

✓

✓

✓

Disks View

✓

✓

✓

Nodes View

✓

✓

✓

HX Datastore Management

✓

✓

✓

VM Summary and Top VM Consumers

✓

✓

✓

Network Management

-

✓

✓

iSCSI Management

2

-

✓

✓

Events and Alarms

✓

✓

✓

Manage Tasks

-

✓

✓

HX Snapshots and clones at the virtual machine level

-

✓

✓

Schedule Snapshot

3

-

✓

✓

Manage users and access to HX clusters

✓

✓

✓

Cross-launch HX Connect for upgrade

✓

✓

✓

Embedded vCenter server actions at the Host and Clusters level

✓

✓

✓

HTML 5 License Status

4

-

-

✓

Linked Mode

-

-

✓

1 Requires HXDP Release 4.5(x) or later.
2 Requires HXDP Release 4.5(x) or later.
3 Requires HXDP Release 4.5(x) or later.
4 Requires HXDP Release 5.0(x) or later.

Navigating the HTML5 plugin

Accessing the Cisco HyperFlex HTML5 Plugin is easily accessed from the vSphere Menu or the Shortcuts list.

vSphere Menu

vSphere Shortcut List

The Cisco HyperFlex HTML5 Plugin has functionality that is common throughout the plugin. This section describes the icons and their usage.

Icon

Usage

Cisco HyperFlex Plugin. When installed, this icon is found on the Menu and the Shortcuts list.

Refresh the view.

Note 

The cluster list uses dynamic function loading, the Scanning Clusters icon indicates when the cluster list is complete.

Indicates that the cluster table is still populating. The icon disappears when the cluster list is complete.

Filter the content seen in the browser.

Expand or collapse the contents.

Navigate between clusters.

Use the VC Cluster button to jump from the HyperFlex Events or Alarms view to vCenter Events or Alarm Page.

Clicking on a VM count (number) takes the user directly to the Datastore page which list all VMs for that datastore.

Cluster Management

Managing Users and Access to HX Clusters

The vCenter plugin requires the user to have administrator privileges. You can create a user and assign administrator role to that user from Permissions tab on cluster level.

To manage users and access to HX clusters, assign the No Access Role to all the clusters for that user.


Note

Administrative Privileges are required for managing users and roles.


Discover the Registered HX Cluster

To discover your HX clusters and map the vSphere managed objects in your deployment perform the following steps:

Procedure


Step 1

Login to the vSphere web client.

Step 2

Select Menu > Cisco HyperFlex

Step 3

Click Rescan to refresh the list of HX clusters displayed.

Registered clusters are displayed in HyperFlex Cluster table along with a summary of the cluster details.
Step 4

If you have added new HX Cluster(s) to the vCenter server and they are not appearing in the cluster list, Click the Rescan icon on top of the cluster list grid to reload the cluster list from HyperFlex. The icon indicates that the cluster table is still populating. The icon disappears when the cluster list is complete.


Rename Cluster

The rename cluster was introduced in HX Release 4.5. To rename a cluster, perform the following steps:

Procedure


Step 1

Log in to the vSphere web client.

Step 2

Select Menu > Cisco HyperFlex

The HyperFlex Clusters List appears.
Step 3

Click on the row of the cluster that you want to rename.

The Rename button appears for supported clusters.
Note 

The rename cluster feature is supported on HXDP Release 4.5 and later.

Step 4

Click the Rename button.

The Rename Cluster window appears.
Step 5

Type the new name on the Cluster Name: line.

Step 6

Click OK to confirm the name change.


View the HX Cluster Summary

To view a summary of the HX Clusters in your deployment perform the following steps:

Procedure


Step 1

Log in to the vSphere web client.

Step 2

Select Menu > Cisco HyperFlex

Step 3

Click the discovered HX cluster name to view its summary.

Step 4

Click on Summary to view details about Total Nodes, Datastores, HyperFlex Version, Model, vCenter Cluster, ESXi Version and Uptime.

Table 3. Cluster Summary View Details

Field Name

Additional Information

vCenter Cluster

Name of the vCenter cluster

Total Nodes

Total number of nodes

Datastore

Datastore connected to the cluster

HyperFlex Version

Version of HyperFlex on the cluster

Model

Model name

ESXi Version

ESXi Version

Uptime

Length of time that the cluster has been up and running

Cluster Type

Type of cluster

Deployment Type

Type of cluster deployment. Valid options are Standard and Edge.

License Type5

Type of License. Valid options include: Evaluation, Standard, and Enterprise.

Note 

New users enjoy a 90-day grace period to register the license. After 90-days a "License is not in compliance" appears and product features are limited.

License Status6

License status. Status include: In-compliance, Out of Compliance, and License expires in x days, Cluster not registered with Cisco Licensing. Cluster not registered with Cisco Licensing.

Storage Capacity Bar

A graphical representation of the percentage of total storage used. Hover over the bar to view the amount of storage used.

Total VMs Bar

A graphical representation of the total number of VMs in the cluster.

Total Datastore Bar

Total number of datastores connected to the cluster. Hover over the bar to view the number of datastores mounted and unmounted.

5 Added in HX release 5.0(x)
6 Added in HX release 5.0(x)
  1. The summary view includes four portlets with additional details about the cluster: Status, Network Details, Capacity and Performance.

    Use the arrows to collapse and expand the portlet contents.

    Table 4. Status Portlet

    Field Name

    Additional Information

    Operational Status

    Online or Offline

    Resiliency Status

    Warning or Healthy

    Click the arrow to collapse or expand additional Resiliency Status details:

    • Host(s) failure tolerance - Number of host failures tolerated

    • Replication Factor- Number of copies

    • Creation time- Cluster creation time

    • Persistent Device failures tolerable- Number of device failures tolerated

    • Caching Device failures tolerable-Number of caching device failures tolerated

    Nodes

    Number of nodes in the cluster.

    Click the arrow to collapse or expand additional Nodes details:

    • Node Type

    • Version

    Table 5. Capacity Portlet

    Field Name

    Additional Information

    Total

    Used and Free Capacity expressed as a percentage

    Total Capacity

    Amount of usable capacity

    Used

    Used Capacity

    Free

    Free Capacity

    Saving

    Total amount space saved

    Click the arrow to collapse or expand the details about the saved space with Compression and Deduplication. The data is expressed as a percentage.

    Table 6. Network Details Portlet

    Field Name

    Additional Information

    Management Network

    Management Network details

    Click the arrow to view the following Management Network details:

    • Management IP address / FQDN

    • VLAN

    • Default Gateway

    Data Network

    Data network details

    Click the arrow to view the following Data Network details:

    • Data IP address / FQDN

    • VLAN

    • Default Gateway

    Network Services

    Network Services details

    Click the arrow to view the following Network Services details:

    • DNS Server(s)

    • NTP Server(s)

    Table 7. Performance Portlet

    Field Name

    Additional Information

    General Usage

    • Performance charts are visible when the License Status is In-compliance.

    • Click on the Time Interval list to select the length of time viewed in the performance chart.

    • Hover over the chart line to display totals for a specific time.

    • Click the refresh arrow to refresh the view.

    • The Scanning Cluster icon indicates that the cluster table is still populating. The icon disappears when the cluster list is complete.

    • To change the timezone, click the current time interval, complete the Time Range pop-up, and click OK. The time seen reflects the browser time.

    IOPS

    Display IOPS performance chart

    Throughput

    Display Throughput performance chart

    Latency

    Display Latency performance chart


Register your license

New users have a 90-day grace period to register their license. During the 90-days you have full access to all feature functionality. To continue using the complete set of features, perform the following steps to register your license using the in-product link.

Before you begin

Beginning with HX Release 5.0(1a) full HTML plugin feature functionallity requires the license status to be In-compliance. Verify the your License type and Status on the Summary Page, if you need to register your license, complete this task.

Table 8. License Compliance Examples

License In-Compliance

License Out of Compliance

Procedure

Step 1

Starting on the vSphere web client Summary page, click the discovered HX cluster name to view its summary.

Step 2

In the License Type summary, click the Register Now link. The "Smart Software Licensing Product Registration window appears.

Step 3

Type the Product Instance Registration Token on the field provided

Note 

If your registration token is not available, generate a new one by clicking on the Cisco Smart Software Manager Link and follow the prompts.

Step 4

Click Register to complete the action.


View Cluster and Datastore Performance Charts

The Performance tab displays performance details for both the cluster and for the datastore for the last hour.

General Usage:

  • Click on the Time Interval list to select the length of time viewed in the performance chart.


    Note

    The Alarms chart appears with time interval selections of 1 Month or less.


  • Use the drop-down Cluster list on the top right to navigate between the clusters.

  • Hover over the chart line to display totals for a specific time.

  • Click the refresh arrow to refresh the view.

  • To change the timezone, click the current time interval, complete the Time Range pop-up, and click OK. The time seen reflects the browser time.

Before you begin

Beginning with HX Release 5.0(1a), Performance charts are only visible when the license status is In-compliance.

Procedure


Step 1

Log in to the vSphere web client.

Step 2

Select Menu > Cisco HyperFlex.

Step 3

Click on HX Cluster you want to review.

Step 4

Select the Performance tab. The Alarms, IOPS, ThroughPut, and Latency charts appear.

Step 5

Click on the Time Interval list to select the time-span viewed in the performance chart.


Disks

To view the Disks details page, perform the following steps:

Procedure


Step 1

Log in to the vSphere client.

Step 2

Select Menu > Cisco HyperFlex

Step 3

Click the Cluster name that you want to view.

Step 4

Using the Cluster Summary Tabs, Click Disks.

The Disk Detail view appears.
Table 9. Disks Details

Field Name

Additional Information

Node

Node Name

Slot

Slot number

Status

Slot Status. Valid values: Available or Claimed

Capacity

Total capacity of the slot

Type

Type of disk. Valid values include: Rotational, Solid state

Usage

How the disk is being used. Valid values include: Caching, Persistence, System

Step 5

(Optional) Locate a physical server using the Turn On LED button

Note 

Beginning with HX Release 5.0(1a), The Turn On/Off LED button functionality requires the license status to be In-compliance.

  1. Click the Turn On LED button to illuminate the LED light on the associated physical server.

  2. When finished, click the Turn Off LED button to turn the LED light off.


Nodes

To view node details specific to the Cluster, Host, and VMs, perform the following steps:

Procedure


Step 1

Log in to the vSphere client.

Step 2

Select Menu > Cisco HyperFlex

Step 3

Click the Cluster name that you want to view.

Step 4

Using the Cluster Summary Tabs, Click Nodes.

The Nodes list appears.
Table 10. Nodes List Details

Field Name

Additional Information

Node

Node name.

Hypervisor Address

IP address of the Hypervisor.

Hypervisor Status

Hypervisor status. Valid values: Online and Offline.

Controller Address

IP address of the Controller.

Controller Status

Controller status. Valid values: Online and Offline.

Model

Type of node.

Version

HXDP version in use.

Disks

Number of disks associated with the node.

Site

Column is displayed only for Edge deployments.

Step 5

Click the Node name that you want to view details. The Node Summary portlet appear below the Nodes list.

  1. The Node Summary view includes two portlets with additional details about the node: Hyperconverged Nodes and Disk Overview.

    Use the arrows to collapse and expand the portlet contents.

    Table 11. Hyperconverged Nodes Portlet

    Field Name

    Additional Information

    Hypervisor

    Health - Online or Offline

    IP Address - IP address of the Hypervisor

    ESXi Version - Installed ESXi Version

    HyperFlex Controller

    Health - Online or Offline

    IP Address - IP address of the HyperFlex Controller

    HX Version - Installed HyperFlex Version

    Table 12. Disk Overview Portlet

    Field Name

    Additional Information

    Disk Overview

    Notes the number of slots in use and the number that are empty.

    Legend

    Legend for icons and colors used in the disk graphics.

    Disk graphic

    Hover over a disk to display details for that disk.

    Details include:

    • Slot Number and type of usage

    • Disk Status: Claimed or Unclaimed

    • Capacity

    • Storage Usage as a percentage.

    • Disk Drive Interface

    • Version

Step 6

(Optional) Enter or Exit Maintenance Mode

  1. Click the Node name that you want to put into or take out of Maintenance Mode.

  2. Click Enter Maintenance Mode or Exit Maintenance Mode.

Note 

Beginning with HX Release 5.0(x), the Enter and Exit Maintenance Mode button functionality is enabled when the license status is In-compliance.

Note 

If you have a 3- or 4-node cluster, only one node will go into maintenance mode.


Network

Network: Create New VLAN

The Network page allows users to create a VLAN without going through UCS. To create a VLAN from the vSphere client perform the following steps:

Procedure


Step 1

Log in to the vSphere client.

Step 2

Select Menu > Cisco HyperFlex > Create VLAN

Step 3

The Create VLAN window appears.

Complete the fields in the Create VLAN window:
Table 13. Create VLAN

Field Name

Additional Information

VLAN ID

To create one VLAN, enter a single numeric ID. A VLAN ID can:

  • Be between 1 and 3967

  • Be between 4049 and 4093

VLAN Name

This name can be between 1 and 32 alphanumeric characters. You cannot use spaces or any special characters, and you cannot change this name after the object has been saved

UCS Manager Host IP or FQDN

UCS Manager FQDN or IP address.

For example, 10.193.211.120

UCS Username

<admin> username.

For example, sample_user1

UCS Password

<root> password.

Step 4

Click OK.

A VLAN is created.
Note 

Creating VLANs is a one-way operation. You can not view VLANs in the HTML plugin. To see the newly created VLAN go to UCS, and then verify the newly created vLAN in the ESXi vSwitch.


HX Datastore Management

Managing Datastores

The Datastore page allows users to view datastore details, create, edit, mount, unmount or delete datastores on a Cluster.


Note

Beginning with HX Release 5.0(1a), the Create and Delete Datastore buttons are enabled when the license status is In-compliance.


Procedure


Step 1

Log in to the vSphere client.

Step 2

Select Menu > Cisco HyperFlex

Step 3

Click the cluster that you want.

Step 4

Click Datastore.

The Datastore Detail Table appears. Use the arrows to advance to the next or previous page, and first or last page of datastores.
Table 14. Datastore Table Details

Field Name

Additional Information

Name

Datastore name

Mount Summary

Mounted or Unmounted

Status

Status of the Datastore: Valid values include: Normal

Provisioned

Amount of space provisioned

Used

Amount of space used

Free

Amount of space available

Step 5

Click on a Datastore name in the table to view additional details about the Datastore.

SUMMARY is auto-selected and the Details and Trends portlets appear below the table.
Table 15. Details Portlet

Field Name

Additional Information

Total

Graph of space provisioned and used

Status

Mounted or Unmounted

Provisioned

Amount of space provisioned

VMs

Number of VMs created on the datastore

Clicking on a VM count (number) takes the user directly to the Datastore page which list all VMs for that datastore.

Table 16. Trends Portlet

Field Name

Additional Information

General Usage:

  • Click on the Time Interval list to select the length of time viewed in the performance chart.

  • Hover over the chart line to display totals for a specific time.

  • Click the refresh arrow to refresh the view.

  • The Scanning Cluster icon indicates that the cluster table is still populating. The icon disappears when the cluster list is complete.

  • To change the timezone, click the current time interval, complete the Time Range pop-up, and click OK. The time seen reflects the browser time.

IOPS

Display IOPS performance chart

Throughput

Display Throughput performance chart

Latency

Display Latency performance chart

Table 17. Hosts Portlet

Field Name

Additional Information

Host Name

Displays the IP address of the host for the selected datastore.

Mount Status

Specifies if the Host is Mounted or Unmounted.

Accessable

Specifies if the Host is accessable or not.


Create New Datastore

To create a new datastore:

Before you begin

  • Beginning with HX Release 5.0(1a), the Create Datastore button is enabled when the license status is In-compliance.

  • Log in to the vSphere client and Select Menu > Cisco HyperFlex.

Procedure


Step 1

Click the cluster that you want.

Step 2

Click Datastore.

Step 3

Click the Create button. The Create New Datastore window appears.

  1. Enter the Datastore Name.

  2. Enter the Size, and select GB or TB.

  3. Select the Block Size, Select 4K or 8K.

Step 4

Click OK. A new Datastore is created and added to the Datastore table list.

Step 5

If the new Datastore does not appear in the list, click the Refresh arrow and recheck the list.


Edit Datastore

To edit an existing datastore:


Note

You can only change the name of a datastore after it has been Unmounted.


Before you begin

Login to the vSphere client and Select Menu > Cisco HyperFlex.

Procedure


Step 1

Click the cluster that you want.

Step 2

Click Datastore and select Datastore for Edit action.

Step 3

Click the Edit button. The Edit Datastore window appears.

Step 4

Edit the Datastore details.

Step 5

Click OK to save your changes. The Datastore information is updated.


Mount or Unmount Datastore

The Mount and Unmount buttons are active based on the current status of the datastore. A Mounted datastore offers the option to Unmount the datastore, while an Unmounted datastore offers the option to Mount the datastore. To Mount or Unmount a datastore:

Before you begin

  • Remove any VMs created or registered to the datastore before starting the Unmount action.

  • Login to the vSphere client and Select Menu > Cisco HyperFlex.

Procedure


Step 1

Click the cluster that you want.

Step 2

Click Datastore and select Datastore for Mount (Unmount) action.

Step 3

Click the Mount(Unmount) button.

The Mount (Unmount) Datastore window appears with a confirmation question "Do you want to mount (Unmount) the datastore?"

Step 4

Click OK to continue with the Mount (Unmount) action, or click Cancel to exit the Mount (or Unmount) Datastore window. The datastore status is changed from Mounted to Unmounted or Unmounted to Mounted.


Delete Datastore

To delete a datastore:

Before you begin

  • Beginning with HX Release 5.0(1a), the Delete Datastore button is enabled when the license status is In-compliance.

  • Remove any VMs created or registered to the datastore and unmount the datastore before starting the Delete Datastore action.

  • Login to the vSphere client and Select Menu > Cisco HyperFlex.

Procedure


Step 1

Click the cluster that you want.

Step 2

Click Datastore and select Datastore for Delete action.

Step 3

Click the Delete button.

The Delete Datastore window appears with the confirmation question "Do you want to delete the datastore?"

Step 4

Click OK to continue with the delete action, or Cancel to exit the Delete Datastore window.

The selected Datastore is deleted from the Datastore table list.

VMs

To view VM details specific to the Cluster, Host, and VMs, perform the following steps:

Procedure


Step 1

Log in to the vSphere client.

Step 2

Select Menu > Cisco HyperFlex

Step 3

Click the Cluster name that you want to view.

Step 4

Using the Cluster Summary Tabs, Click VMs.

The VM Detail displays three portlets: Summary, Alarms/Events and Top 15 VMs.
Table 18. Summary Portlet

Field Name

Additional Information

VMs Summary

Usage diagram of user VMs in use. Hover over to view the number of VMs running, suspended, and off.

Total VMs: The total count of all user VMs.

Note 

Controller VMs are not included in the summary.

VMs Storage

The sum of all user VMs storage. Total storage capacity for all user VMs appears above image. Hover over the graphic to view the current amount of storage being consumed.

VMs Memory

Amount of point-in-time memory. Total memory capacity is listed, hover over the graphic to view the current amount of memory used.

CPU

Total vCPU Count - Total CPU count for all VMs in the cluster.

CPU Usage - Number of cycles per second a given CPU is using.

Table 19. Alarms/Events Portlet

Field Name

Additional Information

Alarms

Displays Alarms for the VMs during the last week (7days).

Click View to navigate to the Alarms Details view.

  • Triggered Time-Date and time the alarm occurred.

  • Description-Alarm Description.

Events

Displays Events for theVMs during the last week (7days).

Click View to navigate to the Events Details view.

  • DateTime - Date and time the event occurred.

  • Description- Event description.

Table 20. Top 15 VMs Portlet

Field Name

Additional Information

Time list

Specify the measurement of time to show the top 15 VMs. List options include: 1 Hour, 1 Day, or 1 Week.

Metrics List

Select the metric type used to populate the table. Options include: CPU, Memory, Disk Latency, Network, and Space.

  • CPU, Memory, Disk Latency, Network - only report metrics for VMs in a running condition. VMs that are switched off are not included.

  • Space - counts all VMs regardless of their state.

Name

VM Name - Clicking on the VM name redirects users to the graph or monitoring page of VM being viewed in vCenter.

State

Current state of the VM. Valid values are Running, Off and Suspended.

Datastore

Datastore Name

CPU

CPU usage in megahertz used durineg the interval.

Memory

Amount of host physical memory consumed for backing up guest physical memory pages.

Disk Latency

Highest latency value across all disks used by the host

Network Throughput

Network utilization during the interval (combined transmit and receive rates).

Space (Disk Usage)

Amount of disk space the VM is using

View Metrics

Link to view CPU, Memory, Disk Latency, and Network Throughput performance tables for that specified VM. The usage values displayed are for the five-minute average for all.

Use the hover feature to display the matrices simultaneously and evaluate any visible spikes in the data.


Events

To view events specific to the Cluster, Node, Host, VM or Disk, perform the following steps:

Procedure


Step 1

Log in to the vSphere client.

Step 2

Select Menu > Cisco HyperFlex.

Step 3

Click the Cluster name that you want to view.

Step 4

Using the Cluster Summary Tabs, Click Events.

The Events Detail view appears.
Table 21. Event Details

Field Name

Additional Information

Description

Text description of the event

Event Name

Event name

Entity Type

Entity affected. Values include: All, Cluster, Node, Virtual Machine, and Disk

Severity

Event severity level. Valid values include: All, Info, Warning, Error, and Critical

DateTime

Date and time the event occurred

Step 5

(Optional) Use filters to limit the results that appear in the Events Table.

Filter

Filter Options

Entity Type

All, Cluster, Node, Virtual Machine, and Disk

Severity

All, Info, Warning, Error, and Critical

Filter

Type a keyword in the Filter option to filter the table contents seen in the browser

Step 6

In the list of events, Click on the event name that you want more information about.

The details appear below the Events table. Details include:
  • Description

  • Event Name

  • Entity Type

  • Severity

  • DateTime


Alarms

To view alarms specific to the Cluster, Host, and VMs, perform the following steps:


Note

Acknowledged alarms on HX Connect or HTML plugin does not acknowledge the equivalent vCenter alarm.


Procedure


Step 1

Log in to the vSphere client.

Step 2

Select Menu > Cisco HyperFlex

Step 3

Click the Cluster name that you want to view.

Step 4

Using the Cluster Summary Tabs, Click Alarms.

The Alarms Detail view appears.
Table 22. Alarm Details

Field Name

Additional Information

Source

Text description of the alarm

Description

Alarm name

Severity

Alarm severity level. Valid values include: All, Info, Warning, and Error

Triggered Time

Date and time the alarm occurred

Use the arrow to sort and re-sort the table results

Acknowledged Time

Time when the Alarm was acknowledged

Acknowledged by

Auto-enters who acknowledged the alarm

Step 5

(Optional) Use filters to limit the results that appear in the Alarms Table.

Filter

Filter Options

Severity

All, Info, Warning, and Error

Entity Type

All, Cluster, Node, Virtual Machine, Disk and Datastore

Acknowledged

All, True, and False

Filter

Type a keyword in the Filter option to filter the table contents seen in the browser

Step 6

Click the Acknowledged button to acknowledge that the alarm has been seen.

Clicking the Acknowledged button auto-enters who acknowledged the alarm in the Acknowledged by field.
Step 7

Click the Reset To Green button to remove the alarm from the list.


Tasks

View asynchronous tasks that are happening on the platform to validate maintenance, perform the following steps:

Procedure


Step 1

Log in to the vSphere client.

Step 2

Select Menu > Cisco HyperFlex > Tasks

Step 3

Click the Task that you want to view.

The sub-tasks appear in the table below the list of tasks.
Table 23. Task List

Field Name

Additional Information

Description

Description of the task

Name

Task Name

Entity Type

Type of task, Valid values include: NODE, DP_Summary, Virtual Machine, Disk and Datastore.

Entity ID

Device ID number

State

Specifies the success or failure of the task.

Triggered Time

Date and time the task occurred

Table 24. Task Details

Field Name

Additional Information

Sub-task name

Name of the task.

Success indicator

Description of the action and the status of the task when it completed. A check icon preceding the description identifies that the task was successful. Review this list to identify where a task failed.

Step 4

(Optional) Use the Entity Type list to filter the table results.


vCenter: HyperFlex Plugin Embedded Actions

vCenter Server Actions at the Host and Cluster Level

Create New Datastore

To create a new datastore from the Hosts and Clusters level, perform the following steps:

Before you begin

Beginning with HX Release 5.0(1a), this functionality is enabled when the license status is In-compliance.

Procedure


Step 1

Access the Hosts & Clusters either from the vSphere Menu or the Shortcut link.

Step 2

Right click on the cluster and select Cisco HyperFlex > Upgrade. Upgrade Launches HyperFlex Connect and takes the user directly to the upgrade page to complete the upgrade process.

Step 3

Right click on the cluster and select Cisco HyperFlex > Create Datastore.

The Create New Datastore window appears.
Step 4

Complete the fields in the New Datastore Window.

  • Enter the Datastore Name

  • Enter the Size, and select GB or TB.

  • Select the Block Size, Select 4K or 8K.

  • Click OK.


Enter or Exit Maintenance Mode

To enter or exit Maintenance Mode from the Host level from the vSphere web UI perform the following steps:

Before you begin

Beginning with HX Release 5.0(1a), this functionality is enabled when the license status is In-compliance.

Procedure


Step 1

Access Hosts & Clusters either from the vSphere Menu or the Shortcut link.

Step 2

Click on the cluster name and select the Hosts tab.

The summary page appears.
Step 3

Right click on the host and select Cisco HyperFlex > > Maintenance Mode > Enter (or Exit) MainenanceMode to enter or Exit HyperFlex Maintenance Mode.


View HTML5 Plugin Portlets from the Summary Tab

To view Cisco HyperFlex HTML5 Plugin Portlets from the vSphere web UI perform the following steps:

Procedure


Step 1

Access Hosts & Clusters either from the vSphere Menu or the Shortcut link.

Step 2

Click on a cluster name and select the Summary tab. The summary page appears.

Step 3

Scroll down and use the arrow in each portlet to show or hide the portlet details.


View HTML5 Plugin Portlets from the Monitor Tab

To view Cisco HyperFlex HTML5 Plugin Portlets from the vSphere web UI perform the following steps:

Procedure


Step 1

Access Hosts & Clusters either from the vSphere Menu or the Shortcut link.

Step 2

Click on a cluster name and select the Monitor tab.

Step 3

Scroll down the Monitor navigation panel and locate Cisco HyperFlex.

Step 4

Click on Storage Capacity or Performance to display the related Cisco HyperFlex HTML5 Plugin chart.


View iSCSI and Datastore Summary from the Configure Tab

To view the iSCSI and Datastore Summary Pages from the vSphere web UI perform the following steps:

Before you begin

The iSCSI features are supported in Cisco HyperFlex Release 4.5(x) and later.

Procedure


Step 1

Access Hosts & Clusters either from the vSphere Menu or the Shortcut link.

Step 2

Click on a cluster name and select the Configure tab.

Step 3

Scroll down the Monitor navigation panel and locate Cisco HyperFlex.

Step 4

Click on iSCSI Summary or Datastore Summary to display the related Cisco HyperFlex HTML5 Plugin page.

Step 5

Use the buttons to perform all maintenance tasks as defined in the related topics.


vCenter Server Actions at Virtual Machine Level

Snapshot Now

Before you begin

Access the VMs and Templates either from the vSphere Menu or the Shortcut link.

Procedure


Step 1

Right click on the virtual machine. Select Cisco HyperFlex > Snapshot Now.

Step 2

The Take VM Native Snapshot window appears. Complete the following fields:

  • Name- Snapshot name

  • Description - Description of the snapshot

  • Quiesce guest file system - Check box.

Step 3

Click OK to create a VM Snapshot. You will see the snapshot task active in the background. After the Snapshot is complete it will be listed in the Snapshot Manager.


ReadyClones

Before you begin

  • Beginning with HX Release 5.0(1a), the ReadyClones feature is enabled when the license status is In-compliance.

  • Access the VMs and Templates either from the vSphere Menu or the Shortcut link.

Procedure


Step 1

Right click on the virtual machine. Select Cisco HyperFlex > ReadyClones.

Step 2

The Ready Clones window appears. Complete the General Settings Fields:

  • Number of Clones- Valid entry 1-256

  • Customization specifications - If configured, select from the list

  • Resource Pool - If configured, select from the list

Step 3

Complete the Clone Name Fields:

  • Power on VMs after cloning- Check box

  • Name of VM Prefix - Type VM prefix

  • Starting clone number- The default is 1

  • Increment clone number by - The default is 1

  • Use same name for Guest Name- Uncheck to provide a guest name


vCenter Server Actions at the Storage Level

Edit Datastore

From the Datastore level users have the ability to edit existing datastores.

Before you begin

Access the Datastores either from the vSphere Menu or the Shortcut link.

Procedure


Step 1

Right click on the datastore name.

Step 2

Select Cisco HyperFlex > Edit Datastore.

The Edit Datastore window appears.
Step 3

Edit the Datastore details.

Step 4

Click OKto save your changes.


Delete Datastore

From the Datastore level users have the ability to delete existing datastores.

Before you begin

Access the Datastores either from the vSphere Menu or the Shortcut link.

Procedure


Step 1

Right click on the datastore name.

Step 2

Select Cisco HyperFlex > Delete Datastore

The Delete Datastore window appears.
Step 3

Click the Delete button.

The Delete Datastore window appears with the confirmation question "Do you want to delete the datastore?"
Step 4

Click OK to continue with the delete action, or Cancel to exit the Delete Datastore window.


Cisco HyperFlex Flash Plugin for VMware vCenter

Cisco HyperFlex Flash plugin for VMware vCenter, enables virtualization administrator to manage and monitor the Cisco HyperFlex physical infrastructure.

Cisco HyperFlex Flash Prerequisites

The following hardware and software prerequisites apply to the Cisco HyperFlex Flash Plugin:


Note

The Cisco HyperFlex Flash Plugin is the original plugin. HXDP Release 4.5(1a) is the final release that supports the Cisco HyperFlex Flash Plugin. This change coensides with the end of flash support in popular browsers. It is recommended that users upgrade to the Cisco HyperFlex HTML5 Plugin for VMware vCenter.


  • Browser compatibility: The Cisco HyperFlex Flash Plugin works with all browsers where vSphere Client and HyperFlex Connect work.

Launching HyperFlex Menu Options from vSphere

You can launch HyperFlex Connect from the vSphere Client UI in a new browser tab and perform management actions in the HyperFlex UI.

  • To launch HyperFlex Connect Ready Clone in a new browser tab; in the vSphere client atVirtual Machine level, select Actions > Cisco HyperFlex Systems > Ready Clone

  • To launch HyperFlex Connect Dashboard in a new browser tab; in the vSphere client at HX Cluster level, select Actions > Cisco HyperFlex Systems > Summary

Checking Cluster Rebalance and Self-Healing Status from the Flash Plugin

The storage cluster is rebalanced on a regular schedule and when the amount of available storage in the cluster changes. A rebalance is also triggered when there is a change in the amount of available storage. This is an automatic self-healing function.


Important

Rebalance typically occurs only when a single disk usage exceeds 50% or cluster aggregate disk usage is greater than 50%.


You can check rebalance status through the HX Data Platform plugin or through the storage controller VM command line. For directions on using the VM command line, see Checking Cluster Rebalance and Self-Healing Status.

Procedure


Check the rebalance status through HX Data Platform plugin.

  1. From the vSphere Web Client Navigator, select vCenter Inventory Lists > Cisco HyperFlex Systems > Cisco HX Data Platform > cluster > Summary.

    The Status portlet lists the Self-healing status.

  2. Expand the Resiliency Status to see the Self-healing status section. The Self-healing status field lists the rebalance activity or N/A, when rebalance is not currently active.

The Recent Tasks tab in the HX Data Platform plugin displays a status message.


Setting a Disk Beacon through the HX Flash Plugin

Beaconing is a method of turning on an LED to assist in locating and identifying a node (host) and a disk. Nodes have the beacon LED in the front near the power button and in the back. Disks have the beacon LED on the front face.

You set a node beacon through Cisco UCS Manager. You set a disk beacon through the Cisco HX Data Platform plugin or HX Connect user interface.

Procedure


Turn on and off a disk beacon using the HX Data Platform Plugin.

  1. From the vSphere Web Client Navigator, select vCenter Inventory Lists > Cisco HyperFlex Systems > Cisco HX Data Platform > cluster > Manage.

  2. From Manage, select Cluster > cluster > host > Disks > disk.

  3. Locate the physical location of the object and turn on the beacon.

    From Actions drop-down list, select Beacon ON.

  4. After you locate the disk, turn off the beacon.

    From Actions drop-down list, select Beacon OFF

    The beacon LED for all the disks on the selected node are toggled, except Housekeeping SSDs and cache NVMe SSDs. Housekeeping SSDs or cache NVMe SSDs do not have functioning LED beacons.