| Step 1 |
Launch UCS Manager and log in.
|
| Step 2 |
Perform the following steps to clone a Service Profile template:
-
In the Navigation pane, click Servers.
-
Expand the node for the organization where you want to clone and select Create a Clone
-
In the Create Clone from Service Profile dialog box, enter a name you to use for the new profile in the Clone Name field (Example: hx-compute. Click OK.
|
| Step 3 |
Perform the following steps to enable FC Zoning:
-
In the Navigation pane, go to SAN > VSAN.
-
Ensure that the Enabled radio-button is selected under FC Zoning.
|
| Step 4 |
Unbind your blade server from the current Service Profile template, and bind it to the newly created template in Step 2.
|
| Step 5 |
Perform the following steps to mount the HyperFlex Driver Image file and modify the autounattend.xml file:
-
Connect to your HX Installer VM and navigate to the shared folder that contains the Windows ISO and HyperFlex Driver Image
files.
-
Run the following commands to mount the HyperFlex image:
mkdir /mnt/hx-img
mount /var/www/localhost/images/latest.img /mnt/hx-img
-
Open the autounattend.xml file, search for DiskID and change the value from 0 to the value in Windows PE ( WinPE).
|
| Step 6 |
Perform the following steps to configure a SAN boot policy:
-
Select the newly created Service Profile Template from Step 2 and go to the Boot Order tab. Click Modify Boot Policy. In the Modify Boot Policy page, click Create Boot Policy.
-
Expand vHBAs, select Add SAN Boot, and in the name field, type the name of the vHBA(Example: hx-ext-fc-a).
-
Select Primary and click OK.
-
In the Add SAN Boot Target, leave the Boot Target LUN set to 0. In the Boot Target WWPN field, type the WWPN from your storage array. Verify Type is set to Primary and click OK.
|
| Step 7 |
Create a vMedia policy for the Windows OS and Cisco driver images:
-
In the Navigation pane, click Servers.
-
Expand
-
Right-click vMedia Policies and select Create vMedia Policy HyperFlex.
-
In the Create vMedia Policy dialog box, complete the following fields:
|
Field Name
|
Description
|
|
Name
|
The name of the vMedia policy. For example, HX-vMedia.
This name can be between 1 and 16 alphanumeric characters. You cannot use spaces or any special characters other than - (hyphen),
_ (underscore), : (colon), and . (period), and you cannot change this name after the object is saved.
|
|
Description
|
A description of the policy. We recommend including information about where and when the policy should be used. Maximum 115
characters.
|
|
Retry on Mount Failure
|
Designates if the vMedia will continue mounting when a mount failure occurs. This can be:
| Note
|
The default setting is Yes. When Yes is selected the remote server will continue to try to mount the vMedia mount process until it is successful or you disable
this option. If you select No, a warning message will appear indicating retry on mount failure will not work in case of mount
failure.
|
|
Refer to the following screeshot as an example: 
-
On the icon bar under the vMedia Mounts pane, click + Add. In the Create vMedia Mount dialog box, complete the following fields:
|
Field Name
|
Description
|
Example Value
|
|
Name
|
Name for the mount point.
|
Windows-ISO
|
|
Description
|
Can be used for more information.
|
Windows Server 2016 image
|
|
Device Type
|
Type of image that you want to mount. This can be:
|
CDD
|
|
Protocol
|
The protocol used for accessing the share where the ISO files are located.
|
HTTP
|
|
Hostname/IP Address
|
IP address or FQDN of the server hosting the images.
|
10.101.1.92
|
|
Image Name Variable
|
This value is not used in HyperFlex installation.
|
None
|
|
Remote File
|
The filename of the ISO file that you want to mount.
|
|
|
Remote Path
|
The path on the remote server to where the file resides
|
|
|
Username
|
If you use CIFS or NFS a username might be necessary
|
|
|
Password
|
If you use CIFS or NFS a password might be necessary
|
|
Refer to the screenshot below as an example: 
-
Click OK. When you click OK, you will now be returned to the vMedia Policies screen, and you should see the information that you just submitted.
-
Repeat Steps 2e and 2f, however, change the type to HDD and the remote file name to the Cisco HyperFlex driver image.
-
At the end of this step, the two vMedia mounts will be listed in the Create vMedia Policy screen as shown in the following
screenshot:
|
| Step 8 |
Associate the vMedia Policy to a Service Profile:
-
In the Navigation pane, select
-
Click the vMedia Policy tab. Then, click Modify vMedia Policy
-
Choose the vMedia Policy that you created earlier from the drop-down selection, and click OK twice.
-
Under the General tab, verify that the vMedia policy is added to the Service Profile.
|
| Step 9 |
Modify Boot Policy and set the boot order to have CIMC CD/DVD to the list:
-
In the Navigation pane, click the Servers tab.
-
Expand
-
( For M5 Servers only) In the Boot Order configuration pane, click CIMC Mounted CD/DVD . Then, click Add CIMC Mounted CD/DVD to add this to the boot order. Move it to the top of the boot order using the Move up button.
| Important
|
The CIMC Mounted CD/DVD option must be highest in the boot order preceding the other options, Embedded Local Disk and CD/DVD.
|
(For M4 Servers with Local SAS Drivers) In the Boot Order configuration pane, click vHBAs. Then, click Add SAN Boot to add this to the boot order.
-
Click Save Changes, and click OK in the Success dialog box. The modified boot policy is saved.
|
| Step 10 |
Verify successful vMedia mounting:
-
On the Equipment tab, select one of the servers.
-
Click , scroll down and ensure for mount entry #1(OS image) and mount entry #2 (Cisco HyperFlex driver image) you see status as
Mounted and there are no failures.
-
In the menu bar, click Servers and choose the first HyperFlex service profile.
-
Click the General tab and choose .
| Note
|
The KVM console will try to open in a new browser. Be aware of any pop-up blockers. Allow the pop-ups and re-open the KVM
|

-
Reboot the host, launch the KVM Console, and power on the server to monitor the progress of the Windows installation. You
should see the Loading Files screen appear. Windows should install automatically without user intervention. You should see a blue screen and within a
few moments you should see the Setup is starting message. If automated installation does not begin, double-check that both images are mounted to the server.
-
Once Windows installation completes, a command prompt will show up. Wait for the installation to complete. The host will then
reboot a few times. The installation is complete when you get a clear command prompt at c:\users\administrator>. It may take several minutes and reboot operations for the Driver Image to be copied and installed.
| Note
|
Ignore the prompt with the The system cannot find the file specified message.
|
| Important
|
Ensure that you have completed Steps e and f, on ALL servers that will be part of the HX cluster.
|
-
Login to each server, enter the command C>Users>Administrator>Get-ScheduledTask and verify that the HX Install Bootstrap Launcher task is running.
|
| Step 11 |
Remove the vMedia policy from the service profile:
-
To un-map the vMedia policy from the service profile, go to . Then, click on Modify vMedia Policy.
-
Under the vMedia Policy drop-down selection, deselect the vMedia policy (HX-vMedia) previously used to map the two images.
|
| Step 12 |
Restore the boot order to the one before installation:
-
In the Navigation pane, click the Servers tab.
-
Expand
-
In the Boot Order configuration pane, use the Move Down button to move CIMC Mounted CD/DVD option to the bottom of the list.
Refer to the screenshot below for the boot order after it is restored in this step: 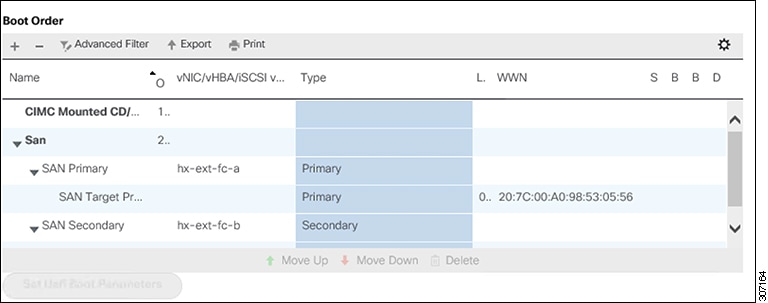
|


 Feedback