Cisco HyperFlex Systems Server Imaging for Factory Shipped Servers

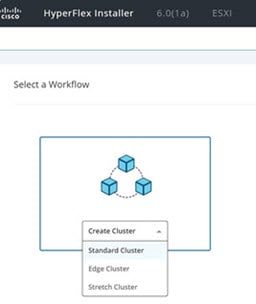
Standard Installation Overview

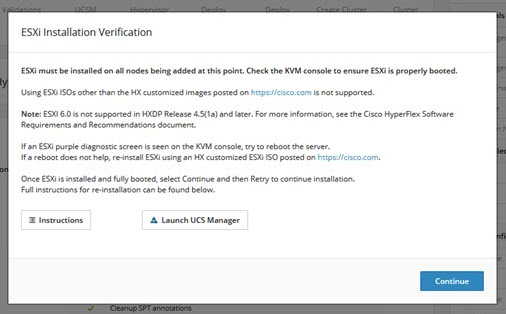
Beginning in April 2024, HyperFlex servers are being shipped from the factory without VMware ESXi preinstalled. This chapter describes the process for manually preparing factory shipped servers for the Cisco HyperFlex install. It is imperative that the ESXi ISO is installed before starting the HyperFlex Installation..

This standard installation method is used for the following install scenarios:

  • New cluster deployment.

  • Converged node expansion.

Installation and Configuration of Factory Shipped Cisco HyperFlex Systems

Before you begin

Review the installation and configuration requirements for Cisco HyperFlex Systems. See Installation Prerequisites for more details.

Procedure


Step 1

Download the Cisco HyperFlex Data Platform Installer OVA file from Download Software.

Example:

Cisco-HX-Data-Platform-Installer-v5.5.1a-43232-esx.ova

Step 2

Launch the HX Data Platform Installer and sign-in.

  1. Select Standard Workflow.

  2. Select Create Cluster > Create Standard.

  3. Follow the install wizard to provide required details. Refer Installation Workflow for more information.

    Note


    In Hyperflex standard installation, factory shipped servers are shipped without VMware ESXi preinstalled. Therefore, workflow may fail or pause during Hypervisor configuration.

Step 3

Perform the ESXi installation using the vMedia method. See Installing VMware ESXi for more details.

Note


By default, the HX Data Platform Installer assigns static IP addresses to the ESXi servers. Using Dynamic Host Configuration Protocol (DHCP) for automatic IP address assignment is not recommended. If you are using DHCP, configure the networking in the ESXi manually with the proper VLANs.

Step 4

Return to the HX Data Platform Installer and click the Retry button.

Ensure that you select Clear Disk Partitions in the wizard.


Installing VMware ESXi

A supported version of VMware ESXi must be installed on all HX servers in your deployment. At the time this was authored, Cisco recommended installing ESXi 7.0 U2 or later to attain the best HX snapshot performance and functionality. See the Cisco HyperFlex Software Requirements and Recommendations document for the current list of supported ESXi versions.

To install VMware ESXi complete the following tasks in order.

  1. Download the ESXi Image.

  2. Upload VMware ESXi ISO to the Installer

  3. Configure vMedia and Boot Policies Through Cisco UCS Manager

  4. Start the VMware ESXi Installation

  5. Undo vMedia and Boot Policy Changes

To get started, download the ESXi image:

Procedure


Step 1

Download the VMware ESXi image from the Cisco HyperFlex Data Platform Download Software page. Select a networked location that can be accessed through Cisco UCS Manager.

Example:

The ESXi image name may vary based on the recommended version for your deployment.
HX-ESXi-7.0U3-21930508-Cisco-Custom-7.3.0.16-install-only.iso

Step 2

Continue to Upload VMware ESXi ISO to the Installer.


Upload VMware ESXi ISO to the Installer

To upload the VMware ESXi ISO, complete the following task:

Procedure


Step 1

Execute the SCP command to upload the VMware ESXi ISO from user’s machine to the installer at the /var/www/localhost/images path.

Example:

scp ~/Downloads/HX*ESX.iso root@<installer_ip>:/var/www/localhost/images

Step 2

Continue to the Configure vMedia and Boot Policies Through Cisco UCS Manager.


Configure vMedia and Boot Policies Through Cisco UCS Manager

To configure the Cisco UCS vMedia and Boot Policies, complete the following steps:

Procedure


Step 1

In Cisco UCS Manager, click the Servers tab in the Navigation Pane.

Step 2

Expand Servers > Policies > root > Sub-Organizations > hx-cluster > vMedia Policies

Step 3

Click vMedia Policy HyperFlex.

Step 4

In the Configuration Pane, click Create vMedia Mount.

Step 5

Type a name for the mount, for example: ESX.

Step 6

Select CDD option.

Step 7

Select HTTP as the protocol.

Step 8

Type the IP Address of the HyperFlex installer VM, for example: 192.168.10.210.

Step 9

Select None as the Image Variable Name.

Step 10

Type the installed ESXi file name as the Remote File.

Example:

ESXi file name HX-ESXi-7.0U3-21930508-Cisco-Custom-7.3.0.16-install-only.iso

Step 11

Type /images/ as the Remote Path.

Step 12

Click Save Changes, and click OK.

Step 13

In the Configuration Pane, select the HX Node you want to configure in the Configuration Pane. Select Servers > Service Profile Templates > root > Sub-Organizations > hx-cluster > Service Template hx-nodes

Step 14

Select the vMedia Policy tab.

Step 15

Click on Modify vMedia Policy.

Step 16

Select HyperFlex vMedia Policy from the selection, and click OK twice.

Step 17

Select Servers > Policies > root > Sub-Organizations > hx-cluster > Boot Policy HyperFlex.

Step 18

In the Navigation Pane, expand the section titled CIMC Mounted vMedia.

Step 19

Click on the entry labeled Add CIMC Mounted CD/DVD.

Step 20

Select the CIMC Mounted CD/DVD entry in the Boot Order list.

Step 21

Click the Move Up button until the CIMC Mounted CD/DVD entry is listed first.

Step 22

Click Save Changes and click OK.

Step 23

When you acknowledge the reboot, then server automatically reboots.

Step 24

Continue to Start the VMware ESXi Installation.


Start the VMware ESXi Installation

To initiate the VMware ESXi installation and monitor the installation process. It is advisable to open a remote KVM console session to watch the installation. To get started, perform the following steps:

Procedure


Step 1

In Cisco UCS Manager, click Servers in the Navigation pane.

Step 2

Expand Servers > Service Profiles > Root > Sub-Organizations > hx-cluster > rack-unit-number.

Step 3

In the Work pane, select the General tab.

Step 4

In the Actions area, click KVM Console.

Step 5

Click Continue to any security alerts that appear. The remote KVM Console window appears shortly and shows the server’s local console output.

  • Error messages can be safely ignored.

  • Warning Message: DHCP look-up failed. May prevent access to the system until you customize the network configuration.

Step 6

Repeat Steps 2-4 for any additional servers whose KVM Console you wish to monitor during the installation.

The servers that you are monitoring in the KVM console window immediately reboot, then boot from the remote vMedia mount, and install the Cisco customized ESXi ISO.

Step 7

Successful VMware ESXi Installation message:

Step 8

Continue to Undo vMedia and Boot Policy Changes.


Undo vMedia and Boot Policy Changes

To prevent the servers from going into a boot loop (constantly booting from the installation ISO file), undo the changes to the boot policy.

Before you begin

Ensure that all the servers have booted from the remote vMedia file and have begun their installation process.

Procedure


Step 1

In Cisco UCS Manager, click Servers in the Navigation pane.

Step 2

Expand Servers > Policies > Root > Sub-Organizations > hx-cluster_name > Boot Policies > Boot Policy HyperFlex .

Step 3

In the Work pane, click the General tab.

Step 4

In the Actions area, click CIMC Mounted CD/DVD.

Step 5

Select the CIMC Mounted CD/DVD entry in the Boot Order list, and click Delete.

Step 6

Click Save Changes, and click OK.

Step 7

Acknowledge the pending changes.


What to do next

Return to the HX Data Platform Installer and click the Retry button to proceed with the HyperFlex standard installation.