Cisco Group Encrypted Transport VPN

Cisco Group Encrypted Transport VPN (GET VPN) is a set of features that are necessary to secure IP multicast group traffic or unicast traffic over a private WAN that originates on or flows through a Cisco IOS device. GET VPN combines the keying protocol Group Domain of Interpretation (GDOI) with IP security (IPsec) encryption to provide users with an efficient method to secure IP multicast traffic or unicast traffic. GET VPN enables the router to apply encryption to nontunneled (that is, “native”) IP multicast and unicast packets and eliminates the requirement to configure tunnels to protect multicast and unicast traffic.


Note


Security threats, as well as the cryptographic technologies to help protect against them, are constantly changing. For more information about the latest Cisco cryptographic recommendations, see the Next Generation Encryption (NGE) white paper.


This document describes how to configure, verify, and troubleshoot Cisco GET VPN.

Cisco Group Encrypted Transport VPN provides the following benefits:

  • Provides data security and transport authentication, helping to meet security compliance and internal regulation by encrypting all WAN traffic

  • Enables high-scale network meshes and eliminates complex peer-to-peer key management with group encryption keys

  • For Multiprotocol Label Switching (MPLS) networks, maintains network intelligence such as full-mesh connectivity, natural routing path, and quality of service (QoS)

  • Grants easy membership control with a centralized key server

  • Helps ensure low latency and jitter by enabling full-time, direct communications between sites, without requiring transport through a central hub

  • Reduces traffic loads on customer premises equipment (CPE) and provider-edge (PE) encryption devices by using the core network for replication of multicast traffic, avoiding packet replication at each individual peer site

Finding Feature Information

Your software release may not support all the features documented in this module. For the latest caveats and feature information, see Bug Search Tool and the release notes for your platform and software release. To find information about the features documented in this module, and to see a list of the releases in which each feature is supported, see the feature information table.

Use Cisco Feature Navigator to find information about platform support and Cisco software image support. To access Cisco Feature Navigator, go to https://cfnng.cisco.com/. An account on Cisco.com is not required.

Prerequisites for Cisco Group Encrypted Transport VPN

  • You must be using Cisco IOS XE Release 2.3 or later.

  • You should be knowledgeable about IPsec and Internet Key Exchange (IKE).

  • You should know how to configure multicast and unicast routing on a Cisco IOS XE global router.

  • When the IKE policy is configured, the IKE lifetime should be set to the minimum of 5 minutes so that unnecessary resources are not wasted on the maintenance of the IKE security association (SA). After the registration IKE SA is established, the registration SAs no longer have to be maintained because the rekey SA has been created and will be used to accept future rekeys.

  • When the group rekey lifetime is configured with 300 seconds and forced rekey with policy change is perfomed, you might face network issues. To overcome this issue, one of the following is recommended for group rekey (KEK):

    • Set the lifetime to three times of TEK lifetime configured in transform-set.

    • Set the group rekey lifetime to default value, which is 24 hours (86400 seconds)

    • Configure rekey lifetime as 7200 seconds (2 hours)

Restrictions for Cisco Group Encrypted Transport VPN

  • If you are encrypting high packet rates for counter-based antireplay, ensure that you do not make the lifetime too long or it can take several hours for the sequence number to wrap. For example, if the packet rate is 100 kilopackets per second, the lifetime should be configured as fewer than 11.93 hours so that the SA is used before the sequence number wraps.

  • Cisco ASR 1000 Series Aggregation Routers with virtual-ppp interface cannot be configured as GETVPN group member.

  • In Cisco IOS XE software, an inclusive port range for users to access a network cannot be matched in the extended ACL using the permit command.

  • For unicast traffic and counter-based antireplay, the sequence numbers may be out of sync between the group members if one of the group members goes down and comes back up. For example: There is traffic from group member 1 to group member 2, and the last sequence number is n . Group member 1 goes down and comes back up. The sequence number of the SA at group member 1 now starts with 1, but group member 2 is expecting continuation from the previous sequence number (n + 1). This situation causes subsequent traffic from group member 1 to be dropped until the sequence number on group member 1 reaches n or the next rekey.

  • When you configure transport mode traffic selectors, it is possible to have transport mode SAs. SAs occur when the packet size exceeds the MTU, and the packet cannot be forwarded.

  • Transport mode should be used only for Group Encrypted Transport VPN Mode (GM) to GM traffic.

  • If you are overriding the don’t fragment bit (df-bit) setting in the IP header of encapsulated packets, you must configure the override commands in global configuration mode. GET VPN does not honor the interface configuration. This restriction is limited only to GET VPN. IPsec accepts both global configuration- and interface-specific override commands.

  • Counter-based antireplay is not recommended and works only if there are two group members in a group.

  • The GET VPN Time-Based Anti-Replay feature does not support Encapsulating Security Payload (ESP) transport mode in Cisco ASR 1000 Series Aggregation Services Routers and Cisco 4330 Integrated Services Router.

  • Because Path MTU Discovery (PMTUD) does not work for GET VPN, there is a possibility that encapsulated packets could be dropped when the df-bit is set and the MTU of an intermediate link is less than the size of the encapsulated packet. In such an event, the router that drops the packet sends a notification to the source IP address on the packet, indicating that the packet has been dropped because the router could not fragment the packet due to the df-bit setting. In GET VPN, this message goes past the encapsulating endpoint directly to the source of the data due to the header preservation feature of GET VPN. Thus, the encapsulating router never knows that it has to fragment the packet to a smaller size before setting the df-bit after encapsulation. It continues to set the df-bit on the packets and they continue to be dropped at the intermediate router. (This is known as null-routing the traffic.)

  • In Cisco IOS XE Release 3.5S and earlier releases, key servers cannot be configured using Cisco IOS XE images. They must be configured using Cisco IOS T-based or mainline-based images. This is not a restriction in Cisco IOS XE Release 3.6S and newer releases.

  • Because of crypto engine optimization, the time-based antireplay (TBAR) overhead is 16 bytes instead of 12 bytes.

  • GET VPN uses TBAR Cisco Metadata Protocol to carry TBAR information. Cisco IOS software uses 12-byte header and Cisco IOS XE uses 16-byte header. Cisco IOS XE software configured on GETVPN group members and using TBAR for anti-replay will have an effective mtu ("cleartext mtu") of the ipsec traffic as 4 bytes lower than group members that configured with Cisco IOS software. When migrating GET VPN group member from Cisco IOS software to Cisco IOS XE software, the reduction in the 4 bytes might result in unexpected performance issues.

  • To ensure normal traffic flow for a GET VPN configuration on Cisco ASR 1000 Series Aggregation Services Routers, a TBAR window size greater than 20 seconds is recommended in Cisco IOS XE Release 3.12S and earlier releases, Cisco IOS XE Release 3.14S and Cisco IOS XE Release 3.15S. In Cisco IOS XE Release 3.13S, Cisco IOS XE Release 3.16S and later releases, a TBAR window size lesser than 20 seconds is permitted.

  • Crypto maps are not supported on tunnel interface. However, as an exception to the rule, crypto map for GDOI is supported on tunnel interfaces.

  • Crypto maps are not supported on VLAN interfaces.

  • RSVP as used in Mediatrace sets the "Router Alert" IP option flag. The Cavium N2 crypto accelerator does not support the use of IP options. Therefore, Mediatrace will fail with IPsec encryption on ASR1000 with Cavium N2. Mediatrace will fail with GETVPN encryption (IPSec with header preservation) on ASR1000 with Cavium N2.

  • Deny statements can only be added locally to a GM. Permit statements are not supported in locally configured policies. In case of a conflict, a local policy overrides the policy downloaded from a KS.

  • In Cisco ASR 1000 Series Aggregation Services Routers, when there is a failure to reregister, the outbound flow from QFP is not removed since a dummy ACE is pushed instead of a real ACE. As a result, when the SA expires, the GM will continue to encrypt outbound traffic using an expired SPI, instead of dropping the traffic locally. The traffic eventually gets dropped on the receiving GM due to an invalid SPI mechanism.

  • While configuring an IPv6 access list on a Key Server, do not use the ahp option with the permit or deny commands.

  • A Cisco IOS XE platform running as a GETVPN group member can only support one GETVPN-ipv4 group member instance and one GETVPN-ipv6 group member instance.

  • SSO Restrictions

  • Cisco ASR 1000 Series Routers support stateful IPsec sessions on Embedded Services Processor (ESP) switchover. During ESP switchover, all IPsec sessions will stay up and no user intervention is needed to maintain IPsec sessions.

  • For an ESP reload (no standby ESP), the SA sequence number restarts from 0. The peer router drops packets that do not have the expected sequence number. You may need to explicitly reestablish IPSec sessions to work around this issue for systems that have a single ESP after an ESP reload. Traffic disruption might happen over the IPSec sessions in such cases for the duration of the reload.

  • The Cisco ASR 1000 Series Router currently does not support Stateful Switchover (SSO) IPsec sessions on Route Processors (RPs). The IPsec sessions will go down on initiation of the switchover, but will come back up when the new RP becomes active. No user intervention is needed. Traffic disruption might happen over the IPSec sessions for the duration of the switchover, until the sessions are back up.

  • Cisco ASR 1000 Series Router does not support stateful ISSU for IPsec sessions. Before performing an ISSU, you must explicitly terminate all existing IPSec sessions or tunnels prior to the operation and reestablish them post ISSU. Specifically, ensure that there are no half-open or half-established IPsec tunnels present before performing ISSU. To do this, we recommend a interface shutdown in the case of interfaces that may initiate a tunnel setup, such as a routing protocol initiating a tunnel setup, or interfaces that have keepalive enabled, or where there is an auto trigger for an IPsec session. Traffic disruption over the IPsec sessions during ISSU is obvious in this case.

Information About Cisco Group Encrypted Transport VPN

Cisco Group Encrypted Transport VPN Overview

Networked applications such as voice and video increase the need for instantaneous, branch-interconnected, and QoS-enabled WANs. The distributed nature of these applications results in increased demands for scale. At the same time, enterprise WAN technologies force businesses to trade off between QoS-enabled branch interconnectivity and transport security. As network security risks increase and regulatory compliance becomes essential, GET VPN, a next-generation WAN encryption technology, eliminates the need to compromise between network intelligence and data privacy.

With GET, Cisco provides tunnelless VPN, which eliminates the need for tunnels. Meshed networks, by removing the need for point-to-point tunnels, can scale higher while maintaining network-intelligence features critical to voice and video quality. GET is a standards-based security model that is based on the concept of “trusted” group members. Trusted member routers use a common security methodology that is independent of any point-to-point IPsec tunnel relationship. Also, “any-any” networks, by using trusted groups instead of point-to-point tunnels, can scale higher while maintaining network-intelligence features (such as QoS, routing, and multicast), which are critical to voice and video quality.

GET-based networks can be used in a variety of WAN environments, including IP and MPLS. MPLS VPNs that use this encryption technology are highly scalable, manageable, and cost-effective, and they meet government-mandated encryption requirements. The flexible nature of GET allows security-conscious enterprises either to manage their own network security over a service provider WAN service or to offload encryption services to their providers. GET simplifies securing large Layer 2 or MPLS networks that require partial or full-mesh connectivity.

Cisco Group Encrypted Transport VPN Architecture

GET VPN encompasses Multicast Rekeying, a way to enable encryption for “native” multicast packets, and unicast rekeying over a private WAN. Multicast Rekeying and GET VPN is based on GDOI as defined in Internet Engineering Task Force (IETF) RFC 3547. In addition, there are similarities to IPsec in the area of header preservation and SA lookup. Dynamic distribution of IPsec SAs has been added, and tunnel overlay properties of IPsec have been removed. The figure below further illustrates the GET VPN concepts and relationships.

Figure 1. GET VPN Concepts and Relationships

Key Distribution Group Domain of Interpretation

GDOI

GDOI is defined as the Internet Security Association Key Management Protocol (ISAKMP) Domain of Interpretation (DOI) for group key management. In a group management model, the GDOI protocol operates between a group member and a group controller or key server (GCKS), which establishes SAs among authorized group members. The ISAKMP defines two phases of negotiation. GDOI is protected by a Phase 1 ISAKMP security association. The Phase 2 exchange is defined in RFC 6407. The topology shown in the figure below and the corresponding explanation show how this protocol works.

Group Member

The group member registers with the key server to get the IPsec SA or SAs that are necessary to communicate with the group. The group member provides the group ID to the key server to get the respective policy and keys for this group. These keys are refreshed periodically, and before the current IPsec SAs expire, so that there is no loss of traffic.

The output of the show crypto isakmp sa detail command will show the security association (SA) Authentication as “rsig” because the RSA signature is used for key encryption key (KEK) rekey authentication in GET VPN.

Key Server

The responsibilities of the key server include maintaining the policy and creating and maintaining the keys for the group. When a group member registers, the key server downloads this policy and the keys to the group member. The key server also rekeys the group before existing keys expire.


Note


In Cisco IOS XE Release 3.5S and earlier releases, key servers are not supported on the Cisco ASR 1000 series routers. They must be configured using Cisco IOS T-based or mainline-based images. This is not a restriction on Cisco IOS XE Release 3.6S and newer releases.


The key server has two responsibilities: servicing registration requests and sending rekeys. A group member can register at any time and receive the most current policy and keys. When a group member registers with the key server, the key server verifies the group ID that the group member is attempting to join. If this ID is a valid group ID, the key server sends the SA policy to the group member. After the group member acknowledges that it can handle the downloaded policy, the key server downloads the respective keys.

There are two types of keys that the key server can download: the key encryption key (KEK) and the traffic encryption key (TEK). The TEK becomes the IPsec SA with which the group members within the same group communicate. The KEK encrypts the rekey message.

The GDOI server sends out rekey messages if an impending IPsec SA expiration occurs or if the policy has changed on the key server (using the command-line interface [CLI]). With CSCti89255, KEK rekeys before the KEK timer expires. The group member also starts a timer and expects to receive refreshed keys before timer expiration. If they are not received, the group member initiates a jittered re-registration prior to KEK expiry. KEK is deleted when the KEK lifetime expires.

The rekey messages may also be retransmitted periodically to account for possible packet loss. Packet loss can occur because rekey messages are sent without the use of any reliable transport. If the rekey mechanism is multicast, there is no efficient feedback mechanism by which receivers can indicate that they did not receive a rekey message, so retransmission seeks to bring all receivers up to date. If the rekey mechanism is unicast, the receivers will send an acknowledgment message.

Figure 2. Protocol Flows That Are Necessary for Group Members to Participate in a Group

The topology shows the protocol flows that are necessary for group members to participate in a group, which are as follows:

  1. Group members register with the key server. The key server authenticates and authorizes the group members and downloads the IPsec policy and keys that are necessary for them to encrypt and decrypt IP multicast packets.

  2. As needed, the key server “pushes” a rekey message to the group members. The rekey message contains a new IPsec policy and keys to use when old IPsec SAs expire. Rekey messages are sent in advance of the SA expiration time to ensure that valid group keys are always available.

  3. The group members are authenticated by the key server and communicate with other authenticated group members that are in the same group using the IPsec SAs that the group members have received from the key server.

How Protocol Messages Work with Cisco Software

Multicast Rekeying uses the GDOI protocol (RFC 6407) to distribute the policy and keys for the group. The GDOI protocol is between a key server and a group member. The key server creates and maintains the policy and keys, and it downloads the policy and keys to the authenticated group members.

The GDOI protocol is protected by an ISAKMP Phase 1 exchange. The GDOI key server and the GDOI group member must have the same ISAKMP policy. This Phase 1 ISAKMP policy should be strong enough to protect the GDOI protocol that follows. The GDOI protocol is a four-message exchange that follows the Phase 1 ISAKMP policy. The Phase 1 ISAKMP exchange can occur in main mode or aggressive mode.

The figure below shows the ISAKMP Phase 1 exchange.

Figure 3. ISAKMP Phase 1 Exchange and GDOI Registration

The ISAKMP Phase 1 messages and the four GDOI protocol messages are referred to as the GDOI registration, and the entire exchange that is shown is a unicast exchange between the group member and the key server.

During the registration, if the rekey mechanism is multicast, the group member receives the address of the multicast group and registers with the multicast group that is required to receive the multicast rekeys.

The GDOI protocol uses User Datagram Protocol (UDP) port 848 (with Network Address Translation-Traversal (NAT-T), it floats to 4500).

IPsec

IPsec is a well-known RFC that defines an architecture to provide various security services for traffic at the IP layer. The components and how they fit together with each other and into the IP environment are described in IETF RFC 2401.

Communication Flow Between Key Servers and Group Members to Update IPsec SAs

Key servers and group members are the two components of the GET VPN architecture. The key server holds and supplies group authentication keys and IPsec SAs to the group members.

Group members provide encryption service to the interesting traffic (traffic that is worthy of being encrypted and secured by IPsec).

Communication among the key server and group members is encrypted and secured. GDOI supports the use of two keys: the TEK and the KEK. The TEK is downloaded by the key server to all the group members. The downloaded TEK is used by all the group members to communicate securely among each other. This key is essentially the group key that is shared by all the group members. The group policies and IPsec SAs are refreshed by the key server using periodic rekey messages to the group members. The KEK is also downloaded by the key server and is used by the group members to decrypt the incoming rekey messages from the key server.

The key server generates the group policy and IPsec SAs for the GDOI group. The information generated by the key server includes multiple TEK attributes, traffic encryption policy, lifetime, source and destination, a Security Parameter Index (SPI) ID that is associated with each TEK, and the rekey policy (one KEK).

The figure below illustrates the communication flow between group members and the key server. The key server, after receiving registration messages from a group member, generates the information that contains the group policy and new IPsec SAs. The new IPsec SA is then downloaded to the group member. The key server maintains a table that contains the IP address of each group member per group. When a group member registers, the key server adds its IP address in its associated group table, thus allowing the key server to monitor an active group member. A key server can support multiple groups. A group member can be part of multiple groups.

Figure 4. Communication Flow Between Group Members and the Key Server
IPsec and ISAKMP Timers

IPsec and ISAKMP SAs are maintained by the following timers:

  • TEK lifetime-Determines the lifetime of the IPsec SA. Before the end of the TEK lifetime, the key server sends a rekey message, which includes a new TEK encryption key and transforms as well as the existing KEK encryption keys and transforms. The TEK lifetime is configured only on the key server, and the lifetime is "pushed down" to the group members using the GDOI protocol. The TEK lifetime value depends on the security policy of the network. If the set security-association lifetime command is not configured, the default value of 86,400 seconds takes effect. To configure a TEK lifetime, see the “Configuring an IPsec Lifetime Timer” section.

  • KEK lifetime-Determines the lifetime of the GET VPN rekey SAs. Before the end of the lifetime, the key server sends a rekey message, which includes a new KEK encryption key and transforms and new TEK encryption keys and transforms. The KEK lifetime is configured only on the key server, and the lifetime is pushed down to group members dynamically using the GDOI protocol. The KEK lifetime value should be greater than the TEK lifetime value (it is recommended that the KEK lifetime value be at least three times greater than the TEK lifetime value). If the rekey lifetime command is not configured, the default value of 86,400 seconds takes effect. To configure a KEK lifetime, see the “Configuring a Multicast Rekey” section.


    Note


    By default, the KEK lifetime is 86,400 seconds. From Cisco IOS XE Everest 16.6, a KEK lifetime of 86,400 seconds or longer is considered a long SA lifetime, and the rekey behavior is as per the long SA lifetime funtionality described in the chapter GET VPN Resiliency.

    If you do not want the KEK lifetime to be a long SA lifetime, configure a lifetime less than 86,400 seconds.


  • ISAKMP SA lifetime-Defines how long each ISAKMP SA should exist before it expires. The ISAKMP SA lifetime is configured on a group member and on the key server. If the group members and key servers do not have a cooperative key server, the ISAKMP SA is not used after the group member registration. In this case (no cooperative key server), the ISAKMP SA can have a short lifetime (a minimum of 60 seconds). If there is a cooperative key server, all key servers must have long lifetimes to keep the ISAKMP SA "up" for cooperative key server communications. If the lifetime command is not configured, the default value of 86,400 seconds takes effect. To configure an ISAKMP SA lifetime, see the “Configuring an ISAKMP Lifetime Timer” section.

Address Preservation

The following section describes address preservation in GET VPN.

As shown in the figure below, IPsec-protected data packets carry the original source and destination in the outer IP header rather than replacing them with tunnel endpoint addresses. This technique is known as IPsec Tunnel Mode with Address Preservation.

Figure 5. Header Preservation

Address preservation allows GET VPN to use the routing functionality present within the core network. Address preservation allows routing to deliver the packets to any customer-edge (CE) device in the network that advertises a route to the destination address. Any source and destination matching the policy for the group will be treated in a similar manner. In the situation where a link between IPsec peers is not available, address preservation also helps combat traffic “route absence” situations.

Header preservation also maintains routing continuity throughout the enterprise address space and in the WAN. As a result, end host addresses of the campus are exposed in the WAN (for MPLS, this applies to the edge of the WAN). For this reason, GET VPN is applicable only when the WAN network acts as a “private” network (for example, in an MPLS network).

Secure Data Plane Multicast

The multicast sender uses the TEK that is obtained from the key server and encrypts the multicast data packet with header preservation before it switches out the packet. The replication of the multicast packet is carried out in the core on the basis of the (S, G) state that is retained in the multicast data packet. This process is illustrated in the figure below.

Figure 6. Secure Data Plane Multicast Process

Secure Data Plane Unicast

The unicast sender uses the TEK that is obtained from the key server and encrypts the unicast data packet with header preservation before it switches out the packet to the destination. This process is illustrated in the figure below.

Figure 7. Secure Data Plane Unicast Process

Cisco Group Encrypted Transport VPN Features

Rekeying

Rekey messages are used to refresh IPsec SAs. When the IPsec SAs or the rekey SAs are about to expire, one single rekey message for a particular group is generated on the key server. No new IKE sessions are created for the rekey message distribution. The rekey messages are distributed by the key server over an existing IKE SA.

Rekeying can use multicast or unicast messages. GET VPN supports both unicast and multicast rekeying.

With CSCti89255, KEK rekeys before the KEK timer expires. The group member also starts a timer and expects to receive refreshed keys before timer expiration. If they are not received, the group member initiates a jittered re-registration prior to KEK expiry. KEK is deleted when the KEK lifetime expires. This ensure the following:
  • A safer KEK expiry checking mechanism

  • A safer KEK re-registration mechanism

  • Avoids use of KEK beyond configured lifetime

The following subsections give detailed rekeying information:

Rekey Sequence Number

Before the end of a TEK/KEK lifetime, KS sends a rekey message with the sequence number incremented by 1. However, if a secondary KS has become the primary KS in the time since the last rekey message was sent, the new primary KS increments the sequence number of the rekey message by 10.

The primary KS and secondary KS synchronize sequence numbers every 20 seconds.

The following example shows how the sequence number of rekey messages changes in a deployment consisting of a primary KS, KS1, and a secondary KS, KS2. For the sake of the example, we assume the sequence number has the initial value 1.

We also assume that the deployment has a large number of GMs and that the KS may need to retry the delivery of rekey messages. The sequence number is incremented by 1 for each retry.

  1. When it is time to send a rekey message, KS1 increments the sequence number to 2.

  2. Suppose that KS1 resends the rekey message thrice so that all the GMs receive the message. With each retry, the sequence number is incremented by 1. So, the value of the sequence number at the end of this rekey is 5.

  3. When it is time to send the next rekey message, suppose that KS1 sends the rekey message only once. So, the sequence number at the end of this second rekey is 6.

  4. Before the next rekey message is sent, suppose KS2 becomes the primary KS.

  5. When it is time to send the rekey message, KS2 increments the sequence number by 10. So, the rekey message is sent with the sequence number 16.

  6. Suppose that KS2 resends the rekey message twice so that all the GMs receive the message. With each retry, the sequence number is incremented by 1. So, the value of the sequence number at the end of this rekey is 18.

  7. Before the next rekey message is sent, suppose that KS1 becomes the primary KS.

  8. When it is time to send the rekey message, KS1 increments the sequence number by 10. So, the rekey message is sent with the sequence number 28. Suppose that KS1 sends the rekey message only once. The sequence number at the end of the rekey is 28.

  9. When it is time to send the next rekey message, KS1 increments the sequence number by 1. Suppose KS1 sends the rekey message only once. The sequence number at the end of the rekey is 29.

The following table summarizes the change in sequence numbers during each rekey operation:

Rekey # 1(3 retries) 2(0 retries) 3(2 retries 4(0 retries) 5(0 retries)
Sequence # 2,3,4,5 6 16,17,18 28 29
Rekey Sequence-Number Check

The rekey sequence-number check between the key server and the group member is conducted as follows:

  1. Antireplay in GROUPKEY-PUSH messages is restored as specified in RFC 6407.
    • The group member drops any rekey message that has a sequence number lower than or equal to that of the last received rekey message.
    • The group member accepts any rekey message that has a sequence number higher than that of the last received rekey message, no matter how large the difference.
  2. The sequence number is reset to 1 at the first rekey message after the KEK rekey, not at the KEK rekey message itself.

Multicast Rekeying

Multicast rekeys are sent out using an efficient multicast rekey. Following a successful registration, the group member registers with a particular multicast group. All the group members that are registered to the group receives this multicast rekey. Multicast rekeys are sent out periodically on the basis of the configured lifetime on the key server. Multicast rekeys are also sent out if the IPsec or rekey policy is changed on the key server. Triggered by the configuration change, the rekey sends out the new updated policy to all the group members with an efficient multicast rekey.

The key server pushes the rekey time back as follows:

1. If the TEK timeout is 300 seconds:

tek_rekey_offset = 90 (because 300 < 900)

If retransmissions are configured, the rekey timer is moved back more.

For three retransmissions every 10 seconds: 3 x 10

So the rekey will actually happen at (300 - 90 - 30) = 180 seconds

2. If the TEK timeout is 3600 seconds:

tek_rekey_offset = 3600 x 10 percent = 360 seconds

If retransmissions are configured, the rekey timer is moved back more.

For three retransmissions every 10 seconds: 3 x 10

So the rekey will actually happen at (3600 - 360 - 30) = 3210 seconds

When a KEK expires and when the transport mode is multicast, a multicast KEK rekey is sent. When a multicast KEK rekey is sent, the group member replaces the old KEK with the new KEK. Because it is a multicast rekey, and the retransmissions are sent, the old KEK continues to be used for encryption. This situation occurs because the group member does not receive the new KEK rekey. Hence the group member that received the multicast KEK rekey does not have the old KEK, and hence it drops these retransmissions.

The group member that did not initially receive the KEK key now receives the KEK retransmission and replaces the old KEK with the new KEK and will drop the retransmissions that will follow. For example, if five retransmissions are configured and a multicast KEK rekey with sequence number 1 is received at group member 1, all the other retransmissions with sequence numbers 2 3 4 5 6 will be dropped at the group member because the group member does not have the old KEK.

If group member 2 does not get the KEK rekey with sequence number 1 and it receives the retransmission with sequence number 2, it will drop the other retransmissions 3, 4, 5, 6.

Configuration Requirements for Multicast Rekeying

When a group member registers to a key server, it installs the KEK SA into its database. When the rekey transport is multicast the group member will use IGMP to join the multicast stream defined by the key server. The IGMP join is transmitted from the interface that contains the crypto map.


Note


The IGMP traffic should be excluded from encryption via either the ACL defined on the key server or a local deny ACL on the group member.


When the key server is not reachable via the same interface as the one configured with the crypto map, it will have to manually join the stream.

Unicast Rekeying and SAs

In a large unicast group, to alleviate latency issues, the key server generates rekey messages for only a small number of group members at a time. The key server is ensured that all group members receive the same rekey messages for the new SA before the expiration of the old SA. Also, in a unicast group, after receiving the rekey message from the key server, a group member sends an encrypted acknowledge (ACK) message to the key server using the keys that were received as part of the rekey message. When the key server receives this ACK message, it notes this receipt in its associated group table, which accomplishes the following:

  • The key server keeps a current list of active group members.

  • The key server sends rekey messages only to active members.

In addition, in a unicast group, the key server removes the group member from its active list and stops sending the rekey messages to that particular group member if the key server does not receive an ACK message for three consecutive rekeys. If no ACK message is received for three consecutive rekeys, the group member has to fully re-register with the key server after its current SA expires if the group member is still interested in receiving the rekey messages. The ejection of a nonresponsive group member is accomplished only when the key server is operating in the unicast rekey mode. The key server does not eject group members in the multicast rekey mode because group members cannot send ACK messages in that mode.

As in multicast rekeying, if retransmission is configured, each rekey will be retransmitted the configured number of times.

Rekey transport modes and authentication can be configured under a GDOI group.

If unicast rekey transport mode is not defined, multicast is applied by default.

If the TEK rekey is not received, the group member re-registers with the key server 60 seconds before the current IPsec SA expires. The key server has to send out the rekey before the group member re-registration occurs. If no retransmission is configured, the key server sends the rekey tek_rekey_offset before the SA expires. The tek_rekey_offset is calculated based on the configured rekey lifetime. If the TEK rekey lifetime is less than 900 seconds, the tek_rekey_offset is set to 90 seconds. If the TEK rekey lifetime is configured as more than 900 seconds, the tek_rekey_offset = (configured TEK rekey lifetime)/10. If retransmission is configured, the rekey occurs earlier than the tek_rekey_offset to let the last retransmission be sent 90 seconds before the SA expires.

The key server uses the formula in the following example to calculate when to start sending the rekey to all unicast group members. The unicast rekey process on the key server sends rekeys to unicast group members in groups of 50 within a loop. The time spent within this loop is estimated to be 5 seconds.

A key server rekeys group members in groups of 50, which equals two loops. For example, for 100 group members:

Number of rekey loops = (100 group members)/50 = 2 loops:

  • Time required to rekey one loop (estimation) = 5 seconds

  • Time to rekey 100 group members in two loops of 50: 2 x 5 seconds = 10 seconds

So the key server pushes the rekey time back as follows:

  • If the TEK timeout is 300: 300 - 10 = 290

But the start has to be earlier than the TEK expiry (as in the multicast case):

  • Because 300 < 900, tek_rekey_offset = 90

  • So 90 seconds is subtracted from the actual TEK time: 290 - tek_rekey_offset = 200 seconds

If retransmissions are configured, the rekey timer is moved back more:

  • For three retransmissions every 10 seconds: 200 - (3 x 10) = 170

  • If the TEK timeout is 3600 seconds: 3600 - 10 = 3590

But the start has to be earlier than the TEK expiry (as in the multicast case):

  • Because 3600 > 900, tek_rekey_offset = 3600 x 10 percent = 360

  • So 360 seconds is subtracted from the actual TEK time: 3590 - tek_rekey_offset = 3230 seconds

If retransmissions are configured, the rekey timer is moved back more:

  • For three retransmissions every 10 seconds: 3230 - (3 x 10) = 3200 seconds

The tek_rekey_offset formula applies to unicast and multicast rekeying.

Rekey Behavior After Policy Changes

The table below provides a list of rekey behavior based on the security policy changes.

Table 1. Rekey Behavior After Security Policy Changes

Policy Changes

Rekey Sent?

Rekey Behavior After Policy Changes

TEK: SA lifetime

No

The old SA remains active until its lifetime expires. The new lifetime will be effective after the next scheduled rekey.

TEK: IPSEC transformset

Yes

The SAs of the old transform set remain active until its lifetime expires.

TEK: IPSEC profile

Yes

The SAs of the old profile remain active until its lifetime expires.

TEK:matching ACL

Yes

Outbound packet classification will use the new access control list (ACL) immediately. The old SAs are still kept in the SA database.

TEK:enable replay counter

Yes

The old SA without counter replay remains active until its lifetime expires.

TEK:change replay counter

No

The SA with a new replay counter will be sent out in the next scheduled rekey.

TEK:disable replay counter

Yes

The old SA with counter replay enabled remains active until its lifetime expires.

TEK:enable receive-only

Yes

Receive-only mode is activated immediately after rekey.

TEK:disable receive-only

Yes

Receive-only mode is deactivated immediately after rekey.

KEK:SA lifetimebehavior

No

Change is applied with the next rekey.

KEK:change authentication key

Yes

Change is applied with the next rekey.

KEK:changing crypto algorithm

Yes

Change is applied immediately.

Enter the following commands for the policy changes to take effect immediately:

  • Use the clear crypto gdoi [group ] command on the key server.

  • Use the clear crypto gdoi [group ] command on all the group members.


Note


The key server sends rekeys for policy updates after the administrator exits configuration mode, ensuring that the rekeys are sent when appropriate.


Note


Passive-mode behavior before changing to bidirectional mode on a group member is as follows:

If an you change the SA mode on the key server to “no sa receive-only,” and exits configuration mode, the rekey is sent to the group member, and you can see the state on the group member changing from “inbound only” to “inbound optional;” the state will change to “both” after an interval set by a built-in timer; about five minutes.

The key server shows this state as “both” immediately; this is done by design because all group members might be in the process of being updated.


IPsec SA Usage on the Group Members

When a rekey is received and processed on a group member, the new IPsec SA (the SPI) is installed. There is a period of time when the old and the new IPsec SAs are used. After a certain specified interval, the old IPsec SA is deleted. This overlap ensures that all group members receive the current rekey and insert the new IPsec SAs. This behavior is independent of the transport method (multicast or unicast rekey transport) for the rekeys from the key server.

Approximately 30 seconds before the old SA expires, the group member starts to use the new SA in the outbound direction to encrypt the packet. Approximately 60 seconds before the old SA expires, if no new SA is received on the group member side via a rekey from the key server, the group member reregisters.

In the figure below, time T2 is when the old SA expires. T1 is 30 seconds before T2, which is when the group member (GM) starts to use the new SA in the outbound direction. T0 is another 30 seconds before T2. If no new SA is received at T0, the group member has to reregister. T is another 30 seconds from T0. The key server should send a rekey at T.

Figure 8. IPsec SA Usage on a Group Member
Configuration Changes Can Trigger a Rekey By a Key Server

Note


Security threats, as well as the cryptographic technologies to help protect against them, are constantly changing. For more information about the latest Cisco cryptographic recommendations, see the Next Generation Encryption (NGE) white paper.


Configuration changes on a key server can trigger a rekey by the key server. Please refer to the following sample configuration as you read through the changes that will or will not cause a rekey that are described following the example.


crypto ipsec transform-set gdoi-p esp-aes esp-sha-hmac
! 
crypto ipsec profile gdoi-p
 set security-association lifetime seconds 900
set transform-set gdoi-p 
!
crypto gdoi group diffint
 identity number 3333
 server local
  rekey algorithm aes 128
  rekey address ipv4 121
  rekey lifetime seconds 3600
  no rekey retransmit
  rekey authentication mypubkey rsa mykeys
  sa ipsec 1
   profile gdoi-p
   match address ipv4 120
   replay counter window-size 3

The following configuration changes on the key server will trigger a rekey from the key server:

  • Any change in the TEK configuration (“sa ipsec 1” in the example):
    • If the ACL (“match address ipv4 120” in the above example) is changed. Any addition, deletion, or change in the ACL causes a rekey.
    • If TEK replay is enabled or disabled on the key server, rekey is sent.
    • Removal or addition of the IPsec profile in the TEK (“profile gdoi-p” in the example).
    • Changing from multicast to unicast transport.
    • Changing from unicast to multicast transport.

The following configuration changes on the key server will not trigger a rekey from the key server:

  • Replay counter window size is changed under the TEK (“sa ipsec 1” in the example).

  • Configuring or removing rekey retransmit.

  • Removing or configuring the rekey ACL.

  • Changing the TEK lifetime (“set security-association lifetime seconds 300” in the example) or changing the KEK lifetime (“rekey lifetime seconds 500” in the example).

  • Adding, deleting, or changing the rekey algorithm (“rekey algorithm aes 128” in the example).

Commands That Trigger a Rekey

The table below is a comprehensive list of GET VPN command changes, and it shows which commands will or will not trigger a rekey. Commands are broken out based on the configuration mode in which they are entered. The table also shows when the commands take effect, regardless of whether they trigger a rekey.


Note


When the KEK lifetime is changed in the GDOI group, the changes take place only when the current KEK expires and a new one is generated. You can force the changes to take place, by issuing the rekey command, crypto gdoi ks rekey , on the key server.


Table 2. Commands That Trigger a Rekey

Description

Command

Rekey Triggered

When Triggered

When Change Takes Effect

Mode = (config)

configure terminal

Change/delete ACL used in GDOI group (example: rekey address ipv4 access-list-number [options ])

[no ] access-list access-list-number [options ]

No

Immediately

Change/delete ACL used in IPsec profile (example: match address ipv4 access-list-id | name [options ])

[no ] access-list access-list-number [options ]

Yes

End configuration mode

show running-config command output on key server indicates that the policy is incomplete, the packet is still encrypted/decrypted by the existing SA, downloaded ACLs are cleared but multidimensional-tree entries are still present (by displaying show crypto ruleset command output), and no new SAs are downloaded and old SAs are still active in encrypt/decrypt.

Add/remove ISAKMP preshared key (arbitrary key)

crypto isakmp key address peer-address

No

Immediately

Add/remove ISAKMP preshared key (group member key)

crypto isakmp key address peer-address

No

After key encryption key (KEK) SA expires (re-registration)

Add IPsec profile

crypto ipsec profile

No

Immediately

Add/remove ISAKMP policy

crypto isakmp policy priority

No

Immediately

Mode = (ipsec-profile)

crypto ipsec profile name

Change SA lifetime (in IPsec profile)

set security-association lifetime seconds

No

Next rekey

Change transform-set

set transform-set transform-set-name

Yes

End configuration mode

The SAs of the old transform set remain active until the lifetime expires.

Mode = (config-gdoi-group)

crypto gdoi group group-name

Change identity number

identity number number

No

Must immediately configure on the group member. The other group members keep using the TEKs and KEKs of the old group ID.

Mode = (gdoi-local-server)

server local

Change from unicast to multicast transport

rekey transport unicast

Yes

Immediately

After triggered rekey

Change from multicast to unicast transport

[no ] rekey transport unicast

Yes

End configuration mode

After triggered rekey

Change rekey address

rekey address ipv4 {access-list-number | access-list-name }

Yes

End configuration mode

After triggered rekey (however, changing the ACL itself will not trigger a multicast rekey)

Change rekey lifetime

rekey lifetime seconds number-of-seconds

No

Next rekey, but lifetime starts decrementing when the command is issued (the current lifetime is sent out with the rekey).

Enable/disable rekey retransmit

rekey retransmit number-of-seconds [number number-of- retransmissions ]

No

Next rekey

Enable rekey authentication

rekey authentication mypubkey rsa key-name

Yes

End configuration mode

After triggered rekey

Disable rekey authentication

[no ] rekey authentication

No

Immediately

Change rekey authentication key

rekey authentication mypubkey rsa key-name

Yes

End configuration mode

After triggered rekey

Change rekey encryption

rekey algorithm type-of-encryption-algorithm

Yes

End configuration mode

New algorithm takes effect immediately.

Mode = (gdoi-sa-ipsec)

sa ipsec sequence-number

Change profile

profile ipsec-profile-name

Yes

End configuration mode

SAs of the old profile are still in effect until the lifetime expires.

Change ACL match

match address [options]

Yes

End configuration mode

After triggered rekey

Enable counter replay

replay counter window-size seconds

Yes

End configuration mode

Old SA without counter replay is still inactive until the lifetime expires.

Change replay counter value

replay counter window-size seconds

No

Next rekey

Enable time-based antireplay

replay time window-size seconds

Yes

End configuration mode

New SA with time-based antireplay enabled is sent, but the old SA with time-based antireplay disabled is still active until the lifetime expires.

Change time-based antireplay window

replay time window-size seconds

No

New time-based antireplay window is effective only after entering the clear crypto gdoi command on both the key server and group member.

Mode = (gdoi-coop-ks-config)

redundancy

Enable redundancy

redundancy

No

Must immediately configure on other key servers

Change local priority

local priority number

No

Immediately but does not force key server election

Add/remove peer address

[no ] peer address ipv4 ip-address

No

Next cooperative (COOP) message

Disable redundancy

[no ] redundancy

No

Must immediately configure on other key servers

When a timeout is caused by a pseudotime synchronization, the key server checks if either the KEK or the TEK timer is scheduled to expire in next 60 seconds, and if so, combines that timeout with the pseudotime synchronization timeout. That is, the rekey acts as both a TEK or KEK rekey and a pseudotime synchronization timeout rekey. See the “Time-Based Antireplay” section for more information on pseudotime synchronization.

Retransmitting a Rekey

Multicast rekeys are retransmitted by default. For unicast rekeys, if the key server does not receive the ACK, it retransmits the rekey. In either case, before retransmitting a rekey, the key server checks if there is a TEK or KEK rekey scheduled in the next 120 seconds. If so, it stops the current retransmission and waits for the scheduled rekey to happen.

Group Member Access Control List

For GET VPN, the traffic that has to be protected is defined statically on the key server using the ACL. The group member gets information about what has to be protected from the key server. This structure allows the key server to choose and change the policy dynamically as needed. In Secure Multicast, the key server ACL is defined inclusively. The ACL includes only the exact traffic that should be encrypted, with an implicit deny causing all other traffic to be allowed in the clear (that is, if there is no permit, all other traffic is allowed).

GET VPN employs a different philosophy: The definition of which packets should be encrypted is delivered independently. GET VPN supports only statically defined traffic selectors. Policy can be defined by using both deny and permit ACLs on the key server. Only the deny ACL is allowed to be manually configured on a group member. The policies that are downloaded from the key server and configured on the group member are merged. Any ACL that is configured on the group member has predominance over what is downloaded from the key server.

After the group member gets the ACL from the key server, the group member creates a temporary ACL and inserts it into the database. This ACL will be deleted if the group member is removed from the GDOI group for any reason. The packets that are going out of the interface are dropped by the group member if a packet matches the ACL but no IPsec SA exists for that packet.

The key server can send a set of traffic selectors, which may not exactly match the group member ACL on the group member. If such differences occur, the differences have to be merged and resolved. Because the group member is more aware of its topology than the key server, the downloaded ACLs are appended to the group member ACL. The group member ACL (except the implicit deny) is inserted into the database first, followed by the downloaded key server ACL. The database is prioritized, and the database search stops whenever a matched entry is found.


Note


  • On a Key Server (KS) running Cisco IOS XE Fuji 16.8.1 or later, do not configure a deny statement as the last entry of a KS GETVPN ACL. Such a configuration is not supported. The KS ignores the last deny statement and does not include it in the KS GETVPN ACL sent to Group Members (GMs).

  • On a KS running a Cisco IOS XE release earlier than Cisco IOS XE Fuji 16.8.1, configuration of a deny statement as the last entry in a KS GETVPN ACL is supported only if none of the GMs is running Cisco IOS XE Fuji 16.8.1 or later. If a GM is running Cisco IOS XE Fuji 16.8.1 or later, and the last entry in a KS GETVPN ACL is a deny statement, the encryption policy on the GM is corrupted after a rekey and the GM behaves in an undefined manner. To avoid any adverse impact due to this undefined GM behavior, do not configure a deny statement as the last entry in a KS GETVPN ACL.

If the KS or GMs in a GETVPN deployment are running Cisco IOS XE Fuji 16.8.1 or later, we recommend that you configure a permit statement as the last entry in a KS GETVPN ACL.


For information about configuring a group member ACL, see the “Configuring Group Member ACLs” section.

Behavior of a Group Member When Security Policy Changes

The behavior of a group member changes when ACL changes or any other policy changes are made in the key server. The effect of different policy changes on the behavior of the group members is explained in the following three scenarios.

Scenario 1

In the following example, the ACL has been initially configured to permit host A and host B.

ip access-list extended get-acl
permit ip host A host B
permit ip host B host A

Then the ACL is changed to permit host C and host D in the key server:

ip access-list extended get-acl
permit ip host C host D
permit ip host D host C

ACL changes affect the behavior of the group member in the following ways:

  • Key server sends out a rekey to all group members immediately.

  • Group member sends traffic between host A and host B in clear text immediately after rekey.

  • Group member sends traffic between host C and host D in encrypted text immediately after rekey.


Note


GETVPN group members of Cisco ASR 1000 Series Aggregation Services Routers and Cisco ISR G2 routers behave differently after a rekey (either triggered or periodic) that follows a ACL change or any other policy change in the key server. The group members of Cisco ISR G2 routers install the new policy without a full reregistration, while the group members of Cisco ASR 1000 Series Aggregation Services Routers will reregister to get the updated policy.


Scenario 2

The behavior of a group member changes when policy updates and transform set and time-based antireplay (TBAR) changes are made to the key server.

In this scenario, it is assumed that:

  • The transform set has been changed from ESP-3DES to ESP-AES.

  • The policy change occurs at 1000 seconds before the current TEK lifetime expires.

These policy changes affect the behavior of the group member in the following ways:

  • The key server sends out a rekey of both old SAs (3DES) and new SAs (AES).

  • Group member continues to use the old SA (3DES) for 1000 seconds until it expires.

  • After the old SA expires, the group member automatically switches over to new SAs (AES).

Scenario 3

The behavior of a group member changes when other policy updates in the key server involve both ACL changes and other changes like the transform set or TBAR.

In this scenario it is assumed that:

  • The ACL has been updated as specified in Scenario 1.

  • The transform set was changed from ESP-3DES to ESP-AES.

  • The policy change occurs 1000 seconds before the current TEK lifetime expires.

ACL changes and other policy updates affect the behavior of the group member in the following ways:

  • The key server sends out a rekey that consists of both old SAs (3DES) and new SAs (AES).

  • The group member sends traffic between host A and host B in clear text immediately after rekey.

  • The group member sends encrypted traffic between host C and host D using old SAs (3DES) for 1000 seconds until its TEK lifetime expires.

  • When old SAs (3DES) expire, the group member automatically switches to new SAs to encrypt traffic between host C and host D in AES.

Enhancement in Group Members Running Cisco IOS XE Software

Effective with Cisco IOS XE Fuji 16.8.1, the GETVPN Policy-Change Enhancement for XE-based Group Members feature enhances group members, running Cisco IOS XE software, handle policy change rekeys that require flow relocation. As a result of this feature, group members need not reregister and download again SAs and traffic that matches the old and new crypto policy is not leaked via clear text.


Note


There are no changes either to scheduled rekeys or to policy change rekeys without flow relocation.


The limitations of this feature are as follows:

  • A tiny window (approximately 5 to 10 milliseconds) of slight packet drop may happen during policy change rekey

  • This enhancement does not apply to GM local policy change and it will still trigger GM reregistration

  • KS cannot trigger policy change rekey if an older SA is present with lifetime of less than 30 seconds

  • When an SA is deleted due to policy change rekey, the crypto statistics (encrypt and decrypt counters) may not updated accurately for about 1 second.

  • GETVPN Suite B policy change rekey must ensure unique initialization vector (IV) in each packet, where IV = GM_SID + GM_SSID. GM allocates 90% of GM_SSID when installing new SAs and 10% is reserved for policy change rekey usage. When policy change rekey occurs, 90% of GM_SSID space is allocated for new TEKs received in rekey and the reserved 10% of GM_SSID space is allocated for the old-TEKs received in rekey. If a KS makes a policy change rekey before the expiry of old-TEKs received in the first policy change rekey and the GM has no reserved GM_SSID space for old-TEKs, the GM will reregister to refresh the policy or SA with new GM_SID.

Time-Based Antireplay

Antireplay is an important feature in a data encryption protocol such as IPSec (RFC 2401). Antireplay prevents a third party from eavesdropping on an IPsec conversation, stealing packets, and injecting those packets into a session at a later time. The time-based antireplay mechanism helps ensure that invalid packets are discarded by detecting the replayed packets that have already arrived at an earlier time.

GET VPN uses the Synchronous Antireplay (SAR) mechanism to provide antireplay protection for multisender traffic. SAR is independent of real-world Network Time Protocol (NTP) clock or sequential-counter mechanisms (which guarantee packets are received and processed in order). A SAR clock advances regularly. The time tracked by this clock is called pseudotime. The pseudotime is maintained on the key server and is sent periodically to the group members within a rekey message as a time-stamp field called pseudoTimeStamp. GET VPN uses a Cisco proprietary protocol called Metadata to encapsulate the pseudoTimeStamp. Group members have to be resynchronized to the pseudotime of the key server periodically. The pseudotime of the key server starts ticking from when the first group member registers. Initially, the key server sends the current pseudotime value of the key server and window size to group members during the registration process. New attributes, such as time-based replay-enabled information, window size, and the pseudotime of the key server, is sent under the SA payload (TEK).

The group members use the pseudotime to prevent replay as follows: the pseudoTimeStamp contains the pseudotime value at which a sender created a packet. A receiver compares the pseudotime value of senders with its own pseudotime value to determine whether a packet is a replayed packet. The receiver uses a time-based antireplay “window” to accept packets that contain a time-stamp value within that window. The window size is configured on the key server and is sent to all group members.


Note


You should not configure time-based antireplay if you are using a Cisco VSA as a group member.


The figure below illustrates an antireplay window in which the value PTr denotes the local pseudotime of the receiver, and W is the window size.

Figure 9. Antireplay Window
Clock Synchronization

Clocks of the group members can slip and lose synchronization with the key server. To keep the clocks synchronized, a rekey message (multicast or unicast, as appropriate), including the current pseudotime value of the key server, is sent periodically, either in a rekey message or at a minimum of every 30 minutes to the group member. If a packet fails this antireplay check, the pseudotime of both the sender and receiver is printed, an error message is generated, and a count is increased.

To display antireplay statistics, use the show crypto gdoi group group-name gm replay command on both the sender and receiver devices. If the configuration is changed by the administrator to affect the replay method of the size configuration, the key server initiates a rekey message.

Interval Duration

A tick is the interval duration of the SAR clock. Packets sent in this duration have the same pseudoTimeStamp. The tick is also downloaded to group members, along with the pseudotime from the key server. For example, as shown in the figure below, packets sent between T0 and T1 would have the same pseudoTimeStamp T0. SAR provides loose antireplay protection. The replayed packets are accepted if they are replayed during the window. The default window size is 100 seconds. It is recommended that you keep the window size small to minimize packet replay.

Figure 10. SAR Clock Interval Duration
Antireplay Configurations

The Antireplay feature can be enabled under IPsec SA on a key server by using the following commands:

  • replay time window-size —Enables the replay time option, which supports the nonsequential, or time-based, mode. The window size is in seconds. Use this mode only if you have more than two group members in a group.

  • replay counter window-size —Enables sequential mode. This mode is useful if only two group members are in a group.

  • no replay counter window-size —Disables antireplay.

Control-Plane Time-Based Antireplay
Rekey Pseudotime Check

The rekey pseudotime check between key servers and group members is conducted as follows:

  • The group member calculates the allowable pseudotime difference between the key server and its own as the lesser of the configured TBAR window size, that is, the value that was configured for it in the data plane, or 30 seconds.

  • The group member accepts any rekey with a pseudotime larger than its own and updates its own pseudotime to the larger value. If the difference is larger than the calculated allowable pseudotime difference, it also generates the following syslog message:

*Jul 28 22:56:37.503: %GDOI-3-PSEUDO_TIME_LARGE: Pseudotime difference between key server (20008 sec) and GM (10057 sec) is larger than expected in group GET. Adjust to new pseudotime
  • If the group member receives a rekey with a pseudotime smaller than its own but within the allowable difference, the group member accepts the rekey and updates its pseudotime value to the rekey pseudotime value.
  • If the group member receives a rekey with a pseudotime smaller than its own but exceeding the allowable difference, the group member drops the rekey message and generates the following syslog message:

*Jul 28 23:37:59.699: %GDOI-3-PSEUDO_TIME_TOO_OLD: Rekey received in group GET is too old and fail PST check: my_pst is 22490 sec, peer_pst is 10026 sec, allowable_skew is 30 sec
ANN Message Pseudotime Handling in the Secondary Key Server

Cooperative key server announcement (ANN) messages are used to synchronize policy and group-member information between cooperative key servers.

The secondary key server handles ANN messages as follows:.

  • The secondary key server calculates the allowable ANN message pseudotime as the lesser of the configured TBAR window size, that is, the value that was configured for it in the data plane, or 30 seconds.

  • If the secondary key server receives an ANN message from the primary key server with a larger pseudotime, it does the following:

  • It updates its pseudotime to the primary key server’s value.

  • If the pseudotime difference is larger than allowable, it generates the following syslog message:


*Jul 28 23:48:56.871: %GDOI-4-GDOI_ANN_TIMESTAMP_LARGE: COOP_KS ANN received from KS 10.0.8.1 in group GET has pseudotime bigger than myself. Adjust to new pseudotime:
my_old_pst is 23147 sec, peer_pst is 30005 sec
  • If the secondary key server receives an ANN message from the primary key server with a smaller pseudotime, it behaves as follows:
    • If the difference is within the allowable range, the secondary key server accepts it and updates its pseudotime to the primary key server’s value.
    • If the difference exceeds the allowable range, it generates the following syslog message:

*Jul 28 23:42:12.603: %GDOI-4-GDOI_ANN_TIMESTAMP_TOO_OLD: COOP_KS ANN from KS 10.0.8.1 in group GET is too old and fail PST check:
my_pst is 22743 sec, peer_pst is 103 sec, allowable_skew is 10 sec

If, after three retransmit requests, the secondary key server has still not received any ANN message with a valid pseudotime, it starts blocking new group-member registrations, as follows:


*Jul 28 23:38:57.859: %GDOI-5-COOP_KS_VALID_ANN_TIMER_EXPIRED: This sec-KS has NOT received an ANN with valid pseudotime for an extended period in group GET. It will block new group members registration temporarily until a valid ANN is received
*Jul 29 00:08:47.775: %GDOI-5-COOP_KS_BLOCK_NEW_GM_REGISTER: This key server temporarily blocks group member with ip-addr 10.0.0.2 from registering in group GET as it has not received an ANN with valid pseudotime for prolonged period

The secondary key server resumes its group member registration functionality if any of the following happens:

  • It receives an ANN with a valid pseudotime from the primary key server.

  • It becomes a primary key server itself.

  • The clear crypto gdoi group command is executed on the secondary key server.

ANN Message Pseudotime Handling in the Primary Key Server

The primary key server handles ANN messages as follows:

  • It calculates the allowable ANN message pseudotime as the lesser of the configured TBAR window size, that is, the value that was configured for it in the data plane, or 30 seconds.

  • It accepts from the secondary key server ANN messages that have a smaller pseudotime but are within the allowable difference.

  • It rejects ANN messages that have a smaller pseudotime but exceed the allowable difference.

During a network merge, the following conditions apply:

  • The new primary key server always picks the larger pseudotime between the two key servers.

  • If the difference is larger than the calculated allowable pseudotime difference, the new primary key server sends out rekeys to all group members to update their pseudotime. It also generates the following syslog messages:


*Jul 28 23:42:41.311: %GDOI-5-COOP_KS_ELECTION: KS entering election mode in group GET (Previous Primary = NONE)
*Jul 28 23:42:41.311: %GDOI-4-GDOI_ANN_TIMESTAMP_LARGE: COOP_KS ANN received from KS 10.0.9.1 in group GET has PST bigger than myself. Adjust to new pseudotime:
my_old_pst is 0 sec, peer_pst is 22772 sec
*Jul 28 23:43:16.335: %GDOI-5-COOP_KS_TRANS_TO_PRI: KS 10.0.8.1 in group GET transitioned to Primary (Previous Primary = NONE)
*Jul 28 23:43:16.347: %GDOI-5-KS_SEND_UNICAST_REKEY: Sending Unicast Rekey for group GET from address 10.0.8.1 with seq # 1

Cooperative Key Server

The figure below illustrates cooperative key server key distribution. The text following the illustration explains the Cooperative Key Server feature.

Figure 11. Cooperative Key Server Key Distribution

Cooperative key servers provide redundancy to GET VPN. Multiple key servers are supported by GET VPN to ensure redundancy, high availability, and fast recovery if the primary key server fails. Cooperating GDOI key servers jointly manage the GDOI registrations for the group. Each key server is an active key server, handling GDOI registration requests from group members. Because the key servers are cooperating, each key server distributes the same state to the group members that register with it. Load balancing is achieved because each of the GDOI key servers can service a portion of the GDOI registrations.

The primary key server is responsible for creating and distributing group policy. When cooperative key server key distribution occurs, one key server declares itself as primary, creates a policy, and sends the policy to the other secondary key server. The secondary key server declares the primary key server as primary key server when it gets the policy and ends the election mode. The secondary key server now also blocks GM registration while the cooperative key server key distribution is in progress. This change allows the cooperative key server distribution to become more efficient because it saves time. For example, the syslog warning message similar to the following is displayed during distribution:


00:00:16: %GDOI-5-COOP_KS_BLOCK_NEW_GM_REGISTER_ELECTION: This KS temporarily blocks GM with ip-addr 10.0.4.1 from registering in group diffint as the KS election is underway

The primary key server periodically sends out (or broadcasts) group information updates to all other key servers to keep those servers in synchronization. If the secondary key servers somehow miss the updates, they contact the primary key server to directly request information updates. The secondary key servers mark the primary key server as unreachable (that is, “dead”) if the updates are not received for an extended period.

When a new policy is created on a primary key server, regardless of which key server a group member may be registered with, it is the responsibility of the primary key server to distribute rekey messages to GDOI group members.

In a cooperative-key-server setting, the rekey sequence number is synchronized between the primary and secondary key servers.

In a network merge, the key servers pick the larger of the rekey sequence numbers that they have between them.

If you are supporting more than 300 group members in your cooperative key server setup, you should increase the buffer size by using the buffers huge size command.

If the registration interface that is used in the GETVPN Group Configurtion on the key server is shutdown, a network spit will occur. If the interface is not the forwarding interface, as in the loopback interface which is the recommended configuration, rekeys will still be sent to the GMs from all of the KSs in the group. You cannot turn off the keyservers by shutting down the interface. To safely turn off the keyservers, use the no crypto gdoi group group name command.

The following example shows the registration interface that is referenced in the GETVPN Group Configurtion on the key server.
crypto gdoi group groupA
identity number 111
server local
  sa ipsec 10
   profile groupA
   match address ipv4 groupA-crypto-policy
   no replay
  no tag
  address ipv4 a.b.c.d
  redundancy
   local priority 250
   peer address ipv4 a.b.c.d
   peer address ipv4 a.b.c.d
Announcement Messages

Announcement messages are secured by IKE Phase 1 and are sent as IKE notify messages. Authentication and confidentiality that are provided by IKE is used to secure the messaging between the key servers. Antireplay protection is provided by the sequence numbers in the announcement messages. Announcement messages are periodically sent from primary to secondary key servers.

Announcement messages include the components, described in the following sections that help maintain the current state.

Sender Priority of a Key Server

This value describes the priority of the sender, which is configurable using the CLI. The key server with the highest priority becomes the primary key server. If the priority values are the same, the key server with the highest IP address becomes the primary key server.

Maintaining the Role of the Sender

During the synchronization period, if the key servers are at geographically dispersed locations, they may suffer a network-partitioning event. If a network-partitioning event occurs, more than one key server can become the primary key server for a period of time. When the network is operating normally again and all the key servers find each other, they need to be told the current role of the sender so the key servers can attain their proper roles.

Request for a Return Packet Flag

All messages are defined as one-way messages. When needed, a key server can request the current state from a peer to find out its role or request the current state of the group.

Group Policies

The group policies are the policies that are maintained for a group, such as group member information and IPsec SAs and keys.

Antireplay functionalities and incorporated Cooperative announcement messages are supported. The primary key server updates the pseudotime value, sending it to all secondary key servers in the group. The secondary key servers should synchronize their SAR clocks to this updated value.

ANN Message Sequence Number Check Between Cooperative Key Servers

The following describes the sequence number check between cooperative key servers:

  • Cooperative key servers drop any ANN message with a sequence number smaller than or equal to that of the last received ANN message.

  • The ANN message is accepted if the sequence number is larger than that of the last received rekey message, no matter how large the difference.

  • If a key server is reloaded, a new IKE session is created between the peers, and the reloaded key server's ANN sequence number will start with zero. In this case, the other side will accept the ANN message with any sequence number.

Change Key Server Role

In a network of cooperative key servers, the primary server is elected based on its highest priority at the time of election. The other key servers have secondary status. If the primary key server is detected as being dead or if its role changes, the clear crypto gdoi ks coop role command allows you to reset the cooperative role of the primary key server.

If the clear crypto gdoi ks coop role command is executed on a secondary key server, the election is triggered on that secondary key server although that server would most likely remain a secondary key server because there has been an elected primary key server. However, if the clear crypto gdoi ks coop role command is executed on the primary key server, the primary key server is reassigned to a secondary role, and as a result, a new election that involves all the key servers is triggered. If the previous primary server has the highest priority (of all the key servers), it again becomes the primary server. If the previous primary server does not have the highest priority, the server having the highest priority is elected as the new primary server.

Receive Only SA

For multicast traffic using the GDOI protocol, bidirectional SAs are installed. The Receive Only feature enables an incremental deployment so that only a few sites can be verified before bringing up an entire network. To test the sites, one of the group members should send encrypted traffic to all the other group members and have them decrypt the traffic and forward the traffic “in the clear.” Receive Only SA mode allows encryption in only the inbound direction for a period of time. (See the steps for the Receive Only SA process.) If you configure the sa receive-only command on the key server, Steps 2 and 3 happen automatically.

  1. Mark IPsec SAs as “receive-only” on the GDOI key server.

This action allows the group members to install SAs in the inbound direction only. Receive-only SAs can be configured under a crypto group. (See the “Configuring the Group ID Server Type and SA Type” section.)

  1. Mark GDOI TEK payloads as “receive only.”

If the sa receive-only command is configured, all TEKs under this group are going to be marked “receive only” by the key server when they are sent to the group member.

  1. Install one-way IPsec flows.

Every time a GDOI group member receives an IPsec SA from the key server that is marked as “receive only,” the group member installs this IPsec SA only in the inbound direction rather than in both incoming and outgoing directions.

  1. Test individual group members using the following local-conversion commands:

  2. crypto gdoi gm ipsec direction inbound optional

  3. crypto gdoi gm ipsec direction both

First, individually convert each of the group members to passive mode (this change tells the outbound check that there is a valid SA) and then to bidirectional mode.

  1. Globally convert from “receive only” to “receive and send.”

The following method can be used when the testing phase is over and “receive only” SAs have to be converted to bidirectional SAs.

Global Conversion

Remove the sa receive-only command under the group. Removing the sa receive-only command creates new IPsec SAs for this group and causes a rekey. On receipt, group members reinstall the SA in both directions and begin to use it in passive mode. Because the SA cannot remain in passive mode forever, the group members change those SAs to receive or send mode if there is no rekey in 5 minutes. The conversion from passive mode to bidirectional encryption mode is automatic and does not require the administrator to do anything.

Passive SA

The Passive SA feature allows you to configure a group member so that it is in passive mode permanently. By using the Passive SA feature, you will avoid having to use the crypto gdoi gm ipsec direction inbound optional privileged EXEC command, which is not persistent after a router reload and can be overridden by key server configuration from a rekey. Having the group member in passive mode benefits network testing and debugging during migration to GET VPN, and it provides complete encryption protection during the migration. The group-member passive-mode configuration has higher priority over a key server configuration. The crypto gdoi gm ipsec direction inbound optional privileged EXEC command can override the configuration until the next rekey, which will bring back the group member and key server configuration.

To configure the Passive SA feature, see the “Configuring Passive SA” section.

Enhanced Solutions Manageability

Several show and debug commands are supported to help verify functionality. See the “Activating Fail-Close Mode” section for details.

Support with VRF-Lite Interfaces

The VRF-Lite application supports segmentation of traffic in the control and forwarding planes by keeping the routing tables separate for each user group (or VPN) and forwarding the traffic on the associated or dedicated interfaces of each user group.

There are some deployment scenarios in which remote sites that are connecting to an MPLS VPN network might be extending segmentation from a campus to the WAN. In such an extended segmentation case, a CE-PE interface on a CE (group member or key server) device “bounds” to its associated virtual routing and forwarding (VRF) instance. This VRF interface connects to an MPLS PE device where it is directly mapped to its associated Border Gateway Protocol (BGP) VRF process, in which case the crypto map is applied to a VRF interface. No other configuration changes are necessary.

Authentication Policy for GM Registration

GMs can authenticate to the key server at registration time using preshared keys or Public Key Infrastructure (PKI). Preshared keys are easy to deploy but must be managed proactively. We recommend that you deploy a peer-based preshared key instead of defining a default key (the key defined with an address of 0.0.0.0) for all the devices in the network. Preshared keys should be updated regularly (every few months).


Note


A preshared key can be updated on a key server-group member (KS-GM) peer basis without affecting the crypto data plane or control plane because rekeys are secured using the KEK. It is important to ensure that a GM can re-register to each ordered set of key servers using the newly assigned preshared key.


PKI uses its infrastructure to overcome the key management difficulties encountered when preshared keys are used. The PKI infrastructure acts as a certificate authority (CA) where router certificates are issued and maintained. However, using PKI during IKE authentication is computationally intensive. In PKI deployments, key server capacity, design, and placement become important.

For added security, GET VPN also supports GM authorization using either preshared keys or PKI. For more information, see the “GET VPN Authorization” section.

GET VPN GM Authorization

GET VPN GM authorization can be done using preshared keys or PKI. It is a best practice to turn on GET VPN authorization. When a key server serves multiple GDOI groups, key server authorization is required to prevent a GM in one group from requesting keys and policies from another group. The ISAKMP authorization confirms that the GM is allowed to request GDOI attributes from the key server while the GDOI authorization confirms that the GM is allowed to request GDOI attributes from a specific group configured in the key server.

GDOI authorization is based on the ISAKMP identity sent by a GM. If a GM sends an IP address as an identity, then only an authorization address is used for authorization. If a GM sends a distinguished name (DN) or hostname, then an authorization identity is used. Using an IP address as an identity will bypass authorization matching a DN or hostname and vice versa. To ensure that only GMs with a specific DN can connect (and no GMs using another identity can connect), you must specify deny any in the authorization address.

GM Authorization Using Preshared Keys

GET VPN supports GM authorization using the IP address when preshared keys are used. An ACL matching the WAN addresses (or subnets) of the GM can be defined and applied to the GET VPN group configuration. Any GM whose IP addresses match the ACL authorizes successfully and can register to the key server. If a GM IP address does not match the ACL, the key server rejects the GM registration request.

In cases of unsuccessful authorization, the following syslog message is generated:


%GDOI-1-UNAUTHORIZED_IPADDR: Group getvpn received registration from
unauthorized ip address: 10.1.1.9
GM Authorization Using PKI

GET VPN supports GM authorization using the commonly used DN or fully qualified domain name (FQDN) when PKI is used. The authorization identity command is used to activate GM authorization. A crypto identity matching certain fields in the GM certificate (typically—organizational unit [OU]) can be defined and applied to the GET VPN group configuration. Use the crypto identity command to define a crypto identity.

Any GM whose certificate credentials match the ISAKMP identity is authorized and can register to the key server. For example, if all GM certificates are issued with OU=GETVPN, a key server can be configured to check (authorize) that all GMs present a certificate having OU=GETVPN. If the OU in the certificate presented by a GM is set to something else, the GM will not be authorized to register to the key server.

If authorization is unsuccessful, the following syslog message is generated:


%GDOI-1-UNAUTHORIZED_IDENTITY: Group getvpn received registration from
unauthorized identity: Dist.name: hostname=GroupMember-1, ou=TEST

Rekey Functionality in Protocol Independent Multicast-Sparse Mode

Multicast rekeying can be used with all modes of multicast. The rekey retransmit command should be used whenever the Protocol Independent Multicast-sparse mode (PIM-SM) is configured because the PIM-SM shortest path tree (SPT) can be torn down if it does not receive continuing traffic. When traffic resumes, PIM-SM must reestablish the SPT. Retransmitting rekey packets increases the chance that group members receive the rekeys when PIM-SM is setting up the SPT.

Fail-Close Mode

Until a group member registers with a key server, traffic passing through the group member is not encrypted. This state is called “fail open.” To prevent unencrypted traffic from passing through a group member before that member is registered, you can configure the Fail-Close feature. If the feature is configured, an implicit “permit ip any any” policy is installed, and all unencrypted traffic passing through the group member is dropped (this state is called fail-close mode).

The fail-close function can also be achieved by configuring an interface ACL. However, the Fail-Close feature is more manageable and is easier to implement than ACL lists.

If you configure the Fail-Close feature, you can still allow specific unencrypted traffic to pass through the group member by configuring the match address command (match address {access-list-number | access-list-name }). This explicit “deny” ACL is added before the implicit “permit ip any any” to allow denied (unencrypted) traffic to pass through the group member.

After the group member has successfully completed its registration, the fail-close policy, both explicit and implicit, is removed, and the group member behaves as it did before the Fail-Close feature was configured.

Guidelines for Using the Fail-Close Feature

When you are configuring a crypto map to work in fail-close mode, you must be careful. If the fail-close ACL is defined improperly, you may lock yourself out of the router. For example, if you use Secure Shell (SSH) to log in to the router through the interface with the crypto map applied, you have to include the deny tcp any eq port host address command line under the fail-close ACL. You may also need to include the routing protocol that the router is using (such as deny ospf any any ) to find the path to the key server. It is suggested that you configure fail-close and its ACL first, and then verify the fail-close ACL using the show crypto map gdoi fail-close map-name command. After you have checked your fail-close ACL and are confident that it is correct, you can make the crypto map work in the fail-close mode by configuring the activate command. Fail-close is not activated until you have configured the activate command.

The fail-close ACL is configured from the group-member perspective. The fail-close ACL is configured on group member as follows:

access-list 125 deny ip host host1-ip-addr host2-ip-addr

In fail-close mode, all IP traffic from host1 to host2 will be sent out by group member 1 in clear text. In addition, the inbound mirrored traffic (that is, IP traffic from host2 to host1) is also accepted by GM1 in clear text.


Note


All IP traffic matching deny entries are sent out by the group member in clear text.


The inbound traffic is matched to the mirrored access list.

The fail-close access list follows the same rules as the group member access list. For more information, see the "Group Member Access Control List" section.

You need not configure the deny udp any eq 848 any eq 848 command to make the GDOI registration go through. The code itself checks whether it is a GDOI packet for a particular group member from the key server to which it is configured. If it is a GDOI packet for this group member, the packet is processed. But for a scenario in which the key server is behind group member 1, if group member 1 cannot register successfully with the key server, other group members also will not be able to register unless an explicit deny udp any eq 848 any eq 848 command line is configured for group member 1. However, if the Fail-Close feature is properly configured, even if a group member fails to register with a key server, you will be able to ensure that no unwanted traffic can go out “in the clear.” But you can allow specified traffic to go out in the clear, in which case registration packets from other group members will be able to reach the key server through group member 1 even if it fails to get registered.

For information on configuring fail-close mode, see the "Activating Fail-Close Mode" section.

To verify whether fail-close mode is activated, use the show crypto map gdoi fail-close command.

Fail-close Revert

In the fail close mode, before registering in the fail close mode, group member applies its local fail close policy and manages the traffic accordingly. After registration, group member applies the policy downloaded from key server and handles traffic accordingly.

When there is no rekey or the group member is not able to re-register to the key server, the group member uses the same downloaded policy from the key server. It leads to packet drop as there is no key for encryption or decryption. Fail-close Revert enables group members to return to the fail close mode and to remove the downloaded key server policy. This happens only if fail-close revert is enabled on the group member.

This fail-close revert triggers when all active SAs expire and all the key servers are not reachable for re-registration. Clearing the IPsec SAs manually by using the command “clear crypto sa” does not provide the intended behavior of the feature. However “clear crypto gdoi” will revert to fail close mode in case of a key server unreachability.

To know about feature configuration steps, see the section, “Configuring Fail Close Revert”.

Create MIB Object to Track a Successful GDOI Registration

The routing plane and crypto plane for GET VPN must be synchronized to avoid null routes. A GET VPN null route occurs during the following situations:

  • GMs fail to register to a KS that has no active TEKs to encrypt or decrypt traffic.
  • GMs TEK SAs have expired but do not receive new keys from KS through rekey or reregistration.
  • GMs receive rekeys from KS, but errors occur when installing SAs to a crypto engine.

The Create MIB Object to Track a Successful GDOI Registration feature introduces a new MIB object in the GDOI MIB to indicate the number of active TEKs in a group.

GET VPN Routing Awareness for BGP

The routing plane and crypto plane for GET VPN must synchronize to avoid null routes. When a group member (GM) successfully registers to a key server (KS), no security policies or keys are installed on the GM. However, the GM may still advertise the routes of its protected network to other GMs.

The following diagram explains the creation of a null route.

Figure 12. Null Route Creation


  1. Group Member1, Group Member2, Group Member3 boot up and establish a routing adjacency with the WAN.

  2. Group Member1 and Group Member2 advertises the prefix for Network A into the WAN. The preferred path for traffic from Network B to Network A is through Group Member1.

  3. Group Member3 advertises Network B into the WAN. The preferred path for traffic Network A to Network B is through Group Member1

  4. KS defines the security to protect all traffic between Network A and Network B

  5. Group Member1 and Group Member3 (as well as Group Member2) successfully obtain security keys from KS and protect all traffic between Network A <-> Network B.

  6. Group Member1 fails to receive updated keys or policy and fails to reregister to a KS while Group Member2 and Group Member3 successfully obtain keys.

  7. Routing protocols continue to prefer the path through Group Member1 for all Network A between Network B traffic.

  8. Group Member1 drops all traffic flowing between Network A and Network B because the policy/keys are invalid.

When the host in Network B sends traffic to a host in Network A, the traffic will be encrypted by Group Member3 and sent to Network A via Group Member1 (the preferred path). However, Group Member1 will drop the packet because it has no policy or current keys to decrypt traffic. As a result, the traffic is dropped and a null route is created. Likewise, when a host in Network A sends traffic to a host in Network B, the traffic will be directed to Group Member1 (the preferred path) and dropped due to lack of policy or current keys in Group Member1. The appropriate behavior is for the traffic to be diverted and rerouted via Group Member2 while Group Member1 has no policy or keys.

The GET VPN Routing Awareness for BGP feature prevents routing absence by tracking the GETVPN GM crypto state and by applying the tracking information to perform bidirectional conditional route filtering on the GM.

Bidirectional Conditional Route Filtering

The bidirectional conditional route filtering supports different routing protocols, such as BGP, OSPF, EIGRP, RIPv2, etc. The EOT tracks the GET VPN GM crypto status and conditionally enables or disables specific route-map entries based on the EOT value. The following is a sample configuration to monitor the GET VPN GM crypto state.

route-map bgp-policy-out permit 10
 match ip address register-int-Only
route-map bgp-policy-out permit 20
 match track 99
 match ip address orig_route_map_acl_out
route-map bgp-policy-out deny 30
 
route-map bgp-policy-in permit 10
 match ip address noc
route-map bgp-policy-in permit 20
 match track 99
 match ip address orig_route_map_acl_in
route-map bgp-policy-in deny 30
 
ip access-list standard noc
 permit 1.1.1.0                                   <---- NOC subnet with Keyserver (KS)
ip access-list standard register-int-Only
 permit 2.2.2.2                                   <---- registration interface ip of the GM itself
ip access-list standard orig_route_map_acl_in       <---- original inbound route-map ACL
 permit a.b.c.d
 permit .......
ip access-list standard orig_route_map_acl_out      <---- original outbound route-map ACL
 permit e.f.g.h
 permit .......
 
router bgp 64600
 no synchronization
 bgp router-id xxxxxxxx
 bgp log-neighbor-changes
 network xxxxxxxxxx mask 255.255.255.255
 network xxxxxxxxxx mask 255.255.255.252
 neighbor xxxxxxxxxx remote-as 65000
 neighbor xxxxxxxxxx description PE
 neighbor xxxxxxxxxx route-map bgp-policy-in in
 neighbor xxxxxxxxxx route-map bgp-policy-out out

In the above example, the match track 99 command is specified to monitor the GET VPN GM crypto state. If GM works properly, the match track 99 command returns a value true and the GM advertises or receives the following routes:

  • Outbound—The routes to reach the GM registration interface and the routes permitted by inbound route map access control list (ACL) “orig_route_map_acl_out.”
  • Inbound—The routes to reach the NOC and the routes permitted by outbound route map ACL “orig_route_map_acl_in” received from peers.

On the other hand, if GM does not work properly, the match track 99 command returns a value false and the GM advertises or receives the following routes only:

  • Outbound—The routes to reach the GM registration interface.
  • Inbound—The routes to reach the NOC subnet.

Cisco Group Encrypted Transport VPN System Logging Messages

The table below lists GET VPN system logging (also called syslog) messages and explanations.

Table 3. GET VPN System Logging Messages

Message

Explanation

COOP_CONFIG_MISMATCH

The configuration between the primary KS and secondary KS are mismatched.

COOP_KS_ADD

A KS has been added to the list of cooperative KSs in a group.

COOP_KS_ELECTION

The local KS has entered the election process in a group.

COOP_KS_REACH

The reachability between the configured cooperative KSs is restored.

COOP_KS_REMOVE

A KS has been removed from the list of cooperative KSs in a group.

COOP_KS_TRANS_TO_PRI

The local KS transitioned to a primary role from being a secondary server in a group.

COOP_KS_UNAUTH

An unauthorized remote server tried to contact the local KS in a group. Could be considered a hostile event.

COOP_KS_UNREACH

The reachability between the configured cooperative KSs is lost. Could be considered a hostile event.

COOP_KS_VER_MISMATCH

KSs are running different versions of the Cisco IOS code.

COOP_PACKET_DROPPED

A hard limit set on the driver buffer size prevents the sending of packets this size or larger.

GDOI-3-GDOI_REKEY_SEQ_FAILURE

The rekey message is rejected because the sequence number antireplay check failed.

GDOI-3-GM_NO_CRYPTO_ENGINE

No crypto engine is found due to a lack of resources or an unsupported feature requested.

GDOI-3-PSEUDO_TIME_LARGE

The rekey has a larger pseudotime that exceeds the calculated allowable pseudotime difference.

GDOI-3-PSEUDO_TIME_TOO_OLD

The rekey has a smaller pseudotime that exceeds the calculated allowable pseudotime difference.

GDOI-4-GDOI_ANN_TIMESTAMP_ LARGE

The secondary KS receives from the primary KS an ANN that has a larger pseudotime that exceeds the calculated allowable pseudotime difference.

GDOI-4-GDOI_ANN_TIMESTAMP_ TOO_OLD

The secondary KS receives from the primary KS an ANN that has a smaller pseudotime that exceeds the calculated allowable pseudotime difference.

GDOI-5-COOP_KS_BLOCK_NEW_GM_REGISTER

The secondary KS temporarily blocks a GM from registering in a group because it has not received a valid pseudotime from the primary KS.

GDOI-5-COOP_KS_VALID_ANN_ TIMER_EXPIRED

The secondary KS keeps receiving ANNs with invalid pseudotimes after three retransmits. The secondary KS temporarily blocks new group-member registration until a valid ANN is received.

GDOI_ACL_NUM

The ACL has too many entries. GDOI will honor only the first 100 ACL entries specified.

GDOI_REKEY_FAILURE

During GDOI rekey the payload parsing failed on this GM from the KS.

GM_ACL_MERGE

The ACL differences between a GM and KS are resolved and a merge took place.

GM_ACL_PERMIT

The GM can support only an ACL for “deny.” Any traffic matching the “permit” entry will be dropped.

GM_CLEAR_REGISTER

The clear crypto gdoi command has been executed by the local GM.

GM_CM_ATTACH

A crypto map has been attached for the local GM.

GM_CM_DETACH

A crypto map has been detached for the local GM.

GM_CONV_SA_DUPLEX

IPsec SAs have been converted to bidirectional mode in a group on a GM.

GM_CONV_SA_DUPLEX_LOCAL

IPsec SAs have been converted to bidirectional mode in a group on a GM by a CLI command.

GM_DELETE

A GM has been deleted in a group from a KS.

GM_ENABLE_GDOI_CM

A GM has enabled ACL on a GDOI crypto map in a group with a KS.

GM_HASH_FAIL

During GDOI registration protocol, a message sent by the KS has bad or no hash.

GM_INCOMPLETE_CFG

Registration cannot be completed because the GDOI group configuration may be missing the group ID, server ID, or both.

GM_NO_IPSEC_FLOWS

The hardware limitation for IPsec flow limit reached. Cannot create any more IPsec SAs.

GM_RE_REGISTER

The IPsec SA created for one group may have been expired or cleared. Need to re-register to the KS.

GM_RECV_DELETE

A message sent by the KS to delete the GM has been received.

GM_RECV_REKEY

Rekey received.

GM_REGS_COMPL

Registration complete.

GM_REJECTING_SA_PAYLOAD

During GDOI registration protocol, a proposal sent by the KS was refused by the local GM.

GM_REKEY_NOT_RECD

A GM has not received a rekey message from a KS in a group. Currently unimplemented.

GM_REKEY_TRANS_2_MULTI

A GM has transitioned from using a unicast rekey mechanism to using a multicast mechanism.

GM_REKEY_TRANS_2_UNI

A GM has transitioned from using a multicast rekey mechanism to using a unicast mechanism.

GM_SA_INGRESS

A received-only ACL has been received by a GM from a KS in a group.

GM_UNREGISTER

A GM has left the group.

KS_BAD_ID

A configuration mismatch exists between a local KS and a GM during GDOI registration protocol.

KS_BLACKHOLE_ACK

A KS has reached a condition of null route messages from a GM. Could be considered a hostile event.

KS_CLEAR_REGISTER

The clear crypto gdoi command has been executed by the local KS.

KS_CONV_SAS_DUPLEX

IPsec SAs have been converted to bidirectional mode in a group.

KS_CONV_SAS_INGRESS

IPsec SAs have been converted to receive-only mode in a group.

KS_FIRST_GM, GDOI, LOG_INFO

A local KS has received the first GM joining the group.

KS_GM_REJECTS_SA_PAYLOAD

During GDOI registration protocol, a proposal sent by the KS was refused by the GM.

KS_GM_REVOKED

During rekey protocol, an unauthorized member tried to join a group. Could be considered a hostile event.

KS_GROUP_ADD

A configuration command has been executed to add a KS in a group.

KS_GROUP_DELETE

A configuration command has been executed to remove a KS from a group.

KS_HASH_FAIL

During GDOI registration protocol, a message sent by the GM has a bad or no hash.

KS_LAST_GM

The last GM has left the group on the local KS.

KS_NACK_GM_EJECT

The KS has reached a condition of not receiving an ACK message from a GM and has been ejected.

KS_NO_RSA_KEYS

RSA keys were not created or they are missing.

KS_REGS_COMPL

The KS has successfully completed a registration in a group.

KS_REKEY_TRANS_2_MULTI

The group has transitioned from using a unicast rekey mechanism to a multicast mechanism.

KS_REKEY_TRANS_2_UNI

The group has transitioned from using a multicast rekey mechanism to using a unicast mechanism.

KS_SEND_MCAST_REKEY

Sending multicast rekey.

KS_SEND_UNICAST_REKEY

Sending unicast rekey.

KS_UNAUTHORIZED

During GDOI registration protocol, an unauthorized member tried to join a group. Could be considered a hostile event.

KS_UNSOL_ACK

The KS has received an unsolicited ACK message from a past GM or is under a DOS attack. Could be considered a hostile event.
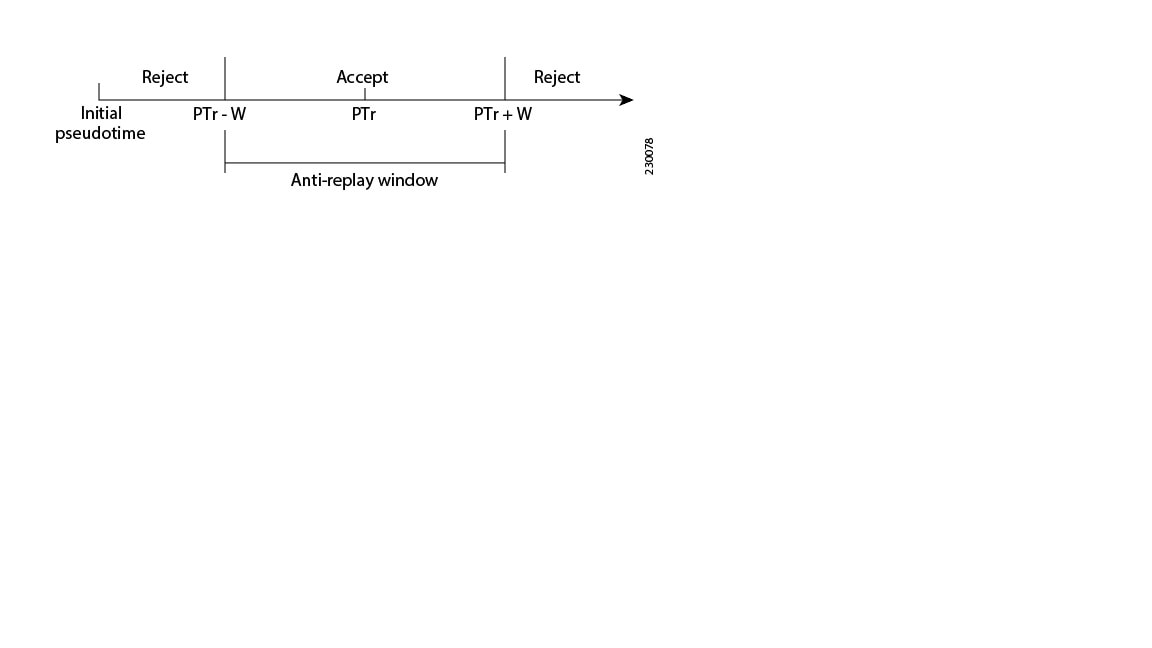
PSEUDO_TIME_LARGE

A GM has received a pseudotime with a value that is largely different from its own pseudotime.

REPLAY_FAILED

A GM or KS has failed an antireplay check.

UNAUTHORIZED_IDENTITY

The registration request was dropped because the requesting device was not authorized to join the group.

UNAUTHORIZED_IPADDR

The registration request was dropped because the requesting device was not authorized to join the group.

UNEXPECTED_SIGKEY

An unexpected signature key was found that frees the signature key.

UNREGISTERED_INTERFACE

Receiving registration from unregistered interface. Stop processing it.

UNSUPPORTED_TEK_PROTO

Unexpected TEK protocol.

How to Configure Cisco Group Encrypted Transport VPN

Configuring a Key Server

Prerequisites

Before creating the GDOI group, you must first configure IKE and the IPsec transform set, and you must create an IPsec profile. For information about how to configure IKE and the IPsec transform set and to create an IPsec profile, see the “Related Documents” subsection of the “Additional References” section.

Configuring RSA Keys to Sign Rekey Messages


Note


Security threats, as well as the cryptographic technologies to help protect against them, are constantly changing. For more information about the latest Cisco cryptographic recommendations, see the Next Generation Encryption (NGE) white paper.


To configure RSA keys that will be used to sign rekey messages, perform the following steps. Omit this subtask if rekey is not in use.

SUMMARY STEPS

  1. enable
  2. configure terminal
  3. crypto key generate rsa general-keys label name-of-key

DETAILED STEPS

  Command or Action Purpose

Step 1

enable

Example:

Router> enable

Enables privileged EXEC mode.

  • Enter your password if prompted.

Step 2

configure terminal

Example:

Router# configure terminal

Enters global configuration mode.

Step 3

crypto key generate rsa general-keys label name-of-key

Example:

Router(config)# crypto key generate rsa general-keys label mykeys

Generates RSA keys that will be used to sign rekey messages. You are prompted to confirm the length (in bits) of the keys to be generated. Length of less than 2048 is not recommended.

What to Do Next

Configure the group ID, server type, and SA type. (See the “Configuring the Group ID Server Type and SA Type” section.)

Configuring the Group ID Server Type and SA Type

For a large number of sites, it is better to take precautions and add functionality incrementally, especially when migrating from any other encryption solutions like Dual Multipoint VPN (DMVPN). For example, instead of setting up all the CPE devices to encrypt the traffic bidirectionally, it is possible to configure one-way encryption so that only one or fewer members of a group are allowed to send encrypted traffic. Others are allowed to receive only encrypted traffic. After the one-way encryption is validated for one or a few members, bidirectional encryption can be turned on for all the members. This “inbound only” traffic can be controlled using the sa receive only command under a crypto group.

To configure the group ID, server type, and SA type, perform the following steps.

SUMMARY STEPS

  1. enable
  2. configure terminal
  3. crypto gdoi group group-name
  4. Enter one of the following commands:
    • identity number number
    • identity address ipv4 address
  5. server local
  6. sa receive-only

DETAILED STEPS

  Command or Action Purpose

Step 1

enable

Example:

Router> enable

Enables privileged EXEC mode.

  • Enter your password if prompted.

Step 2

configure terminal

Example:

Router# configure terminal

Enters global configuration mode.

Step 3

crypto gdoi group group-name

Example:

Router(config)# crypto gdoi group gdoigroupname 

Identifies a GDOI group and enters GDOI group configuration mode.

Step 4

Enter one of the following commands:

  • identity number number
  • identity address ipv4 address
Example:

Router(config-gdoi-group)# identity number 3333
Example:

Router(config-gdoi-group)# identity address ipv4 209.165.200.225

Identifies a GDOI group number or address.

Step 5

server local

Example:

Router(config-gdoi-group)# server local

Designates a device as a GDOI key server and enters GDOI local server configuration mode.

Step 6

sa receive-only

Example:

Router(config-local-server)# sa receive-only

Specifies that an IPsec SA is to be installed by a group member as “inbound only.”

What to Do Next

Remove the receive-only configuration on the key server so that the group members are now operating in bidirectional receive and send mode.

Configuring the Rekey

This section includes the following optional tasks:

Rekey is used in the control plane by the key server to periodically refresh the policy and IPsec SAs of the group. On the group-member side, instead of fully re-registering when timers expire for any other reasons, refreshing the registration with a rekey is more efficient. The initial registration is always a unicast registration.

The key server can be configured to send rekeys in unicast or multicast mode. The rekey transport mode is determined by whether the key server can use IP multicast to distribute the rekeys. If multicast capability is not present within the network of the customer, the key server will have to be configured to send rekeys using unicast messages.

Additional options for rekey use the rekey authentication , rekey retransmit , and rekey address ipv4 commands. If unicast transport mode is configured, the source address command will have to be included to specify the source address of this unicast rekey message.

Multicast is the default transport type for rekey messages. The following bulleted items explain when to use rekey transport type multicast or unicast:

  • If all members in a group are multicast capable, do not configure the rekey transport unicast command. The no rekey transport unicast command is not needed if the rekey transport type “unicast” was not configured previously under this group because multicast rekeys are on by default.

  • If all members in a group are unicast, use the rekey transport unicast command.

  • If you have mixed members in a group (that is, the majority are multicast, but a few are unicast), do not configure the rekey transport unicast command. The rekeys will be distributed using multicast to the majority of group members. The remainder of the group members that do not receive the multicast messages (unicast group members) will have to re-register to the key server when their policies expire. Mixed mode (that is, unicast and multicast rekey mode) is not supported.

If the no rekey transport unicast command is used, members in the GDOI group that are unable to receive the multicast rekey messages need to re-register with the key server to get the latest group policies. The re-registration forces the default transport type to multicast. If no transport type was configured previously, the multicast transport type will apply by default.

Prerequisites

Before configuring the rekey authentication command, you must have configured the router to have an RSA key generated using the crypto key generate rsa command and general-keys and label keywords (for example, “crypto key generate rsa general-key label my keys”).

Configuring a Unicast Rekey

In the configuration task table, the address “ipv4 10.0.5.2” specifies the interface on the key server by which the unicast or multicast rekey messages are sent. This address is required for unicast rekeys, but it is optional for multicast rekeys. For multicast rekeys, the source address of the key server can be retrieved from the rekey ACL.

To configure a unicast rekey, perform the following steps.

SUMMARY STEPS

  1. enable
  2. configure terminal
  3. crypto gdoi group group-name
  4. Enter one of the following commands:
    • identity number number
    • identity address ipv4 address
  5. server local
  6. rekey transport unicast
  7. rekey lifetime seconds number-of-seconds
  8. rekey retransmit number-of-seconds number number-of-retransmissions
  9. rekey authentication mypubkey rsa key-name
  10. address ipv4 ipv4-address

DETAILED STEPS

  Command or Action Purpose

Step 1

enable

Example:

Router> enable

Enables privileged EXEC mode.

  • Enter your password if prompted.

Step 2

configure terminal

Example:

Router# configure terminal

Enters global configuration mode.

Step 3

crypto gdoi group group-name

Example:

Router(config)# crypto gdoi group gdoigroupname 

Identifies a GDOI group and enters GDOI group configuration mode.

Step 4

Enter one of the following commands:

  • identity number number
  • identity address ipv4 address
Example:

Router(config-gdoi-group)# identity number 3333
Example:

Router(config-gdoi-group)# identity address ipv4 209.165.200.225

Identifies a GDOI group number or address.

Step 5

server local

Example:

Router(config-gdoi-group)# server local

Designates a device as a GDOI key server and enters GDOI local server configuration mode.

Step 6

rekey transport unicast

Example:

Router(config-local-server)# rekey transport unicast

Configures unicast delivery of rekey messages to group members.

Step 7

rekey lifetime seconds number-of-seconds

Example:

Router(gdoi-local-server)# rekey lifetime seconds 300

(Optional) Limits the number of seconds that any one encryption key should be used.

  • If this command is not configured, the default value of 86,400 seconds takes effect.

Step 8

rekey retransmit number-of-seconds number number-of-retransmissions

Example:

Router(gdoi-local-server)# rekey retransmit 10 number 3

(Optional) Specifies the number of times the rekey message is retransmitted.

  • If this command is not configured, there will be no retransmits.

Step 9

rekey authentication mypubkey rsa key-name

Example:

Router(gdoi-local-server)# rekey authentication mypubkey rsa mykeys

(Optional) Specifies the keys to be used for a rekey to GDOI group members.

  • This command is optional if rekeys are not required. If rekeys are required, this command is required.

Step 10

address ipv4 ipv4-address

Example:

Router(gdoi-local-server)# address ipv4 209.165.200.225

(Optional) Specifies the source information of the unicast rekey message.

  • If rekeys are not required, this command is optional. If rekeys are required, this command is required.

Configuring a Multicast Rekey

To configure a multicast rekey, perform the following steps.

SUMMARY STEPS

  1. enable
  2. configure terminal
  3. crypto gdoi group group-name
  4. Enter one of the following commands:
    • identity number number
    • identity address ipv4 address
  5. server local
  6. rekey address ipv4 {access-list-name | access-list-number }
  7. rekey lifetime seconds number-of-seconds
  8. rekey retransmit number-of-seconds number number-of-retransmissions
  9. rekey authentication {mypubkey | pubkey } rsa key-name
  10. exit
  11. exit
  12. access-list access-list-number {deny | permit } udp host source [operator [port ]] host source [operator [port ]]
  13. interface type slot/ port
  14. ip igmp join-group group-address [source source-address]

DETAILED STEPS

  Command or Action Purpose

Step 1

enable

Example:

Router> enable

Enables privileged EXEC mode.

  • Enter your password if prompted.

Step 2

configure terminal

Example:

Router# configure terminal

Enters global configuration mode.

Step 3

crypto gdoi group group-name

Example:

Router(config)# crypto gdoi group gdoigroupname 

Identifies a GDOI group and enters GDOI group configuration mode.

Step 4

Enter one of the following commands:

  • identity number number
  • identity address ipv4 address
Example:

Router(config-gdoi-group)# identity number 3333
Example:

Router(config-gdoi-group)# identity address ipv4 209.165.200.225

Identifies a GDOI group number or address.

Step 5

server local

Example:

Router(config-gdoi-group)# server local

Designates a device as a GDOI key server and enters GDOI local server configuration mode.

Step 6

rekey address ipv4 {access-list-name | access-list-number }

Example:

Router(gdoi-local-server)# rekey address ipv4 121

Defines to which multicast subaddress range group members will register.

Step 7

rekey lifetime seconds number-of-seconds

Example:

Router(gdoi-local-server)# rekey lifetime seconds 300

(Optional) Limits the number of seconds that any one encryption key should be used.

  • If this command is not configured, the default value of 86,400 seconds takes effect.

Step 8

rekey retransmit number-of-seconds number number-of-retransmissions

Example:

Router(gdoi-local-server)# rekey retransmit 10 number 3

(Optional) Specifies the number of times the rekey message is retransmitted.

  • If this command is not configured, there will be no retransmits.

Step 9

rekey authentication {mypubkey | pubkey } rsa key-name

Example:

Router(gdoi-local-server)# rekey authentication mypubkey rsa mykeys

(Optional) Specifies the keys to be used for a rekey to GDOI group members.

  • This command is optional if rekeys are not required. If rekeys are required, this command is required.

Step 10

exit

Example:

Router(gdoi-local-server)# exit

Exits GDOI server local configuration mode.

Step 11

exit

Example:

Router(config-gdoi-group)# exit

Exits GDOI group configuration mode.

Step 12

access-list access-list-number {deny | permit } udp host source [operator [port ]] host source [operator [port ]]

Example:

Router(config)# access-list 121 permit udp host 10.0.5.2 eq 848 host 239.0.1.2 eq 848

Defines an extended IP access list.

Step 13

interface type slot/ port

Example:

Router(config)# interface gigabitethernet 0/0

Configures an interface type and enters interface configuration mode.

Step 14

ip igmp join-group group-address [source source-address]

Example:

Router(config-if)# ip igmp join-group 232.2.2.2 source 10.1.1.1
Configures an interface on the router to join the specified group or channel.

Note


Use this command to manually join the stream when the key server is not reachable via the same interface as the one configured with the crypto map.

Configuring Group Member ACLs

All IP traffic matching deny entries are sent out by the group member in clear text. The inbound traffic is matched to the mirrored access list.


Note


The recommended method to add or delete an entry in the Group Member ACL is to first create a copy of the existing Group Member ACL with a different name and then add or delete the entry in this new ACL, after which, you should replace the existing group member ACL under the GDOI crypto map with the newly created Group Member ACL. If you do not follow this recommended method, it might lead to an unexpected behavior.


To configure group member ACLs, perform this task (note that a group member access list can contain only deny statements).

SUMMARY STEPS

  1. enable
  2. configure terminal
  3. access-list access-list-number deny ip host source host source
  4. access-list access-list-number permit ip source

DETAILED STEPS

  Command or Action Purpose

Step 1

enable

Example:

Router> enable

Enables privileged EXEC mode.

  • Enter your password if prompted.

Step 2

configure terminal

Example:

Router# configure terminal

Enters global configuration mode.

Step 3

access-list access-list-number deny ip host source host source

Example:

Router(config)# access-list 101 deny ip host 10.0.0.1 host 10.0.0.2

Defines a denied IP access list.

Step 4

access-list access-list-number permit ip source

Example:

Router(config)# access-list 103 permit ip 209.165.200.225 0.255.255.255 10.20.0.0 0.255.255.255

Defines an allowed IP access list.

What to Do Next

The access list defined in Step 4 is the same one that should be used to configure the SA. See the “Configuring the IPsec SA” section.

Configuring an IPsec Lifetime Timer

To configure an IPsec lifetime timer for a profile, perform the following steps. If this configuration task is not performed, the default is the maximum IPsec SA lifetime of 3600 seconds. The TEK lifetime value should be more than 900 seconds.

SUMMARY STEPS

  1. enable
  2. configure terminal
  3. crypto ipsec profile name
  4. set security-association lifetime seconds seconds

DETAILED STEPS

  Command or Action Purpose

Step 1

enable

Example:

Router> enable

Enables privileged EXEC mode.

  • Enter your password if prompted.

Step 2

configure terminal

Example:

Router# configure terminal

Enters global configuration mode.

Step 3

crypto ipsec profile name

Example:

Router(config)# crypto ipsec profile profile1

Defines the IPsec parameters that are to be used for IPsec encryption between two IPsec routers and enters crypto ipsec profile configuration mode.

Step 4

set security-association lifetime seconds seconds

Example:

Router(ipsec-profile)# set security-association lifetime seconds 2700

Overrides (for a particular crypto map entry) the global lifetime value, which is used when negotiating IPsec SAs.

What to Do Next

Configure the IPsec SA. See the “Configuring IPsec SA” section.

Configuring an ISAKMP Lifetime Timer

To configure an ISAKMP lifetime timer, perform the following steps.

SUMMARY STEPS

  1. enable
  2. configure terminal
  3. crypto isakmp policy priority
  4. lifetime seconds

DETAILED STEPS

  Command or Action Purpose

Step 1

enable

Example:

Router> enable

Enables privileged EXEC mode.

  • Enter your password if prompted.

Step 2

configure terminal

Example:

Router# configure terminal

Enters global configuration mode.

Step 3

crypto isakmp policy priority

Example:

Router(config)# crypto isakmp policy 1

Defines an IKE policy and enters ISAKMP policy configuration mode.

Step 4

lifetime seconds

Example:

Router(config-isakmp-policy)# lifetime 86400

Specifies the lifetime of an IKE SA.

Configuring the IPsec SA

If time-based antireplay is configured on the key server but the group member is not capable of supporting it, the GDOI-3-GM_NO_CRYPTO_ENGINE syslog message is logged to the group member. See the “Cisco Group Encrypted Transport VPN System Logging Messages” section for a list of system error messages.


Note


Security threats, as well as the cryptographic technologies to help protect against them, are constantly changing. For more information about the latest Cisco cryptographic recommendations, see the Next Generation Encryption (NGE) white paper.


To configure the IPsec SA, perform the following steps.

SUMMARY STEPS

  1. enable
  2. configure terminal
  3. crypto ipsec transform-set transform-set-name transform [transform2 ...transform4 ]
  4. crypto ipsec profile ipsec-profile-name
  5. set transform-set transform-set-name
  6. exit
  7. crypto gdoi group group-name
  8. Enter one of the following commands:
    • identity number number
    • identity address ipv4 address
  9. server local
  10. sa ipsec sequence-number
  11. profile ipsec-profile-name
  12. match address ipv4 {access-list-number | access-list-name }
  13. end

DETAILED STEPS

  Command or Action Purpose

Step 1

enable

Example:

Router> enable

Enables privileged EXEC mode.

  • Enter your password if prompted.

Step 2

configure terminal

Example:

Router# configure terminal

Enters global configuration mode.

Step 3

crypto ipsec transform-set transform-set-name transform [transform2 ...transform4 ]

Example:

Router(config)# crypto ipsec transform-set gdoi-trans esp-aes esp-sha-hmac

Defines a transform set--an acceptable combination of security protocols and algorithms.

Step 4

crypto ipsec profile ipsec-profile-name

Example:

Router(config)# crypto ipsec profile profile1

Defines an IPsec profile and enters crypto ipsec profile configuration mode.

Step 5

set transform-set transform-set-name

Example:

Router(ipsec-profile)# set transform-set transformset1

Specifies which transform sets can be used with the crypto map entry.

Step 6

exit

Example:

Router(ipsec-profile)# exit

Exits IPsec profile configuration mode.

Step 7

crypto gdoi group group-name

Example:

Router(config)# crypto gdoi group gdoigroupname 

Identifies a GDOI group and enters GDOI group configuration mode.

Step 8

Enter one of the following commands:

  • identity number number
  • identity address ipv4 address
Example:

Router(config-gdoi-group)# identity number 3333
Example:

Router(config-gdoi-group)# identity address ipv4 209.165.200.225

Identifies a GDOI group number or address.

Step 9

server local

Example:

Router(config-gdoi-group)# server local

Designates a device as a GDOI key server and enters GDOI local server configuration mode.

Step 10

sa ipsec sequence-number

Example:

Router(gdoi-local-server)# sa ipsec 1

Specifies the IPsec SA policy information to be used for a GDOI group and enters GDOI SA IPsec configuration mode.

Step 11

profile ipsec-profile-name

Example:

Router(gdoi-sa-ipsec)# profile gdoi-p

Defines the IPsec SA policy for a GDOI group.

Step 12

match address ipv4 {access-list-number | access-list-name }

Example:

Router(gdoi-sa-ipsec)# match address ipv4 102

Specifies an IP extended access list for a GDOI registration.

Step 13

end

Example:

Router(gdoi-sa-ipsec)# end

Exits GDOI SA IPsec configuration mode and returns to privileged EXEC mode.

What to Do Next

Replay should be configured. If replay is not configured, the default is counter mode.

Configuring Time-Based Antireplay for a GDOI Group

To configure time-based antireplay for a GDOI group, perform the following steps.

SUMMARY STEPS

  1. enable
  2. configure terminal
  3. crypto gdoi group group-name
  4. identity number policy-name
  5. server local
  6. address ip-address
  7. sa ipsec sequence-number
  8. profile ipsec-profile-name
  9. match address {ipv4 access-list-number | access-list-name }
  10. replay counter window-size seconds
  11. replay time window-size seconds

DETAILED STEPS

  Command or Action Purpose

Step 1

enable

Example:

Router> enable

Enables privileged EXEC mode.

  • Enter your password if prompted.

Step 2

configure terminal

Example:

Router# configure terminal

Enters global configuration mode.

Step 3

crypto gdoi group group-name

Example:

Router(config)# crypto gdoi group gdoigroup1 

Identifies a GDOI group and enters GDOI group configuration mode.

Step 4

identity number policy-name

Example:

Router(config-gdoi-group)# identity number 1234

Identifies a GDOI group number.

Step 5

server local

Example:

Router(config-gdoi-group)# server local

Designates a device as a GDOI key server and enters GDOI local server configuration mode.

Step 6

address ip-address

Example:

Router(config-server-local)# address 209.165.200.225

Sets the source address, which is used as the source for packets originated by the local key server.

Step 7

sa ipsec sequence-number

Example:

Router(config-server-local)# sa ipsec 1

Specifies the IPsec SA and enters GDOI SA IPsec configuration mode.

Step 8

profile ipsec-profile-name

Example:

Router(gdoi-sa-ipsec)# profile test1

Defines the IPsec SA policy for a GDOI group.

Step 9

match address {ipv4 access-list-number | access-list-name }

Example:

Router(gdoi-sa-ipsec)# match address ipv4 101

Specifies an IP extended access list for a GDOI registration.

Step 10

replay counter window-size seconds

Example:

Router(gdoi-sa-ipsec)# replay counter window-size 512

Turns on counter-based antireplay protection for traffic defined inside an access list using GDOI if there are only two group members in a group.

Note


The behavior caused by this command and that caused by the replay time window-size command are mutually exclusive. You can configure either one without configuring the other.

Step 11

replay time window-size seconds

Example:

Router(gdoi-sa-ipsec)# replay time window-size 1

Sets the window size for antireplay protection using GDOI if there are more than two group members in a group.

Note


The behavior caused by this command and that caused by the replay counter window-size command are mutually exclusive. You can configure either one without configuring the other.

Configuring Passive SA

To configure passive SA (to put the group member in passive mode), perform the following steps.

SUMMARY STEPS

  1. enable
  2. configure terminal
  3. crypto gdoi group group-name
  4. identity name
  5. passive
  6. server address ipv4 {address | hostname }

DETAILED STEPS

  Command or Action Purpose

Step 1

enable

Example:

Router> enable

Enables privileged EXEC mode.

  • Enter your password if prompted.

Step 2

configure terminal

Example:

Router# configure terminal

Enters global configuration mode.

Step 3

crypto gdoi group group-name

Example:

Router(config)# crypto gdoi group group1

Identifies a GDOI group and enters GDOI group configuration mode.

Step 4

identity name

Example:

Router(config-gdoi-group)# identity 2345

Sets the identity to the crypto map.

Step 5

passive

Example:

Router(config-gdoi-group)# passive

Puts the group member into passive mode.

Step 6

server address ipv4 {address | hostname }

Example:

Router(config-gdoi-group)# server address ipv4 209.165.200.225

Specifies the address of the server that a GDOI group is trying to reach.

Resetting the Role of the Key Server

To reset the cooperative role of the primary key server, perform the following steps.

SUMMARY STEPS

  1. enable
  2. clear crypto gdoi ks coop role

DETAILED STEPS

  Command or Action Purpose

Step 1

enable

Example:

Router> enable

Enables privileged EXEC mode.

  • Enter your password if prompted.

Step 2

clear crypto gdoi ks coop role

Example:

Router# clear crypto gdoi ks coop role

Resets the cooperative role of the key server.

Configuring a Group Member

To configure a group member, perform the following subtasks:

Configuring the Group Name ID Key Server IP Address and Group Member Registration

To configure the group name, ID, key server IP address, and group member registration, perform the following steps. You can configure up to eight key server addresses.

SUMMARY STEPS

  1. enable
  2. configure terminal
  3. crypto gdoi group group-name
  4. Do one of the following:
    • identity number number
    • identity address ipv4 address
  5. server address ipv4 address

DETAILED STEPS

  Command or Action Purpose

Step 1

enable

Example:

Router> enable

Enables privileged EXEC mode.

  • Enter your password if prompted.

Step 2

configure terminal

Example:

Router# configure terminal

Enters global configuration mode.

Step 3

crypto gdoi group group-name

Example:

Router(config)# crypto gdoi group gdoigroupone

Identifies a GDOI group and enters GDOI group configuration mode.

Step 4

Do one of the following:

  • identity number number
  • identity address ipv4 address
Example:

Router(config-gdoi-group)# identity number 3333
Example:

Router(config-gdoi-group)# identity address ipv4 209.165.200.225

Identifies a GDOI group number or address.

Step 5

server address ipv4 address

Example:

Router(config-gdoi-group)# server address ipv4 209.165.200.225

Specifies the address of the server a GDOI group is trying to reach.

  • To disable the address, use the no form of the command.

What to Do Next

Configure a crypto map. See the “Creating a Crypto Map Entry” section.

Creating a Crypto Map Entry

To create a crypto map entry and associate a GDOI group to it, perform the following steps.

SUMMARY STEPS

  1. enable
  2. configure terminal
  3. crypto map map-name seq-num gdoi
  4. set group group-name

DETAILED STEPS

  Command or Action Purpose

Step 1

enable

Example:

Router> enable

Enables privileged EXEC mode.

  • Enter your password if prompted.

Step 2

configure terminal

Example:

Router# configure terminal

Enters global configuration mode.

Step 3

crypto map map-name seq-num gdoi

Example:

Router(config)# crypto map mymap 10 gdoi

Enters crypto map configuration mode and creates or modifies a crypto map entry.

Step 4

set group group-name

Example:

Router(config-crypto-map)# set group group1

Associates the GDOI group to the crypto map.

What to Do Next

Apply the crypto map to an interface to which the traffic has to be encrypted. See the “Applying the Crypto Map to an Interface to Which the Traffic Must Be Encrypted” section.

Applying the Crypto Map to an Interface to Which the Traffic Must Be Encrypted

To apply the crypto map to an interface to which the traffic must be encrypted, perform the following steps.

SUMMARY STEPS

  1. enable
  2. configure terminal
  3. interface type slot / port
  4. crypto map map-name redundancy standby-group-name stateful

DETAILED STEPS

  Command or Action Purpose

Step 1

enable

Example:

Router> enable

Enables privileged EXEC mode.

  • Enter your password if prompted.

Step 2

configure terminal

Example:

Router# configure terminal

Enters global configuration mode.

Step 3

interface type slot / port

Example:

Router(config)# interface gigabitethernet 0/0

Configures an interface type and enters interface configuration mode.

Step 4

crypto map map-name redundancy standby-group-name stateful

Example:

Router(config-if)# crypto map map1

Applies the crypto map to the interface.

Activating Fail-Close Mode

Fail-close mode prevents unencrypted traffic from passing through a group member before that member is registered with a key server.

To configure a crypto map to work in fail-close mode, perform the following steps:

SUMMARY STEPS

  1. enable
  2. configure terminal
  3. crypto map map-name gdoi fail-close
  4. match address {access-list-number | access-list-name }
  5. activate

DETAILED STEPS

  Command or Action Purpose

Step 1

enable

Example:

Router> enable

Enables privileged EXEC mode.

  • Enter your password if prompted.

Step 2

configure terminal

Example:

Router# configure terminal

Enters global configuration mode.

Step 3

crypto map map-name gdoi fail-close

Example:

Router(config)# crypto map map1 gdoi fail-close

Specifies that the crypto map is to work in fail-close mode and enters crypto map fail-close configuration mode.

Step 4

match address {access-list-number | access-list-name }

Example:

Router(crypto-map-fail-close)# match address 133

(Optional) Specifies an ACL for a GDOI registration.

Step 5

activate

Example:

Router(crypto-map-fail-close)# activate

Activates fail-close mode.

Configure Fail Close Revert


Note


Activating fail close mode is mandatory for the Fail Close Revert feature.


SUMMARY STEPS

  1. enable
  2. configure terminal
  3. crypto gdoi group group-name
  4. Enter one of the following commands:
    • identity number number
    • identity address ipv4 address
  5. server address ipv4 address
  6. client fail-close revert
  7. end

DETAILED STEPS

  Command or Action Purpose

Step 1

enable

Example:

Router> enable

Enables privileged EXEC mode.

  • Enter your password if prompted.

Step 2

configure terminal

Example:

Router# configure terminal

Enters global configuration mode.

Step 3

crypto gdoi group group-name

Example:

Router(config)# crypto gdoi group gdoigroupone

Identifies a GDOI group and enters GDOI group configuration mode.

Step 4

Enter one of the following commands:

  • identity number number
  • identity address ipv4 address
Example:

Router(config-gdoi-group)# identity number 3333
Example:

Router(config-gdoi-group)# identity address ipv4 10.2.2.2

Identifies a GDOI group number or address.

Step 5

server address ipv4 address

Example:

Router(config-gdoi-group)# server address ipv4 10.0.5.2

Specifies the address of the server a GDOI group is trying to reach.

  • To disable the address, use the no form of the command.

Step 6

client fail-close revert

Example:

Router(config-gdoi-group)# client fail-close revert

Enables the client fail close revert feature

Step 7

end

Example:

Router(config-gdoi-group)# end

Exits GDOI group configuration mode and returns to privileged EXEC mode.

Configuring Acceptable Ciphers or Hash Algorithms for KEK


Note


Security threats, as well as the cryptographic technologies to help protect against them, are constantly changing. For more information about the latest Cisco cryptographic recommendations, see the Next Generation Encryption (NGE) white paper.


To configure the ciphers and hash algorithms for KEK to be allowed by the GM, perform the following steps.

SUMMARY STEPS

  1. enable
  2. configure terminal
  3. crypto gdoi group group-name
  4. Enter one of the following commands:
    • identity number number
    • identity address ipv4 address
  5. server address ipv4 address
  6. client rekey encryption cipher [... [cipher ]]
  7. client rekey hash hash
  8. end

DETAILED STEPS

  Command or Action Purpose

Step 1

enable

Example:

Router> enable

Enables privileged EXEC mode.

  • Enter your password if prompted.

Step 2

configure terminal

Example:

Router# configure terminal

Enters global configuration mode.

Step 3

crypto gdoi group group-name

Example:

Router(config)# crypto gdoi group gdoigroupone

Identifies a GDOI group and enters GDOI group configuration mode.

Step 4

Enter one of the following commands:

  • identity number number
  • identity address ipv4 address
Example:

Router(config-gdoi-group)# identity number 3333
Example:

Router(config-gdoi-group)# identity address ipv4 10.2.2.2

Identifies a GDOI group number or address.

Step 5

server address ipv4 address

Example:

Router(config-gdoi-group)# server address ipv4 10.0.5.2

Specifies the address of the server a GDOI group is trying to reach.

  • To disable the address, use the no form of the command.

Step 6

client rekey encryption cipher [... [cipher ]]

Example:

Router(config-gdoi-group)# client rekey encryption aes 128 aes 192 aes 256

Sets the client acceptable rekey ciphers for the KEK.

Step 7

client rekey hash hash

Example:

Router(config-gdoi-group)# client rekey hash sha

Sets the client acceptable hash algorithm for KEK.

Step 8

end

Example:

Router(config-gdoi-group)# end

Exits GDOI group configuration mode and returns to privileged EXEC mode.

Configuring Acceptable Transform Sets for TEK

To configure the transform sets used by TEKs for data encryption or authentication to be allowed by the GM, perform the following steps.

SUMMARY STEPS

  1. enable
  2. configure terminal
  3. crypto ipsec transform-set transform-set-name transform [transform2 ...transform4 ]
  4. exit
  5. crypto gdoi group group-name
  6. client transform-sets transform-set-name1 [... [transform-set-name6 ]]
  7. end

DETAILED STEPS

  Command or Action Purpose

Step 1

enable

Example:

Router> enable

Enables privileged EXEC mode.

  • Enter your password if prompted.

Step 2

configure terminal

Example:

Router# configure terminal

Enters global configuration mode.

Step 3

crypto ipsec transform-set transform-set-name transform [transform2 ...transform4 ]

Example:

Router(config)# crypto ipsec transform-set g1 esp-aes 192 esp-sha-hmac

Defines a transform set—an acceptable combination of security protocols and algorithms—and enters crypto transform configuration mode.

Step 4

exit

Example:

Router(cfg-crypto-trans)# exit

Exits crypto transform configuration mode.

Step 5

crypto gdoi group group-name

Example:

Router(config)# crypto gdoi group gdoigroupone

Identifies a GDOI group and enters GDOI group configuration mode.

Step 6

client transform-sets transform-set-name1 [... [transform-set-name6 ]]

Example:

Router(config-gdoi-group)# client transform-sets g1

Specifies the acceptable transform-set tags used by TEK for data encryption and authentication.

  • You can specify up to six transform-set tags.

Step 7

end

Example:

Router(config-gdoi-group)# end

Exits GDOI group configuration mode and returns to privileged EXEC mode.

Tracking the Group Member Crypto State

Perform this task to track the crypto state of the group member (GM) using the configured Enhanced Object Tracker (EOT) stub-object ID.

Before you begin

You must configure an Enhanced Object Tracking (EOT) by creating a stub-object and assign the object with a tracking ID to monitor the GDOI MIB. The following is a sample configuration in which, tracking ID 99 is assigned to the stub-object.

event manager applet test1
 event snmp oid <new GDOI MIB object> .....
 action 2.0 track set 99 state up
 
track 99 stub-object
 delay up 60

SUMMARY STEPS

  1. enable
  2. configure terminal
  3. crypto gdoi group group-name
  4. client status active-sa track tracking-number
  5. exit

DETAILED STEPS

  Command or Action Purpose

Step 1

enable

Example:
Device> enable

Enables privileged EXEC mode.

  • Enter your password if prompted.

Step 2

configure terminal

Example:
Device# configure terminal

Enters global configuration mode.

Step 3

crypto gdoi group group-name

Example:
Device(config)# crypto gdoi group gdoigroupone

Identifies a GDOI group and enters GDOI group configuration mode.

Step 4

client status active-sa track tracking-number

Example:
Device(config-gdoi-group)# client status active-sa track 99

Enables the tracking for the stub-object. In this example, a GM will set the stub-object 99 to state “UP” when it receives valid traffic encryption key (TEK) from the key server (KS).On the other hand, the GM will set the stub-object 99 to state “DOWN” if it has no valid TEK because of errors, such as registration failure or TEK expiration before rekey.

Step 5

exit

Example:
Device(config-gdoi-group)# exit

Exits GDOI group configuration mode and returns to privileged EXEC mode.

Configuring GET VPN GM Authorization

GET VPN GM authorization can be done using preshared keys or PKI. It is a best practice to turn on GET VPN authorization. When a key server serves multiple GDOI groups, key server authorization is required to prevent a GM in one group from requesting keys and policies from another group. The ISAKMP authorization confirms that the GM is allowed to request GDOI attributes from the key server while the GDOI authorization confirms the GM is allowed to request GDOI attributes from a specific group configured in the key server.

To configure GET VPN GM authorization, perform either of the following tasks:

Configuring GM Authorization Using Preshared Keys

To configure GM authorization using preshared keys, perform the following steps.

SUMMARY STEPS

  1. enable
  2. configure terminal
  3. crypto gdoi group group-name
  4. server local
  5. authorization address ipv4 { access-list-name | access-list-number }
  6. exit
  7. exit
  8. access-list access-list-number [dynamic dynamic-name [timeout minutes ]] {deny | permit } protocol source source-wildcard destination destination-wildcard [precedence precedence ] [tos tos ] [time-range time-range-name ] [fragments ] [log [word ] | log-input [word ]]
  9. exit

DETAILED STEPS

  Command or Action Purpose

Step 1

enable

Example:

Router> enable

Enables privileged EXEC mode.

  • Enter your password if prompted.

Step 2

configure terminal

Example:

Router# configure terminal

Enters global configuration mode.

Step 3

crypto gdoi group group-name

Example:

Router(config)# crypto gdoi group getvpn

Identifies a GDOI and enters GDOI group configuration mode.

Step 4

server local

Example:

Router(config-gdoi-group)# server local

Designates a device as a GDOI key server and enters GDOI local server configuration mode.

Step 5

authorization address ipv4 { access-list-name | access-list-number }

Example:

Router(gdoi-local-server)# authorization address ipv4 50

Specifies a list of addresses for a GDOI.

Step 6

exit

Example:

Router(gdoi-local-server)# exit

Exits GDOI local configuration mode and returns to GDOI group configuration mode.

Step 7

exit

Example:

Router(config-gdoi-group)# exit

Exits GDOI group configuration mode and returns to global configuration mode.

Step 8

access-list access-list-number [dynamic dynamic-name [timeout minutes ]] {deny | permit } protocol source source-wildcard destination destination-wildcard [precedence precedence ] [tos tos ] [time-range time-range-name ] [fragments ] [log [word ] | log-input [word ]]

Example:

Router(config)# access-list 50 permit ip 209.165.200.225 0.0.0.0 209.165.200.254 0.0.0.0

Defines an allowed IP access list.

  • In the example, an access list with access list number 50 is defined, and packets sent from source IP address 209.165.200.225 to destination IP address 209.165.200.254 are permitted.

Step 9

exit

Example:

Router(config)# exit

Exits global configuration mode and returns to privileged EXEC mode.

Configuring GM Authorization Using PKI

To configure GM authorization using PKI, perform the following steps.

SUMMARY STEPS

  1. enable
  2. configure terminal
  3. crypto isakmp identity {address | dn | hostname}
  4. crypto pki trustpoint name
  5. subject-name [x.500-name ]
  6. exit
  7. crypto gdoi group group-name
  8. server local
  9. authorization identity name
  10. exit
  11. exit
  12. crypto identity name
  13. dn name=string [, name=string ]
  14. exit
  15. crypto isakmp identity {address | dn | hostname }
  16. crypto pki trustpoint name
  17. subject-name [x.500-name ]
  18. end

DETAILED STEPS

  Command or Action Purpose

Step 1

enable

Example:

Router> enable

Enables privileged EXEC mode.

  • Enter your password if prompted.

Step 2

configure terminal

Example:

Router# configure terminal

Enters global configuration mode.

Step 3

crypto isakmp identity {address | dn | hostname}

Example:

Router(config)# crypto isakmp identity dn

Defines the identity used by the router when the router is participating in the Internet Key Exchange (IKE) protocol.

Step 4

crypto pki trustpoint name

Example:

Router(config)# crypto pki trustpoint GETVPN

Declares the trustpoint that your router should use and enters ca-trustpoint configuration mode.

Step 5

subject-name [x.500-name ]

Example:

Router(ca-trustpoint)# subject-name OU=GETVPN

Specifies the subject name in the certificate request.

Step 6

exit

Example:

Router(ca-trustpoint)# exit

Exits ca-trustpoint configuration mode and returns to global configuration mode.

Step 7

crypto gdoi group group-name

Example:

Router(config)# crypto gdoi group getvpn

Identifies a GDOI group and enters GDOI group configuration mode.

Step 8

server local

Example:

Router(config-gdoi-group)# server local

Designates a device as a GDOI key server and enters GDOI local server configuration mode.

Step 9

authorization identity name

Example:

Router(gdoi-local-server)# authorization identity GETVPN_FILTER

Specifies an identity for a GDOI group.

Step 10

exit

Example:

Router(gdoi-local-server)# exit

Exits GDOI local server configuration mode and returns to GDOI group configuration mode.

Step 11

exit

Example:

Router(config-gdoi-group)# exit

Exits GDOI group configuration mode and returns to global configuration mode.

Step 12

crypto identity name

Example:

Router(config)# crypto identity GETVPN_FILTER

Configures the identity of the router with a given list of DNs in the certificate of the router and enters crypto identity configuration mode.

Step 13

dn name=string [, name=string ]

Example:

Router(config-crypto-identity)# dn ou=GETVPN

Associates the identity of a router with the DN in the certificate of the router.

Step 14

exit

Example:

Router(config-crypto-identity)# exit

Exits GDOI group configuration mode and returns to global configuration mode.

Step 15

crypto isakmp identity {address | dn | hostname }

Example:

Router(config)# crypto isakmp identity dn

Defines the identity used by the router when the router is participating in the IKE protocol.

Step 16

crypto pki trustpoint name

Example:

Router(config)# crypto pki trustpoint GETVPN

Declares the trustpoint that your router should use and enters ca-trustpoint configuration mode.

Step 17

subject-name [x.500-name ]

Example:

Router(ca-trustpoint)# subject-name ou=getvpn

Specifies the subject name in the certificate request.

Step 18

end

Example:

Router(ca-trustpoint)# exit

Exits GDOI group configuration mode, saves the configuration, and returns to privileged EXEC mode.

Verifying and Troubleshooting Cisco Group Encrypted Transport VPN Configurations

The following tasks can be used to verify and troubleshoot your GET VPN configurations. These tasks are optional and are used to gather information during troubleshooting.


Note


With CSCsi82594, if Time-based Anti-Replay (TBAR) is enabled, the rekey time period is set to 2 hours (7200 seconds). In this scenario, the Key Server periodically sends a rekey to the Group Members every 2 hours (7200 seconds). In the below example, even though the Traffic Encryption Key (TEK) lifetime is set to 28800 seconds (8 hours), the rekey timer is still 2 hours. For show outputs displaying TBAR information, use the show crypto gdoi gm replay and show crypto gdoi ks replay commands.


crypto ipsec profile atm-profile
set security-association lifetime seconds 28800
!
crypto gdoi group ATM-DSL
server local
   sa ipsec 1
      !
      replay time window-size 100


Verifying Active Group Members on a Key Server

To verify active group members on a key server, perform the following steps.

SUMMARY STEPS

  1. enable
  2. show crypto gdoi ks members

DETAILED STEPS

  Command or Action Purpose

Step 1

enable

Example:

Router> enable

Enables privileged EXEC mode.

  • Enter your password if prompted.

Step 2

show crypto gdoi ks members

Example:

Router# show crypto gdoi ks members

Displays information about key server members.

Verifying Rekey-Related Statistics

To verify rekey-related statistics, perform the following steps.

SUMMARY STEPS

  1. enable
  2. show crypto gdoi ks rekey
  3. show crypto gdoi [gm]

DETAILED STEPS


Step 1

enable

Example:

Device> enable

Enables privileged EXEC mode.

  • Enter your password if prompted.

Step 2

show crypto gdoi ks rekey

Example:

Device# show crypto gdoi ks rekey

For group diffint (handle: 2147483650) server 10.0.8.1 (handle: 2147483650):

# of teks : 1 Seq num : 0
KEK POLICY (transport type : Unicast)
spi : 0xA8110DE7CC8B0FB201F2A8BFAA0F2D90
management alg : disabled encrypt alg : 3DES 
crypto iv length : 8 key size : 24 
orig life(sec): 300 remaining life(sec): 296 <------- ticking down
sig hash algorithm : enabled sig key length : 94 
sig size : 64 
sig key name : mykeys

On the key server, this command displays information about the rekeys that are being sent from the key server. The output displays the ticking down of the KEK remaining lifetime.

Step 3

show crypto gdoi [gm]

Example:

Device# show crypto gdoi 
GROUP INFORMATION

Group Name : diffint
Group Identity : 3333
Rekeys received : 0
IPSec SA Direction : Both

Group Server list : 10.0.8.1

Group member : 10.0.3.1 vrf: None
Version : 1.0.2 
Registration status : Registered
Registered with : 10.0.8.1
Re-registers in : 93 sec <-----------re-registration time for TEK or KEK
Succeeded registration: 1
Attempted registration: 1
Last rekey from : 0.0.0.0
Last rekey seq num : 0
Unicast rekey received: 0
Rekey ACKs sent : 0
Rekey Received : never
allowable rekey cipher: any
allowable rekey hash : any
allowable transformtag: any ESP

Rekeys cumulative
Total received : 0
After latest register : 0
Rekey Acks sents : 0

ACL Downloaded From KS 10.0.8.1:
access-list permit ip host 10.0.1.1 host 239.0.1.1
access-list permit ip host 10.0.100.2 host 238.0.1.1

KEK POLICY:
Rekey Transport Type : Unicast
Lifetime (secs) : 255	<-----------lifetime ticking
Encrypt Algorithm : 3DES
Key Size : 192 
Sig Hash Algorithm : HMAC_AUTH_SHA
Sig Key Length (bits) : 512 

On the group member, this command displays information about the rekeys that are being sent from the key server. The "re-registers in" field of the output displays the duration after which the group member re-registers for a TEK or a KEK, whichever time is smaller


Verifying IPsec SAs That Were Created by GDOI on a Group Member

To verify IPsec SAs that were created by GDOI on a group member, perform the following steps.

SUMMARY STEPS

  1. enable
  2. show crypto gdoi group group-name ipsec sa

DETAILED STEPS

  Command or Action Purpose

Step 1

enable

Example:

Router> enable

Enables privileged EXEC mode.

  • Enter your password if prompted.

Step 2

show crypto gdoi group group-name ipsec sa

Example:

Router# show crypto gdoi group diffint ipsec sa

Displays information about IPsec SAs that were created by GDOI on a group member.

  • In this case, information will be displayed only for group “diffint.”

  • For information about IPsec SAs for all groups, omit the group keyword and group-name argument.

Verifying IPsec SAs That Were Created by GDOI on a Key Server

To verify IPsec SAs that were created by GDOI on a key server, perform the following steps.

SUMMARY STEPS

  1. enable
  2. show crypto ipsec sa

DETAILED STEPS

  Command or Action Purpose

Step 1

enable

Example:

Device> enable

Enables privileged EXEC mode.

  • Enter your password if prompted.

Step 2

show crypto ipsec sa

Example:

Device# show crypto ipsec sa

Displays the settings used by current SAs.

Verifying the TEKs that a Group Member Last Received from the Key Server

To verify the TEKs that a GM last received from the KS, perform the following steps on the GM:

SUMMARY STEPS

  1. enable
  2. show crypto gdoi

DETAILED STEPS

  Command or Action Purpose

Step 1

enable

Example:

Router> enable

Enables privileged EXEC mode.

  • Enter your password if prompted.

Step 2

show crypto gdoi

Example:

Router# show crypto gdoi

Displays the current GDOI configuration and the policy that is downloaded from the KS. The TEKs are listed in the TEK POLICY section. Without enabling debugging, you can use this command to compare the TEKs that a GM actually last received with the TEKs downloaded from the KS to the IPsec control plane (which you can view using the show crypto ipsec sa command).

Verifying Cooperative Key Server States and Statistics

To verify cooperative key server states and statistics, perform the following steps, using one or both of the debug and show commands shown.

SUMMARY STEPS

  1. enable
  2. debug crypto gdoi ks coop
  3. show crypto gdoi group group-name ks coop [version ]

DETAILED STEPS

  Command or Action Purpose

Step 1

enable

Example:

Router> enable

Enables privileged EXEC mode.

  • Enter your password if prompted.

Step 2

debug crypto gdoi ks coop

Example:

Router# debug crypto gdoi ks coop

Displays information about a cooperative key server.

Step 3

show crypto gdoi group group-name ks coop [version ]

Example:

Router# show crypto gdoi group diffint ks coop version

Displays information for the group “diffint” and version information about the cooperative key server.

Verifying Antireplay Pseudotime-Related Statistics

To verify antireplay pseudotime-related statistics, perform the following steps using one or all of the clear , debug , and show commands.

SUMMARY STEPS

  1. enable
  2. clear crypto gdoi group group-name replay
  3. debug crypto gdoi replay
  4. show crypto gdoi group group-name
  5. show crypto gdoi group group-name ks replay

DETAILED STEPS

  Command or Action Purpose

Step 1

enable

Example:

Router> enable

Enables privileged EXEC mode.

  • Enter your password if prompted.

Step 2

clear crypto gdoi group group-name replay

Example:

Router# clear crypto gdoi group diffint replay

Clears the replay counters.

Step 3

debug crypto gdoi replay

Example:

Router# debug crypto gdoi replay

Displays information about the pseudotime stamp that is contained in a packet.

Step 4

show crypto gdoi group group-name

Example:

Router# show crypto gdoi group diffint

Displays information about the current pseudotime of the group member.

  • It also displays the different counts that are related to the antireplay for this group.

Step 5

show crypto gdoi group group-name ks replay

Example:

Router# show crypto gdoi group diffint ks replay

Displays information about the current pseudotime of the key server.

Verifying the Fail-Close Mode Status of a Crypto Map

To verify the fail-close mode status of a crypto map, perform the following steps.

SUMMARY STEPS

  1. enable
  2. show crypto map gdoi fail-close

DETAILED STEPS

  Command or Action Purpose

Step 1

enable

Example:

Router> enable

Enables privileged EXEC mode.

  • Enter your password if prompted.

Step 2

show crypto map gdoi fail-close

Example:

Router# show crypto map gdoi fail-close

Displays information about the status of the fail-close mode.

Configuration Examples for Cisco Group Encrypted Transport VPN

Example: Key Server and Group Member Case Study

The following case study includes encrypting traffic CE-CE in an MPLS VPN environment.

The MPLS VPN core interconnects VPN sites as is shown in the figure below. VPN site CPEs, Group Member 1 through Group Member 4, are grouped into a single GDOI group that correlates with a VPN with which these sites are a part. This scenario is an intranet VPN scenario. All the key servers and Group Members are part of the same VPN. Key Server 1 and Key Server 2 are the cooperative key servers that support VPN members Group Member 1 through Group Member 4. Key Server 1 is the primary key server and Key Server 2 is the secondary key server.

Figure 13. Key Server and Group Member Scenario

The following configuration examples are based on the case study in the figure above.

Example Key Server 1

Key server 1 is the primary key server.


service timestamps debug datetime msec
service timestamps log datetime msec
no service password-encryption
service internal
!
hostname KS1
!
logging buffered 100000 debugging
no logging console
!
no aaa new-model
!
resource policy
!
clock timezone EST 0
ip subnet-zero
no ip domain lookup
ip domain name cisco.com
!
crypto isakmp policy 1
 encr 3des
 authentication pre-share
 group 2
 lifetime 400
crypto isakmp key cisco address 10.1.1.13
crypto isakmp key cisco address 10.1.1.9
crypto isakmp key cisco address 10.1.1.1
crypto isakmp key cisco address 10.1.1.5
crypto isakmp key cisco address 10.1.1.21
!
crypto ipsec transform-set gdoi-trans-group1 esp-3des esp-sha-hmac 
!
crypto ipsec profile gdoi-profile-group1
 set security-association lifetime seconds 1800
 set transform-set gdoi-trans-group1 
!
crypto gdoi group group1
 identity number 1
 server local
  rekey lifetime seconds 86400
  rekey retransmit 10 number 2
  rekey authentication mypubkey rsa group1-export-general
  rekey transport unicast
  sa ipsec 1
   profile gdoi-profile-group1
   match address ipv4 101
   replay counter window-size 64
  address ipv4 209.165.200.225
  redundancy
   local priority 10
   peer address ipv4 209.165.200.225
   !
interface Ethernet0/0
 ip address 209.165.200.225 255.255.255.252
!
ip classless
ip route 0.0.0.0 0.0.0.0 10.1.1.18
!
access-list 101 permit ip 10.1.0.0 0.0.255.255 10.1.0.0 0.0.255.255
!
end

Example Key Server 2

Key Server 2 is the secondary key server.


service timestamps debug datetime msec
service timestamps log datetime msec
no service password-encryption
service internal
!
hostname KS2
!
logging buffered 100000 debugging
no logging console
!
no aaa new-model
!
resource policy
!
clock timezone EST 0
ip subnet-zero
no ip domain lookup
ip domain name cisco
!
crypto isakmp policy 1
 encr 3des
 authentication pre-share
 group 2
 lifetime 400
crypto isakmp key cisco address 10.1.1.9
crypto isakmp key cisco address 10.1.1.1
crypto isakmp key cisco address 10.1.1.5
crypto isakmp key cisco address 10.1.1.17
crypto isakmp key cisco address 10.1.1.13
!
crypto ipsec transform-set gdoi-trans-group1 esp-3des esp-sha-hmac 
!
crypto ipsec profile gdoi-profile-group1
 set security-association lifetime seconds 1800
 set transform-set gdoi-trans-group1 
!
crypto gdoi group group1
 identity number 1
 server local
  
  rekey lifetime seconds 86400
  rekey retransmit 10 number 2
  rekey authentication mypubkey rsa group1-export-general
  rekey transport unicast
  sa ipsec 1
   profile gdoi-profile-group1
   match address ipv4 101
   replay counter window-size 64
  address ipv4 10.1.1.21
  redundancy
   local priority 1
   peer address ipv4 10.1.1.17
   !
interface Ethernet0/0
 ip address 209.165.200.225 255.255.255.252
!
ip classless
ip route 0.0.0.0 0.0.0.0 10.1.1.22
!
access-list 101 permit ip 10.1.0.0 0.0.255.255 10.1.0.0 0.0.255.255
!
end

Example: Configuring Group Member 1

Group member 1 is part of a GDOI group that correlates with a VPN with which these sites are a part.


service timestamps debug datetime msec
service timestamps log datetime msec
no service password-encryption
!
hostname GM1
!
resource policy
!
clock timezone EST 0
ip subnet-zero
!
crypto isakmp policy 1
 encr aes
 authentication pre-share
 group 14
 lifetime 3600
crypto isakmp key cisco address 209.165.200.225
crypto isakmp key cisco address 209.165.201.1
!
crypto gdoi group group1
 identity number 1
 server address ipv4 209.165.200.225
 server address ipv4 209.165.201.1
!
crypto map map-group1 10 gdoi 
 set group group1
!
interface Ethernet0/0
 ip address 209.165.200.225 255.255.255.252
 crypto map map-group1
!
router bgp 1000
 no synchronization
 bgp log-neighbor-changes
 network 10.1.1.0 mask 255.255.255.0
 neighbor 10.1.1.2 remote-as 5000
 no auto-summary
!
ip classless
!
End
The same GDOI group cannot be applied to multiple interfaces. The following examples show unsupported cases:

Example 1


crypto map map-group1
  group g1
 interface ethernet 1/0
  crypto map map-group1
 interface ethernet 2/0
  crypto map map-group1

Example 2


crypto map map-group1 10 gdoi
  set group group1
crypto map map-group2 10 gdoi
  set group group1
 interface ethernet 1/0
  crypto map map-group1
 interface ethernet 2/0

Example: Configuring Group Member 2

Group member 2 is part of a GDOI group that correlates with a VPN with which these sites are a part.


service timestamps debug datetime msec
service timestamps log datetime msec
!
hostname GM2
!
resource policy
!
clock timezone EST 0
ip subnet-zero
!
crypto isakmp policy 1
 encr aes
 authentication pre-share
 group 14
 lifetime 3600
crypto isakmp key cisco address 209.165.200.225
crypto isakmp key cisco address 209.165.201.1
!
crypto gdoi group group1
 identity number 1
 server address ipv4 209.165.201.1
 server address ipv4 209.165.200.225
!
crypto map map-group1 10 gdoi 
 set group group1
!
interface Ethernet0/0
 ip address 209.165.200.225 255.255.255.252
 crypto map map-group1
!
router bgp 2000
 no synchronization
 bgp log-neighbor-changes
 network 10.1.2.0 mask 255.255.255.0
 neighbor 10.1.1.6 remote-as 5000
 no auto-summary
!
ip classless
!
end

Example: Configuring Group Member 3

Group member 3 is part of a GDOI group that correlates with a VPN with which these sites are a part.


service timestamps debug datetime msec
service timestamps log datetime msec
no service password-encryption
!
hostname GM3
!
resource policy
!
clock timezone EST 0
ip subnet-zero
!
crypto isakmp policy 1
 encr aes
 authentication pre-share
 group 14
 lifetime 3600
crypto isakmp key cisco address 209.165.200.225
crypto isakmp key cisco address 209.165.201.1
!
crypto ipsec transform-set gdoi-trans-group1 esp-aes esp-sha-hmac 
crypto gdoi group group1
 identity number 1
 server address ipv4 209.165.200.225
 server address ipv4 209.165.201.1
!
crypto map map-group1 10 gdoi 
 set group group1
!
interface Ethernet0/0
 ip address 209.165.201.1 255.255.255.252
 crypto map map-group1
!
router bgp 3000
 no synchronization
 bgp log-neighbor-changes
 network 10.1.3.0 mask 255.255.255.0
 neighbor 10.1.1.10 remote-as 5000
 no auto-summary
!
ip classless
!
end

Example: Configuring Group Member 4

Group member 4 is part of a GDOI group that correlates with a VPN with which these sites are a part.


service timestamps debug datetime msec
service timestamps log datetime msec
no service password-encryption
!
hostname GM4
!
clock timezone EST 0
ip subnet-zero
!
crypto isakmp policy 1
 encr aes
 authentication pre-share
 group 14
 lifetime 3600
crypto isakmp key cisco address 209.165.200.225
crypto isakmp key cisco address 209.165.201.1
!
crypto gdoi group group1
 identity number 1
 server address ipv4 209.165.200.225
 server address ipv4 209.165.201.1
!
crypto map map-group1 10 gdoi 
 set group group1
!
interface Ethernet0/0
 ip address 209.165.201.1 255.255.255.252
 crypto map map-group1
!
router bgp 4000
 no synchronization
 bgp log-neighbor-changes
 network 10.1.4.0 mask 255.255.255.0
 neighbor 10.1.1.14 remote-as 5000
 no auto-summary
!
ip classless
!
end

Example: Configuring Group Member 5

If a group member has multiple interfaces that are part of the same GDOI group, you should use a loopback interface to source the crypto. If a loopback interface is not used, each interface that handles encrypted traffic must register individually with the key server.

The key server sees these as separate requests and must keep multiple records for the same group member, which also means sending multiple rekeys. If crypto is sourced from the loopback interface instead, the group member registers only once with the key server.

The following configuration shows how the group member registers once with the key server:

!


interface GigabitEthernet0/1
 description *** To AGG-1 ***
 crypto map dgvpn
!
interface GigabitEthernet0/2
 description *** To AGG-2 ***
 crypto map dgvpn
!
interface Loopback0
 ip address 209.165.201.1 255.255.255.255
!
 crypto map dgvpn local-address Loopback0
!

Example: Verifying the TEKs That a Group Member Last Received from the Key Server

The following example shows how to display the current GDOI configuration and the policy that is downloaded from the KS:


Device# show crypto gdoi

GROUP INFORMATION
 
    Group Name               : GETV6
.
.
.
KEK POLICY:
.
.
.
TEK POLICY for the current KS-Policy ACEs Downloaded:
  Ethernet2/0:
    IPsec SA:
        spi: 0x627E4B84(1652444036)
        transform: esp-aes
        sa timing:remaining key lifetime (sec): (3214)
        Anti-Replay(Time Based) : 10 sec interval
        tag method : cts sgt
        alg key size: 24 (bytes)
        sig key size: 20 (bytes)
        encaps: ENCAPS_TUNNEL


GROUP INFORMATION
 
    Group Name               : GETV4
.
.
.
KEK POLICY:
.
.
.
TEK POLICY for the current KS-Policy ACEs Downloaded:
  Ethernet2/0:
    IPsec SA:
        spi: 0xF6E6B597(4142314903)
        transform: esp-aes
        sa timing:remaining key lifetime (sec): (3214)
        Anti-Replay : Disabled
        tag method : cts sgt
        alg key size: 24 (bytes)
        sig key size: 20 (bytes)
        encaps: ENCAPS_TUNNEL

The TEKs are listed in the TEK POLICY section. Without enabling debugging, you can use this command to compare the TEKs that a GM actually last received with the TEKs downloaded from the KS to the IPsec control plane (which you can view using the show crypto ipsec sa command).

The tag method field shows the method used for GET VPN inline tagging; the possible values are either cts sgt (for Cisco TrustSec security group tags) or disabled. The alg key size field shows the key length for the encryption algorithm that is configured in the TEK policy. The sig key size field shows the key length for the signature that is configured in the TEK policy. The encaps field shows the type of IPsec encapsulation (either tunnel or transport) that is configured in the TEK policy.

The output from this command might show that a TEK has expired since the time it was received from the KS.

Example Passive SA

The following example displays information about crypto rules on outgoing packets:


Router# show crypto ruleset
Ethernet0/0:
  59 ANY ANY DENY
  11 ANY/848 ANY/848 DENY
 IP ANY ANY IPSec SA Passive
 IP ANY ANY IPSec Cryptomap

The following example displays the directional mode of the IPsec SA:


Router# show crypto ruleset detail
Ethernet0/0:
 20000001000019  59 ANY ANY DENY -> 20000001999999
20000001000029  11 ANY/848 ANY/848 DENY -> 20000001999999
 20000001000035 IP ANY ANY IPSec SA Passive
 20000001000039 IP ANY ANY IPSec Cryptomap

Example Fail-Close Mode

The following example shows that fail-close mode has been activated, and unencrypted traffic from access list 102 is allowed before the group member is registered:


crypto map map1 gdoi fail-close
 match address 102 
 activate
crypto map map1 10 gdoi
 set group ks1_group
 match address 101
!
access-list 101 deny ip 10.0.1.0 0.0.0.255 10.0.1.0 0.0.0.255
access-list 102 deny tcp any eq telnet any

The following show crypto map gdoi fail-close command output shows that fail-close has been activated:


Router# show crypto map gdoi fail-close
 
Crypto Map: "svn" 
        Activate: yes
        Fail-Close Access-List: (Deny = Forward In Clear, Permit = Drop)
            access-list 105 deny tcp any port = 23 any
            access-list 105 deny ospf any any

Example: Verifying Fail-Close Revert

Device#show cry gdoi group GDOI_GROUP_1 | i Fail|Policy
       Fail-Close Revert : Enabled
       KS Policy Removal in : 697 sec

Additional References for Cisco Group Encrypted Transport VPN

Standards

Standard

Title

No new or modified standards are supported, and support for existing standards has not been modified.

MIBs

MIB

MIBs Link

CISCO-GDOI-MIB

To locate and download MIBs for selected platforms, Cisco software releases, and feature sets, use Cisco MIB Locator found at the following URL:

http://www.cisco.com/go/mibs

RFCs

RFC

Title

RFC 2401

Security Architecture for the Internet Protocol

RFC 6407

The Group Domain of Interpretation

Technical Assistance

Description

Link

The Cisco Support and Documentation website provides online resources to download documentation, software, and tools. Use these resources to install and configure the software and to troubleshoot and resolve technical issues with Cisco products and technologies. Access to most tools on the Cisco Support and Documentation website requires a Cisco.com user ID and password.

http://www.cisco.com/cisco/web/support/index.html

Feature Information for Cisco Group Encrypted Transport VPN

The following table provides release information about the feature or features described in this module. This table lists only the software release that introduced support for a given feature in a given software release train. Unless noted otherwise, subsequent releases of that software release train also support that feature.

Use Cisco Feature Navigator to find information about platform support and Cisco software image support. To access Cisco Feature Navigator, go to https://cfnng.cisco.com/. An account on Cisco.com is not required.
Table 4. Feature Information for Cisco Group Encrypted Transport VPN

Feature Name

Releases

Feature Information

Cisco Group Encrypted Transport VPN

Cisco IOS XE Release 2.3

Cisco Group Encrypted Transport VPN is an optimal encryption solution for large-scale IP or MPLS sites that require any-to-any connectivity with minimum convergence time, low processing, provisioning, managing, and troubleshooting overhead.

The following commands were introduced or modified: address ipv4 (GDOI) , clear crypto gdoi , crypto gdoi gm , debug crypto gdoi , local priority , peer address ipv4 , redundancy , rekey address ipv4 , rekey transport unicast , replay counter window-size , replay time window-size , sa receive-only , show crypto gdoi .

Create MIB Object to Track a Successful GDOI Registration

Cisco IOS XE Release 3.12S

The Create MIB Object to track a successful GDOI Registration feature introduces a new MIB object in the GDOI MIB to indicate the number of active TEKs in a group.

GET VPN Hardening

Cisco IOS XE Release 3.9S

This feature improves GET VPN resiliency. The improvements in resiliency prevent or minimize data-traffic disruption by using one of the following methods:

  • Making corrections when conditions that could cause a traffic disruption are detected.

  • Rapidly executing a recovery mechanism when a disruption is detected.

The following commands were modified: show crypto gdoi , show crypto ipsec sa , show tech-support .

GET VPN IKEv1 Separation

Cisco IOS XE Release 3.11S

This feature eases maintenance and troubleshooting.

The following commands were modified: show tech-support, show crypto gdoi and show crypto ipsec sa .

GET VPN Phase 1.2

Cisco IOS XE Release 2.3

These enhancements include the following features:

  • Change Key Server Role

    This feature enables you to change the role of the key server from primary to secondary.

    The following commands were added or modified for this feature: clear crypto gdoi ks coop role

  • Fail-Close Mode

    This feature prevents unencrypted traffic from passing through the group member before that member is registered.

    The following commands were added or modified for this feature: activate , crypto map , match address , and show crypto map .

  • Passive SA

    This feature allows a group member to be configured into passive mode permanently.

    The following command was introduced: passive .

GETVPN Policy-Change Enhancement for XE-based Group Members

Cisco IOS XE Fuji 16.8.1

The GETVPN Policy-Change Enhancement for XE-based Group Members feature enhances group members, running Cisco IOS XE software, handle policy change rekeys that require flow relocation. As a result of this feature, group members need not reregister and download again SAs and traffic that matches the old and new crypto policy is not leaked via clear text. This feature creates new inbound and outbound flows (SAs) for both old and new TEKs.

No command was introduced or modified for this feature.

GETVPN Routing Awareness for BGP

Cisco IOS XE Release 3.13S

The GET VPN Routing Awareness for BGP feature prevents routing absence by tracking the GETVPN GM crypto state and by applying the tracking information to perform bidirectional conditional route filtering on the GM.

The following commands were introduced or modified: client status active-sa track.

GET VPN Resiliency

Cisco IOS XE Release 3.9S

This feature improves the resiliency of GET VPN, so that data traffic disruption is prevented or minimized when errors occur.

This feature introduces long SA lifetime functionality, which extends the maximum for which you can configure the lifetime of the key encryption key and traffic encryption keys from 24 hours to 30 days. This feature also lets you configure key servers to continue to send periodic reminder rekeys to group members that did not respond with an acknowledgment in the last scheduled rekey.

By using a long SA lifetime in combination with periodic reminder rekeys, a key server can effectively synchronize group members if they miss a scheduled rekey before the keys roll over.

The following commands were modified: rekey lifetime , rekey retransmit , set security-association lifetime , show crypto gdoi .

GET VPN Support of IPsec Inline Tagging for Cisco TrustSec

Cisco IOS XE Release 3.9S

Cisco TrustSec (CTS) uses the user and device identification information acquired during authentication to classify packets as they enter the network. CTS maintains classification of each packet by tagging packets with security group tags (SGTs) on ingress to the CTS network so that they can be identified for applying security and other policy criteria along the data path. The tags allow network intermediaries such as switches and firewalls to enforce the access control policy based on the classification. The GET VPN Support of IPsec Inline Tagging for Cisco TrustSec feature uses GET VPN inline tagging to carry the SGT information across the private WAN.

The following commands were introduced or modified: show crypto gdoi , show crypto ipsec sa , tag cts sgt .

GET VPN Time-Based Anti-Replay

Cisco IOS XE Release 2.3

Support for time-based antireplay was added to the Cisco VSA.

GET VPN Troubleshooting

Cisco IOS XE Release 3.8S

This feature provides improved debugging levels (so debug messages can be enabled per feature), event logging, exit trace capabilities to save a log of error conditions and their tracebacks, and conditional debugging (which provides the ability to debug individual group members from the key server). The conditional debugging feature provides the ability to perform conditional debugging on the key server so that it can filter based on GM or other cooperative key servers. The event logging feature provides the ability to log the last set of events.

The following commands were introduced or modified: clear crypto gdoi , debug crypto condition unmatched , debug crypto gdoi , debug crypto gdoi condition , monitor event-trace gdoi , show crypto gdoi , and show monitor event-trace gdoi .

Group Encrypted Transport VPN Key Server

Cisco IOS XE Release 3.6S

Support was added for configuring a device running Cisco IOS XE as a key server.

In Cisco IOS XE Release 3.6S, this feature was introduced on the Cisco ASR 1000 Series Aggregation Services Routers.

In Cisco IOS XE Release 3.13S, support was added for the Cisco Cloud Services Router (CSR) 1000V Series.

VSA Support for GET VPN

Cisco IOS XE Release 2.3

Cisco VSA (high-performance crypto engine) support was added for GDOI and GET VPN.

Glossary

DOI —Domain of Interpretation. For Internet Security Association Key Management Protocol (ISAKMP), a value in the security association (SA) payload that describes in which context the key management message is being sent (IPsec or Group Domain of Interpretation).

GDOI —Group Domain of Interpretation. For ISAKMP, a means of distributing and managing keys for groups of mutually trusted systems.

group member —Device (Cisco IOS router) that registers with a group that is controlled by the key server for purposes of communicating with other group members.

group security association —SA that is shared by all group members in a group.

IPsec —IP security. Data encryption protocol for IP packets that are defined in a set of RFCs (see IETF RFC 2401).

ISAKMP —Internet Security Association and Key Management Protocol. Protocol that provides a framework for cryptographic key management protocols.

KEK —key encryption key. Key used to protect the rekey between the key server and group members.

key server —Device (Cisco IOS router) that distributes keys and policies to group members.

MTU —maximum transmission unit. Size (in bytes) of the largest packet or frame that a given layer of a communications protocol can pass onward.

SA —security association. SA that is shared by all group members in a group.

Simple Network Management Protocol (SNMP) —An interoperable standards-based protocol that allows for external monitoring of a managed device through an SNMP agent.

TEK —traffic encryption key. Key that is used to protect the rekey between group members.