Security for VPNs with IPsec Configuration Guide, Cisco IOS XE Gibraltar 16.11.x
Bias-Free Language
The documentation set for this product strives to use bias-free language. For the purposes of this documentation set, bias-free is defined as language that does not imply discrimination based on age, disability, gender, racial identity, ethnic identity, sexual orientation, socioeconomic status, and intersectionality. Exceptions may be present in the documentation due to language that is hardcoded in the user interfaces of the product software, language used based on RFP documentation, or language that is used by a referenced third-party product. Learn more about how Cisco is using Inclusive Language.
IPsec virtual tunnel
interfaces (VTIs) provide a routable interface type for terminating IPsec
tunnels and an easy way to define protection between sites to form an overlay
network. IPsec VTIs simplify the configuration of IPsec for protection of
remote links, support multicast, and simplify network management and load
balancing.
Note
Security threats, as well as
the cryptographic technologies to help protect against them, are constantly
changing. For more information about the latest Cisco cryptographic
recommendations, see the
Next Generation
Encryption (NGE) white paper.
Finding Feature Information
Your software release may not support all the features documented in this module. For the latest caveats and feature information,
see Bug Search Tool and the release notes for your platform and software release. To find information about the features documented in this module,
and to see a list of the releases in which each feature is supported, see the feature information table.
Use Cisco Feature Navigator to find information about platform support and Cisco software image support. To access Cisco Feature
Navigator, go to www.cisco.com/go/cfn. An account on Cisco.com is not required.
Restrictions for IPsec
Virtual Tunnel Interfaces
Fragmentation
Fragmentation is not supported over IPsec tunnel. You can choose to set the lower MTU on hosts to avoid packet fragments or
choose to fragment the packets on any device.
IPsec Transform Set
The IPsec transform set must be configured in tunnel mode only.
IKE Security
Association
The Internet Key
Exchange (IKE) security association (SA) is bound to the VTI.
IPsec SA Traffic
Selectors
Static VTIs (SVTIs) support only a single IPsec SA that is attached to the VTI interface. The traffic selector for the IPsec
SA is always “IP any any.”
By default, Static VTIs (SVTIs) support only a single IPSec SA that is attached to the virtual tunnel interface. The traffic
selector for the IPsec SA is always “IP any any”.
IPv4
This feature
supports SVTIs that are configured to encapsulate IPv4 packets
.
Tunnel Protection
Do not configure
the
shared keyword
when using the
tunnel mode ipsec
ipv4 command for IPsec IPv4 mode.
Traceroute
The traceroute function with crypto offload on VTIs is not supported.
VxLAN GPE Tunnel Interface
The VxLAN GPE Tunnel Interface cannot use the same source interface as IPsec VTI.
Information About IPsec
Virtual Tunnel Interfaces
The use of IPsec VTIs can simplify the configuration process when you need to provide protection for remote access and it
provides an alternative to using generic routing encapsulation (GRE) or Layer 2 Tunneling Protocol (L2TP) tunnels for encapsulation.
A benefit of using IPsec VTIs is that the configuration does not require static mapping of IPsec sessions to a physical interface.
The IPsec tunnel endpoint is associated with an actual (virtual) interface. Because there is a routable interface at the tunnel
endpoint, many common interface capabilities can be applied to the IPsec tunnel.
The IPsec VTI allows
for the flexibility of sending and receiving both IP unicast and multicast
encrypted traffic on any physical interface, such as in the case of multiple
paths. Traffic is encrypted or decrypted when it is forwarded from or to the
tunnel interface and is managed by the IP routing table. Using IP routing to
forward the traffic to the tunnel interface simplifies the IPsec VPN
configuration
. Because
DVTIs function like any other real interface you can apply quality of service
(QoS), firewall, and other security services as soon as the tunnel is active.
The following
sections provide details about the IPSec VTI:
Benefits of Using IPsec
Virtual Tunnel Interfaces
IPsec VTIs allow you
to configure a virtual interface to which you can apply features. Features for
clear-text packets are configured on the VTI. Features for encrypted packets
are applied on the physical outside interface. When IPsec VTIs are used, you
can separate the application of features such as Network Address Translation
(NAT), ACLs, and QoS and apply them to clear-text, or encrypted text, or both.
There are two types
of VTI interfaces: static VTIs (SVTIs) and dynamic VTIs (DVTIs).
Static Virtual Tunnel
Interfaces
SVTI configurations
can be used for site-to-site connectivity in which a tunnel provides always-on
access between two sites.
Additionally,
multiple Cisco IOS software features can be configured directly on the tunnel
interface and on the physical egress interface of the tunnel interface. This
direct configuration allows users to have solid control on the application of
the features in the pre- or post-encryption path.
The figure below
illustrates how a SVTI is used.
Figure 1. IPsec SVTI
The IPsec VTI
supports native IPsec tunneling and exhibits most of the properties of a
physical interface.
Multi-SA Support for SVTI
By default, the traffic selector for an SVTI is set to ‘any any’. As a result, a single IPSec SA is attached for the SVTI
corresponding to the ‘any any’ traffic selector.
From Cisco IOS XE Gibraltar 16.12.1, you can define and associate an Access Control List (ACL) with an SVTI to select traffic
between specific source and destination proxies instead of the ‘any any’ proxy defined by the default. IPSec SAs are created
for each non-any-any traffic selector, and thus, multiple SAs are attached to an SVTI.
This feature is supports IPv4 and IPv6 traffic protection with IPSec encapsulation in tunnel mode. The feature supports both
IKEv1 and IKEv2.
Restrictions
This feature is not supported with tunnel protection shared.
This feature is not supported with IPSec Mixed Mode.
Traffic selectors associated with the SVTIs at both the ends of a tunnel must have matching source and destination proxies.
Do not narrow down the traffic selector at one of the SVTIs forming a tunnel.
ACL Characteristics and Effects on SVTI IPSec SAs
An ACL associated with an SVTI must not contain an ‘any any’ proxy. For an ‘any any’ traffic selector, use the default behaviour
of the SVTI and do not associate an ACL with the SVTI.
An ACL associated with an SVTI supports only permit statements and must not contain deny statements.
Run-time modification of an ACL associated with an SVTI is not supported. Shut the tunnel down before adding or modifying
ACEs in the ACL.
If you disassociate an ACL from an SVTI, existing IPSec SAs are deleted and a new IPSec SA for default traffic selector of
‘IP any any’ is formed.
We recommend that you associate a maximum of 100 Access Control Entries (ACEs) with an SVTI. Further, all the ACLs associated
with the various tunnel interfaces should together use a maximum of 2000 ACEs.
Reverse Route Injection
For Multi-SA SVTIs, Reverse Route Injection (RRI) can be configured in the IPSec profile.
If you use extended ACL or ACE options, such as protocol, port number, and DHCP, do not use RRI; use other means such as route
maps for routing.
Note
RRI capability with distance and tag is yet to be supported.
Dynamic Virtual Tunnel
Interfaces
DVTIs can provide
highly secure and scalable connectivity for remote-access VPNs. The DVTI
technology replaces dynamic crypto maps and the dynamic hub-and-spoke method
for establishing tunnels.
Note
You can configure DVTIs with IKEv1 or IKEv2. The legacy crypto map
based configuration supports DVTIs with IKEv1 only. A DVTI configuration with
IKEv2 is supported only in FlexVPN.
DVTIs can be used for
both the server and the remote configuration. The tunnels provide an on-demand
separate virtual access interface for each VPN session. The configuration of
the virtual access interfaces is cloned from a virtual template configuration,
which includes the IPsec configuration and any Cisco IOS software feature
configured on the virtual template interface, such as QoS, NetFlow, or ACLs.
DVTIs function like
any other real interface, so you can apply QoS, firewall, or other security
services as soon as the tunnel is active. QoS features can be used to improve
the performance of various applications across the network. Any combination of
QoS features offered in Cisco IOS software can be used to support voice, video,
or data applications.
DVTIs provide
efficiency in the use of IP addresses and provide secure connectivity. DVTIs
allow dynamically downloadable per-group and per-user policies to be configured
on a RADIUS server. The per-group or per-user definition can be created using
an extended authentication (Xauth) User or Unity group, or can be derived from
a certificate. DVTIs are standards based, so interoperability in a
multiple-vendor environment is supported. IPsec DVTIs allow you to create
highly secure connectivity for remote access VPNs and can be combined with
Cisco Architecture for Voice, Video, and Integrated Data (AVVID) to deliver
converged voice, video, and data over IP networks. The DVTI simplifies VPN
routing and forwarding- (VRF-) aware IPsec deployment. The VRF is configured on
the interface.
A DVTI requires
minimal configuration on the router. A single virtual template can be
configured and cloned.
The DVTI creates an
interface for IPsec sessions and uses the virtual template infrastructure for
dynamic instantiation and management of dynamic IPsec VTIs. The virtual
template infrastructure is extended to create dynamic virtual-access tunnel
interfaces. DVTIs are used in hub-and-spoke configurations. A single DVTI can
support several static VTIs.
The figure below
illustrates the DVTI authentication path.
Figure 2. Dynamic IPsec
VTI
The authentication
shown in the figure above follows this path:
User 1 calls the
router.
Router 1
authenticates User 1.
IPsec clones the
virtual access interface from the virtual template interface.
Traffic Encryption with the
IPsec Virtual Tunnel Interface
When an IPsec VTI is
configured, encryption occurs in the tunnel. Traffic is encrypted when it is
forwarded to the tunnel interface. Traffic forwarding is handled by the IP
routing table, and dynamic or static routing can be used to route traffic to
the SVTI. DVTI uses reverse route injection to further simplify the routing
configurations. Using IP routing to forward the traffic to encryption
simplifies the IPsec VPN configuration
. The IPsec virtual tunnel also allows you
to encrypt multicast traffic with IPsec.
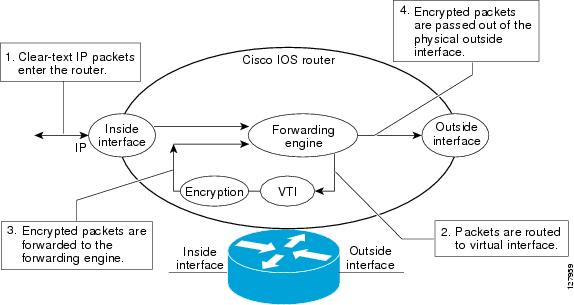
IPsec packet flow
into the IPSec tunnel is illustrated in the figure below.
Figure 3. Packet Flow into the IPsec
Tunnel
After packets arrive
on the inside interface, the forwarding engine switches the packets to the VTI,
where they are encrypted. The encrypted packets are handed back to the
forwarding engine, where they are switched through the outside interface.
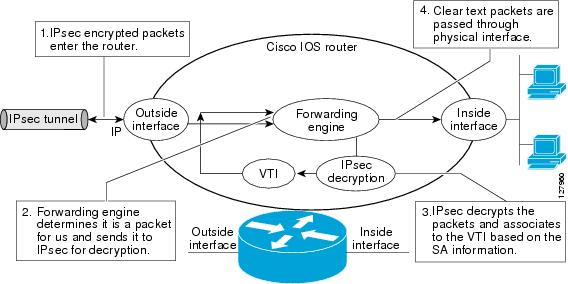
The figure below
shows the packet flow out of the IPsec tunnel.
Figure 4. Packet Flow out of the IPsec
Tunnel
Dynamic Virtual Tunnel Interface Life Cycle
IPsec profiles define the policy for DVTIs. The dynamic interface is created at the end of IKE Phase 1 and IKE Phase 1.5.
The interface is deleted when the IPsec session to the peer is closed. The IPsec session is closed when both IKE and IPsec
SAs to the peer are deleted.
Routing with IPsec Virtual
Tunnel Interfaces
Because VTIs are
routable interfaces, routing plays an important role in the encryption process.
Traffic is encrypted only if it is forwarded out of the VTI, and traffic
arriving on the VTI is decrypted and routed accordingly. VTIs allow you to
establish an encryption tunnel using a real interface as the tunnel endpoint.
You can route to the interface or apply services such as QoS, firewalls,
network address translation (NAT), and NetFlow statistics as you would to any
other interface. You can monitor the interface and route to it, and the
interface
provides benefits similar to other Cisco IOS interface.
FlexVPN Mixed
Mode Support
The FlexVPN Mixed
Mode feature provides support for carrying IPv4 traffic over IPsec IPv6
transport. This is the first phase towards providing dual stack support on the
IPsec stack. This implementation does not support using a single IPsec security
association (SA) pair for both IPv4 and IPv6 traffic.
This feature is
only supported for Remote Access VPN with IKEv2 and Dynamic VTI.
The FlexVPN Mixed Mode feature provides support for carrying IPv6
traffic over IPsec IPv4 transport from Cisco IOS XE Everest 16.4.1.
Auto Tunnel Mode
Support in IPsec
When configuring a VPN headend in a multiple vendor scenario, you must be aware of the technical details of the peer or responder.
For example, some devices may use IPsec tunnels while others may use generic routing encapsulation (GRE) or IPsec tunnel,
and sometimes, a tunnel may be IPv4 or IPv6. In the last case, you must configure an Internet Key Exchange (IKE) profile and
a virtual template.
The Tunnel Mode Auto Selection feature eases the configuration and spares you about knowing the responder’s details. This
feature automatically applies the tunneling protocol (GRE or IPsec) and transport protocol (IPv4 or IPv6) on the virtual template
as soon as the IKE profile creates the virtual access interface. This feature is useful on dual stack hubs aggregating multivendor
remote access, such as Cisco AnyConnect VPN Client, Microsoft Windows7 Client, and so on.
Note
The Tunnel Mode Auto Selection feature eases the configuration for a responder only. The tunnel must be statically configured
for an initiator.
IPSec Mixed Mode
Support for VTI
The IPSec Mixed Mode feature
provides support for carrying IPv4 traffic over IPsec IPv6 transport. This is
the first phase towards providing dual stack support on the IPsec stack. This
implementation does not support using a single IPsec security association (SA)
pair for both IPv4 and IPv6 traffic.
This feature is supported for SVTI as well as DVTI and IKEv1 as well as
IKEv2.
Exits IPsec
profile configuration mode, and enters global configuration mode.
Step 6
interfacetypenumber
Example:
Device(config)# interface tunnel 0
Specifies the
interface on which the tunnel will be configured and enters interface
configuration mode.
Step 7
ipaddressaddressmask
Example:
Device(config-if)# ip address 10.1.1.1 255.255.255.0
Specifies the
IP address and mask.
Step 8
tunnel mode ipsec
ipv4
Example:
Device(config-if)# tunnel mode ipsec ipv4
Defines the mode for the tunnel.
Step 9
tunnelsourceinterface-typeinterface-number
Example:
Device(config-if)# tunnel source loopback 0
Specifies the tunnel source as a loopback interface.*
Note
*If you are configuring the Tunnel Mode Auto Selection feature using a virtual-template, omit the tunnel source and tunnel
mode in interface virtual-template number type tunnel command. If the tunnel source and tunnel mode are specified, clients
using IPv6 transport will fail to connect.
Step 10
tunneldestinationip-address
Example:
Device(config-if)# tunnel destination 172.16.1.1
Identifies
the IP address of the tunnel destination.
Enters router configuration mode and creates a BGP routing process.
autonomous-system-number —Number of an autonomous system that identifies the router to other BGP routers and tags the routing information that is passed
along. Number in the range from 1 to 65535.
In the example, the first router in this procedure is identified as "65510".
network-ip-address—IP address of the network advertised in BGP. For example, the IP address of a loopback interface.
subnet-mask—subnet mask of the network advertised in BGP.
Note
The BGP network command network and mask must exactly match a route that is already in the routing table for it to be brought into BGP and advertised to BGP neighbors.
This is different from EIGRP, OSPF where the network statement just has to "cover" an interface network and it will pick up
the network with mask from the interface.
Step 4
exit
Example:
Device(config-router)# exit
Exits router configuration mode.
Step 5
Enter the following commands on the second router.
Step 6
routerbgpautonomous-system-number
Example:
Device(config)# router bgp 65511
Enters router configuration mode and creates a BGP routing process.
autonomous-system-number —Number of an autonomous system that identifies the router to other BGP routers and tags the routing information that is passed
along. Number in the range from 1 to 65535.
In the example, the second router in this procedure is identified as "65511".
Associates a tunnel interface with an IPsec profile.
Step 9
exit
Example:
Device(config-if)# exit
Exits
interface configuration mode.
Step 10
crypto isakamp
profileprofile-name
Example:
Device(config)# crypto isakamp profile profile1
Defines the
ISAKMP profile to be used for the virtual template.
Step 11
match identity addressip-address
mask
Example:
Device(conf-isa-prof)# match identity address 10.1.1.0 255.255.255.0
Matches an
identity from the ISAKMP profile and enters isakmp-profile configuration mode.
Step 12
virtual templatetemplate-number
Example:
Device(config)# virtual-template 1
Specifies the
virtual template attached to the ISAKMP profile.
Step 13
end
Example:
Device(config)# end
Exits global
configuration mode and enters privileged EXEC mode.
Configuring Multi-SA
Support for Dynamic Virtual Tunnel Interfaces Using IKEv1
Note
Security threats, as well
as the cryptographic technologies to help protect against them, are constantly
changing. For more information about the latest Cisco cryptographic
recommendations, see the
Next Generation
Encryption (NGE) white paper.
Device(config-ext-nacl)# permit ip 30.0.1.0 0.0.0.255 10.0.1.0 0.0.0.255
Permits traffic that matches all of the conditions specified in the statement.
Do not use the keyword any as the wildcard for both the source and destination proxies. For the ‘any any’ traffic selector, use the default SVTI without
an attached ACL.
Do not use deny statements.
Step 16
end
Example:
Device(config-ext-nacl)# end
Exits standard named access list configuration mode and enters privileged EXEC mode.
Configuring Tunnel Mode as Dual-overlay
To configure the tunnel mode as dual-overlay, perform these steps:
Procedure
Step 1
enable
Example:
Device> enable
Enables privileged EXEC mode. Enter your password if prompted.
Step 2
configure terminal
Example:
Device# configure terminal
Enters global configuration mode.
Step 3
interface tunneltype number
Example:
Device(config)# interface tunnel 1
Specifies a tunnel interface and number, and enters interface configuration mode.
Step 4
ipv6 enable
Example:
Device(config-if)# ipv6 enable
Enables IPv6 processing on an interface that has not been configured with an explicit IPv6 address.
Specifies the source IPv6 address or the source interface type and number for the tunnel interface. If an interface type and
number are specified, that interface must be configured with an IPv6 address.
Step 6
tunnel mode ipsec dual-overlay
Example:
Device(config-if)# tunnel mode ipsec dual-overlay
Specifies a dual-overlay tunnel. The tunnel mode ipsec dual-overlay command specifies the encapsulation protocol for the tunnel.
Associates a tunnel interface with an IPsec profile. The name argument specifies the name of the IPsec profile; this value must match the name specified in the crypto IPsec profilename command
Step 9
exit
Example:
Device(config-if)# exit
Exits interface configuration mode and enters global configuration mode.
Step 10
end
Example:
Device(config-if)# end
Exits interface configuration mode and returns to privileged EXEC mode.
Configuration Examples for
IPsec Virtual Tunnel Interfaces
Example: Static Virtual
Tunnel Interface with IPsec
The following
example configuration uses a preshared key for authentication between peers.
VPN traffic is forwarded to the IPsec VTI for encryption and then sent out the
physical interface. The tunnel on subnet 10 checks packets for the IPsec policy
and passes them to the Crypto Engine (CE) for IPsec encapsulation. The figure
below illustrates the IPsec VTI configuration.
Figure 5. VTI with IPsec
Router
Configuration
version 12.3
service timestamps debug datetime
service timestamps log datetime
hostname 7200-3
no aaa new-model
ip subnet-zero
ip cef
controller ISA 6/1
!
crypto isakmp policy 1
encr aes
authentication pre-share
group 14
crypto isakmp key Cisco12345 address 0.0.0.0 0.0.0.0
crypto ipsec transform-set T1 esp-aes esp-sha-hmac
crypto ipsec profile P1
set transform-set T1
!
interface Tunnel0
 ip address 10.0.51.203 255.255.255.0

 load-interval 30
 tunnel source 10.0.149.203
 tunnel destination 10.0.149.217
 tunnel mode IPsec ipv4
 tunnel protection IPsec profile P1
!

 ip address 10.0.149.203 255.255.255.0
 duplex full
!

 ip address 10.0.35.203 255.255.255.0
 duplex full
!
ip classless
ip route 10.0.36.0 255.255.255.0 Tunnel0
line con 0
line aux 0
line vty 0 4
end
Router
Configuration
version 12.3
hostname c1750-17
no aaa new-model
ip subnet-zero
ip cef
crypto isakmp policy 1
encr aes
authentication pre-share
group 14
crypto isakmp key Cisco12345 address 0.0.0.0 0.0.0.0
crypto ipsec transform-set T1 esp-aes esp-sha-hmac
crypto ipsec profile P1
set transform-set T1
!
interface Tunnel0
 ip address 10.0.51.217 255.255.255.0

 tunnel source 10.0.149.217
 tunnel destination 10.0.149.203
 tunnel mode ipsec ipv4
 tunnel protection ipsec profile P1
!
interface
 ip address 10.0.149.217 255.255.255.0
 speed 100
 full-duplex
!
interface
 ip address 10.0.36.217 255.255.255.0
 load-interval 30
 full-duplex
!
ip classless
ip route 10.0.35.0 255.255.255.0 Tunnel0
line con 0
line aux 0
line vty 0 4
end
Example: Verifying the
Results for the IPsec Static Virtual Tunnel Interface
This section
provides information that you can use to confirm that your configuration is
working properly. In this display, Tunnel 0 is “up,” and the line protocol is
“up.” If the line protocol is “down,” the session is not active.
Verifying the
IPsec Static Virtual Tunnel
Interface
Router# show interface tunnel 0

Tunnel0 is up, line protocol is up
Hardware is Tunnel
Internet address is 10.0.51.203/24
MTU 1514 bytes, BW 9 Kbit, DLY 500000 usec,
reliability 255/255, txload 103/255, rxload 110/255
Encapsulation TUNNEL, loopback not set
Keepalive not set
Tunnel source 10.0.149.203, destination 10.0.149.217
Tunnel protocol/transport ipsec/ip, key disabled, sequencing disabled
Tunnel TTL 255
Checksumming of packets disabled, fast tunneling enabled
Tunnel transmit bandwidth 8000 (kbps)
Tunnel receive bandwidth 8000 (kbps)
Tunnel protection via IPsec (profile "P1")
Last input never, output never, output hang never
Last clearing of "show interface" counters never
Input queue: 1/75/0/0 (size/max/drops/flushes); Total output drops: 0
Queueing strategy: fifo
Output queue: 0/0 (size/max)
30 second input rate 13000 bits/sec, 34 packets/sec
30 second output rate 36000 bits/sec, 34 packets/sec
191320 packets input, 30129126 bytes, 0 no buffer
Received 0 broadcasts, 0 runts, 0 giants, 0 throttles
0 input errors, 0 CRC, 0 frame, 0 overrun, 0 ignored, 0 abort
59968 packets output, 15369696 bytes, 0 underruns
0 output errors, 0 collisions, 0 interface resets
0 output buffer failures, 0 output buffers swapped out

Router# show crypto session

Crypto session current status
Interface: Tunnel0
Session status: UP-ACTIVE
Peer: 10.0.149.217 port 500
IKE SA: local 10.0.149.203/500 remote 10.0.149.217/500 Active
IPsec FLOW: permit ip 0.0.0.0/0.0.0.0 0.0.0.0/0.0.0.0
Active SAs: 4,
Router# show ip route

Codes: C - connected, S - static, R - RIP, M - mobile, B - BGP
D - EIGRP, EX - EIGRP external, O - OSPF, IA - OSPF inter area
N1 - OSPF NSSA external type 1, N2 - OSPF NSSA external type 2
E1 - OSPF external type 1, E2 - OSPF external type 2
i - IS-IS, su - IS-IS summary, L1 - IS-IS level-1, L2 - IS-IS level-2
ia - IS-IS inter area, * - candidate default, U - per-user static route
o - ODR, P - periodic downloaded static route
Gateway of last resort is not set
10.0.0.0/8 is variably subnetted, 4 subnets, 2 masks
C 10.0.35.0/24 is directly connected, Ethernet3/3
S 10.0.36.0/24 is directly connected, Tunnel0
C 10.0.51.0/24 is directly connected, Tunnel0
C 10.0.149.0/24 is directly connected, Ethernet3/0
You can apply any QoS policy to the tunnel endpoint by including the
service-policy statement under the tunnel interface. The following example shows how to police traffic out the tunnel interface.
C8000 Router Configuration
hostname c8000
.
.
class-map match-all VTI
 match any
!
policy-map VTI
  class VTI
  police cir 2000000
    conform-action transmit
    exceed-action drop
!
.
.
interface Tunnel0
 ip address 10.0.51.217 255.255.255.0
 tunnel source 10.0.149.217
 tunnel destination 10.0.149.203
 tunnel mode ipsec ipv4
 tunnel protection ipsec profile P1
 service-policy output VTI
!
.
.
!
end
Example: Static Virtual Tunnel Interface with Virtual Firewall
Applying the virtual firewall to the SVTI tunnel allows traffic from the spoke to pass through the hub to reach the Internet.
The figure below illustrates an SVTI with the spoke protected inherently by the corporate firewall.
Figure 6. Static VTI with Virtual Firewall
The basic SVTI configuration has been modified to include the virtual firewall definition:
C8000 Router Configuration
hostname c8000
.
.
ip inspect max-incomplete high 1000000
ip inspect max-incomplete low 800000
ip inspect one-minute high 1000000
ip inspect one-minute low 800000
ip inspect tcp synwait-time 60
ip inspect tcp max-incomplete host 100000 block-time 2
ip inspect name IOSFW1 tcp timeout 300
ip inspect name IOSFW1 udp
!
.
.
interface GigabitEthernet0/1
 description Internet Connection
 ip address 172.18.143.246 255.255.255.0
 ip access-group 100 in
 ip nat outside
!
interface Tunnel0
 ip address 10.0.51.217 255.255.255.0
 ip nat inside
 ip inspect IOSFW1 in
 tunnel source 10.0.149.217
 tunnel destination 10.0.149.203
 tunnel mode ipsec ipv4
 tunnel protection ipsec profile P1
!
ip classless
ip route 0.0.0.0 0.0.0.0 172.18.143.1
!
ip nat translation timeout 120
ip nat translation finrst-timeout 2
ip nat translation max-entries 300000
ip nat pool test1 10.2.100.1 10.2.100.50 netmask 255.255.255.0
ip nat inside source list 110 pool test1 vrf test-vti1 overload
!
access-list 100 permit esp any any
access-list 100 permit udp any eq isakmp any
access-list 100 permit udp any eq non500-isakmp any
access-list 100 permit icmp any any
access-list 110 deny   esp any any
access-list 110 deny   udp any eq isakmp any
access-list 110 permit ip any any
access-list 110 deny   udp any eq non500-isakmp any
!
end
Example: Dynamic Virtual Tunnel Interface Easy VPN Server
The following example illustrates the use of the DVTI Easy VPN server, which serves as an IPsec remote access aggregator.
The client can be a home user running a Cisco VPN client or a Cisco IOS router configured as an Easy VPN client.
C8000 Router Configuration
hostname c8000
!
aaa new-model
aaa authentication login local_list local
aaa authorization network local_list local
aaa session-id common
!
ip subnet-zero
ip cef
!
username cisco password 0 cisco123
!
controller ISA 1/1
!
crypto isakmp policy 1
 encr aes
 authentication pre-share
 group 14
!
crypto isakmp client configuration group group1
 key cisco123
 pool group1pool
 save-password
!
crypto isakmp profile vpn1-ra
   match identity group group1
   client authentication list local_list
   isakmp authorization list local_list
   client configuration address respond
   virtual-template 1
!
crypto ipsec transform-set VTI-TS esp-aes esp-sha-hmac
!
crypto ipsec profile test-vti1
 set transform-set VTI-TS
!
interface GigabitEthernet0/1
 description Internet Connection
 ip address 172.18.143.246 255.255.255.0
!
interface GigabitEthernet0/2
 description Internal Network
 ip address 10.2.1.1 255.255.255.0
!
interface Virtual-Template1 type tunnel
 ip unnumbered GigabitEthernet0/1
 ip virtual-reassembly
 tunnel mode ipsec ipv4
 tunnel protection ipsec profile test-vti1
!
ip local pool group1pool 192.168.1.1 192.168.1.4
ip classless
ip route 0.0.0.0 0.0.0.0 172.18.143.1
!
end
Example: Verifying the Results for the Dynamic Virtual Tunnel Interface Easy VPN Server
The following examples show that a DVTI has been configured for an Easy VPN server.
Router# show running-config interface Virtual-Access2

Building configuration...
Current configuration : 250 bytes
!
interface Virtual-Access2
 ip unnumbered GigabitEthernet0/1
 ip virtual-reassembly
 tunnel source 172.18.143.246
 tunnel destination 172.18.143.208
 tunnel mode ipsec ipv4
 tunnel protection ipsec profile test-vti1
 no tunnel protection ipsec initiate
end
Router# show ip route

Codes: C - connected, S - static, R - RIP, M - mobile, B - BGP
       D - EIGRP, EX - EIGRP external, O - OSPF, IA - OSPF inter area
       N1 - OSPF NSSA external type 1, N2 - OSPF NSSA external type 2
       E1 - OSPF external type 1, E2 - OSPF external type 2
       i - IS-IS, su - IS-IS summary, L1 - IS-IS level-1, L2 - IS-IS level-2
       ia - IS-IS inter area, * - candidate default, U - per-user static route
       o - ODR, P - periodic downloaded static route
Gateway of last resort is 10.2.1.10 to network 0.0.0.0
     172.18.0.0/24 is subnetted, 1 subnets
C       172.18.143.0 is directly connected, GigabitEthernet0/1
     192.168.1.0/32 is subnetted, 1 subnets
S       192.168.1.1 [1/0] via 0.0.0.0, Virtual-Access2
     10.0.0.0/24 is subnetted, 1 subnets
C       10.2.1.0 is directly connected, GigabitEthernet0/2
S*   0.0.0.0/0 [1/0] via 172.18.143.1
Example: VRF-Aware IPsec
with a Dynamic VTI When VRF Is Configured Under a Virtual Template
The following
example shows how to configure VRF-aware IPsec under a virtual template to take
advantage of the DVTI:
hostname c8000
!
ip vrf VRF-100-1
  rd 1:1
!
ip vrf VRF-100-2
  rd 1:1
!
!
!
crypto keyring cisco-100-1
  pre-shared-key address 10.1.1.1 key cisco-100-1
crypto keyring cisco-100-2
  pre-shared-key address 10.1.2.1 key cisco-100-2
crypto isakmp profile cisco-isakmp-profile-100-1
  keyring cisco-100-1
  match identity address 10.1.1.0 255.255.255.0
  virtual-template 101
crypto isakmp profile cisco-isakmp-profile-100-2
  keyring cisco-100-2
  match identity address 10.1.2.0 255.255.255.0
  virtual-template 102
!
!
crypto ipsec transform-set cisco esp-aes esp-sha-hmac
!
crypto ipsec profile cisco-ipsec-profile-101
  set security-policy limit 3
  set transform-set cisco
!
crypto ipsec profile cisco-ipsec-profile-102
  set security-policy limit 5
  set transform-set Cisco
!
interface Virtual-Template101 type tunnel
  ip vrf forwarding VRF-100-1
  ip unnumbered Ethernet 0/0
  tunnel mode ipsec ipv4
  tunnel protection ipsec profile cisco-ipsec-profile-101
!
interface Virtual-Template102 type tunnel
  ip vrf forwarding VRF-100-2
  ip unnumbered Ethernet 0/0
  tunnel mode ipsec ipv4
  tunnel protection ipsec profile cisco-ipsec-profile-102
!
Example: VRF-Aware IPsec
with Dynamic VTI When VRF Is Configured Under a Virtual Template with the
Gateway Option in an IPsec Profile
The following
example shows how to configure VRF-aware IPsec to take advantage of the DVTI,
when the VRF is configured under a virtual template with the gateway option in
an IPsec profile.
hostname c8000
!
ip vrf VRF-100-1
 rd 1:1
!
ip vrf VRF-100-2
 rd 1:1
!
!
!
crypto keyring cisco-100-1
 pre-shared-key address 10.1.1.1 key cisco-100-1
crypto keyring cisco-100-2
 pre-shared-key address 10.1.2.1 key cisco-100-2
crypto isakmp profile cisco-isakmp-profile-100-1
 keyring cisco-100-1
 match identity address 10.1.1.0 255.255.255.0
 virtual-template 101
crypto isakmp profile cisco-isakmp-profile-100-2
 keyring cisco-100-2
 match identity address 10.1.2.0 255.255.255.0
 virtual-template 102
!
!
crypto ipsec transform-set cisco esp-3des esp-sha-hmac
!
crypto ipsec profile cisco-ipsec-profile-101
 set security-policy limit 3
 set transform-set cisco
 set reverse-route gateway 172.16.0.1
!
crypto ipsec profile cisco-ipsec-profile-102
 set security-policy limit 5
 set transform-set cisco
 set reverse-route gateway 172.16.0.1
!
interface Virtual-Template101 type tunnel
 ip vrf forwarding VRF-100-1
 ip unnumbered Ethernet 0/0
 tunnel mode ipsec ipv4
 tunnel protection ipsec profile cisco-ipsec-profile-101
!
interface Virtual-Template102 type tunnel
 ip vrf forwarding VRF-100-2
 ip unnumbered Ethernet 0/0
 tunnel mode ipsec ipv4
 tunnel protection ipsec profile cisco-ipsec-profile-102
!
Example: VRF-Aware IPsec
with a Dynamic VTI When VRF Is Configured Under an ISAKMP Profile
Example: VRF-Aware IPsec
with a Dynamic VTI When VRF Is Configured Under an ISAKMP Profile and a Gateway
Option in an IPsec Profile
The following
example shows how to configure VRF-aware IPsec to take advantage of the DVTI,
when the VRF is configured under an ISAKMP profile and a gateway option in an
IPsec profile:
Example: VRF-Aware IPsec with a Dynamic VTI When a VRF Is Configured Under Both a Virtual Template and an ISAKMP Profile
Note
When separate VRFs are configured under an ISAKMP profile and a virtual template, the VRF configured under the virtual template
takes precedence. This configuration is not recommended.
The following example shows how to configure VRF-aware IPsec to take advantage of the DVTI when the VRF is configured under
both a virtual template and an ISAKMP profile:
hostname C8000 server
.
.
.
ip vrf test-vti2
 rd 1:2
 route-target export 1:1
 route-target import 1:1
!
.
.
.
ip vrf test-vti1
 rd 1:1
 route-target export 1:1
 route-target import 1:1
!
.
.
.
crypto isakmp profile cisco-isakmp-profile
 vrf test-vti2
 keyring key
 match identity address 10.1.1.0 255.255.255.0
!
.
.
.
interface Virtual-Template1 type tunnel
 ip vrf forwarding test-vti1
 ip unnumbered Loopback 0
 ip virtual-reassembly
 tunnel mode ipsec ipv4
 tunnel protection ipsec profile test-vti1
!
.
.
.
end
Example: Dynamic Virtual Tunnel Interface with Virtual Firewall
The DVTI Easy VPN server can be configured behind a virtual firewall. Behind-the-firewall configuration allows users to enter
the network, while the network firewall is protected from unauthorized access. The virtual firewall uses Context-Based Access
Control (CBAC) and NAT applied to the Internet interface as well as to the virtual template.
hostname c8000
.
.
ip inspect max-incomplete high 1000000
ip inspect max-incomplete low 800000
ip inspect one-minute high 1000000
ip inspect one-minute low 800000
ip inspect tcp synwait-time 60
ip inspect tcp max-incomplete host 100000 block-time 2
ip inspect name IOSFW1 tcp timeout 300
ip inspect name IOSFW1 udp
!
.
.
interface GigabitEthernet0/1
 description Internet Connection
 ip address 172.18.143.246 255.255.255.0
 ip access-group 100 in
 ip nat outside
!
interface GigabitEthernet0/2
 description Internal Network
 ip address 10.2.1.1 255.255.255.0
!
interface Virtual-Template1 type tunnel
 ip unnumbered Loopback0
 ip nat inside
 ip inspect IOSFW1 in
 tunnel mode ipsec ipv4
 tunnel protection ipsec profile test-vti1
!
ip classless
ip route 0.0.0.0 0.0.0.0 172.18.143.1
!
ip nat translation timeout 120
ip nat translation finrst-timeout 2
ip nat translation max-entries 300000
ip nat pool test1 10.2.100.1 10.2.100.50 netmask 255.255.255.0
ip nat inside source list 110 pool test1 vrf test-vti1 overload
!
access-list 100 permit esp any any
access-list 100 permit udp any eq isakmp any
access-list 100 permit udp any eq non500-isakmp any
access-list 100 permit icmp any any
access-list 110 deny   esp any any
access-list 110 deny   udp any eq isakmp any
access-list 110 permit ip any any
access-list 110 deny   udp any eq non500-isakmp any
!
end
Example: Dynamic Virtual Tunnel Interface with QoS
You can add QoS to the DVTI tunnel by applying the service policy to the virtual template. When the template is cloned to
make the virtual access interface, the service policy will also be applied to the virtual access interface. The following
example shows the basic DVTI configuration with QoS added.
hostname c8000
.
.
class-map match-all VTI
 match any
!
policy-map VTI
  class VTI
  police cir 2000000
    conform-action transmit
    exceed-action drop
!
.
.
interface Virtual-Template1 type tunnel
 ip vrf forwarding test-vti1
 ip unnumbered Loopback0
 ip virtual-reassembly
 tunnel mode ipsec ipv4
 tunnel protection ipsec profile test-vti1
 service-policy output VTI
!
.
.
!
end
Example: Static Virtual Tunnel Interface with Multiple IPsec SAs
In the following examples an IPSec tunnel is to be established between two routers Cisco 3745 and Cisco 3725 using SVTI. The
configuration uses non-any-any traffic selectors and enables the formation of multiple IPSec SAs.
Sample configuration on a Router with the IPv4 Tunnel Mode:
The following figure illustrates the reference topology for the configuration.
Sample configuration for the router Cisco 3745 is as follows:
Internet
Security Association and Key Management Protocol
RFC 2409
The
Internet Key Exchange (IKE)
Technical Assistance
Description
Link
The Cisco
Support and Documentation website provides online resources to download
documentation, software, and tools. Use these resources to install and
configure the software and to troubleshoot and resolve technical issues with
Cisco products and technologies. Access to most tools on the Cisco Support and
Documentation website requires a Cisco.com user ID and password.
Feature Information for IPsec
Virtual Tunnel Interfaces
The following table provides release information about the feature or features described in this module. This table lists
only the software release that introduced support for a given feature in a given software release train. Unless noted otherwise,
subsequent releases of that software release train also support that feature.
Use Cisco Feature Navigator to find information about platform support and Cisco software image support. To access Cisco
Feature Navigator, go to https://cfnng.cisco.com/. An account on Cisco.com is not required.
Table 1. Feature Information for IPsec
Virtual Tunnel Interfaces
Feature
Name
Releases
Feature
Configuration Information
Dynamic
IPsec VTIs
Dynamic
VTIs enable efficient use of IP addresses and provide secure connectivity.
Dynamic VTIs allow dynamically downloadable per-group and per-user policies to
be configured on a RADIUS server. IPsec dynamic VTIs allow you to create highly
secure connectivity for remote access VPNs. The dynamic VTI simplifies
VRF-aware IPsec deployment.
The
following commands were introduced or modified:
crypto isakmp profile,
interface virtual-template, show vtemplate, tunnel mode,
virtual-template.
FlexVPN
Mixed Mode Support
The
FlexVPN Mixed Mode feature provides support for carrying IPv4 traffic over
IPsec IPv6 transport. This is the first phase towards providing dual stack
support on the IPsec stack. This implementation does not support using a single
IPsec security association (SA) pair for both IPv4 and IPv6 traffic.
This
feature is only supported for Remote Access VPN with IKEv2 and Dynamic VTI.
Multi-SA for
Dynamic VTIs
The DVTI can
accept multiple IPsec selectors that are proposed by the initiator.
The
following commands were introduced or modified:
set security-policy limit,
set reverse-route.
Static
IPsec VTIs
IPsec VTIs
provide a routable interface type for terminating IPsec tunnels and an easy way
to define protection between sites to form an overlay network. IPsec VTIs
simplify configuration of IPsec for protection of remote links, support
multicast, and simplify network management and load balancing.
Tunnel Mode
Auto Selection
The Tunnel Mode Auto Selection feature eases the configuration and spares you about knowing the responder’s details. This
feature automatically applies the tunneling protocol (GRE or IPsec) and transport protocol (IPv4 or IPv6) on the virtual template
as soon as the IKE profile creates the virtual access interface.
The following command was introduced or modified: virtual-template
FlexVPN
Mixed Mode v6 over v4 Transport
The
FlexVPN Mixed Mode v6 over v4 Transport feature provides support for carrying
IPv6 traffic over IPsec IPv4 transport. This implementation does not support
using a single IPsec security association (SA) pair for both IPv4 and IPv6
traffic.


 Feedback