The documentation set for this product strives to use bias-free language. For the purposes of this documentation set, bias-free is defined as language that does not imply discrimination based on age, disability, gender, racial identity, ethnic identity, sexual orientation, socioeconomic status, and intersectionality. Exceptions may be present in the documentation due to language that is hardcoded in the user interfaces of the product software, language used based on RFP documentation, or language that is used by a referenced third-party product. Learn more about how Cisco is using Inclusive Language.
Cisco TrustSec uses tags to represent logical group privilege. This tag, called a Security Group Tag (SGT), is used in access
policies. The SGT is understood and is used to enforce traffic by Cisco switches, routers and firewalls. Cisco TrustSec is
defined in three phases: classification, propagation and enforcement.
When users and devices connect to a network, the network assigns a specific security group. This process is called classification.
Classification can be based on the results of the authentication or by associating the SGT with an IP, VLAN, or port-profile.
After user traffic is classified, then the SGT is propagated from where classification took place, to where enforcement action
is invoked. This process is called propagation. Cisco TrustSec has two methods of SGT propagation: inline tagging and SXP.
With inline tagging, the SGT is embedded into the ethernet frame. The ability to embed the SGT within an ethernet frame does
require specific hardware support. Therefore network devices that do not have the hardware support use a protocol called SXP
(SGT Exchange Protocol). SXP is used to share the SGT to IP address mapping. This allows the SGT propagation to continue to
the next device in the path.
Finally an enforcement device controls traffic based on the tag information. A TrustSec enforcement point can be a Cisco firewall,
router, or switch. The enforcement device takes the source SGT and looks it up against the destination SGT to determine if
the traffic should be allowed or denied. If the enforcement device is a Cisco firewall, then it also allows stateful firewall
processing and IPS deep packet inspection using the same source SGT in a single firewall rule.
Note
Cisco TrustSec features are not supported on switch ports on the Cisco 1000 Series Integrated Services Routers.
Note
When CTS enforcement is enabled, the device attempts to download policies from ISE and this requires that a RADIUS server
is configured. If the RADIUS server is not configured then the policies cannot be downloaded and the Syslog file records the
error.
Each security group in a CTS domain is assigned a unique 16-bit tag called the “Scalable Group Tag” (SGT). The SGT is a single
label indicating the privileges of the source within the entire network. It is in turn propagated between network hops allowing
any intermediary devices (switches, routers) to enforce polices based on the identity tag.
CTS-capable devices have built-in hardware capabilities than can send and receive
packets with SGT embedded in the MAC (L2) layer. This feature is called “L2-SGT
Imposition.” It allows Ethernet interfaces on the device to be enabled for L2-SGT
imposition so that device can insert an SGT in the packet to be carried to its next hop Ethernet neighbor. SGT-over-Ethernet
is a method of hop-by-hop propagation of SGT embedded in clear-text (unencrypted) Ethernet packets. Inline identity propagation
is scalable, provides near line-rate performance and avoids control plane overhead.
The Cisco TrustSec with SXPv4
feature supports CTS Meta Data (CMD) based L2-SGT. When a packet enters a CTS enabled interface, the IP-SGT mapping database
(with dynamic entries built by SXP and/or static entries built by configuration commands) is analyzed to learn the SGT corresponding
to the source IP address of the packet, which is then inserted into the packet and carried throughout the network within the
CTS header.
As the tag represents the group of the source, the tag is also referred to as the Source
Group Tag (SGT). At the egress edge of the network, the group assigned to the
packet’s destination becomes known. At this point, the access control can be
applied. With CTS, access control policies are defined between the security groups
and are referred to as Security Group Access Control Lists (SGACL). From the view of
any given packet, it is simply being sourced from a security group and destined for
another security group.
Protected Access Credential (PAC)
The PAC is a unique shared credential used to mutually authenticate client and server. It is associated with a specific client
username and a server authority identifier (A-ID). A PAC removes the need for Public Key Infrastructure (PKI) and digital
certificates.
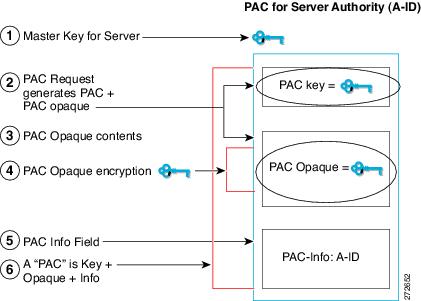
Creating a PAC consists of the following steps:
Server A-ID maintains a local key (master key) that is only known by the server.
When a client, which is referred to in this context as an initiator identity (I-ID), requests a PAC from the server, the
server generates a randomly unique PAC key and PAC-Opaque field for this client.
The PAC-Opaque field contains the randomly generated PAC key along with other information such as an I-ID and key lifetime.
PAC Key, I-ID, and Lifetime in the PAC-Opaque field are encrypted with the master key.
A PAC-Info field that contains the A-ID is created.
The PAC is distributed or imported to the client automatically.
Note
The server does not maintain the PAC or the PAC key, enabling the EAP-FAST server to be stateless.
The figure below describes the PAC's construction. A PAC consists of the PAC-Opaque, PAC Key, and PAC-Info fields. The PAC-Info
field contains the A-ID.
PAC Provisioning
In Secure RADIUS, the PAC key is provisioned into each device during authentication to derive the shared secret. Since the
RADIUS ACS does not store the PAC key for each device, the clients must also send an additional RADIUS attribute containing
the PAC-Opaque field, which is a variable length field that can only be interpreted by the server to recover the required
information and validate the peer’s identity and authentication. For example, the PAC-Opaque field may include the PAC key
and the PAC’s peer identity.
The PAC-Opaque field format and contents are specific to the PAC server on which it is issued. The RADIUS server obtains
the PAC Key from the PAC-Opaque field and derives the shared secret the same way clients do. Secure RADIUS only modifies the
way shared secret is derived and not its usage.
EAP-FAST Phase 0 is used to automatically provision a client with a PAC.
Deploying Devices in High Availability Setup
Perform the following steps when deploying devices in an HA setup:
Clear the credentials from all the devices which are part of the HA setup.
Boot the stack setup and establish the device roles (active, standby, and members).
Configure the credentials on the active device. Use the cts credentials ididpasswordpassword command to configure the credentials.
Note
While adding a new device to an existing stack, ensure that you clear the credentials on the fresh device and then add it
to the existing stack setup.
CTS Credentials
CTS requires each device in the network to identity itself uniquely. For use in TrustSec Network Device Admission Control
(NDAC) authentication, use the cts credentials command to specify the Cisco TrustSec device ID and password for this device to use when authenticating with other Cisco
TrustSec devices and for provisioning the PAC (Protected Access Credentials) with EAP-FAST. The CTS credentials state retrieval
is not performed by the nonvolatile generation process (NVGEN) because the CTS credential information is saved in the keystore,
not in the startup-config. Those credentials are stored in the keystore, eliminating the need to save the running-config.
To display the CTS device ID, use the show cts credentials command. The stored password is never displayed.
To change the device ID or the password, reenter the command. To clear the keystore, use the clear cts credentials command.
Note
When the CTS device ID is changed, all Protected Access Credentials (PACs) are flushed from the keystore because the PACs
are associated with the old device ID and are not valid for a new identity.
Configuring SGT Inline Tagging
SUMMARY STEPS
enable
configure terminal
interface {gigabitethernetport |
vlannumber}
cts manual
propagate sgt
policy static sgttag [trusted]
end
show cts interface brief
DETAILED STEPS
Command or Action
Purpose
Step 1
enable
Example:
Device> enable
Enables privileged EXEC mode.
Enter your password if prompted.
Step 2
configure terminal
Example:
Device# configure terminal
Enters global configuration mode.
Step 3
interface {gigabitethernetport |
vlannumber}
Example:
Device(config)# interface gigabitethernet 0
Enters the interface on which CTS SGT authorization and forwarding is enabled.
Step 4
cts manual
Example:
Device(config-if)# cts manual
Enables the interface for CTS SGT authorization and forwarding. Enters CTS manual interface configuration mode.
Note
If you are using subinterfaces, configure the cts manual command in the config-subif mode (subinterface) instead of the config-if mode (parent interface).
Step 5
propagate sgt
Example:
Device(config-if-cts-manual)# propagate sgt
Enables CTS SGT propagation on an interface.
Use this command in situations where the peer device is not capable of receiving SGT over Ethernet packets (that is, when
a peer device does not support Cisco Ethertype CMD 0x8909 frame format).
Configures a static SGT ingress policy on the interface and defines the trustworthiness of an SGT received on the interface.
Note
The trusted keyword indicates that the interface is trustworthy for CTS. The SGT value received in the Ethernet packet on this interface
is trusted and will be used by the device for any SG-aware policy enforcement or for purpose of egress-tagging.
Device# show cts interface brief

Interface GigabitEthernet0/0
    CTS is enabled, mode:    MANUAL
    Propagate SGT:           Enabled
    Peer SGT assignment:     Trusted

Interface GigabitEthernet0/1
    CTS is enabled, mode:    MANUAL
    Propagate SGT:           Disabled
    Peer SGT assignment:     Untrusted

Interface GigabitEthernet0/3
    CTS is disabled.
Displays CTS configuration statistics for the interface.
Configuring CTS Credentials
SUMMARY STEPS
enable
cts credentials idcts-idpasswordcts-pwd
show cts credentials
show keystore
DETAILED STEPS
Command or Action
Purpose
Step 1
enable
Example:
Device> enable
Enables privileged EXEC mode.
Enter your password if prompted.
Step 2
cts credentials idcts-idpasswordcts-pwd
Example:
Device# cts credentials id atlas password cisco123
Specifies the Cisco TrustSec device ID and password for this device to use when authenticating with other CTS devices with
EAP-FAST.
Step 3
show cts credentials
Example:
Device# show cts credentials
Displays the Cisco TrustSec (CTS) device ID.
Step 4
show keystore
Example:
**Note that the following is the sample output of the command till Cisco IOS XE Everest release 16.5.**

Device# show keystore

Using software keystore emulation.
Keystore contains the following records (S=Simple Secret, P=PAC, R=RSA):

Index  Type  Name
-----  ----  ----
    0    S  CTS-password
    1    P  57366898EEF9D71A6E33C3628CE7EEDE
Example:
**Note that the following is the sample output of the command from Cisco IOS XE Everest release 16.6 and above.
The Protected Access Credentials (PAC) information is not displayed.**

Device# show keystore

Using software keystore emulation.
Keystore contains the following records (S=Simple Secret, P=PAC, R=RSA):

Index  Type  Name
-----  ----  ----
    0    S  CTS-password
Display the contents of the software or hardware encryption keystore.
Example: Configuring SGT Inline Tagging
This example shows how to enable an interface on the device for L2-SGT tagging or imposition and defines whether the interface
is trusted for CTS:

 Feedback