Implementing Certification Authority Interoperability
CA interoperability permits devices and CAs to communicate so that your device can obtain and use digital certificates from the CA. Although IPSec can be implemented in your network without the use of a CA, using a CA provides manageability and scalability for IPSec.
 Note |
IPSec will be supported in a future release. |
Prerequisites for Implementing Certification Authority
The following prerequisites are required to implement CA interoperability:
-
You must be in a user group associated with a task group that includes the proper task IDs. The command reference guides include the task IDs required for each command. If you suspect user group assignment is preventing you from using a command, contact your AAA administrator for assistance.
-
You must install and activate the Package Installation Envelope (PIE) for the security software.
For detailed information about optional PIE installation, refer to the System Management Guide.
From Cisco IOS XR Software Release 7.0.1 and later, you need not install the PIE, because the functionality is available in the base image itself.
-
You need to have a CA available to your network before you configure this interoperability feature. The CA must support Cisco Systems PKI protocol, the simple certificate enrollment protocol (SCEP) (formerly called certificate enrollment protocol [CEP]).
Restrictions for Implementing Certification Authority
-
The software does not support CA server public keys greater than 2048 bits.
-
Starting Cisco IOS XR Software Release 7.4.1, we mandate the below X509 certificate Subject Alternate Name (SAN) fields and domain name server configuration to validate SAN. TLS connection cannot be established if there is no domain name-server is configured.
Here are some key-points regarding SAN field:
-
SAN must be a fully-qualified domain name. For example, DNS:smartreceiver.cisco.com
-
SAN must be a critical extension in the absence of Common Name (CN).
-
If the SAN cannot be represented as a FQDN, then it must be configured with GeneralName field as IP Address but not as DNS. For example, IP address: 192.0.2.1
To configure domain name-server use the domain name-server ip-address .
To configure domain name-server with VRF, use the following commands:
-
domain vrf name-serverip-address
-
Use the crypto ca trustpoint-name vrf vrf-name command when you are using VRF.
-
Use the crypto ca trustpoint Trustpool vrf vrf-name command for smart-licensing.
For Static Domain Name Configuration, use the domain ipv4 host host-name ip-address command. and for configuring static domain name using VRF, use the domain ipv4 vrf vrf-name host-name ip-address command.
-
-
Starting Cisco IOS XR Software Release 7.4.2, you can bypass FQDN and IP address check in SAN by configuring crypto ca fqdn-check ip-address allow.
-
Starting Cisco IOS XR Software Release 7.10.1, in addition to SAN field, you must also set FQDN in the CN field. However, CN check can be bypassed by configuring crypto ca fqdn ip-address allow. For example, CN=root.cisco.com.
To ensure successful FQDN validations for SAN & CN fields, the device must have proper DNS configurations in place. If the DNS server becomes unreachable, it's mandatory to configure a static DNS entry. Failure to do so will result in certificate validation errors, leading to potential TLS authentication failures.
Note
Cisco strongly recommends regenerating the existing certificates with valid FQDNs.
Configure Router Hostname and IP Domain Name
This task configures a router hostname and IP domain name.
You must configure the hostname and IP domain name of the router if they have not already been configured. The hostname and IP domain name are required because the router assigns a fully qualified domain name (FQDN) to the keys and certificates used by IPSec, and the FQDN is based on the hostname and IP domain name you assign to the router. For example, a certificate named router20.example.com is based on a router hostname of router20 and a router IP domain name of example.com.
Procedure
|
Step 1 |
configure Example:Enters mode. |
|
Step 2 |
hostname name Example:Configures the hostname of the router. |
|
Step 3 |
domain name domain-name Example:Configures the IP domain name of the router. |
|
Step 4 |
Use the commit or end command. commit —Saves the configuration changes and remains within the configuration session.
|
Generate RSA Key Pair
This task generates an RSA key pair.
From Cisco IOS XR Software Release 7.0.1 and later, the crypto keys are auto-generated at the time of router boot up. Hence, step 1 is required to be configured only if the RSA host-key pair is not present in the router under some scenarios.
RSA key pairs are used to sign and encrypt IKE key management messages and are required before you can obtain a certificate for your router.
Procedure
|
Step 1 |
crypto key generate rsa [usage keys | general-keys] [keypair-label] Example:Generates RSA key pairs.
|
|
Step 2 |
crypto key zeroize rsa [keypair-label] Example:(Optional) Deletes all RSAs from the router.
|
|
Step 3 |
show crypto key mypubkey rsa Example:(Optional) Displays the RSA public keys for your router. |
Import Public Key to the Router
This task imports a public key to the router.
A public key is imported to the router to authenticate the user.
Procedure
|
Step 1 |
crypto key import authentication rsa [usage keys | general-keys] [keypair-label] Example:Generates RSA key pairs.
|
|
Step 2 |
show crypto key mypubkey rsa Example:(Optional) Displays the RSA public keys for your router. |
Declare Certification Authority and Configure Trusted Point
This task declares a CA and configures a trusted point.
Procedure
|
Step 1 |
configure Example:Enters mode. |
||
|
Step 2 |
crypto ca trustpoint ca-name Example:Declares a CA.
|
||
|
Step 3 |
enrollment url CA-URL Example:Specifies the URL of the CA.
|
||
|
Step 4 |
query url LDAP-URL Example:(Optional) Specifies the location of the LDAP server if your CA system supports the LDAP protocol. |
||
|
Step 5 |
enrollment retry period minutes Example:(Optional) Specifies a retry period.
|
||
|
Step 6 |
enrollment retry count number Example:(Optional) Specifies how many times the router continues to send unsuccessful certificate requests before giving up.
|
||
|
Step 7 |
rsakeypair keypair-label Example:(Optional) Specifies a named RSA key pair generated using the crypto key generate rsa command for this trustpoint.
|
||
|
Step 8 |
Use the commit or end command. commit —Saves the configuration changes and remains within the configuration session.
|
Authenticate CA
This task authenticates the CA to your router.
The router must authenticate the CA by obtaining the self-signed certificate of the CA, which contains the public key of the CA. Because the certificate of the CA is self-signed (the CA signs its own certificate), manually authenticate the public key of the CA by contacting the CA administrator to compare the fingerprint of the CA certificate.
Procedure
|
Step 1 |
crypto ca authenticate ca-name Example:Authenticates the CA to your router by obtaining a CA certificate, which contains the public key for the CA. |
|
Step 2 |
show crypto ca certificates Example:(Optional) Displays information about the CA certificate. |
Request Your Own Certificates
This task requests certificates from the CA.
You must obtain a signed certificate from the CA for each of your router’s RSA key pairs. If you generated general-purpose RSA keys, your router has only one RSA key pair and needs only one certificate. If you previously generated special usage RSA keys, your router has two RSA key pairs and needs two certificates.
Procedure
|
Step 1 |
crypto ca enroll ca-name Example:Requests certificates for all of your RSA key pairs.
|
|
Step 2 |
show crypto ca certificates Example:(Optional) Displays information about the CA certificate. |
Configure Certificate Enrollment Using Cut-and-Paste
This task declares the trustpoint certification authority (CA) that your router should use and configures that trustpoint CA for manual enrollment by using cut-and-paste.
Procedure
|
Step 1 |
configure Example:Enters mode. |
||
|
Step 2 |
crypto ca trustpoint ca-name Example:Declares the CA that your router should use and enters trustpoint configuration mode.
|
||
|
Step 3 |
enrollment terminal Example:Specifies manual cut-and-paste certificate enrollment. |
||
|
Step 4 |
Use the commit or end command. commit —Saves the configuration changes and remains within the configuration session.
|
||
|
Step 5 |
crypto ca authenticate ca-name Example:Authenticates the CA by obtaining the certificate of the CA.
|
||
|
Step 6 |
crypto ca enroll ca-name Example:Obtains the certificates for your router from the CA.
|
||
|
Step 7 |
crypto ca import ca- name certificate Example:Imports a certificate manually at the terminal.
|
||
|
Step 8 |
show crypto ca certificates Example:Displays information about your certificate and the CA certificate. |
The following example shows how to configure CA interoperability.
Comments are included within the configuration to explain various commands.
configure
hostname myrouter
domain name mydomain.com
end

Uncommitted changes found, commit them? [yes]:yes

crypto key generate rsa mykey

The name for the keys will be:mykey
Choose the size of the key modulus in the range of 360 to 2048 for your General Purpose Keypair
Choosing a key modulus greater than 512 may take a few minutes.
How many bits in the modulus [1024]:
Generating RSA keys ...
Done w/ crypto generate keypair
[OK]

show crypto key mypubkey rsa

Key label:mykey
Type     :RSA General purpose
Size     :1024
Created  :17:33:23 UTC Thu Sep 18 2003
Data     :
 30819F30 0D06092A 864886F7 0D010101 05000381 8D003081 89028181 00CB8D86
 BF6707AA FD7E4F08 A1F70080 B9E6016B 8128004C B477817B BCF35106 BC60B06E
 07A417FD 7979D262 B35465A6 1D3B70D1 36ACAFBD 7F91D5A0 CFB0EE91 B9D52C69
 7CAF89ED F66A6A58 89EEF776 A03916CB 3663FB17 B7DBEBF8 1C54AF7F 293F3004
 C15B08A8 C6965F1E 289DD724 BD40AF59 E90E44D5 7D590000 5C4BEA9D B5020301
 0001

! The following commands declare a CA and configure a trusted point.

configure
crypto ca trustpoint myca
enrollment url http://xyz-ultra5
enrollment retry count 25
enrollment retry period 2
rsakeypair mykey
end

Uncommitted changes found, commit them? [yes]:yes

! The following command authenticates the CA to your router.

crypto ca authenticate myca

Serial Number  :01
Subject Name   :
cn=Root coax-u10 Certificate Manager,ou=HFR,o=Cisco Systems,l=San Jose,st=CA,c=US
Issued By      :
cn=Root coax-u10 Certificate Manager,ou=HFR,o=Cisco Systems,l=San Jose,st=CA,c=US
Validity Start :07:00:00 UTC Tue Aug 19 2003
Validity End   :07:00:00 UTC Wed Aug 19 2020
Fingerprint:58 71 FB 94 55 65 D4 64 38 91 2B 00 61 E9 F8 05
Do you accept this certificate?? [yes/no]:yes

! The following command requests certificates for all of your RSA key pairs.

crypto ca enroll myca

% Start certificate enrollment ...
% Create a challenge password. You will need to verbally provide this
  password to the CA Administrator in order to revoke your certificate.
% For security reasons your password will not be saved in the configuration.
% Please make a note of it.

Password:
Re-enter Password:
    Fingerprint: 17D8B38D ED2BDF2E DF8ADBF7 A7DBE35A

! The following command displays information about your certificate and the CA certificate.

show crypto ca certificates

Trustpoint       :myca
==========================================================
CA certificate
  Serial Number  :01
  Subject Name   :
        cn=Root coax-u10 Certificate Manager,ou=HFR,o=Cisco Systems,l=San Jose,st=CA,c=US
  Issued By      :
        cn=Root coax-u10 Certificate Manager,ou=HFR,o=Cisco Systems,l=San Jose,st=CA,c=US
  Validity Start :07:00:00 UTC Tue Aug 19 2003
  Validity End   :07:00:00 UTC Wed Aug 19 2020
Router certificate
  Key usage      :General Purpose
  Status         :Available
  Serial Number  :6E
  Subject Name   :
        unstructuredName=myrouter.mydomain.com,o=Cisco Systems
  Issued By      :
        cn=Root coax-u10 Certificate Manager,ou=HFR,o=Cisco Systems,l=San Jose,st=CA,c=US
  Validity Start :21:43:14 UTC Mon Sep 22 2003
  Validity End   :21:43:14 UTC Mon Sep 29 2003
  CRL Distribution Point
        ldap://coax-u10.cisco.com/CN=Root coax-u10 Certificate Manager,O=Cisco Systems
Certificate Authority Trust Pool Management
The trust pool feature is used to authenticate sessions, such as HTTPS, that occur between devices by using commonly recognized trusted agents called certificate authorities (CAs). This feature is enabled by default in the software to create a scheme to provision, store, and manage a pool of certificates from known CAs in a way similar to the services a browser provides for securing sessions. A special trusted point called a trust pool is designated, containing multiple known CA certificates from Cisco and possibly from other vendors. The trust pool consists of both built-in and downloaded CA certificates.
Implementing Certification Authority Interoperability provides details on Certificate Authority and trusted point.
CA Certificate Bundling in the Trust Pool
The router uses a built-in CA certificate bundle that is packaged into the asr9k-k9sec PIE. The bundle is contained in a special certificate store called a CA trust pool, which is updated automatically by Cisco. This trust pool is known by Cisco and other vendors. A CA certificate bundle can be in the following formats:
-
Privilege Management Infrastructure (PMI) certificates in Distinguished Encoding Rules (DER) binary format enveloped within a public-key cryptographic message syntax standard 7 (pkcs7).
-
A file containing concatenated X.509 certificates in Privacy Enhanced Mail (PEM) format with PEM headers.
Updating the CA Trustpool
The CA trustpool must be updated when the following conditions occur:
-
A certificate in the trustpool is due to expire or has been reissued.
-
The published CA certificate bundle contains additional trusted certificates that are needed by a given application.
-
The configuration has been corrupted.
The CA trustpool is considered as a single entity, As such, any update you perform will replace the entire trustpool.
Note |
A built-in certificate in the trustpool cannot be physically replaced. However, a built-in certificate is rendered inactive after an update if its X.509 subject-name attribute matches the certificate in the CA certificate bundle. |
Following are the methods available for updating the certificates in the trustpool:
-
Automatic update: A timer is established for the trustpool that matches the CA certificate with the earliest expiration time. If the timer is running and a bundle location is not configured and not explicitly disabled, syslog warnings should be issued at reasonable intervals to alert the admin that this trustpool policy option is not set. Automatic trustpool updates use the configured URL. When the CA trustpool expires, the policy is read, the bundle is loaded, and the PKI trustpool is replaced. If the automatic CA trustpool update encounters problems when initiating, then the following schedule is used to initiate the update until the download is successful: 20 days, 15 days, 10 days, 5 days, 4 days, 3 days, 2 days, 1 day, and then once every hour.
-
Manual update: Manually Update Certificates in Trust Pool provides details.
Manually Update Certificates in Trust Pool
The CA trust pool feature is enabled by default and uses the built-in CA certificate bundle in the trust pool, which receives automatic updates from Cisco. Perform this task to manually update certificates in the trust pool if they are not current, are corrupt, or if certain certificates need to be updated.
Procedure
| Command or Action | Purpose | |
|---|---|---|
|
Step 1 |
crypto ca trustpool import url clean Example: |
(Optional) Manually removes all downloaded CA certificates. This command is run in the EXEC mode. |
|
Step 2 |
crypto ca trustpool import url url Example: |
Specify the URL from which the CA trust pool certificate bundle must be downloaded. This manually imports (downloads) the CA certificate bundle into the CA trust pool to update or replace the existing CA certificate bundle. |
|
Step 3 |
show crypto ca trustpool policy Example: |
Displays the CA trust pool certificates of the router in a verbose format. |
Configuring Optional Trustpool Policy Parameters
Procedure
| Command or Action | Purpose | |
|---|---|---|
|
Step 1 |
configure Example: |
Enters mode. |
|
Step 2 |
crypto ca trustpool policy Example: |
Enters ca-trustpool configuration mode where commands can be accessed to configure CA trustpool policy parameters. |
|
Step 3 |
cabundle url URL Example: |
Specifies the URL from which the CA trustpool certificate bundle is downloaded. |
|
Step 4 |
crl optional Example: |
Disables revocation checking when the trustpool policy is being used. By default, the router enforces a check of the revocation status of the certificate by querying the certificate revocation list (CRL). |
|
Step 5 |
description LINE Example: |
Handling of CA Certificates appearing both in Trust Pool and Trust Point
There may be cases where a CA resides in both the trust pool and a trust point; for example, a trust point is using a CA and a CA bundle is downloaded later with this same CA inside. In this scenario, the CA in the trust point and its policy is considered, before the CA in the trust pool or trust pool policy to ensure that any current behavior is not altered when the trust pool feature is implemented on the router.
The policy indicates how the security appliance obtains the CA certificate and the authentication policies for user certificates issued by the CA.
Expiry Notification for PKI Certificate
The section provides information about the notification mechanism using SNMP trap and syslog messages when a public key infrastructure (PKI) certificate is approaching its expiry date.
Learn About the PKI Alert Notification
Security is critical and availability of certificates for applications is vital for authenticating the router. If the certificate expires, they become invalid and impacts services like Crosswork Trust Insights, Internet Key Exchange version 2, dot1x, and so on.
What if there is a mechanism to alert the user about the expiry date of the certificate?
From Release 7.1.1, IOS -XR provides a mechanism by which a CA client sends a notification to a syslog server when certificates are on the verge of expiry. Alert notifications are sent either through the syslog server or Simple Network Management Protocol (SNMP) traps.
PKI traps retrieves the certificate information of the devices in the network. The device sends SNMP traps at regular intervals to the network management system (NMS) based on the threshold configured in the device.
An SNMP trap (certificate expiry notification) is sent to the SNMP server at regular intervals starting from 60 days to one week before the certificate end date. The notifications are sent at the following intervals:
The notifications are sent at the following intervals:
|
Intervals |
Description |
Notification Mode |
|---|---|---|
|
First notification |
The notification is sent 60 days before the expiry of the certificate. |
The notificiation are in a warning mode. |
|
Repeated notifications |
The repeated notification is sent every week, until a week before the expiry of the certificate. The notifications are in a warning mode when the certificate is valid for more than a week. |
The notifications are in a warning mode when the certificate is valid for more than a week. |
|
Last notification |
The notifications are sent every day until the certificate expiry date. |
The notifications are in an alert mode when the validity of a certificate is less than a week. |
The notifications include the following information:
-
Certificate serial number
-
Certificate issuer name
-
Trustpoint name
-
Certificate type
-
Number of days remaining for the certificate to expire
-
Certificate subject name
The following is a syslog message that is displayed on the device:
%SECURITY-CEPKI-1-CERT_EXPIRING_ALERT : Certificate expiring WITHIN A WEEK.
Trustpoint Name= check, Certificate Type= ID, Serial Number= 02:EC,
Issuer Name= CN=cacert,OU=SPBU,O=CSCO,L=BGL,ST=KA,C=IN, Subject name= CN=cisco.com,
Time Left= 1 days, 23 hours, 59 minutes, 41 seconds
Restrictions for PKI Credentials Expiry Alerts
Alerts are not sent for the following certificates:
-
Secure Unique Device Identifier (SUDI) certificates
-
Certificates that belong to a trustpool. Trustpools have their own expiry alerts mechanism
-
Trustpoint clones
-
CA certificates that do not have a router certificate associated with it.
-
Certificates with key usage keys
Enable PKI Traps
This feature cannot be disabled and requires no additional configuration tasks.
To enable PKI traps, use the snmp-server traps pki command. If SNMP is configured, the SNMP trap is configured in the same PKI expiry timer.
Router(config)# snmp-server traps pki
Router(config)# commit
Verification
Router# show runn snmp-server traps
snmp-server traps pki
What’s Next: See Regenerate the Certificate.
Regenerate the Certificate
The certificate becomes invalid once expired. When you see the certificate expiry notification, we recommend you to regenerate the certificate, as soon as possible.
Perform the following steps, to regenerate the certificates:
-
Clear the existing certificate using the following command:
Router# clear crypto ca certificates [trustpoint-name]For example,
Router# clear crypto ca certificates myca -
We recommend you to regenerate a new keypair for the label configured under the trustpoint-name. The new keypair overwrites the old key pair.
Router# crypto key generate rsa [keypair-lablel]For example,
Router# crypto key generate rsa mykey The name for the keys will be: mykey % You already have keys defined for mykey Do you really want to replace them? [yes/no]: yes Choose the size of the key modulus in the range of 512 to 4096 for your General Purpose Keypair. Choosing a key modulus greater than 512 may take a few minutes. How many bits in the modulus [2048]: Generating RSA keys ... Done w/ crypto generate keypair [OK]The name for the keys will be: mykey % You already have keys defined for mykey Do you really want to replace them? [yes/no]: yes Choose the size of the key modulus in the range of 512 to 4096 for your General Purpose Keypair. Choosing a key modulus greater than 512 may take a few minutes. How many bits in the modulus [2048]: Generating RSA keys ... Done w/ crypto generate keypair [OK] -
Reenroll the certificate using the following command. For more information, see Request Your Own Certificates.
Router# crypto ca authenticate [trustpoint-name]
Router# crypto ca enroll [trustpoint-name]
For example,
Router# crypto ca authenticate myca
Router# crypto ca enroll myca
Integrating Cisco IOS XR and Crosswork Trust Insights
The Cisco IOS XR Software provides you the infrastructure to enroll and share the signed-data with Cisco Crosswork cloud infrastructure and applications. The Cisco Crosswork Trust Insights is a cloud-based Software as a service (SaaS) that provides signed and encrypted system integrity information to track the trust posture of network hardware and software components. For details, see Cisco Crosswork Trust Insights Data Sheet.
Integrating IOS XR and Crosswork Trust Insights include these main processes:
-
System enrollment – Enrolling a Cisco IOS XR platform into Crosswork cloud infrastructure.
- Signed-data sharing – Sharing the data for infrastructure trust analysis between the systems that run IOS XR and Crosswork. This involves collecting the signed-data dossier, that is, signed-data that is needed for infrastructure trust inspection service.
Workflow
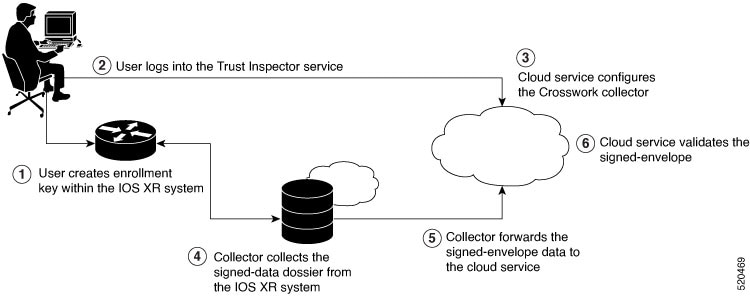
The following steps depict the workflow of Cisco IOS XR and Crosswork Trust Insights integration:
- As part of the enrollment process, the user generates new key pair and trust root within the IOS XR system by using the IOS XR commands.
- The user logs into the Trust Inspector service, and enters the enrollment workflow in the enrollment dialog to create a new device ID. The user must provide the management IP address, login credentials and certificate root to the Trust Inspector service.
- The Trust Inspector service configures the Crosswork collector to log in to the router, and to pull the data that is pushed down from the cloud to the collector.
- The Crosswork collector begins a periodic polling cycle and executes a command to generate a signed-information dossier from each IOS XR instance that is being polled.
- The collector forwards the signed-envelope data to the cloud service for validation.
- The cloud service validates signed-envelope against the enrolled certificate or trust chain.
How to Integrate Cisco IOS XR and Crosswork Trust Insights
Integrating Cisco IOS XR and Crosswork Trust Insights involve these main tasks for system enrollment and data-signing:
Prerequisites
Before you begin, you must check here for any available IOS XR Software Maintenance Updates (SMUs) specific to Crosswork Trust Insights. For information related to SMUs, see Cisco IOS XR Release Notes.
You must ensure that the below configurations are present on the IOS XR device, before starting IOS XR and Crossworks Trust Insights integration.
-
User authorization required to collect the signed-data dossier
-
SSH server configuration
-
Netconf server configuration
-
Domain name configuration, which is required for certification enrollment
The sections given below lists the configuration example for the prerequisites.
Configuration Example for User Authorization
You must have the required user access privileges in order to collect the data dossier from the system. This is defined in terms of IOS XR Task IDs for each command.
For the respective Task ID applicable for each data dossier option and for the signed-envelope, see the Task ID section in the Command Reference page of show platform security integrity dossier command and utility sign command.
Note |
We recommend that you use the task execute dossier to configure a CTI (customer-define) user, who collects dossier from the system. |
Listed below are the configurations to set up a user with sufficient authorization to collect all the signed-data dossier. You can configure customized task groups, then associate those task groups with user groups, and finally associate the user groups with the user.
Router#configure
Router(config)#taskgroup alltasks-dossier
Router(config-tg)#task read sysmgr
Router(config-tg)#task read system
Router(config-tg)#task read pkg-mgmt
Router(config-tg)#task read basic-services
Router(config-tg)#task read config-services
Router(config-tg)#task execute dossier
Router(config-tg)#task execute basic-services
Router(config-tg)#commit
Router#configure
Router(config)#usergroup dossier-group
Router(config-ug)#taskgroup alltasks-dossier
Router(config-ug)#commit
Router#configure
Router(config)#username dossier-user
Router(config-un)#group dossier-group
Router(config-un)#commit
Configuration Example for for SSH and Netconf
Router#configure
Router(config)#ssh server v2
Router(config)#ssh server vrf default
Router(config)#ssh server netconf vrf default
Router(config)#netconf-yang agent
Router(config-ncy-agent)#ssh
Router(config-ncy-agent)#exit
Router(config)#domain name example.com
Router(config)#commit
Running Configuration
ssh server v2
ssh server vrf default
ssh server netconf vrf default
!
netconf-yang agent
 ssh
!
domain name example.com
While the dossier is collected from a device through SSH, the SSH session might timeout. Also, multiple ssh sessions to a device can result in the denial of some SSH sessions. To avoid such occurrence, the following configuration is recommended on the device:
Router#configure
Router(config)#ssh server rate-limit 600
Router(config)#line default
Router(config-line)#exec-timeout 0 0
Router(config-line)#session-timeout 0
Router(config-line)#commit
Running Configuration
ssh server rate-limit 600
!
line default
 exec-timeout 0 0
 session-timeout 0
!
Generate Key Pair
To enroll a system running Cisco IOS XR Software, you must generate the key and the certificate for both the leaf and the root node. The system supports a two tier self-signed certificate chain for the enrollment key to support re-keying without re-enrollment of the certificate with the Crossworks service.
You can use the system-root-key and system-enroll-key options in the crypto key generate command to generate the root key and the enrollment key respectively, for all the hashing algorithms. You can do this for hashing algorithms such as RSA, DSA or ECDSA (including ECDSA nistp384 and ECDSA nitsp521).
Example of Generating Key Pair
Key pair generation for root:
Router#crypto key generate rsa system-root-key

Sun Oct 20 13:05:26.657 UTC
The name for the keys will be: system-root-key
Choose the size of the key modulus in the range of 512 to 4096 for your General Purpose Keypair. Choosing a key modulus greater than 512 may take a few minutes.
How many bits in the modulus [2048]:
Generating RSA keys ...
Done w/ crypto generate keypair
[OK]
Key pair generation for leaf:
Router#crypto key generate rsa system-enroll-key

Sun Oct 20 13:05:40.370 UTC
The name for the keys will be: system-enroll-key
Choose the size of the key modulus in the range of 512 to 4096 for your General Purpose Keypair. Choosing a key modulus greater than 512 may take a few minutes.
 How many bits in the modulus [2048]:
Generating RSA keys ...
Done w/ crypto generate keypair
[OK]
Verification
You can use the show crypto key mypubkey rsa command to verify the above key pair generation.
Router#show  crypto  key mypubkey rsa | begin system-
Fri Mar 27 14:00:20.954 IST
Key label: system-root-key
Type     : RSA General purpose
Size     : 2048
Created  : 01:13:10 IST Thu Feb 06 2020
Data     :
 30820122 300D0609 2A864886 F70D0101 01050003 82010F00 3082010A 02820101
 00A93DE0 1E485EE3 0E7F0964 C48361D1 B6014BE7 A303D8D6 F7790E92 88E69C4B
 B97B7A9C D1B277E3 1569093C 82BD3258 7F67FB49 94860ECD 34498F1F 59B45757
 F32C8E8F 7CEE23EC C36A43D1 9F85C0D9 B96A14DD DD3BBD4C A1FB0888 EED210A7
 39D9A403 7ACE0F6E 39107226 CA621AD8 6E8102CA 9761B86F D33F2871 9DD16559
 AFCB4729 EFCEDBAF 83DF76E4 9A439844 EE3B1180 4022F575 99E11A2C E25BB23D
 9DD74C81 4E5C1345 D9E3CC79 1B98B1AA 6C06F004 22B901EC 36C099FE 10DE2622
 EB7CE618 9A555769 12D94C90 D9BEE5EA A664E7F6 4DF8D8D4 FE7EAB07 1EF4FEAB
 22D9E55F 62BA66A0 72153CEC 81F2639F B5F2B5C5 25E10364 19387C6B E8DB8990
 11020301 0001

Key label: system-enroll-key
Type     : RSA General purpose
Size     : 2048
Created  : 01:13:16 IST Thu Feb 06 2020
Data     :
 30820122 300D0609 2A864886 F70D0101 01050003 82010F00 3082010A 02820101
 009DBC14 C83604E4 EB3D3CF8 5BA7FDDB 80F7E85B 427332D8 BBF80148 F0A9C281
 49F87D5C 0CEBA532 EBE797C5 7F174C69 0735D13A 493670CB 63B04A12 4BCA7134
 EE0031E9 047CAA1E 802030C5 6071E8C2 F8ECE002 CC3B54E7 5FD24E5C 61B7B7B0
 68FA2EFA 0B83799F 77AE4621 435D9DFF 1D713108 37B614D3 255020F9 09CD32E8
 82B07CD7 01A53896 6DD92B5D 5119597C 98D394E9 DBD1ABAF 6DE949FE 4A8BF1E7
 851EB3F4 60B1114A 1456723E 063E50C4 2D410906 BDB7590B F1D58480 F3FA911A
 6C9CD02A 58E68D04 E94C098F 0F0E81DB 76B40C55 64603499 2AC0547A D652412A
 BCBBF69F 76B351EE 9B2DF79D E490C0F6 92D1BB97 B905F33B FAB53C20 DDE2BB22
 C7020301 0001
Associated Commands
- crypto key generate dsa
- crypto key generate ecdsa
- crypto key generate rsa
- show crypto key mypubkey dsa
- show crypto key mypubkey ecdsa
- show crypto key mypubkey rsa
Generate System Trust Point for the Leaf and Root Certificate
You must configure these steps to generate the system trust point for the root and the leaf certificate:
Configuration Example
Router#config
Router(config)#domain name domain1
Router(config)#crypto ca trustpoint system-trustpoint
Router(config)#keypair rsa system-enroll-key
Router(config)#ca-keypair rsa system-root-key
Router(config)#subject-name CN=lab1-ads,C=US,ST=CA,L=San Jose,O=cisco systems,OU=ASR
Router(config)#subject-name ca-certificate CN=lab1-ca,C=US,ST=CA,L=San Jose,O=cisco systems,OU=ASR
Router(config)#enrollment url self
Router(config)#key-usage certificate digitalsignature keyagreement dataencipherment
Router(config)#lifetime certificate 300
Router(config)#message-digest sha256
Router(config)#key-usage ca-certificate digitalsignature keycertsign crlsign
Router(config)#lifetime ca-certificate 367
Router(config)#commit
Running Configuration
config
domain name domain1
crypto ca trustpoint system-trustpoint
keypair rsa system-enroll-key
ca-keypair rsa system-root-key
subject-name CN=lab1-ads,C=US,ST=CA,L=San Jose,O=cisco systems,OU=ASR
subject-name ca-certificate CN=lab1-ca,C=US,ST=CA,L=San Jose,O=cisco systems,OU=ASR
enrollment url self
key-usage certificate digitalsignature keyagreement dataencipherment
lifetime certificate 300
message-digest sha256
key-usage ca-certificate digitalsignature keycertsign crlsign
lifetime ca-certificate 367
!
Associated Commands
- ca-keypair
- crypto ca trustpoint
- domain
- enrollment
- key-usage
- key-pair
- lifetime
- message-digest
- subject-name
Generate Root and Leaf Certificates
You must perform these steps to generate the root and the leaf certificates.
The root certificate is self-signed. The root certificate signs the leaf certificate.
Example of Generating Root Certificate
Router#crypto ca authenticate system-trustpoint

Sun Oct 20 13:07:24.136 UTC
% The subject name in the certificate will include: CN=lab1
ca,C=US,ST=CA,L=San Jose,O=cisco systems,OU=ASR
% The subject name in the certificate will include: ios.cisco.com
Serial Number  : 0B:62
Subject:
serialNumber=c44a11fc,unstructuredName=ios.cisco.com,OU=ASR,O=cisco systems,L=San Jose,ST=CA,C=US,CN=lab1-ca
Issued By      :
        serialNumber=c44a11fc,unstructuredName=ios.cisco.com,OU=ASR,O=cisco systems,L=San Jose,ST=CA,C=US,CN=lab1-ca
  Validity Start : 13:07:26 UTC Sun Oct 20 2019
  Validity End   : 13:07:26 UTC Wed Oct 21 2020
  SHA1 Fingerprint:
         9DD50A6B24FEBC1DDEE40CD2B4D99A829F260967
Example of Generating Leaf Certificate
Router#crypto ca enroll system-trustpoint

Sun Oct 20 13:07:45.593 UTC
% The subject name in the certificate will include: CN=lab1-ads,C=US,ST=CA,L=San Jose,O=cisco systems,OU=ASR
% The subject name in the certificate will include: ios.cisco.com
% Include the router serial number in the subject name? [yes/no]: yes
% The serial number in the certificate will be: c44a11fc
% Include an IP address in the subject name? [yes/no]: no
Certificate keypair configured Type: 1, Label: system-enroll-key.Leaf cert key usage string: critical,digitalSignature,keyEncipherment,keyAgreement.  Serial Number  : 0B:63
  Subject:
        serialNumber=c44a11fc,unstructuredName=ios.cisco.com,OU=ASR,O=cisco systems,L=San Jose,ST=CA,C=US,CN=lab1-ads
  Issued By      :
        serialNumber=c44a11fc,unstructuredName=ios.cisco.com,OU=ASR,O=cisco systems,L=San Jose,ST=CA,C=US,CN=lab1-ca
  Validity Start : 13:07:47 UTC Sun Oct 20 2019
  Validity End   : 13:07:47 UTC Sat Aug 15 2020
  SHA1 Fingerprint:
         19D4C40F9EFF8FF25B59DE0161BA6C0706DC9E3A
Verification
You can use the show crypto ca certificates system-trustpoint [detail] command to see the details of generated root and leaf certificates:
Router#show crypto ca certificates system-trustpoint
Fri Mar 27 14:00:51.037 IST

Trustpoint       : system-trustpoint
==================================================
CA certificate
  Serial Number  : 10:B5
  Subject:
        serialNumber=7b20faa4,unstructuredName=test-sec1.cisco.com
  Issued By      :
        serialNumber=7b20faa4,unstructuredName=test-sec1.cisco.com
  Validity Start : 12:30:17 UTC Fri Feb 21 2020
  Validity End   : 12:30:17 UTC Sat Feb 20 2021
  SHA1 Fingerprint:
         9400A30816805219FAAA5B9C86C214E6F34CEF7B
Router certificate
  Key usage      : General Purpose
  Status         : Available
  Serial Number  : 10:B6
  Subject:
        serialNumber=7b20faa4,unstructuredAddress=10.1.1.1,unstructuredName=test-sec1.cisco.com,CN=Anetwork,OU=IT,O=Spark Network,L=Rotterdam,ST=Zuid Holland,C=NL
  Issued By      :
        serialNumber=7b20faa4,unstructuredName=test-sec1.cisco.com
  Validity Start : 12:30:31 UTC Fri Feb 21 2020
  Validity End   : 12:30:31 UTC Sat Feb 20 2021
  SHA1 Fingerprint:
         21ACDD5EB6E6F4103E02C1BAB107AD86DDCDD1F3
Associated Trustpoint: system-trustpoint
Associated Commands
- crypto ca authenticate
- crypto ca enroll
- show crypto ca certificates system-trustpoint
System Certificates Expiry
You need to regenerate the certificate, before it expires. From Release 7.1.1, IOS -XR provides a mechanism by which a CA client sends a notification to a syslog server when certificates are on the verge of expiry. For more information see Learn About the PKI Alert Notification.
When you see the certificate expiry notification, we recommend you to regenerate the certificate, see Regenerate the Certificate.
The following example shows how to regenerate the certificate.
Router# clear crypto ca certificates system-trustpoint
Router# crypto ca authenticate system-trustpoint
Router# crypto ca enroll system-trustpoint
Collect Data Dossier
|
Feature Name |
Release Information |
Description |
|---|---|---|
|
Collect Filesystem Inventory |
Release 7.3.1 |
With this feature, a snapshot of the filesystem metadata such as when the file was created, modified, or accessed is collected at each configured interval. In addition to displaying the changes that the file underwent as compared to the previous snapshot, the inventory helps in maintaining data integrity of all the files in the system. |
|
IMA Optimization |
Release 7.3.1 |
Integrity Measurement Architecture (IMA) is a Linux-based utility that attests and appraises the integrity of a system security, at runtime. In this release, IMA introduces the following IMA optimization aspects:
|
|
Support for Display Compact Option |
Release 7.4.1 |
This release introduces:
Use the |
The Cisco IOS XR Software provides a data dossier command, show platform security integrity dossier , that helps in collecting the data from various IOS XR components. The output is presented in JSON format.
You can choose various selectors for this command as given below :
Router#show platform security integrity dossier include packages reboot-history rollback-history system-integrity-snapshot system-inventory nonce 1580 | utility sign nonce 1580 include-certificate
Create Signed-Envelope
To verify the data integrity and authenticity of the data dossier output, a signature is added to the output data. To enable this feature, you can use the utility sign command along with the show platform security integrity dossier command. The output is presented in JSON format.
This utility sign can also be used with any of the IOS XR commands.
Note |
The Secure Unique Device Identifier or SUDI signature provides the hardware root of trust to the dossier that is collected by the system. |
Verification Example
Router#show  platform security integrity  dossier include  reboot-history nonce 1580 | utility sign nonce 1580 include-certificate
NCS560
Collect Filesystem Inventory
The metadata of the filesystem can be collected using data dossier. The metadata of the file includes information about time the file was created, last accessed, last modified and so on. A snapshot is captured at each configured interval. The initial snapshot shows a complete snapshot of all files in the filesystem. The files are scanned periodically and new inventory data is collected and stored as incremental snapshots.
Router(config)#filesystem-inventory
Router(config-filesystem-inventory)#snapshot-interval 2
Router(config-filesystem-inventory)#commit
The snapshot-interval is the time interval in 15-minute blocks. The interval ranges 1–96. For example, value of 2 indicates that a snapshot interval is collected every 30 minutes. The snapshots are stored in./misc/scratch/filesysinv The logs are stored in /var/log/iosxr/filesysinv/*.
To retrieve the filesystem inventory, use the following dossier command. Output is presented in JSON format.
show platform security integrity dossier include filesystem-inventory | file <platform>-parent.json

{"collection-start-time":1610168028.380901,
"model-name":"http://cisco.com/ns/yang/Cisco-IOS-XR-ama",
"model-revision":"2019-08-05","license-udi":{"result-code": "Success", "license-udi":
"UDI: PID:NCS-55A1-24H,SN:FOC2104R15R\n"},"version":{"result-code": "Success",
"version": "Cisco IOS XR Software, Version 7.3.1
\nCopyright (c) 2013-2020 by Cisco Systems, Inc.\n\nBuild Information:\n
Built By     : <user>\n Built On     : Thu Jan  7 17:16:02 PST 2021\n
Built Host   : <host>\n Workspace    : <ws>
Version      : 7.3.1\n  Location     : /opt/cisco/XR/packages/\n Label        : 7.3.1\n\ncisco
() processor\nSystem uptime is 8 hours 7 minutes\n\n"},"platform":{"result-code":
"Success", "platform":
"Node              Type                       State             Config state
--------------------------------------------------------------------------------
0/RP0/CPU0        <node-type>(Active)       IOS XR RUN        NSHUT\n
0/RP0/NPU0        Slice                      UP
0/RP0/NPU1        Slice                      UP
0/FT0             <platform>-A1-FAN-RV       OPERATIONAL       NSHUT
0/FT1             <platform>-A1-FAN-RV       OPERATIONAL       NSHUT
0/FT2             <platform>-A1-FAN-RV       OPERATIONAL       NSHUT
PM1               <platform>-1100W-ACRV      OPERATIONAL       NSHUT
"},
----------------------------Output is snipped for brevity -------------------------------------show platform security integrity dossier include filesystem-inventory filesystem-inventory-options '{\"0/RP0/CPU0\": {\"block_start\": 0, \"count\": 1}}’
To start from a new block, use the following command:
show platform security integrity dossier include filesystem-inventory filesystem-inventory-options '{\"0/RP0/CPU0\": {\"block_start\": 5}}’
show platform security integrity dossier include filesystem-inventory filesystem-inventory-options '{\"0/RP1/CPU0\": {\"block_start\": 0}}’ | file harddisk:PE1_remote.json
{"node-data":[{"node-location":"node0_RP0_CPU0","up-time":150311,"start-time":"Tue Jul 27 13:55:12 2021","ima-event-log-compact":
["IlYIABoMCO+ggIgGEKmxwZYBIkQIABAKGhTU2yPVDA5Rx+64ecp41qZQrLEWSCACKhSXl+340O7Ta
xz5JUeBYFHIr05F7jIOYm9vdF9hZ2dyZWdhdGVAAQ=="]}]}
Incremental Integrity Measurement Architecture
show platform security integrity dossier incremental-ima
"{\"ima_start\":[{\"0/RP0/CPU0\":{\"start_event\":1000,\"start_time\":\"Tue Feb 16 09:15:17 2021\"}}]}"
Associated Command
- show platform security integrity dossier
- utility sign
Procedure to Test Key Generation and Data-signing with Different Key Algorithm
You can follow these steps to test key generation and data-signing with a different key algorithm:
- Unconfigure the trustpoint (using the no crypto ca trustpoint system-trustpoint command)
- Clear the certificates that were generated earlier (using the clear crypto ca certificates system-trustpoint command)
- Generate new keys.
- Configure the system trustpoint again.
- Authenticate and enroll the system trustpoint to generate the certificates.
See How to Integrate Cisco IOS XR and Crosswork Trust Insights section for configuration steps of each task.
Verify Authenticity of RPM Packages Using Fingerprint
|
Feature Name |
Release Information |
Description |
|---|---|---|
|
Verify Authenticity of RPM Packages Using Fingerprint |
Release 7.3.1 |
This feature helps in verifying the authenticity of an installable package using fingerprint values. The fingerprint value of the package is compared with a point of reference called Known Good Value (KGV). The KGV for an image or package is generated after it is built by Cisco. After installing the package, the associated install time and build time fingerprint values are compared using Yang RPC to determine whether the package is genuine. A match in the fingerprints indicates that the package published on CCO and that installed on router are the same. |
Is there a simple way to determine the authenticity of a package that is installed on a router? Is there a mechanism to identify whether a package signature is checked at install time, or detect changes to the files after the package is installed at run time?
Cisco IOS XR, Release 7.3.1 introduces a fingerprint mechanism to verify the authenticity of a package that Cisco releases. This mechanism helps determine whether the installed package is genuine, where the installed and running software matches the software that is published by Cisco.
There are significant security measures for installing software using GPG and IMA signing. However, there is need to report more data for Cisco Crosswork application to monitor and flag potential issues for further investigation. Cisco Crosswork monitors the installed software over a period to help accomplish the following tasks:
-
To determine whether there are any differences between the software that is published on Cisco.com and that downloaded to the router.
-
To determine whether any files in a package have been altered, either accidentally or maliciously, from the time the package was installed.
A Known Good Value (KGV) is calculated and published for each package. This value is considered the right value for the package.
-
Install time fingerprint: Hex value that represents the software in the package at install time. An RPM is genuine if it is not modified before install, and it matches the KGV. Whereas a manipulated RPM shows a mismatch in the fingerprint that is published in the KGV.
-
Run time fingerprint: Hex value that represents the running software of an installed package. The value matches the corresponding install time fingerprint if the RPM has not been modified since the install time. If there are changes to the files, the run time and install time fingerprints show a mismatch. Every time the files that are installed by an RPM are changed, the run time fingerprint also changes. A value of
0(zero) is displayed if no run time fingerprint is available for a package. This is used to monitor changes to the running software over time.
Note |
These two values are displayed only in the Yang model output. No CLI commands are provided to view these values. |
Received message from host
<?xml version="1.0" ?>
<rpc-reply message-id="urn:uuid:97f5bc36-0eb0-4d2f-9c6f-3d34fea14be0" xmlns="urn:ietf:params:xml:ns:netconf:base:1.0" xmlns:nc="urn:ietf:params:xml:ns:netconf:base:1.0">
<data>
    <install xmlns="http://cisco.com/ns/yang/Cisco-IOS-XR-spirit-install-instmgr-oper">
      <packages>
        <active>
         <summary>
          <rpm-fingerprint-status>generation-up-to-date</rpm-fingerprint-status>
            <rpm-fingerprint-timestamp>Mon Jun 15 15:58:22 2020</rpm-fingerprint-timestamp>
            <package>
             <name>asr9k-xr</name>
              <version>7.3.1</version>
              <release>r731</release>
             <gpg-key-id>ddcead3dcb38048d</gpg-key-id>
              <rpm-fingerprint>
              <rpm-fingerprint-install-time>2871bf68d3cd764938775afc9e5a69c130f9fbde</rpm-fingerprint-install-time>
              <rpm-fingerprint-run-time>2871bf68d3cd764938775afc9e5a69c130f9fbde</rpm-fingerprint-run-time>
              </rpm-fingerprint>
            </package>

           <package>
            <name>asr9k-mcast-x64</name>
            <version>2.0.0.0</version>
            <release>r731</release>
            <gpg-key-id>ddcead3dcb38048d</gpg-key-id>
             <rpm-fingerprint>
                <rpm-fingerprint-install-time>3ddca55bc00a0ce2c2e52277919d398621616b28</rpm-fingerprint-install-time>
                <rpm-fingerprint-run-time>3ddca55bc00a0ce2c2e52277919d398621616b28</rpm-fingerprint-run-time>
              </rpm-fingerprint>
            </package>
------------------------------ Truncated for brevity ---------------------------------
In the example, both the install time and run time fingerprints are the same.
The fingerprint generation status is used to indicate how up-to-date the run time fingerprints are. This may indicate that generation is currently in progress and will complete shortly, or generation is awaiting the end of an atomic change.
Support for Ed25519 Public-Key Signature System
|
Feature Name |
Release Information |
Feature Description |
|---|---|---|
|
Support for Ed25519 Public-Key Signature System |
Release 7.3.1 |
This feature allows you to generate and securely store crypto key pair for the Ed25519 public-key signature algorithm on Cisco IOS XR 64-bit platforms. This signature system provides fast signing, fast key generation, fool proof session keys, collision resilience, and small signatures. The feature also facilitates integration of Cisco IOS XR with Cisco Crosswork Trust Insights. Commands introduced for this feature are: show crypto key mypubkey ed25519 Commands modified for this feature are: |
The Cisco IOS XR Software Release 7.3.1 introduces the support for Ed25519 public-key signature algorithm on 64-bit platforms. Prior to this release, only DSA, ECDSA, and RSA signature algorithms were supported. The Ed25519 signature algorithm uses the elliptic curve cryptography that offers a better security with faster performance when compared to other signature algorithms.
You can generate the Ed25519 crypto keys either with an empty label or with two predefined labels: system-root-key and system-enroll-key . In the case of an empty label, the system generates the key pair against the default label. You can use the key pairs with the predefined labels to integrate Cisco IOS XR with Cisco Crosswork Trust Insights.
Generate Crypto Key for Ed25519 Signature Algorithm
Configuration Example
To generate the Ed25519 crypto key, use the crypto key generate ed25519 command in XR EXEC mode.
Router#crypto key generate ed25519
To delete the Ed25519 crypto key with default label or any predefined label, use the crypto key zeroize ed25519 command in XR EXEC mode.
Verification
Use the show crypto key mypubkey ed25519 command to view all Ed25519 crypto keys generated on the system.
Router# show crypto key mypubkey ed25519

Mon Nov 30 07:05:06.532 UTC
Key label: the_default
Type : ED25519
Size : 256
Created : 07:03:17 UTC Mon Nov 30 2020
Data :
FF0ED4E7 71531B3D 9ED72C48 3F79EC59 9EFECCC3 46A129B2 FAAA12DD EE9D0351
Related Topics
Associated Commands
-
crypto key generate ed25519
-
crypto key zeroize ed25519
-
show crypto key mypubkey ed25519
Information About Implementing Certification Authority
Supported Standards for Certification Authority Interoperability
Cisco supports the following standards:
-
IKE—A hybrid protocol that implements Oakley and Skeme key exchanges inside the Internet Security Association Key Management Protocol (ISAKMP) framework. Although IKE can be used with other protocols, its initial implementation is with the IPSec protocol. IKE provides authentication of the IPSec peers, negotiates IPSec keys, and negotiates IPSec security associations (SAs).
-
Public-Key Cryptography Standard #7 (PKCS #7)—A standard from RSA Data Security Inc. used to encrypt and sign certificate enrollment messages.
-
Public-Key Cryptography Standard #10 (PKCS #10)—A standard syntax from RSA Data Security Inc. for certificate requests.
-
RSA keys—RSA is the public key cryptographic system developed by Ron Rivest, Adi Shamir, and Leonard Adelman. RSA keys come in pairs: one public key and one private key.
-
SSL—Secure Socket Layer protocol.
-
X.509v3 certificates—Certificate support that allows the IPSec-protected network to scale by providing the equivalent of a digital ID card to each device. When two devices want to communicate, they exchange digital certificates to prove their identity (thus removing the need to manually exchange public keys with each peer or specify a shared key at each peer). These certificates are obtained from a CA. X.509 as part of the X.500 standard of the ITU.
Certification Authorities
Purpose of CAs
CAs are responsible for managing certificate requests and issuing certificates to participating IPSec network devices. These services provide centralized key management for the participating devices.
CAs simplify the administration of IPSec network devices. You can use a CA with a network containing multiple IPSec-compliant devices, such as routers.
Digital signatures, enabled by public key cryptography, provide a means of digitally authenticating devices and individual users. In public key cryptography, such as the RSA encryption system, each user has a key pair containing both a public and a private key. The keys act as complements, and anything encrypted with one of the keys can be decrypted with the other. In simple terms, a signature is formed when data is encrypted with a user’s private key. The receiver verifies the signature by decrypting the message with the sender’s public key. The fact that the message could be decrypted using the sender’s public key indicates that the holder of the private key, the sender, must have created the message. This process relies on the receiver’s having a copy of the sender’s public key and knowing with a high degree of certainty that it does belong to the sender and not to someone pretending to be the sender.
Digital certificates provide the link. A digital certificate contains information to identify a user or device, such as the name, serial number, company, department, or IP address. It also contains a copy of the entity’s public key. The certificate is itself signed by a CA, a third party that is explicitly trusted by the receiver to validate identities and to create digital certificates.
To validate the signature of the CA, the receiver must first know the CA’s public key. Normally, this process is handled out-of-band or through an operation done at installation. For instance, most web browsers are configured with the public keys of several CAs by default. IKE, an essential component of IPSec, can use digital signatures to authenticate peer devices for scalability before setting up SAs.
Without digital signatures, a user must manually exchange either public keys or secrets between each pair of devices that use IPSec to protect communication between them. Without certificates, every new device added to the network requires a configuration change on every other device with which it communicates securely. With digital certificates, each device is enrolled with a CA. When two devices want to communicate, they exchange certificates and digitally sign data to authenticate each other. When a new device is added to the network, a user simply enrolls that device with a CA, and none of the other devices needs modification. When the new device attempts an IPSec connection, certificates are automatically exchanged and the device can be authenticated.
CA Registration Authorities
Some CAs have a registration authority (RA) as part of their implementation. An RA is essentially a server that acts as a proxy for the CA so that CA functions can continue when the CA is offline.
 Feedback