Perform System Upgrade and Install Feature Packages

The system upgrade and package installation processes are executed using install commands on the router. The processes involve adding and activating the iso images (.iso) and feature packages on the router. These files are accessed from a network server and then activated on the router. If the installed package or SMU causes any issue on the router, it can be uninstalled.

The topics covered in this chapter are:

Upgrading the System

Upgrading the system is the process of installing a new version of the Cisco IOS XR operating system on the router. The router comes preinstalled with the Cisco IOS XR image. However, you can install the new version in order to keep router features up to date. The system upgrade operation is performed from the XR VM. However, during system upgrade, the software that runs on both the XR VM and the System Admin VM get upgraded.


Note


If an interface on a router doesn’t have a configuration and is brought up by performing no-shut operation, then upon router reload, the interface state changes to admin-shutdown automatically.

Note


  • Ensure that you have adequate disk space.

  • Run the fsck command to check the status of the file system, for a successful IOS XR upgrade. You must run the fsck command in the System Admin EXEC mode to install a System Admin package, and in the XR EXEC mode to install the XR package.

  • All install commands are applicable in both the System Admin EXEC mode and in XR EXEC mode. System Admin install operations are done from XR EXEC mode.


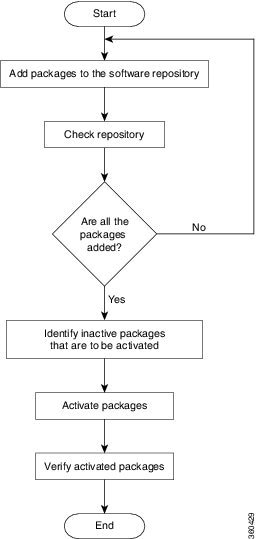
Perform a system upgrade by installing a base package–Cisco IOS XR Unicast Routing Core Bundle. To install this bundle, run the install command. The filename for the Cisco IOS XR Unicast Routing Core Bundle bundle is ncs560-mini-x.iso.


Caution


Do not perform any install operations when the router is reloading.

Do not reload the router during an upgrade operation.


Note


If you perform a manual or automatic system reload without completing the transaction with the install commit command, the action will revert the system to the point before the install transaction commenced, including any configuration changes. Only the log is preserved for debugging.

This action clears all configuration rollback points available. You’ll not be able to roll back to, or view, any commits made until the install rollback event. Any new commits made after the install rollback event starts from commit ID ‘1000000001’.


Note


To enable hardware programming after upgrading the chassis from an older software version to IOS XR Release 7.6.x or later through ISSU, initiate a chassis reload. The chassis reload is mandatory, if you must enable a maximum transmission unit (MTU) value of 9646 on applicable interfaces.


Cisco IOS XR supports RPM signing and signature verification for Cisco IOS XR RPM packages in the ISO and upgrade images. All RPM packages in the Cisco IOS XR ISO and upgrade images are signed to ensure cryptographic integrity and authenticity. This guarantees that the RPM packages haven’t been tampered with and the RPM packages are from Cisco IOS XR. The private key, which is used for signing the RPM packages, is created and securely maintained by Cisco.

View Supported Software Upgrade or Downgrade Versions

Table 1. Feature History Table

Feature Name

Release Information

Description

Supported Software Upgrade or Downgrade IOS XR Versions

Release 7.5.1

You can determine whether a software version can be upgraded or downgraded to another version using this functionality. Before an actual upgrade or downgrade process, you can also view the hardware or software limitations that could cause the upgrade or downgrade to fail. This feature helps you plan successful software upgrades or downgrades.

This feature introduces the show install upgrade-matrix command.

Your Cisco router comes preinstalled with IOS XR software. You either upgrade the software release to use new features and software fixes, or you downgrade the software. To leverage new features that are added or software fixes that are provided, it is important that you upgrade your router to a current version.

To help you select a Cisco IOS XR software release that aligns with Cisco-certified upgrade and downgrade paths, this feature provides answers to the following questions:

  • What upgrade or downgrade releases are supported for the current release?

  • I plan to upgrade from Release X to Release Y. Does my router support upgrade to Release Y?

  • Are there any bridging SMUs that must be installed before I upgrade the software?

This feature provides a mechanism to determine whether the current release supports an upgrade to a target release. This task is run at the start of a software upgrade or downgrade through the install replace command. If the validation fails, the software upgrade is blocked, and the system notifies the reason for the failure. This feature allows you to proactively examine whether you can upgrade or downgrade to a certain release, saving time and effort involved in planning and upgrading the software.

The feature provides the following information to help you understand the prerequisites or limitations related to the specific software upgrade or downgrade:
  • Required bridging SMU RPMs

  • Blocking SMU RPMs

  • Unsupported hardware

  • Caveats or restrictions

You can overwrite the automatic validation using the force keyword in the install replace command. With this option, the system displays warning messages when the upgrade fails but does not block the software upgrade. Use the force ? keyword to understand any other impact to system functionalities apart from the disabling of this process that determines the supported releases for software upgrade or downgrade.

You can view the support information using the following show commands or through the operational data.

Command

Description

show install upgrade-matrix running

Displays all supported software upgrades from the current version according to the support data installed on the running system

show install upgrade-matrix iso path-to-ISO

Displays details about the software upgrade from the current version to the version of the target ISO according to the support data in both the running system and the ISO image

show install upgrade-matrix iso path-to-ISO all

Displays all supported software upgrades from any version according to the support data in the target ISO image

show install upgrade-matrix iso path-to-ISO from-running

Displays details about the software upgrade from the current version to the version of ISO according to the support matrices in both the running system and the target ISO image

View All Supported Software Upgrade from Running Version

The following example shows all supported releases for upgrade from the current version 7.5.1 on the router:

Router#show install upgrade-matrix running
Fri Jul 29 10:31:55.832 IST
This may take a while ...

The current software [7.5.1] can be upgraded from and downgraded to the following releases:

================================================================================
From      To        Bridge SMUs Required        Caveats                         
================================================================================
7.5.1     7.4.1     None                        None                            
--------------------------------------------------------------------------------
7.5.1     7.1.2     None                        None                            
--------------------------------------------------------------------------------
7.5.1     7.1.1     None                        None                            
--------------------------------------------------------------------------------
7.5.1     7.2.1     None                        None                            
--------------------------------------------------------------------------------
7.5.1     7.2.2     None                        None                            
--------------------------------------------------------------------------------
7.5.1     7.3.1     None                        None                            
--------------------------------------------------------------------------------
7.5.1     7.3.2     None                        None                            
--------------------------------------------------------------------------------
7.4.1     7.5.1     None                        None                            
--------------------------------------------------------------------------------
7.1.2     7.5.1     None                        None                            
--------------------------------------------------------------------------------
7.1.1     7.5.1     None                        None                            
--------------------------------------------------------------------------------
7.2.1     7.5.1     None                        None                            
--------------------------------------------------------------------------------
7.2.2     7.5.1     None                        None                            
--------------------------------------------------------------------------------
7.3.1     7.5.1     None                        None                            
--------------------------------------------------------------------------------
7.3.2     7.5.1     None                        None                            
--------------------------------------------------------------------------------

View Supported Releases to Upgrade Software From Current Version to Target Version

This example shows the supported release to upgrade software from the current version to a target version.

Router#show install upgrade-matrix iso /harddisk:/ncs560-goldenk9-x-7.5.2-rev1.iso
Fri Jul 29 10:32:01.028 IST
This may take a while ...
Upgrade from the current software [7.5.1] to 7.5.2 is supported

================================================================================
From      To        Bridge SMUs Required        Caveats                         
================================================================================
7.5.1     7.5.2     None                        None                            
--------------------------------------------------------------------------------

The current image has the upgrade matrix that specifies only its supported upgrade or downgrade versions up to a certain version. If you want to determine the upgrade path of a newer version of ISO that is higher than the version in the current matrix, the upgrade matrix from the new ISO provides the supported upgrade or downgrade paths.

View Supported Releases from Current Version to an ISO Version

The following example shows the software upgrade paths, downgrade paths, and restrictions to an upgrade from the current version to the target ISO version:

Router#show install upgrade-matrix iso /harddisk:/ncs560-goldenk9-x-7.5.2-rev1.iso all
Fri Jul 29 10:32:05.075 IST
This may take a while ...

7.5.2 can be upgraded from and downgraded to the following releases:
================================================================================
From      To        Bridge SMUs Required        Caveats                         
================================================================================
7.5.1     7.5.2     None                        None                            
--------------------------------------------------------------------------------
7.4.2     7.5.2     None                        None                            
--------------------------------------------------------------------------------
7.4.1     7.5.2     None                        None                            
--------------------------------------------------------------------------------
7.5.2     7.5.1     None                        None                            
--------------------------------------------------------------------------------
7.5.2     7.4.2     None                        None                            
--------------------------------------------------------------------------------
7.5.2     7.6.1     None                        None                            
--------------------------------------------------------------------------------
7.5.2     7.4.1     None                        None                            
--------------------------------------------------------------------------------
7.5.2     7.1.2     None                        None                            
--------------------------------------------------------------------------------
7.5.2     7.2.2     None                        None                            
--------------------------------------------------------------------------------
7.5.2     7.3.1     None                        None                            
--------------------------------------------------------------------------------
7.5.2     7.3.2     None                        None                            
--------------------------------------------------------------------------------
7.1.2     7.5.2     None                        None                            
--------------------------------------------------------------------------------
7.2.2     7.5.2     None                        None                            
--------------------------------------------------------------------------------
7.6.1     7.5.2     None                        None                            
--------------------------------------------------------------------------------
7.3.1     7.5.2     None                        None                            
--------------------------------------------------------------------------------
7.3.2     7.5.2     None                        None                            
--------------------------------------------------------------------------------

View Supported Releases from Running Version to an ISO Version

The following example displays details about the software upgrade from the current version to the version of ISO according to the support matrices in both the running system and the target ISO image:

Router#show install upgrade-matrix iso /harddisk:/ncs560-goldenk9-x-7.5.2-rev1.iso from-running
Fri Jul 29 10:32:10.009 IST
This may take a while ...
Upgrade from the current software [7.5.1] to 7.5.2 is supported

================================================================================
From      To        Bridge SMUs Required        Caveats                         
================================================================================
7.5.1     7.5.2     None                        None                            
--------------------------------------------------------------------------------

Upgrading Features

Upgrading features is the process of deploying new features and software patches on the router. Feature upgrade is done by installing package files, termed simply, packages. Software patch installation is done by installing Software Maintenance Upgrade (SMU) files.

Installing a package on the router installs specific features that are part of that package. Cisco IOS XR software is divided into various software packages; this enables you to select the features to run on your router. Each package contains components that perform a specific set of router functions, such as routing, security, and so on.

For example, the components of the routing package are split into individual RPMs, such as BGP and OSPF. BGP is a mandatory RPM which is a part of the base software version and hence cannot be removed. Optional RPMs such as OSPF can be added and removed as required.

The naming convention of the package is <platform>-<pkg>-<pkg version>-<release version>.<architecture>.rpm. Standard packages are:

  • ncs560-mpls-<package-versison>-<release-number>.x86_64.rpm

  • ncs560-isis-<package-versison>-<release-number>.x86_64.rpm

  • ncs560-mcast-<package-versison>-<release-number>.x86_64.rpm

  • ncs560-mgbl-<package-versison>-<release-number>.x86_64.rpm

  • ncs560-bgp-<package-versison>-<release-number>.x86_64.rpm

  • ncs560-ospf-<package-versison>-<release-number>.x86_64.rpm

  • ncs560-mpls-te-rsvp-<package-versison>-<release-number>.x86_64.rpm

  • ncs560-li-<package-versison>-<release-number>.x86_64.rpm

  • ncs560-eigrp-<package-versison>-<release-number>.x86_64.rpm

  • ncs560-k9sec-<package-versison>-<release-number>.x86_64.rpm

Package and SMU installation is performed using install commands. For more information about the install process, see the Install Packages section.

There are separate packages and SMUs for the XR VM and the System Admin VM. They can be identified by their filenames. The XR and System Admin packages and SMUs can be activated from XR and System Admin VMs.

For more information on upgrading the system and the RPMs, see Cisco IOS XR Flexible Packaging Configuration Guide.

Third-party SMUs

Consider these points while activating and deactivating third-party SMUs:

  • To activate a third-party SMU you should have a corresponding base package.

  • When you activate a third-party SMU, the corresponding third-party base package state is inactive, this is an expected behavior.

  • To deactivate a third-party SMU, you should activate corresponding third-party base package.


Note


All SMUs are bundled together with the base package in a TAR file.


Note


All Cisco RPMs have the platform name in the file name. For example, ncs560-sysadmin.


Workflow for Install Process

The workflow for installation and uninstallation processes is depicted in this flowchart.

For installing a package, see Install Packages. For uninstalling a package, see Uninstall Packages.

Install Packages

Complete this task to upgrade the system or install a patch. The system upgrade is done using an ISO image file, while the patch installation is done using packages and SMUs. This task is also used to install .rpm files. The .rpm file contains multiple packages and SMUs that are merged into a single file. The packaging format defines one RPM per component, without dependency on the card type.

Note


  • The System Admin package and XR package can be executed using install commands in the System Admin EXEC and XR EXEC mode. All install commands are applicable in both these modes.

  • Install operation over IPv6 is not supported.


The workflow for installing a package is shown in this flowchart.

Figure 1. Installing Packages Workflow

Add packages workflow

This image depicts the workflow to install packages. From XR 732 onwards, you can enable FPD auto upgrade.

Before you begin


Note


Effective Cisco IOS XR Release 7.3.2, in the XR VM, use the fpd auto-upgrade enable command to automatically upgrade the FPDs. For more information, see the Auto FPD Upgrade section in the Upgrading Field-Programmable Device chapter.


Procedure


Step 1

Execute one of these:

  • install add source <tftp transfer protocol>/package_path/ filename1 filename2 ...
  • install add source <ftp or sftp transfer protocol>//user@server:/package_path/ filename1 filename2 ...

Example:

RP/0/RP0/CPU0:router# install add source /harddisk:/ncs560-mpls-1.0.0.0-r60023I.x86_64.rpm
 ncs560-mgbl-2.0.0.0-r60023I.x86_64.rpm
RP0
RP/0/RP0/CPU0:router# install add source /harddisk:/ncs560-mpls-te-rsvp-1.0.0.0-<release-number>.x86_64.rpm ncs560-mgbl-1.0.0.0-<release-number>.x86_64.rpm
or
RP/0/RP0/CPU0:router# install add source sftp://root@8.33.5.15:/auto/ncs/package/
RP/0/RP0/CPU0:router# install add source /harddisk:/ncs560-mpls-1.0.0.0-<release-number>.x86_64.rpm ncs560-mgbl-2.0.0.0-<release-number>.x86_64.rpm
RP/0/RP0/CPU0:router# install add source /harddisk:/ncs560-mpls-te-rsvp-1.0.0.0-<release-number>.x86_64.rpm ncs560-mgbl-1.0.0.0-<release-number>.x86_64.rpm

Note


A space must be provided between the package_path and filename.

The software files are unpacked from the package and added to the software repository. This operation might take time depending on the size of the files being added. The operation is performed in asynchronous mode. The install add command runs in the background, and the EXEC prompt is returned as soon as possible.

Note


The repositories for the XR VM and the System Admin VM are different. The system automatically adds a routing package to the XR VM repository and a system administration package to the System Admin VM repository.

Step 2

show install request

Example:

RP/0/RP0/CPU0:router#show install request
Thu Mar 28 13:29:03.219 IST

The install add operation 36 is 30% complete
RP/0/RP0/CPU0:router#

(Optional) Displays the operation ID of the add operation and its status. The operation ID can be later used to execute the activate command.

Install operation 8 is still in progress

For system administration packages, the remaining steps must be performed from the System Admin EXEC mode. Use the admin command to enter the System Aadmin EXEC mode.

Step 3

show install repository

Example:

RP/0/RP0/CPU0:router# show install repository all

Displays packages that are added to the repository. Packages are displayed only after the install add operation is complete.

Step 4

show install inactive

Example:

RP/0/RP0/CPU0:router# show install inactive

Displays inactive packages that are present in the repository. Only inactive packages can be activated.

Step 5

Execute one of the following:

  • install activate package_name
  • install activate id operation_id

Example:

RP/0/RP0/CPU0:router# install activate ncs560-mcast-1.0.0.0-<release-number>.x86_64.rpm
ncs560-mpls-1.0.0.0-<release-number>.x86_64.rpm

The operation_id is that of the install add operation. This command can also be run from System Admin mode. The package configurations are made active on the router. As a result, new features and software fixes take effect. This operation is performed in asynchronous mode. The install activate command runs in the background, and the EXEC prompt is returned.

If you use the operation ID, all packages that were added in the specified operation are activated together. For example, if 5 packages are added in operation 8, by executing install activate id 8 , all 5 packages are activated together. You do not have to activate the packages individually.

Activation does not happen instantaneously, but takes some time. Activation of some SMUs require a manual reloading of the router. When such SMUs are activated, a warning message is displayed to perform reload. The components of the SMU get activated only after the reload is complete. Perform router reload immediately after executing the install activate command. If the SMU has dependency on both XR VM and System Admin VM, perform the reload after activating the SMU in both VMs so that they take effect simultaneously. To reload the router, use the hw-module location all reload command from the System Admin EXEC mode.

Step 6

show install active

Example:

RP/0/RP0/CPU0:router# show install active

Displays packages that are active.

Step 7

install commit

Example:

RP/0/RP0/CPU0:router# install commit

Commits the XR newly active software. To commit both XR and System Admin software, use install commit system .


Installing Packages: Related Commands

Related Commands Purpose

show install log

Displays the log information for the install process; this can be used for troubleshooting in case of install failure.

show install package

Displays the details of the packages that have been added to the repository. Use this command to identify individual components of a package.

install prepare

Makes pre-activation checks on an inactive package, to prepare it for activation.

show install prepare

Displays the list of package that have been prepared and are ready for activation.

What to do next

  • After performing a system upgrade, upgrade FPD by using the upgrade hw-module location all fpd all command from the System Aadmin EXEC mode. The progress of FPD upgrade process can be monitored using the show hw-module fpd command in the System Aadmin EXEC mode. Reload the router after the FPD upgrade is completed.


    Note


    Starting Cisco IOS XR Release 7.3.2, if you have enabled the FPD auto-upgrade feature, you do not need to use the upgrade hw-module location all fpd all command to upgrade FPDs.

    Also, the router automatically reloads after an FPD auto upgrade.

    Use the show hw-module fpd command to verify the FPD versions.

    For more information, see the Auto FPD Upgrade section in the Upgrading Field-Programmable Device chapter.


  • Verify the installation using the install verify packages command.

  • Uninstall the packages or SMUs if their installation causes any issues on the router. See Uninstall Packages.


    Note


    ISO images cannot be uninstalled. However, you can perform a system downgrade by installing an older ISO version.


Install Prepared Packages

A system upgrade or feature upgrade is performed by activating the ISO image file, packages, and SMUs. It is possible to prepare these installable files before activation. During the prepare phase, preactivation checks are made and the components of the installable files are loaded on to the router setup. The prepare process runs in the background and the router is fully usable during this time. When the prepare phase is over, all the prepared files can be activated instantaneously. The advantages of preparing before activation are:

  • If the installable file is corrupted, the prepare process fails. This provides an early warning of the problem. If the corrupted file was activated directly, it might cause router malfunction.

  • Directly activating an ISO image for system upgrade takes considerable time during which the router is not usable. However, if the image is prepared before activation, not only does the prepare process run asynchronously, but when the prepared image is subsequently activated, the activation process too takes less time. As a result, the router downtime is considerably reduced.

  • It performs a disk-space check that is required for a successful operation. This quantifies the disk-space deficit, and provides you possible alternatives to free up space in the filesystem.

  • It performs a package compatibility check. This ensures that all the required installation packages are available. For any package compatibility check error, details of the package and version are logged.

Complete this task to upgrade the system and install packages by making use of the prepare operation.

Note


Depending on whether you are installing a System Admin package or a XR package, execute the install commands in the System Admin EXEC mode or XR EXEC mode respectively. All install commands are applicable in both these modes. System Admin install operations can be done from XR mode.


Procedure


Step 1

Add the required ISO image and packages to the repository.

For details, see Install Packages.

Step 2

show install repository

Example:

RP/0/RP0/CPU0:router#show install repository

Perform this step to verify that the required installable files are available in the repository. Packages are displayed only after the "install add" operation is complete.

Step 3

show install request

Example:

RP/0/RP0/CPU0:router#show install request
Thu Mar 28 13:29:03.219 IST                   
 
The install add operation 36 is 30% complete
RP/0/RP0/CPU0:ios#

(Optional) Displays the operation ID of the add operation and its status. The operation ID can be later used to execute the activate command.

Install operation 8 is still in progress

Step 4

Execute one of these:

  • install prepare package_name
  • install prepare id operation_id

Example:

The prepare process takes place. This operation is performed in asynchronous mode. The install prepare command runs in the background, and the EXEC prompt is returned as soon as possible.

If you use the operation ID, all packages that were added in the specified operation are prepared together. For example, if 5 packages are added in operation 8, by executing install prepare id 8 , all 5 packages are prepared together. You do not have to prepare the packages individually.

Step 5

show install prepare

Example:

RP/0/RP0/CPU0:router#show install prepare

Displays packages that are prepared. From the result, verify that all the required packages have been prepared.

Step 6

install activate

Example:

RP/0/RP0/CPU0:router#install activate

All the packages that have been prepared are activated together to make the package configurations active on the router.

Note

 
You should not specify any package name or operation ID in the CLI.

Activations of some SMUs require manual reload of the router. When such SMUs are activated, a warning message is displayed to perform reload. The components of the SMU get activated only after the reload is complete. Perform router reload immediately after the execution of the install activate command is completed.

Step 7

show install active

Example:

RP/0/RP0/CPU0:router#show install active

Displays packages that are active.

From the result, verify that on all RPs and LCs, the same image and package versions are active.

Step 8

install commit

Example:

RP/0/RP0/CPU0:router#install commit

Installing Packages: Related Commands

Related Commands Purpose

show install log

Displays the log information for the install process; this can be used for troubleshooting in case of install failure.

show install package

Displays the details of the packages that have been added to the repository. Use this command to identify individual components of a package.

install prepare clean

Clears the prepare operation and removes all the packages from the prepared state.

What to do next

  • After performing a system upgrade, upgrade FPD by using the upgrade hw-module location all fpd all command from the System Admin EXEC mode. The progress of FPD upgrade process can be monitored using the show hw-module fpd command in the System Admin EXEC mode. Reload the router after the FPD upgrade is completed.


    Note


    Starting Cisco IOS XR Release 7.3.2, if you have enabled the FPD auto-upgrade feature, you do not need to use the upgrade hw-module location all fpd all command to upgrade FPDs.

    Also, the router automatically reloads after an FPD auto upgrade.

    Use the show hw-module fpd command to verify the FPD versions.


  • Verify the installation using the install verify packages command.

  • Uninstall the packages or SMUs if their installation causes any issues on the router. See Uninstall Packages.


    Note


    ISO images cannot be uninstalled. However, you can perform a system downgrade by installing an older ISO version.


Uninstall Packages

Complete this task to uninstall a package. All router functionalities that are part of the uninstalled package are deactivated. Packages that are added in the XR VM cannot be uninstalled from the System Admin VM. However, the cross VM operation allows System Admin packages to be deactivated from XR as well.


Note


Installed ISO images cannot be uninstalled. Also, kernel SMUs that install third party SMU on host, XR VM and System Admin VM, cannot be uninstalled. However, subsequent installation of ISO image or kernel SMU overwrites the existing installation.


The workflow for uninstalling a package is shown in this flowchart.

Figure 2. Uninstalling Packages Workflow


This task uninstalls XR VM packages. If you need to uninstall System Admin packages, run the same commands from the System Admin EXEC mode.

Procedure


Step 1

show install active

Example:

RP/0/RP0/CPU0:router#show install active

Displays active packages. Only active packages can be deactivated.

Step 2

Execute one of these:

  • install deactivate package_name
  • install deactivate id operation_id

Example:

The operation_id is the ID from install add operation. All features and software patches associated with the package are deactivated. You can specify multiple package names and deactivate them simultaneously.

If you use the operation ID, all packages that were added in the specified operation are deactivated together. You do not have to deactivate the packages individually. If System admin packages were added as a part of the install add operation (of the ID used in deactivate) then those packages will also be deactivated.

Step 3

show install inactive

Example:

RP/0/RP0/CPU0:router#show install inactive

The deactivated packages are now listed as inactive packages. Only inactive packages can be removed from the repository.

Step 4

install commit

Step 5

install remove package_name

Example:

The inactive packages are removed from the repository.

Use the install remove command with the id operation-id keyword and argument to remove all packages that were added for the specified operation ID.

You can also use the install remove inactive all to remove all inactive packages from XR and System Admin.

Step 6

show install repository

Example:

RP/0/RP0/CPU0:router#show install repository

Displays packages available in the repository. The package that are removed are no longer displayed in the result.


What to do next

Install required packages. .