Golden ISO Workflow

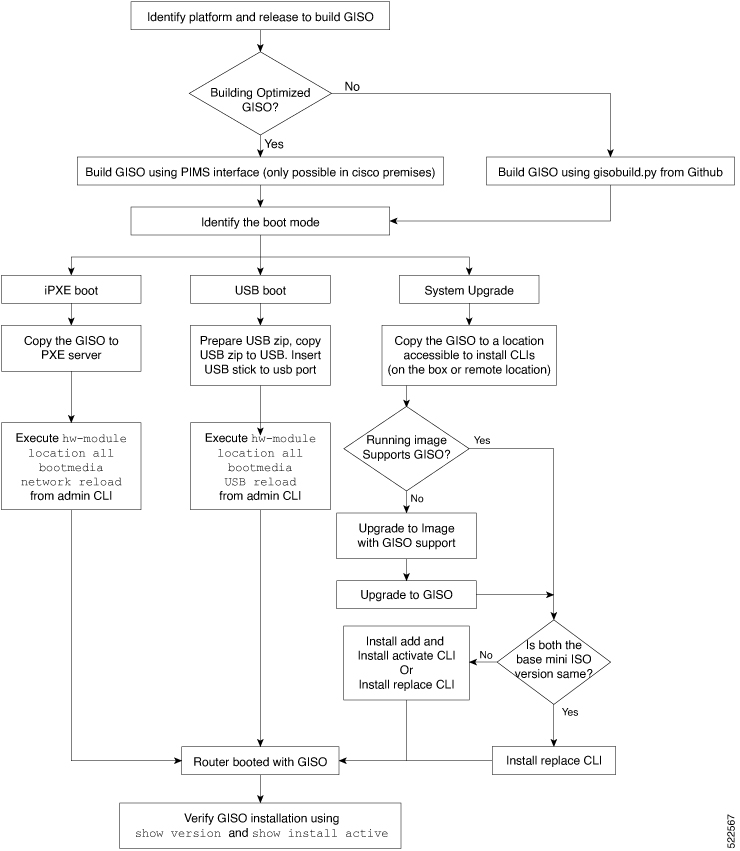
The following image shows the workflow for building and installing golden ISO.

Figure 1. Golden ISO Workflow

The image shows a workflow of how you can build and install a Golden ISO

Build Golden ISO

The customized ISO is built using Cisco Golden ISO (GISO) build script gisobuild.py available on the Github location.

The GISO build script supports automatic dependency management, and provides these functionalities:
  • Builds RPM database of all the packages present in package repository.

  • Scans the repositories and selects the relevant Cisco RPMs that matches the input iso.

  • Skips and removes third-party RPMs that are not SMUs of already existing third-party base package in mini-x.iso.

  • Displays an error and exits build process if there are multiple base RPMs of same release but different versions.

  • Performs compatibility check and dependency check for all the RPMs. For example, the child RPM is dependent on the parent RPM . If only the child RPM is included, the Golden ISO build fails.
Install Golden ISO

Golden ISO (GISO) automatically performs the following actions:

  • Installs host and system admin RPMs.

  • Partitions repository and TFTP boot on RP.

  • Creates software profile in system admin and XR modes.

  • Installs XR RPMs. Use show install active command to see the list of RPMs.

  • Applies XR configuration. Use show running-config command in XR mode to verify.

Procedure


Step 1

Download GISO image to the router using one of the following options:

  • PXE boot: when the router is booted, the boot mode is identified. After detecting PXE as boot mode, all available ethernet interfaces are brought up, and DHClient is run on each interface. DHClient script parses HTTP or TFTP protocol, and GISO is downloaded to the box.
  • USB boot or Disk Boot: when the USB mode is detected during boot, and GISO is identified, the additional RPMs and XR configuration files are extracted and installed.
  • System Upgrade when the system is upgraded, GISO can be installed using install add , install activate , or using install replace commands.
    Important 

    To replace the current version and packages on the router with the version from GISO, note the change in command and format.

    • In versions prior to Cisco IOS XR Release 6.3.3, 6.4.x and 6.5.1, use the install update command:
      install update source <source path> <Golden-ISO-name> replace
    • In Cisco IOS XR Release 6.5.2 and later, use the install replace command.
      install replace <absolute-path-of-Golden-ISO>
    Note 

    To create a Bootable External USB Disk, do the following:

    • Ensure that the USB Boot Disk has a minimum storage of 8GB, and that you have root/admin or appropriate permission to create bootable disk on linux machine.

    1. Copy and execute usb-install script on the Linux machine to create a bootable external USB.

    2. Reset the RSP/RP and plug in bootable USB to RSP/RP's front panel. The USB will get detected in ROMMON. Note that when the system is in ROMMON, and if you add a front panel external USB, the USB will not be detected until the RSP/RP is reset.

    The options to upgrade the system are as follows:

    • system upgrade from a non-GISO (image that does not support GISO) to GISO image: If a system is running a version1 with an image that does not support GISO, the system cannot be upgraded directly to version2 of an image that supports GISO. Instead, the version1 must be upgraded to version2 mini ISO, and then to version2 GISO.

    • system upgrade in a release from version1 GISO to version2 GISO: If both the GISO images have the same base version but different labels, install add and install activate commands does not support same version of two images. Instead, using install source command installs only the delta RPMs. System reload is based on restart type of the delta RPMs.

      Using install replace command performs a system reload, irrespective of the difference between ISO and the existing version.

    • system upgrade across releases from version1 GISO to version2 GISO: Both the GISO images have different base versions. Use install add and install activate commands, or install replace command to perform the system upgrade. The router reloads after the upgrade with the version2 GISO image.

Step 2

Run the show install repository all command in System Admin mode to view the RPMs and base ISO for host, system admin and XR.

Step 3

Run the show install package <golden-iso> command to display the list of RPMs, and packages built in GISO.

Note 
To list RPMs in the GISO, the GISO must be present in the install repository.

The ISO, SMUs and packages in GISO are installed on the router.