Provision Network Devices using Zero Touch Provisioning

Manually deploying network devices in a large-scale environment requires skilled workers and is time consuming.

With Zero Touch Provisioning (ZTP), you can seamlessly provision thousands of network devices accurately within minutes and without any manual intervention. This can be easily defined using a configuration file or script using shell or phyton.

Learn about Zero Touch Provisioning

ZTP allows you to provision the network device with day 0 configurations and supports both management ports and data ports.


Note


Currently, ZTP only supports single name-server. When the DHCP server has more than one server address configured, ZTP fails to apply the server configuration.


ZTP provides multiple options, such as:

  • Automatically apply specific configuration in a large-scale environment.

  • Download and install specific IOS XR image.

  • Install specific application package or third party applications automatically.

  • Deploy containers without manual intervention.

  • Upgrade or downgrade software versions effortlessly on thousands of network devices at a time

Benefits of Using ZTP

ZTP helps you manage large-scale service providers infrastructures effortlessly. Following are the added benefits of using ZTP:

  • ZTP helps you to remotely provision a router anywhere in the network. Thus eliminates the need to send an expert to deploy network devices and reduces IT cost.

  • Automated provisioning using ZTP can remove delay and increase accuracy and thus is cost-effective and provides better customer experience.

    By automating repeated tasks, ZTP allows network administrators to concentrate on more important stuff.

  • ZTP process helps you to quickly restore service. Rather than troubleshooting an issue by hand, you can reset a system to well-known working status.

Use Cases

The following are some of the useful use cases for ZTP:

  • Using ZTP to install Chef

  • Using ZTP to integrate IOS-XR with NSO

  • Using ZTP to install Puppet

You can initiate ZTP in one of the following ways:

Zero Touch Provisioning on a Fresh Boot of a Router

When you boot the device, the ZTP process initiates automatically if the device does not have a prior configuration.

Fresh Boot Using Removable Storage Device

You can automatically provision a network device using ZTP from a removable storage device such as a USB flash drive. The following are the configuration types available in a removable storage device:

  • Device-specific configuration: The device-specific configuration is available in the folder that has a name matching the chassis serial number of the device. The sample path for the device-specific configuration is /USB-path/xr-config/serial-number/router-cfg. For example, /USB-path/xr-config/FOC2102R1D0/router-cfg FOC2102R1D0 is the chassis serial number.

  • Generic configuration: The generic configuration is available in the xr-config folder. The sample path for the generic configuration is./USB-path/xr-config/router-cfg

Here is the high-level work flow of the ZTP process using a USB flash drive:

  1. When you boot the device, the device verifies if the USB is enabled in the ztp.ini file. By default, the USB fetcher is enabled and assigned the highest priority.

    Fetcher defines which port ZTP should use to get the provisioning details. By default, each port has a fetcher priority defined in the ztp.ini file.

  2. ZTP checks for a USB flash drive on the device If the USB drive isn't available, the ZTP process moves to the next fetcher as defined in the fetcher priority of the ZTP.ini file.

  3. If a USB flash drive is available, the device scans for the xr-config file in the root of the USB mount in the following sequence:

    1. The ZTP process first scans for the router-cfg file in the folder that is matching the chassis serial number of the device within the xr-config folder and applies the device-specific configuration.

      For example, /USB-path/xr-config/FOC2102R1D0/router-cfg

    2. If the device-specific configuration with a serial number isn't available, the ZTP process scans for the router-cfg file in the xr-config folder and applies a generic configuration.

    3. If the xr-config folder isn't available, the ZTP process moves to the next fetcher as defined in the fetcher priority of the ZTP.ini file.

  4. The device applies the configuration.

  5. The network device is now up and running.

Configure ZTP using USB

Follow these steps to configure ZTP using a USB flash drive:

  1. Create the configuration file. See Build your Configuration File.


    Note


    When you use a USB flash drive as a source for ZTP, you can't use the script file for provisioning. The script file isn't supported for USB fetcher.


  2. Copy the bootstrapping data to the USB flash drive and mount it on the device.

Fresh Boot Using DHCP

When you boot the device, the ZTP process initiates automatically if the device does not have a prior configuration. During the process, the router receives the details of the configuration file from the DHCP server.

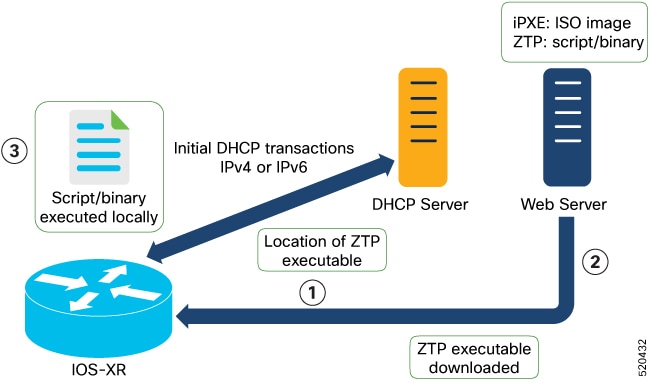
This image depicts the high-level work flow of the ZTP process:

The ZTP process initiates when you boot the network-device with an IOS-XR image. The process starts only on the device that doesn't have a prior configuration.

Here is the high-level work flow of the ZTP process for the Fresh boot:

  1. ZTP sends DHCP request to fetch the ZTP configuration file or user script. To help the Bootstrap server uniquely identify the device, ZTP sends below DHCP option

    • DHCP(v4/v6) client-id=Serial Number

    • DHCPv4 option 124: Vendor, Platform, Serial-Number

    • DHCPv6 option 16: Vendor, Platform, Serial-Number

    The following is the default sequential flow of the ZTP process:

    • ZTP sends IPv4 DHCP request first on all the management port. In case there is a failure, then ZTP sends IPv6 DHCP request on all the management port.

    • ZTP sends IPv4 DHCP request first on all the data port. In case there is a failure, then ZTP sends IPv6 DHCP request on all the data port.

      The default sequential flow is defined in configuration file and you can modify the sequence using the configuration file.

  2. DHCP server identifies the device and responds with DHCP response using one of the following options:

    DHCP server should be configured to respond with the DHCP options.

    • DHCPv4 using BOOTP filename to supply script/config location.

    • DHCPv4 using Option 67 (bootfile-name) to supply script/config location.

    • DHCPv6 using Option 59 (OPT_BOOTFILE_URL) to supply script/config location

  3. The network device downloads the file from the web server using the URI location that is provided in the DHCP response.

  4. The device receives a configuration file or script file from the HTTP server.


    Note


    • If the downloaded file content starts with !! IOS XR it is considered as a configuration file.

    • If the downloaded file content starts with #! /bin/bash, #! /bin/sh or #!/usr/bin/python it is considered as a script file.


  5. The device applies the configuration file or executes the script or binary in the default bash shell.

  6. The Network device is now up and running.

Build your Configuration File

Based on the business need, you can use a configuration or script file to initiate the ZTP process.

The configuration file content starts with !! IOS XR and the script file content starts with #! /bin/bash, #! /bin/sh or #!/usr/bin/python.

Once you create the configuration file, apply it to the device using the ztp_helper function xrapply.

The following is the sample configuration file:

!! IOS XR
username root
group root-lr
password 0 lablab
!
 
hostname ios
alias exec al show alarms brief system active
 
interface HundredGigE 0/0/0/24
ipv4 address 10.10.10.55 255.255.255.0
no shutdown
!

Create User Script

This script or binary is executed in the IOS-XR Bash shell and can be used to interact with IOS-XR CLI to configure, verify the configured state and even run exec commands based on the workflow that the operator chooses.

Build your ZTP script with either shell and python. ZTP includes a set of CLI commands and a set of shell utilities that can be used within the user script.


Note


We recommend that you do not execute the APIs on a router that is already provisioned. ZTP Utility APIs are designed to be executed from the ZTP script when you boot the router for the first time. The APIs perform additional operations to run the requested actions during the boot process and bring changes in the existing configuration before executing any action.

ZTP utility APIs have prerequisites that are executed in the ZTP workflow before running the ZTP utility APIs. These prerequisites help with running specific actions during the boot process and in making necessary configuration changes.

We recommend that you do not use ZTP utilities outside the scope of ZTP script. The APIs in this script use username as ztp or ztp-user in every action. The ZTP utility executed outside the scope of the ZTP script may fail as it is not executed from the ZTP workflow. This may modify the configurations on the device and affect other related operations. If the ZTP utility is executed outside the scope ZTP script, the logs display that the script is executed using username ztp or ztp-user, misleading that the script is executed from the workflow.


ZTP Shell Utilities

ZTP includes a set of shell utilities that can be sourced within the user script. ztp_helper.sh is a shell script that can be sourced by the user script. ztp_helper.sh provides simple utilities to access some XR functionalities. You can invoke the following bash functions:

  • xrcmd—Used to run a single XR exec command:xrcmd “show running”

  • xrapply—Applies the block of configuration, specified in a file:

    
    cat >/tmp/config <<%%
    !! XR config example
    hostname node1-mgmt-via-xrapply
    %%
    xrapply /tmp/config
  • xrapply_with_reason—Used to apply a block of XR configuration along with a reason for logging purpose:

    
    cat >/tmp/config <<%%
    !! XR config example
    hostname node1-mgmt-via-xrapply
    %%
    xrapply_with_reason "this is a system upgrade" /tmp/config
  • xrapply_string—Used to apply a block of XR configuration in one line:

    
    xrapply_string "hostname foo\interface HundredGigE0/0/0/24\nipv4 address 1.2.3.44 
    255.255.255.0\n"
  • xrapply_string_with_reason—Used to apply a block of XR configuration in one line along with a reason for logging purposes:

    
    xrapply_string_with_reason ”system renamed again" "hostname venus\n interface HundredGigE0/0/0/24\n 
    ipv4 address 172.30.0.144/24\n”
  • xrreplace—Used to apply XR configuration replace in XR namespace via a file.

    
    cat rtr.cfg <<%%
    !! XR config example
    hostname node1-mgmt-via-xrreplace
    %%
    xrreplace rtr.cfg
  • xrapply_with_extra_auth—Used to apply XR configuration that requires authentication in XR namespace via a file. The xrapply_with_extra_auth API is used when configurations that require additional authentication to be applied such as alias, flex groups. This api internally performs authentication and authorization to gain additional privilege.

    
    cat >/tmp/config <<%%
    !! XR config example
    alias exec alarms show alarms brief system active
    alias exec version run cat /etc/show_version.txt
    %%
    xrapply_with_extra_auth >/tmp/config 
    
    
  • xrreplace_with_extra_auth—Used to apply XR configuration replace in XR namespace via a file. The xrreplace_with_extra_auth API is used when configurations that require additional authentication to be applied such as alias, flex groups. This api internally performs authentication and authorization to gain additional privilege.

    
    cat >/tmp/config <<%%
    !! XR config example
    alias exec alarms show alarms brief system active
    alias exec version run cat /etc/show_version.txt
    %%
    xrreplace_with_extra_auth >/tmp/config 

API Implementation Behavior


Note


The xrcmd ,xrapply , and xrreplace APIs or utilities carry out a series of internal operations to execute specific actions. These operations, which are performed sequentially, include:

  • User Creation—This operation involves generating a ztp-user (temporary user) before the execution of any other operations.

  • Command Execution or Configuration Application—This operation encompasses executing a command, applying configurations using parser utilities, or applying the configuration through cfg-mgr.

  • User Removal—This operation involves removing the ztp-user (temporary user) from the XR configuration.

In addition to these internal operations, the xrapply_with_extra_auth and xrreplace_with_extra_auth APIs performs an authentication process before applying configurations.


ZTP Helper Python Library

The ZTP python library defines a single Python class called ZtpHelpers. The helper script is located at /pkg/bin/ztp_helper.sh

ZtpHelpers Class Methods

Following are utility methods of the ZtpHelpers class:

  • init(self, syslog_server=None, syslog_port=None, syslog_file=None):
    __init__ constructor
    :param syslog_server: IP address of reachable Syslog Server 
           :param syslog_port: Port for the reachable syslog server
            :param syslog_file: Alternative or addon file for syslog
            :type syslog_server: str
            :type syslog_port: int
            :type syslog_file:str
    
             All parameters are optional. When nothing is specified during object creation, then all logs are sent to a log rotated file /tmp/ztp_python.log (max size of 1MB).
    
  • setns(cls, fd, nstype):
    Class Method for setting the network namespace
               :param cls: Reference to the class ZtpHelpers 
               :param fd: incoming file descriptor  
               :param nstype: namespace type for the sentns call
               :type nstype: int  
                      0      Allow any type of namespace to be joined.
                      CLONE_NEWNET = 0x40000000 (since Linux 3.0)
                             fd must refer to a network namespace
    
  • get_netns_path(cls, nspath=None, nsname=None, nspid=None):

    Class Method to fetch the network namespace filepath 
               associated with a PID or name 
               :param cls: Reference to the class ZtpHelpers
               :param nspath: optional network namespace associated name
               :param nspid: optional network namespace associate PID
               :type nspath: str
               :type nspid: int 
               :return: Return the complete file path 
               :rtype:  str 
    
  • toggle_debug(self, enable):
    Enable/disable debug logging
               :param enable: Enable/Disable flag 
               :type enable: int
    
  • set_vrf(self, vrfname=None):
    Set the VRF (network namespace)
               :param vrfname: Network namespace name 
                               corresponding to XR VRF  
    
  • download_file(self, file_url, destination_folder):

    Download a file from the specified URL
               :param file_url: Complete URL to download file 
               :param destination_folder: Folder to store the 
                                          downloaded file
               :type file_url: str
               :type destination_folder: str
               :return: Dictionary specifying download success/failure
                        Failure => { 'status' : 'error' }
                        Success => { 'status' : 'success',
                                     'filename' : 'Name of downloaded file',
                                     'folder' : 'Directory location of downloaded file'}
               :rtype: dict 
    
  • setup_syslog(self):

    Method to Correctly set sysloghandler in the correct VRF (network namespace) and point to a remote syslog Server or local file or default log-rotated log file.

  • xrcmd(self, cmd=None):

    Issue an IOS-XR exec command and obtain the output
               :param cmd: Dictionary representing the XR exec cmd
                           and response to potential prompts
                           { 'exec_cmd': '', 'prompt_response': '' }
               :type cmd: dict            
               :return: Return a dictionary with status and output
                        { 'status': 'error/success', 'output': '' }
               :rtype: dict
    
  • xrapply(self, filename=None, reason=None):

    Apply Configuration to XR using a file 
               :param file: Filepath for a config file
                            with the following structure: 
                            !
                            XR config command
                            !
                            end
               
               :param reason: Reason for the config commit.
                              Will show up in the output of:
                              "show configuration commit list detail"
               :type filename: str
               :type reason: str
               :return: Dictionary specifying the effect of the config change
                         { 'status' : 'error/success', 'output': 'exec command based on status'}
                         In case of Error:  'output' = 'show configuration failed' 
                         In case of Success: 'output' = 'show configuration commit changes last 1'
               :rtype: dict
    
  • xrapply_string(self, cmd=None, reason=None):

    Apply Configuration to XR using  a single line string
               :param cmd: Single line string representing an XR config command  
               :param reason: Reason for the config commit.
                              Will show up in the output of:
                              "show configuration commit list detail"
               :type cmd: str
               :type reason: str 
               :return: Dictionary specifying the effect of the config change
                         { 'status' : 'error/success', 'output': 'exec command based on status'}
                         In case of Error:  'output' = 'show configuration failed'
                         In case of Success: 'output' = 'show configuration commit changes last 1'
               :rtype: dict
    
  • xrreplace(self, filename=None):

    Replace XR Configuration using a file
    
               :param file: Filepath for a config file
                            with the following structure:
    
                            !
                            XR config commands
                            !
                            end
               :type filename: str
               :return: Dictionary specifying the effect of the config change
                         { 'status' : 'error/success', 'output': 'exec command based on status'}
                         In case of Error:  'output' = 'show configuration failed'
                         In case of Success: 'output' = 'show configuration commit changes last 1'
               :rtype: dict
    

API Implementation Behavior


Note


The xrcmd ,xrapply , and xrreplace APIs or utilities carry out a series of internal operations to execute specific actions. These operations, which are performed sequentially, include:

  • User Creation—This operation involves generating a ztp-user (temporary user) before the execution of any other operations.

  • Command Execution or Configuration Application—This operation encompasses executing a command, applying configurations using parser utilities, or applying the configuration through cfg-mgr.

  • User Removal—This operation involves removing the ztp-user (temporary user) from the XR configuration.


Example

The following shows the sample script in phyton

[apple2:~]$ python sample_ztp_script.py 

###### Debugs enabled ######


###### Change context to user specified VRF ######


###### Using Child class method, setting the root user ######

2016-12-17 04:23:24,091 - DebugZTPLogger - DEBUG - Config File content to be applied  !
                     username netops
                     group root-lr
                     group cisco-support
                     secret 5 $1$7kTu$zjrgqbgW08vEXsYzUycXw1
                     !
                     end
2016-12-17 04:23:28,546 - DebugZTPLogger - DEBUG - Received exec command request: "show configuration commit changes last 1"
2016-12-17 04:23:28,546 - DebugZTPLogger - DEBUG - Response to any expected prompt ""
Building configuration...
2016-12-17 04:23:29,329 - DebugZTPLogger - DEBUG - Exec command output is ['!! IOS XR Configuration version = 6.2.1.21I', 'username netops', 'group root-lr', 'group cisco-support', 'secret 5 $1$7kTu$zjrgqbgW08vEXsYzUycXw1', '!', 'end']
2016-12-17 04:23:29,330 - DebugZTPLogger - DEBUG - Config apply through file successful, last change = ['!! IOS XR Configuration version = 6.2.1.21I', 'username netops', 'group root-lr', 'group cisco-support', 'secret 5 $1$7kTu$zjrgqbgW08vEXsYzUycXw1', '!', 'end']


###### Debugs Disabled ######


###### Executing a show command ######

Building configuration...
{'output': ['!! IOS XR Configuration version = 6.2.1.21I',
            '!! Last configuration change at Sat Dec 17 04:23:25 2016 by UNKNOWN',
            '!',
            'hostname customer2',
            'username root',
            'group root-lr',
            'group cisco-support',
            'secret 5 $1$7kTu$zjrgqbgW08vEXsYzUycXw1',
            '!',
            'username noc',
            'group root-lr',
            'group cisco-support',
            'secret 5 $1$7kTu$zjrgqbgW08vEXsYzUycXw1',
            '!',
            'username netops',
            'group root-lr',
            'group cisco-support',
            'secret 5 $1$7kTu$zjrgqbgW08vEXsYzUycXw1',
            '!',
            'username netops2',
            'group root-lr',
            'group cisco-support',
            'secret 5 $1$7kTu$zjrgqbgW08vEXsYzUycXw1',
            '!',
            'username netops3',
            'group root-lr',
            'group cisco-support',
            'secret 5 $1$7kTu$zjrgqbgW08vEXsYzUycXw1',
            '!',
            'cdp',
            'service cli interactive disable',
            'interface MgmtEth0/RP0/CPU0/0',
            'ipv4 address 11.11.11.59 255.255.255.0',
            '!',
            'interface TenGigE0/0/0/0/24',
            'shutdown',
            '!',
            'interface TenGigE0/0/0/0/25',
            'shutdown',
            '!',
             
            'router static',
            'address-family ipv4 unicast',
            '0.0.0.0/0 11.11.11.2',
            '!',
            '!',
            'end'],
 'status': 'success'}

###### Apply valid configuration using a file ######

Building configuration...
{'status': 'success', 'output': ['!! IOS XR Configuration version = 6.2.1.21I', 'hostname customer', 'cdp', 'end']}

###### Apply valid configuration using a string ######

Building configuration...
{'output': ['!! IOS XR Configuration version = 6.2.1.21I',
            'hostname customer2',
            'end'],
 'status': 'success'}

###### Apply invalid configuration using a string ######

{'output': ['!! SYNTAX/AUTHORIZATION ERRORS: This configuration failed due to',
            '!! one or more of the following reasons:',
            '!!  - the entered commands do not exist,',
            '!!  - the entered commands have errors in their syntax,',
            '!!  - the software packages containing the commands are not active,',

For information on helper APIs, see https://github.com/ios-xr/iosxr-ztp-python#iosxr-ztp-python.

Set Up DHCP Server

For ZTP to operate a valid IPv4 or IPv6 address is required and the DHCP server must send a pointer to the configuration script.

The DHCP request from the router has the following DHCP options to identify itself:

  • Option 60: “vendor-class-identifier” : Used to Identify the following four elements:

    • The type of client: For example, PXEClient

    • The architecture of The system (Arch): For example: 00009 Identify an EFI system using a x86-64 CPU

    • The Universal Network Driver Interface (UNDI):

      For example 003010 (first 3 octets identify the major version and last 3 octets identify the minor version)

    • The Product Identifier (PID):

  • Option 61: “dhcp-client-identifier” : Used to identify the Serial Number of the device.

  • Option 66 : Used to request the TFTP server name.

  • Option 67: Used request the TFTP filename.

  • Option 97: “uuid” : Used to identify the Universally Unique Identifier a 128-bit value (not usable at this time)

Example

The following DHCP request sample provides a fixed IP address and a configuration file with the mac address of the management interface.

host cisco-rp0 {
   hardware ethernet e4:c7:22:be:10:ba;
   fixed-address 172.30.12.54;
   filename "http://172.30.0.22/configs/cisco-1.config";
}

The following DHCP request sample provides a fixed IP address and a configuration file with the mac address of the management interface along with capability to re-image the system using iPXE (exr-config option):

host cisco-rp0 {
   hardware ethernet e4:c7:22:be:10:ba;
   fixed-address 172.30.12.54;
   if exists user-class and option user-class = "iPXE" {
      filename = "http://172.30.0.22/boot.ipxe";
   } elsif exists user-class and option user-class = "exr-config"  {
      filename = "http://172.30.0.22/scripts/cisco-rp0_ztp.sh";
   }
}

DHCP server identifies the device and responds with either an IOS-XR configuration file or a ZTP script as the filename option.

The DHCP server responds with the following DHCP options:

  • DHCPv4 using BOOTP filename to supply script/config location.

  • DHCPv4 using Option 67 (bootfile-name) to supply script/config location.

  • DHCPv6 using Option 15: If you have configured this option for the server to identify ztp requests, ensure that you update the server configuration, for Linux or ISC servers. Sample server-side configuration required to check user-class for ZTP is shown in the following example:

    if exists dhcp6.user-class and (substring(option dhcp6.user-class, 0, 9) = "xr-config" or substring(option dhcp6.user-class, 2, 9) = "xr-config"){
         #
    }
    
  • DHCPv6 using Option 59 (OPT_BOOTFILE_URL) to supply script/config location

The following sample shows the DHCP response with bootfile-name (option 67):

option space cisco-vendor-id-vendor-class code width 1 length width 1;
option vendor-class.cisco-vendor-id-vendor-class code 9 = {string};

######### Network 11.11.11.0/24 ################
shared-network 11-11-11-0 {

####### Pools ##############
  subnet 11.11.11.0 netmask 255.255.255.0 {
    option subnet-mask 255.255.255.0;
	option broadcast-address 11.11.11.255;
	option routers 11.11.11.2;
	option domain-name-servers 11.11.11.2;
	option domain-name "cisco.local";
	# DDNS statements
  	ddns-domainname "cisco.local.";
	# use this domain name to update A RR (forward map)
  	ddns-rev-domainname "in-addr.arpa.";
  	# use this domain name to update PTR RR (reverse map)

    }

######## Matching Classes ##########

  class "cisco" {
       match if (substring(option dhcp-client-identifier,0,11) = "FGE194714QS");
  }


  pool {
      allow members of "cisco";
      range 11.11.11.47 11.11.11.50;
      next-server 11.11.11.2;

      if exists user-class and option user-class = "iPXE" {
         filename="http://11.11.11.2:9090/cisco-mini-x-6.2.25.10I.iso";
      }

  
      if exists user-class and option user-class = "exr-config"  
       {
          if (substring(option vendor-class.cisco-vendor-id-vendor-class,19,99)="cisco")
          {           
            option bootfile-name "http://11.11.11.2:9090/scripts/exhaustive_ztp_script.py";
          }
        }
      

      ddns-hostname "cisco-local";
      option routers 11.11.11.2;
  }
}

Authentication on Data Ports

On fresh boot, ZTP process is initiated from management ports and may switch to data ports. To validate the connection with DHCP server, authentication is performed on data ports through DHCP option 43 for IPv4 and option 17 for IPv6. These DHCP options are defined in option space and are included within dhcpd.conf and dhcpd6.conf configuration files. You must provide following parameters for authentication while defining option space:

  • Authentication code—The authentication code is either 0 or 1; where 0 indicates that authentication is not required, and 1 indicates that MD5 checksum is required.


    Note


    If the option 43 for IPv4, and option 17 for IPv6 is disabled, the authentication fails.


  • Client identifier—The client identifier must be 'exr-config' .

  • MD5 checksum—This is chassis serial number. It can be obtained using echo -n $SERIALNUMBER | md5sum | awk '{print $1}' .

Here is the sample dhcpd.conf configuration. In the example below, the option space called VendorInfo is defined with three parameters for authentication:
class "vendor-classes" {
   match option vendor-class-identifier;
}

option space VendorInfo;
option VendorInfo.clientId code 1 = string;
option VendorInfo.authCode code 2 = unsigned integer 8;
option VendorInfo.md5sum code 3 = string;
option vendor-specific code 43 = encapsulate VendorInfo;
subnet 10.65.2.0 netmask 255.255.255.0 {
  option subnet-mask 255.255.255.0;
  option routers 10.65.2.1;
  range 10.65.2.1 10.65.2.200;
}
host cisco-mgmt {
   hardware ethernet 00:50:60:45:67:01;
   fixed-address 10.65.2.39;
   vendor-option-space VendorInfo;
   option VendorInfo.clientId "exr-config" ;
   option VendorInfo.authCode 1;
   option VendorInfo.md5sum "aedf5c457c36390c664f5942ac1ae3829";
   option bootfile-name "http://10.65.2.1:8800/admin-cmd.sh";
}

Here is the sample dhcpd6.conf configuration file. In the example below, the option space called VendorInfo is defined that has code width 2 and length width 2 (as per dhcp standard for IPv6) with three parameters for authentication:


log-facility local7;
option dhcp6.name-servers 2001:1451:c632:1::1;
option dhcp6.domain-search "cisco.com";
dhcpv6-lease-file-name "/var/lib/dhcpd/dhcpd6.leases";
option dhcp6.info-refresh-time 21600;
option dhcp6.bootfile-url code 59 = string;
option dhcp6.user-class code 15 = string;
option space CISCO-EXR-CONFIG code width 2 length width 2;
option CISCO-EXR-CONFIG.client-identifier code 1 = string;
option CISCO-EXR-CONFIG.authCode code 2 = integer 8;
option CISCO-EXR-CONFIG.md5sum code 3 = string;
option vsio.CISCO-EXR-CONFIG code 9 = encapsulate CISCO-EXR-CONFIG;
subnet6 2001:1451:c632:1::/64{
 range6 2001:1451:c632:1::2 2001:1451:c632:1::9;        
 option CISCO-EXR-CONFIG.client-identifier "exr-config";
 option CISCO-EXR-CONFIG.authCode 1;
 #valid md5
 option CISCO-EXR-CONFIG.md5sum "90fd845ac82c77f834d57a034658d0f0";
 if option dhcp6.user-class = 00:04:69:50:58:45 {
  option dhcp6.bootfile-url "http://[2001:1851:c632:1::1]/cisco-2/image.iso";
 }
 else {
   #option dhcp6.bootfile-url "http://[2001:1851:c632:1::1]/cisco-2/cisco-mini-x.iso.sh";
   option dhcp6.bootfile-url "http://[2001:1851:c632:1::1]/cisco-2/ztp.cfg";
  }
}

Invoke ZTP Manually

You can invoke Zero Touch Provisioning (ZTP) manually through the Command Line Interface. This method is Ideal for verifying the ZTP configuration without a reboot. This manual approach helps you to provision the router in stages. To invoke ZTP on an interface (data ports or management port), you don't have to bring up and configure the interface first.

Even when the interface is down, you can run the ztp initiate command, and the ZTP script will bring it up and invoke dhclient. Hence, ZTP can run on all interfaces irrespective of their availability.

Use the following commands to manually invoke the ZTP commands and to force ZTP to run on all interfaces:

  • ztp initiate — Invokes a new ZTP DHCP session. Logs can be found in /disk0:/ztp/ztp.log.

    Configuration Example:

    
    Router#ztp initiate debug verbose interface HundredGigE 0/0/0/24
    Invoke ZTP? (this may change your configuration) [confirm] [y/n] :
    
  • ztp terminate —Terminates any ZTP session in progress.

    Configuration Example:

    Router #ztp terminate verbose
    Mon Oct 10 16:52:38.507 UTC
    Terminate ZTP? (this may leave your system in a partially configured state) [confirm] [y/n] :y
    ZTP terminated
    
  • ztp enable —Enables the ZTP at boot.

    Configuration Example:

    Router#ztp enable
    Fri Jul 12 16:09:02.154 UTC
    Enable ZTP? [confirm] [y/n] :y
    ZTP Enabled.
    
  • ztp disable —Disables the ZTP at boot.

    Configuration Example:

    Router#ztp disable
    Fri Jul 12 16:07:18.491 UTC
    Disable ZTP? [confirm] [y/n] :y
    ZTP Disabled.
    Run ZTP enable to run ZTP again.
    
  • ztp clean —Removes only the ZTP state files.

    Configuration Example:

    Router#ztp clean verbose
    Mon Oct 10 17:03:43.581 UTC
    Remove all ZTP temporary files and logs? [confirm] [y/n] :y
    All ZTP files have been removed.
    If you now wish ZTP to run again from boot, do 'conf t/commit replace' followed by reload.
    

    The log file ztp.log is saved in /var/log folder, and a copy of log file is available at /disk0:/ztp/ztp.log location using a soft link. However, executing ztp clean clears files saved on disk and not on /var/log folder where current ZTP logs are saved. In order to have a log from current ZTP run, you must manually clear the ZTP log file from /var/log/ folder.

Configuration

This task shows the most common use case of manual ZTP invocation: invoke ZTP.

  1. Invoke DHCP sessions on all data ports which are up or could be brought up. ZTP runs in the background. Use show logging or look at /disk0:/ztp/ztp.log to check progress.

Configuration Example:


Router# ztp initiate dataport

Configure ZTP BootScript

If you want to hard code a script to be executed every boot, configure the following.


Router#configure 
Router(config)#ztp bootscript /disk0:/myscript
Router(config)#commit

The above configuration will wait for the first data-plane interface to be configured and then wait an additional minute for the management interface to be configured with an IP address, to ensure that we have connectivity in the third party namespace for applications to use. If the delay is not desired, use:


Router#configure
Router(config)#ztp bootscript preip /disk0:/myscript
Router(config)#commit

Note


When the above command is first configured, you will be prompted if you wish to invoke it now. The prompt helps with testing.


This is the example content of /disk0:/myscript:


#!/bin/bash
exec &> /dev/console # send logs to console 
source /pkg/bin/ztp_helper.sh
 
# If we want to only run one time: 
xrcmd "show running" | grep -q myhostname
if [[ $? -eq 0 ]]; then
    echo Already configured
fi
 
# Set the hostname
cat >/tmp/config <<%%
!! XR config example
hostname myhostname
%%
xrapply /tmp/config
 
#
# Force an invoke of ZTP again. If there was a username normally it would not run. This forces it.
# Kill off ztp if it is running already and suppress errors to the console when ztp runs below and
# cleans up xrcmd that invokes it. ztp will continue to run however.
#
xrcmd "ztp terminate noprompt" 2>/dev/null
xrcmd "ztp initiate noprompt" 2>/dev/null

Customize ZTP Initialization File

You can customize the following ZTP configurable options in the ztp.ini file:

  • ZTP: You can enable or disable ZTP at boot using CLI or by editing the ztp.ini file.

  • Retry: Set the ZTP DHCP retry mechanism: The available values are infinite and once.

  • Fetcher Priority: Fetcher defines which port ZTP should use to get the provisioning details. By default, each port has a fetcher priority defined in the ztp.ini file. You can modify the default priority of the fetcher. Allowed range is 0–10.


    Note


    Lower the number higher the priority. The value 0 has the highest priority and 10 has the lowest priority.


    In the following example, the Mgmt4 port has the highest priority:

    
    [Fetcher Priority]
    Mgmt4: 0
    Mgmt6: 1
    DPort4: 2
    DPort6: 3
    
  • progress_bar: Enable progress bar on the console. By default, the progress bar is disabled. To enable the progress bar, add the following entry in the ztp.ini file.

    [Options]
    progress_bar: True

By default, the ztp.ini file is located in the /pkg/etc/ location. To modify the ZTP configurable options, make a copy of the file in the /disk0:/ztp/ directory and then edit the ztp.ini file.

To reset to the default options, delete the ztp.ini file in the /disk0:/ztp/ directory.


Note


Do not edit or delete the ztp.ini file in the /pkg/etc/ location to avoid issues during installation.


The following example shows the sample of the ztp.ini file:

[Startup]
start: True
retry_forever: True

[Fetcher Priority]
Mgmt4:  1 
Mgmt6:  2 
DPort4: 3 
DPort6: 4 

Enable ZTP Using CLI

If you want to enable ZTP using CLI, use the ztp enable command.

Configuration example

Router#ztp enable
Fri Jul 12 16:09:02.154 UTC
Enable ZTP? [confirm] [y/n] :y
ZTP Enabled.

Disable ZTP Using CLI

If you want to disable ZTP using CLI, use the ztp disable command.

Configuration example

Router#ztp disable
Fri Jul 12 16:07:18.491 UTC
Disable ZTP? [confirm] [y/n] :y
ZTP Disabled.
Run ZTP enable to run ZTP again.