Reimage Protection for Routers

Table 1. Feature History Table

Feature Name

Release Information

Feature Description

Reimage Protection for Routers

IOS XR 7.8.1

This feature is supported on the following Cisco NCS 540 router variants:

  • N540-28Z4C-SYS-A/D

  • N540X-16Z4G8Q2C-A/D

  • N540X-16Z8Q2C-D

  • N540-12Z20G-SYS-A/D

  • N540X-12Z16G-SYS-A/D

  • N540X-6Z18G-SYS-A/D

  • N540X-8Z16G-SYS-A/D

  • N540X-4Z14G2Q-A/D

  • N540-6Z18G-SYS-AD

Reimage Protection for Routers

IOS XR 7.6.1

By disallowing USB and PXE boots, this feature aims to prevent the reimage of stolen routers. Such an intervention ensures that attackers can't use the USB or PXE boot facility to erase the existing configuration and boot the stolen router with a fresh IOS Rx image for resale.

This feature is supported on the following Cisco NCS 540 router variants:

  • N540-ACC-SYS

  • N540X-ACC-SYS

  • N540-24Z8Q2C-SYS

Despite additional security measures, constant monitoring of remote sites, and strong password schemes, service providers still face theft of routers. USB and PXE boots allow attackers to easily reimage the devices for resale.

To discourage theft of routers, the Reimage Protection feature is introduced.

Once a router is activated with Reimage protection, it cannot be factory-reset; in other words, USB and PXE boots are disallowed on a reimage-protected router (unless done by authorized personnel via an established process). This ensures that attackers can't use the USB or PXE boot facility to erase the existing configuration and boot the stolen router with a fresh IOS XR image for resale.

The following workflow depicts the Reimage Protection solution:

Figure 1. Solution Workflow for Reimage Protection of Routers

You can enable reimage protection through one of the following ways:

  • Using Cisco's Consent Token (CT) workflow

  • Or, using the Customer CT workflow

If you use Cisco's CT workflow, there is no setup required on your premises. However, you will be required to contact Cisco TAC for every request to enable or disable reimage protection on your Cisco routers.

But if you decide to use the Customer CT workflow to enable reimage protection, you must:

  1. Establish Device Ownership

  2. Provision Third Party Key Package

  3. Enable the Consent Token Workflow

Figure 2. Preventing the Use of USB and PXE Boots Through Reimage Protection

Key Terms and Concepts

Owner Certificate: The owner certificate (OC) is an X.509 certificate [RFC5280] that is used to identify an owner, for example, an organization. The OC can be signed by any certificate authority (CA).

The OC is used by a device to verify the CA signature using the public key that is also in the owner certificate.

The OC structure must contain the owner certificate itself, as well as all intermediate certificates leading to the "pinned-domain-cert" (PDC) certificate specified in the ownership voucher.

Ownership Voucher: The ownership voucher (OV) [RFC8366] is used to securely identify the device's owner, as known to the manufacturer. The OV is signed by the device's manufacturer.

The OV is used to verify that the owner certificate has a chain of trust leading to the trusted certificate (PDC) included in the ownership voucher.

OVs are issued by Cisco's Manufacturer Authorized Signing Authority (MASA) service. For information on MASA, see the Manufacturer Authorized Signing Authority (MASA) chapter.

Product Identification: Each router is given a distinct PID number, which is the equivalent to a stock-keeping unit (SKU) number.

Serial Number: The serial number (SN) of the router is typically in the format of LLLYYWWSSSS. LLL represents the location of manufacturing. YY and WW represent the year and week of manufacture respectively. SSSS is the unique code of your router.

You can find the serial number at the bottom of the router or by running the show version command.

Establish Device Ownership

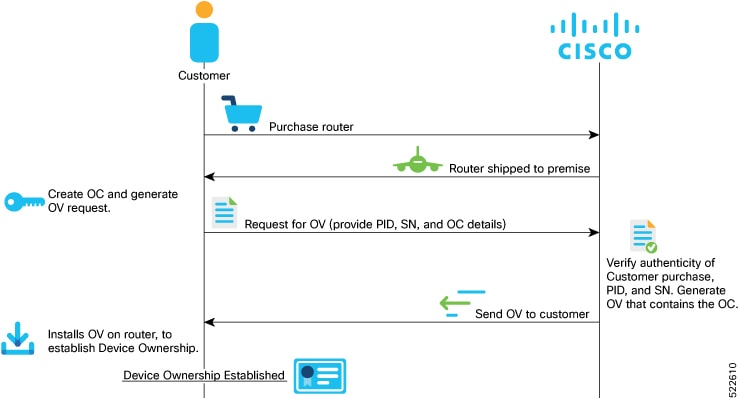
Device ownership is a process by which a device establishes its first trusted connection with the device management service (network) and vice versa.

Device Ownership Establishment (DOE) is required to allow the network to validate the router, and for the router to validate the network. DOE also helps to validate the signature of third-party applications before being installed on the router.

DOE is also required to perform some tasks securely and without Cisco’s intervention, such as:

  • Enable or disable Reimage Protection mechanism

  • Install and enable customer key-package – a feature that provides a conduit to verify and onboard third party applications on Cisco IOS XR routers.

Figure 3. Workflow for Device Ownnership Establishment
  1. Create the ownership certificate using OpenSSL commands.

    The router verifies that the OC has a chain of trust leading to the trust certificate (pinned-domain-cert [PDC]) that is included in the OV.

  2. Create request for ownership voucher (OV). For more information, see the Interacting with the MASA Server section in the Manufacturer Authorized Signing Authority (MASA) chapter.


    Note


    Reference scripts to create OCs are available on Github at https://github.com/ios-xr/key-package-scripts.


  3. Send the OV request to Cisco along with the following artifacts:

    • Router’s Product Identifier (PID)

    • Router’s Serial Number

    • Owner Certificate (OC) for the router for which the OV is required

    Cisco verifies the authenticity of the artifacts and generates the OVs.

  4. Install the OVs on the router by running the platform security device-owership command in EXEC mode.

    RP/0/RP0/CPU0:router# platform security device-ownership /disk0:/testing2/deliverable/bulk_ovs.tar.gz /disk0:/testing2/oc-single.cms
    Mon Jun 14 16:05:15.008 UTC
    

    Note


    • This command requires you to provide a tar ball of OVs, with each OV representing a route processor (RP) on the router. You can choose to include an OV for the chassis in the tar ball. You can also choose to maintain a single tar ball of OVs of all the route processors you have purchased that you can then provide as input to the command.

    • The OC must have its trust chain leading to the PDC in the OV.

    • The command accepts only the latest OV. The installation fails if you install a version of the OV that is older than the version of the currently-installed OV.


    The router verifies that the OC has a chain of trust leading to the trust certificate (pinned-domain-cert [PDC]) that is included in the OV.

    The router adds the PDC and OC to a special trust point as a CA certificate. This trust point configuration appears by default in the router configuration and can be used by any third-party application to establish trust.

    If a PDC or OC has expired or has been revoked, re-run the platform security device-ownership command with new certificates.

  5. Run the following command to verify device ownership is established:

    RP/0/RP0/CPU0:ios# show platform security device-ownership 
    
    Performing operation on all nodes..
    =========================
    Location : 0/RP0/CPU0 
    =========================
    
    Trustpoint : device_ownership
    ==================================================
    CA certificate 
    Certificate:
    Data:
    Version: 3 (0x2)
    Serial Number:
    f6:20:61:bd:db:22:30:74
    ...truncated...

    Run the show logging command to verify.

    RP/0/RP0/CPU0:router# show logging
    
    RP/0/RP1/CPU0:Oct 13 13:10:26.086 UTC: ownership_app[66652]: %SECURITY-OWNERSHIP-6-INFO : Device ownership established.

For information on establishing device ownership through Secure Zero touch provisioning (SZTP), see the chapter Securely Provision Your Network Devices in the System Setup and Software Installation Guide for Cisco NCS 540 Series Routers.

To clear device ownership:

RP/0/RP0/CPU0:router# clear device-ownership

Do you want to clear the device ownership [Y/N]? Y

RP/0/RP0/CPU0:router# show platform security device-ownership 

No platform ownership information found.

Note


When you clear device ownership all applications that depend on the OC will fail to function.


Provision Third Party Key Packages

Key packages are required for the Consent Token workflow of the Reimage Protection feature.

For information about Consent Token workflow, see the Consent Token Workflow section.

Key Package File

Key package is a Cryptographic Message Syntax (CMS [RFC5652]) file that has a payload and must be digitally signed with private keys of the customer's Ownership Certificate (OC).

The payload of the TAR file contains:

  • Customer keys (X509 or GPG)

  • Key package configuration file

Key Package Configuration File

The key package configuration file defines what operation should be done with the keys present in the key package.


Note


The rules mentioned in the configuration file apply to all keys present in the key package. If you need a combination of keys, that is, some keys to be added and other keys to be removed, then you must create multiple key packages—one key package to add keys, another key-package to remove keys and so on. You can then bundle these key packages into a super key package.


The key configuration file is generated when you run the key package script on GitHub. The configuration file has the following fields:

Table 2. Fields in the Key Package Configuration Files

Flag

Possible Values

Purpose

VERSION

1 and 2

Current supported version

MULTIPLE_KEYPACKAGE

  • 0

  • 1

Whether this is a super package (1) or not. If super-package flag is set, all other flags in config file are ignored.

OPERATION

  • ADD

Keys to be added

  • DELETE

Keys to be deleted

TARGET

  • ALLOWED_LIST

Destination is allowed_list

  • REVOKED_LIST

Destination is revoked_list

USAGE

Any string of length six alphanumeric characters. CUSTOMER-CONSENT-TOKEN is a special string used for the reimage protection feature.

Application-specific usage flags

Figure 4. Workflow for Installing Key Package on Router

To onboard a third-party key package:

  1. Generate an RSA key-pair that is used to sign the third-party key package.

    See step 1 of Provisioning Key Packages on the Router.


    Note


    Generate your own public-private key-pair (typically this key pair is a GPG key, but it could also be an X509 certificate). This key pair is used to subsequently sign all customer software, such as RPMs.


  2. Install or onboard the key pair on the Cisco IOS XR router.

    See step 2 of Provisioning Key Packages on the Router.

You can now use your keys to sign the consent token response.

Provisioning Key Packages on the Router

Before you begin

Ensure that your device ownership is established

Procedure


Step 1

On a Linux machine, use the standard openssl commands to generate the RSA key pair.

Step 2

Generate the key package by using the script at https://github.com/ios-xr/key-package-scripts.

Create a key package using the create_kpkg.py tool on https://github.com/ios-xr/key-package-scripts.

create_kpkg.py [-h] -o {ADD,DELETE} -t {ALLOWED_LIST,REVOKED_LIST} -u
<usage-string> [-a <additional-string>] [-d <time-stamp>]
[-k {X509KEY,GPGKEY}] [-n] [-x <temp-directory>] [-v] -i <input-key-file>
[-p <public-key-file>] [-r <private-key-file>] -f <output-file>

In the following example, a key package key_add.kpkg is created:

bash-4.2$ python2 create_kpkg.py -o ADD -t ALLOWED_LIST -u "CUSTOMER-CONSENT-TOKEN" -a "PNM:APNAM,KNM:AKNAM," -k X509KEY -i cust-ct.der -p oc-single.pem -r oc-single-priv.key -f ./key_add.kpkg
Key package generated at: ./key_add.kpkg

The key package is located at same directory from where you executed the above command.

Verify the generated key package by running the verify_kpkg.py command.

bash-4.2$ python2 verify_kpkg.py -p oc-single.pem -f key_add.kpkg

            Key package is valid

Step 3

On the Cisco router, install the key package:

Copy the key package to router and use the platform security key-package customer install key-package-file command to install the key package.

RP/0/RP0/CPU0:router# platform security key-package customer install disk0:/testing2/key-pkg/key_add.kpkg
Mon Jun 14 16:09:28.238 UTC
 
Key package successfully validated
Config file successfully parsed.
Successfully added key cust-ct.der to TPM
Successfully processed all keys.
RP/0/RP0/CPU0:router#

Step 4

Verify that the key package is installed.


RP/0/RP0/CPU0:router# show platform security key-package customer allowed-list location 0/RP0/CPU0
                  
Mon Jun 14 16:10:01.440 UTC
---------------------------------------------
Node - node0_RP0_CPU0
---------------------------------------------
 
Key Name: D3CUS-CT1
Key:
MIIC7TCCAdUCAQIwDQYJKoZIhvcNAQELBQAwOzELMAkGA1UEBhMCVVMxDDAKBgNV
BAoMA3h6eTEMMAoGA1UECwwDYWJjMRAwDgYDVQQDDAdST09ULUNOMB4XDTIxMDYx
NDE1MjkwOVoXDTI0MDMxMDE1MjkwOVowPjELMAkGA1UEBhMCVVMxDDAKBgNVBAoM
A3h5ejEMMAoGA1UECwwDYWJjMRMwEQYDVQQDDApDVVNULUNULUNOMIIBIjANBgkq
hkiG9w0BAQEFAAOCAQ8AMIIBCgKCAQEAyOT2SGTuJcQlAHCsQn4gcoZGK+po1A6g
LPV5AzOBcY0pfXV5eXoxf6S8qbmQP4l4v5MjsHzFTOuouMmijpGYFJv7TORwJ2Xw
weJ5aKbqsYTQlSQSUZ1XxG7AOdHMshVRzy7vIA7LLQJnD0j1F1U2FoRi5NhhY12L
wmYA4aPj1o+LoubAfjF1BVl3vE8rfI0mzsXODJIks+oeJbsq4HmyMbOAzLVdeucp
7bu3S8kDlc1ph4zqm81BkDZgV1++2CoCBWROt9dRZrp+ENw1GEHcXgS659iZpUmj
juG1n0W3Y6br8SE+EqqhMqkAfSbO8vaG02qYtTUNJ5gkMcTljCfDAQIDAQABMA0G
CSqGSIb3DQEBCwUAA4IBAQCDeJ5ov2gG3rj5ttpfibxiakpzl706W9crjIePJka6
CWS7Y3nxt02+PGsBByEcBPV7aU8oH2GfKN4jNZHDChfzGN7rtfRE2CG+ttvTxJLC
Ba+LjzKFSveKgPRG/gAAkZY0hRmTe7FkgmKB4UCi+u0XP3U5VlT5XRP3LGVoX0fC
rY4/GBKkG5eOF+VGD4iyPfOHjrwduO/K2DqDXyUfa1PXZDzatpnin07ShkCJQoT+
u6C1SotJ8mtrFJpePDUsa5W3O2oPROFHd4sGCivt40AbpaWECK+KLpKC+DoqN+46
tMV79rpQ0mtXo/XfY4UGir4weH9g/e2fct4g+Y2E/BD+
 
           
Key Name: D3CUS-CTX
Key:
PNM:APNAM,KNM:AKNAM,
RP/0/RP0/CPU0:router#

Consent Token Workflow

Consent Token is a security feature that is used to authenticate the network administrator of your organization so that they can perform certain privileged operations. Consent Token is a lock-unlock-re-lock mechanism that provides the network administrator with access to certain privileged commands.

If you choose to sign the Consent Token requests at your premises, use the reference scripts on Github https://github.com/ios-xr/consent-token-signing-server.

However, if you choose to use Cisco's consent token workflow, you are required to contact Cisco TAC for every request to enable or disable reimage protection.

Set Up Customer Consent Token Server

If you choose to sign the Consent-token requests at your premises, you must set up a server on your premises to handle the challenge-responses. The Consent token server takes the generated challenge string as input and provides the response string as output.

A sample script, ct_sim.py, is available on Github at https://github.com/ios-xr/consent-token-signing-server to set up the consent token server.

The response string generated by this script must be signed with the same Consent Token keys added to the Cisco IOS XR router in the Provisioning Key Packages on the Router section.

The customer consent token server performs the following functions:

  • Parse the challenge request.

  • Verify the fields and checksum in the challenge request.

  • Compute the signature on the challenge string with the provisioned consent token key.

Figure 5. Workflow for the Consent Token Server

Reimage Protection of Routers

Reimage-protection enables you to set the anti-theft (AT) flag in the Trust Anchor Module (TAm). During the USB or PXE boot, BIOS accesses the TAm and looks for the presence or absence of the AT flag. If BIOS detects the presence of the AT flag, it disallows USB and PXE boot.

Even though there are other ways to reimage a router (other than USB/PXE boot), BIOS disallows reimage of the router if it detects that the AT flag is set.

The following are attempts to bypass the AT flag and reimage the router, and the BIOS response to them. In each case, BIOS thwarts the attempt.

  • Running the hw-module location {loc | all} bootmedia usb reload command—The command boots the image from USB, enters BIOS, and installs the image onto the hard disk. If the reimage protection feature is enabled, BIOS checks for the presence of the AT flag and disallows a reimage if the AT flag is present.

  • System Upgrade—You can choose to downgrade to an older version of IOS XR that does not have the reimage protection feature. If the reimage protection feature is enabled, the System Upgrade checks the AT flag before starting a downgrade and stops the process if the AT flag is set.

Enable Reimage Protection

Before You Begin

  • You must ensure that the BIOS version supports Reimage Protection. Ensure that your router is running Cisco IOS XR Release 7.6.1 and later.

Enabling Reimage Protection Using Cisco Consent Token Key

Figure 6. Workflow to Enable Reimage Protection Using Cisco Consent Token Key
Procedure

Step 1

Contact Cisco TAC and provide the details of the Cisco IOS XR router—product identifier (PID) and serial number (SN).

Step 2

Generate the Cisco challenge string on the router.

RP/0/RP0/CPU0:router# platform security reimage-protection enable challenge cisco
Mon Jun  7 06:19:16.817 UTC
 
+--------------------------------------+
   Node location: node0_RP0_CPU0 
+--------------------------------------+
Challenge string:
plaSjQAAAQYBAAQAAAAFAgAEAAAAAwMACAAAAAAAAAAABAAQF17kHjS4v5XiP/fSKnVa1wUABAAAAAUGAAxJT1MtWFI
tU1ctQ1QHAAxJT1MtWFItU1ctQ1QIAA5ONTQwLTI0WjhRMkMtTQkAC0ZPQzIyNDlOMEtQ
RP/0/RP0/CPU0:router #

Step 3

Provide the challenge string to Cisco TAC.

Cisco TAC authenticates the challenge string and generates a response.

Step 4

Enter the challenge response on the router. For example,


RP/0/RP0/CPU0:ios# platform security reimage-protection enable response       
Mon Jun  7 06:20:37.534 UTC
***************************************************************
Please enter challenge response string for node location node0_RP0_CPU0
***************************************************************
hNtY7QAAAQYBAAQAAAAFAgAEAAAAAwMBYmdrN1ZPbTRxdU45cW5TcTFMM0RyYzVsdWJOSTlqSzV3enRw
d1loMSticU1qVC9mZStwdmdIdHUrdCtLZExzSGMNCmtYdE9iOTFyQWtrbTA2YldVeitvNGJRcS8rSFo4U
VZEMXVBd3RtVmI2RU1uMmp2eUllWWlnN3c5UDJBWUxCbGcNCkI5YU1CRDZDWURUUUVWVHQvVEtEdlhONV
gyNGFhTXZpeExuaFhYRzZBUktvNFJjY1cxMXlndjNMOHpQeEJySmUNCitZY2dJWVN3azQ2UHlmWVJaUEx
QbUxITmNoZWZ4Ymt6Um11bjZWNGNYTFZqS1kzWmNCWFlTMGc5TUl1WVU2OEUNCmh3dlhhWXBXQU5LWjNt
bVB3bEdWVDd4cWVsNHVrcEpzUkFscVlTSnU0SnFOUy91cWFFbXlXRGw2eHJkZUZqS2oNCkVxSnB2WUVyNm
l3RzBodHBLL0dpN2c9PQ==
 
+--------------------------------------+
   Node location: node0_RP0_CPU0 
+--------------------------------------+
Error code: 0
 
Set Flag Response status:
 
+--------------------------------------+
   Node location: node0_0_CPU0 
+--------------------------------------+
Error code: 0 - Success
 
Set Flag Response status:
 
+--------------------------------------+
   Node location: node0_RP0_CPU0 
+--------------------------------------+
Error code: 0 - Success
RP/0/RP0/CPU0:ios#

Note


The challenge response string is valid only for five minutes. You must enter the string on the router within five minutes. If the response string has expired, you must create a new challenge request and repeat the steps.

Step 5

Verify that the Reimage Protection is now enabled.


RP/0/RP0/CPU0:ios# show platform security reimage-protection status             
Mon Jun 7 06:20:44.884 UTC
Platform re-image protection: ON
RP/0/RP0/CPU0:ios#

Enabling Reimage Protection with Customer Consent Token Key

Figure 7. Workflow for the Customer Consent Tokenn Key
Before you begin
Procedure

Step 1

Generate the customer challenge string on the Cisco IOS XR router.

RP/0/RP0/CPU0:ios# platform security reimage-protection enable challenge customer

Mon Jun 7 06:09:28.136 UTC
 
+--------------------------------------+
   Node location: node0_RP0_CPU0 
+--------------------------------------+
Challenge string:
cfPdYgAAAQYBAAQAAAAFAgAEAAAAAwMACAAAAAAAAAAABAAQEqAXoK4BhPMl/J1vJksvGgUABAAAAAUGAAVBS05BTQ
cABUFLTkFNCAAOTjU0MC0yNFo4UTJDLU0JAAtGT0MyMjQ5TjBLUA==
RP/0/RP0/CPU0:ios#

Step 2

Provide the challenge string to the Customer Consent Token (CT) Server.

The Customer CT server authenticates the challenge string and generates a customer challenge response.

Step 3

Enter the customer response string on the router.


RP/0/RP0/CPU0:ios# platform security reimage-protection enable response          
Mon Jun 7 06:10:38.491 UTC
***************************************************************
Please enter challenge response string for node location node0_RP0_CPU0
***************************************************************
5OPB3gAAAQYBAAQAAAAFAgAEAAAAAwMBZGkvNWZ5ZDVvV0FIV0ZuQ1FEanp4dkVUYTNIbFBIZE
pid3dCWGg3TklybjJOMUdUZmNzMlk5VFVMSlhLa0lvVzEKDXBQNk9PNHNIdDV1SERHYkdYUlBSWE
lEK01SUXN3c1B1SVZ2NVJhVE1Jb3NHWnpiNm52cHJGZDdCbFlVS2drVE0KDTNuTjVxSFZQSFhoaj
FZa3lZSFVsNkJ1d0JrbVB3YXRyQ0xOZU90dXFRbUFXYzdOWW1CNVFGYWZZZUtsYm43UVIKDVArNU
pvTjIvK2ZDWmt2ZjBOdU9yV3d0MXRsRHBwQTZrbyt4MXdvVXl1U0NhMlVUZXpObTkrZG1VVlNTN0Fu
QlIKDUtHcnhPSWFyMG5KbUpINTg4Z0Zxd3YzQWpVdzhVMXJmSDVEYlhNVGRwMmFmWGpEOGkzWDEzcl
RzZFRybnRsSGMKDXAwSWJ0dVk0ckRHTnhPa1dKelF3cEE9PQoN
 
+--------------------------------------+
   Node location: node0_RP0_CPU0 
+--------------------------------------+
Error code: 0
 
Set Flag Response status:
 
+--------------------------------------+
   Node location: node0_0_CPU0 
+--------------------------------------+
Error code: 0 - Success
 
Set Flag Response status:
 
+--------------------------------------+
   Node location: node0_RP0_CPU0 
+--------------------------------------+
Error code: 0 - Success
RP/0/RP0/CPU0:ios#

Step 4

Verify that the Reimage Protection is enabled.


RP/0/RP0/CPU0:ios# show platform security reimage-protection status                
Mon Jun 7 06:10:48.813 UTC
Platform re-image protection: ON
RP/0/RP0/CPU0:ios#

Disable Reimage Protection on Routers

Before You Begin

Disabling Reimage Protection Using Cisco Consent Token Key

Procedure


Step 1

Contact Cisco TAC and provide the details of the Cisco IOS XR router—product identifier (PID) and serial number (SN).

Step 2

Generate the Cisco challenge string on the router.

RP/0/RP0/CPU0:router# platform security reimage-protection disable challenge cisco
Mon Jun  7 06:19:16.817 UTC
 
+--------------------------------------+
   Node location: node0_RP0_CPU0 
+--------------------------------------+
Challenge string:
plaSjQAAAQYBAAQAAAAFAgAEAAAAAwMACAAAAAAAAAAABAAQF17kHjS4v5XiP/fSKnVa1wUABAAAAAUGAAxJT1MtWFI
tU1ctQ1QHAAxJT1MtWFItU1ctQ1QIAA5ONTQwLTI0WjhRMkMtTQkAC0ZPQzIyNDlOMEtQ
RP/0/RP0/CPU0:router #

Step 3

Provide the challenge string to Cisco TAC.

Cisco TAC authenticates the challenge string and generates a response.

Step 4

Enter the challenge response on the router. For example,


RP/0/RP0/CPU0:ios# platform security reimage-protection disable response       
Mon Jun  7 06:20:37.534 UTC
***************************************************************
Please enter challenge response string for node location node0_RP0_CPU0
***************************************************************
hNtY7QAAAQYBAAQAAAAFAgAEAAAAAwMBYmdrN1ZPbTRxdU45cW5TcTFMM0RyYzVsdWJOSTlqSzV3enRw
d1loMSticU1qVC9mZStwdmdIdHUrdCtLZExzSGMNCmtYdE9iOTFyQWtrbTA2YldVeitvNGJRcS8rSFo4U
VZEMXVBd3RtVmI2RU1uMmp2eUllWWlnN3c5UDJBWUxCbGcNCkI5YU1CRDZDWURUUUVWVHQvVEtEdlhONV
gyNGFhTXZpeExuaFhYRzZBUktvNFJjY1cxMXlndjNMOHpQeEJySmUNCitZY2dJWVN3azQ2UHlmWVJaUEx
QbUxITmNoZWZ4Ymt6Um11bjZWNGNYTFZqS1kzWmNCWFlTMGc5TUl1WVU2OEUNCmh3dlhhWXBXQU5LWjNt
bVB3bEdWVDd4cWVsNHVrcEpzUkFscVlTSnU0SnFOUy91cWFFbXlXRGw2eHJkZUZqS2oNCkVxSnB2WUVyNm
l3RzBodHBLL0dpN2c9PQ==
 
+--------------------------------------+
   Node location: node0_RP0_CPU0 
+--------------------------------------+
Error code: 0
 
Set Flag Response status:
 
+--------------------------------------+
   Node location: node0_0_CPU0 
+--------------------------------------+
Error code: 0 - Success
 
Set Flag Response status:
 
+--------------------------------------+
   Node location: node0_RP0_CPU0 
+--------------------------------------+
Error code: 0 - Success
RP/0/RP0/CPU0:ios#

Note


The challenge response string is valid only for five minutes. You must enter the string on the router within five minutes. If the response string has expired, you must create a new challenge request and repeat the steps.

Step 5

Verify that the Reimage Protection is now disabled.


RP/0/RP0/CPU0:ios# show platform security reimage-protection status             
Mon Jun 7 06:20:44.884 UTC
Platform re-image protection: OFF
RP/0/RP0/CPU0:ios#

Disabling Reimage Protection Using Customer Consent Token Key

Procedure


Step 1

Generate the customer challenge string on the Cisco IOS XR router.

RP/0/RP0/CPU0:ios# platform security reimage-protection disable challenge customer

Mon Jun 7 06:09:28.136 UTC
 
+--------------------------------------+
   Node location: node0_RP0_CPU0 
+--------------------------------------+
Challenge string:
cfPdYgAAAQYBAAQAAAAFAgAEAAAAAwMACAAAAAAAAAAABAAQEqAXoK4BhPMl/J1vJksvGgUABAAAAAUGAAVBS05BTQ
cABUFLTkFNCAAOTjU0MC0yNFo4UTJDLU0JAAtGT0MyMjQ5TjBLUA==
RP/0/RP0/CPU0:ios#

Step 2

Provide the challenge string to the Customer Consent Token (CT) Server.

The Customer CT server authenticates the challenge string and generates a customer challenge response.

Step 3

Enter the customer response string on the router.


RP/0/RP0/CPU0:ios# platform security reimage-protection disable response          
Mon Jun 7 06:10:38.491 UTC
***************************************************************
Please enter challenge response string for node location node0_RP0_CPU0
***************************************************************
5OPB3gAAAQYBAAQAAAAFAgAEAAAAAwMBZGkvNWZ5ZDVvV0FIV0ZuQ1FEanp4dkVUYTNIbFBIZE
pid3dCWGg3TklybjJOMUdUZmNzMlk5VFVMSlhLa0lvVzEKDXBQNk9PNHNIdDV1SERHYkdYUlBSWE
lEK01SUXN3c1B1SVZ2NVJhVE1Jb3NHWnpiNm52cHJGZDdCbFlVS2drVE0KDTNuTjVxSFZQSFhoaj
FZa3lZSFVsNkJ1d0JrbVB3YXRyQ0xOZU90dXFRbUFXYzdOWW1CNVFGYWZZZUtsYm43UVIKDVArNU
pvTjIvK2ZDWmt2ZjBOdU9yV3d0MXRsRHBwQTZrbyt4MXdvVXl1U0NhMlVUZXpObTkrZG1VVlNTN0Fu
QlIKDUtHcnhPSWFyMG5KbUpINTg4Z0Zxd3YzQWpVdzhVMXJmSDVEYlhNVGRwMmFmWGpEOGkzWDEzcl
RzZFRybnRsSGMKDXAwSWJ0dVk0ckRHTnhPa1dKelF3cEE9PQoN
 
+--------------------------------------+
   Node location: node0_RP0_CPU0 
+--------------------------------------+
Error code: 0
 
Set Flag Response status:
 
+--------------------------------------+
   Node location: node0_0_CPU0 
+--------------------------------------+
Error code: 0 - Success
 
Set Flag Response status:
 
+--------------------------------------+
   Node location: node0_RP0_CPU0 
+--------------------------------------+
Error code: 0 - Success
RP/0/RP0/CPU0:ios#

Step 4

Verify that the Reimage Protection is disabled.


RP/0/RP0/CPU0:ios# show platform security reimage-protection status                
Mon Jun 7 06:10:48.813 UTC
Platform re-image protection: OFF
RP/0/RP0/CPU0:ios#

Recovering Reimage Protection-Enabled Routers From BIOS

There could be scenarios that may need genuine recovery of the router. For example:

  • Runtime IOS-XR corruption at your premises

  • Device Return Materials Authorization (RMA) at a Cisco depot

These scenarios require a BIOS recovery workflow to re-enable the USB or PXE boot by clearing the anti-theft (AT) flag in the TAm. This dissabling is achieved through the Consent Token (CT) mechanism.

Disabling Reimage Protection with Cisco Consent Token Key

BIOS provides the only way to disable Reimage Protection. You can either use the Cisco or Customer consent token key for challenge string generation.

Figure 8. BIOS Recovery Utility

To disable the Reimage Protection:

  1. Enter the BIOS setup.

    When Reimage Protection is enabled, BIOS displays the following message during boot process:

    SATA Port 0: Micron_M500IT_ - 128.0 GB
    iofpga id value 0x70171FD3
    Processing... Re-image protection
    Re-image protection Enabled...
    DISK Boot Partition = UEFI: Micron_M500IT_MTFDDAT128MBD, Partition 4
    XR OS Boot Mode = 0x0
    Selected Boot Option:
            XROS: Harddisk Boot
    Version 2.18.1260. Copyright (C) 2021 American Megatrends, Inc.                                                                                                     
    Winterfell BIOS: v1.14.0 Date: 06/09/2021 23:30:50                                                                                                                  
    Press <ESC> to enter setup.                                                                                                                                         
    Entering Setup...  
           Aptio Setup Utility - Copyright (C) 2021 American Megatrends, Inc.      
        Security Save & Exit 
    
  2. Select UEFI: Re-image protection Recovery and follow the instructions on the screen.

    Enter time to live: (minutes)30
    Key Type? (Cisco:0 Cust:1)0
    Generating Challenge.....................................
    Challenge String (Please copy everything between the asterisk lines exclusively):
    *****************************************************************************************
    Ct2QewAAAQYBAAQAAAAFAgAEAAAAAgMACBi53KVMXO5SBAAQBrnCn/IsXdP7GG73NuKdOQUABAAAAB4GAAxJT1MtWF
    ItU1ctQ1QHAAxJT1MtWFItU1ctQ1QIAA9ONTQwLTI0WjhRMkMtTSAJAAtGT0MyMjQ5TjBLUA==
    *****************************************************************************************
    Please input the response when you are ready .........................
    Input the Response String:CpH60gAAAQYBAAQAAAAFAgAEAAAAAgMBYkFSazRFSDQ0QTZTQ1hzcHVRTWN3VDB
    LRE51SE1uQkk5c2M1TUdUamMycUNEdzFnUTJZYTlJazE1RTBBSGt6emkNCkRLUHVkT2hYYXdmSFViSkhNdTFBRVNmcTJ
    tZW1wTDB1Q1BnTnVZcjlvempiRDhab1ltcDJ6RUtMc1FQdi8xWi8NCk8vQkU5a0ZML3g2bXB1bUMxSGpwd1NXUjN4aDJQ
    Rjg1WHNmS0tCMWdzcVN0SVk4eVByNGdmQWt4VjdHZ1lXdWYNClZVT0hrVW8wNDEraXA5QVpXRVlvUDdXdk5aQVdIZGRp
    U2NYa055T2pDRDZyUVhkU1dCYXNieFZ1S1N1TGo4dVINCnFFM2pGd2djZG9pcXc3WDNoVUtyV0pYa1ZMWDVFM3pycF
    lmK0tTUmcvdmpRRk1HV0IwSXo0c3JWZ2hJQWlKbzANCjF2ZEN3UDhLei85U3dNMXRXSnV0dWc9PQ==
    CT Response Signature Verification OK
    Response Signature Verified successfully
    Disabling Re-image protection...
    Rebooting....  
    SATA Port 0: Micron_M500IT_ - 128.0 GB
    iofpga id value 0x70171FD3
    Processing... Re-image protection
    Re-image protection Not-Enabled..
    DISK Boot Partition = UEFI: Micron_M500IT_MTFDDAT128MBD, Partition 4 
    XR OS Boot Mode = 0x0 
    Selected Boot Option:
            XROS: Harddisk Boot
    Version 2.18.1260. Copyright (C) 2021 American Megatrends, Inc.                                                                                                     
    Winterfell BIOS: v1.14.0 Date: 06/09/2021 23:30:50                                                                                                                  
    Press <ESC> to enter setup.                                                                                                                                         
    Entering Setup... 
           Aptio Setup Utility - Copyright (C) 2021 American Megatrends, Inc.      
        Security Save & Exit 
    

Generating the Challenge String to Disable Reimage Protection

Before you begin

If you are using the the Cisco consent token, contact Cisco TAC. However, if you are using the customer consent token mechanism, ensure that the consent token server is set up at your premises.

Procedure

Step 1

Generate the consent token challenge string on the Cisco IOS XR router


RP/0/RP0/CPU0:router# platform security reimage-protection disable challenge cisco
Mon Jun  7 06:19:16.817 UTC
 
+--------------------------------------+
   Node location: node0_RP0_CPU0 
+--------------------------------------+
Challenge string:
plaSjQAAAQYBAAQAAAAFAgAEAAAAAwMACAAAAAAAAAAABAAQF17kHjS4v5XiP/fSKnVa1wUABAAAAAUGAAxJT1MtWFItU1ctQ1QHAAxJT1MtWFItU1ctQ1QIAA5
ONTQwLTI0WjhRMkMtTQkAC0ZPQzIyNDlOMEtQ
RP/0/RP0/CPU0:router #

or

RP/0/RP0/CPU0:router# platform security reimage-protection disable challenge customer

Mon Jun  7 06:19:16.817 UTC
 
+--------------------------------------+
   Node location: node0_RP0_CPU0 
+--------------------------------------+
Challenge string:
cfPdYgAAAQYBAAQAAAAFAgAEAAAAAwMACAAAAAAAAAAABAAQEqAXoK4BhPMl/J1vJksvGgUABAAAAAUGAAVBS05BTQcABUFLTkFNCAAOTjU0MC0yNFo4UTJDLU0JAAtGT0MyMjQ5TjBLUA==
RP/0/RP0/CPU0:router #

Step 2

Provide the challenge string to either Cisco TAC or to your Consent Token server.