Customize Installation using Golden ISO

Golden ISO (GISO) is a customized ISO that a user can build to suit the installation requirement. The user can customize the installable image to include the standard base image with the basic functional components, and add additional RPMs, SMUs and configuration files based on requirement.

The ease of installation and the time taken to seamlessly install or upgrade a system plays a vital role in a cloud-scale network. An installation process that is time-consuming and complex affects the resiliency and scale of the network. The GISO simplifies the installation process, automates the installation workflow, and manages the dependencies in RPMs and SMUs automatically.

GISO is built using a build script gisobuild.py available on the github location Github location.

When a system boots with GISO, additional SMUs and RPMs in GISO are installed automatically, and the router is pre-configured with the XR configuration in GISO. For more information about downloading and installing GISO, see Install Golden ISO.

The capabilities of GISO can be used in the following scenarios:

  • Initial deployment of the router

  • Software disaster recovery

  • System upgrade from one base version to another

  • System upgrade from same base version but with additional SMUs

  • Install update to identify and update dependant packages

Limitations

The following are the known problems and limitations with the customized ISO:

  • Building and booting GISO for asynchronous package (a package of different release than the ISO) is not supported.

  • Verifying the XR configuration is not supported in the GISO build script gisobuild.py.

  • Renaming a GISO build and then installing from the renamed GISO build is not supported.

  • Install operation over IPv6 is not supported.

Golden ISO Workflow


Note


This document is applicable only for the following Cisco NCS 540 router variants:

  • N540-ACC-SYS

  • N540X-ACC-SYS

  • N540-24Z8Q2C-SYS

For all other Cisco NCS 540 router variants, see the Build a Golden ISO section in the Install XR7 OS on NCS 540 Series Routers chapter.


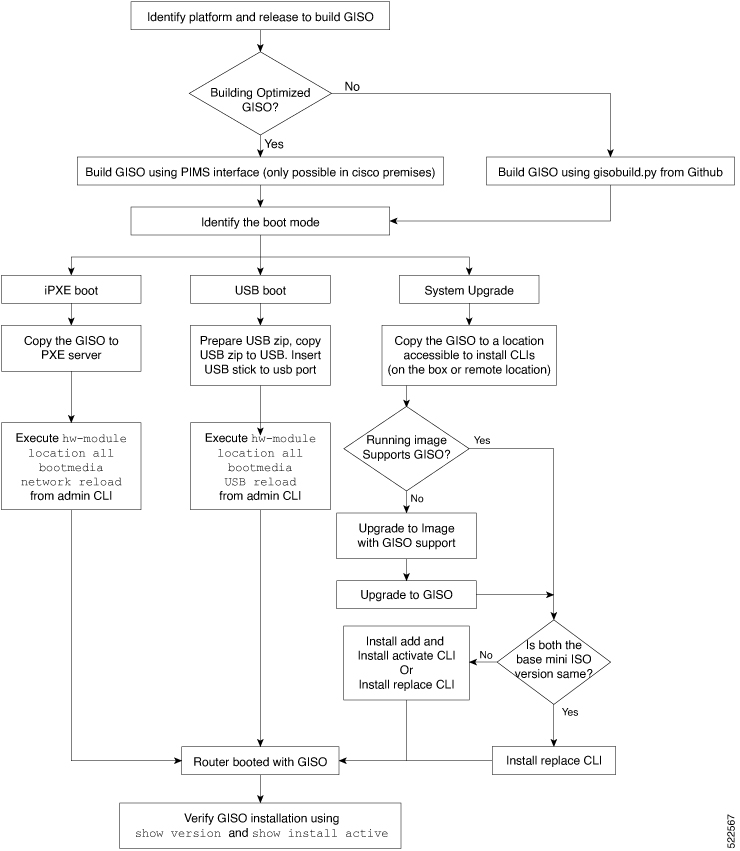
The following image shows the workflow for building and installing golden ISO.

Figure 1. Golden ISO Workflow

The image shows a workflow of how you can build and install a Golden ISO

Build Golden ISO Using Script

To build GISO, provide the following input parameters to the script:
  • Base mini-x.iso (mandatory)

  • XR configuration file (optional)

  • one or more Cisco-specific SMUs for host, XR and System admin (optional)

  • one or more third-party SMUs for host, XR and System admin (optional)

  • Label for golden ISO (optional)

  • Optional RPMs


Note


To successfully add k9sec RPM to GISO, change the permission of the file to 644 using the chmod command.
chmod 644 [k9 sec rpm]

To build GISO, perform the following steps:

Before you begin

  • To upgrade from a release that did not support GISO to a release supporting GISO version, it is mandatory to first upgrade to mini ISO with GISO support.

  • The system where GISO is built must meet the following requirements:
    • System must have Python version 3.6 and later.

    • System must have free disk space of minimum 12 GB.

    • Verify that the Linux utilities mount, rm, cp, umount, zcat, chroot, mkisofs are present in the system. These utilities will be used by the script. Ensure privileges are available to execute all of these Linux commands.

    • Kernel version of the system must be later than 3.16 or later than the version of kernel of Cisco ISO.

    • Verify that a libyaml rpm supported by the Linux kernel is available to successfully import yaml in the tool.

    • User should have proper permission for security rpm(k9sec-rpm) in rpm repository, else security rpm would be ignored for Golden ISO creation.

  • The system from where the gisobuild.py script is executed must have root credentials.

Procedure


Step 1

Copy the script gisobuild.py from the Github location to an offline system or external server where the GISO will be built. Ensure that this system meets the pre-requisites described above in the Before You Begin section.

Step 2

Run the script gisobuild.py and provide parameters to build the golden ISO off the router.

Example:

[directory-path]$ gisobuild.py [-h] [-i <mini-x.iso>] [-r <rpm repository>] 
[-c <config-file>] [-l <giso label>] [-m] [-v]

Note


The -i option is mandatory, and either or both -r or -c options must be provided.

The corresponding GISO and build logs are available under the specified out_directory path. The default directory is /output_gisobuild.

where:
  • -i is the path to mini-x.iso

  • -r is the path to RPM repository

  • -c is the path to XR config file

  • -l is the golden ISO label

  • -h shows the help message

  • -v is the version of the build tool gisobuild.py

  • -m is to build the migration tar to migrate from IOS XR to IOS XR 64 bit

Note

 
It is recommended to build GISOs with a label name.

The corresponding GISO and build logs are available under the specified directory in out_directory. If a directory is not specified, the files are placed in /output_gisobuild directory.


Note


The GISO script does not support verification of XR configuration.


What to do next

Install the GISO image on the router.

Install Golden ISO

Golden ISO (GISO) automatically performs the following actions:

  • Installs host and system admin RPMs.

  • Partitions repository and TFTP boot on RP.

  • Creates software profile in system admin and XR modes.

  • Installs XR RPMs. Use show install active command to see the list of RPMs.

  • Applies XR configuration. Use show running-config command in XR mode to verify.

Procedure


Step 1

Download GISO image to the router using one of the following options:

  • PXE boot: when the router is booted, the boot mode is identified. After detecting PXE as boot mode, all available ethernet interfaces are brought up, and DHClient is run on each interface. DHClient script parses HTTP or TFTP protocol, and GISO is downloaded to the box.
  • USB boot or Disk Boot: when the USB mode is detected during boot, and GISO is identified, the additional RPMs and XR configuration files are extracted and installed.
  • System Upgrade: when the system is upgraded, GISO can be installed using install add , install activate , or using install replace commands.

    Important


    To replace the current version and packages on the router with the version from GISO, note the change in command and format.

    • In versions prior to Cisco IOS XR Release 6.3.3, 6.4.x and 6.5.1, use the install update command:
      install update source <source path> <Golden-ISO-name> replace
    • In Cisco IOS XR Release 6.5.2 and later, use the install replace command.
      install replace <absolute-path-of-Golden-ISO>

    Note


    To create a Bootable External USB Disk, do the following:

    • Ensure that the USB Boot Disk has a minimum storage of 8GB, and that you have root/admin or appropriate permission to create bootable disk on linux machine.

    1. Copy and execute usb-install script on the Linux machine to create a bootable external USB.

    2. Reset the RSP/RP and plug in bootable USB to RSP/RP's front panel. The USB will get detected in ROMMON. Note that when the system is in ROMMON, and if you add a front panel external USB, the USB will not be detected until the RSP/RP is reset.

    The options to upgrade the system are as follows:

    • system upgrade from a non-GISO (image that does not support GISO) to GISO image: If a system is running a version1 with an image that does not support GISO, the system cannot be upgraded directly to version2 of an image that supports GISO. Instead, the version1 must be upgraded to version2 mini ISO, and then to version2 GISO.

    • system upgrade in a release from version1 GISO to version2 GISO: If both the GISO images have the same base version but different labels, install add and install activate commands does not support same version of two images. Instead, using install source command installs only the delta RPMs. System reload is based on restart type of the delta RPMs.

      Using install replace command performs a system reload, irrespective of the difference between ISO and the existing version.

    • system upgrade across releases from version1 GISO to version2 GISO: Both the GISO images have different base versions. Use install add and install activate commands, or install replace command to perform the system upgrade. The router reloads after the upgrade with the version2 GISO image.

Step 2

Run the show install repository all command in System Admin mode to view the RPMs and base ISO for host, system admin and XR.

Step 3

Run the show install package <golden-iso> command to display the list of RPMs, and packages built in GISO.

Note

 
To list RPMs in the GISO, the GISO must be present in the install repository.

The ISO, SMUs and packages in GISO are installed on the router.

Install Replace with Golden ISO

Procedure


Step 1

install replace <GISO-location> [commit| noprompt]

Example:

Router#install replace harddisk:/<giso-image>.iso
 ++++++++++++++++++++++++++++++++++++++++++++++++++++++++++++++++++++++++++++++++
Install operation 11 started by root:
exec-timeout is suspended.
No install operation in progress at this moment
Label = More_Pkgs
ISO <giso-iso-image>.iso in input package list. Going to upgrade the system to 

version <new-giso-image>.
System is in committed state
Current full-label: <giso-image>_R_Commit
Current only-label: R_Commit
Current label: R_Commit
Updating contents of golden ISO
Scheme : localdisk
Hostname : localhost
Username : None
SourceDir : /ws
Collecting software state..
Getting platform
Getting supported architecture
Getting active packages from XR
Getting inactive packages from XR
Getting list of RPMs in local repo
Getting list of provides of all active packages
Getting provides of each rpm in repo
Getting requires of each rpm in repo
Fetching .... <giso-image>.iso
Label within GISO: More_Pkgs
Skipping <platform>-mgbl-3.0.0.0-<release>.x86_64.rpm from GISO as it's active 
Adding packages 
        <platform>-golden-x-<release>-<Label>.iso
RP/0/RP0/CPU0:Jun 20 14:43:59.349 UTC: sdr_instmgr[1164]: %INSTALL-INSTMGR-2-OPERATION_SUCCESS : 

Install operation 12 finished successfully 
Install add operation successful
Activating <platform>-golden-x-<release>-<Label>
Jun 20 14:44:05 Install operation 13 started by root:
  install activate pkg <platform>-golden-x-<release>-<Label> replace noprompt 
Jun 20 14:44:05 Package list:
Jun 20 14:44:05     <platform>-golden-x-<release>-<Label>.iso
Jun 20 14:44:29 Install operation will continue in the background
exec-timeout is resumed.
Router# Install operation 13 finished successfully
Router: sdr_instmgr[1164]: %INSTALL-INSTMGR-2-OPERATION_SUCCESS : 

Install operation 13 finished successfully 

Router#install replace <path-to-image> <platform-name-golden-x-<version>-<label>.iso
Tue Mar 17 08:07:15.176 UTC
++++++++++++++++++++++++++++++++++++++++++++++++++++++++++++++++++++++++++++++++
Mar 17 08:07:24 Install operation 46 started by root:
Mar 17 08:07:24   install replace source <path-to-image> <platform-name-golden-x-<version>-<label>.iso
Mar 17 08:07:24 No install operation in progress at this moment
Mar 17 08:07:24 Checking system is ready for install operation
Mar 17 08:07:24 'install replace' in progress
Mar 17 08:07:24 Label = GISO_IMAGE_XRV9K_<version>
Mar 17 08:07:24 ISO xrv9k-goldenk9-x-<version>-<label>.iso in input package list. Going to upgrade the system to version <new-version>
Mar 17 08:07:25 Scheme : http
Mar 17 08:07:25 Hostname : 10.x.x.x
Mar 17 08:07:25 Collecting software state..
Mar 17 08:07:25 Getting platform
Mar 17 08:07:25 Getting supported architecture
Mar 17 08:07:25 Getting active packages from XR
Mar 17 08:07:25 Getting inactive packages from XR
Mar 17 08:07:28 Getting list of RPMs in local repo
Mar 17 08:07:28 Getting list of provides of all active packages
Mar 17 08:07:28 Getting provides of each rpm in repo
Mar 17 08:07:28 Getting requires of each rpm in repo
Mar 17 08:07:36 Fetching .... xrv9k-goldenk9-x-<version>-<label>.iso
Mar 17 08:08:02 Adding packages 
        xrv9k-goldenk9-x-<version>-<label>.iso
Router:Mar 17 08:09:03.487 UTC: sdr_instmgr[1281]: %INSTALL-INSTMGR-2-OPERATION_SUCCESS : Install operation 47 finished successfully 
Mar 17 08:09:03 Install add operation successful
Mar 17 08:09:08 Activating xrv9k-goldenk9-x-<version>-<label>
Mar 17 08:09:10 Install operation 46 started by root:
  install activate pkg xrv9k-goldenk9-x-<version>-<label> replace 
Mar 17 08:09:10 Package list:
Mar 17 08:09:10     xrv9k-goldenk9-x-<version>-<label>
This install operation will reload the system, continue?
 [yes/no]:[yes] yes
Mar 17 08:10:30 Install operation will continue in the background
Mar 17 08:10:30 Activate operation ID is: 46 for 'install source' ID:46

Router# Install operation 46 finished successfully
%INSTALL-INSTMGR-2-OPERATION_SUCCESS : Install operation 46 finished successfully
sdr_instmgr[1150]: %INSTALL-INSTMGR-2-SYSTEM_RELOAD_INFO : The whole system will be reloaded to complete install operation 46

Important

 
For versions earlier than Cisco IOS XR Release 6.5.2, use the following command:

install update source <absolute-path-of-Golden-ISO> replace

For example,
Router#install update source harddisk:/ <giso-image>.iso replace

The version and label of the newly added GISO is compared with the version and label of the currently active version. If a mismatch is identified, a new partition is created and the full package is installed. After installation, the system reloads with the image and packages from the newly added GISO.

Note


Activating or deactivating on a system that has a valid label invalidates the label. This action is irreversible. For example, running show version command on the system displays the label 6.3.3_633rev1005. If any SMU is activated or deactivated on the system, the label 633rev1005 is invalidated, and the show version command displays only 6.3.3 as the label.

Step 2

show version

Example:


Router#show version
Wed Jun 20 15:06:37.915 UTC
Cisco IOS XR Software, Version <new-giso-image>
Copyright (c) 2013-2018 by Cisco Systems, Inc.

Build Information:
Built By     : <user>
Built On     : <date>
Build Host   : <host-name>
Workspace    : <workspace-name>
Version      : <version>
Location    : <path>
Label        : <label-name>

cisco <platform> () processor 
System uptime is 3 hours 51 minutes


The system loads with the image and packages from the newly added GISO.