Manage

This section contains the following topics:

Manage adapters

To interact with external target systems, CWM requires adapters. You can manage them using the CWM API. The following API endpoints are available for handling adapters:

  • GET/adapter: gets a list of adapters existing in the CWM application.

  • POST/adapter: uploads an adapter .tar file to CWM storage.

  • GET/adapter/{adapterId}: gets the details of a specific adapter existing in the CWM application. Among others, it lists all the activities available in the adapter.

  • PUT/adapter/{adapterId}: updates an existing adapter file with a new adapter version.

  • DELETE/adapter/{adapterId}: deletes an adapter from the CWM application.

  • POST/adapter/{adapterId}/deploy: deploys an adapter in the system based on the uploaded adapter file.

Install adapter

CWM adapters come in .tar installation files. Before they can be used in a workflow, they need to be uploaded to storage and deployed in the system. Here's how to do it.

Upload adapter file

Before you deploy an adapter, you need to upload the adapter .tar file to CWM storage:

Procedure

Step 1

Get a latest adapter installation file or create your own adapter.

Step 2

Log in to CWM and from the navigation menu on the left, click the swagger icon.

Step 3

In the adapters section, click the POST/adapter endpoint to expand it. Inside the endpoint, click Try it out.

Step 4

In the subsection that appears, click Choose File, select the adapter .tar installation file and click Upload, then click Execute.

If the server response code is 201, the adapter file is successfully uploaded into the CWM database.


Deploy adapter

Procedure

Step 1

In the CWM API adapters section, click the GET/adapter endpoint to expand it. Inside the endpoint, click Try it out and Execute.

Step 2

From the server response body, copy the value of the id field for your uploaded adapter.

Step 3

In the CWM API adapters section, click the POST/adapter/{adapterId}/deploy endpoint to expand it.

Step 4

Inside the endpoint, click Try it out. Paste the adapter id into the Adapter ID field.

Step 5

In the createWorker field, you may set the createWorker parameter to true. This will create a worker with the same name as the adapter id.

Step 6

Click Execute.

If the server response code is 201, the adapter plugin is successfully installed.


Delete adapter

To delete an adapter permanently from storage and "uninstall" it:

Procedure


Step 1

In the CWM API adapters section, click the GET/adapter endpoint to expand it. Inside the endpoint, click Try it out and Execute.

Step 2

From the server response body, copy the value of the id field for your uploaded adapter.

Step 3

In the CWM API adapters section, click the DELETE/adapter/{adapterId} endpoint to expand it.

Step 4

Inside the endpoint, click Try it out. Paste the adapter id into the Adapter ID field.

Step 5

Click Execute.


Manage workers

Workers are processes that execute actions defined in workflow definitions and adapter code. You can manage them using the CWM UI as described in the Operator guide, or with the CWM API, as described below.

The following actions for managing workers are available:

  • GET/worker: gets a list of workers existing in the CWM application.

  • POST/worker: creates a new worker in the CWM application.

  • GET/worker/{workerName}: gets the details of a specific worker existing in the CWM application.

  • PUT/worker/{workerName}: updates an existing worker with new parameter values.

  • DELETE/worker/{workerName}: deletes a worker from the CWM application.

  • POST/worker/{workerName}/start: activates a worker created in the application.

  • POST/worker/{workerName}/stop: deactivates a worker created in the application.

Create worker

Procedure


Step 1

Log in to CWM and from the navigation menu on the left, click the swagger icon.

Step 2

In the CWM API workers section, click the POST/worker endpoint to expand it. Inside the endpoint, click Try it out.

Step 3

In the Worker data field, provide the required values:

  1. "activities": paste the ID of your deployed adapter or specific adapter activity.

  2. "startWorker": set to true.

  3. "workerName": provide a name for your worker.

Step 4

Click Execute.


Start worker

Procedure


Step 1

In the CWM API workers section, click the POST/{workerName}/start endpoint to expand it. Inside the endpoint, click Try it out.

Step 2

In the parameters fields, provide the required values:

  1. "Name of a worker to start": paste the name the worker to be started.

  2. "forceReload": set to true if you want to force the worker to start.

Step 3

Click Execute.


Stop worker

Procedure


Step 1

In the CWM API workers section, click the POST/{workerName}/stop endpoint to expand it. Inside the endpoint, click Try it out.

Step 2

In the parameters fields, provide the required values:

  1. "Name of a worker to stop": paste the name the worker to be stopped.

  2. "forceStop": set to true if you want to force the worker to stop.

Step 3

Click Execute.


Manage workflows

Workflow instances can be managed both in the CWM UI as described in the Operator guide, or using the CWM API:

  • POST/workflow: creates a new workflow instance in the CWM application.

  • GET/workflow/list: gets a list of adapters existing in the CWM application.

  • GET/workflow/{id}: gets the details of a specific workflow existing in the CWM application.

  • PUT/workflow/{id}: updates an existing workflow with new workflow definition.

  • DELETE/workflow/{id}: deletes a selected workflow from the CWM application.


    Note


    The recommended method for managing workflows is through CWM UI. For details, refer to the Operator guide.


Manage resources and secrets

For CWM, adapters define activities that enable to execute actions in external entities, such as other systems or applications. These entities are, in most cases, integrated via APIs which usually require connection and authentication data. CWM provides a framework where when an activity is consumed in a workflow, the details of a connection endpoint and authentication data can be passed at runtime. Thus, the operator who runs a workflow may not know any details of these systems (resources) such as IP addresses, ports or usernames and password.

CWM provides a framework for secure handling of resources and secrets in database and identifying them by their respective IDs. When running a workflow instance, just the resource ID needs to be passed, with the rest of the data sent to the adapter by the Resource Manager without any intervention from the Operator or additional development from Adapter developer.

Resource and secret types

You can think of resource and secret types are buckets used to organize resources and secrets created by users by their type. Types are defined inside a given adapter and are added to the system automatically upon installing the adapter. You can list secrets belonging to a specific type using the GET/secret/type/{type} API endpoint.

Secrets API endpoints

The following actions for managing secrets are available:

  • GET/secret: gets a list of secrets existing in the CWM application.

  • POST/secret: creates a new secret in the CWM application.

  • GET/secret/type/{type}: lists secrets existing in the CWM application that belong to a specific type.

  • GET/secret/types: gets a list of secret types existing in the CWM application.

  • GET/secret/{id}: gets details of an existing secret.

  • DELETE/secret/{id}: deletes a secret from the CWM application.

  • PATCH/secret/{id}: updates a secret existing in the CWM application with new parameter values.

Resources API endpoints

The following actions for managing resources are available:

  • GET/resource: gets a list of resources existing in the CWM application.

  • POST/resource: creates a new resource in the CWM application.

  • GET/resource/{resourceId}: gets the details of a specific resource existing in the CWM application.

  • PUT/resource/{resourceId}: updates an existing resource with new parameter values.

  • DELETE/resource/{resourceId}: deletes a resource from the CWM application.

  • GET/resourceType: gets a list of resource types existing in the CWM application.

  • GET/resourceType/{resourceId}: gets the details of an existing resource type.

Create secret

Procedure


Step 1

Log in to CWM and from the navigation menu on the left, click the swagger icon.

Step 2

In the CWM API secrets section, click the POST /secret endpoint to expand it.

Step 3

Inside the endpoint, click Try it out, and provide your data into the Secret input field. Example input can look like this:

{
"secret": {
"username": "admin",
"password": "admin"
},
"secretId": "NSOSecret",
"secretType": "basicAuth"
}

Step 4

Click Execute.

If the server response code is 201, the secret is successfully created and you can start creating a resource to associate the secret with.


Create resource

Procedure


Step 1

In the CWM API resources section, click the POST /resource endpoint to expand it.

Step 2

Inside the endpoint, click Try it out, and provide your data into the Resource input field. Example input can look like this:

{
    "resource": {
        "scheme": "http",
        "host": "127.0.0.1",
        "port": 8080
    },
    "resourceId": "NSOLocal",
    "resourceType": "cisco.nso.resource.v1.0.0",
    "secretId": "NSOSecret"
}

Step 3

Click Execute.

If the server response code is 201, the resource is successfully created.


User access via NxF

The CWM allows you to manage user access and permissions via NextFusion (NxF). NxF adds an additional layer of security and works as a Single Authentication Agent, thus sharing local, LDAP and SAML users.

Users, roles, and permissions

Currently, only one role and permission type (admin) is supported. Every user is associated with admin permissions by default.

To allow access to CWM to a larger group of regular users, set the user authentication via LDAP or/and SAML SSO protocols (you can have both at the same time), depending on your environment.

Permissions scope

Admin role has full access to the CWM and all of its functionalities; admins can control user access and permissions. All local users with admin permissions can create new users as needed.

NxF functionality in CWM

NxF functionality is available for admin users from the Settings tab in CWM UI. To access NxF functionality in the CWM:

Procedure


Step 1

In the CWM, go to the outermost navigation menu on the left.

Step 2

Click the Settings icon (gear icon).

Figure 1. NxF settings

Step 3

In the expanded drawer, you can find the following:

Figure 2. Settings drawer
  1. System Info section with information about the latest versions of NxF and CWM microservices.

  2. Security section for access management:

    • Local Users: where you can display, create and edit local users via UI.

    • LDAP: where you can set LDAP settings for user authentication.

    • SAML SSO: where you can set SAML Single-Sign-On settings for user authentication.

    • Permission Mapping: where you can handle permission management via Cisco Policy Management Tool.


Add local user

Procedure


Step 1

In the CWM, go to the outermost navigation menu on the left.

Step 2

Navigate to CWM (Cisco icon) -> Local Users tab.

Step 3

Click Add...

Step 4

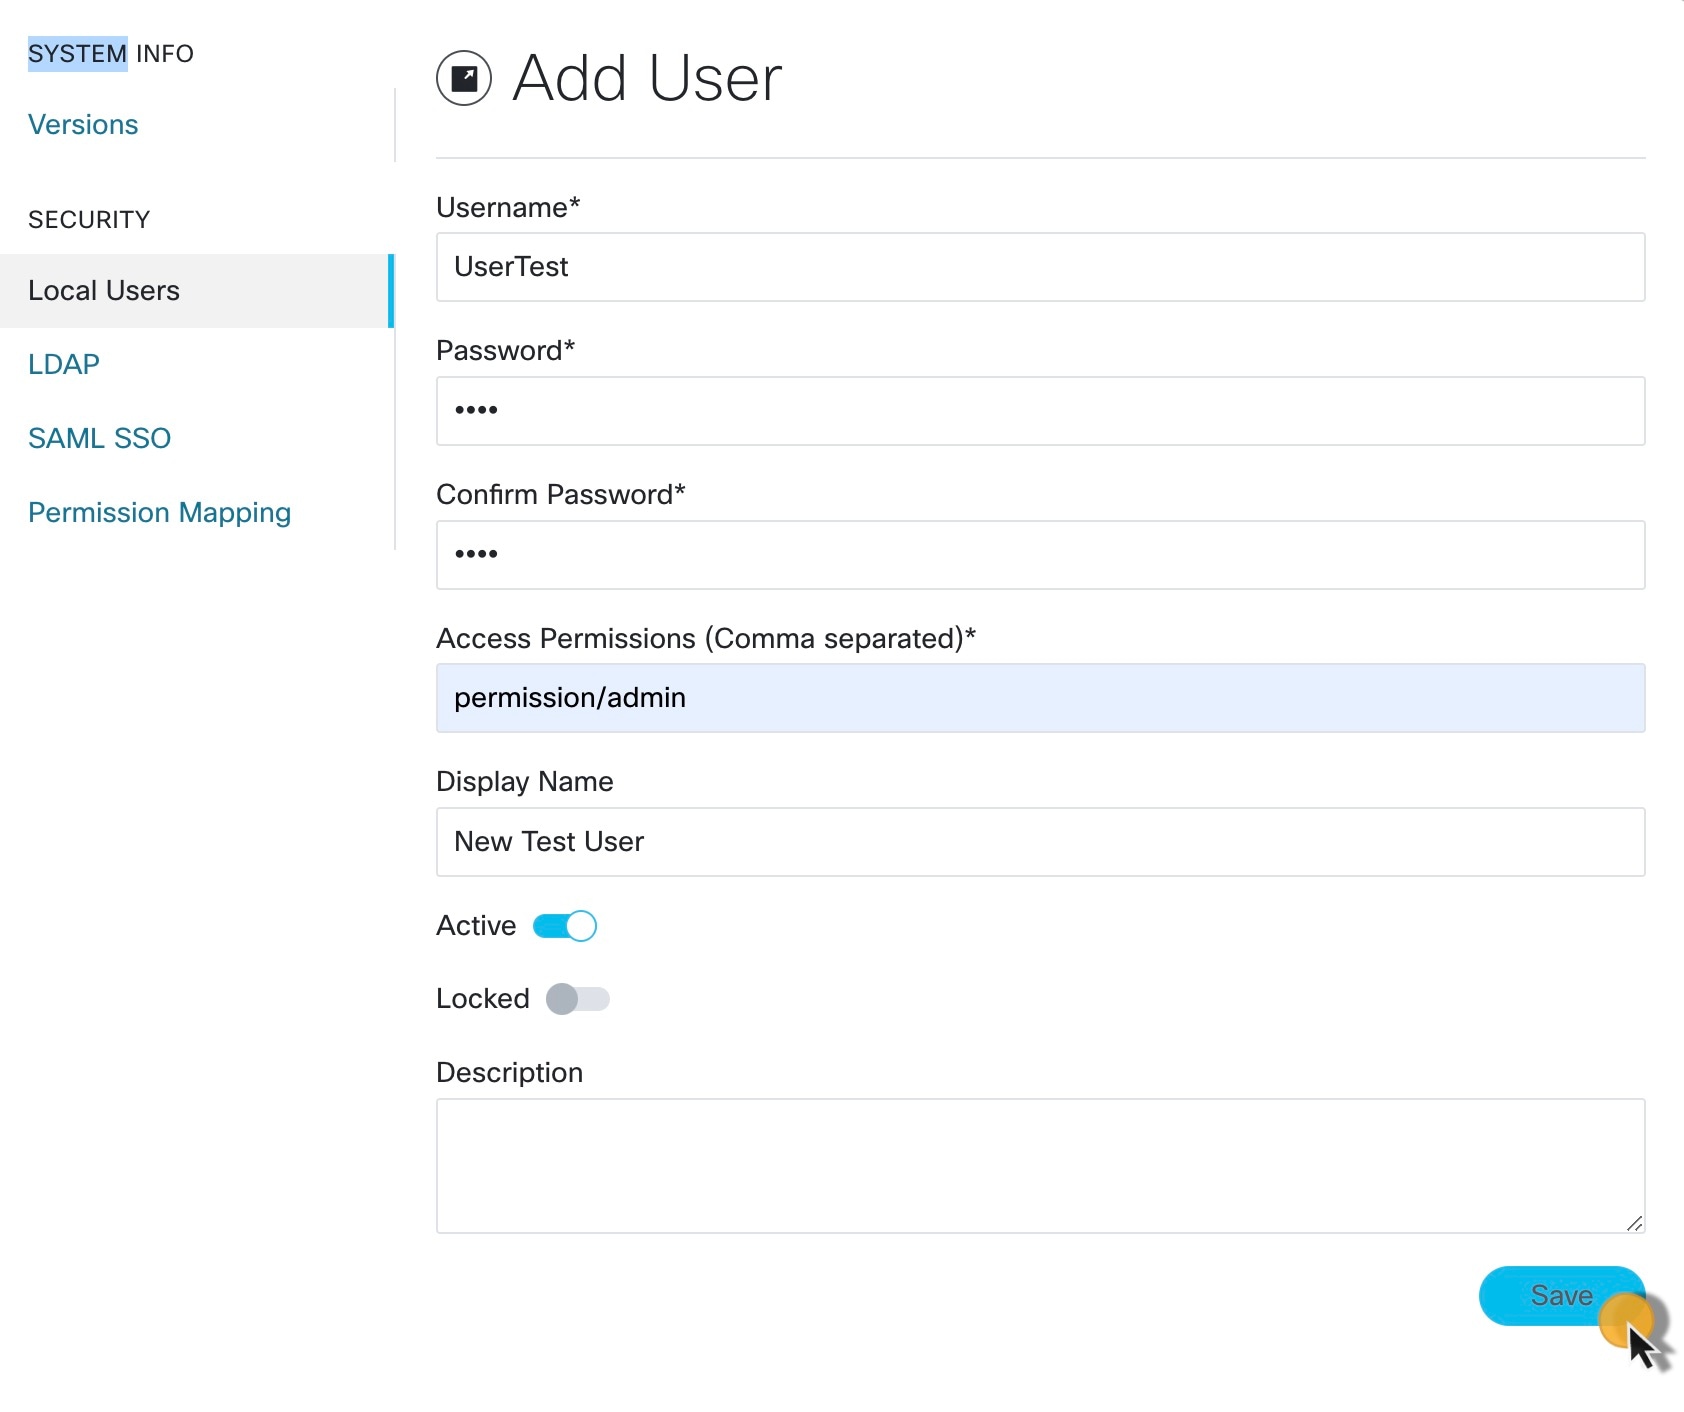
In the Add User panel, fill in the mandatory fields (marked with an asterisk): Username (used to log in to the CWM), Password, Confirm Password and Access Permissions (enter permission/admin). The Description and Display Name (visible next to the username in the CWM) are optional fields.

Figure 3. NxF Add User

Step 5

Use radio buttons to set the user status. You can make both radio buttons disabled or enabled at the same time.

  • Active enabled: allows the user to log in to the CWM.

  • Active disabled: forbids the user to log in to the CWM.

  • Locked enabled: prevents deleting the user.

  • Locked disabled: allows removal of the user.

Step 6

Click Save.


Set up authentication via LDAP

Besides supporting local users, CWM allows adding LDAP users through integration with LDAP (Lightweight Directory Access Protocol) servers.

Procedure


Step 1

In the CWM, go to the outermost navigation menu on the left.

Step 2

Navigate to CWM (Cisco icon) -> LDAP tab.

Step 3

Click the Enabled radio button.

Step 4

Fill in the mandatory fields (marked with an asterisk): LDAP Server Address, Bind DN, Bind Credentials and Search Filter. Search Base and Root CAs are optional.

Figure 4. LDAP

Step 5

Click Save.


Set up authentication via SAML SSO

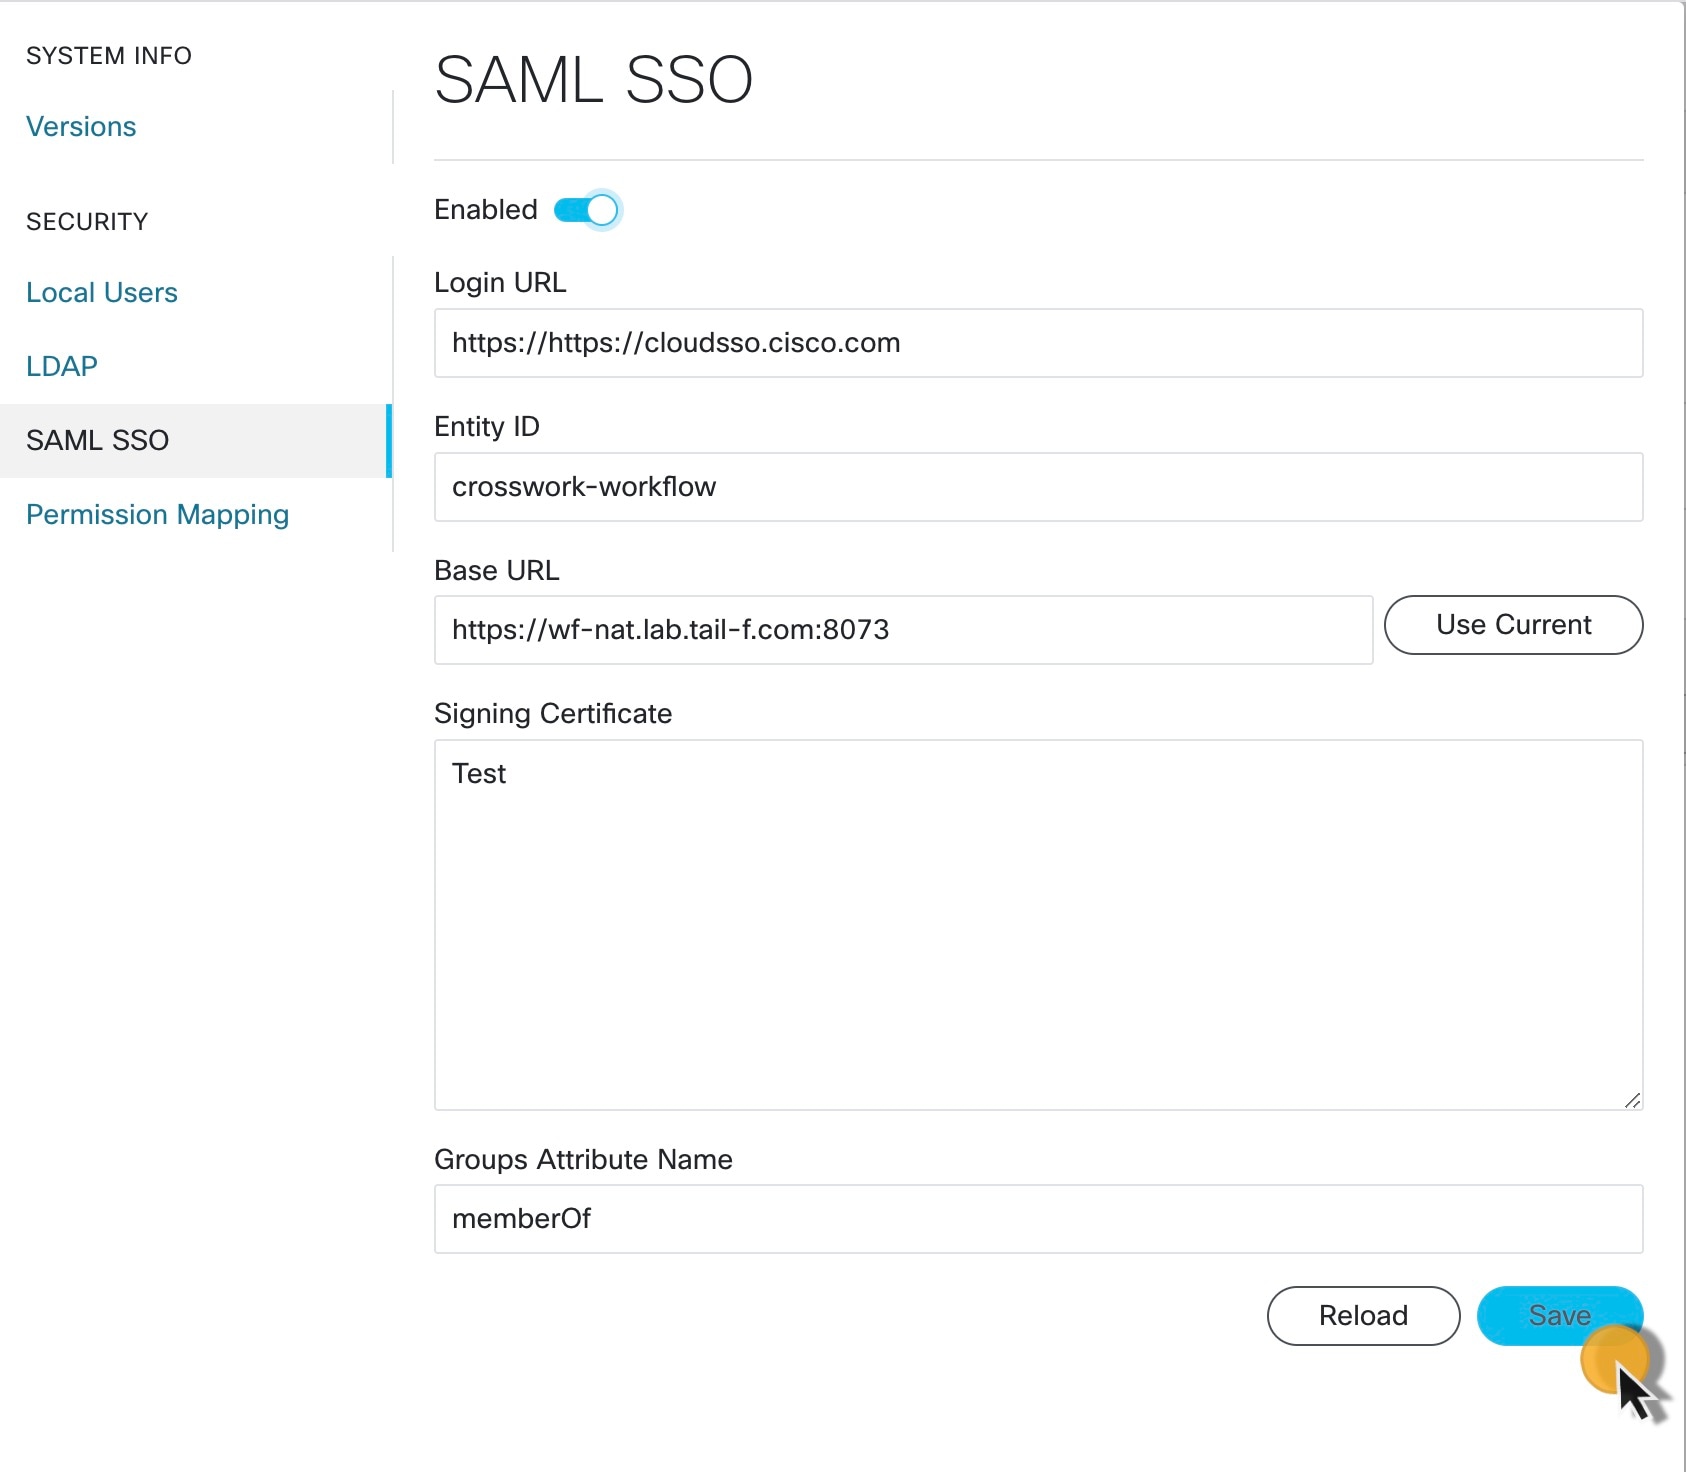
CWM offers SAML SSO feature that supports both LDAP and non-LDAP users to gain single sign-on access based on the protocol SAML (Security Assertion Markup Language). You can enable SAML SSO for CWM along with LDAP or without it.

Procedure


Step 1

In the CWM, go to the outermost navigation menu on the left.

Step 2

Navigate to CWM (Cisco icon) -> SAML SSO tab.

Step 3

Click the Enabled radio button.

Step 4

Fill in the mandatory fields: Login URL, Entity ID, Base URL, Signing Certificate and Groups Attribute Name.

Figure 5. NxF SAMLSSO

Step 5

Click Save.


Set up permission mapping

You can give specific permissions to a group of users via Cisco Policy Management Tool (PMT).

Procedure


Step 1

In the CWM, go to the outermost navigation menu on the left.

Step 2

Navigate to CWM (Cisco icon) -> Permission Mapping tab.

Step 3

Click Add....

Step 4

In the Add Permission Mapping panel, choose one Mapping Type from the dropdown menu: SAML User, SAML Group, LDAP User, or LDAP Group.

Figure 6. Permission mapping

Step 5

Fill in the Match field with the entry from the Cisco Policy Management Tool. You can find the match in PMT UI -> OAuth Clients tab -> Client ID Column.

Step 6

Enter appropriate permission (for example permission/admin) in the Access Permission field.

Step 7

Click Save.