Install the ISO on the Appliance
The appliance is shipped with the software version pre-installed. You do not have to perform these steps during the initial installation of the appliance. However in case you need to re-image the appliance, you can install the software from the ISO file.
To reduce the installation time, choose Admin > Network > Network Settings in the CIMC interface and check the Auto Negotiation check box.
Before You Begin
Download the ISO file PI-APL-3.9.0.0.219-1-K9.iso from cisco.com and verify file integrity using the checksum values listed for it on cisco.com.
You can verify the Cisco Signature for the ISO image with the following steps:
-
Download PI-APL-3.9.0.0.219-1-K9.iso, CiscoPI3.9.pem and PI-APL-3.9.0.0.219-1-K9.iso.signature.
-
Copy these file to any Linux server and enter the following command.
openssl dgst -sha512 -verify
CiscoPI3.9.pem -signature PI-APL-3.9.0.0.219-1-K9.iso.signature PI-APL-3.9.0.0.219-1-K9.iso
The result will be shown as “Verified”.
 Note |
Ensure no storage devices are connected to the USB port of the appliance before upgrading or installing the ISO image. The installation fails if a USB storage device is connected to the USB port of the appliance as the installer selects the USB storage device. |
Note |
When you connect Gen 2 and Gen 3 appliances through serial console connection after reboot, there are chances that you might encounter garbled screen display. To overcome this issue, you can connect through CIMC or VGA console. |
Procedure
|
Step 1 |
Connect to the console using one of the options mentioned in Connect to the Console. |
|
Step 2 |
Mount ISO using any one of the mounting options. See DVD Mount Options for more details. |
|
Step 3 |
Reboot the appliance by pressing the power switch or select Power > Reset System(Warm Boot) if you are using vKVM to restart. |
|
Step 4 |
After the appliance reboots, press F6 to enter the boot option. |
|
Step 5 |
Select one of the DVD mount option with the Cisco Prime Infrastructure 3.9 software image. See DVD Mount Options for more information.  |
|
Step 6 |
From the available boot options, enter 1 or 2 carefully, as all future management messages will be displayed in the selected display. 1—Prime Infrastructure System Installation (Keyboard/Monitor) if you are connected through the VGA port/vKVM (KVM Console). All console data /information will appear on the VGA port /vKVM (KVM console). 2—Prime Infrastructure System Installation (Serial Console) if you are connected through the serial port or Serial Over Lan. See Connect to the Console Using Serial Over LAN for more information. All console data/information will appear on the serial port or Serial Over Lan. 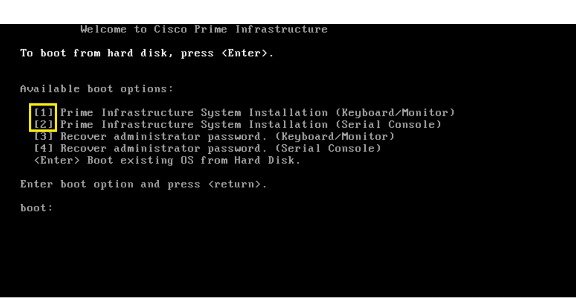 The time taken to deploy the image will depend on the network speed. |
|
Step 7 |
Enter setup at the login prompt when prompted to initiate the installation. |
What to do next
See Set Up Prime Infrastructure on a Virtual Machine or Physical Appliance section (Step 3 onwards) in Cisco Prime Infrastructure Quick Start Guide for more information about installing the software.
Note |
Cisco Prime Infrastructure is installed only using the 1 Gbps ports. To disable the 10 Gbps ports on Cisco DNA Center appliance and use the 1 Gbps ports to install Prime Infrastructure, perform the following steps.
|
Note |
In order to Install Prime Infrastructure in DNAC2 Appliance - we need to Disable Virtual Drive option in Cisco FlexFlash link, perform the following steps:
|
Manage the Appliance Using CIMC
You can connect to the vKVM console by launching the CIMC and log in using your username and password configured in Set the Appliance. Using the vKVM console you can do the following:
-
Remotely power on or off the server.
-
Monitor the server and disk status.
-
Change the BIOS settings. Following table displays the hardware types and their respective latest firmware and BIOS versions that support the Cisco Prime Infrastructure 3.9 Physical Appliance ISO image:
Hardware TypeYe
Firmware Version
BIOS Version
PID
Gen 2
412(b)
C220M4.4.1.2b.0.0625202204
PI-UCS-APL-K9
Gen 3
412(b)
C220M5.4.1.2b.0.0917201934
PI-UCSM5-APL-U-K9
DNAC
412(b)
C220M4.4.1.2b.0.0625202204
DN1-HW-APL
DNAC2
412(b)
C220M5.4.1.2b.0.0917201934
DN2-HW-APL
-
Launch a virtual console on the appliance.
-
Mount iso files as virtual DVD drives.
-
Other server management functions. Note that if there are additional slots configured with JBOD, the upgrade will fail, hence ensure that you set the status of additional slots to be “Unconfigured Good”.
-
See Cisco Integrated Management Controller documentation for more information.
 Feedback