Provisioning with the VPN Solutions Center Template Manager
Available Languages
Table Of Contents
Provisioning with the VPN Solutions Center Template Manager
Uses for the Templating Function
Creating a Template for VPN Provisioning
Entering Configuration Commands in the Template Body
Assigning Attributes to Template Variables
About the Variable Types and Their Attributes
Creating a Template Data File Folder
Creating a New Template Data File
Entering Values for a One-Dimensional Array
Entering Values for a Two-Dimensional Array
Creating a Template Configuration File
Provisioning a Template Configuration File Directly to a Router
Using VPN Solutions Center Repository Variables as Template Data
Summary of IPsec Repository Variables
Summary of MPLS Repository Variables
Provisioning with the VPN Solutions Center Template Manager
The Template Manager
The Template Manager in the VPN Solutions Center software is a provisioning system that provides fast, flexible, and extensible Cisco IOS command generation capability. The Template Manager defines standard templates to generate Cisco IOS configurations for common provisioning tasks, such as common IPv4, QoS, and VPN provisioning.
•
A template file is a file created by the Template Manager that stores a VPN Solutions Center template definition.
•
•
The template data files are tightly linked with its corresponding template. You can use a data file and its associated template to create a template configuration file. The template configuration file is merged with (either appended to or prepended to) the VPNSC configlet. VPN Solutions Center downloads the combined configlet to the edge device router.
You can apply the same template to multiple edge devices, assigning the appropriate template data file for each device. Each template data file includes the specific data for a particular device (for example, the management IP address or host name of each device).
The template files and data files are in XML format. The template file, its data files, and all template configuration file files are mapped to a single directory.
•

Tips
1. Find the following statement in the csm.properties file:netsys.vpn.serviceRequest.showTemplates=falseChange the statement to true:
2.
netsys.vpn.serviceRequest.showTemplates=trueRestart VPN Solutions Center.
3.
•
Uses for the Templating Function
Service providers can use the Template Manager to enhance VPN Solutions Center functionality. Because the Telnet Gateway Server (TGS) supports console access to VPN Solutions Center targets, you can use the Template Manager to provide initial configuration for any service provider core device or edge device.
The Template Manager can be used as a stand-alone tool to generate complete configuration files that you can download to any VPN Solutions Center target.
Some of the additional uses for templating are as follows:
•
•
•
•
Creating a Template for VPN Provisioning
To create a VPN Solutions Center template for VPN provisioning, follow these steps:
Step 1
Step 2
The VPN Solutions Center Template Manager appears (see Figure 8-1).
Figure 8-1 The Template Manager Window

Template Home is a the root folder for templates.
Template folders logically organize templates into a hierarchy that facilitates navigation. As in a file system, the Template folders are like directories and the templates are equivalent to files. Many data files can be associated with a template, and any of the data files can be used to generate a template.
As you can see in Figure 8-1, the Template Manager provides several template examples.
Step 3
The menu shown in Figure 8-2 appears.
Figure 8-2 Template Folders Menu

Step 4
The New Template Folder dialog box appears (see Figure 8-3).
Figure 8-3 New Template Folder Dialog Box

Step 5
The new template folder is added to the folders in the template tree.
Step 6
The Folders menu appears, but now additional commands are enabled, including New Template (see Figure 8-4).
Figure 8-4 Opening a New Template

Step 7
The Template Editor appears in the data pane (see Figure 8-5).
Figure 8-5 The Template Editor

Step 8
a.
The Title field is optional, but recommended. The title you enter here is not the name of the template; it is a high-level description of the template.
b.
The Description field is optional, but recommended.
Step 9
The keywords are to assist you in finding templates after they have been defined.
a.
A new keyword field appears in the Keywords area.
b.
Entering Configuration Commands in the Template Body
The Body area of the Template Manager is the place where you enter the configuration commands that you want to add to a configuration file. This area of the Template Manager allows you to enter the Cisco IOS commands, check the VPNSC template syntax of the command you have entered, and create the variables called by the IOS commands.
For a discussion of the template grammar and conventions in the VPN Solutions Center template language, see "Template Language and Syntax Reference."
The result is a template configuration file that is added to the VPNSC configlet generated through standard VPN Solutions Center provisioning. VPN Solutions Center software downloads the combined template configuration file and VPNSC configlet to the target routers.
The use of interactive IOS commands is not supported in VPN Solutions Center templates.
Step 1
Tips
Step 2
The Template Manager automatically checks the VPNSC template syntax—not the IOS syntax—and places the variables that were entered in the Body area into the Variables area (at the bottom of the dialog box)—see Figure 8-6.
If there is one or more errors in the template syntax, a syntax error message appears. The syntax error message states the type of error and the line on which the error occurs. Dismiss the error message and correct the syntax error.
Figure 8-6 Completed Template and Variables Displayed

Step 3
The Save Template dialog box appears (see Figure 8-7).
Figure 8-7 Saving the Template Changes

Step 4
When you save a template, the name of the template is added to the template tree under the appropriate template folder.
Assigning Attributes to Template Variables
Variables are strings that start with a $ sign. Variables are placeholders that are replaced with actual values from the template data files when the template is generated.
All variables entered into VPN Solutions Center templates are local variables. A variable declared in one template can only be used by that template.
To set attributes for the variables, do the following:
Step 1
Step 2
The Edit Variable dialog box appears (see Figure 8-8).
Figure 8-8 Edit Variable Dialog Box

Setting the Variable Type
Step 3
As shown in Figure 8-8. there are five variable types you can choose from:
•
•
•
•
•
When you select a variable type, the fields displayed in the Edit Variable dialog box change to accommodate the parameters you can set for the selected type. Some of the parameters are common to all the variable types, and those are described in the following steps.
For each variable type, there are a set of predefined attributes associated with it. For details on each of the variable types, see the "About the Variable Types and Their Attributes" section.
Declaring the Variable as Required or Optional
Step 4
•
•
Specifying the Dimension Attribute
Step 5
The Dimension attribute is an optional attribute that creates an array (or list) of variables. The default value is 0, which indicates a single or enum variable.
If you set the Dimension attribute to 1 or 2, the variable becomes a 1- or 2-dimension array. In this case, the constraint attributes are applied to all the elements in the array.
Specifying the Default Attribute
Step 6
Specifying the Available Values
When you specify a set of available values for a variable, the values entered become the only values that are allowed to be assigned to the variable. If you also set a default value for this variable, the default value must be one of the available values.
Step 7
a.
The Edit Variable: variable_name dialog box appears.
b.
A new blank field is displayed in the Available Values area.
c.
d.
e.
The values you entered in the Edit Variable dialog box are displayed for the selected variable in the Template Manager Variables area.
Step 8
About the Variable Types and Their Attributes
A variable is a symbol or name that stands for a value. VPN Solutions Center converts most variables to strings when the template is created, but you can set attributes for each variable type. For example, for an integer variable, you can set the minimum and maximum values allowed in the data.
As shown in Figure 8-8. there are five variables types you can choose from:
•
•
•
•
•
Integer Variable Type
An integer is a whole number. The attributes included in the Integer variable type are as follows:
String Variable Type
A string is a combination of characters considered as a group. The attributes included in the String variable type are as follows:
Float Variable Type
A floating point number is a number that has no fixed number of digits before or after the decimal point. The attributes included in the Float variable type are as follows:
IPv4 Address Variable Type
This variable type represents an IPv4 address. The default IPv4 Address variable is in string format, unless the operator provides the IP address data. Figure 8-9 shows an example of an IPv4 variable definition using the Edit Variable dialog box.
Figure 8-9 Example of an IPv4 Address Variable Definition


Note
The attributes included in the IPv4 Address Variable type are as follows:
Template Variable Type
A template that is embedded within a template is called a subtemplate. This variable type specifies a subtemplate variable that can retrieve a subtemplate. VPN Solutions Center supports one level of subtemplates only. Thus, a subtemplate cannot include (or embed) another subtemplate.
Before you create a Template variable, you must create the subtemplate that the variable refers to. When you set the variable type to Template, you must browse for and specify the name and location of the indicated subtemplate.
The attributes included in the Template variable type are as follows:
Creating a Template Data File Folder
You can create a folder to organize your template data files. Template data file folders logically organize data files into a hierarchy that facilitates navigation. The template data files are exclusively linked to the associated template.
To create a data file folder, follow these steps:
Step 1
The Template Manager appears.
Step 2
Step 3
Step 4
Figure 8-10 New Data File Folder Option

The New Data File Folder dialog box appears (see Figure 8-11).
Figure 8-11 Entering the Name of the New Data File Folder

Step 5
The new data file folder is added to the template hierarchy (see Figure 8-12).
Figure 8-12 New Data File Folder Added

Creating a New Template Data File
A template data file is a text file that stores the variable values necessary to generate a template file. A valid template data file contains name-value pairs for all the variables defined in a template.
Each template can be associated with multiple data files; however, note that each data file can only be associated with a single template. You can select which template data file to use to generate a template.
To create a new template data file, follow these steps:
Step 1
The Template Manager appears.
Step 2
Step 3
Step 4
Figure 8-13 New Data File Menu Option

The new Template Data Files dialog box appears in the data pane on the right (see Figure 8-14).
In the Data Files area of the dialog box, the name of each of the variables appears with a cell beneath it for the designated value of that variable.
Figure 8-14 New Template Data Files Dialog Box

Step 5
a.
b.
Step 6
The Template Manager displays the variables in standard spreadsheet format. The initial default values are displayed for each variable.
Depending on the type of variable, and its settings and attributes, the data values you enter will vary. The Template Manager provides type checking when you save the data; for example, if you enter non-numeric characters in a field defined as an integer, the Template Manager does not accept the data and alerts you to the discrepancy.
As shown in the track_priority variable in Figure 8-15, you can see the available values set for a particular variable by clicking the name of the variable.
Figure 8-15 A Variable's Available Values Listed

Entering Values for a One-Dimensional Array
A one-dimensional array creates a list of values that you can apply in your template for that variable. The number of values that can be substituted for any given one-dimensional variable is determined by the number of values you define for it (as shown below in Figure 8-17).
The following is an example of program statements entered into a template that make use of a one-dimensional array:
!{access-list $ACL[$i] permit ip $Source_IP_Address[$i] $Source_Mask[$i] $Dest_IP_Address[$i] $Dest_Mask[$i] precedence 7}The $i specified in the variables declared in the substatements above such as:
$Source_IP_Address[i]indicates that it is a one-dimensional variable. For example, for each value specified for the Source_IP_Address variable, the template substitutes one of the values for Source_IP_Address.
To enter the values for a one-dimensional array, follow these steps:
Step 1
Step 2
Step 3
The Template Manager Data Files dialog box is displayed (see Figure 8-16).
Figure 8-16 Selecting One-Dimensional Variable

The name of the selected template data file and each of its variables are displayed. You can use the mouse to adjust the width of each variable cell.
Step 4
Step 5
The Edit Variable: variable_name dialog box appears (Figure 8-17).
Figure 8-17 Entering Data for a One-Dimensional Array Variable

Step 6
A new blank field appears in the editing area.
Step 7
Step 8
–
Step 9
The values you entered are displayed in the corresponding Data Files variable cell, as shown in Figure 8-18.
Figure 8-18 One-Dimensional Array Added to Data File Variable Display

Step 10
Entering Values for a Two-Dimensional Array
A two-dimensional array creates a table of values that you can apply in your template for that variable. The number of values that can be substituted for any given two-dimensional variable is determined by the number of rows and columns that you define in the Edit Variable dialog box.
The indexing convention uses pairs of numbers that refer to positions in the indexing table, as shown in Table 8-6:
Table 8-6 Indexing Convention for a Two-Dimensional Array
0, 0
0, 1
0, 2
1, 0
1, 1
1, 2
2, 0
2, 1
2, 2
The rows and columns that you create with the Template Manager Variable Editor creates a table of cells that correspond to the indexing convention for two-dimensional variables. Substituting values occurs by linking the positions indicated by the indexing convention with two-dimensional variable statements.
For example, let us say that you have a Protocol variable that has four possible values: IP, TCP, RIP, and UDP. The examples of the Edit Variable dialog box shown in Figure 8-19 show the index positions and the four protocol values in their corresponding relative positions.
Figure 8-19 Entering a Two-Dimensional Array

•
•
•
•
To substitute the appropriate variable values, the variables defined in the template body would be defined as follows:
•
•
•
•
To enter the values for a two-dimensional array, follow these steps:
Step 1
Step 2
Step 3
The Template Manager Data Files dialog box is displayed. The name of the selected template data file and each of its variables are displayed. You can use the mouse to adjust the width of each variable cell.
Step 4
Step 5
The Edit Variable: variable_name dialog box appears (Figure 8-20).
Figure 8-20 Editing Two-Dimensional Array

When the Edit Variable dialog box for a two-dimensional array first appears, there are no fields displayed in the edit area.
Step 6
A row appears, as shown in Figure 8-20.
Step 7
Step 8
You can also remove unneeded rows and columns by selecting a cell in the row or column you want to remove and clicking Remove Row or Remove Column.
Step 9
Step 10
The values you entered are displayed in the corresponding Data Files variable cell, as shown in Figure 8-21.
Figure 8-21 Two-Dimensional Array Added to Data File Variable Display

Step 11
Copying a Template Data File
You can copy a template data file from one location to another within the Template Manager. Keep in mind that template data files are tightly coupled with their associated template. Therefore, you would normally copy a template data file to the same template, then modify the variables accordingly.
To copy a template data file, follow these steps:
Step 1
Step 2
Figure 8-22 Copying a Template Data File

Step 3
Step 4
Step 5
The template data file is copied to the selected folder.
Deleting a Template Data File
You can delete a template data file from the Template Manager. Keep in mind that template data files are tightly coupled with their associated template. Therefore, deleting a data file can effectively disable a template.
To delete a template data file, follow these steps:
Step 1
Step 2
Step 3
You receive the following warning:
Warning: Are you sure that you want to delete <name> file?
Step 4
To cancel the data file deletion operation, click No.
Creating a Template Configuration File
You can create a template configuration file based upon a particular template and a specific data file.
To create a template configuration file, follow these steps:
Step 1
The Template Manager appears.
Step 2
Step 3
Step 4
The Template Data Files dialog box appears.
Step 5
Figure 8-23 Selecting the Template Data File

Step 6
You receive the following message:
The Data File will be saved before creating a configuration.
Step 7
The Configuration Created window appears, which displays the template configuration file that was created from the selected template and configuration file (see Figure 8-24).
Figure 8-24 Template Configuration File Displayed
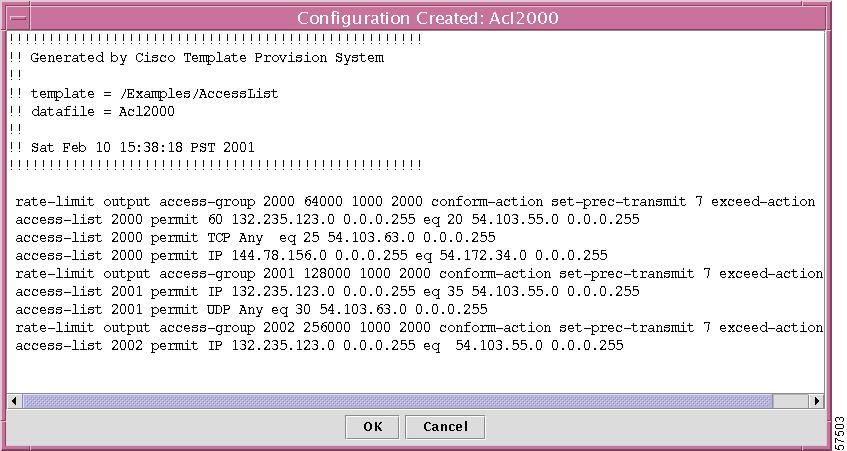
The Template Manager creates a folder called "Configurations" in the appropriate template folder, and places the configuration file in the Configurations folder.
Step 8
Copying a Template
You can copy a VPN Solution Center template from one folder to another within the template hierarchy. When you copy a template, all the files and folders associated with that template—its data files and configuration files—are copied to the new location.
To copy a VPN Solution Center template, follow these steps:
Step 1
Step 2
Step 3
Step 4
Step 5
The template, along with the files and folders associated with it, is copied to the selected folder.
Deleting a Template
You can delete any template from the VPN Solutions Center Template Manager. When you delete a template, all the files and folders associated with that template—its data files and configuration files—are also deleted.
To delete a VPN Solution Center template, follow these steps:
Step 1
Step 2
Step 3
You receive the following warning:
WARNING: All files in the selected template directory will be deleted. Do you want to continue?
Step 4
To cancel the template deletion operation, click No.
The template, along with the files and folders associated with it, is deleted from the Template Manager.
Provisioning a Template Configuration File Directly to a Router
You can download a template configuration file directly to a router. To do so, follow these steps:
Step 1
The Template Manager appears.
Step 2
Step 3
Figure 8-25 Template Configuration File Menu

Step 4
The VPN Solutions Center Network window appears (see Figure 8-26).
Figure 8-26 Selecting Router from the VPNSC Network Window

Step 5
a.
b.
c.
Step 6
An informational window appears, which shows the status of the template configuration file download operation (see Figure 8-27).
Figure 8-27 Template Configuration File Download Status Window

Using VPN Solutions Center Repository Variables as Template Data
You can choose from a list of IPsec (or MPLS) variables that are part of the VPN Solutions Center service definition. Their data values are substituted when you associate a template with a service request. For details on this procedure, see the "Integrating a Template with a Service Request" section.

Caution
To use VPN Solutions Center Repository values as template data, follow these steps:
Step 1
Step 2
Step 3
Step 4
The Data Files dialog box appears.
Step 5
A menu appears with two options: IPsec and MPLS.
Step 6
The list of IPsec service values is displayed (see Figure 8-28).
Figure 8-28 Menu of IPsec Repository Variables

Step 7
Summary of IPsec Repository Variables
Table 8-7 provides a summary of the IPsec Repository variables available from the VPN Solutions Center Template Manager.
Summary of MPLS Repository Variables
Table 8-8 provides a summary of the MPLS Repository variables available from the VPN Solutions Center Template Manager.
Table 8-8
MPLS Repository Variables
 Feedback