Installing the ONS 15454 M6 Shelf

This chapter explains how to install the ONS 15454 M6 shelf.


Note


Unless otherwise specified, the ECU module refers to the ECU, ECU2, ECU-S, and ECU-60V units. For details about the various ECU modules, see the External Connection Units.

ANSI Rack Installation

The ONS 15454 M6 shelf is mounted on a 19-inch (482.6-mm) or 23-inch (584.2-mm) equipment rack. Make sure that the correct type of 19-inch ANSI rack is used for mounting the ONS 15454 M6 shelf as shown in 19-inch ANSI Rack Post Recommended for Cisco ONS 15454 M6 and M2 Shelves. If the shelf is mounted in the front position, then it projects 1.7 inches (43.18 mm) from the front of the rack. If the shelf is mounted in the middle position, then it projects 5.1 inches (129.54 mm) from the front of the rack. The shelf mounts in both Electronic Industries Alliance (EIA) standard and Telcordia-standard racks. The shelf is a total of 17 inches (431.8 mm) wide with no mounting ears attached. Ring runs are not provided by Cisco and might hinder side-by-side installation of shelves where space is limited.

The ONS 15454 M6 shelf measures 10.4 inches (264.16 mm) high, 19 or 23 inches (482.6 or 584.2 mm) wide (depending on which way the mounting ears are attached), and 11.1 inches (304.8 mm) deep. You can install up to seven ONS 15454 M6 shelves in a 7-foot (2133.6 mm) equipment rack.

The following figure shows the dimensions of the ONS 15454 M6 shelf on a 19-inch (482.6 mm) ANSI rack configuration with brackets mounted in the front position.
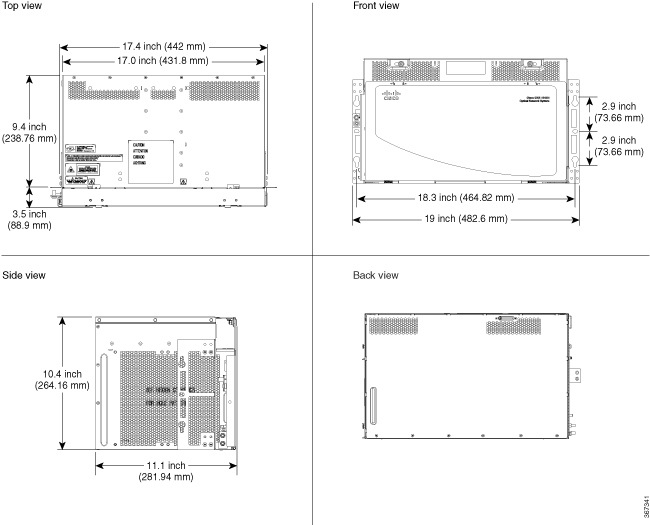
Figure 1. Cisco ONS 15454 M6 Shelf Dimensions for a 19-inch ANSI Rack Configuration

Reversible Mounting Bracket


Caution


Use only the fastening hardware provided with the ONS 15454 M6 shelf to prevent loosening, deterioration, and electromechanical corrosion of the hardware and joined material.


Caution


When mounting the ONS 15454 M6 shelf in a frame with a nonconductive coating (such as paint, lacquer, or enamel) either use the thread-forming screws provided with the ONS 15454 M6 shipping kit, or remove the coating from the threads to ensure electrical continuity.


The reversible mounting bracket is used to mount the shelf on a 19-inch or 23-inch (482.6 mm or 584.2 mm) rack.

Mounting a Single Shelf

Mounting the ONS 15454 M6 shelf on a rack requires a minimum of 10.4-inches (265 mm) of vertical rack space. To ensure that the mounting is secure, use two to three #12-24 mounting screws for each side of the shelf. For an ANSI rack, the brackets can be mounted in the front or middle position.

If the ONS 15454 M6 shelf is fully loaded, then two people should install it. However, it is possible for one person to install an empty shelf. The shelf should be empty for easier lifting.

Mounting Multiple Nodes

Most standard (Telcordia GR-63-CORE, 19-inch (482.6-mm) or 23-inch (584.2-mm) 7-foot (2.133-m) racks can hold seven ONS 15454 M6 shelves and a fuse and alarm panel. However, unequal flange racks are limited to six ONS 15454 M6 shelves and a fuse and alarm panel, or seven ONS 15454 M6 shelves using a fuse and alarm panel from an adjacent rack. In an ANSI shelf, the brackets can be mounted in the front or middle position.

The ONS 15454 M6 shelves can be mounted above each other without any space between the shelves. This method of mounting does not restrict the air flow because the air vents are on either sides of the ONS 15454 M6 shelves.

ETSI Rack Installation

The ONS 15454 M6 shelf is mounted on a 600 x 600-mm (23.6 x 23.6-inch) or 600 x 300-mm (23.6 x 11.8-inch) ETSI standard equipment rack. In an ETSI rack, the shelf can be mounted only in the front position. The shelf projects 1.7 inch (43.18 mm) from the front of the rack and is a total of 431.8 mm (17 inch) wide with no mounting ears attached. Cisco does not provide ring runs, which might hinder side-by-side installation of shelves where space is limited.

The ONS 15454 M6 shelf measures 264.16 mm (10.4 inches) high, 535 mm (21.06 inches) wide, and 304.8 mm (11.1 inches) deep. You can install up to seven ONS 15454 M6 shelves in a 7-foot (2133.6-mm) equipment rack.

The following figure provides the dimensions of the ONS 15454 M6 shelf installed on a 600 x 600-mm (23.6 x 23.6-inch) ETSI standard equipment rack.

Figure 2. Cisco ONS 15454 M6 Shelf Dimensions for an ETSI Rack Configuration

Caution


The standard ETSI racks can hold seven ONS 15454 M6 shelves. When mounting a shelf in a partially filled rack, load the rack from the bottom to the top with the heaviest component at the bottom of the rack. If the rack is provided with stabilizing devices, install the stabilizers before mounting or servicing the unit in the rack.


Mounting a Single Node

The ONS 15454 M6 requires 264.16 mm (10.4-inches) minimum of vertical rack space. To ensure the mounting is secure, use two to three M6 mounting screws for each side of the shelf. A shelf should be mounted at the bottom of the rack if it is the only unit in the rack.

In an ETSI rack, the brackets are mounted only in the front position.

If the ONS 15454 M6 shelf is fully loaded, then two people should install it. However, it is possible for one person to install an empty shelf. The shelf should be empty for easier lifting. For information on the ONS 15454 M6 shelf weight, see the Dimensions.

Mounting Multiple Nodes

Most standard (ETS 300 119) ETSI 600 x 600 x 2200 mm or 600 x 300 x 2200 mm racks can hold seven ONS 15454 M6 shelves, and a fuse and alarm panel. In an ETSI rack, the brackets are mounted only in the front position.

The ONS 15454 M6 shelves can be mounted above each other without any space between the shelves. This method of mounting does not restrict the air flow because the air vents are on either sides of the ONS 15454 M6 shelves.

Air Deflector

An air deflector is a sheet-metal part that is mounted on the ONS 15454 M6 shelf to orient the air flow in a specific direction.

The air deflectors can be mounted in different positions to control the air flow:

  • Front to Front— Only ETSI rack
  • Front to Back— For ANSI and ETSI racks
  • Front to Top— Only ETSI rack

In an ANSI rack, the air deflectors are mounted only on the 23-inch rack configuration.

Air Plenum

 Air plenum orients the air flow in the front-to-back direction inside the equipment to be compliant with GR-63 issue 4 requirement. 

 The air plenum kit has two horizontal and two vertical air plenums. The air that flows from the front top inlet and the front bottom inlet are channelized to the right vertical plenum, inside the equipment, and then to the exhaust air channel towards the left vertical air plenum. The air flow is deflected by 90 degrees and exited out in the rear end. 

The following figure shows the air flow inside the cabinet. 

Figure 3. Air flow within the air plenum in the cabinet
Air flow within the air plenum in the cabinet

 The following two figures shows the dimensions of the air plenum relative to the cabinet or rack. 

Figure 4. Dimension of Cisco ONS 15454 M6 chassis relative to the air plenum
Dimension of Cisco ONS 15454 M6 chassis relative to the air plenum
Figure 5. Dimension on Cisco ONS 15454 M6 relative to the air plenum
Dimension on Cisco ONS 15454 M6 relative to the air plenum

Air Plenum Rack and Cabinet Compatibility

 The table shows the compatibility of air plenum with the ANSI and ETSI racks and cabinets. The chassis can be installed with brackets in front position only. 

Table 1. Air plenum compatibility with racks and cabinets

 Rack / Cabinet 

 Front-to-back air flow 

 ANSI 19-inch rack 

 Supported 

 ANSI 19-inch cabinet 

 Supported 

 ANSI 23-inch rack 

 Supported 

 ANSI 23-inch cabinet 

 Supported 

 ETSI cabinet 

 Supported 

 A minimum opening of 20.600 inches is required to install the vertical air plenum behind the front rails. 


Note


 The ANSI 19-inch two post rack that is compatible with air plenum installation is available from Telect, with part number 12545-301. 
Figure 6. Minimum rear opening for ANSI 19-inch and ETSI configuration
Minimum rear opening for ANSI 19-inch and ETSI configuration

NTP-G344 Install the Air Plenum in ONS 15454 M6 Shelf

Purpose

This procedure installs the air plenum to orient the air flow from front-to- back direction in the ONS 15454 M6 shelf.

Tools/Equipment

  • #2 Phillips Dynamometric screwdriver
  • Medium slot-head screwdriver
  • Small slot-head screwdriver
  • Screws
    • ANSI: #12-24 x 0.50 pan-head Phillips screws
    • ETSI: M6.0 x 20 pan-head Phillips screws
  • Wing head screws (8)
  • Adapter plates
  • One air plenum kit (horizontal and vertical air plenums)

Required/As Needed

As needed

Onsite/Remote

Onsite

Security Level

None


Warning


Before performing any of the following procedures, ensure that power is removed from the DC circuit. Statement 1074


Warning


Before working on a chassis or working near power supplies, unplug the power cord on AC units. Statement 246


Warning


This equipment is intended to be grounded. Ensure that the host is connected to earth ground during normal use. Statement 39


Note


For nominal voltage of -60 VDC, the input voltage range is from -40 to -72 VDC.

Note


Use only the fastening hardware provided with the ONS 15454 M6 to prevent loosening, deterioration, and electromechanical corrosion of the hardware and joined material.

Warning


When installing or replacing the unit, the ground connection must always be made first and disconnected last. Statement 1046


Warning


The air plenum is installed on a rack or a cabinet using thread-forming screws that remove any paint or non-conductive coatings inside the hole threads, and establish a metal-to-metal contact. Also, clean both surfaces outside the screw points that come in contact, so that they are free of paint and other nonconductive coating. Apply an appropriate antioxidant compound to the surfaces.


Procedure


Depending on the rack or cabinet, complete the necessary task:

Stop. You have completed this procedure.


DLP-G766 Install Air Plenum for ONS 15454 M6 Shelf in ANSI 19-inch Cabinet

Purpose

 This task installs the air plenum for the ONS 15454 M6 shelf in ANSI 19-inch cabinet. 

Tools/Equipment

  •  #2 Phillips Dynamometric screwdriver 
  •  Medium slot-head screwdriver 
  •  Small slot-head screwdriver 
  •  Screws: #12-24 x 0.50 pan-head Phillips screws (8) 
  •  Wing head screws (8) 
  •  One air plenum kit (horizontal and vertical air plenum) 

Required/As Needed

 As needed 

Onsite/Remote

 Onsite 

Security Level

 None 


Note


 In the ANSI 19-inch rack or cabinet, the air plenum can be mounted only if the minimum opening is 20.600 inches to install the vertical air plenums behind the front rails. 

Procedure


Step 1

 Place the horizontal air plenum at the bottom of the shelf slot in the ANSI 19-inch cabinet. 

Step 2

 Insert the wing head screws provided with the kit, and tighten to a torque value of 11.5 in-lb (1.3 N-m) as shown in the following figure. 

Figure 7. Installing the bottom horizontal air plenum in the ANSI 19-inch cabinet
Installing the bottom horizonatl air plenum in the ANSI 19-inch cabinet

Step 3

 Install the vertical air plenum to the left of the horizontal air plenum: 

  1.  Insert the vertical plenum in the free space between the horizontal plenum and cabinet. 

  2.  Install the wing head screws fom the internal side of the horizontal plenum as shown in the following figure. 

  3.  Tighten the screws to a torque value of 11.5 in-lb (1.3 N-m). 

    Figure 8. Installing the left vertical air plenum
    Installing the left vertical air plenum

Step 4

 Install the vertical air plenum to the right of the horizontal air plenum. Follow step 3a to step 3c. 

Figure 9. Installing the right vertical air plenum
Installing the right vertical air plenum

Step 5

 Install the horizontal air plenum above the vertical plenums. Follow step 3a to step 3c. 

Figure 10. Installing the horizontal air plenum above the vertical plenums
Installing the horizontal air plenum above the vertical plenums

Step 6

 Install the 19-inch standard brackets on both sides of the chassis in the front position. See DLP-G560 Mounting the Reversible Brackets on the ONS 15454 M6 Shelf for ANSI Rack Configuration

Step 7

 Check the length between the top and bottom horizontal air plenums where the chassis will be installed. The length must be not less than 10.5 inches (267 mm). If the length is less, adjust the position of the top horizontal plenum. 

Step 8

 Install the ONS 15454 M6 empty chassis between the two horizontal plenums. 

Figure 11. Installing the ONS 15454 M6 chassis between the horizontal air plenum
Installing the ONS 15454 M6 chassis between the horizontal air plenum

Step 9

 Return to your originating procedure (NTP). 


DLP-G767 Install Air Plenum in ONS 15454 M6 Shelf for ANSI 23-inch Configuration

Purpose

 This task installs the air plenum for the ONS 15454 M6 shelf in the ANSI 23-inch cabinet or rack configuration. 

Tools/Equipment

  •  #2 Phillips Dynamometric screwdriver 
  •  Medium slot-head screwdriver 
  •  Small slot-head screwdriver 
  •  Screws: #12-24 x 3/4 pan-head Phillips mounting screws (8) 
  •  Wing head screws (8) 
  •  Adapter plates 
  •  One air plenum kit (horizontal and vertical air plenum) 

Required/As Needed

 As needed 

Onsite/Remote

 Onsite 

Security Level

 None 


Note


 The airplenums for ANSI 23-inch configuration can be pre-assembled outside the cabinet and then installed inside the cabinet. See DLP-G768 Install Pre-assembled Air Plenums in ANSI 23-inch Configuration

Procedure


Step 1

 Install the ANSI 23-inch adapter plates on the horizontal air plenum. 

Step 2

 Align the screws to fix the adapter plates to the shelf. Insert the screws and tighten them to a torque value of 11.5 in-lb (1.3 N-m). 

Figure 12. Installing the adapter plates on the horizontal air plenum
Installing the adapter plates on the horizontal air plenum

Step 3

 Place the horizontal air plenum below the shelf slot in the ANSI 23-inch cabinet or rack. 

Step 4

 Insert the wing head screws provided with the kit, and tighten to a torque value of 11.5 in-lb (1.3 N-m). 

Figure 13. Installing the bottom horizontal air plenum in the ANSI 23-inch configuration
Installing the bottom horizontal air plenum in the ANSI 23-inch configuration

Step 5

 Install the vertical air plenum to the left of the horizontal air plenum: 

  1.  Insert the vertical air plenum in the free space between the horizontal air plenum and cabinet. 

  2.  Install the wing head screws from the internal side of the horizontal plenum as shown in the following figure. 

  3.  Tighten the screws to a torque value of 11.5 in-lb (1.3 N-m). 

    Figure 14. Installing the left vertical air plenum
    Installing the left vertical air plenum

Step 6

 Install the vertical plenum to the right of the horizontal air plenum. Follow step 5a to step 5c. 

Figure 15. Installing the right vertical air plenum
Installing the right vertical air plenum

Step 7

 Place the horizontal air plenum above the shelf slot in the ANSI 23-inch cabinet or rack. 

Step 8

 Install the wing head screws provided with the kit, and tighten to a torque value of 11.5 in-lb (1.3 N-m). 

Figure 16. Installing the horizontal plenum above the vertical plenums
Installing the horizontal plenum above the vertical plenums

Step 9

 Install ANSI 23-inch standard brackets on both sides of the chassis in front position. See DLP-G562 Mounting the Brackets on the ONS 15454 M6 Shelf for ETSI Rack Configuration

Step 10

 Check the length between the top and bottom horizontal air plenums where the chassis will be installed. The length must be not less than 10.5 inches (267 mm). If the length is less, adjust the position of the top horizontal plenum. 

Step 11

 Install the ONS 15454 M6 empty chassis between the horizontal plenums. 

Figure 17. Installing the ONS 15454 M6 chassis between the horizontal air plenum
Installing the ONS 15454 M6 chassis between the horizontal air plenum

Step 12

 Return to your originating procedure (NTP). 


DLP-G768 Install Pre-assembled Air Plenums in ANSI 23-inch Configuration

Purpose

 This task installs pre-assembled air plenums for the ONS 15454 M6 shelf in the ANSI 23-inch configuration. 

Tools/Equipment

  •  #2 Phillips Dynamometric screwdriver 
  •  Medium slot-head screwdriver 
  •  Small slot-head screwdriver 
  •  Screws: #12-24 x 3/4 pan-head Phillips mounting screws (8) 
  •  Wing head screws (8) 
  •  Adapter plates 
  •  One air plenum kit (horizontal and vertical air plenum) 

Required/As Needed

 As needed 

Onsite/Remote

 Onsite 

Security Level

 None 

Procedure


Step 1

 Install the ANSI 23-inch adapter plates on the horizontal air plenums. 

Step 2

 Align the screws to fix the adapter plates to the shelf. Insert the screws and tighten them to a torque value of 11.5 in-lb (1.3 N-m). 

Step 3

 Place a horizontal air plenum as the base. 

Step 4

 Install the vertical air plenum to the left of the bottom horizontal plenum. 

Step 5

 Install the wing head screws from the internal side of the horizontal plenum and tighten the screws to a torque value of 11.5 in-lb (1.3 N-m). 

Step 6

 Install the vertical air plenum to the right of the horizontal air plenum. Follow step 4. 

Step 7

 Install the horizontal air plenum above the vertical air plenums. Follow step 4. 

Figure 18. Pre-assembling the air plenums
Pre-assembling the air plenums

Step 8

 Install the ANSI 23-inch adapter plates on the horizontal air plenums. 

Step 9

 Install the wing head screws provided with the kit, and tighten to a torque value of 11.5 in-lb (1.3 N-m). 

Figure 19. Pre-assembled air plenum for ANSI 23-inch configuration
Pre-assembled air plenum for ANSI 23-inch configuration

Step 10

 Install the pre-assembled air plenums in the ANSI 23-inch rack or cabinet. 

Step 11

 Check the length between the top and bottom horizontal air plenums where the chassis will be installed. The length must be not less than 10.5 inches (267 mm). If the length is less, adjust the position of the top horizontal plenum. 

Step 12

 Install the empty ONS 15454 M6 chassis between the horizontal plenums. 

Step 13

 Return to your originating procedure (NTP). 


DLP-G769 Install Air Plenum for ONS 15454 M6 Shelf in ETSI Configuration

Purpose

 This task installs the air plenum for the ONS 15454 M6 shelf in the ETSI configuration. 

Tools/Equipment

  •  #2 Phillips Dynamometric screwdriver 
  •  Medium slot-head screwdriver 
  •  Small slot-head screwdriver 
  •  Screws: M6.0 x 20 pan-head Phillips screws (8) 
  •  Wing head screws (8) 
  •  Adapter plates 
  •  One air plenum kit (horizontal and vertical air plenum) 

Required/As Needed

 As needed 

Onsite/Remote

 Onsite 

Security Level

 None 

Procedure


Step 1

 Install the ETSI adapter plates on the horizontal air plenums. 

Step 2

 Align the screws to fix the adapter plates to the shelf. Insert the screws and tighten them to a torque value of 11.5 in-lb (1.3 N-m). 

Figure 20. Installing the adapter plates on the horizontal air plenum
Installing the adapter plates on the horizontal air plenum

Step 3

 Place the horizontal plenum below the chassis slot in the ETSI cabinet. 

Step 4

 Install the wing head screws provided with the kit, and tighten to a torque value of 11.5 in-lb (1.3 N-m). 

Figure 21. Installing the horizontal air plenum in the ETSI configuration
Installing the horizontal air plenum in the ETSI configuration

Step 5

 Install the vertical air plenum to the left of the horizontal air plenum: 

  1.  Insert the vertical plenum in the free space between the horizontal plenum and cabinet. 

  2.  Install the wing head screws from the internal side of the horizontal plenum as shown in the following figure. 

  3.  Tighten the screws to a torque value of 11.5 in-lb (1.3 N-m). 

    Figure 22. Installing the left vertical air plenum
    Installing the left vertical air plenum

Step 6

 Install the vertical air plenum to the right of the horizontal air plenum. Follow step 5a to step 5c. 

Figure 23. Installing the right vertical air plenum
Installing the right vertical air plenum

Step 7

 Place the horizontal plenum above the chassis slot in the ETSI cabinet. 

Step 8

 Install the wing head screws provided with the kit, and tighten to a torque value of 11.5 in-lb (1.3 N-m).. 

Figure 24. Installing the horizontal air plenum above the vertical plenums
Installing the horizontal air plenum above the vertical plenums

Step 9

 Install the standard brackets on both sides of the chassis in front position. See DLP-G562 Mounting the Brackets on the ONS 15454 M6 Shelf for ETSI Rack Configuration

Step 10

 Check the length between the top and bottom horizontal air plenums where the chassis will be installed. The length must be not less than 10.5 inches (267 mm). If the length is less, adjust the position of the top horizontal plenum. 

Step 11

 Install the ONS 15454 M6 empty chassis between the horizontal plenums. 

Figure 25. Installing the ONS 15454 M6 chassis below the horizontal air plenum
Installing the ONS 15454 M6 chassis below the horizontal air plenum

Step 12

 Return to your originating procedure (NTP). 


Air Flow Performance of ONS 15454 M6

The tables below summarizes the air flow performance of ONS 15454 M6:

Case

Deflector Configuration

Worst Line Card Slot (#7) Flow, CFM

Worst Controller Card Slot (#8) Flow, CFM

9600 RPM (27°C)

13500 RPM (40°C and 55°C)

9600 RPM (27°C)

13500 RPM (40°C and 55°C)

Side to Side

No deflectors

16

22.4

14.9

21

ETSI Front to Rear

Inlet and Outlet

8.2

11.2

6.9

10

ETSI Front to Side

Only Inlet

12.2

16.8

12.7

18.4

ANSI Front to Rear

Inlet and Outlet

13.4

18.7

10.6

14.7

ANSI Front to Side

Only Inlet

14.8

20.7

14.1

19.7

Case

Deflector Configuration

Bulk Chassis Flow, CFM

9600 RPM

13500 RPM

Side to Side

No deflectors

215.3

295.6

ETSI Front to Rear

Inlet and Outlet

97.7

135.8

ETSI Front to Side

Only Inlet

187.7

258.6

ANSI Front to Rear

Inlet and Outlet

120.5

166.9

ANSI Front to Side

Only Inlet

193.5

268.6

NTP-G252 Install the ONS 15454 M6 Shelf

Purpose

This procedure installs the shelf.

Tools/Equipment

  • #2 Phillips Dynamometric screwdriver
  • Medium slot-head screwdriver
  • Small slot-head screwdriver
  • ETSI only:
    • Six M6 x 20 pan-head Phillips mounting screws
  • ANSI only:
    • Six #12-24 x 3/4 pan-head Phillips mounting screws

Prerequisite Procedures

NTP-G305 Unpack and Inspect the ONS 15454, ONS 15454 M2, and ONS 15454 M6 Shelves

Required/As Needed

Required

Onsite/Remote

Onsite

Security Level

None


Warning


Stability hazard. The rack stabilizing mechanism must be in place, or the rack must be bolted to the floor before you slide the unit out for servicing. Failure to stabilize the rack can cause the rack to tip over. Statement 1048


Warning


This product requires short-circuit (overcurrent) protection, to be provided as part of the building installation. Install only in accordance with national and local wiring regulations. Statement 1045


Warning


This product relies on the building’s installation for short-circuit (overcurrent) protection. Ensure that the protective device is rated not greater than: 40A and between -40.5 VDC to -57.6 VDC. Statement 1005


Warning


This product relies on the building's installation for short-circuit (overcurrent) protection. Ensure that the protective device is rated not greater than: 10A-20A, 100-240 VAC~. Statement 1005


Warning


To prevent the system from overheating, do not operate it in an area that exceeds the maximum recommended ambient temperature of: 131°F (55°C). Statement 1047


Warning


Take care when connecting units to the supply circuit so that wiring is not overloaded. Statement 1018


Warning


To prevent bodily injury when mounting or servicing this unit in a rack, you must take special precautions to ensure that the system remains stable. The following guidelines are provided to ensure your safety:


  • This unit should be mounted at the bottom of the rack if it is the only unit in the rack.
  • When mounting this unit in a partially filled rack, load the rack from the bottom to the top with the heaviest component at the bottom of the rack.
  • If the rack is provided with stabilizing devices, install the stabilizers before mounting or servicing the unit in the rack. Statement 1006

Warning


To prevent airflow restriction, allow clearance around the ventilation openings to be at least:1 inch (25.4 mm) Statement 1076


Note


Make sure that the correct type of 19-inch ANSI rack is used for mounting the ONS 15454 M6 shelf as shown in 19-inch ANSI Rack Post Recommended for Cisco ONS 15454 M6 and M2 Shelves.

Warning


To comply with EN50121-4:2006 - Railway applications, Electromagnetic compatibility, a shielded cable must be used to connect to the EMS port. This cable must be less than 30 meters in length and not placed in the 3 meter boundary, as defined in EN50121-4:2006, Table 2, note 1. Statement 8010


Warning


To comply with EN50121-4:2006 - Railway applications, Electromagnetic compatibility, DC power cables must be less than 30 meter long. Statement 8011


Note


During installation, do not use the door to handle the chassis.

Note


Remove the door from the ONS 15454 M6 shelf and reinstall it after installing all the other modules.
Figure 26. Handling the Chassis During Installation
Handling the Chassis During Installation

Procedure


Step 1

Complete the necessary task as applicable:

Step 2

Complete the necessary task as applicable:

Step 3

Complete the necessary rack mounting task as applicable:

Step 4

Connect the chassis to the office ground. For detailed instructions on how to ground the chassis, see the Electrostatic Discharge and Grounding Guide for Cisco CPT and Cisco ONS Platforms .

Step 5

Continue with NTP-G259 Open and Remove the Standard Door of the ONS 15454 M6 Shelf.

Stop. You have completed this procedure.


DLP-G674 Verify the ONS 15454 M6 Shelf for AC Power Module Installation

Purpose

This task verifies the shelf for AC power module installation.

Tools/Equipment

None

Prerequisite Procedures

NTP-G305 Unpack and Inspect the ONS 15454, ONS 15454 M2, and ONS 15454 M6 Shelves

Required/As Needed

Required

Onsite/Remote

Onsite

Security Level

None

Procedure


Step 1

Verify the position of the mechanical locking system on the rear side of the chassis. To use the AC power module, the screw must be close to the AC silk-screen text (see the following figure).

Figure 27. AC Power Module Installation—Rear Side of the ONS 15454 M6 Shelf
AC Power Module Installation - Rear Side of the ONS 15454 M6 Shelf

Step 2

Loosen the screw and move it to the left position (towards the AC silk-screen text).

Step 3

Tighten the screw again to a torque value of 4 in-lb (0.45 N-m).


DLP-G675 Verify the ONS 15454 M6 Shelf for DC Power Module Installation

Purpose

This task verifies the shelf for DC power module installation.

Tools/Equipment

None

Prerequisite Procedures

NTP-G305 Unpack and Inspect the ONS 15454, ONS 15454 M2, and ONS 15454 M6 Shelves

Required/As Needed

Required

Onsite/Remote

Onsite

Security Level

None

Procedure


Step 1

Verify the position of the mechanical locking system on the rear side of the chassis. To use the DC power module the screw must be close to the DC silk-screen text (see the following figure).

Figure 28. DC Power Module Installation—Rear Side of the ONS 15454 M6 Shelf
DC Power Module Installation - Rear Side of the ONS 15454 M6 Shelf

Step 2

Loosen the screw and move it to the right position (towards the DC silk-screen text).

Step 3

Tighten the screw again to a torque value of 4 in-lb (0.45 N-m).

Step 4

Return to your originating procedure (NTP).


DLP-G560 Mounting the Reversible Brackets on the ONS 15454 M6 Shelf for ANSI Rack Configuration

Purpose

This task installs the reversible mounting brackets on the ONS 15454 M6 shelf for ANSI rack configuration.

Tools/Equipment

  • #2 Phillips Dynamometric screwdriver
  • Medium slot-head screwdriver
  • Small slot-head screwdriver

Prerequisite Procedures

NTP-G305 Unpack and Inspect the ONS 15454, ONS 15454 M2, and ONS 15454 M6 Shelves

Required/As Needed

As needed

Onsite/Remote

Onsite

Security Level

None


Caution


Use only the fastening hardware provided with the ONS 15454 M6 to prevent loosening, deterioration, and electromechanical corrosion of the hardware and joined material.


Caution


When mounting the ONS 15454 M6 in a frame with a nonconductive coating (such as paint, lacquer, or enamel) either use the thread-forming screws provided with the ONS 15454 M6 ship kit, or remove the coating from the threads to ensure electrical continuity.


Note


In an ANSI rack, reversible mounting brackets (19-inch or 23-inch) are used to install the shelf. The mounting brackets can be installed in the front or the middle position of the chassis.

Procedure


Step 1

To mount the reversible brackets:

Step 2

Align the mounting bracket screw holes against the shelf screw holes.

Step 3

Insert the screws and tighten them to a torque value of 11.5 in-lb (1.3 N-m).

Step 4

Repeat steps 1 through 3 for the mounting bracket on the opposite side.

The following figure shows mounting the brackets for a 19-inch (482.6-mm) configuration.

Figure 29. Mounting the Brackets on the ONS 15454 M6 shelf for a 19-inch (482.6-mm) ANSI Configuration
Mounting the Brackets on the ONS 15454 M6 shelf for a 19-inch (482.6-mm) ANSI Configuration

The following figure shows mounting the brackets for a 23-inch (584.2-mm) configuration.

Figure 30. Mounting the Brackets on the ONS 15454 M6 shelf for a 23-inch (584.2-mm) ANSI Configuration
Mounting the Brackets on the ONS 15454 M6 shelf for a 23-inch (584.2-mm) ANSI Configuration

Step 5

Return to your originating procedure (NTP).


DLP-G561 Mounting the Bracket with Air Deflectors (Front-to-Back) on the ONS 15454 M6 Shelf for ANSI Rack Configuration

Purpose

This task installs the bracket with air deflectors (front-to-back) on the ONS 15454 M6 shelf for ANSI rack configuration.

Note

 
In an ANSI rack, the air deflectors can be mounted only in the 23-inch rack configuration and in the front position of the chassis.

Tools/Equipment

  • #2 Phillips Dynamometric screwdriver
  • Medium slot-head screwdriver
  • Small slot-head screwdriver

Prerequisite Procedures

NTP-G305 Unpack and Inspect the ONS 15454, ONS 15454 M2, and ONS 15454 M6 Shelves

Required/As Needed

As needed

Onsite/Remote

Onsite

Security Level

None


Caution


Use only the fastening hardware provided with the ONS 15454 M6 to prevent loosening, deterioration, and electromechanical corrosion of the hardware and joined material.


Procedure


Step 1

(ANSI only) Place the right front air deflector flush against the right side of the chassis (see Diagram 1 of Mounting the Air Deflectors (Front-to-Back) on the ONS 15454 M6 Shelf for the ANSI rack Configuration).

Step 2

Align the screw holes on the right front air deflector with the screw holes on the right side of the chassis.

Step 3

Insert the screws and tighten them to a torque value of 11.5 in-lb (1.3 N-m).

Step 4

Place the left back air deflector flush chassis as shown in Diagram 2 of Mounting the Air Deflectors (Front-to-Back) on the ONS 15454 M6 Shelf for the ANSI rack Configuration.

Do not mount the left back deflector (exhaust air deflector), if these cards are to be installed in the ONS 15454 M6 shelf:

  • 100G-LC-C, 10x10G-LC, or CFP-LC
  • EDRA1-26, EDRA1-35, EDRA2-26, or EDRA2-35

Use the standard brackets directly to mount the ONS 15454 M6 shelf.

Step 5

Align the screw holes on the left back air deflector with the screw holes on the left side of the chassis.

Step 6

Insert the screws and tighten them to a torque value of 11.5 in-lb (1.3 N-m).

Step 7

Place the 23-inch mounting bracket flush in the front position (see Diagram 1 of Mounting the Brackets with Air Deflectors (Front-to-Back) on the ONS 15454 M6 Shelf for ANSI Rack Configuration) or in the middle position (see Diagram 3 of Mounting the Brackets with Air Deflectors (Front-to-Back) on the ONS 15454 M6 Shelf for ANSI Rack Configuration) against the right side of the chassis.

Step 8

Align the screw holes on the 23-inch mounting bracket with the screw holes on the right side of the chassis.

Step 9

Insert the screws and tighten them to a torque value of 11.5 in-lb (1.3 N-m).

Step 10

Place the 23-inch mounting bracket flush in the front position (see Diagram 1 of Mounting the Brackets with Air Deflectors (Front-to-Back) on the ONS 15454 M6 Shelf for ANSI Rack Configuration) or in the middle position (see Diagram 3 of Mounting the Brackets with Air Deflectors (Front-to-Back) on the ONS 15454 M6 Shelf for ANSI Rack Configuration) against the left side of the chassis.

Step 11

Align the screw holes on the 23-inch mounting bracket with the screw holes on the left side of the chassis.

Step 12

Insert the screws and tighten them to a torque value of 11.5 in-lb (1.3 N-m).

Figure 31. Mounting the Air Deflectors (Front-to-Back) on the ONS 15454 M6 Shelf for the ANSI rack Configuration
Mounting the Air Deflectors (Front-to-Back) on the ONS 15454 M6 Shelf for the ANSI rack Configuration
Figure 32. Mounting the Brackets with Air Deflectors (Front-to-Back) on the ONS 15454 M6 Shelf for ANSI Rack Configuration
Mounting the Brackets with Air Deflectors (Front-to-Back) on the ONS 15454 M6 Shelf for ANSI Rack Configuration

Step 13

Return to your originating procedure (NTP).


DLP-G562 Mounting the Brackets on the ONS 15454 M6 Shelf for ETSI Rack Configuration

Purpose

This task installs the mounting brackets on the ONS 15454 M6 shelf for ETSI rack configuration.

Note

 
In an ETSI rack, the mounting brackets are installed only in the front position.

Tools/Equipment

  • #2 Phillips Dynamometric screwdriver
  • Medium slot-head screwdriver
  • Small slot-head screwdriver

Prerequisite Procedures

NTP-G305 Unpack and Inspect the ONS 15454, ONS 15454 M2, and ONS 15454 M6 Shelves

Required/As Needed

As needed

Onsite/Remote

Onsite

Security Level

None


Caution


Use only the fastening hardware provided with the ONS 15454 M6 to prevent loosening, deterioration, and electromechanical corrosion of the hardware and joined material.


Caution


When mounting the ONS 15454 M6 in a frame with a nonconductive coating (such as paint, lacquer, or enamel) either use the thread-forming screws provided with the ONS 15454 M6 ship kit, or remove the coating from the threads to ensure electrical continuity.


Procedure


Step 1

Place the mounting bracket flush against the shelf as shown in the following figure.

Step 2

Align the mounting bracket screw holes against the shelf screw holes.

Step 3

Insert the screws and tighten them to a torque value of 11.5 in-lb (1.3 N-m).

Step 4

Repeat steps 1 through 3 for the mounting bracket on the opposite side.

Figure 33. Mounting the Brackets on the ONS 15454 M6 Shelf for ETSI Rack Configuration
Mounting the Brackets on the ONS 15454 M6 Shelf for ETSI Rack Configuration

Step 5

Return to your originating procedure (NTP).


DLP-G563 Mounting the Air Deflectors (Front-to-Front) on the ONS 15454 M6 Shelf for ETSI Rack Configuration

Purpose

This task installs the air deflectors (front-to-front) on the ONS 15454 M6 shelf for ETSI rack configuration.

Note

 
The air deflectors can be installed only in the front position of the chassis.

Tools/Equipment

  • #2 Phillips Dynamometric screwdriver
  • Medium slot-head screwdriver
  • Small slot-head screwdriver

Prerequisite Procedures

NTP-G305 Unpack and Inspect the ONS 15454, ONS 15454 M2, and ONS 15454 M6 Shelves

Required/As Needed

As needed

Onsite/Remote

Onsite

Security Level

None


Caution


Use only the fastening hardware provided with the ONS 15454 M6 to prevent loosening, deterioration, and electromechanical corrosion of the hardware and joined material.


Procedure


Step 1

Place the right front air deflector flush against the right side of the chassis (see the following figure).

Step 2

Align the screw holes on the right front air deflector with the screw holes on the right side of the chassis.

Figure 34. Mounting the Air Deflectors (Front-to-Front) on the ONS 15454 M6 Shelf for ETSI Rack Configuration
Mounting the Air Deflectors (Front-to-Front) on the ONS 15454 M6 Shelf for ETSI Rack Configuration

Step 3

Insert the screws and tighten them to a torque value of 11.5 in-lb (1.3 N-m).

Step 4

Place the left front air deflector flush against the left side of the chassis.

Do not mount the left front deflector (exhaust air deflector), if these cards are to be installed in the ONS 15454 M6 shelf:

  • 100G-LC-C, 10x10G-LC, or CFP-LC
  • EDRA1-26, EDRA1-35, EDRA2-26, or EDRA2-35

Use the standard brackets directly to mount the ONS 15454 M6 shelf.

Step 5

Align the screw holes on the left front air deflector with the screw holes on the left side of the chassis.

Step 6

Insert the screws and tighten them to a torque value of 11.5 in-lb (1.3 N-m).

Step 7

Return to your originating procedure (NTP).


DLP-G564 Mounting the Bracket with Air Deflectors (Front-to-Back) on the ONS 15454 M6 Shelf for ETSI Rack Configuration

Purpose

This task installs the bracket with air deflectors (front-to-back) on the ONS 15454 M6 shelf for ETSI rack configuration.

Note

 
The air deflectors can be installed only in the front position of the chassis.

Tools/Equipment

  • #2 Phillips Dynamometric screwdriver
  • Medium slot-head screwdriver
  • Small slot-head screwdriver

Prerequisite Procedures

NTP-G305 Unpack and Inspect the ONS 15454, ONS 15454 M2, and ONS 15454 M6 Shelves

Required/As Needed

As needed

Onsite/Remote

Onsite

Security Level

None


Caution


Use only the fastening hardware provided with the ONS 15454 M6 to prevent loosening, deterioration, and electromechanical corrosion of the hardware and joined material.


Procedure


Step 1

Place the right front air deflector flush against the right side of the chassis (see Diagram 1 of Mounting the Air Deflectors (Front-to-Back) on the ONS 15454 M6 Shelf for ETSI Rack Configuration).

Step 2

Align the screw holes on the right front air deflector with the screw holes on the right side of the chassis.

Step 3

Insert the screws and tighten them to a torque value of 11.5 in-lb (1.3 N-m).

Step 4

Place the left back air deflector flush against the chassis as shown in Diagram 2 of Mounting the Air Deflectors (Front-to-Back) on the ONS 15454 M6 Shelf for ETSI Rack Configuration.

Do not mount the left back deflector (exhaust air deflector), if these cards are to be installed in the ONS 15454 M6 shelf:

  • 100G-LC-C, 10x10G-LC, or CFP-LC
  • EDRA1-26, EDRA1-35, EDRA2-26, or EDRA2-35

Use the standard brackets directly to mount the ONS 15454 M6 shelf.

Step 5

Align the screw holes of the left back air deflector with the screw holes on the left side of the chassis.

Step 6

Insert the screws and tighten them to a torque value of 11.5 in-lb (1.3 N-m).

Step 7

Place the mounting bracket flush in the middle position (see Diagram 1 of Mounting the Bracket with Air Deflectors (Front-to-Back) on the ONS 15454 M6 Shelf for ETSI Rack Configuration) or the front position (see Diagram 3 of Mounting the Bracket with Air Deflectors (Front-to-Back) on the ONS 15454 M6 Shelf for ETSI Rack Configuration) against the right side of the chassis.

Step 8

Align the screw holes on the mounting bracket with the screw holes on the left side of the chassis.

Step 9

Insert the screws and tighten them to a torque value of 11.5 in-lb (1.3 N-m).

Step 10

Place the mounting bracket flush in the middle position (see Diagram 1 of Mounting the Bracket with Air Deflectors (Front-to-Back) on the ONS 15454 M6 Shelf for ETSI Rack Configuration) or the front position (see Diagram 3 of Mounting the Bracket with Air Deflectors (Front-to-Back) on the ONS 15454 M6 Shelf for ETSI Rack Configuration) against the left side of the chassis.

Step 11

Align the screw holes on the mounting bracket with the screw holes on the left side of the chassis.

Step 12

Insert the screws and tighten them to a torque value of 11.5 in-lb (1.3 N-m).

Figure 35. Mounting the Air Deflectors (Front-to-Back) on the ONS 15454 M6 Shelf for ETSI Rack Configuration
Mounting the Air Deflectors (Front-to-Back) on the ONS 15454 M6 Shelf for ETSI Rack Configuration
Figure 36. Mounting the Bracket with Air Deflectors (Front-to-Back) on the ONS 15454 M6 Shelf for ETSI Rack Configuration
Mounting the Bracket with Air Deflectors (Front-to-Back) on the ONS 15454 M6 Shelf for ETSI Rack Configuration

Step 13

Return to your originating procedure (NTP).


DLP-G565 Mounting the Bracket with Air Deflectors (Front-to-Top) on the ONS 15454 M6 Shelf for ETSI Rack Configuration

Purpose

This task installs the bracket with air deflectors (front-to-top ) on the ONS 15454 M6 shelf for ETSI rack configuration.

Tools/Equipment

  • #2 Phillips Dynamometric screwdriver
  • Medium slot-head screwdriver
  • Small slot-head screwdriver

Prerequisite Procedures

NTP-G305 Unpack and Inspect the ONS 15454, ONS 15454 M2, and ONS 15454 M6 Shelves

Required/As Needed

As needed

Onsite/Remote

Onsite

Security Level

None


Caution


Use only the fastening hardware provided with the ONS 15454 M6 to prevent loosening, deterioration, and electromechanical corrosion of the hardware and joined material.


Note


The front-to-top air deflector configuration must be used only for the bottom most chassis in the rack.


Note


Do not install a fan tray (exhaust) side deflector on a chassis that is installed above a chassis with a front-to-top air deflector configuration.


Note


The front-to-top deflector configuration can be operated at a maximum of 50C at 1800 m altitude. Only ROADM cards can be installed for this configuration.


Note


It is recommended to maintain a space of one RU between two chassis in a rack for cable management.


Note


Hot and cold aisle airflow management must be planned for the installation.


Procedure


Step 1

To install the mounting bracket with air deflectors (front-to-top) in the front position, perform Step 3 through Step 11.

Step 2

To install the mounting bracket with air deflectors (front-to-top) in the middle position, perform Step 12 through Step 23.

Step 3

Place the right front air deflector flush against the right side of the chassis (see Diagram 1 of Mounting the Bracket with Air Deflectors (Front-to-Top) on the ONS 15454 M6 Shelf for ETSI Rack Configuration- Front Position).

Step 4

Align the screw holes on the right front air deflector with the screw holes on right side of the chassis.

Step 5

Insert the screws and tighten them to a torque value of 11.5 in-lb (1.3 N-m).

Step 6

Place a mounting bracket flush against the left and right side of the chassis (see Diagram 2 of Mounting the Bracket with Air Deflectors (Front-to-Top) on the ONS 15454 M6 Shelf for ETSI Rack Configuration- Front Position).

Step 7

Align the screw holes on the mounting bracket with the screw holes on the side of the chassis.

Step 8

Insert the screws and tighten them to a torque value of 11.5 in-lb (1.3 N-m).

Step 9

Place the left top air deflector flush against the chassis as shown in Diagram 3 of Mounting the Bracket with Air Deflectors (Front-to-Top) on the ONS 15454 M6 Shelf for ETSI Rack Configuration- Front Position.

Step 10

Align the screw holes with the screw holes of the left top air deflector and the chassis (see Diagram 4 of Mounting the Bracket with Air Deflectors (Front-to-Top) on the ONS 15454 M6 Shelf for ETSI Rack Configuration- Front Position).

Step 11

Insert the screws and tighten them to a torque value of 11.5 in-lb (1.3 N-m). See Diagram 4 of Mounting the Bracket with Air Deflectors (Front-to-Top) on the ONS 15454 M6 Shelf for ETSI Rack Configuration- Front Position.

Figure 37. Mounting the Bracket with Air Deflectors (Front-to-Top) on the ONS 15454 M6 Shelf for ETSI Rack Configuration- Front Position
Mounting the Bracket with Air Deflectors (Front-to-Top) on the ONS 15454 M6 Shelf for ETSI Rack Configuration - Front Position

Step 12

Place the right front air deflector flush against the right side of the chassis (see Diagram 1 of Mounting the Bracket with Air Deflectors (Front-to-Top) on the ONS 15454 M6 Shelf for ETSI Rack Configuration - Middle Position ).

Step 13

Align the screw holes on the right front air deflector with the screw holes on the right side of the chassis.

Step 14

Insert M4 pan-head screws and tighten them to a torque value of 11.5 in-lb (1.3 N-m).

Step 15

Place the mounting bracket flush in the middle position on the right front air deflector (see Diagram 2 of Mounting the Bracket with Air Deflectors (Front-to-Top) on the ONS 15454 M6 Shelf for ETSI Rack Configuration - Middle Position ).

Step 16

Align the screw holes on the mounting bracket with the screw holes on the right front air deflector .

Step 17

Insert M4 flat-head screws and tighten them to a torque value of 11.5 in-lb (1.3 N-m).

Step 18

Place the left top air deflector flush against the left side chassis as shown in Diagram 3 of Mounting the Bracket with Air Deflectors (Front-to-Top) on the ONS 15454 M6 Shelf for ETSI Rack Configuration - Middle Position .

Step 19

Align the screw holes on the left top air deflector with the screw holes on the left side of the chassis.

Step 20

Insert M4 pan-head screws and tighten them to a torque value of 11.5 in-lb (1.3 N-m).

Step 21

Place the mounting bracket flush in the middle position on the left top air deflector (see Diagram 4 ofMounting the Bracket with Air Deflectors (Front-to-Top) on the ONS 15454 M6 Shelf for ETSI Rack Configuration - Middle Position ).

Step 22

Align the screw holes on the mounting bracket with the screw holes on the left top air deflector.

Step 23

Insert M4 flat-head screws and tighten them to a torque value of 11.5 in-lb (1.3 N-m).

Figure 38. Mounting the Bracket with Air Deflectors (Front-to-Top) on the ONS 15454 M6 Shelf for ETSI Rack Configuration - Middle Position
Mounting the Bracket with Air Deflectors (Front-to-Top) on the ONS 15454 M6 Shelf for ETSI Rack Configuration - Middle Position

Step 24

Return to your originating procedure. (NTP).


DLP-G821 Mounting the Bracket with Air Deflectors (Front-to-Side) on the ONS 15454 M6 Shelf for ETSI Rack Configuration

Purpose

This task installs the bracket with air deflectors (front-to-side) on the ONS 15454 M6 shelf for ETSI rack configuration.

Tools/Equipment

  • #2 Phillips Dynamometric screwdriver
  • Medium slot-head screwdriver
  • Small slot-head screwdriver

Prerequisite Procedures

NTP-G305 Unpack and Inspect the ONS 15454, ONS 15454 M2, and ONS 15454 M6 Shelves

Required/As Needed

As needed

Onsite/Remote

Onsite

Security Level

None


Caution


Use only the fastening hardware provided with the ONS 15454 M6 to prevent loosening, deterioration, and electromechanical corrosion of the hardware and joined material.


Note


It is recommended to maintain a space of one RU between two chassis in a rack for cable management


Note


Hot and cold aisle airflow management must be planned for the installation.


Procedure


Step 1

Place the right front air deflector flush against the right side of the chassis (see diagram below).

Figure 39. Mounting the Bracket with Air Deflectors (Front-to-Side) on the ONS 15454 M6 Shelf for ETSI Rack Configuration

Step 2

Align the screw holes on the right front air deflector with the screw holes on the right side of the chassis.

Step 3

Insert M4 pan-head screws and tighten them to a torque value of 11.5 in-lb (1.3 N-m).

Step 4

Place the mounting bracket flush in the middle or front position of the right front air deflector (see Diagram 1 of Mounting the Bracket with Air Deflectors (Front-to-Side) on the ONS 15454 M6 Shelf for ETSI Rack Configuration - Middle Position or Mounting the Bracket with Air Deflectors (Front-to-Side) on the ONS 15454 M6 Shelf for ETSI Rack Configuration - Front Position).

Step 5

Align the screw holes on the mounting bracket with the screw holes on the right front air deflector .

Step 6

Insert M4 flat-head screws and tighten them to a torque value of 11.5 in-lb (1.3 N-m).

Step 7

Place the mounting bracket flush in the middle or front position on the left side of the chassis (see Diagram 2 of Mounting the Bracket with Air Deflectors (Front-to-Side) on the ONS 15454 M6 Shelf for ETSI Rack Configuration - Middle Position or Mounting the Bracket with Air Deflectors (Front-to-Side) on the ONS 15454 M6 Shelf for ETSI Rack Configuration - Front Position).

Step 8

Align the screw holes on the mounting bracket with the screw holes on the left side of the chassis.

Step 9

Insert M4 pan-head screws and tighten them to a torque value of 11.5 in-lb (1.3 N-m).

Figure 40. Mounting the Bracket with Air Deflectors (Front-to-Side) on the ONS 15454 M6 Shelf for ETSI Rack Configuration - Middle Position
Figure 41. Mounting the Bracket with Air Deflectors (Front-to-Side) on the ONS 15454 M6 Shelf for ETSI Rack Configuration - Front Position

Step 10

Return to your originating procedure (NTP).


DLP-G566 Mount the ONS 15454 M6 Shelf on a Rack (One Person)

Purpose

This task allows one person to mount the shelf on a rack.

Note

 
When the chassis is installed in the middle position, in an ETSI rack, the cabinet doors must be kept open (if present).

Tools/Equipment

  • # 2 Phillips Dynamometric screwdriver
  • ANSI—Six #12-24 x ¾ pan-head Phillips mounting screws
  • ETSI—Six M6 mounting screws

Prerequisite Procedures

NTP-G305 Unpack and Inspect the ONS 15454, ONS 15454 M2, and ONS 15454 M6 Shelves

Required/As Needed

As needed

Onsite/Remote

Onsite

Security Level

None


Note


The ONS 15454 M6 requires a minimum of six RU of vertical rack space. To ensure that the mounting is secure, use two to three M6 mounting screws on each side of the shelf. A shelf should be mounted at the bottom of the rack if it is the only unit in the rack.

Procedure


Step 1

Verify that the proper fuse and alarm panel has been installed in the top mounting space. If a fuse and alarm panel is not present, you must install one according to manufacturer instructions:

  • For a DC power supply, the fuse rating must not exceed 40A.
  • For an AC power supply, the fuse rating must not exceed 10A, 15A, or 20A. For North America, the branch circuit protection must be rated 20A. The overcurrent/short circuit protection must be in accordance with local and national electrical codes.

Step 2

Ensure that the shelf is mounted on the appropriate rack equipment:

Diagram 1 of Mounting an ONS 15454 M6 on a Rack shows the ONS 15454 M6 shelf mounted on an ANSI rack in the middle position using 19-inch mounting brackets.

Diagram 2 of Mounting an ONS 15454 M6 on a Rack shows the ONS 15454 M6 shelf mounted on an ETSI rack in the front position.

Figure 42. Mounting an ONS 15454 M6 on a Rack
Mounting an ONS 15454 M6 on a Rack

Step 3

Lift the shelf to the desired position in the rack. If the rack is empty, place the shelf at the bottom of the rack. The placement of the shelf is dependent on where you want to install the new equipment in the rack.

Note

 
To ensure proper cooling of the ONS 15454 M6 shelf, make sure that the space in front of the air flow vents are free of cables, fibers, and mechanical fixtures for fiber and cable management.

Step 4

Align the screw holes on the mounting brackets with the mounting holes in the rack.

Step 5

Using the Phillips Dynamometric screwdriver, install one mounting screw in each side of the assembly. Tighten the screw to a torque value of 22 in-lb (2.5 N-m).

Step 6

When the shelf is secured to the rack, install the remaining two mounting screws on either sides.

Note

 
Use at least one set of the horizontal screw slots on the shelf to prevent slippage.

Step 7

Return to your originating procedure (NTP).


DLP-G567 Mount the ONS 15454 M6 Shelf on a Rack (Two People)

Purpose

This task allows two people to mount the shelf on a rack.

Note

 
When the chassis is installed in the middle position, in an ETSI rack, the cabinet doors must be kept open (if present).

Tools/Equipment

  • # 2 Phillips Dynamometric screwdriver
  • ETSI only:
    • Six M6 x 20 pan-head Phillips mounting screws
  • ANSI only:
    • Six #12-24 x 3/4 pan-head Phillips mounting screws

Prerequisite Procedures

NTP-G305 Unpack and Inspect the ONS 15454, ONS 15454 M2, and ONS 15454 M6 Shelves

Required/As Needed

As needed

Onsite/Remote

Onsite

Security Level

None


Note


The ONS 15454 M6 requires a minimum of six RU of vertical rack space. To ensure that the mounting is secure, use two to three M6 mounting screws on each side of the shelf. A shelf should be mounted at the bottom of the rack if it is the only unit in the rack.

Procedure


Step 1

Verify that the proper fuse and alarm panel has been installed in the top mounting space. If a fuse and alarm panel is not present, you must install one as per the instructions of the manufacturer:

  • For a a DC power supply, the fuse rating must not exceed 40A.
  • For an AC power supply, the fuse rating must not exceed 10A, 15A, or 20A. For North America, the branch circuit protection must be rated 20A. The overcurrent/short circuit protection must be in accordance with local and national electrical codes.

Step 2

Ensure that the shelf is mounted on the appropriate rack equipment:

  • 23-inches (584.2 mm) or 19-inches (482.6 mm) for ANSI racks.
  • 600 x 600-mm (23.6 x 23.6-inch) or 600 x 300-mm (23.6 x 11.8-inch) for ETSI racks.

Step 3

Lift the shelf to the desired position in the rack. If the rack is empty, place the shelf at the bottom of the rack. The placement of the shelf is dependent on where you want to install the new equipment in the rack.

Note

 
To ensure proper cooling of the ONS 15454 M6 shelf, make sure that the space in front of the air flow vents are free of cables, fibers, and mechanical fixtures for fiber and cable management.

Step 4

Align the screw holes on the mounting brackets with the mounting holes in the rack.

Step 5

Have one person hold the shelf in place while the other person uses the Phillips Dynamometric screwdriver to install one mounting screw in each side of the assembly. Tighten the screw to a torque value of 22 in-lb (2.5 N-m).

Step 6

When the shelf is secured to the rack, install the remaining mounting screws.

Note

 
Use at least one set of the horizontal screw slots on the shelf to prevent slippage.

Step 7

Return to your originating procedure (NTP).


DLP-G568 Mount Multiple ONS 15454 M6 Shelves on a Rack

Purpose

This task installs multiple shelves in a rack.

Tools/Equipment

  • #2 Phillips Dynamometric screwdriver
  • ETSI only:
    • Six M6 x 20 pan-head Phillips mounting screws, per shelf
  • ANSI only:
    • Six #12-24 x 3/4 pan-head Phillips mounting screws, per shelf

Prerequisite Procedures

NTP-G305 Unpack and Inspect the ONS 15454, ONS 15454 M2, and ONS 15454 M6 Shelves

Required/As Needed

As needed

Onsite/Remote

Onsite

Security Level

None


Note


A standard rack can hold six or seven ONS 15454 M6 shelves. When mounting a shelf in a partially filled rack, load the rack from the bottom to the top with the heaviest component at the bottom of the rack. If the rack is provided with stabilizing devices, install the stabilizers before mounting or servicing the unit in the rack.

Note


The ONS 15454 M6 requires a minimum of six RU of vertical rack space.

Procedure


Step 1

Verify that the proper fuse and alarm panel has been installed in the top mounting space. If a fuse and alarm panel is not present, you must install one according to manufacturer’s instructions:

  • For a DC power supply, the fuse rating must not exceed 40A.
  • For AC power supply, the fuse rating must not exceed 20A.

Step 2

Mount the first shelf in the bottom of the rack using the DLP-G566 Mount the ONS 15454 M6 Shelf on a Rack (One Person) or the DLP-G567 Mount the ONS 15454 M6 Shelf on a Rack (Two People).

Diagram 1 of Multiple ONS 15454 M6 Shelves Mounted on the Rack shows multiple ONS 15454 M6 shelf assemblies mounted on the ANSI rack.

Diagram 2 of Multiple ONS 15454 M6 Shelves Mounted on the Rack shows multiple ONS 15454 M6 shelf assemblies mounted on the ETSI rack.

Figure 43. Multiple ONS 15454 M6 Shelves Mounted on the Rack
Multiple ONS 15454 M6 Shelves Mounted on the

Step 3

Repeat step 2 for every shelf you need to install.

Step 4

Return to your originating procedure (NTP).


Front Door

The front door of the ONS 15454 M6 provides access to the shelf, fiber-routing tray, fan-tray assembly, and LCD screen.

There are two types of front doors that act as protective panels—standard door and deep-front panel. The deep-front panel provides additional space in front of the shelf to accommodate cables that do not fit inside the standard door. It also provides more space for fiber bend radius and to manage the line card connections.The deep-front panel does not have a hinge and cannot be rotated like the standard door. The fiber or cable guide used in the ONS 15454 M6 shelf provides improved fiber management.

If a standard front door was ordered, the ONS 15454 M6 is shipped with a preinstalled standard door. If a deep-front panel was ordered, a temporary front door is preinstalled on the shelf and the deep-front panel is present in a separate package. If no door was ordered, a temporary front door is preinstalled on the shelf.


Note


The temporary door is used only for shipping purpose and must not be used in the chassis. The temporary door can be opened by removing the tape that is present on top of the door.

You must remove the door before proceeding with the shelf installation.

The ONS 15454 M6 door can be opened by loosening the front screws and pushing the latch in the opposite direction. You can remove the front door to provide unrestricted access to the front of the shelf.

An erasable label is pasted on the inside of the front door. You can use the label to record slot and port assignments, card types, node ID, rack ID, and serial number of the ONS 15454 M6 shelf.

The following figure shows the erasable label on the ONS 15454 M6 shelf.

Figure 44. ONS 15454 M6 Front-Door Erasable Label
ONS 15454 M6 Front-Door Erasable Label

The laser warning label is placed on top of the chassis.

The following figure shows the ONS 15454 M6 laser warning.

Figure 45. Laser Warning on the ONS 15454 M6
Laser Warning on the ONS 15454 M6

The following figure shows the label that is placed on top of ONS 15454 M6:

Figure 46. ONS 15454 M6 Label
ONS 15454 M6 Label
Figure 47. ONS 15454 M6 Front Door Label
ONS 15454 M6 Front Door Label

NTP-G258 Install the Standard Door of the ONS 15454 M6 Shelf

Purpose

This procedure installs the standard door of the ONS 15454 M6 shelf.

Tools/Equipment

#2 Phillips Dynamometric screwdriver

Prerequisite Procedures

Required/As Needed

As needed

Onsite/Remote

Onsite

Security Level

None

Procedure


Step 1

Pull the hinge pins on the standard door in the opposite directions (see the following figure).

Figure 48. Installing the Standard Door
Installing the Standard Door

Step 2

Align the standard door hinges with the chassis hinges.

Step 3

Release the hinge pins.

Step 4

Pull the retention feature from the door (see Mounting the Mechanical Stop).

Step 5

Loosen the screws and place the mechanical stop on the retention feature. (See Diagram 1 of Mounting the Mechanical Stop.)

Step 6

Place the retention feature on the pin present on the chassis. (See Diagram 2 of Mounting the Mechanical Stop.)

Step 7

Raise the door to slide the pin. (See Diagram 3 of Mounting the Mechanical Stop.)

Step 8

Slide the mechanical stop to lock the door position and tighten the screws. (See Diagram 4 of Mounting the Mechanical Stop.)

Note

 
Reinstall the door after installing all the other modules.
Figure 49. Mounting the Mechanical Stop
Mounting the Mechanical Stop
Figure 50. Retention Feature and Ground Strap Cable—Standard Door
Retention Feature and Ground Strap Cable - Standard Door

Step 9

Place the ground strap cable (see Retention Feature and Ground Strap Cable—Standard Door) on the door and the chassis and tighten the nuts to a torque value of 11.5 in-lb (1.3 N-m) to lock the cable.

Step 10

Tighten the door screws to a torque value of 6.5 in-lb (0.75 N-m) to close the standard door as shown in the following figure.

Figure 51. Closing the Standard Door of the ONS 15454 M6 Shelf
Closing the Standard Door of the ONS 15454 M6 Shelf

Stop. You have completed this procedure.


NTP-G259 Open and Remove the Standard Door of the ONS 15454 M6 Shelf

Purpose

This procedure opens and removes the standard door of the ONS 15454 M6 shelf.

Tools/Equipment

#2 Phillips Dynamometric screwdriver

Prerequisite Procedures

Required/As Needed

Required

Onsite/Remote

Onsite

Security Level

None

Procedure


Step 1

Complete the DLP-G576 Open the Standard Door of the ONS 15454 M6 Shelf.

Step 2

Complete the DLP-G577 Remove the Standard Door of the ONS 15454 M6 Shelf.

Stop. You have completed this procedure.


DLP-G576 Open the Standard Door of the ONS 15454 M6 Shelf

Purpose

This task opens the standard door of the ONS 15454 M6 shelf.

Tools/Equipment

#2 Phillips Dynamometric screwdriver

Prerequisite Procedures

Required/As Needed

Required

Onsite/Remote

Onsite

Security Level

None


Note


The ONS 15454 M6 shelf has an ESD plug input and is shipped with an ESD wrist strap. The ESD plug input is located on the outside of the shelf on the left side. It is labeled “ESD” on the top and bottom. Always wear an ESD wrist strap and connect the strap to the ESD plug when working on the ONS 15454 M6. For detailed instructions on how to wear the ESD wristband, see the Electrostatic Discharge and Grounding Guide for Cisco CPT and Cisco ONS Platforms.

Procedure


Step 1

Loosen the standard door screws to a torque value of 6.5 in-lb (0.75 N-m) (see the following figure).

Step 2

Push the latches in the opposite direction as shown in the following figure.

Figure 52. Opening the Standard Door
Opening the Standard Door

Step 3

Swing the door open. The retention feature maintains the door in the horizontal position for line card insertion (see the following figure).

Figure 53. Cisco ONS 15454 M6 Standard Door—Opened
Cisco ONS 15454 M6 Standard Door - Opened

Step 4

Return to your originating procedure (NTP).


DLP-G577 Remove the Standard Door of the ONS 15454 M6 Shelf

Purpose

This task removes the standard door of the ONS 15454 M6 shelf.

Tools/Equipment

None

Prerequisite Procedures

DLP-G576 Open the Standard Door of the ONS 15454 M6 Shelf

Required/As Needed

As needed

Onsite/Remote

Onsite

Security Level

None

Procedure


Step 1

Unscrew the nut holding the ground cable to the shelf. Remove the nut.

Step 2

Remove the ground cable from the shelf (see the following figure).

Figure 54. Removing the ONS 15454 M6 Standard Door
Removing the ONS 15454 M6 Standard Door

Step 3

Loosen the screws and slide the mechanical stop to unlock the door.

Step 4

Lower the door to slide the pin.

Step 5

Remove the retention feature from the pin present on the chassis.

Step 6

Pull the hinge pins holding the door to the chassis, in the opposite direction (see the following figure).

Step 7

Remove the door from its hinges (see the following figure).

Figure 55. Removing the ONS 15454 M6 Standard Door
Removing the ONS 15454 M6 Standard Door

Step 8

Return to your originating procedure (NTP).


NTP-G327 Install the Deep-Front Panel of the ONS 15454 M6 Shelf

Purpose

This procedure installs the deep-front panel of the ONS 15454 M6 shelf.

Tools/Equipment

2 Phillips Dynamometric screwdriver

Socket (6/32 standard) and socket wrench to tighten or loosen the ground nut

Prerequisite Procedures

Remove the temporary door by removing the tape on top of the door.

Required/As Needed

As needed

Onsite/Remote

Onsite

Security Level

None


Note


Use the deep-front panel when ONS-SC+-10G-C pluggables are installed on ONS 15454 M6 shelf.

Note


When the deep front-panel is installed, the total chassis depth is 12.9 inches. The deep front-panel extends from the rack by 1.8 inches.


Caution


The deep-front panel does not have a hinge and cannot be rotated like a standard door. Rotating the deep-front panel can damage the deep-front panel, shelf hinges, other devices and cables placed below the ONS 15454 M6 shelf.


Procedure


Step 1

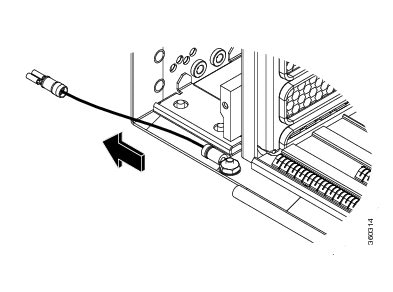
Connect the ground strap cable to the shelf:

  1. Loosen and remove the ground nut from the shelf.

  2. Insert the lug of the ground strap cable and tighten the nut on the shelf to a torque value of 11.5 in-lb (1.3 N-m). See the following figure.

  3. Route the other end of the ground strap cable outside the shelf at an angle of 180 degrees towards the left.

    Figure 56. Insert the lug
    Insert the lug

Step 2

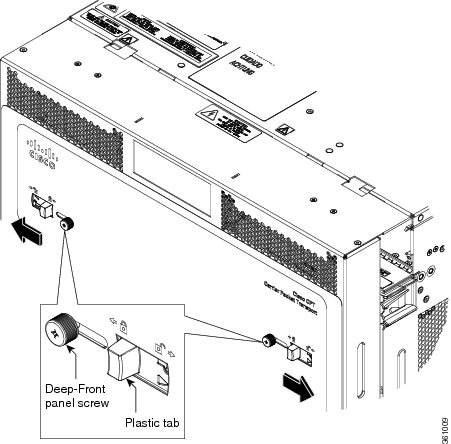
Loosen the deep-front panel screws and slide them outwards using the plastic tabs.

Step 3

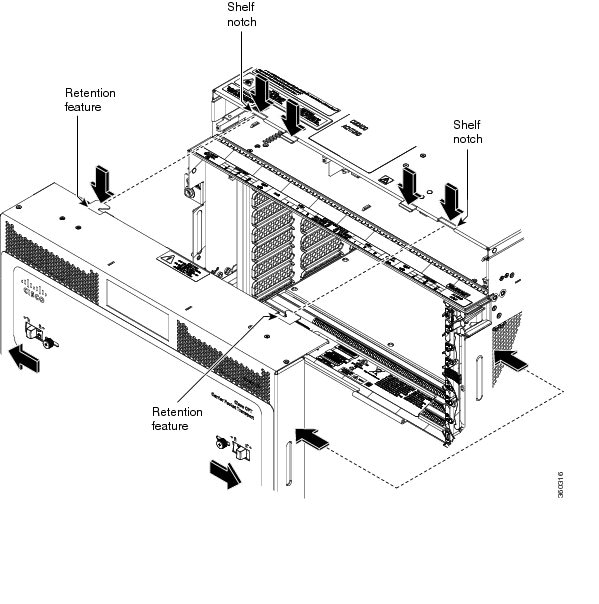
Place the deep-front panel close to the shelf so that the shelf notches, and the deep-front panel retention features are in line, as shown in the following figure.

Figure 57. Placing Deep-Front Panel and Shelf in line
Placing Deep-Front Panel and Shelf in line

Step 4

Align the deep-front panel with the shelf by performing these sub-steps at the same time.

  1. Align the right and left retention features of the deep-front panel with the right and left notches present on the top of the shelf (see the following figure).

  2. Align the deep-front panel pins present at the bottom of the panel with the shelf hinges (see the following figure).

    Figure 58. Aligning the Deep-Front Panel Pins and Shelf hinges
    Aligning the Deep-Front Panel Pins and Shelf hinges

    The following figure shows the deep-front panel aligned with the shelf.

    Figure 59. Aligning the Deep-Front Panel and Shelf
    Aligning the Deep-Front Panel and Shelf

Step 5

Slide the deep-front panel screws inwards using the plastic tabs to engage the retention features and the pins with the shelf notches and hinges (see the following figure). Verify the engagement by gently applying outward pressure to the panel.

Figure 60. Engaging the Deep-Front Panel and Shelf
Engaging the Deep-Front Panel and Shelf

Step 6

Lock the deep-front panel by tightening the screws to a torque value of 6.5 in-lb (0.75 N-m).

Step 7

Connect the other end of the ground strap cable to the ground point present on the deep-front panel exterior (see the following figure).

Figure 61. Connecting ground strap cable to the ground point
Connecting ground strap cable to the ground point

Stop. You have completed this procedure.


NTP-G329 Remove the Deep-Front Panel of the ONS 15454 M6 Shelf 

Purpose

 This procedure removes the deep-front panel of the ONS 15454 M6 system. 

Tools/Equipment

  •  #2 Phillips Dynamometric screwdriver 
  •  Socket (6/32 standard) and socket wrench to tighten or loosen the ground nut 

Prerequisite Procedures

Required/As Needed

 Required 

Onsite/Remote

 Onsite 

Security Level

 None 


Caution


 The deep-front panel does not have a hinge and cannot be rotated like a standard door. Rotating the deep-front panel can damage the deep-front panel, shelf hinges, other devices and cables placed below the ONS 15454 M6 shelf. 


Note


When the deep front-panel is installed, the total chassis depth is 12.9 inches. The deep front-panel extends from the rack by 1.8 inches. 


Procedure


Step 1

 Remove the end of the ground strap cable that is connected to the exterior of the deep-front panel (see the following figure). 

Figure 62. Removing the end of the ground strap cable
Removing the end of the ground strap cable

Step 2

 Loosen the deep-front panel screws and slide them outwards using the plastic tabs to open the deep-front panel as shown in the following figure. 

Figure 63. Moving the deep-front panel to disengage

Step 3

 Move the deep-front panel away from the shelf (see the following figure). 

Figure 64. Moving the deep-front panel away
Moving the deep front panel away

Step 4

 Remove the ground strap cable from the shelf (see the following figure). 

Figure 65. Removing the ground strap cable
Removing the ground strap cable
  1.  Loosen the ground nut on the shelf. 

  2.  Remove the lug and tighten the nut on the shelf to a torque value of 11.5 in-lb (1.3 N-m). 

     Stop. You have completed this procedure.


External Connection Units

The external connection unit (ECU) is a replaceable module placed on top of the ONS 15454 M6 shelf. The ECU module discovers and manages the inventory of the external shelf units. It also handles the multishelf management connections and timing synchronizations. There are three types of ECU modules available for the ONS 15454 M6 shelf, namely ECU (PN: 15454-M6-ECU=), ECU2 (PN: 15454-M6-ECU2=), ECU-60V (PN: 15454-M6-ECU-60=), ECU-S, and ECU60-S.

The ECU and ECU2 modules can be interchanged on an ONS 15454 M6 shelf without any alarms.

A label, as shown in the following figure, is present on the ONS 15454 M6 shelf indicating the connections for the ECU module.

Figure 66. Connector Label for ECU Module
Connector Label for ECU Module

ECU

The external connections of ONS 15454 M6 present on the ECU are:

  • 12 remote inventory standard USB connections
  • 2 BITS-OUT connections (2 subminiature version B [SMB] connectors for ETSI and 4 wire-wrap pins for ANSI)
  • 2 BITS-IN connections (2 SMB connectors for ETSI and 4 wire-wrap pins for ANSI)
  • 6 multishelf connections
  • 1 element management system (EMS) connection
  • 1 craft terminal connection
  • 2 VoIP or 2 user data channel (UDC) connections, or one each of VoIP and UDC connections
  • 1 SCSI with 26 poles for TNC and TNCE relay contact, including alarm cut-off (ACO) signal and digital I/O (D-I/O) signals (on the left-side connector)
  • 1 SCSI with 26 poles for digital I/O signals (on the right-side connector)

The following figure shows the ECU connectors.

Figure 67. Connectors on the ECU Faceplate
Connectors on the ECU Faceplate

Note


The ECU should not be used when the shelf is powered at –60V DC nominal input voltage.

ECU2

The ECU2 is an advanced version of the ECU. The ECU2 is hardware-ready to support IEEE1588v2 PTP, time-of-day (ToD), and pulse-per-second (PPS) inputs. The external connections of ONS 15454 M6 present on the ECU2 are:

  • 12 remote inventory standard USB connections
  • 2 BITS-OUT connections (2 subminiature version B[SMB] connectors for ETSI and 4 wire-wrap pins for ANSI)
  • 10 MHz IN and OUT and PPS IN and OUT (hardware-ready)
  • 2 BITS-IN connections (2 SMB connectors for ETSI and 4 wire-wrap pins for ANSI)
  • 6 multishelf connections
  • 1 element management system (EMS) connection
  • 1 craft terminal connection
  • 1 time-of-day (ToD) connection (hardware-ready)
  • 2 VoIP or 2 user data channel (UDC) connections, or one each of VoIP and UDC connections
  • 1 SCSI with 26 poles for TNC relay contact, including alarm cut-off (ACO) signal and digital I/O (D-I/O) signals (on the left-side connector)
  • 1 SCSI with 26 poles for digital I/O signals (on the right-side connector)

The following figure shows the ECU2 connectors.

Figure 68. Connectors on ECU2 Faceplate
Connectors on ECU2 Faceplate

Note


The ECU2 should not be used when the shelf is powered at –60 VDC nominal input voltage.

ECU-60V

The ECU-60V is used when the shelf is powered at –60 VDC nominal input voltage. The external connections of ONS 15454 M6 present on the ECU-60V are:

  • 12 remote inventory standard USB connections
  • 2 BITS-OUT connections (2 subminiature version B [SMB] connectors for ETSI and 4 wire-wrap pins for ANSI)
  • 10 MHz IN and OUT and PPS IN and OUT (hardware-ready)
  • 2 BITS-IN connections (2 SMB connectors for ETSI and 4 wire-wrap pins for ANSI)
  • 6 multishelf connections
  • 1 element management system (EMS) connection
  • 1 craft terminal connection
  • 1 time-of-day (ToD) connection (hardware-ready)
  • 2 user data channel (UDC) connections

The following figure shows the ECU-60V connectors.

Figure 69. Connectors on ECU-60V Faceplate
Connectors on ECU-60V Faceplate

ECU-S

ECU-S is a new type of ECU introduced in Release 10.5.2 for ONS 15454 M6. The ECU-S module also discovers and manages the inventory of the external shelf units. It also handles the multishelf management connections and timing synchronizations. The ECU-S module available for the ONS 15454 M6 shelf is 15454-M6-ECU-S=. The ONS 15454 M6 ECU-S is backward-compatible with Release 10.1, 10.3, and 10.5. However, there is a small difference in the port numbers detected. The details are listed in the section below.


Note


The NCS 2006 ECU-S should not be used when the shelf is powered at –60V DC nominal input voltage.

The following figure shows the ONS 15454 M6 ECU-S connectors.

Figure 70. Connectors on the ONS 15454 M6 ECU-S Faceplate
Connectors on the ONS 15454 M6 ECU-S Faceplate

1

1 SCSI with 26 poles for TNC relay contact, including ACO signal and digital I/O signals

2

USB 2.0 ports (Ports A1, A2, A3, A4) and USB 3.0 port (Port A5)

3

VOIP/UDC port (RJ-45 port)

4

EMS port (RJ-45 port)

5

Three MSM ports

6

BITS1 input and output ports

7

BITS2 input and output ports

8

Three MSM ports

9

Craft terminal port

10

VOIP/UDC port (RJ-45 port)

11

USB 2.0 ports (Ports B1, B2, B3, B4) and USB 3.0 port (Port B5)

12

1 SCSI with 26 poles for digital I/O signal

The ONS 15454 M6 ECU-S supports IEEE1588v2 PTP, time-of-day (ToD), and pulse-per-second (PPS) inputs. To support high power USB devices, ONS 15454 M6 ECU-S provides a current of 500 mA to each of the ports. The IMPROPRMVL alarm is raised in CTC when the ECU-S is removed from the NCS 2006 shelf.


Note


When ONS 15454 M6 is pre-provisioned, or plugged in without the ECU-S unit, by default, CTC uses the ECU module with the 12 USB 2.0 ports.

The fiber shuffle unit, which can be used to interface 14 single slot passive optical modules can be connected to the ONS 15454 M6 ECU-S using the USB 3.0 port.

The MPO-fan-out unit, which can be used to interface 10 double slot passive optical modules can be connected to the ONS 15454 M6 ECU-S using the USB 3.0 port.

The external connections present on the ONS 15454 M6 ECU-S are:

  • 2 USB 3.0 connections
    • The USB 3.0 port on the left of the faceplate is detected as A5.
    • The USB 3.0 port on the left of the faceplate is detected as B5.
  • 8 USB 2.0 connections
    • 4 USB 2.0 on the left of the faceplate are detected as A1, A2, A3, A4.
    • 4 USB 2.0 ports on the right of the faceplate are detected as B1, B2, B3, B4. In Release 10.1, 10.3, and 10.5, these ports are detected as A5, A6, B1, B2 respectively.
  • 2 BITS-OUT connections (2 subminiature version B [SMB] connectors for ETSI and 4 wire-wrap pins for ANSI)
  • 10 MHz IN and OUT and PPS IN and OUT (hardware-ready)
  • 2 BITS-IN connections (2 SMB connectors for ETSI and 4 wire-wrap pins for ANSI)
  • 6 multishelf connections
  • 1 element management system (EMS) connection
  • 1 craft terminal connection
  • 1 time-of-day (ToD) connection (hardware-ready)
  • 2 VoIP or 2 user data channel (UDC) connections, or one each of VoIP and UDC connections
  • 1 SCSI with 26 poles for TNC relay contact, including alarm cut-off (ACO) signal and digital I/O (D-I/O) signals (on the left-side connector)
  • 1 SCSI with 26 poles for digital I/O signals (on the right-side connector)

ECU60-S

ECU60-S is a new type of ECU-S introduced for the ONS 15454 M6 when the shelf is powered at –60 VDC nominal input voltage. The ECU60-S module available for the ONS 15454 M6 shelf is 15454 M6-ECU60-S=.

The following figure shows the ONS 15454 M6 ECU60-S connectors.

Figure 71. Connectors on the ONS 15454 M6 ECU60-S Faceplate
Connectors on the ONS 15454 M6 ECU60-S Faceplate

1

USB 2.0 ports (Ports 1 through 4 and ports 7 through 10)

2

USB 3.0 ports (Ports 5 and 11)

3

VOIP/UDC ports (RJ-45 port)

4

EMS port (RJ-45 port)

5

MSM ports

6

Craft terminal connection

The ONS 15454 M6 ECU60-S supports IEEE1588v2 PTP, time-of-day (ToD), and pulse-per-second (PPS) inputs. The IMPROPRMVL alarm is raised in CTC when the ECU60-S is removed from the ONS 15454 M6 shelf.


Note


When ONS 15454 M6 is pre-provisioned, or plugged in without the ECU60-S unit, by default, CTC uses the ECU module with the 12 USB 2.0 ports.

The fiber shuffle unit or the NCS2K-MF-6RU unit, which can be used to interface 14 single slot passive optical modules can be connected to the ONS 15454 M6 ECU60-S using the USB 3.0 port.

The MPO-fan-out unit or the NCS2K-MF10-6RU unit, which can be used to interface 10 double slot passive optical modules can be connected to the ONS 15454 M6 ECU60-S using the USB 3.0 port.

The ONS 15454 M6 ECU60-S is backward-compatible with releases prior to 10.5.2.

The external connections present on the NCS 2006 ECU60-S are:

  • 2 USB 3.0 connections
    • The USB 3.0 port on the left of the faceplate is detected as A5.
    • The USB 3.0 port on the left of the faceplate is detected as B5.
  • 8 USB 2.0 connections
    • 4 USB 2.0 on the left of the faceplate are detected as A1, A2, A3, A4.
    • 4 USB 2.0 ports on the right of the faceplate are detected as B1, B2, B3, B4. In releases prior to 10.5.2, these ports are detected as A5, A6, B1, B2 respectively.
  • 2 BITS-OUT connections (2 subminiature version B [SMB] connectors for ETSI and 4 wire-wrap pins for ANSI)
  • 10 MHz IN and OUT and PPS IN and OUT (hardware-ready)
  • 2 BITS-IN connections (2 SMB connectors for ETSI and 4 wire-wrap pins for ANSI)
  • 6 multishelf connections
  • 1 element management system (EMS) connection
  • 1 craft terminal connection
  • 1 time-of-day (ToD) connection (hardware-ready)
  • 2 VoIP or 2 user data channel (UDC) connections, or one each of VoIP and UDC connections

Note


POE functionality is not available for the VOIP ports.

You can upgrade to the NCS2006 ECU60-S from an older ECU (ECU/ECU-2/ECU-S) in the ONS 15454 M6 shelf. For more information, see NTP-L68 Upgrading to ONS 15454 M6 ECU60-S Module.

Alarm Connectors

The ECU modules, except for ECU-60V, have two SCSI alarm connectors that are used to connect ONS 15454 M6 to support external alarms. The alarm connectors provide dry alarm contacts and are similar to the AIC-I card of the ONS 15454 shelf. The left alarm connector is used for TNC and TNCE relay contact, including Alarm Cut Off (ACO) signal and Digital Input/Output (D-I/O) signals. The right alarm connector is used for Digital Input/Output (D-I/O) signals. To export alarms from the ONS 15454 M6 shelf to a third party device, use the output pins of either the right alarm connector or the left alarm connector.

When external controls are not provisioned, 14 external input alarms are available. Input alarm 11 and input alarm 12 are available on the left side connector; input alarm 13 and input alarm 14 are available on the right side connector.

When external controls are provisioned, only 10 external input alarms are available.


Note


In a multishelf configuration, alarms on the subtended shelves cannot be extended through the node controller.

Note


ECU60-S does not support alarm connections.

See Table 1 and Table 2 for pin details of the alarm connectors.

Passive Unit Inventory Interfaces

The passive unit inventory interfaces (USB ports) are used to retrieve inventory information from passive devices such as fiber trays, FBG DCU, patch panels, passive multiplexer or demultiplexer, and so on. There are 12 USB ports on the ECU modules. The inventory details are displayed in the Inventory tab in CTC.

The USB 3.0 port delivers power to the fiber shuffle unit or the MPO-fan-out unit when they are connected to the ONS 15454 M6 2006 ECU-S.


Note


The 12 passive inventory ports on the ECU modules are labeled 1 to 12. However, CTC represents the passive inventory ports as USBP_SIDE_PORT, where SIDE can be A or B, and PORT can be any value from 1 to 12. For example, Port 1 on the left side of the ECU module is represented as USBP_A_1 and Port 1 on the right side of the ECU module is represented as USBP_B_ 1. The left side of the ECU module is Side A and the right side of the ECU module is Side B.

Note


The 8 passive inventory USB 2.0 ports on the NCS 2006 ECU-S module are labeled 1 through 4 and 7 through 10. The USB 3.0 port on the left of the faceplate is detected as A5. The USB 3.0 port on the left of the faceplate is detected as B5. However, CTC represents the passive inventory ports as USBP_SIDE_PORT, where SIDE can be A or B, and PORT can be any value from 1 to 5. For example, Port 1 on the left side of the ECU-S module is represented as USBP_A_1 and Port 1 on the right side of the NCS 2006 ECU-S module is represented as USBP_B_ 1. The left side of the ONS 15454 M6 2006 ECU-S module is Side A and the right side of the ONS 15454 M6 2006 ECU-S module is Side B.

VoIP or UDC

VoIP or UDC is an RJ45 port that can be configured to support UDC or VoIP service on an ONS 15454 M6 shelf. There are two VoIP or UDC ports on the ECU modules. The VoIP or UDC port on the left side is connected to the TNC or TNCE card in Slot 1 and the port on the right side is connected to the TNC or TNCE card in Slot 8. The VoIP or UDC port also supports Power over Ethernet for connecting VoIP equipments.


Note


Power over Ethernet functionality is not available on ECU-60V.

MSM

The multishelf management (MSM) port is an RJ-45 port that is used to connect the ONS 15454 M6 shelf to other ONS 15454 or ONS 15454 M6 shelves that are a part of the multishelf configuration. There are six MSM ports on the ECU modules—three ports on the left side and three ports on the right side. The MSM ports on the left side correspond to the TNC/TNCE/TSC/TSCE card in Slot 1, and those on the right side correspond to the TNC/TNCE/TSC/TSCE card in Slot 8. Three MSM ports are used as working ports, and the remaining three are used as standby ports.

Timing Connections

The ECU modules have four Building Integrated Timing Supply (BITS) connections that support both ETSI and ANSI connections. There are two BITS-IN and two BITS-OUT connections that can either be SMB connectors for ETSI connection or wire-wrap pins for ANSI connection, based on customer requirements. The BITS-IN ports receive input from third-party external sources called Synchronization Supply Unit (SSU) to synchronize the timing of the ONS 15454 M6 shelf. The BITS-OUT ports provide output to external devices (other Cisco or third-party shelves) to synchronize the timing signals with the ONS 15454 M6 shelf.


Note


For timing connection, use 100 ohm shielded BITS clock cable pair #22 or #24 AWG (0.51 mm² [0.020 inch] or 0.64 mm² [0.0252 inch]), twisted-pair T1-type.

Note


See Telcordia SR-NWT-002224 for rules about provisioning timing references.

NTP-G253 Install the ECU or ECU-S Module

Purpose

This procedure installs the external connection unit modules (ECU, ECU2, ECU-S, ECU60-S, or ECU-60V) in the ONS 15454 M6 shelf.

Tools/Equipment

Small slot-head screwdriver

Prerequisite Procedures

Required/As Needed

Required

Onsite/Remote

Onsite

Security Level

None


Warning


The intra-building port(s) of the equipment or subassembly is suitable for connection to intra-building or unexposed wiring or cabling only. The intra-building port(s) of the equipment or subassembly MUST NOT metallically connect to interfaces that connect to the OSP or its wiring. These interfaces are designed for use as intra-building interfaces only (Type 2 or Type 4 ports as described in GR-1089-CORE, Issue 5) and require isolation from the exposed OSP cabling. The addition of Primary Protectors is not sufficient protection in order to connect these interfaces metallically to OSP wiring. Statement 7005


Warning


To comply with the Telcordia GR-1089 NEBS standard for electromagnetic compatibility and safety, connect the serial high-speed WAN interface ports only to intra-building or unexposed wiring or cable. The intrabuilding cable must be shielded and the shield must be grounded at both ends. The intra-building port(s) of the equipment or subassembly must not be metallically connected to interfaces that connect to the OSP or its wiring. These interfaces are designed for use as intra-building interfaces only (Type 2 or Type 4 ports as described in GR-1089-CORE) and require isolation from the exposed OSP cabling. The addition of Primary Protectors is not sufficient protection in order to connect these interfaces metallically to OSP wiring. Statement 7003


Warning


The intra-building port(s) of the equipment or subassembly is suitable for connection to intra-building or unexposed wiring or cabling only. The intra-building port(s) of the equipment or subassembly MUST NOT metallically connect to interfaces that connect to the OSP or its wiring. These interfaces are designed for use as intra-building interfaces only (Type 2 or Type 4 ports as described in GR-1089-CORE, Issue 5) and require isolation from the exposed OSP cabling. The addition of Primary Protectors is not sufficient protection in order to connect these interfaces metallically to OSP wiring. Statement 7018


Warning


Voltages that present a shock hazard may exist on Power over Ethernet (PoE) circuits if interconnections are made using uninsulated exposed metal contacts, conductors, or terminals. Avoid using such interconnection methods, unless the exposed metal parts are located within a restricted access location and users and service people who are authorized within the restricted access location are made aware of the hazard. A restricted access area can be accessed only through the use of a special tool, lock and key or other means of security. Statement 1072


Caution


Always use the supplied ESD wristband when working with a powered ONS 15454 M6. For detailed instructions on how to wear the ESD wristband, see the Electrostatic Discharge and Grounding Guide for Cisco CPT and Cisco ONS Platforms.


Note


If the USB device connected to the ECU module is not detected when the ONS 15454 M6 shelf assembly is powered on, plug out (remove) the ECU module and insert it again.

Procedure


Step 1

Insert the ECU module in the central slot of the chassis (see the following figure).

Step 2

Push the ECU module such that the backplane connector is completely engaged and the faceplate of the ECU module aligns with the edge of the chassis side wall.

Step 3

Tighten the screws to a torque value of 4 in-lb (0.45 N-m).

Figure 72. Installing the ECU module
Installing the ECU module

The following figure shows the ECU module installed in the ONS 15454 M6 shelf.

Figure 73. ONS 15454 M6 Shelf with ECU module Installed
ONS 15454 M6 Shelf with ECU module Installed

Stop. You have completed this procedure.


NTP-L68 Upgrading to ONS 15454 M6 ECU60-S Module


Caution


Always use the supplied ESD wristband when working with a powered ONS 15454 M6. For detailed instructions on how to wear the ESD wristband, see the Electrostatic Discharge and Grounding Guide for Cisco CPT and Cisco ONS Platforms.


Note


Do not replace the 15454-M6-DC20, or 15454-M6-DC40 power modules with the 15454-M6-DC V03 power module if the ONS 15454 M6 shelf is consuming more than 960 W of power. Refer to table A-4 to ascertain the power consumption of the shelf.

Procedure


Step 1

Power down the ONS 15454 M6 shelf.

Step 2

Remove the 15454-M6-DC20 or 15454-M6-DC40 DC power module from the ONS 15454 M6 shelf.

Step 3

Install the 15454-M6-DC V03 DC Power Module in the ONS 15454 M6 shelf as described in the DLP-G570 Install the DC Power Module in the ONS 15454 M6 Shelf.

Step 4

Remove the ECU module (ECU/ECU-2/ECU-S) from the ONS 15454 M6 shelf.

Step 5

Install the ECU60-S module in the ONS 15454 M6 shelf as described in the NTP-G253 Install the ECU or ECU-S Module.

Step 6

Power on the 15454-M6-DC V03 power module as described in the NTP-G256 Install Power and Ground to the ONS 15454 M6 Shelf

Stop. You have completed this procedure.


Power Modules

The ONS 15454 M6 system contains pluggable and redundant power modules for AC and DC power. The AC and DC power modules cannot be used simultaneously to power the ONS 15454 M6 system. Before installing the power module, verify the position of the mechanical locking system on the rear side of the chassis. To insert the AC power module, the screw must be next to the AC silk-screen text; to insert the DC power module the screw must be next to the DC silk-screen text.

AC Power Module

The ONS 15454 M6 system can be powered by a single AC power module or redundant AC power modules. The supported AC power modules on the ONS 15454 M6 shelf are 15454-M6-AC and 15454-M6-AC2. The AC power module converts the AC-input current to DC-output current.

The AC power module supports the lamp test procedure and has fans that are directly powered by the module. The fans cool the module and guarantees proper operation across the complete operating temperature or output power range. These fans contain replaceable air-filters.The AC power module draws power from the power lines to turn on the ONS 15454 M6 shelf. See AC Power Specifications for the power specifications of the AC power modules.

Each AC power module has one AC single-phase 3 poles (line L, Neutral N, and Protective Earth PE) input connector.

The AC power module has a dual color (red and green) LED on the faceplate to represent the different states of the AC power module, which are controlled by the shelf controller card. The different states are:

  • LED is OFF. Indicates that the AC power line is not connected.
  • LED is green. Indicates that the AC power line is functioning correctly.
  • LED is red. Indicates that the AC power line is connected but there is a failure due to a secondary fuse break (48 V DC) or failure of the fan in the AC module.

However, the LED states (OFF/red/green) can be overwritten by the shelf controller card (TNC, TNCE, TSC, or TSCE).

For the 15454-M6-AC2 power module, the power consumption of the ONS-15454-M6 shelf (including ancillaries, controller cards, and line cards) is limited to 1200 W. If the power consumption of the shelf exceeds 1200 W, a new line card, when it is installed in the ONS-15454-M6 shelf, will not boot up. This is indicated by the PWR-CON-LMT alarm that is raised in the Alarms tab of CTC when the installation or pre-provisioning of a card causes the power consumption to exceed the limit of 1200W. The 15454-M6-AC2 has a maximum capacity of1500 W for 230 Vin and 1200 W for 110 Vin.

Changing the AC Power Module

It is possible to change the power modules of the ONS 15454 M6 system, from 15454-M6-AC to 15454-M6-AC2, and vice-versa, without powering down the ONS 15454 M6 system. While changing the power modules, ensure that only one power module is replaced at a time, and the other power module continues to supply power to the shelf. However, during regular operation of the node, the ONS 15454 M6 shelf must have either the 15454-M6-AC or 15454-M6-AC2 power module, but not both. See DLP-G757 Replacing 15454-M6-AC With 15454-M6-AC2 Power module and DLP-G758 Replacing 15454-M6-AC2 With 15454-M6-AC Power module for changing the power modules.

DC Power Module

The ONS 15454 M6 system can be powered by redundant DC power modules or a single DC power module. The supported DC power modules on the ONS 15454 M6 shelf are 15454-M6-DC, 15454-M6-DC20, and 15454-M6-DC40.

The DC power module does not support the lamp test procedure.

The DC power module draws power from the batteries to turn on the ONS 15454 M6 shelf. See DC Power Specifications for the power specifications of the DC power modules.

Each DC power module has:

  • One input battery connector (three poles) —VBAT, VRET, and FGnd for ETSI installation
  • Terminal block connector with VBAT and VRET for ANSI installation

The DC power module has a dual color (red and green) LED on the faceplate to represent the different states of the AC power module which are controlled by the shelf controller card. The different states are:

  • LED is off when the battery is not connected
  • LED turns green when the battery is connected and the power module functions correctly
  • LED turns red when the battery is connected but there is a failure due to a secondary fuse break (48 V DC) or AC module fan failure.

Note


When the ONS 15454 M6 shelf is powered at –60 VDC (nominal), only the TNC, OPT-AMP-C, OPT-AMP-17-C, OPT-EDFA-17, and OPT-EDFA-24, 17 SMR9 FS, 24 SMR9 FS, 34 SMR9 FS, SMR20 FS, SMR20 FS CV, 12-AD-FS, 16-AD-FS, 100GS-CK-LC, and MR-MXP cards, and the 15454-M6-ECU-60 can be installed.

The 15454-M6-DC40 power module is required to accommodate up to four 100GS-CK-LC cards in a ONS-15454-M6 shelf.

For the 15454-M6-DC20 power module, the power consumption of the ONS-15454-M6 shelf (including ancillaries, controller cards, and line cards) is limited to 960 W. A new line card will not boot up when it is installed in the ONS-15454-M6 shelf, if it causes the power consumption of the shelf to exceed 960 W. The PWR-CON-LMT alarm is raised in the Alarms tab in CTC when the installation or pre-provisioning of a card causes the power consumption to exceed the limit of 960 W.

For the 15454-M6-DC40 power module, the power consumption of the ONS-15454-M6 shelf (including ancillaries, controller cards, and line cards) is limited to 1920 W. A new line card will not boot up when it is installed in the ONS-15454-M6 shelf, if it causes the power consumption of the shelf to exceed 1920 W. The PWR-CON-LMT alarm is raised in the Alarms tab in CTC when the installation or pre-provisioning of a card causes the power consumption to exceed the limit of 1920 W.


Note


The total power consumption of the shelf is calculated by the controller card and displayed in CTC in the Provisioning > Power Monitor tab. For details about power calculation, see Power Calculation.

The terminal lugs used on the DC power modules are included in the accessory kit (53-3318-01) and part number of the terminal lug is 32-0603-01 (4 pieces). The accessory kit is placed under the 15454-M-SHIPKIT= PID.

Changing the DC Power Module

It is possible to change the power modules without powering down the ONS 15454 M6 system. While changing the power modules, ensure that only one power module is replaced at a time and the other power module continues to supply power to the shelf. However, during regular operation of the node, the ONS 15454 M6 shelf must have 15454-M6-DC20 or 15454-M6-DC or 15454-M6-DC40 power module. See DLP-G737 Replacing 15454-M6-DC With 15454-M6-DC20 Power Module and DLP-G738 Replacing 15454-M6-DC20 With 15454-M6-DC Power Module for changing the power modules.

Power Filler Module

For redundant power supplies, two AC or DC power modules can be installed in Slot A and Slot B of the ONS 15454 M6 shelf. However, only one power module can sustain the functioning of the entire ONS 15454 M6 system. In that case, insert a power filler module in the empty slot.

NTP-G524 Install the Power Modules in the ONS 15454 M6 Shelf

Purpose

This procedure installs the power modules in the ONS 15454 M6 system.

Tools/Equipment

#2 Phillips screwdriver

Prerequisite Procedures

Required/As Needed

Required

Onsite/Remote

Onsite

Security Level

None


Warning


The plug-socket combination must be accessible at all times because it serves as the main disconnecting device. Statement 1019


Procedure


Step 1

Complete the necessary task as applicable:

Step 2

Complete the NTP-G256 Install Power and Ground to the ONS 15454 M6 Shelf.

Stop. You have completed this procedure.


DLP-G569 Install the AC Power Module in the ONS 15454 M6 Shelf

Purpose

This task installs the 15454-M6-AC or 15454-M6-AC2 power module in the ONS 15454 M6 system.

Tools/Equipment

#2 Phillips screwdriver

Prerequisite Procedures

Required/As Needed

Required

Onsite/Remote

Onsite

Security Level

None


Caution


The node can temporarily work with both 15454-M6-AC and 15454-M6-AC2 power module units installed on the ONS 15454 M6 shelf. However, during regular operation, the shelf must have either the 15454-M6-AC or 15454-M6-AC2 power module, but not both.

Tip


Insert the AC power module in Slot A or Slot B, or both (see the following figure).


Note


While inserting the AC power module, apply insertion force only above the hook and not on the air filter (see the following figure).
Figure 74. Installing the AC Power Modules
Installing the AC Power Modules

Procedure


Step 1

Plug the AC power module completely into the chassis.

Step 2

Tighten the screw to a torque value of 4 in-lb (0.45 N-m) to lock the power module in the chassis (see AC Power Modules Installed in the ONS 15454 M6 Shelf).

Note

 
For redundant power supplies, two AC power modul5es can be installed in Slot A and Slot B. However, only one power module can sustain the functioning of the entire ONS 15454 M6 system. In that case, insert a power filler module in the empty slot (for example, see Installing a Power Filler Module).

Note

 
For information on the power module air filter, see NTP-G114 Inspect and Replace the Air Filter.
Figure 75. AC Power Modules Installed in the ONS 15454 M6 Shelf
AC Power Modules Installed in the ONS 15454 M6 Shelf

Step 3

Return to your originating procedure (NTP).


DLP-G757 Replacing 15454-M6-AC With 15454-M6-AC2 Power module

Purpose

This procedure is used to replace the 15454-M6-AC with 15454-M6-AC2 power module.

Tools/Equipment

#2 Phillips Dynamometric screwdriver

Prerequisite Procedures

NTP-G259 Open and Remove the Standard Door of the ONS 15454 M6 Shelf.

Required/As Needed

Required

Onsite/Remote

Onsite

Security Level

None


Note


Refer to Power Calculation to ascertain the power consumption of the shelf.

Caution


Always use the supplied ESD wristband when working with a powered ONS 15454 M6. For detailed instructions on how to wear the ESD wristband, see the Electrostatic Discharge and Grounding Guide for Cisco CPT and Cisco ONS Platforms.


Procedure


Step 1

Disconnect the power source and remove the power connections from the B-side power module (installed in slot B).

Step 2

Unscrew the holding screw that secures the 15454-M6-AC power module.

Step 3

Pull the 15454-M6-AC power module away from the ONS 15454 M6 chassis.

Step 4

Install the 15454-M6-AC2 power module as described in the DLP-G569 Install the AC Power Module in the ONS 15454 M6 Shelf.

Step 5

Install power on the 15454-M6-AC2 power module as described in the NTP-G256 Install Power and Ground to the ONS 15454 M6 Shelf.

Note

 
While replacing power modules, when the ONS 15454 M6 chassis is in the mixed power mode (with both 15454-M6-AC and 15454-M6-AC2 power modules installed), do not provision or install any line cards. Card provisioning and installation must be done only after both the slots have the same type of power modules.

Step 6

Perform Steps 1 to 5 for the other power module (installed in slot A).

Note

 
To ensure that the controller card calculates the shelf power consumption correctly, reset the controller card. For details about performing card reset, see the “NTP-G106 Resetting Cards Using CTC” procedure in the Cisco ONS 15454 DWDM Network Configuration Guide.

Return to your originating procedure (NTP).


DLP-G758 Replacing 15454-M6-AC2 With 15454-M6-AC Power module

Purpose

This procedure is used to replace the 15454-M6-AC2 with 15454-M6-AC power module.

Tools/Equipment

#2 Phillips Dynamometric screwdriver

Prerequisite Procedures

NTP-G259 Open and Remove the Standard Door of the ONS 15454 M6 Shelf.

Required/As Needed

Required

Onsite/Remote

Onsite

Security Level

None


Caution


When mixed power modules are present, if the power consumption is more than 900W, identify and plug out the line cards so that Total power consumption is less than or equal to 900W.


Caution


Always use the supplied ESD wristband when working with a powered ONS 15454 M6. For detailed instructions on how to wear the ESD wristband, see the Electrostatic Discharge and Grounding Guide for Cisco CPT and Cisco ONS Platforms.


Procedure


Step 1

Disconnect the power source and remove the power connections from the B-side power module (installed in slot B).

Step 2

Unscrew the holding screw that secures the 15454-M6-AC2 power module.

Step 3

Pull the 15454-M6-AC2 power module clear from the ONS 15454 M6 chassis.

Step 4

Install the 15454-M6-AC power module as described in the DLP-G569 Install the AC Power Module in the ONS 15454 M6 Shelf.

Step 5

Install power on the 15454-M6-AC power module as described in the NTP-G256 Install Power and Ground to the ONS 15454 M6 Shelf.

Note

 
While replacing the power modules, do not provision or install any line cards when the ONS 15454 M6 chassis is in the mixed power mode (with both 15454-M6-AC and 15454-M6-AC2 power modules installed). Card provisioning and installation must be done only after both the slots have the same type of power modules.

Step 6

Perform steps 1 to 5 for the other power module (installed in slot A).

Step 7

Return to your originating procedure (NTP).


DLP-G570 Install the DC Power Module in the ONS 15454 M6 Shelf

Purpose

This procedure installs the 15454-M6-DC, 15454-M6-DC20, or 15454-M6-DC40 DC power module in the ONS 15454 M6 system.

Tools/Equipment

#2 Phillips Dynamometric screwdriver

Prerequisite Procedures

Required/As Needed

Required

Onsite/Remote

Onsite

Security Level

None


Caution


While changing the power modules from 15454-M6-DC20 to 15454-M6-DC and vice-versa, the ONS 15454 M6 shelf can temporarily work with both 15454-M6-DC and 15454-M6-DC20 power modules installed. However, during regular operation, the shelf must either have the 15454-M6-DC or 15454-M6-DC20 power module, but not both.


Procedure


Step 1

Insert the DC power module in Slot A or Slot B (or both) (see the following figure).

Figure 76. Installing the DC Power Modules
Installing the DC Power Modules

Step 2

Plug the DC power module completely into the chassis.

Step 3

Tighten the screw to a torque value of 4 in-lb (0.45 N-m) to lock the power module in the chassis (see the following figure).

Figure 77. DC Power Modules Installed in the ONS 15454 M6 Shelf
DC Power Modules Installed in the ONS 15454 M6 Shelf

Note

 
For redundant power supplies, two DC power modules can be installed in Slot A and Slot B. However, only one power module can sustain the functioning of the entire ONS 15454 M6 system. In that case, insert a power filler module in the empty slot (see the following figure).

The following figure shows a DC power module installed in Slot A and a power filler module installed in Slot B.

Figure 78. Installing a Power Filler Module
Installing a Power Filler Module

Step 4

Return to your originating procedure (NTP).

Note

 
When the ONS 15454 M6 shelf is powered at –60 VDC (nominal), only the TNC, OPT-AMP-C, OPT-AMP-17-C, OPT-EDFA-17, and OPT-EDFA-24 cards, and the 15454-M6-ECU-60 can be installed.

DLP-G737 Replacing 15454-M6-DC With 15454-M6-DC20 Power Module

Purpose

This procedure replaces the 15454-M6-DC with 15454-M6-DC20 power module.

Tools/Equipment

#2 Phillips Dynamometric screwdriver

Prerequisite Procedures

NTP-G259 Open and Remove the Standard Door of the ONS 15454 M6 Shelf.

Required/As Needed

Required

Onsite/Remote

Onsite

Security Level

None


Note


The procedure to replace the 15454-M6-DC power module with 15454-M6-DC40 power module is the same as this procedure. The 15454-M6-DC40 power module uses 15454-M6-DCCBL2-L= and 15454-M6-DCCBL2-R= cables.

Note


Do not replace the 15454-M6-DC with the 15454-M6-DC20 power module if the ONS 15454 M6 shelf is consuming more than 960 W of power. Refer to Power Calculation to ascertain the power consumption of the shelf.

Caution


While changing the power modules from 15454-M6-DC20 to 15454-M6-DC and vice-versa, the ONS 15454 M6 shelf can temporarily work with both 15454-M6-DC and 15454-M6-DC20 power modules installed. However, during regular operation, the shelf must either have the 15454-M6-DC or 15454-M6-DC20 power module, but not both.


Caution


Always use the supplied ESD wristband when working with a powered ONS 15454 M6. For detailed instructions on how to wear the ESD wristband, see the Electrostatic Discharge and Grounding Guide for Cisco CPT and Cisco ONS Platforms .


Procedure


Step 1

Disconnect the power source opening the breaker on top of the standby power module (installed in slot B).

Step 2

Unscrew the holding screw that secures the 15454-M6-DC power module.

Step 3

Pull the 15454-M6-DC power module clear from the ONS 15454 M6 chassis.

Step 4

Remove the power connections from the standby power module.

Step 5

Install power on the 15454-M6-DC power module as described in the NTP-G256 Install Power and Ground to the ONS 15454 M6 Shelf.

Note

 
While replacing the power modules, do not provision or install any line cards when the ONS 15454 M6 chassis is in the mixed power mode. Card provisioning and installation must be done only after both the slots have the same type of power modules.

Step 6

Install the 15454-M6-DC power module as described in the DLP-G570 Install the DC Power Module in the ONS 15454 M6 Shelf.

Step 7

Connect the power source closing the breaker on top of the standby power module (installed in slot B).

Step 8

Perform the Step 1 to Step 7 for the active power module (installed in slot A) procedure.

Note

 
To ensure that the controller card is calculating the shelf power consumption correctly, reset the controller card. For details about performing card reset, see the “NTP-G106 Reset Cards Using CTC” procedure in the Cisco ONS 15454 DWDM Configuration Guide.If the power consumption of the shelf is exceeding 960 W, the PWR-CON-LMT alarm is raised. Either revert to the 15454-M6-DC power module or remove and deprovsion the existing line cards to reduce the load.

Step 9

Return to your originating procedure (NTP).


DLP-G738 Replacing 15454-M6-DC20 With 15454-M6-DC Power Module

Purpose

This procedure replaces the 15454-M6-DC20 with 15454-M6-DC power module.

Tools/Equipment

#2 Phillips Dynamometric screwdriver

Prerequisite Procedures

NTP-G259 Open and Remove the Standard Door of the ONS 15454 M6 Shelf.

Required/As Needed

Required

Onsite/Remote

Onsite

Security Level

None


Note


The procedure to replace the 15454-M6-DC20 power module with 15454-M6-DC40 power module is the same as this procedure. The 15454-M6-DC40 power module uses 15454-M6-DCCBL2-L= and 15454-M6-DCCBL2-R= cables.

Caution


While changing the power modules from 15454-M6-DC20 to 15454-M6-DC and vice-versa, the ONS 15454 M6 shelf can temporarily work with both 15454-M6-DC and 15454-M6-DC20 power modules installed. However, during regular operation, the shelf must either have the 15454-M6-DC or 15454-M6-DC20 power module, but not both.


Caution


Always use the supplied ESD wristband when working with a powered ONS 15454 M6. For detailed instructions on how to wear the ESD wristband, see the Electrostatic Discharge and Grounding Guide for Cisco CPT and Cisco ONS Platforms .


Procedure


Step 1

Disconnect the power source and remove the power connections from the standby power module (installed in slot B).

Step 2

Unscrew the holding screw that secures the 15454-M6-DC20 power module.

Step 3

Pull the 15454-M6-DC20 power module clear from the ONS 15454 M6 chassis.

Step 4

Install the 15454-M6-DC power module as described in the DLP-G570 Install the DC Power Module in the ONS 15454 M6 Shelf.

Step 5

Install power on the 15454-M6-DC power module as described in the NTP-G256 Install Power and Ground to the ONS 15454 M6 Shelf.

Note

 
While replacing the power modules, do not provision or install any line cards when the ONS 15454 M6 chassis is in the mixed power mode. Card provisioning and installation must be done only after both the slots have the same type of power modules.

Step 6

Perform steps 1 to 5 for the active power module (installed in slot A).

Step 7

Return to your originating procedure (NTP).


LCD Unit

The LCD unit consists of an LCD display panel, push button, and shelf-level LED indicators on the ONS 15454 M6 system. A backup flash memory is fitted into the LCD unit to support the database (DB) and image backup in the operation of the ONS 15454 M6.

The shelf controller card (TSC, TSCE, TNC, or TNCE) powers the 16 x 2 character LCD screen. The LCD screen displays the shelf name, shelf IP address, and software version currently used. The LCD screen also provides slot-level and port-level information of all card slots, including the number of critical, major, and minor alarms. The display contrast is automatically adjusted for a clearer view. The three accessible push buttons (SLOT, STATUS, and PORT) on the LCD unit are used to set parameters at the slot-level and port-level. There are three alarm LEDs (CRIT, MAJ, and MIN) on the LCD unit that indicate whether a critical, major, or minor alarm is present anywhere on the ONS 15454 M6 shelf. The shelf controller card controls the conditions that result in triggering the LEDs. The LEDs can be overwritten by the shelf controller card (TNC, TNCE, TSC, or TSCE) in all the three states (OFF/red/green). The LCD unit supports the lamp test procedure and the LEDs changes its color or state.


Note


If the LCD unit is removed from the shelf, wait for at least 5 seconds before plugging it back into the shelf. In the event the LCD display appears blank, remove the unit from the shelf, wait for at least 5 seconds and reinsert the unit into the shelf.

The LCD module must be present in the ONS 15454 M6 shelf to:

  • Provision the ECU module, fan-tray assembly, or power modules.
  • Retrieve alarms from the ECU module, fan-tray assembly, or power modules.

NTP-G255 Install the LCD Module in the ONS 15454 M6 Shelf

Purpose

This procedure installs the LCD module in the ONS 15454 M6 system.

Tools/Equipment

Small slot-head screwdriver

Prerequisite Procedures

Required/As Needed

Required

Onsite/Remote

Onsite

Security Level

None


Note


If the LCD unit is removed from the shelf, wait for at least 5 seconds before plugging it back into the shelf. In the event the LCD display appears blank, remove the unit from the shelf, wait for at least 5 seconds and reinsert the unit into the shelf.

Procedure


Step 1

Insert the LCD module in the central slot (between the power slots) of the chassis (see the following figure).

Figure 79. Installing the LCD Module
Installing the LCD Module

Step 2

Push the LCD module into the chassis such that the backplane connector is completely engaged (see the above figure).

Step 3

Tighten the screw to a torque value of 4 in-lb (0.45 N-m) to lock the unit (see the following figure).

Figure 80. LCD Module Installed in the ONS 15454 M6 Shelf
LCD Module Installed in the ONS 15454 M6 Shelf

Stop. You have completed this procedure.


Power and Ground Description

Ground the equipment according to Telcordia standards or local practices. The following sections describe power and ground for the ONS 15454 M6 shelves.


Note


For detailed instructions on grounding the ONS 15454 M6 chassis, see the Electrostatic Discharge and Grounding Guide for Cisco CPT and Cisco ONS Platforms.

ANSI Power and Ground

The ONS 15454 M6 has redundant AC and DC power modules.

For redundant AC power feeds, install both the AC power modules and use the two power cables (right and left cables) shipped with the ONS 15454 M6 and one ground cable. For an AC power supply, the fuse rating must not exceed 10A, 15A, or 20A. For North America, the branch circuit protection must be rated 20A. The overcurrent/short circuit protection must be in accordance with local and national electrical codes. The voltage rating value for AC power ranges between 100 VAC to 240 VAC depending on the standards in various countries. This product is intended for use on the TN and TT power systems.

For redundant DC power feeds, install both the DC power modules and use four power cables and one ground cable. For a single power feed, only two power cables (#8 AWG or larger, copper conductor, 194 degrees F [90 degrees C] minimum) and one ground cable (#6 AWG or larger) are required. Use a conductor with low impedance to ensure circuit overcurrent protection. However, the conductor must have the capability to safely conduct any faulty current that might be imposed. For a a DC power supply, the fuse rating must not exceed 40A. For operating voltages, see DC Power Specifications.

The DC power modules have –48 VDC or –60 VDC #8 dual-hole lug power terminals for ANSI. The terminals are labeled RET and –48 V or –60 V on the DC power modules.


Note


When the ONS 15454 M6 shelf is powered at –60 VDC (nominal), only the TNC, OPT-AMP-C, OPT-AMP-17-C, OPT-EDFA-17, and OPT-EDFA-24 cards, and the 15454-M6-ECU-60 can be installed.

We recommend the following wiring conventions, but customer conventions prevail:

  • Red wire for battery connections (–48 VDC or –60 VDC).
  • Black wire for battery return connections (RET).
  • The battery return connection is treated as DC-I, as defined in Telcordia GR-1089-CORE, Issue 3.

The ground lug must be a dual-hole type, UL Listed, CSA certified and rated to accept the #6 AWG cable. Two ground posts with two M5 nuts are provided on the ONS 15454 M6 to accommodate the dual-hole lug.


Note


Only use the power cables shipped with the ONS 15454 M6 shelf.

ETSI Power and Ground

The ONS 15454 M6 for ETSI has –48 VDC or –60 VDC power connectors (DSUB for DC power module) on the DC power module. For redundant DC power feeds, install both the DC power modules and use the two power cables shipped with the ONS 15454 M6 and one ground cable. For a DC power supply, the fuse rating must not exceed 40A. For operating voltages, see DC Power Specifications.

For redundant AC power feeds, install both the AC power modules and use the two power cables (right and left cables) shipped with the ONS 15454 M6 and one ground cable. For an AC power supply, the fuse rating must not exceed 10A, 15A, or 20A. For North America, the branch circuit protection must be rated 20A. The overcurrent/short circuit protection must be in accordance with local and national electrical codes. The voltage rating value for AC power ranges between 100 VAC to 240 VAC depending on the standards in various countries. This product is intended for use on the TN and TT power systems.


Caution


Only use the power cables shipped with the ONS 15454 M6 shelf.


NTP-G256 Install Power and Ground to the ONS 15454 M6 Shelf

Purpose

This procedure installs power feeds and grounds the ONS 15454 M6 system.

Tools/Equipment

ANSI and ETSI:

  • #2 Phillips Dynamometric screwdriver
  • Medium slot-head screwdriver
  • Small slot-head screwdriver
  • Screws
  • Ground cable 13.3-mm² (#6 AWG) stranded
  • Listed pressure dual-holes lugs suitable for #8 AWG copper conductors
  • Wire cutters
  • Wire strippers
  • Crimp tool
  • Fuse panel

ANSI only:

  • Power cable (from fuse and alarm panel to assembly), #8 AWG, copper conductors, 194 degrees F [90 degrees C])
  • Wire wrapper

ETSI only:

  • Power cable (from fuse panel to power modules), shipped with the ONS 15454 M6
  • Two-hole grounding lug, shipped with the ONS 15454 M6

Prerequisite Procedures

Required/As Needed

Required

Onsite/Remote

Onsite

Security Level

None


Warning


To ensure safety of personnel and equipment, do not connect any power cables into the power module until the module is completely installed into the chassis. Statement 389


Warning


To reduce the risk of electric shock, switch on the power only after the power cord is completely installed into the power module. Statement 390


Warning


Blank faceplates (filler panels) serve three important functions: they prevent exposure to hazardous voltages and currents inside the chassis; they contain electromagnetic interference (EMI) that might disrupt other equipment; and they direct the flow of cooling air through the chassis. Do not operate the system unless all cards, power modules, and faceplates are in place. Statement 261


Warning


This equipment must be grounded. Never defeat the ground conductor or operate the equipment in the absence of a suitably installed ground conductor. Contact the appropriate electrical inspection authority or an electrician if you are uncertain that suitable grounding is available. Statement 1024


Warning


Never install an AC power module and a DC power module in the same chassis. Statement 1050


Warning


When stranded wiring is required, use approved wiring terminations, such as closed-loop or spade-type with upturned lugs. These terminations should be the appropriate size for the wires and should clamp both the insulation and conductor. Statement 1002


Warning


Before performing any of the following procedures, ensure that power is removed from the DC circuit. Statement 1003


Warning


Before working on a chassis or working near power supplies, unplug the power cord on AC units. Statement 246


Warning


This equipment is intended to be grounded. Ensure that the host is connected to earth ground during normal use. Statement 39


Warning


Use copper conductors only. Statement 1025


Warning


Connect the unit only to DC power source that complies with the safety extra-low voltage (SELV) requirements in IEC 60950-1 based safety standards. Statement 1033


Warning


This product requires short-circuit (overcurrent) protection, to be provided as part of the building installation. Install only in accordance with national and local wiring regulations. Statement 1045


Warning


This product relies on the building’s installation for short-circuit (overcurrent) protection. Ensure that the protective device is rated not greater than: 40A and between -40.5 VDC to -57.6 VDC. Statement 1005


Note


For nominal voltage of –60 VDC, the input voltage range is from -50 to -72 VDC.

Warning


This product relies on the building's installation for short-circuit (overcurrent) protection. Ensure that the protective device is rated not greater than: 10A-20A, 100-240 VAC~. Statement 1005


Warning


A readily accessible two-poled disconnect device must be incorporated in the fixed wiring. Statement 1022


Warning


This unit might have more than one power supply connection; all connections must be removed to de-energize the unit. Statement 1028


Caution


Always use the supplied ESD wristband when working with a powered ONS 15454 M6. For detailed instructions on how to wear the ESD wristband, see the Electrostatic Discharge and Grounding Guide for Cisco CPT and Cisco ONS Platforms.


Procedure


Step 1

Verify that the correct fuse and alarm panel is installed in the top mounting space:

  • For a a DC power supply, the fuse rating must not exceed 40A.

  • For an AC power supply, the fuse rating must not exceed 10A, 15A, or 20A. For North America, the branch circuit protection must be rated 20A. The overcurrent/short circuit protection must be in accordance with local and national electrical codes.

Step 2

Depending on the shelf and the power module installed, complete the necessary task:

Step 3

Connect the office ground to the ONS 15454 M6 shelf. For detailed instructions on grounding, see the Electrostatic Discharge and Grounding Guide for Cisco CPT and Cisco ONS Platforms.

Step 4

Complete the DLP-G575 Turn On and Verify DC Office Power on the ONS 15454 M6 Shelf

Step 5

Continue with the NTP-G257 Install the Fan-Tray Assembly in the ONS 15454 M6 Shelf.

Stop. You have completed this procedure.


DLP-G571 Connect Office Power (AC) to the ONS 15454 M6 Shelf

Purpose

This task connects AC power to the ONS 15454 M6 shelf.

Tools/Equipment

  • #2 Phillips Dynamometric screwdriver
  • Medium slot-head screwdriver
  • Small slot-head screwdriver
  • Wire wrapper
  • Wire cutters
  • Wire strippers
  • Crimp tool
  • Fuse panel
  • Ground cable 13.3-mm² (#6 AWG) stranded. The PIDs of the power cables are listed in Table 1.

Prerequisite Procedures

Required/As Needed

Required

Onsite/Remote

Onsite

Security Level

None


Note


This product is intended for use on the TN and TT power systems.

Warning


When installing or replacing the unit, the ground connection must always be made first and disconnected last. Statement 1046


Warning


This equipment shall be connected to AC mains provided with a surge protective device (SPD) at the service equipment complying with NFPA 70, the National Electrical Code (NEC). Statement 7012


Caution


The ONS 15454 M6 relies on the protective devices in the building installation to protect against short circuit, overcurrent and ground faults. Ensure that the protective devices are properly rated and comply with national and local codes.


Note


Not more than 7 feet (2 m) of the power supply cable should be exposed between the equipment and the fiber storage tray.

Caution


When terminating the frame ground, do not use soldering lug connectors, screwless (push-in) connectors, quick connect connectors, or other friction-fit connectors.


Note


If the system loses power or if both the TNC, TNCE, TSC, or TSCE cards are reset, you must reset the ONS 15454 M6 clock. After powering down, the date defaults to January 1, 1970, 00:04:15. To reset the clock, see the “NTP-G24 Setting Up Node Identification Information” procedure in the Cisco ONS 15454 DWDM Control Card and Node Configuration Guide.

Procedure


Step 1

Verify that the AC power module is installed in Slot A or Slot B (or both) of the ONS 15454 M6.

Step 2

Attach the AC power cable to the cable connector in the AC power module (see the following figure).

Figure 81. Connecting Office Power—AC Power Modules
Connecting Office Power - AC Power Modules

Step 3

Close the cable clip to secure the power cable (see the following figure).

Figure 82. Cable Clip to Secure the Power Cable
Cable Clip to Secure the Power Cable

Note

 
For Slot A power module, the power cable exits from the left side. For Slot B power module, the power cable exits from the right side (see the following figure).
Figure 83. Power Cable Exit
Power Cable Exit

Step 4

Connect the power cable to the fuse panel or power source.

Note

 
The voltage rating value for AC power ranges between 100 VAC to 240 VAC depending on the standards in various countries.

Note

 
Turn on the power after installing the power cables.

Step 5

Return to your originating procedure (NTP).

Table 2. PIDs for AC Power Cables

Cable

PID

AC power cable - Japan left exit

15454-M-CBL-L-JPN=

AC power cable - Japan right exit

15454-M-CBL-R-JPN=

AC power cable - China left exit

15454-M-CBL-L-CHI=

AC power cable - China right exit

15454-M-CBL-R-CHI=

AC power cable - India left exit

15454-M-CBL-L-IND=

AC power cable - India right exit

15454-M-CBL-R-IND=

AC power cable - EU left exit

15454-M-CBL-L-EU=

AC power cable - EU right exit

15454-M-CBL-R-EU=

AC power cable - ARG left exit

15454-M-CBL-LARG=

AC power cable - ARG right exit

15454-M-CBL-RARG=

AC power cable - AUS left exit

15454-M-CBL-LAUS=

AC power cable - AUS right exit

15454-M-CBL-RAUS=

AC power cable - UK left exit

15454-M-CBL-L-UK=

AC power cable - UK right exit

15454-M-CBL-R-UK=

AC power cable - KOR left exit

15454-M-CBL-LKOR=

AC power cable - KOR right exit

15454-M-CBL-RKOR=

AC power cable ANSI 110VAC left exit

15454-M-ACCBL-L=

AC power cable ANSI 110VAC right exit

15454-M-ACCBL-R=

AC power cable ANSI 220VAC left exit

15454-M-ACCBL-L2=

AC power cable ANSI 220VAC right exit

15454-M-ACCBL-R2=

AC power cable for data center left exit

15454-M-ACL6-L=

AC power cable for data center right exit

15454-M-ACL6-R=


DLP-G572 Connect Office Power (DC) to the ONS 15454 M6 Shelf (ANSI Only)

Purpose

This task connects DC power to the ONS 15454 M6 (ANSI Only).

Tools/Equipment

  • #2 Phillips Dynamometric screwdriver
  • Medium slot-head screwdriver
  • Small slot-head screwdriver
  • Wire wrapper
  • Wire cutters
  • Wire strippers
  • Crimp tool
  • Open-end wrench or hex tube screw driver
  • Fuse panel
  • Power cable (from fuse and alarm panel to assembly), #8 AWG, copper conductors, 194 degrees F (90 degrees C)
  • Ground cable #6 AWG stranded
  • Listed pressure dual-holes lugs suitable for #8 AWG copper conductors

Prerequisite Procedures

Required/As Needed

Required

Onsite/Remote

Onsite

Security Level

None


Warning


When installing or replacing the unit, the ground connection must always be made first and disconnected last. Statement 1046


Warning


Hazardous voltage or energy may be present on DC power terminals. Always replace cover when terminals are not in service. Be sure uninsulated conductors are not accessible when cover is in place. Statement 1075


Caution


The ONS 15454 M6 relies on the protective devices in the building installation to protect against short circuit, overcurrent, and ground faults. Ensure that the protective devices are properly rated and comply with national and local codes.


Note


The battery return connection is treated as DC-I, as defined in Telcordia GR-1089-CORE Issue 5.

Note


If the system loses power or both the TNC, TNCE, TSC, or TSCE cards are reset, and the system is not provisioned to get the time from a Network Time Protocol/Simple Network Time Protocol (NTP/SNTP) server, you must reset the ONS 15454 clock. After powering down, the date defaults to January 1, 1970, 00:04:15. To reset the clock, see the “NTP-G24 Setting Up Node Identification Information” procedure in the Cisco ONS 15454 DWDM Control Card and Node Configuration Guide. If you are using the TNC, TNCE, TSC, or TSCE cards, the system clock will run for up to three hours. In this case, no action would be required.

Procedure


Step 1

Connect the return cables of the power supply to the Earth ground located at the power supply side.

Step 2

Connect the office power according to the fuse panel engineering specifications.

Step 3

Measure and cut the cables as needed to reach the ONS 15454 M6 from the fuse panel.

Step 4

Address the power according to local site practice.

Step 5

Strip 1/2 inch (12.7 mm) of insulation from all power cables that you will use.

Step 6

Crimp the lugs onto the ends of all the power leads.

Step 7

Verify that the DC power module is installed in Slot A or Slot B (or both) of the ONS 15454 M6 shelf.

Step 8

Remove the terminal block protective covers from the DC power modules (see the following figure).

Figure 84. Connecting Office Power—DC Power Modules (ANSI Only)
Connecting Office Power - DC Power Modules (ANSI Only)

Step 9

Unscrew the nuts from the terminal block (see the following figure).

Figure 85. Connecting Office Power—DC Power Modules (ANSI Only)
Connecting Office Power - DC Power Modules (ANSI Only)

Step 10

Insert the lugs as shown in the above figure. The top cable is for RET and the bottom cable is for –48 V/–60 V.

Step 11

Insert the lock washers and nuts to the terminal block. Tighten the nuts to a torque value of 20 in-lb (2.25 N-m).

Step 12

Mount the terminal block protective covers on the DC power modules (see the following figure).

Note

 
For Slot A power module, the power cable exits from the left side. For Slot B power module, the power cable exits from the right side

Note

 
Use only pressure terminal connectors, such as ring and fork types, when terminating the battery, battery return, and frame ground conductors.
Figure 86. Connecting Office Power—DC Power Modules (ANSI Only)
Connecting Office Power - DC Power Modules (ANSI Only)

Caution


Before you make any crimp connections, coat all bare conductors (battery, battery return, and frame ground) with an appropriate antioxidant compound. Bring all unplated connectors, braided strap, and bus bars to a bright finish, then coat with an antioxidant before you connect them. You do not need to prepare tinned, solder-plated, or silver-plated connectors and other plated connection surfaces, but always keep them clean and free of contaminants.

Caution


When terminating power, return (RET), and frame ground, do not use soldering lug, screwless (push-in) connectors, quick-connect, or other friction-fit connectors.

Step 13

Return to your originating procedure (NTP).


DLP-G573 Connect Office Power (DC) to the ONS 15454 M6 Shelf (ETSI Only)

Purpose

This task connects power to the ONS 15454 M6 shelf (ETSI Only).

Tools/Equipment

  • #2 Phillips Dynamometric screwdriver
  • Medium slot-head screwdriver
  • Small slot-head screwdriver
  • Wire wrapper
  • Wire cutters
  • Wire strippers
  • Crimp tool
  • Fuse panel
  • Ground cable #6 AWG stranded. The PIDs of the power cables are listed in Table 1.

Prerequisite Procedures

Required/As Needed

Required

Onsite/Remote

Onsite

Security Level

None


Warning


When installing or replacing the unit, the ground connection must always be made first and disconnected last. Statement 1046


Warning


Hazardous voltage or energy may be present on DC power terminals. Always replace cover when terminals are not in service. Be sure uninsulated conductors are not accessible when cover is in place. Statement 1075


Note


The battery return connection is treated as DC-I, as defined in Telcordia GR-1089-CORE Issue 5.

Caution


The ONS 15454 M6 relies on the protective devices in the building installation to protect against short circuit, overcurrent, and ground faults. Ensure that the protective devices are properly rated and comply with national and local codes.


Note


If the system loses power or both TNC, TNCE, TSC, or TSCE cards are reset and the system is not provisioned to get the time from a Network Time Protocol/Simple Network Time Protocol (NTP/SNTP) server, you must reset the ONS 15454 M6 clock. After powering down, the date defaults to January 1, 1970, 00:04:15. To reset the clock, see the “NTP-G24 Setting Up Node Identification Information” procedure in the Cisco ONS 15454 DWDM Control Card and Node Configuration Guide. If you are using the TNC, TNCE, TSC, or TSCE cards, the system clock will run for up to three hours. In this case, no action would be required.

Procedure


Step 1

Connect the return cables of the power supply to the Earth ground located at the power supply side.

Step 2

Verify that the DC power module is installed in Slot A or Slot B (or both slots) of the ONS 15454 M6.

Step 3

Unscrew the screws to a torque value of 4 in-lb (0.45 N-m) to remove the protective covers from the DSUB power connector of the DC power modules (see the following figure).

Figure 87. Connecting Office Power—DC Power Modules (ETSI Only)
Connecting Office Power - DC Power Modules (ETSI Only)

Step 4

Attach the DC ETSI power cable to the cable connector in the DC power module (see the following figure).

Step 5

Tighten the screws to a torque value of 4 in-lb (0.45 N-m) to secure the cable (see the following figure).

Figure 88. Connecting Office Power—DC Power Modules (ETSI Only)
Connecting Office Power - DC Power Modules (ETSI Only)

Note

 
For slot A power module, use the left power cable—15454-M6-DCCBL-LE, and for slot B use the right power cable—15454-M6-DCCBL-RE. Use 15454-M6-DCCBL2-L and 15454-M6-DCCBL2-R cables for the 15454-M6-DC40 power module. For slot A power module, the power cable exits from the left side. For slot B power module, the power cable exits from the right side

Note

 
Use only pressure terminal connectors, such as ring and fork types, when terminating the battery, battery return, and frame ground conductors.

Caution


Before you make any crimp connections, coat all bare conductors (battery, battery return, and frame ground) with an appropriate antioxidant compound. Bring all unplated connectors, braided strap, and bus bars to a bright finish, then coat with an antioxidant before you connect them. You do not need to prepare tinned, solder-plated, or silver-plated connectors and other plated connection surfaces, but always keep them clean and free of contaminants.

Caution


When terminating power, return, and frame ground, do not use soldering lug, screwless (push-in) connectors, quick-connect, or other friction-fit connectors.

Step 6

Return to your originating procedure (NTP).

Table 3. PIDs for DC Power Cables

Cable

PID

DC power cable for ETSI left exit

15454-M6-DCCBL-LE=

DC power cable for ETSI right exit

15454-M6-DCCBL-RE=


DLP-G574 Turn On and Verify AC Office Power on the ONS 15454 M6 Shelf

Purpose

This task turns on and verifies AC office power on the ONS 15454 M6 shelf.

Tools/Equipment

Voltmeter

Prerequisite Procedures

Required/As Needed

Required

Onsite/Remote

Onsite

Security Level

None


Caution


Do not apply power to the shelf until you complete all the installation steps.


Warning


To ensure safety of personnel and equipment, do not connect any power cables into the power module until the module is completely installed into the chassis. Statement 389


Warning


To reduce the risk of electric shock, switch on the power only after the power cord is completely installed into the power module. Statement 390


Procedure


Step 1

To power up the node, insert the fuse into the fuse position according to site practice. The fuse rating must not exceed 20A.

Step 2

If the ONS 15454 M6 does not power up, check the voltage at the power source using a voltmeter. The voltage should be 100 to 240 VAC +/-10 percent.

Step 3

Return to your originating procedure (NTP).


DLP-G575 Turn On and Verify DC Office Power on the ONS 15454 M6 Shelf

Purpose

This task turns on the power and verifies correct power and returns on the ONS 15454 M6 shelf.

Tools/Equipment

Voltmeter

Prerequisite Procedures

Required/As Needed

Required

Onsite/Remote

Onsite

Security Level

None


Caution


Do not apply power to the shelf until you complete all the installation steps.


Warning


To ensure safety of personnel and equipment, do not connect any power cables into the power module until the module is completely installed into the chassis. Statement 389


Warning


To reduce the risk of electric shock, switch on the power only after the power cord is completely installed into the power module. Statement 390


Procedure


Step 1

Using a voltmeter, verify the office battery and ground at the following points on the fuse and alarm panel:

  1. To verify the power, place the black test lead of the voltmeter to the frame ground. Place the red test lead on the A-side connection and verify that it is between –40.5 VDC and –72.0 VDC. Place the red test lead on the B-side connection and verify that it is between –40.5 VDC and –72.0 VDC.

    Note

     
    For nominal steady state voltage of –48 VDC, the operating voltage range for the chassis is –40.5 VDC (minimum) to –57.6 VDC (maximum).For nominal steady state voltage of –60 VDC, the operating voltage range for the chassis is –50.0 VDC (minimum) to –72.0 VDC (maximum).
  2. To verify the ground, place the black test lead of the voltmeter to the frame ground. Place the red test lead on the A-side return ground and verify that no voltage is present. Place the red test lead on the B-side return ground and verify that no voltage is present.

Step 2

To power up the node, insert the fuse into the fuse position according to site practice. The fuse rating must not exceed 40 A.

Step 3

Using a voltmeter, verify the ONS 15454 M6 shelf for –48 VDC or –60 VDC battery and ground:

  1. To verify the A-side of the shelf, place the black lead of the voltmeter to the frame ground. Place the red test lead to the –48 V or –60 V (A-side battery connection) red cable. Verify that it reads between –40.5 VDC and –72.0 VDC. Then place the red test lead of the voltmeter to the RET1 (A-side return ground) black cable and verify that no voltage is present.

    Note

     
    For nominal steady state voltage of –48 VDC, the operating voltage range for the chassis is –40.5 VDC (minimum) to –57.6 VDC (maximum).For nominal steady state voltage of –60 VDC, the operating voltage range for the chassis is –50.0 VDC (minimum) to –72.0 VDC (maximum).
  2. To verify the B-side of the shelf, place the black test lead of the voltmeter to the frame ground. Place the red test lead to the –48 V (B-side battery connection) red cable. Verify that it reads between –40.5 VDC and –72.0 VDC. Then place the red test lead of the voltmeter to the RET2 (B-side return ground) black cable and verify that no voltage is present.

    Note

     
    To view the shelf voltage and temperature, see the NTP-G230 View Shelf Voltage and Temperature.

    Note

     
    If the ONS 15454 M6 shelf is being powered at –60 VDC nominal voltage, the door must be kept closed during regular operation.

Step 4

Return to your originating procedure (NTP).


Fan-Tray Assembly

The fan-trays supported on the ONS 15454 M6 shelf are 15454-M6-FTA and 15454-M6-FTA2. The 15454-M6-FTA2 fan-tray provides increased airflow when compared to the 15454-M6-FTA fan-tray. The 15454-M2-FTA2 is compatible with R9.2.0 and later releases.

The fan-tray assembly is located on the left side of the ONS 15454 M6 shelf. The fan-tray is removable and holds the fan-control circuitry and the fans for the ONS 15454 M6 shelf. It has a single dual-color LED on the faceplate. When the fan-tray assembly is not functioning or when the power line is not connected, the LED is OFF. When the power line is connected and if there is no TNC, TNCE, TSC, or TSCE card installed in the ONS 15454 M6 shelf, then the LED is OFF. A red LED indicates an alarm in the fan-tray assembly. A green LED indicates that the fan-tray assembly is functioning, the power line is connected, and the power module is functioning properly. The shelf controller card controls the conditions that result in triggering the LEDs. The LED can be overwritten by the shelf controller card (TNC, TNCE, TSC, or TSCE) in all the three states (OFF/red/green). The fan-tray assembly supports the lamp test procedure. After you install the fan tray, you should only access it if a fan failure occurs.

Fan Speed

The fan speed is controlled by the TNC, TNCE, TSC, or TSCE card temperature sensors. The sensors measure the input air temperature at the fan-tray assembly. Fan speed options are low, medium, and high. If the TNC, TNCE, TSC, or TSCE card fails, the fans automatically shift to high speed. The temperature that the TNC, TNCE, TSC, or TSCE sensors measure appear on the LCD screen.

Fan Failure

If one or more fans fail on the fan-tray assembly, replace the entire assembly. You cannot replace individual fans. The red Fan Fail LED on the front of the fan-tray illuminates when one or more fans fail. The red Fan Fail LED clears after you install a working fan-tray.

NTP-G257 Install the Fan-Tray Assembly in the ONS 15454 M6 Shelf

Purpose

This procedure installs the 15454-M6-FTA or 15454-M6-FTA2 fan-tray assembly in the ONS 15454 M6 system.

Tools/Equipment

Small slot-head screwdriver

Prerequisite Procedures

Required/As Needed

Required

Onsite/Remote

Onsite

Security Level

None


Note


The 15454-M2-FTA2 is compatible with R9.2.0 and later releases.

Caution


Do not operate an ONS 15454 M6 without an air filter. For information on the air filter, see NTP-G114 Inspect and Replace the Air Filter.


Caution


Do not force a fan-tray assembly into place. Doing so can damage either the connectors on the fan tray or the connectors on the backpanel of the shelf, or both.


Note


Error messages appear on the TNC, TNCE, TSC, or TSCE card, the fan-tray LED, and in the Cisco Transport Controller (CTC) when the fan-tray assembly is removed from the shelf or when one fan is not working.

Note


To install the fan-tray assembly, it is not necessary to move any of the fiber-routing facilities.

Procedure


Step 1

Insert the fan-tray assembly inside the left slot (fan tray slot) of the ONS 15454 M6 chassis (see the following figure).

Figure 89. Installing the Fan-Tray Assembly
Installing the Fan-Tray Assembly

Step 2

Push the fan-tray assembly such that the backplane connector is engaged completely.

Step 3

Tighten the screws to a torque value of 4 in-lb (0.45 N-m) to lock the fan-tray assembly into the chassis (see the following figure).

Figure 90. Fan Tray Assembly Installed
Fan Tray Assembly Installed

Step 4

To verify that the tray has plugged into the assembly, check the fan tray and listen to determine if the fans are running.

Stop. You have completed this procedure.


Cable Routing and Management

The ONS 15454 M6 shelf has interchangeable fiber and cable modules. Because the ONS 15454 M6 shelf is designed to be compliant with ANSI and ETSI 600x300 standards, all the wiring and cable connections are available on the front side.

Default Module

The ONS 15454 M6 chassis is shipped with the fiber module installed. If you need to use CAT5 cables instead of optical fibers, you can replace the fiber module with the cable module.

Fiber Module

The minimum fiber bend radius is 1.5 inches. The fiber guide can be replaced with a cable guide to route the CAT-5 Ethernet cables. The maximum number of 2 mm diameter patch cords that can be managed is 144, or alternatively, 72 CAT5 cables. To manage extra length fiber and fan out, a dedicated fiber storage unit and patch panel unit can be installed inside the rack. The maximum capacity of the fiber channel for one side of the shelf depends on the fiber size and number of Ethernet cables running through that fiber channel. The details of the fibers are:

  • 24 fiber x 6 line cards = 144 fibers (72 fibers for each exit point) or 12 CAT5 cables x 6 line cards = 72 RJ45 cables (36 CAT5 cables for each exit point)
  • 4 fibers and 1 RJ45 cable x 2 TNC or TNCE = 8 fibers (4 fibers for each exit point) + 2 CAT5 cables (1 CAT5 cable for each exit point)

The fiber diameter is a maximum of 2 mm and the CAT5 cable diameter is a maximum of 5 to 6 mm. You need to determine your fiber size according to the number of cards and ports installed on each side of the shelf. For example, if your port combination requires 36 fibers, 3-mm (0.11-inch) fiber is adequate. If your port combination requires 68 fibers, you must use 2-mm (0.7-inch) or smaller fibers.


Note


The minimum distance between the fiber LC connector and the bulk attenuator must be at least 50 cm. This is the minimum distance required to place the bulk attenuator outside the shelf from any port of a card.

Cable and Fiber Routing

Cable and fiber routing accommodates all the high-density cards for line card connections in ONS 15454 M6. The exit of the fibers and cables is split into two channels. The line card from slot 1 to 4 exits from the lower right side, and the line card from 5 to 8 exit from the upper right side. (See the following figure.)

Figure 91. Cable and fiber routing
Cable and fiber routing

NTP-G290 Install the Cable and Fiber Modules

Purpose

This procedure installs the cable and fiber modules in the ONS 15454 M6 system.

Tools/Equipment

#1 Phillips cross-head PH screwdriver

Prerequisite Procedures

None

Required/As Needed

As needed

Onsite/Remote

Onsite

Security Level

None

Procedure


Step 1

Complete the DLP-G653 Remove the Fiber Module.

Step 2

Complete the DLP-G654 Install the Cable Module.

Step 3

Complete the DLP-G655 Route and Lock Cables .

Stop. You have completed this procedure.


DLP-G653 Remove the Fiber Module

Purpose

This procedure removes the default fiber module in the ONS 15454 M6 system.

Tools/Equipment

#1 Phillips cross-head PH screwdriver

Prerequisite Procedures

None

Required/As Needed

As needed

Onsite/Remote

Onsite

Security Level

None

Procedure


Step 1

Loosen the screws on the fiber module present on the right side of the ONS 15454 M6 assembly. (See the following figure.)

Step 2

Loosen the screw present on the air filter locking feature of the ONS 15454 M6 shelf.

Step 3

Remove the air filter locking feature by holding the air filter and gently pulling the air filter locking feature away from the shelf.

Step 4

Extract the fiber module by gently removing it from the ONS 15454 M6 shelf.

Figure 92. Removing the Fiber module
Removing the Fiber module

DLP-G654 Install the Cable Module

Purpose

This procedure installs the cable module in the ONS 15454 M6 system.

Tools/Equipment

Phillips cross-head PH screwdriver #1

Prerequisite Procedures

DLP-G653 Remove the Fiber Module

Required/As Needed

As needed

Onsite/Remote

Onsite

Security Level

None

Procedure


Step 1

Insert the air filter locking feature on the cable module. (See the following figure.)

Step 2

Attach the slot label identity on the cable module, with screws.

Step 3

Mount the cable module on the chassis, and tighten the screws to a torque value of 4 in-lb (0.45 N-m) to attach the cable module to the ONS 15454 M6 shelf.

Figure 93. Installing the Cable Module
Installing the Cable Module

DLP-G655 Route and Lock Cables

Purpose

This procedure routes and locks the cables on the ONS 15454 M6 system.

Tools/Equipment

None

Prerequisite Procedures

None

Required/As Needed

As needed

Onsite/Remote

Onsite

Security Level

None

Procedure


Step 1

Route the ECU cables on both the ECU ejectors. ECU module Cable Routing shows an example of ECU cable routing. This allows you to close the front door. Ensure an extra length of ECU cable is available to allow cable management during extraction of the power module. See Diagram 1 of Sequence to Remove the Power Module. It is also possible to manage the extraction of the power module without adding the extra length of ECU cable by reducing the number of cables in the right exit area (see Diagram 1 of Cable Management). An extra length of ECU cable is required in the left exit area to manage the USB connections (see Diagram 2 of Cable Management).

Figure 94. ECU module Cable Routing
ECU module Cable Routing
Figure 95. Cable Management
Cable Management

Step 2

Fix the cables using the tie-wrap provided in the accessories kit.

Step 3

To route the optical patch cords or copper cables, do the following as necessary:

  1. Route the optical patch cords from the line cards through the fiber or cable module as shown in the following figure.

    Figure 96. Cable Routing
    Cable Routing
  2. Remove the front door and connect the copper cables to the SFP or RJ-45 ports of the cards.Do not route the copper cables from the SFPs or RJ-45 ports through the fiber or cable module.

Step 4

To extract the power module, do the following:

  1. Open the door of the chassis. See Diagram 2 of Sequence to Remove the Power Module.

  2. Move the ECU cables away from the chassis. Ensure that the alarm cable with the plastic bend radius controller is not moved. See Diagram 3 of Sequence to Remove the Power Module.

  3. Remove the power module. See Diagram 4 of Sequence to Remove the Power Module.

    Figure 97. Sequence to Remove the Power Module
    Sequence to Remove the Power Module

Step 5

Return to your originating procedure (NTP).


NTP-G312 Attach Wires to Alarm, Timing, LAN, and Craft Pin Connections in Cisco ONS 15454 M6

Purpose

Use this procedure to attach alarm, timing, LAN, and craft wires in the ONS 15454 M6 shelf.

Tools/Equipment

Twisted #22 or #24 AWG (0.51 mm² or 0.64 mm²) shielded wires for LAN or craft 75-ohm coaxial cable with DIN-1.0/2.3 miniature coaxial connector, Alarm 26 pins SCSI cable. The PIDs of the SCSI cables are listed in Table 1.

Prerequisite Procedures

NTP-G253 Install the ECU or ECU-S Module

Required/As Needed

As needed

Onsite/Remote

Onsite

Security Level

None


Caution


Always use the supplied ESD wristband when working with a powered ONS 15454 M6. For detailed instructions on how to wear the ESD wristband, see the Electrostatic Discharge and Grounding Guide for Cisco CPT and Cisco ONS Platforms.


Procedure


Step 1

Complete the DLP-G295 Install Alarm Wires in ONS 15454 M6 if you are provisioning external alarms.

Step 2

Complete the DLP-G296 Install Timing Wires on ONS 15454 M6 - ANSI if you are provisioning external timing in ANSI.

Step 3

Complete the DLP-297 Install Timing Wires in ONS 15454 M6 - ETSI if you are provisioning external timing in ETSI.

Step 4

Complete the DLP-G298 Install LAN Wires in ONS 15454 M6 to create an external LAN connection.

Stop. You have completed this procedure.

Table 4. PIDs for SCSI Cables

Cable

PID

Length

Wire Dimension

SCSI alarm cable

15454-M-ALMCBL=

20 Meter

28 AWG

SCSI alarm patch cable

15454-M-AEXPCBL=

1 Meter

28 AWG

SCSI alarm wire-wrap cable

15454-M-ALMCBL2=

20 Meter

24 AWG

Note

 
Some wire-wrap tools require a minimum of 24 AWG wires to prevent breakage. Ensure that the SCSI alarm wire-wrap cable is used for 24 AWG wires. When the SCSI alarm wire-wrap cable is used, the number of alarms is reduced as fewer strands of wire are supported compared to the SCSI alarm and SCSI alarm patch cables. Table 2 lists alarm connector pin details for SCSI alarm wire-wrap cable.

DLP-G295 Install Alarm Wires in ONS 15454 M6

Purpose

This task installs alarm cables on the ECU module of the ONS 15454 M6 to provision external (environmental) alarms and controls.

Tools/Equipment

Alarm SCSI 26-pin cable

Wire-wrap tool for ANSI BITS

Screw for the alarm cable

Prerequisite Procedures

NTP-G253 Install the ECU or ECU-S Module.

Required/As Needed

As needed

Onsite/Remote

Onsite

Security Level

None

Procedure


Step 1

Connect one end of the SCSI cable to the input alarms or input/output alarms, and the other end to the alarm source (See Diagram 1 of Installing the ECU Alarm Cable—Left Exit Option or Installing the ECU Alarm Cable—Right Exit Option). The details of the alarm connector pins are listed in Table 1 and Table 2.

Note

 
These alarms are generic signals that the operator assigns to a definite wire (color) and name through the Craft Terminal.

Step 2

Tighten the screws of the SCSI connector to a torque value of 4 in-lb (0.45 N-m) using #2 Philips Dynamometric screwdriver. See Diagram 2 of Installing the ECU Alarm Cable—Left Exit Option or Installing the ECU Alarm Cable—Right Exit Option.

Step 3

Bend the cable at an angle of 90° to exit from the left side (see Diagram 3 of Installing the ECU Alarm Cable—Left Exit Option) or to exit from the right side (see Diagram 3 of Installing the ECU Alarm Cable—Right Exit Option).

Step 4

Snap the cable bend controller on the cable. See Diagram 4 of Installing the ECU Alarm Cable—Left Exit Option or Installing the ECU Alarm Cable—Right Exit Option.

Step 5

Return to your originating procedure (NTP).

Figure 98. Installing the ECU Alarm Cable—Left Exit Option
Installing the ECU Alarm Cable - Left Exit Option
Figure 99. Installing the ECU Alarm Cable—Right Exit Option
Installing the ECU Alarm Cable - Right Exit Option
Table 5. SCSI Alarm Cable (15454-M-ALMCBL) and SCSI Alarm Patch Cable (15454-M-AEXPCBL) Connector Details

Pin Number

Color Code

Input Alarms - Right Alarm Connector

Input-Output Alarms - Left Connector

1

Black/Brown

Input Pair #1 +

Minor Audible Alarm +

2

Black/Red

Input Pair #2 +

Major Audible Alarm +

3

Black/Orange

Input Pair #3 +

Critical Audible Alarm +

4

Black/Yellow

Input Pair #4 +

Remote Audible Alarm +

5

Black/Green

Input Pair #5 +

Minor Visual Alarm +

6

Black/Blue

Input Pair #6 +

Major Visual Alarm +

7

White/Blue

Input Pair #7 +

Critical Visual Alarm +

8

White/Orange

Input Pair #8 +

Remote Visual Alarm +

9

White/Green

Input Pair #9 +

10

White/Brown

Input Pair #10 +

Alarm Cutoff (ACO) +

11

12

White/Gray

Output Pair #3 + or Input Pair #13 +

Output Pair #1 + or Input Pair #11 +

13

Black/Gray

Output Pair #4 + or Input Pair #14 +

Output Pair #2 + or Input Pair #12 +

14

Brown/Black

Input Pair #1 -

Minor Audible Alarm -

15

Red/Black

Input Pair #2 -

Major Audible Alarm -

16

Orange/Black

Input Pair #3 -

Critical Audible Alarm -

17

Yellow/Black

Input Pair #4 -

Remote Audible Alarm -

18

Green/Black

Input Pair #5 -

Minor Visual Alarm -

19

Blue/Black

Input Pair #6 -

Major Visual Alarm -

20

Blue/White

Input Pair #7 -

Critical Visual Alarm -

21

Orange/White

Input Pair #8 -

Remote Visual Alarm -

22

Green/White

Input Pair #9 -

23

Brown/White

Input Pair #10 -

Alarm Cutoff (ACO) -

24

25

Gray/White

Output Pair #3 - or Input Pair #13 -

Output Pair #1 - or Input Pair #11-

26

Gray/Black

Output Pair #4 - or Input Pair #14 -

Output Pair #2 - or Input Pair #12 -

Table 6. SCSI Alarm Wire-Wrap Cable (15454-M-ALMCBL2) Connector Details

Pin Number

Color Code

Input Alarms - Right Alarm Connector

Input-Output Alarms - Left Connector

1

Black/Brown

Input Pair #1 +

Minor Audible Alarm +

2

Black/Red

Input Pair #2 +

Major Audible Alarm +

3

4

Black/Yellow

Input Pair #4 +

Remote Audible Alarm +

5

Black/Green

Input Pair #5 +

Minor Visual Alarm +

6

Black/Blue

Input Pair #6 +

Major Visual Alarm +

7

White/Blue

8

White/Orange

Input Pair #8 +

Remote Visual Alarm +

9

White/Green

Input Pair #9 +

10

White/Brown

Input Pair #10 +

Alarm Cutoff (ACO) +

11

12

13

14

Brown/Black

Input Pair #1 -

Minor Audible Alarm -

15

Red/Black

Input Pair #2 -

Major Audible Alarm -

16

17

Yellow/Black

Input Pair #4 -

Remote Audible Alarm -

18

Green/Black

Input Pair #5 -

Minor Visual Alarm -

19

Blue/Black

Input Pair #6 -

Major Visual Alarm -

20

21

Orange/White

Input Pair #8 -

Remote Visual Alarm -

22

Green/White

Input Pair #9 -

23

Brown/White

Input Pair #10 -

Alarm Cutoff (ACO) -

24

25

26


DLP-G296 Install Timing Wires on ONS 15454 M6 - ANSI

Purpose

This task installs the timing cables on the ONS 15454 M6 ECU module for ANSI.

Tools/Equipment

Wire-wrap tool and 100-ohm wire-wrap cable.

Prerequisite Procedures

NTP-G253 Install the ECU or ECU-S Module.

Required/As Needed

As needed

Onsite/Remote

Onsite

Security Level

None

Procedure


Step 1

Locate the timing connector on the ECU module (BITS-1 or BITS-2 In/Out). The following figure shows ECU module ANSI wire-wrap pins. Table 1 lists the ECU module pin assignments for ANSI.

Figure 100. ECU module ANSI Wire-wrap Pins
ECU module ANSI Wire-wrap Pins
Table 7. ECU module Pin Assignments - ANSI

Pin

Function

IN 1

Input from external drive

OUT 1

Output to external drive

IN 2

Input from external drive

OUT 2

Output to external drive

Step 2

Connect one end of the wire-wrap clock cable to the corresponding wire-wrap connector on the ECU module, and the other end to the external source of the timing. Change the timing input to high-impedance (lesser or greater than 3 ohms) using a jumper on the ECU module. Remove the P1 jumper of the BITS-1 to change the top timing input, and the P2 Jumper of the BITS-2 to change the bottom timing input.

Note

 
Route the wire-wrap connections as shown in the following figure to prevent interference with the MSM ports.
Figure 101. ECU module Wire-wrap Cabling—ANSI
ECU module Wire-wrap Cabling - ANSI

Step 3

Repeat for each cable. Refer to ITU-T G.813 for rules about provisioning timing references.

Step 4

Return to your originating procedure (NTP).


DLP-297 Install Timing Wires in ONS 15454 M6 - ETSI

Purpose

This task installs the timing cables on the ONS 15454 M6 ECU module for ETSI.

Tools/Equipment

75-ohm coaxial cable with a DIN-1.0/2.3 miniature coaxial connector. The PID for the BITS IN/OUT cable is 15454-M-TMGCBL=

Prerequisite Procedures

NTP-G253 Install the ECU or ECU-S Module.

Required/As Needed

As needed

Onsite/Remote

Onsite

Security Level

None

Procedure


Step 1

Connect the clock cable to the corresponding ECU module connector using a coaxial cable with DIN-1.0/2.3 miniature coaxial connectors. ECU module ETSI BITS connectors shows the ECU module ETSI BITS connectors. ECU module ETSI BITS Connectors Cabling shows cable routing of ECU module ETSI BITS connectors. The following table lists the pin assignments on the ECU module.

Table 8. ECU module Pin Assignments - ETSI

Pin

Function

IN 1

Input from external drive

OUT 1

Output to external drive

IN 2

Input from external drive

OUT 2

Output to external drive

Figure 102. ECU module ETSI BITS connectors
ECU module ETSI BITS connectors
Figure 103. ECU module ETSI BITS Connectors Cabling
ECU module ETSI BITS Connectors Cabling

Step 2

Gently push the cable connector into the ECU module connector until you hear a click. Perform the following steps to mate the connectors:

  1. Slide the coupling sleeve of the coaxial cable backward. See diagram1 of Cisco ONS 15454 M6 Shelf Dimensions for an ETSI Rack Configuration.

  2. Connect the cable to the ECU module connector. See diagram2 of Cisco ONS 15454 M6 Shelf Dimensions for an ETSI Rack Configuration.

  3. Slide the coupling sleeve forward to lock the cable connector to the ECU module connector. See diagram3 of Cisco ONS 15454 M6 Shelf Dimensions for an ETSI Rack Configuration.

    Note

     
    To unlock the cable connector from the ECU module connector, hold the connector and slide the coupling sleeve backward. See diagram4 of Cisco ONS 15454 M6 Shelf Dimensions for an ETSI Rack Configuration.
    Figure 104. Sequence to Attach the Connectors
    Sequence to Attach the Connectors

    Note

     
    The ECU modules provides 1.0/2.3 miniature coaxial connectors used for timing input and output. The top connectors are for “A” (BITS-1) timing, and the bottom connectors are for “B” (BITS-2) timing. In each case, the left connector is the input and the right connector is the output. The input connectors for timing provide a 75-ohm termination.

Step 3

Connect the other end of the cable to the external source of the timing signal according to Table 1. Repeat for each cable.

Step 4

Change the timing input to high-impedance (lesser or greater than 3 ohms) using a jumper on the ECU module. Remove the P1 jumper of the BITS-1 to change the top timing input, and the P2 Jumper of the BITS-2 to change the bottom timing input. Refer to ITU-T G.813 for rules about provisioning timing references.

Step 5

Return to your originating procedure (NTP).


DLP-G298 Install LAN Wires in ONS 15454 M6

Purpose

This task installs LAN wires on the ECU module of the ONS 15454 M6.

Tools/Equipment

Standard CAT-5 Ethernet cable (straight-through for data terminating equipment [DTE] or cross-over for data circuit-terminating equipment [DCE]) or RJ-45 connector Crimping tool for RJ-45 connector

0.51 mm² or 0.64 mm² (#22 or #24 AWG) wire, preferably CAT-5

Prerequisite Procedures

NTP-G253 Install the ECU or ECU-S Module.

Required/As Needed

As needed

Onsite/Remote

Onsite

Security Level

None

We recommend the use of RJ-45 port (craft terminal port or the EMS port) on the ECU module to establish LAN connectivity. The advantages of using the RJ-45 ports on the ECU module include:

  • CAT-5 Ethernet cable connections can be managed better by routing the cable through the ECU module cable exit area.
  • If the TNC, TNCE, TSC, or TSCE card fails, the LAN connection is not lost during the TNC, TNCE, TSC, or TSCE card switch over.

If the ECU module is absent, you can connect a CAT-5 Ethernet cable to the LAN port on the TNC/TNCE/TSC/TSCE card to create an external LAN connection.


Note


You can use the same procedure to connect Multishelf Management ports of several chassis in MSM configurations.

Note


To avoid duplex mismatch between EMS or craft terminal port and external LAN switch port, auto negotiation must be enabled on the external LAN switch port.


Procedure


Step 1

Using 0.51 mm² or 0.64 mm² (#22 or #24 AWG) wire or a standard CAT-5 Ethernet cable, connect the wires to the RJ-45 connector.

Step 2

Return to your originating procedure (NTP).


NTP-G308 Connect the ONS 15454 M6 Multishelf Node and the ONS 15454 M6 Subtending Shelves

Purpose

Use this procedure to connect the ONS 15454 M6 multishelf node and the ONS 15454 M6 subtending shelves.

Tools/Equipment

Cross-over (CAT-5) LAN cables

Prerequisite Procedures

NTP-G313 Install and Configure the TNC, TNCE, TSC, or TSCE Card.

Required/As Needed

As needed

Onsite/Remote

Onsite

Security Level

None


Note


The multishelf management (MSM) ports are present on the ECU module. The MSM ports located on the left side of the ECU module correspond to the TNC/TNCE/TSC/TSCE card in Slot 1, and the MSM ports located on the right side correspond to the TNC/TNCE/TSC/TSCE card in Slot 8. For more information about the ECU module and MSM ports, see the External Connection Units.

Procedure


Step 1

Using a cross-over (CAT-5) LAN cable:

  1. Plug one connector into the MSM port that corresponds to the TNC/TNCE/TSC/TSCE card in Slot 1 of the ONS 15454 M6 shelf used as the node controller.

  2. Plug the other connector into the MSM port that corresponds to the TNC/TNCE/TSC/TSCE card in Slot 1 of the ONS 15454 M6 shelf used as subtending shelf.

Step 2

Using a cross-over (CAT-5) LAN cable:

  1. Plug one connector into the MSM port that corresponds to the TNC/TNCE/TSC/TSCE card in Slot 8 of the ONS 15454 M6 shelf used as the node controller.

  2. Plug the other connector into the MSM port that corresponds to the TNC/TNCE/TSC/TSCE card in Slot 8 of the ONS 15454 M6 shelf used as subtending shelf.

Step 3

Repeat Step 1 and Step 2 to connect the remaining two MSM ports of the ONS 15454 M6 shelf, used as the node controller, to the subsequent subtending ONS 15454 M6 shelf assemblies.

Note

 
The node controller can support up to three subtended shelves, while each of the subtended shelf can support only two more SSCs.

Step 4

To extend the number of SSCs, using a cross-over (CAT-5) LAN cable:

  1. Plug one connector to any one of the remaining MSM ports of the ONS 15454 M6 SSCs in the first layer.

  2. Plug the other connector to any one of the MSM ports of the ONS 15454 M6 SSCs in the next layer.

  3. Repeat a and b to connect the remaining MSM ports of the ONS 15454 M6 in the first layer to the next layer.

    Stop. You have completed this procedure.


NTP-G309 Connect the ONS 15454 M6 and the ONS 15454 in a Mixed Multishelf Configuration

Purpose

Use this procedure to connect the ONS 15454 M6 and the ONS 15454 with Cisco Catalyst 3560 in a mixed multishelf configuration and configure the Catalyst 3560 using IOS commands.

Tools/Equipment

  • Two Cisco Catalyst 3560 switches must be installed in same rack as the node controller shelf; see the Cisco Catalyst 3560 product documentation for installation instructions.
  • Cross-over (CAT-5) LAN cables (3, plus 2 for each subtending shelf)

Prerequisite Procedures

NTP-G15 Install the Common Control Cards.

NTP-G313 Install and Configure the TNC, TNCE, TSC, or TSCE Card

Required/As Needed

As needed

Onsite/Remote

Onsite

Security Level

None


Note


The MSM (multishelf management) ports are present on the ECU module. The MSM ports located on the left side of the ECU module corresponds to the TNC/TNCE/TSC/TSCE card in Slot 1, and the MSM ports located on the right side corresponds to the TNC/TNCE/TSC/TSCE card in Slot 8. For more information about the ECU module and MSM ports, see the External Connection Units.

Procedure


Step 1

Complete the necessary task as applicable:

Step 2

Complete the necessary task as applicable:

Stop. You have completed this procedure.


DLP-G682 Connect the ONS 15454 M6 as the Node Controller in a Mixed Multishelf Configuration Using the Catalyst 3560

Purpose

Use this procedure to connect the ONS 15454 M6 as the node controller and a mix of ONS 15454 and ONS 15454 M6 as subtending shelves using a Catalyst 3560.

Tools/Equipment

  • Two Cisco Catalyst 3560 switches must be installed in same rack as the node controller shelf; see the Cisco Catalyst 3560 product documentation for installation instructions.
  • Cross-over (CAT-5) LAN cables (3, plus 2 for each subtending shelf)

Prerequisite Procedures

NTP-G15 Install the Common Control Cards.

NTP-G313 Install and Configure the TNC, TNCE, TSC, or TSCE Card

Required/As Needed

As needed

Onsite/Remote

Onsite

Security Level

None


Note


The MSM (multishelf management) ports are present on the ECU module. The MSM ports located on the left side of the ECU module correspond to the TNC/TNCE/TSC/TSCE card in Slot 1, and the MSM ports located on the right side correspond to the TNC/TNCE/TSC/TSCE card in Slot 8. For more information about the ECU module and MSM ports, see the External Connection Units.

Note


Use the craft terminal port or the EMS port present on the ECU module to connect the ONS 15454 M6 node controller to the LAN.

Procedure


Step 1

Using a cross-over (CAT-5) LAN cable:

  1. Plug one connector into Port 1 of the working Catalyst 3560.

  2. Plug the other connector into any one of the MSM ports that correspond to the TNC/TNCE/TSC/TSCE card in Slot 1 of the node controller.

Step 2

Using a cross-over (CAT-5) LAN cable:

  1. Plug one connector into Port 1 of the protect Catalyst 3560.

  2. Plug the other connector into any one of the MSM ports that correspond to the TNC/TNCE/TSC/TSCE card in Slot 8 of the node controller.

Step 3

Using a cross-over (CAT-5) LAN cable:

  1. Plug one connector into Port 23 of the working Catalyst 3560.

  2. Plug the other end into Port 23 of the protect Catalyst 3560.

Step 4

To connect an ONS 15454 M6 subtending shelf to the Catalyst 3560 switches, complete the following:

  1. Using a cross-over (CAT-5) LAN cable:

      • Plug one connector into the MSM port of the subtending ONS 15454 M6 shelf that corresponds to the TNC/TNCE/TSC/TSCE card in Slot 1.
      • Plug the other end into Port 2 of the active Catalyst 3560.
  2. Using a cross-over (CAT-5) LAN cable:

      • Plug one connector into the MSM port of the subtending ONS 15454 M6 shelf that corresponds to the TNC/TNCE/TSC/TSCE card in Slot 8.
      • Plug the other end into Port 2 of the standby Catalyst 3560.
  3. Repeat Step 4a and Step 4b for each subtending shelf in the multishelf configuration using Port 3 to Port 20 on the Catalyst 3560 switches.

Step 5

To connect an ONS 15454 subtending shelf to the Catalyst 3560 switches, complete the following:

  1. Using a cross-over (CAT-5) LAN cable:

      • Plug one connector into the front panel of the subtending shelf TCC2/TCC2P/TCC3 card in Slot 7.
      • Plug the other end into Port 2 of the active Catalyst 3560.
  2. Using a cross-over (CAT-5) LAN cable:

      • Plug one connector into the front panel of the subtending shelf TCC2/TCC2P/TCC3 card in Slot 11.
      • Plug the other end into Port 2 of the standby Catalyst 3560.
  3. Repeat Step 5a and 5b for each subtending shelf in the multishelf configuration using Port 3 to Port 20 on the Catalyst 3560 switches.

Step 6

To daisy chain up to six Catalyst 3560 switches, use a cross-over (CAT-5) LAN cable to connect Port 21 of switch 1 to Port 21 of switch 3 and Port 21 of switch 2 to Port 21 of switch 4. Use another cross-over (CAT-5) LAN cable to connect Port 22 of switch 3 to Port 22 of switch 5 and Port 22 of switch 4 to Port 22 of switch 6.

Figure 105. Mixed Multishelf Configuration with the ONS 15454 M6 as the Node Controller
Mixed Multishelf Configuration with the ONS 15454 M6 as the Node Controller

Note

 
In order to connect the ONS 15454 M6 subtending shelves to the ONS 15454 M6 node controller without using a catalyst, follow the steps described in NTP-G308 Connect the ONS 15454 M6 Multishelf Node and the ONS 15454 M6 Subtending Shelves. To connect an ONS 15454 subtending shelf to the ONS 15454 M6 node controller without using a catalyst switch, connect the MSM ports that correspond to the TNC/TNCE/TSC/TSCE cards in Slot 1 and Slot 8 of the ONS 15454 M6 node controller to the ONS 15454 subtending shelf TCC2/TCC2P/TCC3 cards in Slot 7 and Slot 11.

Step 7

Return to your originating procedure (NTP).


DLP-G729 Connect the ONS 15454 M6 as the Node Controller in a Mixed Multishelf Configuration without a Catalyst Switch

Purpose

Use this procedure to connect the ONS 15454 M6 as the node controller and a mix of ONS 15454 and ONS 15454 M6 as subtending shelves without using a Catalyst switch.

Tools/Equipment

  • Cross-over (CAT-5) LAN cables (3, plus 2 for each subtending shelf)

Prerequisite Procedures

NTP-G15 Install the Common Control Cards.

NTP-G313 Install and Configure the TNC, TNCE, TSC, or TSCE Card

Required/As Needed

As needed

Onsite/Remote

Onsite

Security Level

None


Note


The MSM (multishelf management) ports are present on the ECU module. The MSM ports located on the left side of the ECU module correspond to the TNC/TNCE/TSC/TSCE card in Slot 1, and the MSM ports located on the right side correspond to the TNC/TNCE/TSC/TSCE card in Slot 8. For more information about the ECU module and MSM ports, see the External Connection Units.

Note


Use the craft terminal port or the EMS port present on the ECU module to connect the ONS 15454 M6 node controller to the LAN.

Procedure


Step 1

To connect an ONS 15454 M6 subtending shelf to the ONS 15454 M6 node controller, complete the following:

  1. Using a cross-over (CAT-5) LAN cable:

      • Plug one connector into the MSM port of the subtending ONS 15454 M6 shelf that corresponds to the TNC/TNCE/TSC/TSCE card in Slot 1.
      • Plug the other end into the MSM port of the node controller ONS 15454 M6 shelf that corresponds to the TNC/TNCE/TSC/TSCE card in Slot 1.
  2. Using a cross-over (CAT-5) LAN cable:

      • Plug one connector into the MSM port of the subtending ONS 15454 M6 shelf that corresponds to the TNC/TNCE/TSC/TSCE card in Slot 8.
      • Plug the other end into the MSM port of the node controller ONS 15454 M6 shelf that corresponds to the TNC/TNCE/TSC/TSCE card in Slot 1.
  3. Repeat Step 1a and Step 1b to connect the remaining MSM ports on the node controller ONS 15454 M6 shelf to the MSM ports on the subtending ONS 15454 M6 shelf.

Step 2

To connect an ONS 15454 subtending shelf to the ONS 15454 M6 node controller, complete the following:

  1. Using a cross-over (CAT-5) LAN cable:

      • Plug one connector into the front panel of the subtending shelf TCC2/TCC2P/TCC3 card in Slot 7.
      • Plug the other end into the MSM port of the node controller ONS 15454 M6 shelf that corresponds to the TNC/TNCE/TSC/TSCE card in Slot 1.
  2. Using a cross-over (CAT-5) LAN cable:

      • Plug one connector into the front panel of the subtending shelf TCC2/TCC2P/TCC3 card in Slot 11.
      • Plug the other end into the MSM port of the node controller ONS 15454 M6 shelf that corresponds to the TNC/TNCE/TSC/TSCE card in Slot 8.
  3. Repeat Step 2a and 2b for each subtending shelf in the multishelf configuration using the remaining MSM ports on the node controller ONS 15454 M6 shelf.

Step 3

To connect an ONS 15454 subtending shelf to the ONS 15454 M6 subtending shelf, complete the following:

  1. Using a cross-over (CAT-5) LAN cable:

      • Plug one connector into the front panel of the subtending shelf TCC2/TCC2P/TCC3 card in Slot 7.
      • Plug the other end into the MSM port of the subtended ONS 15454 M6 shelf that corresponds to the TNC/TNCE/TSC/TSCE card in Slot 1.
  2. Using a cross-over (CAT-5) LAN cable:

      • Plug one connector into the front panel of the subtending shelf TCC2/TCC2P/TCC3 card in Slot 11.
      • Plug the other end into the MSM port of the subtended ONS 15454 M6 shelf that corresponds to the TNC/TNCE/TSC/TSCE card in Slot 8.
  3. Repeat Step 3a and 3b for each subtending shelf in the multishelf configuration using the remaining MSM ports on the subtending ONS 15454 M6 shelf.

    Figure 106. Mixed Multishelf Configuration without a Catalyst Switch Using ONS 15454 M6 as the Node Controller
    Mixed Multishelf Configuration without a Catalyst Switch Using ONS 15454 M6 as the Node Controller

Step 4

Return to your originating procedure (NTP).


DLP-G683 Connect the ONS 15454 as the Node Controller in a Mixed Multishelf Configuration

Purpose

Use this procedure to connect the ONS 15454 as the node controller and a mix of ONS 15454 and ONS 15454 M6 as subtending shelves using the Catalyst 3560.

Tools/Equipment

  • Two Cisco Catalyst 3560 switches must be installed in same rack as the node controller shelf; refer to the Cisco Catalyst 3560 product documentation for installation instructions.
  • Cross-over (CAT-5) LAN cables

Prerequisite Procedures

NTP-G15 Install the Common Control Cards.

NTP-G313 Install and Configure the TNC, TNCE, TSC, or TSCE Card

Required/As Needed

As needed

Onsite/Remote

Onsite

Security Level

None


Note


The MSM (multishelf management) ports are present on the ECU module. The MSM ports located on the left side of the ECU module correspond to the TNC/TNCE/TSC/TSCE card in Slot 1, and the MSM ports located on the right side correspond to the TNC/TNCE/TSC/TSCE card in Slot 8. For more information about the ECU module and MSM ports, see the External Connection Units.

Note


This procedure explains the steps to connect the ONS 15454 multishelf node and subtending shelves to a 24-port Catalyst 2950 or Catalyst 3560 switch. Follow the steps provided in this procedure to connect the multishelf node to the 48-port Catalyst 2950 or Catalyst 3560 switch.

Note


Cisco ONS 15454 M12 subtended shelf does not support connecting to NCS multi-shelf node.

Procedure


Step 1

Using a cross-over (CAT-5) LAN cable:

  1. Plug one connector into Port 1 of the active Catalyst 3560.

  2. Plug the other connector into the front panel of the node controller TCC2/TCC2P/TCC3 card in Slot 7.

Step 2

Using a cross-over (CAT-5) LAN cable:

  1. Plug one connector into Port 1 of the standby Catalyst 3560.

  2. Plug the other connector into the front panel of the node controller TCC2/TCC2P/TCC3 card in Slot 11.

Step 3

Using a cross-over (CAT-5) LAN cable:

  1. Plug one connector into Port 23 of the active Catalyst 3560.

  2. Plug the other connector into Port 23 of the standby Catalyst 3560.

    Note

     
    Use TCC3 cards in the ONS 15454 node controller while connecting it to the ONS 15454 M6 subtending shelves and when there are more than 12 subtending shelves.

Step 4

To connect an ONS 15454 M6 subtending shelf to the Catalyst 3560 switches, complete the following:

  1. Using a cross-over (CAT-5) LAN cable:

      • Plug one connector into the MSM port of the subtending ONS 15454 M6 shelf that corresponds to the TNC/TNCE/TSC/TSCE card in Slot 1.
      • Plug the other connector into Port 2 of the active Catalyst 3560.
  2. Using a cross-over (CAT-5) LAN cable:

      • Plug one connector into the MSM port of the subtending ONS 15454 M6 shelf that corresponds to the TNC/TNCE/TSC/TSCE card in Slot 8.
      • Plug the other connector into Port 2 of the standby Catalyst 3560.
  3. Repeat Steps 4a and 4b for each subtending shelf in the multishelf configuration using Port 3 to Port 20 on the Catalyst 3560 switches.

Step 5

To connect an ONS 15454 subtending shelf to the Catalyst 3560 switches, complete the following:

  1. Using a cross-over (CAT-5) LAN cable:

      • Plug one connector into the front panel of the subtending shelf TCC2/TCC2P/TCC3 card in Slot 7.
      • Plug the other connector into Port 2 of the active Catalyst 3560.
  2. Using a cross-over (CAT-5) LAN cable:

      • Plug one connector into the front panel of the subtending shelf TCC2/TCC2P/TCC3 card in Slot 11.
      • Plug the other connector into Port 2 of the standby Catalyst 3560.
  3. Repeat Step 5a and 5b for each subtending shelf in the multishelf configuration using Port 3 to Port 20 on the Catalyst 3560 switches.

Step 6

To daisy chain up to six Catalyst 3560 switches, use a cross-over (CAT-5) LAN cable to connect Port 21 of switch 1 to Port 21 of switch 3 and Port 21 of switch 2 to Port 21 of switch 4. Use another cross-over (CAT-5) LAN cable to connect Port 22 of switch 3 to Port 22 of switch 5 and Port 22 of switch 4 to Port 22 of switch 6.

Figure 107. Mixed Multishelf Configuration with the ONS 15454 as the Node Controller
Mixed Multishelf Configuration with the ONS 15454 as the Node Controller

Step 7

Return to your originating procedure (NTP).


NTP-G310 Upgrade the ONS 15454 Multishelf Configuration Using the ONS 15454 M6

Purpose

Use this procedure to upgrade the existing ONS 15454 multishelf configuration using the ONS 15454 M6 as subtending shelves and configure the Catalyst switches using the IOS commands.

Tools/Equipment

  • If there are no free ports in the Cisco Catalysts 2950, two Cisco Catalyst 3560 switches must be installed in same rack as the node controller shelf; see the Cisco Catalyst 3560 product documentation for installation instructions.
  • Cross-over (CAT-5) LAN cables

Prerequisite Procedures

Required/As Needed

As needed

Onsite/Remote

Onsite

Security Level

None


Note


The multishelf management (MSM) ports are present on the ECU module. The MSM ports located on the left side of the ECU module correspond to the TNC/TNCE/TSC/TSCE card in Slot 1, and the MSM ports located on the right side correspond to the TNC/TNCE/TSC/TSCE card in Slot 8. For more information about the ECU module and MSM ports, see the External Connection Units.

Procedure


Step 1

Complete the necessary task as applicable:

Step 2

To configure the Catalyst 2950 switch using IOS commands, complete the NTP-G298 Configure a Cisco Catalyst 2950 or Catalyst 3560 (Active and Standby) for a ONS 15454 Multishelf Node .

Step 3

To configure the Catalyst 3560 switch using IOS commands, complete the NTP-G298 Configure a Cisco Catalyst 2950 or Catalyst 3560 (Active and Standby) for a ONS 15454 Multishelf Node .

Stop. You have completed this procedure.


DLP-G687 Upgrade the ONS 15454 Multishelf with the Catalyst 2950 Switch Configuration

Purpose

Use this task to upgrade the existing ONS 15454 multishelf with Catalyst 2950 configuration, with the ONS 15454 M6 subtending shelves and Cisco Catalyst 3950.

Tools/Equipment

  • Two Cisco Catalyst 3560 switches must be installed in same rack as the node controller shelf; refer to the Cisco Catalyst 3560 product documentation for installation instructions.
  • Cross-over (CAT-5) LAN cables

Prerequisite Procedures

Required/As Needed

As needed

Onsite/Remote

Onsite

Security Level

None


Note


Use TCC3 cards in ONS 15454 node controller while connecting it to the ONS 15454 M6 subtending shelves and when there are more than 12 subtending shelves.

Procedure


Step 1

Disconnect the subtending shelf at Port 21 of the active and standby Catalyst 2950:

  1. Remove the cross-over (CAT 5) LAN cable from Port 21 of the active Catalyst 2950.

  2. Remove the cross-over (CAT 5) LAN cable from Port 21 of the standby Catalyst 2950.

Step 2

Connect the extended Catalyst 3560 (active and standby) to the Catalyst 2950:

  1. Using a cross-over (CAT-5) LAN cable:

      • Plug one connector to Port 1 of the extended Catalyst 3560 (active).
      • Plug the other connector to Port 21 of the active Catalyst 2950.
  2. Using a cross-over (CAT-5) LAN cable:

      • Plug one connector to Port 1 of the extended Catalyst 3560 (standby).
      • Plug the other connector to Port 21 of the standby Catalyst 2950.

Step 3

Reconnect the ONS 15454 subtending shelf disconnected in Step 1 to the Catalyst 3560 switches:

  1. Using a cross-over (CAT-5) LAN cable:

      • Plug one connector into the front panel of the subtending shelf TCC2/TCC2P/TCC3 card in Slot 7.
      • Plug the other connector into Port 2 of the active Catalyst 3560.
  2. Using a cross-over (CAT-5) LAN cable:

      • Plug one connector into the front panel of the subtending shelf TCC2/TCC2P/TCC3 card in Slot 11.
      • Plug the other connector into Port 2 of the standby Catalyst 3560.

Step 4

Repeat Step 3a and Step 3b to connect additional ONS 15454 subtending shelves using Port 3 through Port 20 on the Catalyst 3560 switches.

Step 5

To connect an ONS 15454 M6 subtending shelf to the Catalyst 3560 switches, complete the following:

  1. Using a cross-over (CAT-5) LAN cable:

      • Plug one connector into the MSM port of the subtending ONS 15454 M6 shelf that corresponds to the TNC/TNCE/TSC/TSCE card in Slot 1.
      • Plug the other connector into Port 3 of the active Catalyst 3560.
  2. Using a cross-over (CAT-5) LAN cable:

      • Plug one connector into the MSM port of the subtending ONS 15454 M6 shelf that corresponds to the TNC/TNCE/TSC/TSCE card in Slot 8.
      • Plug the other connector into Port 3 of the standby Catalyst 3560.
  3. Repeat Step 4a and Step 4b to connect additional ONS 15454 M6 subtending shelves in the multishelf configuration using Port 4 to Port 20 on the Catalyst 3560 switches.

    Figure 108. Upgrading the ONS 15454 Multishelf Configuration Connected to the Catalyst 2950
    Upgrading the ONS 15454 Multishelf Configuration Connected to the Catalyst 2950

Step 6

To configure the Catalyst 3560 (extended) using IOS commands, complete the NTP-G298 Configure a Cisco Catalyst 2950 or Catalyst 3560 (Active and Standby) for a ONS 15454 Multishelf Node.

Step 7

Return to your originating procedure (NTP).


DLP-G688 Upgrade the ONS 15454 Multishelf with MS-ISC Card Configuration

Purpose

Use this task to upgrade the existing ONS 15454 multishelf configuration that has the MS-ISC card installed, with the ONS 15454 M6 subtending shelves and Cisco Catalyst 3950.

Tools/Equipment

  • Two Cisco Catalyst 3560 switches must be installed in same rack as the node controller shelf; refer to the Cisco Catalyst 3560 product documentation for installation instructions.
  • Cross-over (CAT-5) LAN cables (3, plus 2 for each subtending shelf)

Prerequisite Procedures

Required/As Needed

As needed

Onsite/Remote

Onsite

Security Level

None


Note


Use TCC3 cards in ONS 15454 node controller while connecting it to the ONS 15454 M6 subtending shelves and when there are more than 12 subtending shelves.

Note


The CTC in ONS 15454 M6 shelf view displays the three ports of the MS-ISC card, and EMS and circuit ports present on the ECU.

Procedure


Step 1

Disconnect the ONS 15454 subtending shelf from the EAPs:

  1. Remove the cross-over (CAT 5) LAN cable (connecting the ONS 15454 subtending shelf) from the SSC8 port of the right EAP.

  2. Remove the cross-over (CAT 5) LAN cable (connecting the ONS 15454 subtending shelf) from the SSC8 port of the left EAP.

Step 2

Connect the EAPs to the Catalyst 3560:

  1. Using a cross-over (CAT-5) LAN cable:

      • Plug one connector to the SSC8 port of the right EAP.
      • Plug the other connector to Port 1 of the active Catalyst 3560.
  2. Using a cross-over (CAT-5) LAN cable:

      • Plug one connector to the SSC8 port of the left EAP.
      • Plug the other connector to Port 1 of the standby Catalyst 3560.

Step 3

Reconnect the ONS 15454 subtending shelf disconnected in Step1 to the Catalyst 3560 switches:

  1. Using a cross-over (CAT-5) LAN cable:

      • Plug one connector into the front panel of the subtending shelf TCC2/TCC2P/TCC3 card in Slot 7.
      • Plug the other connector into Port 2 of the active Catalyst 3560.
  2. Using a cross-over (CAT-5) LAN cable:

      • Plug one connector into the front panel of the subtending shelf TCC2/TCC2P/TCC3 card in Slot 11.
      • Plug the other connector into Port 2 of the standby Catalyst 3560.

Step 4

Repeat Step 3a and Step 3b to connect additional ONS 15454 shelves using Port 3 to Port 24 on the Catalyst 3560 switches.

Step 5

To connect an ONS 15454 M6 subtending shelf to the Catalyst 3560 switches, complete the following:

  1. Using a cross-over (CAT-5) LAN cable:

      • Plug one connector into the MSM port of the subtending ONS 15454 M6 shelf that corresponds to the TNC/TNCE/TSC/TSCE card in Slot 1.
      • Plug the other connector into Port 3 of the active Catalyst 3560.
  2. Using a cross-over (CAT-5) LAN cable:

      • Plug one connector into the MSM port of the subtending ONS 15454 M6 shelf that corresponds to the TNC/TNCE/TSC/TSCE card in Slot 8.
      • Plug the other connector into Port 3 of the standby Catalyst 3560.
  3. Repeat Steps 4a and 4b to connect additional ONS 15454 M6 subtending shelves in the multishelf configuration using Port 4 to Port 24 on the Catalyst 3560 switches.

    Figure 109. Upgrading the ONS 15454 Multishelf Configuration Using the MS-ISC Card
    Upgrading the ONS 15454 Multishelf Configuration Using the MS-ISC Card

Step 6

To configure the Catalyst 3560 (extended) using IOS commands, complete the NTP-G298 Configure a Cisco Catalyst 2950 or Catalyst 3560 (Active and Standby) for a ONS 15454 Multishelf Node.

Step 7

Return to your originating procedure (NTP).


NTP-G264 Perform the ONS 15454 M6 Shelf Installation Acceptance Test

Purpose

Use this procedure to perform a shelf installation acceptance test for the ONS 15454 M6.

Tools/Equipment

Voltmeter

Prerequisite Procedures

Applicable procedures in Installing the ONS 15454 M6 Shelf

Required/As Needed

Required

Onsite/Remote

Onsite

Security Level

None

Procedure


Step 1

If you installed an ONS 15454 M6, complete the following table by verifying that each applicable procedure was completed.

Table 9. ONS 15454 M6 Shelf —ETSI Rack Installation Task Summary

Description

Completed

NTP-G305 Unpack and Inspect the ONS 15454, ONS 15454 M2, and ONS 15454 M6 Shelves

NTP-G252 Install the ONS 15454 M6 Shelf

Connect the chassis to the office ground. For detailed instructions on how to ground the chassis, see the Electrostatic Discharge and Grounding Guide for Cisco CPT and Cisco ONS Platforms.

NTP-G259 Open and Remove the Standard Door of the ONS 15454 M6 Shelf

NTP-G253 Install the ECU or ECU-S Module

NTP-G524 Install the Power Modules in the ONS 15454 M6 Shelf

NTP-G255 Install the LCD Module in the ONS 15454 M6 Shelf

NTP-G256 Install Power and Ground to the ONS 15454 M6 Shelf

NTP-G257 Install the Fan-Tray Assembly in the ONS 15454 M6 Shelf

NTP-G313 Install and Configure the TNC, TNCE, TSC, or TSCE Card

NTP-G308 Connect the ONS 15454 M6 Multishelf Node and the ONS 15454 M6 Subtending Shelves (as applicable)

NTP-G309 Connect the ONS 15454 M6 and the ONS 15454 in a Mixed Multishelf Configuration (as applicable)

NTP-G310 Upgrade the ONS 15454 Multishelf Configuration Using the ONS 15454 M6 (as applicable)

NTP-G298 Configure a Cisco Catalyst 2950 or Catalyst 3560 (Active and Standby) for a ONS 15454 Multishelf Node (as applicable)

NTP-G258 Install the Standard Door of the ONS 15454 M6 Shelf

Note

 
The ECU module, power modules, LCD and the fan-tray assembly can be installed in any order.

Step 2

Complete the DLP-G578 Inspect the ONS 15454 M6 Shelf Installation and Connections.

Step 3

Complete the DLP-G579 Measure DC Voltage on the ONS 15454 M6 Shelf.

Step 4

Continue with the Connect the PC and Log into the GUI document.

Stop. You have completed this procedure.


DLP-G578 Inspect the ONS 15454 M6 Shelf Installation and Connections

Purpose

Use this task to inspect the shelf installation and connections and verify that everything is installed and connected properly.

Tools/Equipment

None

Prerequisite Procedures

None

Required/As Needed

Required

Onsite/Remote

Onsite

Security Level

None

Procedure


Step 1

Make sure all external wiring connections on the ECU module (that is, power, ground, alarms, and so on) are secure. If a wire or cable is loose, return to the appropriate procedure in this chapter to correct it.

Step 2

Return to your originating procedure (NTP).


DLP-G579 Measure DC Voltage on the ONS 15454 M6 Shelf

Purpose

Use this task to measure DC voltage on the ONS 15454 M6 shelf.

Tools/Equipment

Voltmeter

Prerequisite Procedures

Before installing the DC power, check the voltage

Required/As Needed

Required

Onsite/Remote

Onsite

Security Level

None


Caution


Do not apply power to the shelf until you complete all installation steps.


Warning


To ensure safety of personnel and equipment, do not connect any power cables into the power module until the module is completely installed into the chassis. Statement 389


Warning


To reduce the risk of electric shock, switch on the power only after the power cord is completely installed into the power module. Statement 390


Procedure


Step 1

Using a voltmeter, verify the office ground and power:

  1. Place the black lead (positive) on the frame ground on the bay. Hold it there while completing Step b.

  2. Place the red lead (negative) on the fuse power points on the third-party power distribution panel to verify that they read between –40.5 VDC and –57.6 VDC (power) and 0 (return ground).

Step 2

Using a voltmeter, verify the shelf ground and power wiring:

  1. Place the black lead (positive) on the RET1 and the red lead on the –48 V point. Verify a reading between –40.5 VDC and –57.6 VDC. If there is no voltage, check the following and correct if necessary:

    • Battery and ground are reversed to the shelf.
    • Battery is open or missing.
    • Return is open or missing.

Step 3

Repeat Step 1 and Step 2 for the RET2 and –48 V of the redundant power supply input.

Step 4

Return to your originating procedure (NTP).


NTP-G317 Connect the ONS 15454 M6 Multishelf Node and the ONS 15454 M6 Subtending Shelves with Simplex Controllers

Purpose

Use this procedure to connect the ONS 15454 M6 multishelf node and the ONS 15454 M6 subtending shelves with simplex controllers.

Tools/Equipment

Cross-over (CAT-5) LAN cables

Prerequisite Procedures

NTP-G313 Install and Configure the TNC, TNCE, TSC, or TSCE Card. See the Cisco ONS 15454 DWDM Configuration Guide.

Required/As Needed

As needed

Onsite/Remote

Onsite

Security Level

None


Note


The MSM (multishelf management) ports are present on the ECU module. The MSM ports located on the left side of the ECU module correspond to the TNC/TNCE/TSC/TSCE card in Slot 1, and the MSM ports located on the right side correspond to the TNC/TNCE/TSC/TSCE card in Slot 8. For more information about the ECU module and MSM ports, see External Connection Units.

Procedure


Step 1

Using a cross-over (CAT-5) LAN cable:

  1. Plug one connector into the MSM port that corresponds to the TNC/TNCE/TSC/TSCE card in Slot 1 of the ONS 15454 M6 shelf used as the node controller.

  2. Plug the other connector into the MSM port that corresponds to the TNC/TNCE/TSC/TSCE card in Slot 1 of the ONS 15454 M6 shelf used as subtending shelf.

    Note

     
    When connecting two shelves using the cross-over cables, it is possible to have shelves not having controller cards in same slots. Use corresponding MSM ports according to the controller card slots.

Step 2

Repeat Step 1 to connect the remaining two MSM ports of the ONS 15454 M6 shelf, used as the node controller, to the subsequent subtending ONS 15454 M6 shelf assemblies.

Note

 
You can connect up to a maximum of 3 SSCs in the multishelf configuration.
Figure 110. Connecting the ONS 15454 M6 Multishelf Node and the ONS 15454 M6 Subtending Shelves with Simplex Controllers
Connecting the ONS 15454 M6 Multishelf Node and the ONS 15454 M6 Subtending Shelves with Simplex Controllers

Stop. You have completed this procedure.


NTP-G318 Connect the ONS 15454 M6 Multishelf Node and the ONS 15454 M6 Subtending Shelves in a Ring Topology

Purpose

Use this procedure to connect the ONS 15454 M6 multishelf node and the ONS 15454 M6 subtending shelves in a ring topology.

Tools/Equipment

Cross-over (CAT-5) LAN cables

Prerequisite Procedures

NTP-G313 Install and Configure the TNC, TNCE, TSC, or TSCE Card. See the Cisco ONS 15454 DWDM Configuration Guide.

Required/As Needed

As needed

Onsite/Remote

Onsite

Security Level

None


Note


The MSM (multishelf management) ports are present on the ECU module. The MSM ports located on the left side of the ECU module correspond to the TNC/TNCE/TSC/TSCE card in Slot 1, and the MSM ports located on the right side correspond to the TNC/TNCE/TSC/TSCE card in Slot 8. For more information about the ECU module and MSM ports, see the External Connection Units.

Procedure


Step 1

Using a cross-over (CAT-5) LAN cable:

  1. Plug one connector into the MSM port that corresponds to the TNC/TNCE/TSC/TSCE card in Slot 1 of the ONS 15454 M6 shelf used as the node controller.

  2. Plug the other connector into the MSM port that corresponds to the TNC/TNCE/TSC/TSCE card in Slot 1 of the ONS 15454 M6 shelf used as subtending shelf.

    Note

     
    When connecting two shelves using the cross-over cables, it is possible to have shelves not having controller cards in same slots. Use corresponding MSM ports according to the controller card slots.

Step 2

Using a cross-over (CAT-5) LAN cable:

  1. Plug one connector to any one of the remaining MSM ports of the ONS 15454 M6 SSCs in the first layer.

  2. Plug the other connector to any one of the MSM ports of the ONS 15454 M6 SSCs in the next layer.

  3. Repeat a and b to connect the remaining MSM ports of the ONS 15454 M6 SSCs.

    After connecting all the SSCs as per Step 2, connect the last 15454 M6 SSC to the 15454 M6 node controller to complete the ring.

    Note

     
    You can connect up to a maximum of 9 SSCs in the ring topology.
    Figure 111. Connecting the ONS 15454 M6 Multishelf Node and the ONS 15454 M6 Subtending Shelves in a Ring Topology
    Connecting the ONS 15454 M6 Multishelf Node and the ONS 15454 M6 Subtending Shelves in a Ring Topology

    Stop. You have completed this procedure.


Air Deflector

An air deflector is a sheet-metal part that is mounted on the ONS 15454 M6 shelf to orient the air flow in a specific direction.

Air deflectors can be mounted in different positions to control the air flow:

  • Front to Front—Only ETSI rack
  • Front to Back—For ANSI and ETSI racks
  • Front to Top—Only ETSI rack

In an ANSI rack, the air deflectors are mounted only on the 23-inch rack configuration.

Filler and Blank Cards

Filler cards must be installed in unused and empty slots to ensure proper air flow and electromagnetic interference (EMI) requirements during the ONS 15454 M6 operation. CTC detects filler cards from R 10.6 onwards.

There are two types of card fillers:

  • Line card fillers (15454-M-FILLER)

These filler cards operate in slots 2, 3, 4, 5, 6, and 7, and have no card-level LED indicators.

The following figure shows the faceplate of line card filler.

Figure 112. Line Card Filler—Faceplate
Line Card Filler - Faceplate
  • Timing and Control Card fillers (15454-M-T-FILLER)

These filler cards are for control cards that operate in slots 1 and 8. The following figure shows the faceplate of timing and control card filler.

Figure 113. Timing and Control Card Fillers - Faceplate
Timing and Control Card Fillers - Faceplate

Blank cards (15454-BLANK) can be installed in any empty slot in the shelf. CTC does not detect blank cards. The following figure shows the faceplate of the blank card filler.

Figure 114. Blank Card Filler - Faceplate
Blank Card Filler - Faceplate

Air Filter

The ONS 15454 M6 contains a preinstalled reusable air filter (15454 M6-FTF) on the right side of the shelf.

The reusable filter is made up of a gray, open-cell, polyurethane foam that is specially coated to provide fire and fungi resistance. Spare filters should be kept in stock. Inspect the air filter every 30 days, and clean the filter every 3 to 6 months. The air filter can be replaced without removing the fan-tray assembly. However, the fan-tray must be turned off to remove the air filter. Replace the air filter every two to three years. Avoid cleaning the air filter with harsh cleaning agents or solvents.


Caution


Do not operate an ONS 15454 M6 without the mandatory air filter.


Shelf Voltage and Temperature


Note


The temperature that the TNC, TNCE, TSC, or TSCE sensors measure appear on the LCD screen in the ONS 15454 M6 chassis.

The input voltages and temperature of the ONS 15454 M6 chassis are displayed in the Shelf view > Provisioning > General > Voltage/Temperature pane in CTC. The voltage supplied to the shelf (in millivolts) is displayed in the Voltage area of the Voltage/Temperature pane. The temperature of the shelf (in degree Celsius) is displayed in the Temperature area of the pane.

The Voltage/Temperature pane retrieves the following values for the ONS 15454 M6 chassis:

  • Voltage A—Voltage of the shelf that corresponds to power supply A, in millivolts.
  • Voltage B—Voltage of the shelf that corresponds to power supply B, in millivolts.
  • Chassis Temperature—Temperature of the shelf, in degrees Celsius.

In a multishelf configuration, the voltage and temperature of each shelf is displayed in the Shelf view > Provisioning > General > Voltage/Temperature pane.

Cooling Profile

The cooling profile feature allows you to control the speed of the fans in the ONS 15454 M6 shelf depending on the I/O cards used.

CTC allows you to choose a cooling profile for ONS 15454 M6 shelf. You can change the cooling profile in Shelf view > Provisioning > General > Voltage/Temperature pane in CTC. The supported cooling profile values are Low, Medium, and High. The default cooling profile value is High. You can change the cooling profile depending on the cards used in the shelf.

If there are multiple cards in the shelf, you must choose the cooling profile of the card that requires the highest cooling profile. For example, if the shelf has two cards with low cooling profile, three cards with medium cooling profile, and one card with high cooling profile, you must choose a high cooling profile for the shelf.


Caution


The wrong cooling profile chosen for the shelf might harm the cards present in the shelf.


If a wrong cooling profile is chosen for the shelf, the COOL-MISM condition is raised on the shelf. For more information on the alarm, see the “COOL-MISM” alarm in Chapter 2, Alarm Troubleshooting of Cisco ONS 15454 DWDM Troubleshooting Guide .

The following table shows the cards that require high, medium, and low cooling profile.

Table 10. Cooling Profile Values for ONS 15454 M6 Cards

Cards with Low Cooling Profile

Cards with Medium Cooling Profile

Cards with High Cooling Profile

  • 32-WSS
  • 32-WSS-L
  • 32-DMX
  • 32-DMX-L
  • 32-DMX-O
  • 10GE-XP
  • 40-SMR1-C
  • 40-SMR2-C
  • 40-WSS-C
  • 40-WSS-L
  • 100G-LC-C
  • 10X10G-LC
  • CFP-LC
  • EDRA1-26, EDRA1-35
  • EDRA2-26, EDRA2-35
  • 40-DMX-C
  • 40-DMX-L
  • 32-MUX-O
  • 40-MUX-C
  • 40-MUX-L
  • 40E-MXP-C
  • 40E-TXP-C
  • 40G-MXP-C
  • 40G-TXP-C
  • ADM-10G
  • 40-WXC-C
  • 40-WXC-L
  • 80-WXC-C
  • AD-1B
  • AD-1C
  • AR_MXP
  • AR_XP
  • GE-XP
  • MXP_2.5G_10E
  • MXP_2.5G_10G
  • AD-2C
  • AD-4B
  • AD-4C
  • MD-4
  • MMU
  • MXP_2.5G_10X
  • MXP_MR_10DME
  • MXP_MR_10DMEX
  • MXP_MR_2.5G
  • MXPP_MR_2.5G
  • OPT-AMP-17-C
  • OPT-AMP-C
  • OPT-AMP-L
  • OPT-BST
  • OPT-BST-E
  • OPT-BST-L
  • OPT-EDFA-17
  • OPT-EDFA-24
  • OPT-PRE
  • OSCM
  • OSC-CSM
  • PSM
  • TDC-CC
  • TDC-FC
  • TXP_MR_10E
  • TXP_MR_10EX
  • TXP_MR_10G
  • TXP_MR_2.5G
  • TXPP_MR_2.5G
  • OPT-RAMP-C
  • OPT-RAMP-CE
  • OTU2_XP
  • RAMAN-COP
  • RAMAN-CTP