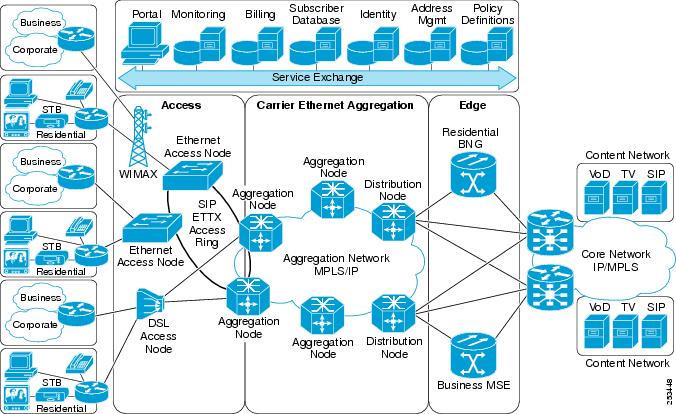
The Carrier Ethernet Model

This chapter introduces you to Layer 2 (L2) features and standards. This chapter also describes how to configure L2VPN features

The distributed Gigabit Ethernet and 10-Gigabit Ethernet architecture and features deliver network scalability and performance, while enabling service providers to offer high-density, high-bandwidth networking solutions designed to interconnect the router with other systems in POPs, including core and edge routers and L2 and Layer 3 (L3) switches.


Note


This chapter does not include configuration information for Management Ethernet interfaces. To set up a Management Ethernet interface and enable Telnet servers, see the Cisco ASR 9000 Series Aggregation Services Routers Getting Started Guide. To configure a Management Ethernet interface for routing or to modify the configuration of a Management Ethernet interface, see the Advanced Configuration and Modification of the Management Ethernet Interface on the Cisco ASR 9000 Series Router chapter of the Interface and Hardware Component Configuration Guide for Cisco ASR 9000 Series Routers.

Feature History for Configuring Ethernet Interfaces

Release

Modification

Release 3.7.2

This feature was introduced on the Cisco ASR 9000 Series Routers.

Release 4.1.1

Scalability of EFPs on bundle interfaces was introduced.

Prerequisites for Configuring Layer 2 Ethernet Interfaces

Before configuring Ethernet interfaces, ensure that these tasks and conditions are met:

  • You must be in a user group associated with a task group that includes the proper task IDs. The command reference guides include the task IDs required for each command.

    If you suspect user group assignment is preventing you from using a command, contact your AAA administrator for assistance.

  • Confirm that at least one of these line cards is installed on the router:

    • 4-port 10-Gigabit Ethernet (4 x 10 GE) line card
    • 8-port 10-Gigabit Ethernet (4 x 10 GE) line card
    • 40-port 1-Gigabit Ethernet line card
  • You know the interface IP address.
  • You know how to apply the specify the generalized interface name with the generalized notation rack/slot/module/port .

Layer 2 Theory and Standards Adherence

To configure Ethernet interfaces, you must understand these concepts:

Ethernet Technology Overview

Ethernet is defined by the IEEE 802.3 international standard. It enables the connection of up to 1024 nodes over coaxial, twisted-pair, or fiber-optic cable.

The Cisco ASR 9000 Series Routers support Gigabit Ethernet (1000 Mbps) and 10-Gigabit Ethernet (10 Gbps) interfaces.

Carrier Ethernet Services

Cisco endorses Metro Ethernet Forum (MEF) Carrier Ethernet (CE) 2.0 services:

  • E-LINE: An E-Line is a point-to-point Ethernet service that connects exactly 2 UNIs.

  • E-LAN: An E-LAN is a multipoint-to-multipoint service that connects a number of UNIs (2 or more) providing full mesh connectivity for those sites.

  • E-TREE: An E-Tree is a rooted multipoint service that connects a number of UNIs providing sites with hub and spoke multipoint connectivity.

  • E-ACCESS: An E-Access Service is an OVC-based service with at least one UNI OVC End Point and one ENNI End Point.

When discussing an Ethernet WAN (EWAN), these terminologies should be used:

  • CE (customer edge): The customer device connecting to the service provider
  • PE (provider edge): The service provider device connecting to the customer
  • UNI: The connection between the CE and PE
  • AC: The physical or virtual circuit attaching a CE to a PE
  • Multiplexed UNI: A UNI supporting multiple VLAN flows
  • Pseudowire: A term used to indicate an end-to-end path in a service provider network
Figure 1. EWAN Terms

EWAN Terms

Ethernet Wire Service

An Ethernet Wire Service is a service that emulates a point-to-point Ethernet segment. This is similar to Ethernet private line (EPL), a Layer 1 point-to-point service, except the provider edge operates at Layer 2 and typically runs over a Layer 2 network. The EWS encapsulates all frames that are received on a particular UNI and transports these frames to a single-egress UNI without reference to the contents contained within the frame. The operation of this service means that an EWS can be used with VLAN-tagged frames. The VLAN tags are transparent to the EWS (bridge protocol data units [BPDUs])—with some exceptions. These exceptions include IEEE 802.1x, IEEE 802.2ad, and IEEE 802.3x, because these frames have local significance and it benefits both the customer and the Service Provider to terminate them locally.

Since the service provider simply accepts frames on an interface and transmits these without reference to the actual frame (other than verifying that the format and length are legal for the particular interface) the EWS is indifferent to VLAN tags that may be present within the customer Ethernet frames.

EWS subscribes to the concept of all-to-one bundling. That is, an EWS maps a port on one end to a point-to-point circuit and to a port on another end. EWS is a port-to-port service. Therefore, if a customer needs to connect a switch or router to n switches or routers it will need n ports and n pseudowires or logical circuits.

One important point to consider is that, although the EWS broadly emulates an Ethernet Layer 1 connection, the service is provided across a shared infrastructure, and therefore it is unlikely that the full interface bandwidth will be, or needs to be, available at all times. EWS will typically be a sub-line rate service, where many users share a circuit somewhere in their transmission path. As a result, the cost will most likely be less than that of EPL. Unlike a Layer 1 EPL, the SP will need to implement QoS and traffic engineering to meet the specific objectives of a particular contract. However, if the customer's application requires a true wire rate transparent service, then an EPL service—delivered using optical transmission devices such as DWDM (dense wavelength division multiplexing), CDWM (coarse wavelength division multiplexing), or SONET/SDH—should be considered.

Ethernet Virtual Private Line

Ethernet Virtual Private Line (EVPL) is similar to EWS in that it offers point-to-point connectivity. The key differentiation between EWS and EVPL is that an EVPL uses a VLAN tag to multiplex several, non-same-destination pseudowires to one port. That is, unlike EPL and EWS, EVPL is a one-to-many multiplexed service. Service multiplexing simply means that multiple pseudowires utilize a single access interface or UNI. These circuits can terminate within an L2VPN or on, for example, an Internet gateway. From the service user's perspective, this service multiplexing capability offers more efficient interface utilization, simplification of cable plant, and reduced maintenance costs associated with additional interfaces.

Using the same example as above, where a router connects to n other routers, the source router only needs one port for the service instead of n, as is the case with an EWS. The service need not be port-to-port, but can be logical-pseudowire-to-logical-pseudowire. In the case of an EVPL, each circuit can terminate at a different remote location, whereas using EWS, all frames are mapped to a single circuit and therefore a single egress point.

Figure 2. EVPL Service Multiplexing Example: One Port (Left) Can Be Used for All Destinations (Right)


Like Frame Relay, EVPL allows a customer device to access multiple connections through a single physical port attached to the service provider network. The service offered by EVPL can be thought of as being similar in concept to Frame Relay, in that a VLAN number is used as a virtual circuit identifier in a similar fashion to Frame Relay data link connection identifier (DLCI). Unlike EWS, EVPL does not forward BPDUs, because IEEE 802.1Q (VLAN tagging) only sends BPDUs on a default VLAN. In a hub-and-spoke network, only one spoke at most would receive BPDUs, thus breaking the spanning tree in the rest of the network. Therefore, an EVPL does not transmit any BPDUs and runs routing protocols instead of Ethernet Spanning Tree. The routing protocols give the customer and provider greater flexibility, traffic determination characteristics, and value-added services.

Ethernet LAN Service

An Ethernet LAN Service (E-LAN) differs from EWS and ERS in that an E-LAN provides a multipoint connectivity model. It should be noted that an E-LAN service definition is still under review within the IETF Multipoint Layer 2 Services working group. Although E-LAN uses a multipoint model, it can forward unicast packets to single destinations; that is, it also supports point-to-point connections. To the end user, the network looks like a giant Ethernet switch where each customer has their own VLAN or broadcast domain, rather than end-to-end pseudowire link(s).

E-LAN Example

An E-LAN does not map an interface or VLAN to a specific point-to-point pseudowire. Instead, it models the operation of a virtual Ethernet switch: E-LAN uses the customer's MAC address to forward frames to the correct egress UNI within the service provider's network. An E-LAN emulates the service attributes of an Ethernet switch and learns source MAC to interface associations, floods unknown broadcast and multicast frames, and (optionally) monitors the service user's spanning tree protocol. One important point to note is that although the service provider may utilize spanning tree within the transport network, there is no interaction with the service user's spanning tree.

This service works similar to an MPLS VPN, except it functions at L2 instead of L3. While a VPLS E-LAN is a viable solution, its scalability and QoS control are suspect compared to that of MPLS VPNs. In addition, it is much more difficult, and may be impossible, for the service provider to offer value-added Layer 3 services (this is discussed later in the document).

Ethernet Flow Point

An Ethernet Flow Point (EFP) is a substream partition of a main interface. On Cisco ASR 9000 Series Routers, the EFP is implemented as an L2 subinterface with an encapsulation statement.

Ethernet Virtual Circuit

An Ethernet Virtual Circuit (EVC) is a point-to-point tunnel. On Cisco ASR 9000 Series Routers, the EVC is implemented as a pseudowire (PW).

Ethernet OAM Protocols

Ethernet as a Metro Area Network (MAN) or a Wide Area Network (WAN) technology benefits greatly from the implementation of Operations, Administration and Maintenance (OAM) features. OAM features allow Service Providers to monitor the quality of the connections on a MAN or WAN. Service providers can monitor specific events, take actions on events, and if necessary, put specific interfaces into loopback mode for troubleshooting. Ethernet OAM features can be configured to monitor either side or both sides of a link.

For more information on Ethernet OAM protocols, refer to the Configuring Ethernet Interfaces chapter of the Interface and Hardware Component Configuration Guide for Cisco ASR 9000 Series Routers.

Layer 2 VPN on Ethernet Interfaces

Layer 2 Virtual Private Network (L2VPN) connections emulate the behavior of a LAN across an IP or MPLS-enabled IP network, allowing Ethernet devices to communicate with each other as if they were connected to a common LAN segment.

The L2VPN feature enables service providers (SPs) to provide L2 services to geographically disparate customer sites. Typically, an SP uses an access network to connect the customer to the core network. This access network may use a mixture of L2 technologies, such as Ethernet and Frame Relay. The connection between the customer site and the nearby SP edge router is known as an attachment circuit (AC). Traffic from the customer travels over this link to the edge of the SP core network. The traffic then tunnels through a pseudowire over the SP core network to another edge router. The edge router sends the traffic down another AC to the customer's remote site.

The L2VPN feature enables the connection between different types of L2 attachment circuits and pseudowires, allowing users to implement different types of end-to-end services.

Cisco IOS XR software supports a point-to-point end-to-end service, where two Ethernet circuits are connected together. An L2VPN Ethernet port can operate in one of two modes:

  • Port Mode—In this mode, all packets reaching the port are sent over the pseudowire, regardless of any VLAN tags that are present on the packets. In VLAN mode, the configuration is performed under the l2transport configuration mode.
  • VLAN Mode—Each VLAN on a CE (customer edge) or access network to PE (provider edge) link can be configured as a separate L2VPN connection (using either VC type 4 or VC type 5). To configure L2VPN on VLANs, see The Carrier Ethernet Model chapter in this manual. In VLAN mode, the configuration is performed under the individual subinterface.

Switching can take place in three ways:

  • AC-to-PW—Traffic reaching the PE is tunneled over a PW (pseudowire) (and conversely, traffic arriving over the PW is sent out over the AC). This is the most common scenario.
  • Local switching—Traffic arriving on one AC is immediately sent out of another AC without passing through a pseudowire.
  • PW stitching—Traffic arriving on a PW is not sent to an AC, but is sent back into the core over another PW.

Keep these in mind when configuring L2VPN on an Ethernet interface:

  • L2VPN links support QoS (Quality of Service) and MTU (Maximum Transmission Unit) configuration.
  • If your network requires that packets are transported transparently, you may need to modify the packet’s destination MAC (Media Access Control) address at the edge of the Service Provider (SP) network. This prevents the packet from being consumed by the devices in the SP network.

Use the show interfaces command to display AC and pseudowire information.

Gigabit Ethernet Protocol Standards Overview

The Gigabit Ethernet interfaces support these protocol standards:

These standards are further described in the sections that follow.

IEEE 802.3 Physical Ethernet Infrastructure

The IEEE 802.3 protocol standards define the physical layer and MAC sublayer of the data link layer of wired Ethernet. IEEE 802.3 uses Carrier Sense Multiple Access with Collision Detection (CSMA/CD) access at a variety of speeds over a variety of physical media. The IEEE 802.3 standard covers 10 Mbps Ethernet. Extensions to the IEEE 802.3 standard specify implementations for Gigabit Ethernet, 10-Gigabit Ethernet, and Fast Ethernet.

IEEE 802.3ab 1000BASE-T Gigabit Ethernet

The IEEE 802.3ab protocol standards, or Gigabit Ethernet over copper (also known as 1000BaseT) is an extension of the existing Fast Ethernet standard. It specifies Gigabit Ethernet operation over the Category 5e/6 cabling systems already installed, making it a highly cost-effective solution. As a result, most copper-based environments that run Fast Ethernet can also run Gigabit Ethernet over the existing network infrastructure to dramatically boost network performance for demanding applications.

IEEE 802.3z 1000 Mbps Gigabit Ethernet

Gigabit Ethernet builds on top of the Ethernet protocol, but increases speed tenfold over Fast Ethernet to 1000 Mbps, or 1 Gbps. Gigabit Ethernet allows Ethernet to scale from 10 or 100 Mbps at the desktop to 100 Mbps up to 1000 Mbps in the data center. Gigabit Ethernet conforms to the IEEE 802.3z protocol standard.

By leveraging the current Ethernet standard and the installed base of Ethernet and Fast Ethernet switches and routers, network managers do not need to retrain and relearn a new technology in order to provide support for Gigabit Ethernet.

IEEE 802.3ae 10 Gbps Ethernet

Under the International Standards Organization’s Open Systems Interconnection (OSI) model, Ethernet is fundamentally a L2 protocol. 10-Gigabit Ethernet uses the IEEE 802.3 Ethernet MAC protocol, the IEEE 802.3 Ethernet frame format, and the minimum and maximum IEEE 802.3 frame size. 10 Gbps Ethernet conforms to the IEEE 802.3ae protocol standards.

Just as 1000BASE-X and 1000BASE-T (Gigabit Ethernet) remained true to the Ethernet model, 10-Gigabit Ethernet continues the natural evolution of Ethernet in speed and distance. Because it is a full-duplex only and fiber-only technology, it does not need the carrier-sensing multiple-access with the CSMA/CD protocol that defines slower, half-duplex Ethernet technologies. In every other respect, 10-Gigabit Ethernet remains true to the original Ethernet model.

General Ethernet Standards

  • Ethernet II framing also known as DIX.
  • IEEE 802.3 framing also includes LLC and LLC/SNAP protocol frame formats.
  • IEEE 802.1d MAC Bridges and Spanning Tree—This standard specifies the MAC learning and MAC aging in a bridging environment. It also defines the original spanning tree protocol. Also MSTP is defined in IEEE 802.1s and IEEE 802.1q.
  • IEEE 802.1q VLAN tagging—This standard defines VLAN tagging, and also the traditional VLAN trunking between switches. Technically, it also defines QinQ tagging, and MSTP. The Cisco ASR 9000 Series Routers do NOT support ISL.
  • IEEE 802.1ad Provider Bridges—This standard is a subset of 802.1q and is often referred to as 802.1ad. The Cisco ASR 9000 Series Routers do not adhere to the entire standard, but large portions of the standard's functionality are supported.

MAC Address

A MAC address is a unique 6-byte address that identifies the interface at L2.

Ethernet MTU

The Ethernet Maximum Transmission Unit (MTU) is the size of the largest frame, minus the 4-byte Frame Check Sequence (FCS), that can be transmitted on the Ethernet network. Every physical network along the destination of a packet can have a different MTU.

Cisco IOS XR software supports two types of frame forwarding processes:

  • Fragmentation for IPV4 packets—In this process, IPv4 packets are fragmented as necessary to fit within the MTU of the next-hop physical network.


    Note


    IPv6 does not support fragmentation.
  • MTU discovery process determines largest packet size—This process is available for all IPV6 devices, and for originating IPv4 devices. In this process, the originating IP device determines the size of the largest IPv6 or IPV4 packet that can be sent without being fragmented. The largest packet is equal to the smallest MTU of any network between the IP source and the IP destination devices. If a packet is larger than the smallest MTU of all the networks in its path, that packet will be fragmented as necessary. This process ensures that the originating device does not send an IP packet that is too large.

Jumbo frame support is automatically enable for frames that exceed the standard frame size. The default value is 1514 for standard frames and 1518 for 802.1Q tagged frames. These numbers exclude the 4-byte FCS.

Flow Control on Ethernet Interfaces

The flow control used on 10-Gigabit Ethernet interfaces consists of periodically sending flow control pause frames. It is fundamentally different from the usual full- and half-duplex flow control used on standard management interfaces. On the Cisco ASR 9000 Series Routers both ingress and egress flow control are off by default.

VRRP

The Virtual Router Redundancy Protocol (VRRP) eliminates the single point of failure inherent in the static default routed environment. VRRP specifies an election protocol that dynamically assigns responsibility for a virtual router to one of the VPN concentrators on a LAN. The VRRP VPN concentrator controlling the IP addresses associated with a virtual router is called the primary, and forwards packets sent to those IP addresses. When the primary becomes unavailable, a backup VPN concentrator takes the place of the primary.

For more information on VRRP, see the Implementing VRRP chapter of Cisco ASR 9000 Series Routers IP Addresses and Services Configuration Guide.

HSRP

Hot Standby Routing Protocol (HSRP) is a proprietary protocol from Cisco. HSRP is a routing protocol that provides backup to a router in the event of failure. Several routers are connected to the same segment of an Ethernet, FDDI, or token-ring network and work together to present the appearance of a single virtual router on the LAN. The routers share the same IP and MAC addresses and therefore, in the event of failure of one router, the hosts on the LAN are able to continue forwarding packets to a consistent IP and MAC address. The transfer of routing responsibilities from one device to another is transparent to the user.

HSRP is designed to support non disruptive failover of IP traffic in certain circumstances and to allow hosts to appear to use a single router and to maintain connectivity even if the actual first hop router they are using fails. In other words, HSRP protects against the failure of the first hop router when the source host cannot learn the IP address of the first hop router dynamically. Multiple routers participate in HSRP and in concert create the illusion of a single virtual router. HSRP ensures that one and only one of the routers is forwarding packets on behalf of the virtual router. End hosts forward their packets to the virtual router.

The router forwarding packets is known as the active router. A standby router is selected to replace the active router should it fail. HSRP provides a mechanism for determining active and standby routers, using the IP addresses on the participating routers. If an active router fails, a standby router can take over without a major interruption in the host's connectivity.

HSRP runs on top of User Datagram Protocol (UDP), and uses port number 1985. Routers use their actual IP address as the source address for protocol packets, not the virtual IP address, so that the HSRP routers can identify each other.

For more information on HSRP, see the Implementing HSRP chapter of Cisco ASR 9000 Series Routers IP Addresses and Services Configuration Guide.

Link Autonegotiation on Ethernet Interfaces

Link autonegotiation ensures that devices that share a link segment are automatically configured with the highest performance mode of interoperation. Use the negotiation auto command in interface configuration mode to enable link autonegotiation on an Ethernet interface. On line card Ethernet interfaces, link autonegotiation is disabled by default.


Note


The negotiation auto command is available on Gigabit Ethernet interfaces only.

What is an Ethernet Flow Point?

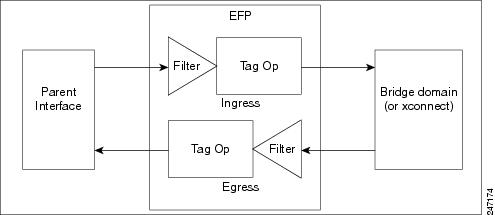
An Ethernet Flow Point (EFP) is a Layer 2 logical subinterface used to classify traffic under a physical or a bundle interface.

A physical interface can be a Gigabit Ethernet 0/0/0/1 or a 10 Gigabit Ethernet 0/0/0/0 interface and has ports on the line card. A bundle interface is a virtual interface, created by grouping physical interfaces together.

For example, physical interfaces such as Gigabit Ethernet 0/0/0/1 and 10 Gigabit Ethernet 0/0/0/0 can be configured as members of a bundle interface.

Grouping physical interfaces together can:

  • Reduce the routing entries

  • Increase the bandwidth of the bundle interface
  • Balance the traffic on the bundle members

EFP has the following characteristics:

  • An EFP represents a logical demarcation point of an Ethernet Virtual Connection (EVC) on an interface. For an EVC associating two or more UNIs, there is a flow point on each interface of every device, through which that EVC passes.
  • An EFP can be regarded as an instantiation of a particular service. An EFP is defined by a set of filters. These filters are applied to all the ingress traffic to classify the frames that belong to a particular EFP. An EFP filter is a set of entries, where each entry looks similar to the start of a packet (ignoring source/destination MAC address). Each entry usually contains 0, 1 or 2 VLAN tags. A packet that starts with the same tags as an entry in the filter is said to match the filter; if the start of the packet does not correspond to any entry in the filter then the packet does not match the filter.

  • An EFP serves four purposes:

    • Identifies all frames that belong to a particular flow on a given interface
    • Performs ingress and egress Ethernet header manipulations
    • Adds features to the identified frames
    • Optionally define how to forward those frames in the data path

You can perform a variety of operations on the traffic flows when a router is configured with EFPs on various interfaces. Also, you can bridge or tunnel the traffic by many ways from one or more of the router’s ingress EFPs to one or more egress EFPs. This traffic is a mixture of VLAN IDs, single or double (QinQ) encapsulation, and ethertypes.

Figure 3. EFP Model


An EFP subinterface is configured to specify which traffic on ingress is vectored to that EFP. This is done by specifying a VLAN, range of VLANs, or QinQ tagging to match against on ingress. All traffic on ingress is compared to each EFP’s matching criterion, and processed by that EFP if a match occurs. The processing performed by an EFP can change VLAN IDs, add or remove VLAN tags, and change ethertypes.

Improving the Scalability of EFPs on Bundle Interfaces

Table 1. Feature History Table

Feature Name

Release

Description

Increased Ethernet Flow Point Support per Bundle Interface

Release 7.10.1

The maximum number of Ethernet Flow Points (EFPs) that can be added to a bundle interface is now enhanced to 40960 (40K). This greatly improves the flexibility to manage the traffic with different EFP filters.

Note

  • Each bundle interface can support up to 40K L2 or L3 sub interfaces, or a combination totaling 40K.

  • Only per bundle capacity is increased to 40K. There is no change in overall system scale, which remains 128K.

  • The A99-12x100GE and A9K-4x100GE line cards do not support the enhanced limit.

You can improve the scalability of EFPs on bundle interfaces in two ways:

  • Increase the number of EFPs per chassis from 32000 to 64000.

  • Increase the number of EFPs per line card, on a single node point, to the same scale as the physical interface scaling.

The following example illustrates how to improve the scalability of EFPs per line card:

Consider a B module line card type with a bundle interface scaling of 4000 and a physical interface scaling of 16000. The scalability of EFPs on the B module is improved by adding three additional bundles of 4000 EFPs per bundle.

The number of EFPs per line card is now scaled to 16000 or 4 bundles of 4000 EFPs each.

EFP CLI Overview

Cisco IOS XR implements a structured CLI for EFP and EVC configuration. The following commands are typically used to configure an EFP:

  • l2transport command - This command identifies a subinterface (or a physical port or bundle-port parent interface) as an EFP.

  • encapsulation command - This command is used to specify matching criteria.

  • rewrite command - This command is used to specify the VLAN tag rewrite criteria.

Egress EFP Filtering

The Egress EFP Filtering feature implements a means of filtering EFP egress traffic, ensuring that all the given EFP’s egress traffic complies with the ingress matching criterion.

An ingress EFP is similar to an egress EFP. The router is configured to send traffic on the EFP, that matches that EFP’s ingress matching criterion. It is possible to configure a router so that this does not occur, and there is no safeguard to prevent such mismatching egress EFP traffic from exiting the router.

The Cisco ASR 9000 Series Routers allow for different VLANs on different ports within the same bridge domain. This allows a bridge to forward a packet out of a port not configured for the VLAN tag on the packet. Egress EFP filtering checks this and drops invalid packets at the egress port.

Identifying Frames of an EFP

The EFP identifies frames belonging to a particular flow on a given port, independent of their Ethernet encapsulation. An EFP can flexibly map frames into a flow or EFP based on the fields in the frame header.

The frames can be matched to an EFP using:

  • VLAN tag or tags

  • MAC address (source address, destination address, or both)

  • 802.1p CoS bits

  • Logical conjunction of two or more of the above: VLAN, MAC, and CoS

  • Default match (that is, any other traffic that has not matched a more specific EFP)

  • Protocol ethertype

The frames cannot be matched to an EFP through use of any of these:

  • Any information outside the outermost Ethernet frame header and its associated tags such as

    • IPv4, IPv6, or MPLS tag header data

    • C-DMAC, C-SMAC, or C-VLAN

  • Logical disjunction of the valid frame matches above: VLAN, MAC, and CoS

The specific match criteria are covered in more detail in these sections.

VLAN Tag Matching

Below table describes the different encapsulation types and the EFP identifier corresponding to each.

Encapsulation Type EFP Identifier

Untagged

Static configuration on the ingress physical interface or a subinterface that uses the untagged keyword in the encapsulation command. There can be only one untagged subinterface. If an untagged subinterface has been created, traffic goes to this interface instead of the main interface.

Priority-tagged Ethernet frames

A priority-tagged frame is defined as having a single 802.1Q VLAN header, with a VLAN id of zero.

Native VLAN

Cisco ASR 9000 Series Routers do not support native VLAN.

Use this command:

encapsulation dot1q < vlan-id> , untagged

Single tagged frames

802.1Q customer-tagged Ethernet frames

Double tagged frames

802.1Q (ethertype 0x8100) double tagged frames

802.1ad double tagged frames

Legacy 0x9100 and 0x9200 double tagged frames

Default tagging

An EFP which has a maximum-match wildcard. The effect is to receive any traffic that does not match any other EFP on the same physical interface.

You can use wildcards as well as VLAN ranges while defining frames that map to a given EFP. EFPs can distinguish flows based on a single VLAN tag, a range of VLAN tags, a stack of VLAN tags or a combination of both (VLAN stack with wildcards). It provides the EFP model, a flexibility of being encapsulation agnostic, and allows it to be extensible as new tagging or tunneling schemes are added.

MAC Address Matching

The source MAC address, the destination MAC address, or both can be matched. In all cases, the MAC address requires an exact match. A wildcard match or partial match is not adequate.

802.1p CoS Bits Matching

One or more exact CoS matches are specified. Because CoS is only 3 bits, this limits it to 8 possible choices.

Logical Conjunction

All of the match criteria above can be selectively combined those frames that match all of the separate criteria.

Default Match

A single EFP can be defined that matches all other traffic that has not been matched by a more specific EFP.

Match Precedence and Config Verification

Overlapping EFPs are allowed to be configured, where it is possible to determine an order in which they should be used for matching. But EFPs that conflict with other EFPs or subinterfaces on the parent trunk interface should be blocked at config verification.

An ordering precedence is used for how EFP matches are applied in hardware. The model is for matches that are more specific to be processed before matches that are less specific.

Egress Behavior

The EFP matching criteria can also be used on egress to police the frames that can egress from the EFP, based on the platform support. Frames that do not match the criteria (source/destination MAC match criteria are reversed) are dropped.

Applying Features

After the frames are matched to a particular EFP, any appropriate features can be applied. In this context, “features” means any frame manipulations specified by the configuration as well as things such as QoS and ACLs. The Ethernet infrastructure provides an appropriate interface to allow the feature owners to apply their features to an EFP. Hence, IM interface handles are used to represent EFPs, allowing feature owners to manage their features on EFPs in the same way the features are managed on regular interfaces or subinterfaces.

The only L2 features that can be applied on an EFP that is part of the Ethernet infrastructure are the L2 header encapsulation modifications. The L2 features are described in this section.

Encapsulation Modifications

EFP supports these L2 header encapsulation modifications on both ingress and egress:

  • Push 1 or 2 VLAN tags

  • Pop 1 or 2 VLAN tags


Note


This modification can only pop tags that are matched as part of the EFP.
  • Rewrite 1 or 2 VLAN tags:
    • Rewrite outer tag
    • Rewrite outer 2 tags
    • Rewrite outer tag and push an additional tag
    • Remove outer tag and rewrite inner tag

    Note


    For dot1ad encapsulation, priority-tagged frame and rewrite ingress tag cannot coexist.


    For each of the VLAN ID manipulations, these can be specified:

  • The VLAN tag type, that is, C-VLAN, S-VLAN, or I-TAG. The ethertype of the 802.1Q C-VLAN tag is defined by the dot1q tunneling type command.

  • The VLAN ID. 0 can be specified for an outer VLAN tag to generate a priority-tagged frame.


Note


For tag rewrites, the CoS bits from the previous tag should be preserved in the same way as the DEI bit for 802.1ad encapsulated frames.

Defining Data-Forwarding Behavior

The EFP can be used to designate the frames belonging to a particular Ethernet flow forwarded in the data path. These forwarding cases are supported for EFPs in Cisco IOS XR software:

  • L2 Switched Service (Bridging)—The EFP is mapped to a bridge domain, where frames are switched based on their destination MAC address. This includes multipoint services:
    • Ethernet to Ethernet Bridging
    • Multipoint Layer 2 Services
  • L2 Stitched Service (AC to AC xconnect)—This covers point-to-point L2 associations that are statically established and do not require a MAC address lookup.
    • Ethernet to Ethernet Local Switching—The EFP is mapped to an S-VLAN either on the same port or on another port. The S-VLANs can be identical or different.
  • Tunneled Service (xconnect)—The EFP is mapped to a Layer 3 tunnel. This covers point-to-point services only:
    • EoMPLS
    • L2TPv3
  • L2 Terminated Service (Ethernet access to Layer 3 service)—The EFP is mapped to an IP interface that has a global address or belongs to a VRF (includes both IP and MPLS Layer 3 VPNs).

802.1Q VLAN

A VLAN is a group of devices on one or more LANs that are configured so that they can communicate as if they were attached to the same wire, when in fact they are located on a number of different LAN segments. Because VLANs are based on logical instead of physical connections, it is very flexible for user and host management, bandwidth allocation, and resource optimization.

The IEEE's 802.1Q protocol standard addresses the problem of breaking large networks into smaller parts so broadcast and multicast traffic does not consume more bandwidth than necessary. The standard also helps provide a higher level of security between segments of internal networks.

The 802.1Q specification establishes a standard method for inserting VLAN membership information into Ethernet frames.

Cisco IOS XR software supports VLAN subinterface configuration on Gigabit Ethernet and10-Gigabit Ethernet interfaces.

802.1Q Tagged Frames

The IEEE 802.1Q tag-based VLAN uses an extra tag in the MAC header to identify the VLAN membership of a frame across bridges. This tag is used for VLAN and Quality of Service (QoS) priority identification. The VLANs can be created statically by manual entry or dynamically through Generic Attribute Registration Protocol (GARP) VLAN Registration Protocol (GVRP). The VLAN ID associates a frame with a specific VLAN and provides the information that switches must process the frame across the network. A tagged frame is four bytes longer than an untagged frame and contains two bytes of Tag Protocol Identifier (TPID) residing within the type and length field of the Ethernet frame and two bytes of Tag Control Information (TCI) which starts after the source address field of the Ethernet frame.

Subinterfaces

Subinterfaces are logical interfaces created on a hardware interface. These software-defined interfaces allow for segregation of traffic into separate logical channels on a single hardware interface as well as allowing for better utilization of the available bandwidth on the physical interface.

Subinterfaces are distinguished from one another by adding an extension on the end of the interface name and designation. For instance, the Ethernet subinterface 23 on the physical interface designated TenGigE 0/1/0/0 would be indicated by TenGigE 0/1/0/0.23.

Before a subinterface is allowed to pass traffic it must have a valid tagging protocol encapsulation and VLAN identifier assigned. All Ethernet subinterfaces always default to the 802.1Q VLAN encapsulation. However, the VLAN identifier must be explicitly defined.

Subinterface MTU

The subinterface Maximum Transmission Unit (MTU) is inherited from the physical interface with an additional four bytes allowed for the 802.1Q VLAN tag.

VLAN Subinterfaces on Ethernet Bundles

An Ethernet bundle is a group of one or more Ethernet ports that are aggregated together and treated as a single link. Multiple VLAN subinterfaces can be added to a single Ethernet bundle.

For more information about configuring Ethernet bundles, see the Configuring Link Bundles chapter in this document. The procedure for creating VLAN subinterfaces on an Ethernet bundle is exactly the same as the procedure for creating VLAN subinterfaces on a physical Ethernet interface.

To create a VLAN subinterface on an Ethernet bundle, see the Configuring 802.1Q VLAN Interfaces section later in this chapter.

Layer 2 VPN on VLANs

The Layer 2 Virtual Private Network (L2VPN) feature enables Service Providers (SPs) to provide L2 services to geographically disparate customer sites, as described in the Layer 2 VPN on Ethernet Interfaces section of the The Carrier Ethernet Model chapter.

The configuration model for configuring VLAN Attachment Circuits (ACs) is similar to the model used for configuring basic VLANs, where the user first creates a VLAN subinterface, and then configures that VLAN in subinterface configuration mode. To create an Attachment Circuit, you need to include the l2transport keyword in the interface command string to specify that the interface is a L2 interface.

VLAN ACs support three modes of L2VPN operation:

  • Basic Dot1Q Attachment Circuit—The Attachment Circuit covers all frames that are received and sent with a specific VLAN tag.

  • QinQ Attachment Circuit—The Attachment Circuit covers all frames received and sent with a specific outer VLAN tag and a specific inner VLAN tag. QinQ is an extension to Dot1Q that uses a stack of two tags.

  • Q-in-Any Attachment Circuit—The Attachment Circuit covers all frames received and sent with a specific outer VLAN tag and any inner VLAN tag, as long as that inner VLAN tag is not Layer 3 terminated. Q-in-Any is an extension to QinQ that uses wildcarding to match any second tag.


    Note


    The Q-in-Any mode is a variation of the basic Dot1Q mode. In Q-in-Any mode, the frames have a basic QinQ encapsulation; however, in Q-in-Any mode the inner tag is not relevant, except for the fact that a few specific inner VLAN tags are siphoned for specific services. For example, a tag may be used to provide L3 services for general internet access.

Each VLAN on a CE-to-PE link can be configured as a separate L2VPN connection (using either VC type 4 or VC type 5).

Keep these in mind when configuring L2VPN on a VLAN:

  • Cisco IOS XR software supports 4000 Attachment Circuits per line card.

  • In a point-to-point connection, the two Attachment Circuits do not have to be of the same type. For example, a port mode Ethernet Attachment Circuit can be connected to a Dot1Q Ethernet Attachment Circuit.

  • Pseudowires can run in VLAN mode or in port mode. A pseudowire running in VLAN mode has a single Dot1Q tag, while a pseudowire running in port mode has no tags. Some interworking is required to connect these different types of circuits together. This interworking takes the form of popping, pushing, and rewriting tags. The advantage of L2VPN is that is simplifies the interworking required to connect completely different media types together.

  • The Attachment Circuits on either side of an MPLS pseudowire can be different types. In this case, the appropriate conversion is carried out at one or both ends of the Attachment Circuit to pseudowire connection.

Use the show interfaces command to display Attachment Circuit and pseudowire information.


Note


For more information on the show interfaces command, refer to the Interface and Hardware Component Configuration Guide for Cisco ASR 9000 Series Routers.

How to Configure Layer 2 Features on Ethernet Interfaces


Note


For more information on configuring interfaces, refer to the Interface and Hardware Component Configuration Guide for Cisco ASR 9000 Series Routers.

Default Configuration Values for Gigabit Ethernet and 10-Gigabit Ethernet

The below table describes the default interface configuration parameters that are present when an interface is enabled on a Gigabit Ethernet or 10-Gigabit Ethernet modular services card and its associated PLIM.


Note


You must use the shutdown command to bring an interface administratively down. The interface default is no shutdown. When a modular services card is first inserted into the router, if there is no established preconfiguration for it, the configuration manager adds a shutdown item to its configuration. This shutdown can be removed only be entering the no shutdown command.
Table 2. Gigabit Ethernet and 10-Gigabit Ethernet Modular Services Card Default Configuration Values
Parameter Configuration File Entry Default Value Restrictions

Flow control

flow-control

egress on ingress off

none

MTU

mtu

1514 bytes for normal frames

1518 bytes for 802.1Q tagged frames

1522 bytes for QinQ frames

none

MAC address

mac address

Hardware burned-in address (BIA2)

L3 only

L2 port

l2transport

off/L3

L2 subinterfaces must have L3 main parent interface

Egress filtering

Ethernet egress-filter

off

none

Link negotiation

negotiation

off

physical main interfaces only

Tunneling Ethertype

tunneling ethertype

0X8100

configured on main interface only; applied to subinterfaces only

VLAN tag matching

encapsulation

all frames for main interface; only ones specified for subinterfaces

encapsulation command only subinterfaces

  1. The restrictions are applicable to L2 main interface, L2 subinterface, L3 main interface, interflex L2 interface etc.

  2. burned-in address

Configuring Ethernet Interfaces

For more information on configuring Ethernet interfaces, see the Interface and Hardware Component Configuration Guide for Cisco ASR 9000 Series Routers.

Configuring a 10-Gigabit Ethernet Interface

Perform this task to configure an Ethernet interface:

SUMMARY STEPS

  1. configure interface TenGigE [ instance ]
  2. l2transport
  3. mtu bytes
  4. no shutdown
  5. Use the commit or end command.

DETAILED STEPS


Step 1

configure interface TenGigE [ instance ]

Example:

RP/0/RSP0/CPU0:router# configure
RP/0/RSP0/CPU0:router# interface TenGigE 0/0/0/1

Enters interface configuration mode for a 10-Gigabit Ethernet interface.

Step 2

l2transport

Example:

RP/0/RSP0/CPU0:router(config-if)# l2transport

Enables Layer 2 transport mode on a port and enter Layer 2 transport configuration mode.

Step 3

mtu bytes

Example:

RP/0/RSP0/CPU0:router(config-if-l2)# mtu 1448

Adjusts the maximum packet size or Maximum Transmission Unit (MTU) size for the bridge domain.

  • Use the bytes argument to specify the MTU size, in bytes. The range is from 64 to 65535.

Step 4

no shutdown

Example:

RP/0/RSP0/CPU0:router(config-if-l2)#  no shutdown

Removes the shutdown configuration, which forces an interface administratively down.

Step 5

Use the commit or end command.

commit - Saves the configuration changes and remains within the configuration session.

end - Prompts user to take one of these actions:

  • Yes - Saves configuration changes and exits the configuration session.
  • No - Exits the configuration session without committing the configuration changes.
  • Cancel - Remains in the configuration mode, without committing the configuration changes.

Configuring a Gigabit Ethernet Interface

Perform this task to configure a basic Gigabit Ethernet or 10-Gigabit Ethernet interface:

SUMMARY STEPS

  1. configure
  2. interface type interface-path-id
  3. ipv4 address ip-address mask
  4. flow-control { bidirectional | egress | ingress }
  5. mtu bytes
  6. mac-address value1.value2.value3
  7. negotiation auto (on Gigabit Ethernet interfaces only)
  8. no shutdown
  9. Use the commit or end command.
  10. show interfaces [ GigabitEthernet | TenGigE ] instance

DETAILED STEPS


Step 1

configure

Example:

RP/0/RSP0/CPU0:router# configure terminal

Enters the Global Configuration mode.

Step 2

interface type interface-path-id

Example:

RP/0/RSP0/CPU0:router(config)# interface GigabitEthernet 0/1/0/0

Enters interface configuration mode and specifies the Ethernet interface name and notation rack/slot/module/port.

Step 3

ipv4 address ip-address mask

Example:

RP/0/RSP0/CPU0:router(config-if)# ipv4 address 172.18.189.38 255.255.255.224

Assigns an IP address and subnet mask to the interface.

  • Replace ip-address with the primary IPv4 address for the interface.

  • Replace mask with the mask for the associated IP subnet. The network mask can be specified in either of two ways:

    • The network mask can be a four-part dotted decimal address. For example, 255.0.0.0 indicates that each bit equal to 1 means that the corresponding address bit belongs to the network address.

    • The network mask can be indicated as a slash (/) and number. For example, /8 indicates that the first 8 bits of the mask are ones, and the corresponding bits of the address are network address.

Step 4

flow-control { bidirectional | egress | ingress }

Example:

RP/0/RSP0/CPU0:router(config-if)# flow control ingress

(Optional) Enables the sending and processing of flow control pause frames.

  • egress —Enables the sending of flow control pause frames in egress.

  • ingress —Enables the processing of received pause frames on ingress.

  • bidirectional —Enables the sending of flow control pause frames in egress and the processing of received pause frames on ingress.

Step 5

mtu bytes

Example:

RP/0/RSP0/CPU0:router(config-if)# mtu 1448

(Optional) Sets the MTU value for the interface.

  • The default is 1514 bytes for normal frames and 1518 bytes for 802.1Q tagged frames.

  • The range for Gigabit Ethernet and 10-Gigabit Ethernet mtu values is 64 bytes to 65535 bytes.

Step 6

mac-address value1.value2.value3

Example:

RP/0/RSP0/CPU0:router(config-if)# mac address 0001.2468.ABCD

(Optional) Sets the MAC layer address of the Management Ethernet interface.

  • The values are the high, middle, and low 2 bytes, respectively, of the MAC address in hexadecimal. The range of each 2-byte value is 0 to ffff.

Step 7

negotiation auto (on Gigabit Ethernet interfaces only)

Example:

RP/0/RSP0/CPU0:router(config-if)# negotiation auto

(Optional) Enables autonegotiation on a Gigabit Ethernet interface.

  • Autonegotiation must be explicitly enabled on both ends of the connection, or speed and duplex settings must be configured manually on both ends of the connection.

  • If autonegotiation is enabled, any manually configured speed or duplex settings take precedence.

Note

 
The negotiation auto command is available on Gigabit Ethernet interfaces only.

Step 8

no shutdown

Example:

RP/0/RSP0/CPU0:router(config-if)# no shutdown

Removes the shutdown configuration, which forces an interface administratively down.

Step 9

Use the commit or end command.

commit - Saves the configuration changes and remains within the configuration session.

end - Prompts user to take one of these actions:

  • Yes - Saves configuration changes and exits the configuration session.
  • No - Exits the configuration session without committing the configuration changes.
  • Cancel - Remains in the configuration mode, without committing the configuration changes.

Step 10

show interfaces [ GigabitEthernet | TenGigE ] instance

Example:

RP/0/RSP0/CPU0:router #show interfaces TenGigE 0/3/0/0

(Optional) Displays statistics for interfaces on the router.


Configuring an Attachment Circuit on an Ethernet Port

Use this procedure to configure an attachment circuit on a Gigabit Ethernet or 10-Gigabit Ethernet port. For more information on configuring an attachment circuit, refer to the Interface and Hardware Component Configuration Guide for Cisco ASR 9000 Series Routers.


Note


The steps in this procedure configure the L2VPN Ethernet port to operate in EFP mode.

SUMMARY STEPS

  1. configure
  2. interface [GigabitEthernet | TenGigE] instance.subinterface l2transport
  3. encapsulation dot1q vlan-id
  4. interface [GigabitEthernet | TenGigE] instance.subinterface l2transport
  5. encapsulation dot1q vlan-id
  6. l2vpn
  7. bridge group bridge-group-name
  8. bridge-domain domain-name
  9. interface [GigabitEthernet | TenGigE] instance.subinterface
  10. interface [GigabitEthernet | TenGigE] instance.subinterface
  11. Use the commit or end command.
  12. show run interface [GigabitEthernet | TenGigE] instance.subinterface

DETAILED STEPS


Step 1

configure

Example:


RP/0/RSP0/CPU0:router# configure

Enters the Global Configuration mode.

Step 2

interface [GigabitEthernet | TenGigE] instance.subinterface l2transport

Example:


RP/0/RSP0/CPU0:router(config)# interface GigabitEthernet0/5/0/0.20 
l2transport

Enters subinterface configuration mode and specifies the interface type, location, and subinterface number.

  • Replace the instance argument with one of these instances:

    • Physical Ethernet interface instance, or with an Ethernet bundle instance. Naming notation is rack/slot/module/port, and a slash between values is required as part of the notation.

    • Ethernet bundle instance. Range is from 1 through 65535.

  • Replace the subinterface argument with the subinterface value. Range is from 0 through 4095.

  • Naming notation is instance.subinterface, and a period between arguments is required as part of the notation.

Step 3

encapsulation dot1q vlan-id

Example:


RP/0/RSP0/CPU0:router(config-subif)#encapsulation dot1q 50

Assigns the matching VLAN ID and Ethertype to the interface.

Step 4

interface [GigabitEthernet | TenGigE] instance.subinterface l2transport

Example:


RP/0/RSP0/CPU0:router(config)#  interface GigabitEthernet0/5/0/0.20 
l2transport

Enters subinterface configuration mode and specifies the interface type, location, and subinterface number.

  • Replace the instance argument with one of these instances:

    • Physical Ethernet interface instance, or with an Ethernet bundle instance. Naming notation is rack/slot/module/port, and a slash between values is required as part of the notation.

    • Ethernet bundle instance. Range is from 1 through 65535.

  • Replace the subinterface argument with the subinterface value. Range is from 0 through 4095.

  • Naming notation is instance.subinterface, and a period between arguments is required as part of the notation.

Step 5

encapsulation dot1q vlan-id

Example:


RP/0/RSP0/CPU0:router(config-subif)# encapsulation dot1q 50

Assigns the matching VLAN ID and Ethertype to the interface.

Step 6

l2vpn

Example:


RP/0/RSP0/CPU0:router(config-subif)# l2vpn

Enters L2VPN configuration mode.

Step 7

bridge group bridge-group-name

Example:


RP/0/RSP0/CPU0:router(config-l2vpn)# bridge group ce-doc-examples

Enters configuration mode for the named bridge group. This command creates a new bridge group or modifies the existing bridge group if it already exists. A bridge group organizes bridge domains.

Step 8

bridge-domain domain-name

Example:


RP/0/RSP0/CPU0:router(config-l2vpn-bg)# bridge-
domain ac-example

Enters configuration mode for the named bridge domain. This creates a new bridge domain modifies the existing bridge domain if it already exists.

Step 9

interface [GigabitEthernet | TenGigE] instance.subinterface

Example:


RP/0/RSP0/CPU0:router(config-l2vpn-bg-bd)# interface GigabitEthernet0/5/0/0.20

Adds an interface to a bridge domain that allows packets to be forwarded and received from other interfaces that are part of the same bridge domain. The interface EFP now becomes an attachment circuit on this bridge domain.

Step 10

interface [GigabitEthernet | TenGigE] instance.subinterface

Example:


RP/0/RSP0/CPU0:router(config-l2vpn-bg-bd-ac)# interface GigabitEthernet0/5/0/1.15

Adds an interface to a bridge domain that allows packets to be forwarded and received from other interfaces that are part of the same bridge domain. The interface EFP now becomes an attachment circuit on this bridge domain.

Step 11

Use the commit or end command.

commit - Saves the configuration changes and remains within the configuration session.

end - Prompts user to take one of these actions:

  • Yes - Saves configuration changes and exits the configuration session.
  • No - Exits the configuration session without committing the configuration changes.
  • Cancel - Remains in the configuration mode, without committing the configuration changes.

Step 12

show run interface [GigabitEthernet | TenGigE] instance.subinterface

Example:


RP/0/RSP0/CPU0:router# show run interface GigabitEthernet0/5/0/1.15

(Optional) Displays statistics for the subinterface on the router.


Configuring Egress EFP Filtering

This section describes the procedures for configuring the egress EFP filtering feature on the Cisco ASR 9000 Series Routers.

Egress EFP filtering is a L2 subinterface specific feature that controls how strictly subinterface encapsulation filtering is performed in the egress direction. According to the EFP behavior and model, all packets transmitted out of a subinterface should match the subinterface encapsulation or rewrite criteria if the same packet is to be received on the subinterface (with the source and destination MAC addresses swapped).

Egress EFP filtering has two stages; first stage is without rewrite command, and the second stage is with rewrite command.

In the first stage filtering, the packet is checked against the encapsulation to ensure the match, the same way it is checked on ingress to determine that the packet is forwarded to that EFP.

In the second stage filtering, the packet is checked before the egress rewrite occurs to ensure that the packet in its egress pre-rewrite state is correct. This means that the egress packet's VLAN encapsulation should be same as a hypothetical ingress packet after the ingress rewrite occurs.

In case of an interface configured with both a rewrite and egress EFP filtering, where egress traffic is getting dropped unexpectedly due to egress EFP filtering, the user must first ascertain which stage the drops occur.


Note


Output drops counter displays the drops occurred due to egress EFP filtering in the “show interface” display for that interface. Output drops counter is a summation of drops from multiple causes and not necessarily due to egress EFP filtering.

By using the ethernet egress-filter command, you can configure egress EFP filtering in either global or L2 subinterface mode:

  • ethernet egress-filter strict configures Egress EFP Filtering inGlobal Configuration mode.

  • ethernet egress-filter {strict | disabled} configures Egress EFP Filtering in L2 subinterface mode.

SUMMARY STEPS

  1. configure
  2. ethernet egress-filter strict
  3. interface {GigabitEthernet | TenGigE | FastEthernet | Bundle-Ether} instance.subinterface
  4. ethernet egress-filter {strict | disabled}
  5. exit

DETAILED STEPS


Step 1

configure

Example:


RP/0/RSP0/CPU0:PE44_ASR-9010# config Thu Jun 4 07:50:02.660 PST 
RP/0/RSP0/CPU0:PE44_ASR-9010(config)#

Enters Global Configuration mode.

Step 2

ethernet egress-filter strict

Example:


RP/0/RSP0/CPU0:PE44_ASR-9010(config)#  ethernet egress-filter strict 

Enables strict egress filtering on all subinterfaces on the device by default.

Step 3

interface {GigabitEthernet | TenGigE | FastEthernet | Bundle-Ether} instance.subinterface

Example:


RP/0/RSP0/CPU0:PE44_ASR-9010(config)#  interface GigabitEthernet 0/1/0/1.1 
 RP/0/RSP0/CPU0:PE44_ASR-9010(config-subif)#

Creates an L2 subinterface.

Step 4

ethernet egress-filter {strict | disabled}

Example:


RP/0/RSP0/CPU0:PE44_ASR-9010(config-subif)# ethernet egress-filter strict

Allows egress filtering to be explicitly enabled or disabled on any L2 subinterface. It can also be used to override global settings.

Step 5

exit

Example:


RP/0/RSP0/CPU0:PE44_ASR-9010(config-subif)# exit
RP/0/RSP0/CPU0:PE44_ASR-9010(config)# exit

Exit from the configuration mode.


Configuring 802.1Q VLAN Interfaces

Restrictions for Configuring 802.1Q VLAN Interfaces

To use the sub-interface configurations encapsulation dot1ad (or encapsulation dot1q ) and encapsulation dot1ad second-dot1q any (or encapsulation dot1q second-dot1q any ) together on the same physical interface, use the exact keyword as shown below. Else, it results in traffic loss.

Router(config)# interface hundredGigE 0/0/0/0.0 
Router(config-subif)# encapsulation dot1ad 200 exact 
Router(config)# interface hundredGigE 0/0/0/0.1 
Router(config-subif)# encapsulation dot1ad 200 dot1q any 
Router(config-subif)# commit 

Configuring 802.1Q VLAN Subinterfaces

This task explains how to configure 802.1Q VLAN subinterfaces. To remove these subinterfaces, see the “Removing an 802.1Q VLAN Subinterface” section of this chapter.

SUMMARY STEPS

  1. configure
  2. interface {GigabitEthernet | TenGigE | Bundle-Ether} instance.subinterface
  3. l2transport
  4. encapsulation dot1q vlan-id
  5. Use the commit or end command.
  6. show ethernet trunk bundle-ether instance

DETAILED STEPS


Step 1

configure

Example:

RP/0/RSP0/CPU0:router# configure

Enters the Global Configuration mode.

Step 2

interface {GigabitEthernet | TenGigE | Bundle-Ether} instance.subinterface

Example:

RP/0/RSP0/CPU0:router(config)# interface TenGigE 0/2/0/4.10

Enters subinterface configuration mode and specifies the interface type, location, and subinterface number.

  • Replace the instance argument with one of these instances:

    • Physical Ethernet interface instance, or with an Ethernet bundle instance. Naming notation is rack/slot/module/port, and a slash between values is required as part of the notation.

    • Ethernet bundle instance. Range is from 1 through 65535.

  • Replace the subinterface argument with the subinterface value. Range is from 0 through 4095.

  • Naming notation is instance.subinterface, and a period between arguments is required as part of the notation.

Step 3

l2transport

Example:

RP/0/RSP0/CPU0:router(config-subif)# l2transport

Enables Layer 2 transport mode on a port and enter Layer 2 transport configuration mode.

Step 4

encapsulation dot1q vlan-id

Example:

RP/0/RSP0/CPU0:router(config-subif-l2)# encapsulation dot1q 100

Assigns a VLAN Attachment Circuit to the subinterface.

  • Replace the vlan-id argument with a subinterface identifier. Range is from 1 to 4094 inclusive (0 and 4095 are reserved). To configure a basic Dot1Q Attachment Circuit, use this syntax:

    encapsulation dot1q vlan-id

  • To configure a QinQ Attachment Circuit, use this syntax:

    encapsulation dot1q vlan-id second-dot1q vlan-id

    Note

     
    Following are the varieties of encapsulation commands:
    • encapsulation dot1q 100

    • encapsulation dot1q 100 second-dot1q 101

    • encapsulation dot1ad 200 dot1q 201

Step 5

Use the commit or end command.

commit - Saves the configuration changes and remains within the configuration session.

end - Prompts user to take one of these actions:

  • Yes - Saves configuration changes and exits the configuration session.
  • No - Exits the configuration session without committing the configuration changes.
  • Cancel - Remains in the configuration mode, without committing the configuration changes.

Step 6

show ethernet trunk bundle-ether instance

Example:

RP/0/RSP0/CPU0:router# show ethernet trunk bundle-ether 5

(Optional) Displays the interface configuration.

The Ethernet bundle instance range is from 1 through 65535.


Configuring Native VLAN

This task explains how to configure a native VLAN on an interface.

SUMMARY STEPS

  1. configure
  2. interface [GigabitEthernet | TenGigE | Bundle-Ether] instance.subinterface l2transport
  3. encapsulation [dot1q vlan-id, untagged]
  4. Use the commit or end command.

DETAILED STEPS


Step 1

configure

Example:
RP/0/RSP0/CPU0:router# configure

Enters Global Configuration mode.

Step 2

interface [GigabitEthernet | TenGigE | Bundle-Ether] instance.subinterface l2transport

Example:

RP/0/RSP0/CPU0:router(config)# interface GigabitEthernet 0/2/0/4.2 l2transport

Enters subinterface configuration mode and specifies the interface type, location, and subinterface number.

  • Replace the instance argument with one of these instances:

    • Physical Ethernet interface instance, or with an Ethernet bundle instance. Naming notation is rack/slot/module/port, and a slash between values is required as part of the notation.

    • Ethernet bundle instance. Range is from 1 through 65535.

  • Replace the subinterface argument with the subinterface value. Range is from 0 through 4095.

  • Naming notation is instance.subinterface, and a period between arguments is required as part of the notation.

Note

 
You must include the l2transport keyword in the command string; otherwise, the configuration creates a Layer 3 subinterface rather than an Attachment Circuit.

Step 3

encapsulation [dot1q vlan-id, untagged]

Example:

RP/0/RSP0/CPU0:router(config-subif)# encapsulation dot1q 400

Defines the Native VLAN, associated with an 802.1Q trunk interface.

  • The vlan-id argument is the ID of the subinterface.

  • Range is from 1 through 4094 inclusive (0 and 4095 are reserved).

It is possible to receive both dot1q 400 and untagged frames by issuing the encapsulation command with the untagged keyword.

Step 4

Use the commit or end command.

commit - Saves the configuration changes and remains within the configuration session.

end - Prompts user to take one of these actions:

  • Yes - Saves configuration changes and exits the configuration session.
  • No - Exits the configuration session without committing the configuration changes.
  • Cancel - Remains in the configuration mode, without committing the configuration changes.

Removing an 802.1Q VLAN Subinterface

This task explains how to remove 802.1Q VLAN subinterfaces that have been previously configured using the “Configuring 802.1Q VLAN Subinterfaces" task in this chapter.

SUMMARY STEPS

  1. configure
  2. no interface {GigabitEthernet | TenGigE | Bundle-Ether} instance.subinterface
  3. Repeat Step 2 to remove other VLAN subinterfaces.
  4. Use the commit or end command.
  5. show ethernet trunk bundle-ether instance

DETAILED STEPS


Step 1

configure

Example:
RP/0/RSP0/CPU0:router# configure

Enters the Global Configuration mode.

Step 2

no interface {GigabitEthernet | TenGigE | Bundle-Ether} instance.subinterface

Example:
RP/0/RSP0/CPU0:router(config)# no interface TenGigE 0/2/0/4.10

Removes the subinterface, which also automatically deletes all the configuration applied to the subinterface.

  • Replace the instance argument with one of these instances:

    • Physical Ethernet interface instance, or with an Ethernet bundle instance. Naming notation is rack/slot/module/port, and a slash between values is required as part of the notation.

    • Ethernet bundle instance. Range is from 1 through 65535.

  • Replace the subinterface argument with the subinterface value. Range is from 0 through 4095.

Naming notation is instance.subinterface, and a period between arguments is required as part of the notation.

Step 3

Repeat Step 2 to remove other VLAN subinterfaces.

Step 4

Use the commit or end command.

commit - Saves the configuration changes and remains within the configuration session.

end - Prompts user to take one of these actions:

  • Yes - Saves configuration changes and exits the configuration session.
  • No - Exits the configuration session without committing the configuration changes.
  • Cancel - Remains in the configuration mode, without committing the configuration changes.

Step 5

show ethernet trunk bundle-ether instance

Example:
RP/0/RSP0/CPU0:router# show ethernet trunk bundle-ether 5

(Optional) Displays the interface configuration.

The Ethernet bundle instance range is from 1 through 65535.


Configuration Examples

Configuring an Ethernet Interface: Example

This example shows how to configure an interface for a 10-Gigabit Ethernet modular services card:

RP/0/RSP0/CPU0:router# configure
RP/0/RSP0/CPU0:router(config)# interface TenGigE 0/0/0/1
RP/0/RSP0/CPU0:router(config-if)# l2transport
RP/0/RSP0/CPU0:router(config-if)# mtu 1448
RP/0/RSP0/CPU0:router(config-if)# no shutdown
RP/0/RSP0/CPU0:router(config-if)# end
Uncommitted changes found, commit them? [yes]: yes

RP/0/RSP0/CPU0:router# show interfaces TenGigE 0/0/0/1

TenGigE0/0/0/1 is down, line protocol is down
  Hardware is TenGigE, address is 0001.2468.abcd (bia 0001.81a1.6b23)
  Internet address is 172.18.189.38/27
  MTU 1448 bytes, BW 10000000 Kbit
     reliability 0/255, txload Unknown, rxload Unknown
  Encapsulation ARPA,
  Full-duplex, 10000Mb/s, LR
  output flow control is on, input flow control is on
  loopback not set
  ARP type ARPA, ARP timeout 01:00:00
  Last clearing of "show interface" counters never
  5 minute input rate 0 bits/sec, 0 packets/sec
  5 minute output rate 0 bits/sec, 0 packets/sec
     0 packets input, 0 bytes, 0 total input drops
     0 drops for unrecognized upper-level protocol
     Received 0 broadcast packets, 0 multicast packets
              0 runts, 0 giants, 0 throttles, 0 parity
     0 input errors, 0 CRC, 0 frame, 0 overrun, 0 ignored, 0 abort
     0 packets output, 0 bytes, 0 total output drops
     Output 0 broadcast packets, 0 multicast packets
     0 output errors, 0 underruns, 0 applique, 0 resets
     0 output buffer failures, 0 output buffers swapped out
     0 carrier transitions

Configuring a L2VPN AC: Example

This example indicates how to configure a L2VPN AC on an Ethernet interface:

RP/0/RSP0/CPU0:router# configure
RP/0/RSP0/CPU0:router(config)# interface gigabitethernet 0/5/0/0.2 l2transport
RP/0/RSP0/CPU0:router(config-subif)# encapsulation dot1q 100
RP/0/RSP0/CPU0:router(config-subif)# ethernet egress-filter strict
RP/0/RSP0/CPU0:router(config-subif)# l2vpn
RP/0/RSP0/CPU0:router(config-l2vpn)# clear

RP/0/RSP0/CPU0:router#configure
RP/0/RSP0/CPU0:router(config)# interface gigabitethernet 0/5/0/0.2 l2transport
RP/0/RSP0/CPU0:router(config-subif)# encapsulation dot1q 100
RP/0/RSP0/CPU0:router(config-subif)# ethernet egress-filter strict
RP/0/RSP0/CPU0:router(config-subif)# interface gigabitethernet 0/5/0/1.100 l2transport
RP/0/RSP0/CPU0:router(config-subif)# encapsulation dot1q 100
RP/0/RSP0/CPU0:router(config-subif)# ethernet egress-filter strict
RP/0/RSP0/CPU0:router(config-subif)# l2vpn
RP/0/RSP0/CPU0:router(config-l2vpn)# bridge group example
RP/0/RSP0/CPU0:router(config-l2vpn-bg)# bridge-domain mybridge
RP/0/RSP0/CPU0:router(config-l2vpn-bg-bd)# interface gigabitethernet 0/5/0/0.2
RP/0/RSP0/CPU0:router(config-l2vpn-bg-bd-ac)# interface gigabitethernet 0/5/0/1.100
RP/0/RSP0/CPU0:router(config-l2vpn-bg-bd-ac)# exit
RP/0/RSP0/CPU0:router(config-l2vpn-bg-bd)# exit
RP/0/RSP0/CPU0:router(config-l2vpn-bg)# exit
RP/0/RSP0/CPU0:router(config-l2vpn)# exit
RP/0/RSP0/CPU0:router(config)# show
	
Building configuration...
!! IOS XR Configuration 0.0.0
interface GigabitEthernet0/5/0/0.2 l2transport
 encapsulation dot1q 100
 ethernet egress-filter strict
!
interface GigabitEthernet0/5/0/1.100 l2transport
 encapsulation dot1q 100
 ethernet egress-filter strict
!
l2vpn
 bridge group example
  bridge-domain mybridge
   interface GigabitEthernet0/5/0/0.2
   !
   interface GigabitEthernet0/5/0/1.100
   !
  !
 !
end		

Configuring VPWS with Link Bundles: Example

Physical Interfaces (Port mode)

interface Bundle-Ether12
 l2transport
!
interface GigabitEthernet0/1/0/10
 negotiation auto
 l2transport
!
interface GigabitEthernet0/1/0/20
 bundle id 12 mode on
 negotiation auto
!
interface GigabitEthernet0/1/0/21
 bundle id 12 mode on
 negotiation auto
!
 !
l2vpn
 xconnect group test
  p2p test
   interface Bundle-Ether12
   !
   interface GigabitEthernet0/1/0/10
   !
  !
 !
!

Sub Interfaces (EFP mode)

interface Bundle-Ether12
!
interface Bundle-Ether12.1 l2transport
  encapsulation dot1q 12
 !
!
interface GigabitEthernet0/1/0/10
 negotiation auto
!
interface GigabitEthernet0/1/0/10.1  l2transport
  encapsulation dot1q 12
 !

!
interface GigabitEthernet0/1/0/20
 bundle id 12 mode on
 negotiation auto
!
interface GigabitEthernet0/1/0/21
 bundle id 12 mode on
 negotiation auto
!
 !
l2vpn
xconnect group test
  p2p test
   interface Bundle-Ether12.1
   !
   interface GigabitEthernet0/1/0/10.1
   !
  !
 !
!

Configuring Ethernet Bundle with L2 and L3 Services: Example

This example shows how to configure an Ethernet bundle interface with L3 services:

configure
interface Bundle-Ether 100
 ipv4 address 12.12.12.2 255.255.255.0

!

This example shows how to configure an Ethernet bundle subinterface with L3 services:

configure
interface Bundle-Ether 100.1
 ipv4 address 13.13.13.2 255.255.255.0

!

This example shows how to configure an Ethernet bundle interface with L2 services:

configure
 interface Bundle-Ether 101
 l2transport

!

This example shows how to configure an Ethernet bundle interface with L2 services:

configure
 interface Bundle-Ether1.1 l2transport
!

Configuring VLAN Subinterfaces: Example

This example shows how to create VLAN subinterfaces:

RP/0/RSP0/CPU0:router# configure
RP/0/RSP0/CPU0:router(config)# interface TenGigE 0/2/0/4.1 l2transport
RP/0/RSP0/CPU0:router(config-subif)# encapsulation dot1q 20
RP/0/RSP0/CPU0:router(config-subif)# interface TenGigE0/2/0/4.2 l2transport
RP/0/RSP0/CPU0:router(config-subif)# encapsulation dot1q 30
RP/0/RSP0/CPU0:router(config-subif)# interface TenGigE0/2/0/4.3 l2transport
RP/0/RSP0/CPU0:router(config-subif)# encapsulation dot1q 40
RP/0/RSP0/CPU0:router(config-subif)# commit
RP/0/RSP0/CPU0:router(config-subif)# exit
RP/0/RSP0/CPU0:router(config)# exit

This example shows how to create two VLAN subinterfaces on an Ethernet bundle at one time:

RP/0/RSP0/CPU0:router# configure
RP/0/RSP0/CPU0:router(config)# interface Bundle-Ether 1 l2transport
RP/0/RSP0/CPU0:router(config-if-l2)# exit
RP/0/RSP0/CPU0:router(config)# interface Bundle-Ether  1.1 l2transport
RP/0/RSP0/CPU0:router(config-subif-l2)#  encapsulation dot1q 10
RP/0/RSP0/CPU0:router(config-subif)# exit
RP/0/RSP0/CPU0:router(config)# interface Bundle-Ether 1.2 l2transport
RP/0/RSP0/CPU0:router(config-subif-l2)# encapsulation dot1q 20
RP/0/RSP0/CPU0:router(config-subif)# exit

This example shows how to create a basic Dot1Q Attachment Circuit:

RP/0/RSP0/CPU0:router# configure
RP/0/RSP0/CPU0:router(config)# interface TenGigE 0/2/0/4.1 l2transport
RP/0/RSP0/CPU0:router(config-subif)# encapsulation dot1q 20
RP/0/RSP0/CPU0:router(config-subif)# commit
RP/0/RSP0/CPU0:router(config-subif)# exit
RP/0/RSP0/CPU0:router(config)# exit

This example shows how to create a QinQ Attachment Circuit:

RP/0/RSP0/CPU0:router# configure
RP/0/RSP0/CPU0:router(config)# interface TenGigE 0/2/0/4.2 l2transport
RP/0/RSP0/CPU0:router(config-subif)# encapsulation dot1q 20 second-dot1q 10
RP/0/RSP0/CPU0:router(config-subif)# commit
RP/0/RSP0/CPU0:router(config-subif)# exit
RP/0/RSP0/CPU0:router(config)# exit

This example shows how to create a Q-in-Any Attachment Circuit:

RP/0/RSP/CPU0:router# configure
RP/0/RSP/CPU0:router(config)# interface TenGigE 0/2/0/4.3 l2transport
RP/0/RSP/CPU0:router(config-subif)# encapsulation dot1q 30 second-dot1q any
RP/0/RSP/CPU0:router(config-subif)# commit
RP/0/RSP/CPU0:router(config-subif)# exit
RP/0/RSP/CPU0:router(config)# exit

Where to Go Next

When you have configured an Ethernet interface, you can configure individual VLAN subinterfaces on that Ethernet interface. For information about configuring VLAN subinterfaces, see the The Cisco ASR 9000 Series Routers Carrier Ethernet Model chapter later in this document.

For information about IPv6, see the IP Addresses and Services Configuration Guide for Cisco ASR 9000 Series Routers.