Migration and Upgrade of Cisco ASR 900 RSP1 Module to ASR 900 RSP2 Module

This document details the migration requirements while migrating the ASR 900 RSP1 module to ASR 900 RSP2 module and the supported interface modules (IM).

Migration and Upgrade Workflow

Task
Step1 Performing a backup of licenses and configurations on the router, see Backup of Licenses and Running Configuration
Step2 Migrating the Route Switch Processor (RSP) modules and Interface Modules (IM), see Migration of RSPs and IMs
Step3 Installing and configuring licenses on the RSP module, see Installing the Licenses and Running Configuration
Step4 Upgrading existing IMs to the high-density port IMs, see Upgrading IMs to High Density IM
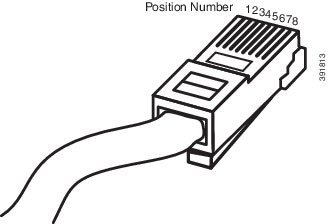
Step5 Understanding Time of Day (TOD) port connections, see Time of Day (TOD) Pin Connections
Step6 Understanding the feature scale information. See Cisco ASR 903 Route Switch Processor 1 Data Sheet

Supported Interface Modules

Table 1. Supported IMs and Slot Numbers
Cisco ASR 900 Series Router Route Switch Processor Module Supported Interface Modules Interface Modules with Part Numbers IM Slots
ASR 903 Router A900-RSP2A-128 Existing IM (Supported on ASR 900 RSP1)

Note


OC-12 IM is not supported in Cisco IOS XE Release 3.13.

8-port Gigabit Ethernet SFP Interface Module (8X1GE) (PN: A900-IMA8S)

8-port Gigabit Ethernet RJ45 (Copper) Interface Module (8X1GE) (PN: A900-IMA8T)

1-port 10 Gigabit Ethernet XFP Interface Module (1X10 GE) (PN: A900-IMA1X)

16 x T1/E1 Interface Module (PN: A900-IMA16D)

4-Port OC3/STM-1 (OC-3) or 1-Port OC12/STM-4 (OC-12) Interface Module (PN: A900-IMA4OS)

14-port Serial Interface Module (PN: A900-IMASER14A/S)

All
New IMs (Introduced on ASR 900 RSP2)

SFP Combo IM—8-port Gigabit Ethernet (8X1GE) + 1-port 10 Gigabit Ethernet (1X10GE) (PN: A900-IMA8S1Z)

Copper Combo IM—8-port Gigabit Ethernet (8X1GE) + 1-port 10 Gigabit Ethernet (1X10GE) (PN: ASR900-IMA8T1Z)

2-port 10 Gigabit Ethernet (2X10GE) (PN: A900-IMA2Z)

A900-RSP2A-64

Note


High Density Combination IMs are not supported.

1-port 10 Gigabit Ethernet XFP Interface Module (1X10 GE) (PN: A900-IMA1X)

2-port 10 Gigabit Ethernet (2X10GE) (PN: A900-IMA2Z)

4-Port OC3/STM-1 (OC-3) or 1-Port OC12/STM-4 (OC-12) Interface Module (PN: A900-IMA4OS)

0-2

8-port Gigabit Ethernet SFP Interface Module (8X1GE) (PN: A900-IMA8S)

8-port Gigabit Ethernet RJ45 (Copper) Interface Module (8X1GE) (PN: A900-IMA8T)

16 x T1/E1 Interface Module (PN: A900-IMA16D)

14-port Serial Interface Module (PN: A900-IMASER14A/S)

3-5
ASR 902 Router A900-RSP2A-128 Existing IM (Supported on ASR 900 RSP1)

8-port Gigabit Ethernet SFP Interface Module (8X1 GE) (PN: A900-IMA8S)

8-port Gigabit Ethernet RJ45 (Copper) Interface Module (8X1GE) (PN: A900-IMA8T)

1-port 10 Gigabit Ethernet XFP Interface Module (1X10 GE) (PN: A900-IMA1X)

16 x T1/E1 Interface Module (PN: A900-IMA16D)

4-Port OC3/STM-1 (OC-3) or 1-Port OC12/STM-4 (OC-12) Interface Module (PN: A900-IMA4OS)

All
New IMs (Introduced on ASR 900 RSP2)

8-port Gigabit Ethernet (8X1GE) + 1-port 10 Gigabit Ethernet (1X10GE) (PN: A900-IMA8S1Z)

8-port Gigabit Ethernet (8X1GE) + 1-port 10 Gigabit Ethernet (1X10GE) (PN: A900-IMA8T1Z)

2-port 10 Gigabit Ethernet (2X10GE) (PN: A900-IMA2Z)

A900-RSP2A-64

Note


OC-12 IM is not supported in Cisco IOS XE Release 3.13.

8-port Gigabit Ethernet SFP Interface Module (8X1 GE) (PN: A900-IMA8S)

8-port Gigabit Ethernet RJ45 (Copper) Interface Module (8X1GE) (PN: A900-IMA8T)

1-port 10 Gigabit Ethernet XFP Interface Module (1X10 GE) (PN: A900-IMA1X)

SFP Combo IM—8-port Gigabit Ethernet (8X1GE) + 1-port 10 Gigabit Ethernet (1X10GE) (PN: A900-IMA8S1Z)

Copper Combo IM—8-port Gigabit Ethernet (8X1GE) + 1-port 10 Gigabit Ethernet (1X10GE) (PN: A900-IMA8T1Z)

2-port 10 Gigabit Ethernet (2X10GE) (PN: A900-IMA2Z)

16 x T1/E1 Interface Module (PN: A900-IMA16D)

4-Port OC3/STM-1 (OC-3) or 1-Port OC12/STM-4 (OC-12) Interface Module (PN: A900-IMA4OS)

0 and 2

1-port 10 Gigabit Ethernet XFP Interface Module (1X10 GE) (PN: A900-IMA1X)

2-port 10 Gigabit Ethernet (2X10GE) (PN: A900-IMA2Z)

4-Port OC3/STM-1 (OC-3) or 1-Port OC12/STM-4 (OC-12) Interface Module (PN: A900-IMA4OS)

1

8-port Gigabit Ethernet SFP Interface Module (8X1GE) (PN: A900-IMA8S)

8-port Gigabit Ethernet RJ45 (Copper) Interface Module (8X1GE) (PN: A900-IMA8T)

16 x T1/E1 Interface Module (PN: A900-IMA16D)

3

Ethernet Interface Modules

The ASR900 RSP2 module supports three new interface modules (IM)s with higher port density.


Note


High-density Combination Interface Modules (ASR900-IMA8S1Z, ASR900-IMA8T1Z ), and 2-port 10 Gigabit Ethernet Interface Module (ASR900-IMA2Z) are not supported with the ASR 900 RSP2-64 module on the Cisco ASR 903 router.


IM Part Numbers Description
New IMs (Introduced on ASR 900 RSP2)
ASR900-IMA2Z (2X10G) 2-port 10 Gigabit Ethernet Interface Module
ASR900-IMA8S1Z (8X1 GE, 1X10GE) (High Density Combination IM) 8-port 1 Gigabit Ethernet SFP Interface Module + 1-port 10 Gigabit Ethernet SFP+ Interface Module
ASR900-IMA8T1Z (8X1 GE, 1X10GE) (High Density Combination IM) 8-port 1 Gigabit Ethernet RJ45 (Copper) Interface Module + 1-port 10 Gigabit Ethernet SFP+ Interface Module

Backup of Licenses and Running Configuration

The Cisco ASR 900 Series Router platform licenses are configured on the RSP on the router. It is recommended to backup the license before performing a migration. Licenses should be re-installed after a migration. For information on the licenses, see Cisco IOS XE Software for Cisco ASR 900 Series Aggregation Services Routers Data Sheet.

For information on licensing the Cisco ASR 900 Series Routers, see Licensing Information.

Procedure


Step 1

Procure the license UDI details using the show license udi command.

Example:

Router# show license udi

SlotID   PID                    SN                      UDI
--------------------------------------------------------------------------------
*6       ASR-903               FOX1637P0UB     ASR-903:FOX1637P0UB

The command lists the serial number of the RSP inserted in the router.

Step 2

Save the license file to an external drive (USB) using the license save bootflash:lic.txt command.

Step 3

Backup the license file in an external drive (USB) or a TFTP server.

Step 4

Backup the running configuration in an external drive (USB) or a TFTP server. You will need to access this server to replace the configuration after the migration.


Migration of RSPs and IMs

General Restrictions

  • Installing a mixture of RSPs such as ASR 900 RSP1 with ASR 900 RSP2 and ASR 900 RSP2-64 with ASR 900 RSP2-128 is not supported.

  • TDM IM (A900-IMA16D) and 1-Port OC12/STM-4 (OC-12) (A900-IMA4OS) IM are not supported in Cisco IOS XE Release 3.13S.

  • Supported feature scale values should be used during migration. For information on supported scale values, see Data Sheets.

  • When replacing one RSP with another RSP (either during RMA or migration of one RSP to another), ensure that RSP image version of the replaced RSP is same as that of Active RSP.

    Follow these steps:

    1. Have a USB with the active configuration, the IOS-XE .bin and the ROMMON image.

    2. Insert the USB into the new RSP.

    3. Remove the old RSP and insert the new RSP.

    4. Boot the new RSP and check the ROMMON version.

      If required, upgrade the ROMMON from the USB, and reboot.

    5. Press Break on the terminal keyboard within 60 seconds of power up to put the router into ROMMON mode.

    6. Boot from ROMMON usb0: active image .bin.

    7. Copy the .bin file to bootflash:

    8. Perform File System cleanup using the delete standby bootflash command.

    9. Load the router configuration from the USB. However, if you have a redundant RSP in the router, the active configuration is automatically copied to the standby RSP.

    10. Reboot into package mode by expanding the .bin to the package and setting auto boot.

    11. Wait for SSO mode and check the status of both RSPs using the show platform and show redundancy commands.

Migration of ASR 900 RSP1A to ASR 900 RSP2A-128

The upgrade depends on the boot time, installation of licenses, and copying the configuration. The complete upgrade procedure including replacing interface modules is estimated at approximately 1 hour.
  • Boot time for the interface modules :15 minute

  • license installation time per interface module: 15 minutes.

  • Configuration replace and copying configuration: 30 minutes

Before you begin

Ensure supported scale values are set before migration.

Procedure


Step 1

Remove the standby RSP1A module (in high availability HA mode) from the router chassis followed by the active RSP1A module.

Note

 
Skip Step2 if interface module upgrade is not required.

Step 2

Replace the IMs with the high-density IMs of the same media type (SFP IM with SFP Combo) in the same slot. For more information on supported IMs, see Supported Interface Modules.

Step 3

Insert the RSP2 in slot0 in the router chassis and the second RSP2 in slot1 (HA mode).

Note

 
Dissimilar images are not supported. Ensure the newly inserted RSPs have the same image on active and standby, if not then ensure by reloading the system with same image.

Step 4

Wait for the RSP2 in slot0 to boot the image and reach the Hot standby state (HA mode).

Step 5

Ensure that the IMs reach the OK state after the reload.


Migration of ASR 900 RSP1B to ASR 900 RSP2A-128

Migration of ASR 900 RSP1B-55 to ASR 900 RSP2A-128 is not recommended due to differences in scale values. Contact Technical Assistance.

The upgrade depends on the boot time, installation of licenses, and copying the configuration. The complete upgrade procedure including replacing interface modules is estimated at approximately 1 hour.
  • Boot time for the interface modules :15 minute

  • license installation time per interface module: 15 minutes.

  • Configuration replace and copying configuration: 30 minutes

Before you begin

Ensure supported scale values are set before migration. Make required feature changes to support the scale differences. See Data Sheets.

Procedure


Step 1

Remove the standby RSP1B module (in high availability HA mode) from the router chassis followed by the active RSP1B module.

Skip Step2 if interface module upgrade is not required.

Step 2

Replace the IMs with the high-density IMs of the same media type (SFP IM with SFP Combo) in the same slot.

Step 3

Insert the RSP2 in slot0 in the router chassis and the second RSP2 in slot1 (HA mode).

Note

 
Dissimilar images are not supported. Ensure the newly inserted RSPs have the same image on active and standby, if not then ensure by reloading the system with same image.

Step 4

Wait for the RSP2 in slot0 to boot the image and reach the Hot standby state (HA mode).

Step 5

Ensure that the IMs reach the OK state after the reload.


Migration of ASR 900 RSP1A to ASR 900 RSP2A-64

The upgrade depends on the boot time, installation of licenses, and copying the configuration. The complete upgrade procedure including replacing interface modules is estimated at approximately 1 hour.
  • Boot time for the interface modules :15 minute

  • license installation time per interface module: 15 minutes.

  • Configuration replace and copying configuration: 30 minutes

Before you begin

  • Ensure supported scale values are set before migration.

  • Review the slot restrictions for the different interface modules. (For example, 10 Gigabit Ethernet in Slot 0-2). For more information, see Supported Interface Modules

Procedure


Step 1

Verify that the interface modules are placed in the supported slots for ASR 900 RSP2A-64.

Step 2

Backup the running configuration in an external drive (USB) or a TFTP server. You will need to access this server to replace the configuration after the migration.

Step 3

Remove the standby RSP1A module (in high availability HA mode) from the router chassis followed by the active RSP1A module.

Note

 
Dissimilar images are not supported. Ensure the newly inserted RSPs have the same image on active and standby, if not then ensure by reloading the system with same image.

Step 4

Ensure that the IMs are inserted in specified slots in the router chassis. See Supported Interface Modules.

Step 5

Insert the RSP2 in slot0 in the router chassis and the second RSP2 in slot1 (HA mode).

Step 6

Wait for the RSP2 in slot0 to boot the image and reach the Hot standby state (HA mode).

Step 7

Ensure that the IMs reach the OK state after the reload.


Installing the Licenses and Running Configuration

Install the licenses after the image is loaded and the router is in hot standby state. For information on the supported images and licenses, see Cisco IOS XE Software for Cisco ASR 900 Series Aggregation Services Routers Data Sheet.

For information on configuring licensing on the Cisco ASR 900 Series Routers, see Licensing Information.

Procedure


Step 1

Insert the external drive (USB) in the provided RSP slot or access the TFTP server to copy the license information. Copy the license file to the bootflash.

Step 2

Execute the license boot command for the license type. For information on booting licenses using software activation commands, see Configuring the Cisco IOS Software Activation Feature.

Step 3

Install the license using the license install usb0: license-file command or use the license install tftp://tftp-server-address / location-license-file / license-file

After installation, "Installing...Feature:feature -name...Supported: Supported" message is displayed.

Step 4

Save router configuration and reload the router for activation of licenses.

Step 5

Wait for the router to reach hot standby state (HA mode).

Step 6

Load the saved configuration from the external drive (USB) or the TFTP server. Use the configure replace usb0: modified-config command or the configure replace tftp://tftp-server-address / location-config / modified-config command.


Upgrading IMs to High Density IM

Upgrading to High Density Interface Modules

This procedure is for upgrading the existing IMs to the high-density port IM in the same slot. This procedure is applicable to the following
  • 8-port 1 Gigabit Ethernet SFP Interface Module to 8-port 1 Gigabit Ethernet SFP Interface Module + 1-port 10 Gigabit Ethernet SFP+ Interface Module

  • 8-port 1 Gigabit Ethernet Cu Interface Module to 8-port 1 Gigabit Ethernet RJ45 (Copper) Interface Module + 1-port 10 Gigabit Ethernet SFP Interface Module

  • 1-port 10 Gigabit Ethernet Interface Module to 2-port 10 Gigabit Ethernet Interface Module

  • 8-port 10 Gigabit Ethernet Interface Module (8X10 GE)

  • 1-port 100 Gigabit Ethernet Interface Module (1X100 GE)

  • 2-port 40 Gigabit Ethernet QSFP Interface Module (2X40 GE)

Before you begin

Defaulting of interfaces is required before upgrading of inteface modules (IM)s. If defaulting is not performed, the interfaces may get corrupted and reload of router is required.

Procedure


Step 1

Save the running configuration to the router bootflash or external drive (USB) or TFTP server.

Step 2

Perform a default of all the interfaces on the IM using the hw-module subslot bay default command. For more information, see Cisco IOS Interface and Hardware Component Command Reference.

Example:

Router# hw-module subslot 0/1 default

Proceed with setting all interfaces as default for the module? [confirm]
%Setting all interfaces in 0/1 to default state
Interface GigabitEthernet0/1/0 set to default configuration
Interface GigabitEthernet0/1/1 set to default configuration
Interface GigabitEthernet0/1/2 set to default configuration
Interface GigabitEthernet0/1/3 set to default configuration
Interface GigabitEthernet0/1/4 set to default configuration
Interface GigabitEthernet0/1/5 set to default configuration
Interface GigabitEthernet0/1/6 set to default configuration
Interface GigabitEthernet0/1/7 set to default configuration
Interface TenGigabitEthernet0/1/8 set to default configuration
Router#
*Jun  3 19:27:52.302: %TRANSCEIVER-6-REMOVED: SIP0: iomd:  Transceiver module removed from TenGigabitEthernet0/1/8
*Jun  3 19:27:52.589: %IOSXE_OIR-6-REMSPA: SPA removed from subslot 0/1, interfaces disabled
*Jun  3 19:27:52.616: %SPA_OIR-6-OFFLINECARD: SPA (A900-IMA8S1Z) offline in subslot 0/1
*Jun  3 19:27:53.985: %LINK-3-UPDOWN: Interface TenGigabitEthernet0/4/8, changed state to down
*Jun  3 19:27:54.686: %LINEPROTO-5-UPDOWN: Line protocol on Interface TenGigabitEthernet0/4/8, changed state to down
*Jun  3 19:28:16.696: %IOSXE_OIR-6-INSSPA: SPA inserted in subslot 0/1
*Jun  3 19:28:22.000: %ASR900IM-3-DIFF_IM_INSERTED:  Different IM type inserted  - A900-IMA1X[0/1] in bay 1
*Jun  3 19:28:41.205: %SPA_OIR-6-ONLINECARD: SPA (A900-IMA1X) online in subslot 0/1
*Jun  3 19:28:41.207: %TRANSCEIVER-6-INSERTED: SIP0: iomd:  transceiver module inserted in TenGigabitEthernet0/1/0

Press enter for confirmation.

Console messages are displayed for the interfaces. Ensure that the interface interface-name set to default configuration message is displayed before performing Step 3.

Step 3

Remove the IM from the bay and insert the new IM. See IM slot compatibility matrix for supported slots before inserting the new IM.

The default configuration is displayed.

Note


If the default configuration is not displayed, the IM may enter the Out of Service state. To recover the IM, insert the old IM, enter the default interface configuration and then reinsert the new IM. For more information, see Cisco ASR 903 Series Aggregation Services Router Hardware Installation Guide .

Step 4

Copy the saved running configuration from the bootflash or the external drive (USB) or TFTP server. Rename the interface names in the configuration file.

Step 5

Configure the additional or new 10 Gigabit Ethernet port.


Upgrading the 1 Gigabit Ethernet Interface Modules to High Density 2-port 10 Gigabit Ethernet Interface Module

This procedure is for upgrading the existing IMs to the high-density port IM in the same slot. This procedure is applicable to the following
  • 8X1 Gigabit Ethernet SFP IM to 2-port 10 Gigabit Ethernet IM

  • 8x1 Gigabit Ethernet Cu IM to 2-port 10 Gigabit Ethernet IM

Before you begin

Defaulting of interfaces is required before upgrading of interface modules (IM). If defaulting is not performed, the interfaces may get corrupted and reload of router is required.

Procedure


Step 1

Save the running configuration to the router bootflash or external drive (USB) or TFTP server.

Step 2

Perform a default of all the interfaces on the IM using the hw-module subslot bay default command. For more information, see Cisco IOS Interface and Hardware Component Command Reference.

Example:

Router# hw-module subslot 0/1 default

Proceed with setting all interfaces as default for the module? [confirm]
%Setting all interfaces in 0/1 to default state
Interface GigabitEthernet0/1/0 set to default configuration
Interface GigabitEthernet0/1/1 set to default configuration
Interface GigabitEthernet0/1/2 set to default configuration
Interface GigabitEthernet0/1/3 set to default configuration
Interface GigabitEthernet0/1/4 set to default configuration
Interface GigabitEthernet0/1/5 set to default configuration
Interface GigabitEthernet0/1/6 set to default configuration
Interface GigabitEthernet0/1/7 set to default configuration
Interface TenGigabitEthernet0/1/8 set to default configuration
Router#
*Jun  3 19:27:52.302: %TRANSCEIVER-6-REMOVED: SIP0: iomd:  Transceiver module removed from TenGigabitEthernet0/1/8
*Jun  3 19:27:52.589: %IOSXE_OIR-6-REMSPA: SPA removed from subslot 0/1, interfaces disabled
*Jun  3 19:27:52.616: %SPA_OIR-6-OFFLINECARD: SPA (A900-IMA8S1Z) offline in subslot 0/1
*Jun  3 19:27:53.985: %LINK-3-UPDOWN: Interface TenGigabitEthernet0/4/8, changed state to down
*Jun  3 19:27:54.686: %LINEPROTO-5-UPDOWN: Line protocol on Interface TenGigabitEthernet0/4/8, changed state to down
*Jun  3 19:28:16.696: %IOSXE_OIR-6-INSSPA: SPA inserted in subslot 0/1
*Jun  3 19:28:22.000: %ASR900IM-3-DIFF_IM_INSERTED:  Different IM type inserted  - A900-IMA1X[0/1] in bay 1
*Jun  3 19:28:41.205: %SPA_OIR-6-ONLINECARD: SPA (A900-IMA1X) online in subslot 0/1
*Jun  3 19:28:41.207: %TRANSCEIVER-6-INSERTED: SIP0: iomd:  transceiver module inserted in TenGigabitEthernet0/1/0

Press enter for confirmation.

Console messages are displayed for the interfaces. Ensure that the interface interface-name set to default configuration message is displayed before performing Step 3.

Step 3

Remove the IM from the bay and insert the 2-port 10 Gigabit Ethernet IM.

The default configuration is displayed

Note


If the default configuration is not displayed, the IM may enter the Out of Service state. To recover the IM, insert the old IM, enter the default interface configuration and then reinsert the new SFP IM. For more information, see Cisco ASR 903 Series Aggregation Services Router Hardware Installation Guide .

Step 4

Copy the saved running configuration from the bootflash or the external drive (USB) or TFTP server.

Step 5

Configure the ports on the IM.


Time of Day (TOD) Pin Connections

Table 2. TOD Cable Pin Connections
Router R1 Router R2 Mode Cable Pin Connection
RSP1 RSP1 RS422 Pin 7 to Pin7
Pin 4 to Pin 4
Pin 5 to Pin 5
Pin 8 to Pin 8
RSP1 RSP2 RS422 Pin 7 to Pin8
Pin 4 to Pin 4
Pin 5 to Pin 5
Pin 8 to Pin 7
RSP2 RSP2 RS422 Pin 7 to Pin 7
Pin 4 to Pin 4
Pin 5 to Pin 5
Pin 8 to Pin 8
Figure 1. Time of Day (TOD) Pinout

Additional References

Related Documents

Related Topic

Document Title

Cisco ASR 903 Series Aggregation Services Router Hardware Installation Guide

http://www.cisco.com/c/en/us/td/docs/wireless/asr_900/hardware/installation/ASR903-HW-install.html

Licensing Information

http://www.cisco.com/c/en/us/support/routers/asr-903-series-aggregation-services-routers/products-licensing-information-listing.html

Data Sheets

http://www.cisco.com/c/en/us/products/routers/asr-903-series-aggregation-services-routers/datasheet-listing.html

Configuration Guides

http://www.cisco.com/c/en/us/support/routers/asr-903-series-aggregation-services-routers/products-installation-and-configuration-guides-list.html

Cisco IOS master command list

Cisco IOS Master Command List , All Releases

Standards

Standard

Title

No new or modified standards are supported, and support for existing standards has not been modified.

--

MIBs

MIB

MIBs Link

No new or modified MIBs are supported, and support for existing MIBs has not been modified.

To locate and download MIBs for selected platforms, Cisco IOS releases, and feature sets, use Cisco MIB Locator found at the following URL:

http://www.cisco.com/go/mibs

RFCs

RFC

Title

No new or modified RFCs are supported, and support for existing RFCs has not been modified.

--

Technical Assistance

Description

Link

The Cisco Support and Documentation website provides online resources to download documentation, software, and tools. Use these resources to install and configure the software and to troubleshoot and resolve technical issues with Cisco products and technologies. Access to most tools on the Cisco Support and Documentation website requires a Cisco.com user ID and password.

http://www.cisco.com/cisco/web/support/index.html