Managing User Access

This section explains how to manage users and roles in IoT FND.

All user management actions are accessed through the Admin > Access Management menu.

Managing Password Policy

IoT FND provides default password policy values that you can enforce among IoT FND users.


Note


To modify these values, you must be logged in either as root or as a user with Administrative Operations permissions.

Caution: In some cases, changing password policies immediately terminates all user sessions and resets all passwords.


Note


The “Password history size” and “Max unsuccessful login attempts” policies do not apply to IoT FND North Bound API users.

These changes invalidate all user sessions and expire their passwords (including the root user):

  • When you increase the minimum length of passwords

  • When you decrease the password expiry interval

  • When you enable "Password cannot contain username or reverse of username"

  • When you enable "Password cannot be cisco or ocsic (cisco reversed)"

  • When you enable "No character can be repeated more than three times consecutively in the password"

  • When you enable "Must contain at least one character from all the character sets (upper-case, lower-case, digits and special characters)"

To edit password policies:

Procedure


Step 1

Choose ADMIN > Access Management > Password Policy.

Step 2

To enable or disable a policy, choose the appropriate option (Enabled or Disabled ) from the Status drop-down menu.

Note


IoT FND supports a maximum password length of 32 characters.

Step 3

To modify the value of a policy, if applicable, enter the new value in the Value field.

Step 4

Click Save to start enforcing the new policies.

Note

 
The password policy you configure in IoT FND applies only to local users and not to remote Active Directory (AD) users. The password policy for AD users is determined and enforced by the AD admin.

Managing User Authentication

This section explains how to configure remote and single sign-on authentication in Cisco IoT FND.

Configuring Remote Authentication

To configure remote authentication for IoT FND, you need to perform the configurations steps (listed below) in Active Directory (AD) and IoT FND.

Support for Remote Authentication

With Remote Authentication, it is easier to integrate IoT FND into an existing AD and Network Policy Server (NPS) infrastructure. This allows administrators to configure IoT FND access for users in AD.

When you configure remote authentication in IoT FND, it hands over the authentication and authorization responsibility to AD and NPS. AD performs user authentication to check the validity of user credentials. The RADIUS server performs user authorization to check whether a user belongs to a group that defines the user role. If so, the server returns the role name to IoT FND.

The following is the flow of user authentication and authorization by AD and NPS:

  1. The user enters their credentials.

    If user was created locally on the NMS server, authentication and authorization occurs locally.

    If IoT FND determines that the user is a remote user, authentication and authorization occurs on the configured RADIUS server.

    If remote authentication is not configured, authentication fails and user is denied access.

  2. For remote users, if authentication and authorization are successful, the assigned user role returns to the NMS server from the RADIUS server.

  3. If the role that returns is valid, the user is granted access.


Note


When remote authentication is enabled, user management is done in AD. If an AD user logs in who was deleted from IoT FND, their profile is added back to IoT FND. To prevent access to IoT FND, their AD user profiles must first be deleted from AD.

Configuring Remote Authentication in IoT FND

To configure remote authentication:

Procedure

Step 1

Choose ADMIN > Access Management > Authentication.

Step 2

Select the authentication type as Local or Remote Authentication.

Step 3

Enter information about the Radius Server:

Field Description

IP

The IP address of the RADIUS server.

Radius Server Description

A descriptive name of the RADIUS server.

Shared Secret

The shared secret you configured on the RADIUS server.

Confirm Shared Secret

Authentication Port

The RADIUS server port that IoT FND uses to send request to. The default port is 1812.

Accounting Port

The RADIUS server accounting port. The default port is 1813.

Retries

The number of times to send a request to the RADIUS server before IoT FND times out and remote authentication fails because no response was received from the RADIUS server.

Timeout (seconds)

The number of seconds before IoT FND times out and remote authentication fails because no response was received from the RADIUS server.

Step 4

To ensure that IoT FND can reach the RADIUS server, click Test Connectivity.

  1. Enter your Remote (AD) username and password.

  2. Click Submit.

    The results of the configuration test displays.

  3. Click OK.

Step 5

Click Save when done.


Configuring Security Policies on the RADIUS Server

To authorize users for IoT FND access, configure security policies for the RADIUS server.

To configure security policies on the RADIUS server, follow these steps:

Procedure

Step 1

Create a network policy for each security group you created in AD.

Step 2

Configure the policy as follows:

  1. In the Overview tab, define the policy name, enable it, and grant access permissions.

  2. Click the Conditions tab, select the User Groups condition, and click Add .

    The User Groups condition specifies that the connecting user must belong to the selected group. For this policy to pass, the user being authorized must belong to the user group configured in this policy.

  3. In the User Groups window, click Add Groups.

  4. In the Select Group window, enter the name of the group

  5. Click OK to close the Select Group dialog box, and then click OK to close the User dialog box.

  6. Click Cancel to close the Select condition window. The condition appears in the Conditions pane.

  7. Click the Settings tab, and then click Add to display the Attribute Information window.

  8. Click Add to define a Vendor Specific Attribute (VSA) that is sent to IoT FND (RADIUS client) after the user credentials and security group membership are verified.

    The VSA to configure is:
    Configure VSA

    Attribute Name: Cisco-AV-Pair

    Attribute number: 5000

    Attribute format: String.

    Attribute value: Enter the attribute value to send to IoT FND.

    Note

     
    The string entered in the Attribute value field must be the exact string listed in the Radius Server VSA column on the Roles page in IoT FND (ADMIN > Access Management > Roles).
  9. Click OK.

    The VSA attribute appears in the Settings pane.

  10. Click OK.


Configuring Remote Authentication in AD

To allow IoT FND to remotely authenticate users, configure the following within Active Directory

Procedure

Step 1

Log in to NPS.

Step 2

Add IoT FND as a radius client on the RADIUS server.

Provide a friendly name, and IP address or DNS name of the IoT FND server and configure the shared secret that IoT FND uses to connect to the RADIUS server.

An entry for the RADIUS client appears under RADIUS Clients and Servers.

Step 3

Log in to AD and create an Organizational Unit.

Cisco recommends that you create all security groups (IoT FND roles) within this Organizational Unit.

Step 4

Add security groups corresponding to IoT FND roles to the Organizational Unit.

The following example shows the security groups defined in the NMS_ROLES Organizational Unit.

Tip: When creating the security groups, ensure that they map one-to-one to IoT FND roles (that is, every role defined in IoT FND maps to only one AD security group). The name of the security group does not have to match a role name in IoT FND, but for organizational purposes, Cisco recommends using names that correlate the security group name to a IoT FND role.

Note

 
You cannot create or assign the IoT FND root role in AD.

Step 5

Assign AD users a role by adding them to the security group mapping to that role.

Since, users can only belong to one security group, the IoT FND role that the user is assigned after log in is dependent on their assigned AD security group.

Tip: In AD, users cannot be assigned multiple IoT FND roles, and cannot belong to multiple security groups. To assign permissions from more than one role to a group of users, create a new IoT FND role with the required permissions, and a create the corresponding AD security group. Users in this new group can then carry out the tasks allowed by this role.

Step 6

Configure the Dial-in Network Access Permission to use the NPS Network Policy.


Enabling and Disabling Remote User Accounts

In IoT FND you cannot enable or disable remote AD user accounts. To enable or disable remote AD user accounts, use your AD server.

Deleting Remote User Accounts

In IoT FND, you can delete remote user accounts. However, this only removes the user from the IoT FND Users page (ADMIN > Access Management > Users ); it does not delete the user account from AD. If a deleted user logs in to IoT FND and AD authentication is successful, an entry for the user is added to the IoT FND Users page.

Logging In to IoT FND Using a Remote User Account

Logging in to IoT FND using a remote AD user account is transparent to the user. In the background, IoT FND checks whether the account is local, and for remote users sends an authentication request to the RADIUS server configured on the Remote Authentication page (ADMIN > Access Management > Remote Authentication ). If both authentication and authorization are successful, IoT FND adds an entry for the user in the Users page (ADMIN > Access Management > Users ).

Unlike entries for local users on the Users page, the user name filed in remote user entries is not a link. You cannot click the name of a remote user to obtain more information about the user.


Note


Remote users cannot be managed through IoT FND. If a remote user wants to update their password, they must use their organization’s AD password update tool. Remote users cannot update their password using IoT FND.

Configuring Single Sign-On Authentication

Starting with Cisco IoT FND 4.8 release, Single Sign-On (SSO) authentication is supported. SSO allows you to access multiple web applications using one set of login credentials. With SSO enabled, the time and effort are minimized as you need not sign-in and sign-out separately while accessing multiple applications.

You can enable SSO on IoT FND using the following ways:

  • Configure IDP Manually

  • Import IDP Metadata File into FND

Table 1. Feature History
Feature Name Release Information Description

Single Sign-On (SSO)

IoT FND 4.8

SSO allows you to access multiple web applications using one set of login credentials.

Single Sign-On Authentication

Single Sign-On (SSO) is an authentication process that allows you to sign into one application and then securely access other authorized applications without the need to resupply your credentials. SSO allows you to sign on only once with a username and password to access browser-based applications and services within a single browser instance. SSO uses Security Assertion Markup Language (SAML) for authentication.


Note


  • SSO is an optional feature

  • Only HTTPS protocol is required to access all the web applications. HTTP access to web application is not supported when the SSO is enabled.


For more information on SSO—SAML solution, refer to:

SAML 2.0 Protocol

Security Assertion Markup Language (SAML) is an XML-based standard or framework to exchange user authentication details between an Identity Provider (IdP) and a service provider.

The identity provider authenticates the user credentials and issues SAML assertions. Each assertion is an XML document that contains security information, which is transferred from the identity provider to the service provider.

A generic SAML authentication flow consists of:

  • Client—A browser-based user.

  • Service Provider—An application or service the user tries to access.

  • Identity Provider—An entity performing the user authentication

For more information, refer to Elements in SSO SAML Solution

Elements in SSO SAML Solution

SAML uses the following elements to authenticate and authorize the user credentials.

Elements Description

Client

A browser-based client such as FND users.

Note


Firefox and MS Edge are the officially supported browsers for FND.

Service Provider

An application or service that trusts the SAML assertion and relies on the IDP to authenticate the users.

Identity Provider (IDP) server

A third-party server, which authenticates user credentials and issues SAML assertions.

IDP Store

Storage that maintains user credentials and their associated roles. Available stores are LDAP store, Active Directory, or RDBMS.

SAML Assertion

An assertion is an XML document that contains trusted statements about a user. Example: username. SAML assertions are digitally signed to ensure their authenticity. It consists of pieces of security information, which are transferred from IDP to the service provider for user authentication.

SAML Request

An authentication request generated by the service provider.

Metadata

An XML file generated by the service provider application and an IDP server.

  • The service provider metadata file contains information such as entity ID, redirect URLs, certificate key.

  • The IDP metadata file contains server information to configure the service provider.

Assertion Consumer Service (ACS) URL

A URL that instructs the IDP where to post SAML assertions.

How SAML Works

A synopsis of SAML workflow:

  • Administrator logs into FND and enables SSO for all users.

  • FND performs web certification checks. If the verification is successful, the SSO users are directed to the IDP login page; else, an error message appears.

  • IDP checks whether the session is active.

    • For active session, you receive a SAML token.

    • For inactive session, you are redirected to IDP login page.

  • IDP validates the credentials of the user.

  • On successful login, SAML response is sent to ACS URL.

  • FND server receives SAML response and extracts information such as user ID and roles associated with the user.

  • FND maps the roles received to the roles in FND and gets the associated permissions for the user.

  • User information is stored in the FND database and SSO is enabled for the user.

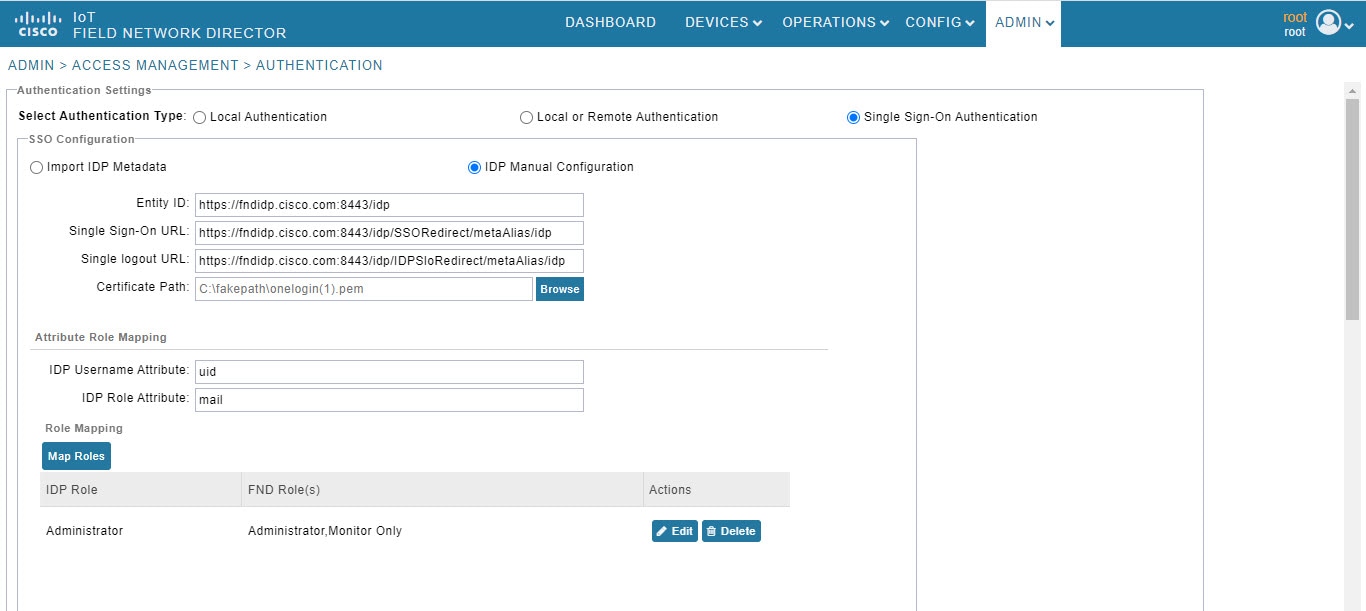
Configuring IDP Manually for SSO Authentication

To configure IDP manually for SSO authentication:

Procedure

Step 1

Choose ADMIN > Access Management > Authentication.

Step 2

In the Authentication Settings page, select the Single Sign-On Authentication radio button.

Step 3

Select the IDP Manual Configuration radio button.

Step 4

In the SSO Configuration section, provide the following information:

Fields Description

Entity ID

IDP URL.

Single Sign-On URL

Target URL of IDP, where the service provider sends the authentication request message.

Single logout URL

URL location of IDP, where the service provider sends the SLO request.

Certificate Path

Browse and select the public certificate keys for IDP.

Step 5

Enter IDP Username Attribute and IDP Role Attribute.

Note


The username and role attributes specified are validated with the username and role in the SAML XML response. The same information is configured on the IDP server as well.

Step 6

Click Map Roles. The Role Mapping window appears.

Step 7

Enter IDP Role.

Step 8

Check the FND Role check box.

Note

 
You can map one IDP role to one or more FND roles.

Step 9

Click Map.

The Role Mapping section displays the mapping of IDP role to FND roles.

Step 10

Click Save. The IDP data gets saved in the IDP_SERVER_DETAILS DB table.

Step 11

Click Export FND Metadata to export the FND metadata file.

The generated XML file is saved in the local drive. The file contains information on the service provider (entity ID, single sign-on URL, single logout URL, and certificate path). This file is used for importing IDP to avoid manual configuration.


Importing IDP Metadata for SSO Authentication

To import IDP metadata for SSO authentication:

Procedure

Step 1

Choose ADMIN > Access Management > Authentication.

Step 2

In the Authentication Settings page, select the Single Sign-On Authentication radio button.

Step 3

Select the Import IDP Metadata radio button.

Step 4

Browse and select Import Metadata File from the local drive.

On importing, the Imported IDP Details section has information on Entity ID, Single Sign-On URL, and Single Logout URL.

Step 5

Enter IDP Username Attribute and IDP Role Attribute.

Note


The username and role attributes specified are validated with the username and role in the SAML XML response. The same information is configured on the IDP server as well.

Step 6

Click Map Roles. The Role Mapping window appears.

Step 7

Enter IDP Role.

Step 8

Check the FND Role check box.

Note

 
You can map one IDP role to one or more FND roles.

Step 9

Click Map.

The Role Mapping section displays the mapping of IDP role to FND roles.

Step 10

Click Save.

The IDP data gets saved in the IDP_SERVER_DETAILS DB table.

Step 11

Click Export FND Metadata to export the FND metadata file.

The generated XML file is saved in the local drive. The file contains information on the Service Provider information (entity ID, single sign-on URL, single logout URL, and certificate path). This file is used for importing IDP to avoid manual configuration.

Limitations for SSO Authentication

  • Supports only browser-based logins; therefore, Northbound (NB) API is not supported.


    Note


    NB API needs local authentication, which SAML does not support.


  • Supports only root domain.

Logging out of SSO

  • On successful logout, IDP login page appears. For example, if you manually log out of FND, then FND sends a SAML logout request to IDP and IDP in-turn logs out of the third-party application as well .

  • On inactive session, FND resends SAML authentication request to IDP to see if the session is still active.

Fallback URL When SSO Fails

Use the FND console URL as a fallback URL to configure the authentication settings when SSO login fails. The root users and the users with administrative privileges only can access the FND console URL.

FND Console URL

https://<FND-IP>/console/home.seam

Note


The FND console URL is not used for the IDP authentication.


Managing Users

This section explains about managing users.

Adding Users

To add users to IoT FND:

Procedure


Step 1

Choose ADMIN > Access Management > Users.

Step 2

Click + icon to Add User.

Step 3

Enter the following user information:

Field Description

User Name

Enter the user name.

New Password

Enter the password. The password must conform to the IoT FND password policy.

Confirm Password

Re-enter the password.

Time Zone

Choose a time zone from the drop-down menu.

Step 4

Click Assign Domain to open the configuration panel:

  1. Select the domain name from the drop-down menu.

  2. Assign Role(s) and its associated Permission for the user by selecting the role check box.

Step 5

Click Assign to save the entries.

IoT FND creates a record for this user in the IoT FND database.

Step 6

To add the new user, click the Disk icon; otherwise, click X to close the window and return to the Users page.

Note

 
A new user account is enabled by default. This means that the user can access IoT FND.

You can make future edits to the User entry by selecting the Edit or Delete buttons that appear under the Actions column.


Enabling Users

You must enable the user account for users to access IoT FND. When users log in for the first time, IoT FND prompts them to change their password.

To enable user accounts in IoT FND:

Procedure


Step 1

Choose Admin > Access Management > Users.

Step 2

Check the check boxes for the user account(s) to enable.

Step 3

Click the solid person icon.

Step 4

To confirm action, click Yes.


Editing Users

To edit user settings in IoT FND:

Procedure


Step 1

Choose Admin > Access Management > Users.

Step 2

To edit user credentials:

  1. Click the user name link.

  2. Edit the role assignments.

  3. Click Save.


Resetting Passwords

As the root user of the Linux server on which IoT FND runs, you can reset your password and use the password utility to reset the password for any other IoT FND user.

To reset a password:

Procedure


Enter this command [root@yourname-lnx1 bin}#./password_admin.sh root

IoT FND manages its own user account database; therefore, you must add all new local users from the IoT FND user interface at the Admin > Access Management > Users page.

Note


Remote users are automatically added to the database. You can also enable, disable, edit, or delete users on this page.

Note


A user with a disabled account cannot log in until an administrator enables their account. After a user account is active, the user must reset their password. There is no limit to the number of users that you can define on the system other than the available database storage.

Note


Starting from Cisco IoT FND release 4.8, the administrator can assist you in resetting your password without you having to know your old password.


Viewing Users

To view IoT FND users:

Procedure


Choose ADMIN > Access Management > Users to open the Users page.

IoT FND displays this information about users:
Field Description

User Name

Specifies the user name.

Default Domain

Shows the default domains for each user.

Enabled

Indicates whether the user account is enabled.

Time Zone

Specifies the user’s time zone.

Roles

Specifies the roles assigned to the user.

Audit Trail

A link to the user’s audit trail.

Remote User

Indicates whether the user account is stored locally. If the value is false, the user account is stored in Active Directory and is accessed via the RADIUS server configured in the Remote Authentication page (ADMIN > Access Management > Users > Remote Authentication).


Deleting Users

Deleting user accounts removes user preferences such as the default map location from the system. Disable a user account to temporarily deactivate it.

To delete users from IoT FND:

Procedure


Step 1

Choose ADMIN > Access Management > Users.

Step 2

Check the box next to the User Name entry that you want to remove from the User Account list.

Step 3

To delete the entry, click the trash can icon.

Step 4

To confirm action, click Yes.


Disabling Users

To prevent users from accessing IoT FND, disable their accounts. Disabling user accounts does not delete their records from the IoT FND database.

To disable user accounts in IoT FND:

Procedure


Step 1

Choose Admin > Access Management > Users.

Step 2

Check the check boxes for the user account(s) to disable.

Step 3

Click the outlined person icon.

Note


If you disable a user account, IoT FND resets the user password.

Step 4

To confirm action, click Yes.


Managing Domains

In IoT FND, you can add domains and define local or remote administrators and users.

Viewing Domains

To view IoT FND domains, open the Domains page (ADMIN > Access Management > Domains).

IoT FND displays the following information about domains:

Field Description

Domains

Specifies domains with root or non-root access.

  • Root - The Admin user who defines root access for other users while creating a domain.

  • Non-root - Admin creates the domain without root access.

Users

Defines local or remote administrators and users.

Description

Provides a brief information about the domain.

Hierarchy

Specifies the level of domains where the root domain is the top most in the structure.

CGK1K

Lists the total number of CGR1K devices mapped to the domain.

C800

Lists the total number of C800 devices mapped to the domain.

IR800

Lists the total number of IR800 devices mapped to the domain.

LORAWAN

Lists the total number of LORAWAN devices mapped to the domain.

IR500

Lists the total number of IR500 devices mapped to the domain.

ENDPOINT

Lists the total number of ENDPOINT devices mapped to the domain.

CELL_ENDPOINT

Lists the total number of CELL ENDPOINT devices mapped to the domain.

IR8100

Lists the total number of IR8100 devices mapped to the domain.

Adding Domains

The user can add a domain and map an existing user to the created domain or create a new user and map the domain to the newly created user.

To add a domain in IoT FND:

Procedure


Step 1

Choose ADMIN > Access Management > Domains.

Step 2

Click + icon to open the Add Domain page.

Step 3

Enter the following domain information.

Field Description

Domain Name

Enter a name for the domain.

Domain Hierarchy

Specify the level of domains, where the root domain is the top most in the structure.

Domain Administrator

Indicates the user who can modify any information in the domain. You can choose either one of the following options:

  • Local - The domain administrator can add new user or choose an existing user.

  • Remote - The domain administrator can only add new users.

User Name

Enter the name of the new user.

Password

Enter the password.

Confirm Password

Re-enter the password.

Existing User

Select the existing user from the Existing User drop-down list.

The License allocation section shows the devices available along with the following information:

  • Licenses Assigned

  • Licenses Consumed

  • Licenses Available

Enter the number of licenses that can be assigned under each device for the newly created domain in the Licenses Assigned section.

Step 4

Click the Disk icon; otherwise, click X to close the window and return to the Domains page.


Editing Domains

To edit user settings in IoT FND:

Procedure


Step 1

Choose ADMIN > Access Management > Domains.

Step 2

To edit domain details:

  1. Click the domain link.

  2. Edit the licenses assigned for each device type.

  3. Click the Disk icon to save the details; otherwise, click X to close the window and return to the Domains page.


Deleting Domains

The user cannot delete a domain if any device or user is associated with the domain. The root domain cannot be deleted.

To delete domains from IoT FND:

Procedure


Step 1

Choose ADMIN > Access Management > Domains.

Step 2

Check the box next to the domain name that you want to remove from the Domain list.

Step 3

To delete the entry, click the trash can icon.

Step 4

To confirm action, click Yes.


Managing Roles and Permissions

Roles define the type of tasks specific role IoT FND users can perform. The operations the user can perform are based on the permissions enabled for the role.

IoT FND lets you assign a system-defined role to a user such as admin or operator (ADMIN > Access Management > Roles). The operations the user can perform are based on the permissions enabled for the role.

Basic User Permissions

The table describes basic IoT FND user permissions.

Table 2. IoT FND User Permissions
Permission Description

Add/Modify/Delete Devices

Allows users to import, remove, and change router and endpoint devices.

Administrative Operations

Allows users to perform system administration operations such as user management, role management, and server configuration settings.

Asset Management

Allows users to view details on Assets (non-Cisco equipment) that are associated with an FND managed device.

Battery Endpoint Operations

IoT FND supports the following special battery-powered endpoints:

  • ACT, BACT, CAM

  • L+G LFN

The interaction with these endpoints should be kept to a minimum in order to reduce draw down of battery within the endpoints.

Endpoint Certificate Management

Permission for erasing node certificates on IR500 gateways.

Endpoint Configuration

Allows users to edit configuration templates and push configuration to mesh endpoints.

Endpoint Firmware Update

Allows users to add and delete firmware images and perform ME firmware update operations.

Endpoint Group Management

Allows users to assign, remove, and change devices from ME configuration and firmware groups.

Endpoint Reboot

Allows users to reboot the ME device.

GOS Application Management

Allows uses to add and delete Guest OS applications.

Issue Management

Allows users to close issues.

Label Management

Allows users to add, change, and remove labels.

LoRA Modem Reboot

Permission for rebooting LoRaWAN gateways and modems.

Manage Device Credentials

Allows users to view router credentials such as Wi-Fi pre-shared key, admin user password, and master key.

Manage Head-End Devices Credentials

Allows users to view the ASR/C8000 admin NETCONF password.

NB API Audit Trail

Allows users to query and delete audit trails using IoT FND NB API.

NB API Device Management

Allows users to add, remove, export, and change router and endpoint devices using IoT FND NB API.

NB API Endpoint Group Management

Permission for accessing the Group Management NB API.

NB API Endpoint Operations

Allows users to manage endpoint operations using IoT FND NB API.

NBAPI Event Subscribe

Allows users to search events, subscribe and unsubscribe from events (including Outage events) using IoT FND NB API.

NB API Issues

Allows users to search issues.

NB API Orchestration Services

Permission for IOK Orchestration Service to access the Orchestration NB APIs.

NB API Reprovision

Allows users to reprovision devices using IoT FND NB API.

NB API Rules

Allows users to search, create, delete, activate, and deactivate rules using IoT FND NB API.

NB API Search

Allows users to search devices, get device details, group information, and metric history using IoT FND NB API.

NB API Tunnels

Permission for accessing the Tunnel Status NB APIs.

Password Policy

Provides a flexible password policy system to manage user passwords. It contains configurable properties for password expiration, failed login attempts, password strength and other aspects of password maintenance.

Router Configuration

Allows users to edit router configuration templates and push configuration to routers.

Router File Management

Permission for managing router files on the Device File Management GUI page.

Router Firmware Update

Allows users to add and delete firmware images and perform firmware update operations for routers.

Router Group Management

Allows users to assign, remove, and change device assignments to router configuration and firmware groups.

Router Reboot

Allows users to reboot the router.

Rules Management

Allows users to add, edit, activate, and deactivate rules.

Security Policy

Allows users to block mesh devices, refresh mesh keys, and so on.

Tunnel Provisioning Management

Allows users to manage tunnel groups, edit/apply tunnel-related templates, and perform factory reprovisioning.

View Device Configuration

Allows users to view field device configuration.

View Head-End

Allows users to view ASR/C8000 configuration, tunnel provisioning, and HER events.

System-Defined User Roles


Note


The system-defined Root role cannot be assigned to users.

The table lists system-defined roles. These roles cannot be modified.

Table 3. System-defined User Roles
Role Description

Administrator

This role combines these basic permissions:

  • Administrative Operations

  • Label Management

  • Rules Management

Endpoint Operator

This role combines these basic permissions:

  • Label Management

  • Endpoint Configuration

  • Endpoint Firmware Update

  • Endpoint Group Management

  • Endpoint Reboot

Monitor Only

Optional role. This role is not defined for every user.

North Bound API

This role combines these basic permissions:

  • NB API Audit Trail

  • NB API Device Management

  • NB API Endpoint Operations

  • NB API Event Subscribe

  • NB API Orchestration Service

  • NB API Rules

  • NB API Search

Root

The system-defined root role cannot be assigned to users. This role can use the password utility to reset the password for any IoT FND user.

Router Operator

This role combines these basic permissions:

  • Label Management

  • Router Configuration

  • Router Firmware Update

  • Router Group Management

  • Router Reboot

Custom User Roles

In IoT FND you can define custom roles. For each role you create, you can assign it one or more basic user permissions (see Basic User Permissions). These permissions specify the type of actions users with this role can perform.

Adding Roles

To add IoT FND user roles:

Procedure


Step 1

Choose ADMIN > Access Management > Roles.

Step 2

Click Add.

Step 3

Enter the name of the role.

Step 4

Check the appropriate check boxes to assign permissions.

Step 5

Click Save .

Step 6

To continue to add roles, click Yes; otherwise, click No to return to the Roles page.


Editing Roles

You cannot edit system-defined roles, but you can edit custom roles.

To edit IoT FND custom roles:

Procedure


Step 1

Choose ADMIN > Access Management > Roles.

Step 2

Click the role to edit.

Step 3

Make changes to the permission assignments by checking or unchecking the relevant check boxes.

Step 4

Click Save.


Deleting Roles

You cannot delete a custom role if it is in use.

To delete IoT FND user roles:

Procedure


Step 1

Choose ADMIN > Access Management > Roles.

Step 2

Check the check boxes of the roles to delete.

Step 3

Click Delete.

Step 4

Click Yes.

Step 5

Click OK.


Viewing Roles

To view IoT FND user roles:

Procedure


Step 1

Choose ADMIN > Access Management > Roles.

For every role, IoT FND lists the Users assigned to this role and the RADIUS Server VSA.

Step 2

To view permission assignments for the role, click the role link.