Perform System Upgrade and Install Feature Packages

In Cisco NCS 4016 systems, the system upgrade and package installation processes are run using Cisco Transport Controller (CTC). The processes involve adding and activating the iso images (.iso), feature packages (.pkg), and software maintenance upgrade files (.smu) on the system. These files are accessed from a network server and then activated on the system. If the installed package or SMU causes any issue on the router, it can be deactivated.

Upgrading the OS and Features

Upgrading Features

Upgrading features is the process of deploying new features and software patches on the router. Feature upgrade is done by installing package files, termed simply, packages. Software patch installation is done by installing Software Maintenance Upgrade (SMU) files.

Installing a package on the router installs specific features that are part of that package. Cisco IOS XR software is divided into various software packages; this enables you to select the features to run on your router. Each package contains components that perform a specific set of router functions, such as routing, security, and so on. Standard XR VM packages are:
  • ncs4k-mpls.pkg

  • ncs4k-mgbl.pkg

  • ncs4k-k9sec.pkg


Caution


Do not perform any install operations when the router is reloading.

Do not reload the router during an upgrade operation.


Package and SMU installation is performed using Cisco Transport Controller (CTC).

There are separate packages and SMUs for the XR VM and the System Admin VM. They can be identified by their filenames. The XR VM package has ncs4k as part of its filename, whereas the System Admin VM package has ncs4k-sysadmin as part of its filename. The XR VM packages or SMUs are activated from the XR VM, whereas the System Admin VM packages or SMUs are activated from the System Admin VM.


Note


Check the type of SMU before installing it in CTC.


Upgrading Features

Upgrading features is the process of deploying new features and software patches on the router. Feature upgrade is done by installing package files, termed simply, packages. Software patch installation is done by installing Software Maintenance Upgrade (SMU) files.

Installing a package on the router installs specific features that are part of that package. Cisco IOS XR software is divided into various software packages; this enables you to select the features to run on your router. Each package contains components that perform a specific set of router functions, such as routing, security, and so on. Standard XR VM packages are:
  • ncs4k-mpls.pkg

  • ncs4k-mgbl.pkg

  • ncs4k-k9sec.pkg

Package and SMU installation is performed using Cisco Transport Controller (CTC).

There are separate packages and SMUs for the XR VM and the System Admin VM. They can be identified by their filenames. The XR VM package has ncs4k as part of its filename, whereas the System Admin VM package has ncs4k-sysadmin as part of its filename. The XR VM packages or SMUs are activated from the XR VM, whereas the System Admin VM packages or SMUs are activated from the System Admin VM.


Note


Check the type of SMU before installing it in CTC.


Install Packages

Complete this task to upgrade or install a patch. The patch installation is done using packages and Software Maintenance Updates (SMUs). This task is also used to install .tar files. The .tar file contains multiple packages and SMUs that are merged into a single file. A single .tar file can contain up to 64 individual files.

In-Service Software Upgrade (ISSU) is used to perform planned software upgrades without affecting the traffic. You can use the ISSU Upgrade wizard to upgrade the XR and SysAdmin installation type without affecting the traffic. You cannot run ISSU upgrade if a package is present in prepare mode in the Prepare, Active and Commit packages area. You can either clean the prepared package or Activate the prepared packages before running ISSU upgrade. ISSU Upgrade wizard options are displayed according to the selected installation type.


Note


ISSU option is not available for System installation type but is available for XR and SysAdmin installation types only.

Before you begin

  • Two route processors (RP), one active and one stand-by must be installed in the system.

  • Ensure both the RPs are in operational mode, active and running using the command show platform . For example:
    RP/0/RP0:J_59_60#show platform
    Thu Jan 5 03:24:20.535 UTC
    Node name     Node type     Node state     Admin state      Config state
    -----------------------------------------------------------------------------------
    0/6           NCS4K-20T-O-S  OPERATIONAL      UP             NSHUT
    0/RP0         NCS4K-RP       OPERATIONAL      UP             NSHUT
    0/RP1         NCS4K-RP       OPERATIONAL      UP             NSHUT
    0/FC0         NCS4016-FC-M   OPERATIONAL      UP             NSHUT
    0/FC1         NCS4016-FC-M   OPERATIONAL      UP             NSHUT
    0/FC2         NCS4016-FC-M   OPERATIONAL      UP             NSHUT
    0/FC3         NCS4016-FC-M   OPERATIONAL      UP             NSHUT
    0/FT0         NCS4K-FTA      OPERATIONAL      UP             NSHUT
    0/FT1         NCS4K-FTA      OPERATIONAL      UP             NSHUT
    0/PT0         NCS4K-AC-PEM   FAILED           UP             NSHUT
    0/PT1         NCS4K-AC-PEM   OPERATIONAL      UP             NSHUT
    0/EC0         NCS4K-ECU      OPERATIONAL      UP             NSHUT
    RP/0/RP0:J_59_60#show redundancy summary
    Thu Jan 5 03:24:24.956 UTC
    Active Node Standby Node
    ----------- ------------
    0/RP0 0/RP1 (Node Ready, NSR: Not Configured)
    0/LC0 0/LC1 (Node Ready, NSR: Not Configured)
    RP/0/RP0:J_59_60#

Procedure


Step 1

In node view, click the Maintenance > Software tabs.

Step 2

Select the installation type and click Add to add new packages in the Inactive Packages area. XR installation type is selected by default.

Step 3

Type the location of the package in the Package Path field.

Step 4

Click Add to Install List to add the package to the Select Packages area.

The Select Packages area displays a list of all the packages added for the installation.

Step 5

Select the packages.

Step 6

Continue with step 7 to install packages using ISSU, or step 8 to install packages using non-ISSU:

Step 7

Install package using ISSU:

  1. Click Extract (Required for ISSU).

  2. Click Install Add.

    A message to confirm whether to proceed with ISSU upgrade is displayed.
  3. Click Yes to continue with ISSU upgrade.

    Note

     
    If you click No, the ISSU upgrade is discontinued. The XR ISO image is displayed in XR panel and SysAdmin and Host ISO images are displayed in SysAdmin panel.
    An ISSU Upgrade wizard is displayed. This wizard includes the installation on both XR and Sysadmin packages with the complete package information.
  4. Follow the ISSU Upgrade wizard to complete the installation of XR and Sysadmin packages using ISSU.

    The SysAdmin installation is completed first followed by the XR installation.

    Note

     
    When the SysAdmin installation is completed, the node view is closed and the network view is displayed. Open the node view and go to the installation pane, a message System ISSU upgrade has not completed, do you want to proceed? is displayed. Click Yes to proceed with the ISSU XR installation.

Step 8

Install package using non-ISSU:

  1. Click Install Add to add the selected packages to the Inactive Packages area Software tab.

  2. Click Close in the Add Package dialog.

  3. From the Installation Type drop-down list, choose XR.

  4. Select the image and click Activate.

    The system reloads with the new full image.
  5. Click Commit to commit the activated package.

    Note


    For SysAdmin or System installation, in step c, select SysAdmin or System respectively. Complete steps d and e.

    The committed package is displayed in green color in the right panel.

The package is installed.

What to do next

  • Verify that the upgrade is successful by viewing the logs. To see the logs, click the Install Log button. The logs can be filtered based on date, time, operation type and so on. Three types of logs are available:

    • Current - Displays log for current install operation.

    • All - Displays logs for all sessions.

    • Last - Enter the number for which you want to view the logs run recently. For example, if you enter 5, the logs for the last 5 sessions are displayed.

Prepare and Install Package

A system upgrade or feature upgrade is performed by activating the ISO image file, packages, and SMUs. It is possible to prepare these installable files before activation. During the prepare phase, pre-activation checks are made and the components of the installable files are loaded on to the router setup. The prepare process runs in the background and the router is fully usable during this time. When the prepare phase is over, all the prepared files can be activated instantaneously. The advantages of preparing before activation are:
  • If the installable file is corrupted, the prepare process fails. This provides an early warning of the problem. If the corrupted file was activated directly, it might cause router malfunction.
  • Directly activating an ISO image for system upgrade takes considerable time during which the router is not usable. However, if the image is prepared before activation, not only does the prepare process run asynchronously, but when the prepared image is subsequently activated, the activation process too takes very less time. As a result, the router downtime is considerably reduced.

Complete this task to install packages after preparing the package:

Procedure


Step 1

In node view, click the Maintenance > Software tabs.

Step 2

From the Installation Type drop-down list, choose XR, or SysAdmin based on installation type.

The packages that can be installed depend on the chosen installation type.

Step 3

Click Add to add new packages in the Inactive Packages area.

The Add Package dialog appears.

  1. Type the location of the package in the Package Path field.

  2. Click Add to Install List to add the package to the Select Packages area. The package is added locally.

  3. The Select Packages area displays a list of all the packages added for the installation.

  4. Check the required check boxes in the Select Packages area to select the packages.

  5. Click Install Add to add the selected packages to the Inactive Packages area of the Maintenance > Software tabs. The package is added to the router.

  6. Click Close in the Add Package dialog.

Step 4

Check the required packages in the Inactive Packages area and click Prepare>> to prepare the packages and move the selected packages from the Inactive Packages area to the Prepare, Active and Commit Packages area.

All the packages in the prepare mode are highlighted in grey color.

Note

 
If a package is in Prepare state, the options available are to:
  • Activate the prepared package.
  • Clean the install prepare operation.

Step 5

Check the required packages in the prepare mode in the Prepare, Active and Commit Packages area and click Activate to activate the packages.

All the packages in the active mode are highlighted in Orange. The Activate button is enabled only when at least one prepare mode package exists in the Prepare, Active and Commit Packages area.

Note

 
  • Only one boot image can be in committed state at point of time, but there can be multiple boot images in active state.
  • Boot image cannot be deactivated.
  • If a package is in Active state, and if the system is rebooted, the active package will not appear in the Prepare, Active, and Commit Packages area, but will be moved to the Inactive packages list. So before reboot, the Active package must be committed for the changes to take effect.

Step 6

Click Commit to install the active packages in Prepare, Active and Commit Packages area on the router.

All the packages in the commit mode are highlighted in Green. The boot image always appear in Prepare, Active and Commit Packages area in commit mode and cannot be deactivated.

The package in active mode moves to the Inactive Packages after the reboot of the system. The package in commit mode remains in the Prepare, Active and Commit Packages even after the reboot of the system.

Step 7

Click Install Log to view the log details of the installed software packages.


The package is prepared and installed.

What to do next

Verify that the package is installed successfully using the Install Log button. Select the type of logs: Current, All or Last. The logs display the information about the package installation.

Install SMU using TAR

Complete this task to install a patch. The patch installation is done using packages and SMUs. This task is used to install .tar files. The .tar file contains multiple packages and SMUs that are merged into a single file. A single .tar file can contain up to 64 individual files.

Before you begin

Copy the .tar to be installed either on the router's hard disk or on a network server to which the router has access.

Procedure


Step 1

To add the package:

  1. In node view, click the Maintenance > Software tabs.

  2. In Installation Type field, select XR and click Add.

  3. Type the location of the .tar file in the Package Path field.

    Note


    Do not select the Active package after the add operation when adding .tar file.

  4. Click Install Add.

  5. Click Refresh.

    The package is displayed in the Inactive Packages area.

Step 2

To activate the package:

  1. In Installation Type field, select XR for XR installation and select all inactive packages.

    Note


    Activation must first be done on XR and then on SysAdmin.

  2. Click Activate and click Yes to confirm activation.

    Note

     
    • In XR installation, the System or SDR will reload if there is a reload SMU.

    • In SysAdmin installation, SysAdmin and XR will reload.

    • The connection to the Node view will be lost due to the reload. After the reload, go to the node view and click Maintenance > Software tabs.

    The active packages are displayed in Prepare, Active and Commit Packages section in orange color.
  3. Select all active packages and click Commit.

    The committed package is displayed in green color in the right pane.
  4. In the Installation Type field, select SysAdmin for SysAdmin installation and select all inactive packages.

  5. Follow steps b and c.


What to do next

  • Verify that the upgrade is successful by viewing the logs. To see the logs, click the Install Log button.

  • Verify the output of show platform from both XR and SysAdmin. Ensure that all cards are in operational state.
    RP/0/RP0:20#sh platform
    Mon May 25 08:50:22.380 UTC
    Node name         Node type             Node state        Admin state   Config state
    -----------------------------------------------------------------------------------
    0/0               NCS4K-24LR-O-S        OPERATIONAL       UP            NSHUT
    0/1               NCS4K-2H-O-K          OPERATIONAL       UP            NSHUT
    0/3               NCS4K-20T-O-S         OPERATIONAL       UP            NSHUT
    0/6               NCS4K-20T-O-S         OPERATIONAL       UP            NSHUT
    

Uninstall Packages

Complete this task to uninstall a package. All router functions that are part of the uninstalled package are deactivated. Packages that are added in the XR VM cannot be uninstalled from the System Admin VM, and vice versa.

Note


Installed ISO images cannot be uninstalled. Also, kernel SMUs that install third party SMU on host, XR VM and System Admin VM, cannot be uninstalled. However, subsequent installation of ISO image or kernel SMU overwrites the existing installation.

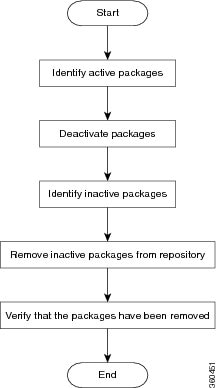
The workflow for uninstalling a package is shown in this flowchart.

Figure 1. Uninstalling Packages Workflow


Procedure


Step 1

In node view, click the Maintenance > Software tabs.

Step 2

In Prepare, Active and Commit Packages section, select the Active package to be deactivated. The Active package is displayed in orange color.

Step 3

Click Deactivate.

All features and software patches associated with the package are deactivated. You can deactivate multiple packages simultaneously.

The deactivated packages are now listed in the Inactive Packages area. Only inactive packages can be removed from the repository.

Step 4

To remove the inactive package from the repository, select the package from the Inactive Packages area.

Step 5

Click Remove.


The package is removed from the Inactive panel.

What to do next

Install required packages. For details, see the "Install Packages" section.