Introduction to License Reservation

Table 1. Feature History

Feature Name

Release Information

Feature Description

License Reservation for Smart Licensing

Cisco IOS XE Cupertino 17.8.1

Routers using Smart Licensing share information at regular intervals with Cisco Smart Software Manager (CSSM). License reservation allows you to use Smart Licensing without the need to share license information. By reserving node-locked licenses, you can deploy smart licensed routers in highly secure and air-gapped networks.

Two kinds of License Reservation are available:

  • Permanent License Reservation—Perpetual (Golden key) reserved license.

  • Specified License Reservation—Specific reserved licenses and term licenses.

License reservation offers two kinds of licensing:

  • Permanent License Reservation

    • Provides an unlimited quantity of licenses.

    • Activates all the functionalities of the router with single universal license.

    • Does not require periodic access to the License Authority.

  • Specific License Reservation

    • Allows selection of licenses.

    • Requires one-time authorization and configuration with CSSM.

For more information see, Cisco Licensing cisco.com/go/licensingguide.

Permanent License Reservation

Permanent License Reservation offers a single “Universal” license that authorizes all possible product functionalities. It also includes an unlimited quantity of counted licenses.

Permanent licenses do not require periodic access to the License Authority. You can purchase the license, and install the license key for Prime Access Registrar.

Permanent license reservation (PLR) enables you to deploy permanent software license on a router without communicating license information to CSSM.

Specific License Reservation

Specific License Reservation (SLR) is a functionality that enables you to deploy a software license on a device without communicating usage information to Cisco. This functionality is especially used in highly secure networks, and it is supported on platforms that have Smart Licensing enabled.

SLR lets you reserve a license for your product instance from the CSSM. These reserved licenses need not be renewed or reauthorized unless there is a license usage change on the device.

License enforcement is a mechanism that prevents a feature from being used without first obtaining a license.The following enforcement mechanisms are available:

  • Hard enforcement: Hard enforcement is applicable only for enforced licenses . If you do not authorize the required licenses by installing the authorization code, the license cannot be used, and the feature is disabled.

  • Soft enforcement: When you do not authorize the required licenses by installing the authorization code, you can continue to use the license. The system displays an appropriate syslog message and the license status is “Not Authorized”.


Note


SLR is not enabled by default, and you must specifically request for this functionality. See How to Reserve Licenses


Obtaining License Reservation Code

To obtain the license reservation code to the Smart Account in Cisco Smart Software Manager (CSSM).

  1. Go to Support Case Manager.

  2. Click OPEN NEW CASE

  3. Select Software Licensing

For more information see, How to Reserve Licenses (SLR)

Enabling License Reservation

Procedure


Step 1

enable

Example:

Router# enable

Enables privileged EXEC mode.

Step 2

configure terminal

Enters global configuration mode.

Example:

Router# configure terminal

Step 3

license smart reservation

Enables License Reservation. Use the no form of this command to disable License Reservation.

Example:

Router(config)# license smart reservation 

Step 4

exit

Exits configuration mode, and returns the device to the global configuration mode.

Step 5

license smart enable

Enables basic Smart Licensing.

Example:

Router(config)# license smart enable

Step 6

license smart reservation request local

Generates a request code for the device to be entered in the Cisco Smart Software Manager.

Note


To cancel the License Reservation request, execute the license smart reservation cancel command.

Example:

Router# license smart reservation request local

Reserving Licenses using CSSM

Procedure


Step 1

Log in to Cisco Smart Software Manager at https://software.cisco.com/# using the Cisco provided username and password..

Step 2

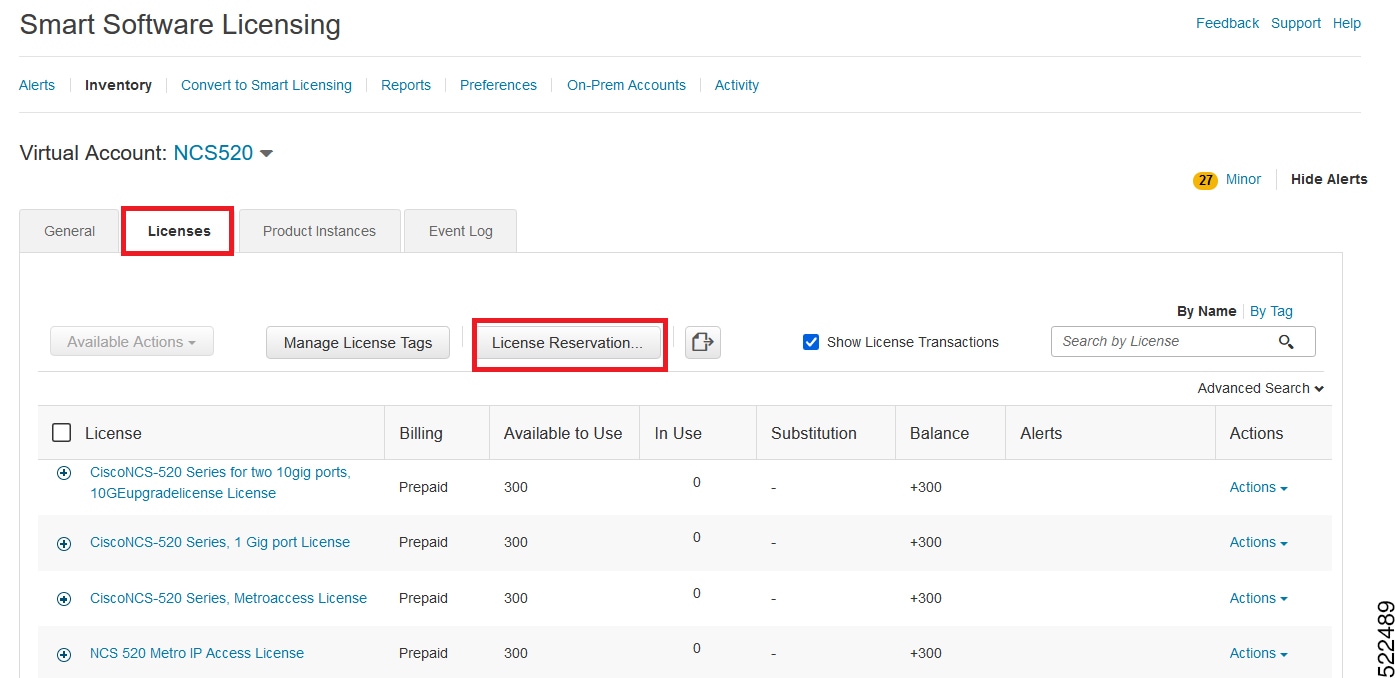
Click the Inventory tab. From the Virtual Account drop-down list, select the smart account.

Step 3

From the Licenses tab, click License Reservation.

The system displays the Smart License Reservation wizard.

Step 4

Click License Reservation. Enter or attach the reservation request code that is generated from the router at Enter Request Code, and click Next.

The Smart License Reservation displays.

Step 5

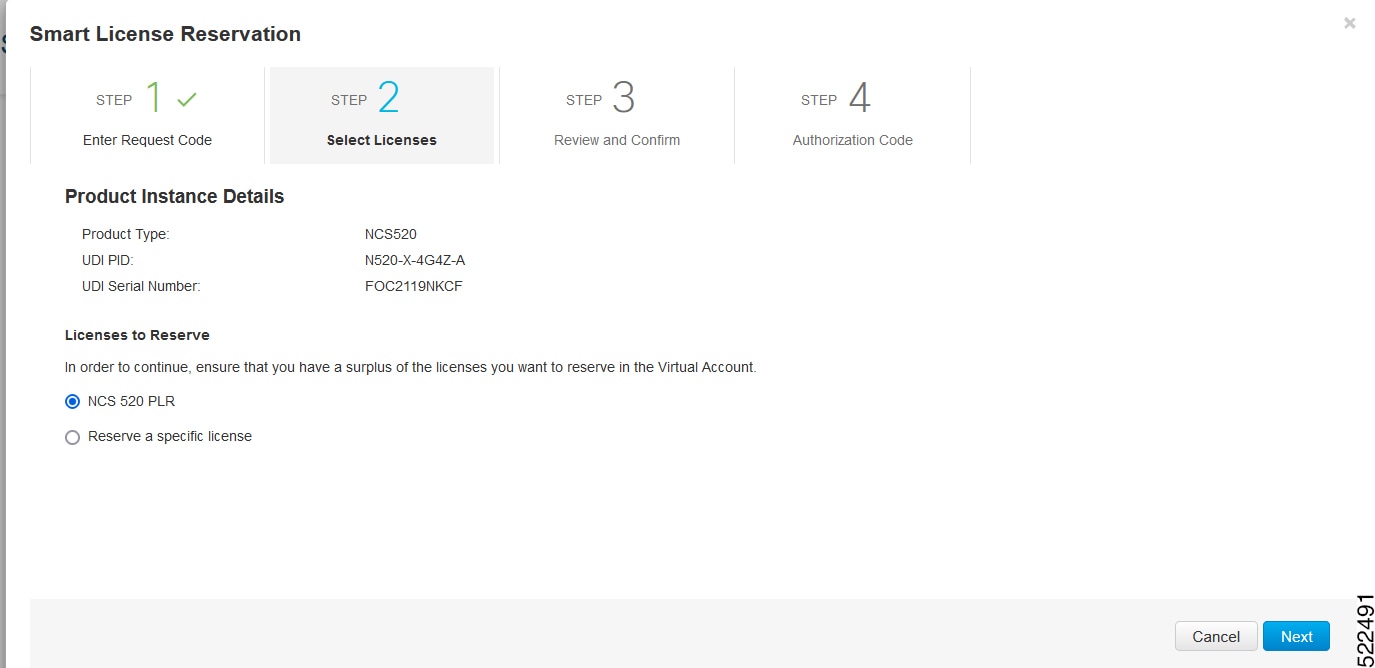
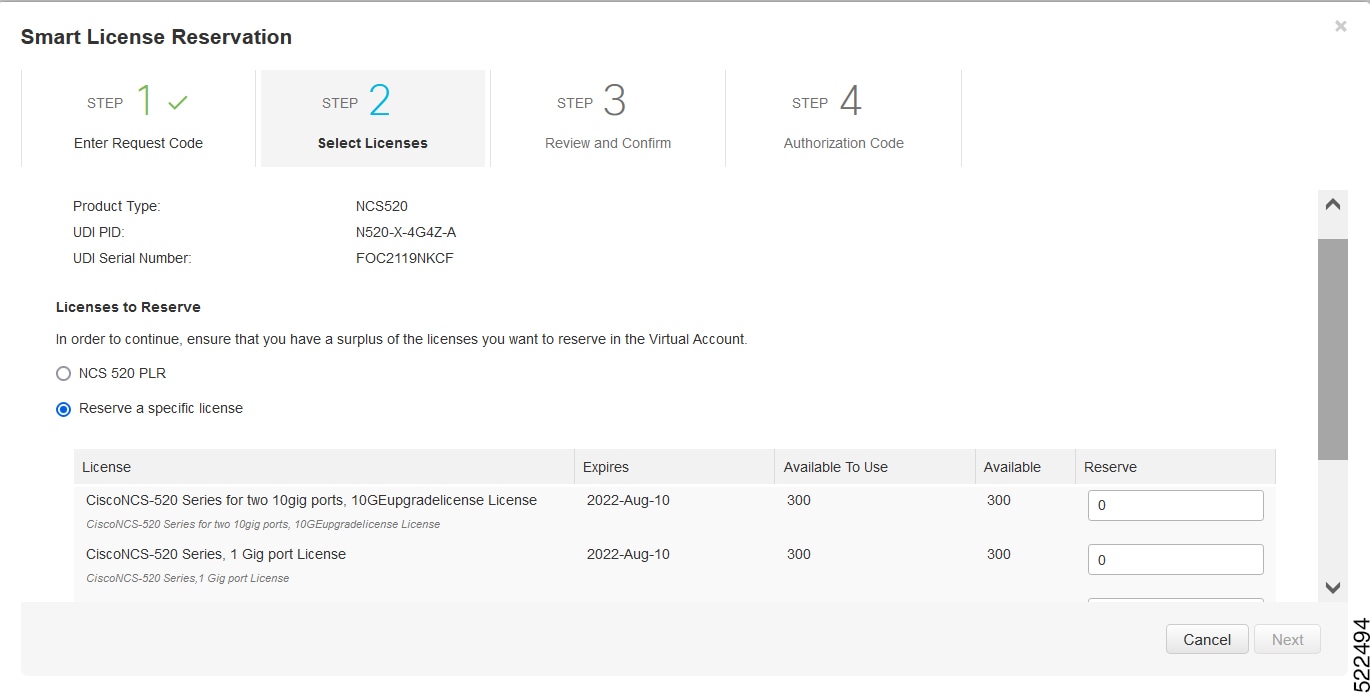
Select the type of license to reserve.


Reserving Licenses with Permanent License Reservation

Procedure


Step 1

Select PLR.

The system reserves the permanent licenses for the router.

Step 2

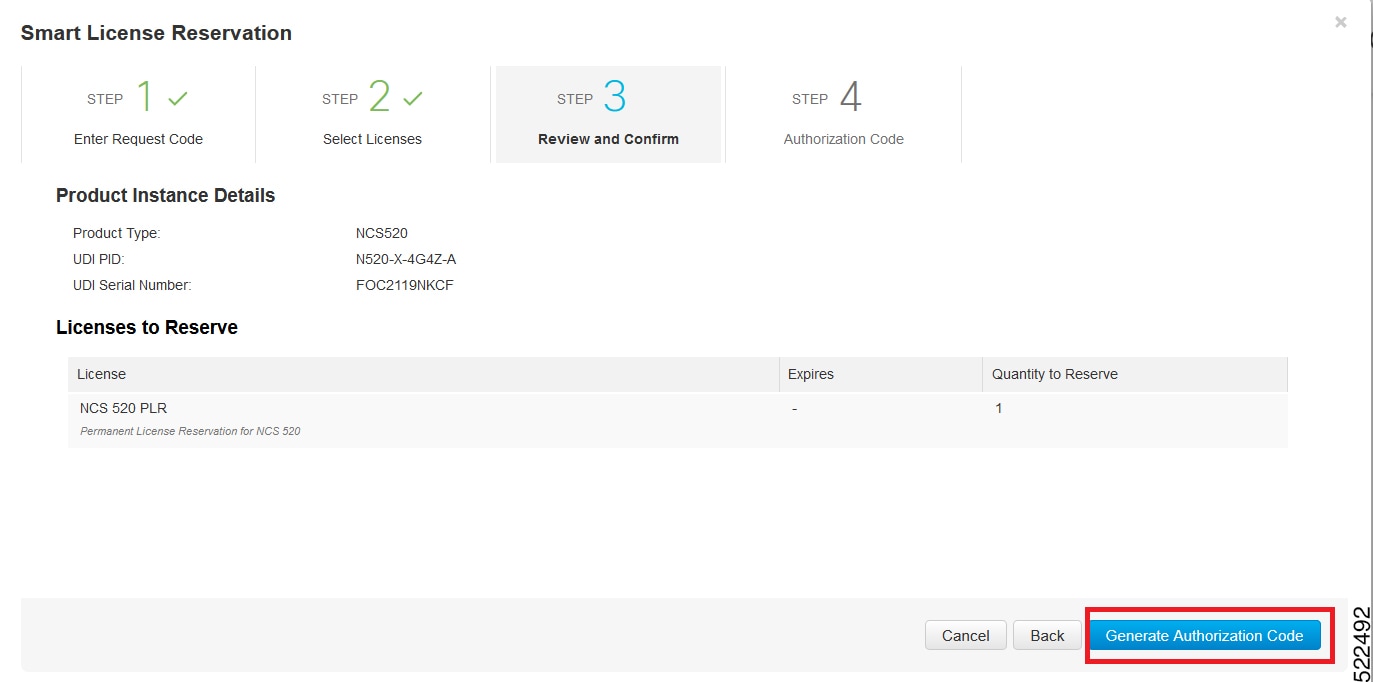
From the Review and Confirm tab, click Generate Authorization Code.

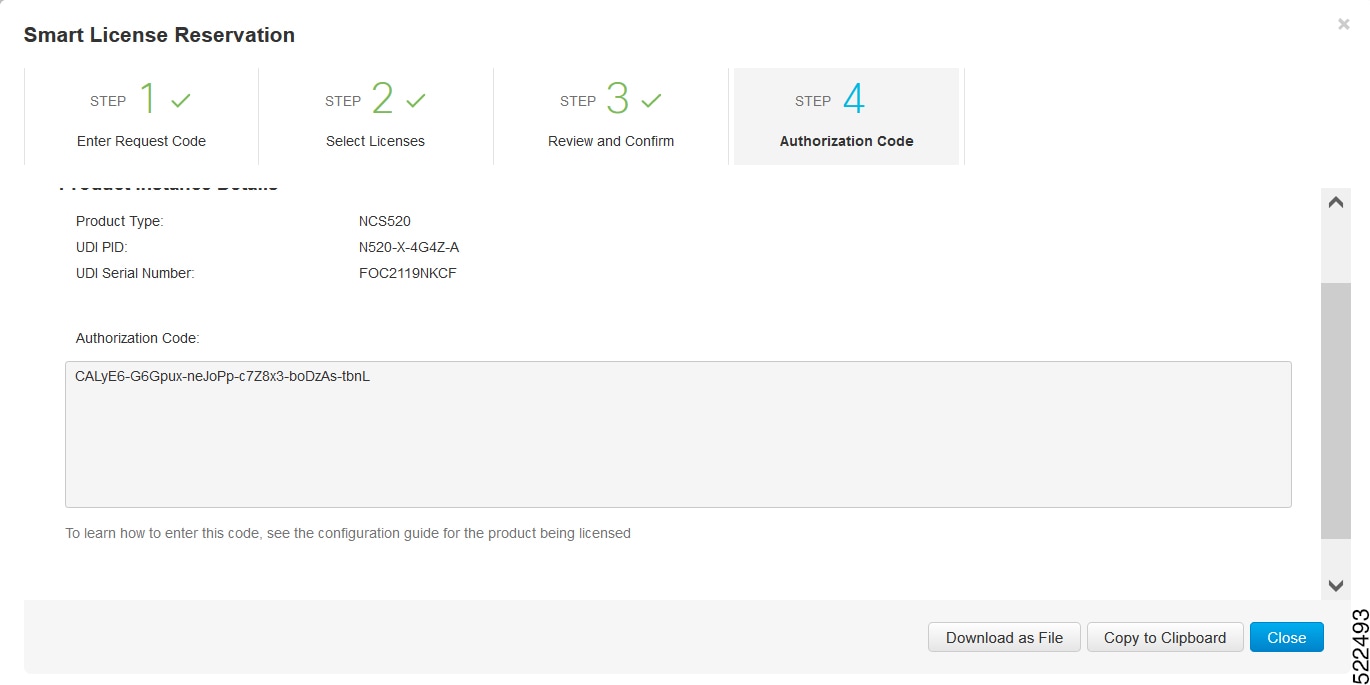
The system displays the Authorization Code.

Note


After generating the code, the authorization code file is valid till you install the code.

For installation failure issues, contact Cisco Global Licensing Operations (GLO) to generate a new authorization code.

Step 3

Click the Copy to Clipboard option to copy the code, or Download as File to download the code as a file.

Step 4

Install the authorization file on the router by registering the device. See Register the Device Using the Authorization Code


Reserving Licenses with Specific License Reservation

Procedure


Step 1

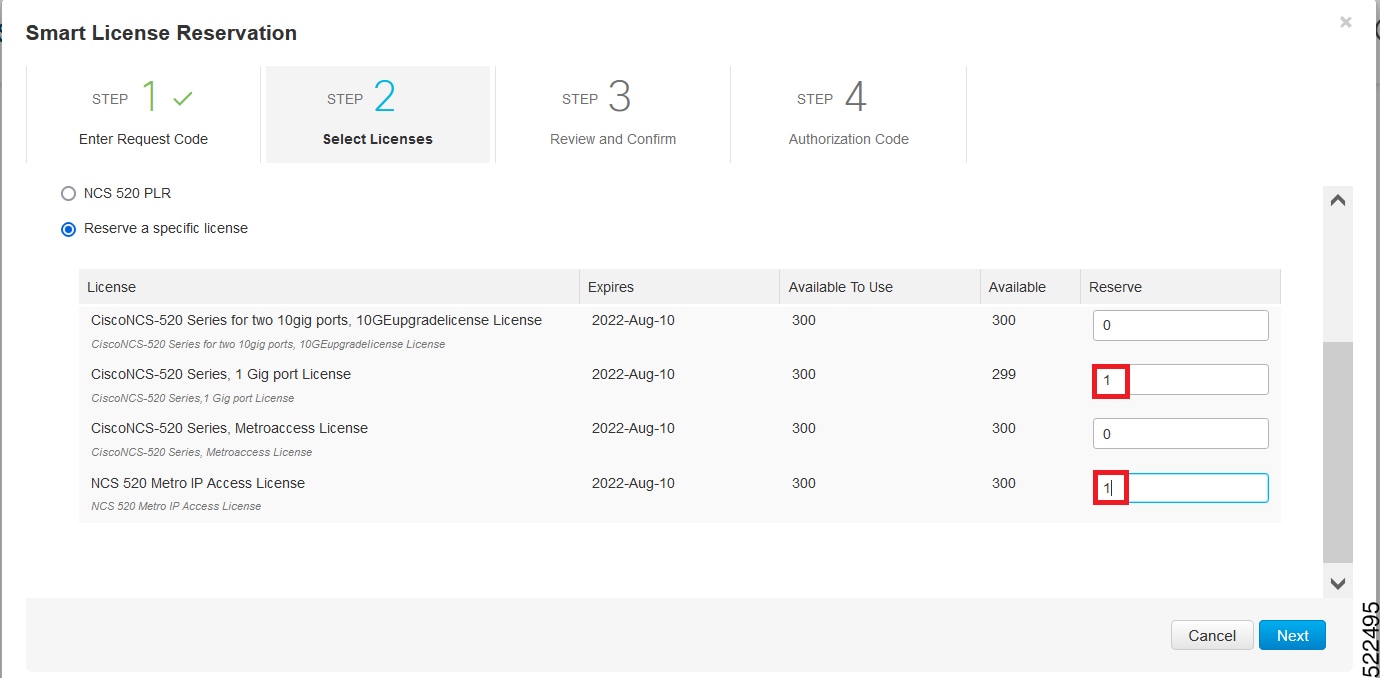
Check Reserve a specific License.

The system displays the list of surplus licenses available in your Virtual Account.

Step 2

Enter the number of licenses to reserve, in the Reserve field. Click Next.

Step 3

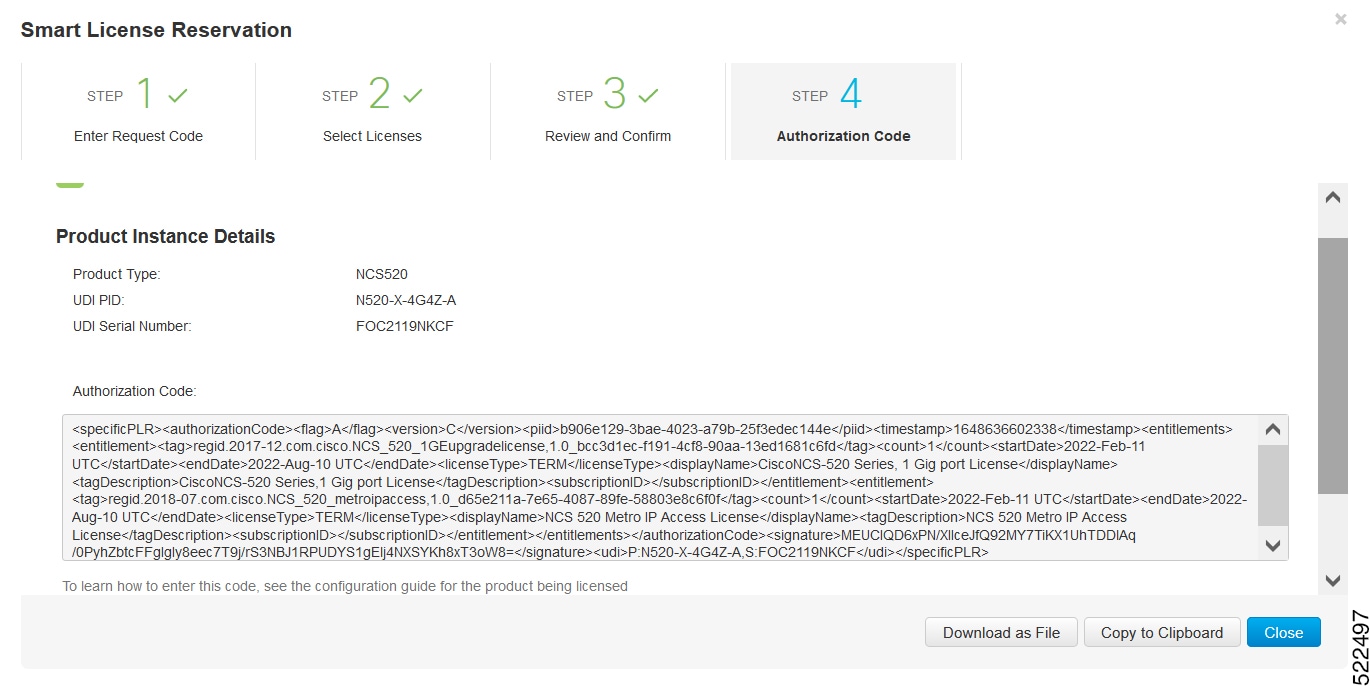
At the Review and Confirm tab, click Generate Authorization Code

The system displays the Authorization Code.

Note


After you generating the code for a specific device, the authorization code file is valid till you install the code the router.

For installation failure issues, contact GLO to generate a new authorization code.

Step 4

Click the Copy to Clipboard option to copy the code or Download as File to download the code as a file.

Step 5

Install the authorization code file on the router by registering the device. See Register the Device Using the Authorization Code


Register the Device Using the Authorization Code

After you get the authorization code from CSSM, execute the following commands to complete the license reservation procedure:

Procedure


Step 1

enable

Enables privileged EXEC mode.

Enter your password, if prompted.

Step 2

license smart reservation install file bootflash:<authfile.txt>

This command registers the device. The authorization code you copied as a file is used to activate smart licensing reservation for your device.When you run the show license tech support command, the system displays the details of the reserved licenses.


Example: Installing the Authorization Code

This example shows how to install the authorization code on the router.

Verifyig License Registration Status with Authorization Code

Verify the license status after registration, using the show license reservation command:

Router# show license reservation
License reservation: ENABLED
Overall status:
  Active: PID:N520-X-4G4Z-A,SN:FOC2119NKCF
      Reservation status: SPECIFIC INSTALLED on Jan 26 06:05:40 2022 UTC
      Last Confirmation code: 92bd4d9f
Specified license reservations:
  CISCO NCS-520 SERIES 2-10G PORT LICENSE (10GEupgradelicense):
    Description: CISCO NCS-520 SERIES 2-10G PORT LICENSE
    Total reserved count: 1
    Enforcement type: NOT ENFORCED
    Term information:
      Active: PID:N520-X-4G4Z-A,SN:FOC2119NKCF
        Authorization type: SPECIFIC INSTALLED on Jan 26 06:05:40 2022 UTC
        License type: TERM
          Start Date: 2021-AUG-06 UTC
          End Date: 2022-FEB-02 UTC
          Term Count: 1
  CISCO NCS-520 SERIES 1G PORT LICENSE (1Gportlicense):
    Description: CISCO NCS-520 SERIES 1G PORT LICENSE
    Total reserved count: 1
    Enforcement type: NOT ENFORCED
    Term information:
      Active: PID:N520-X-4G4Z-A,SN:FOC2119NKCF
        Authorization type: SPECIFIC INSTALLED on Jan 26 06:05:40 2022 UTC
        License type: TERM
          Start Date: 2021-AUG-06 UTC
          End Date: 2022-FEB-02 UTC
          Term Count: 1


This example shows the license status on the router.

Router# show license usage
License Authorization:
  Status: AUTHORIZED

CISCO NCS-520 SERIES 2-10G PORT LICENSE (10GEupgradelicense):
  Description: CISCO NCS-520 SERIES 2-10G PORT LICENSE
  Count: 1
  Version: 1.0
  Status: AUTHORIZED
  Export status: NOT RESTRICTED
  Feature Name: 10GEupgradelicense
  Feature Description: 10GEupgradelicense
  Reservation:
    Reservation status: SPECIFIC INSTALLED
    Total reserved count: 1

CISCO NCS-520 SERIES 1-G PORT LICENSE (1Gportlicense):
  Description: CISCO NCS-520 SERIES 1G PORT LICENSE
  Count: 0
  Status: AUTHORIZED
  Export status: NOT RESTRICTED
  Feature Name: CISCO NCS-520 SERIES 1G PORT LICENSE
  Feature Description: CISCO NCS-520 SERIES 1G PORT LICENSE
  Reservation:
    Reservation status: SPECIFIC INSTALLED
    Total reserved count: 1

Upgrading Licenses with Specific License Reservation

Registered devices can be upgraded new features licenses or licenses.

Procedure


Step 1

Log in to Cisco Smart Software Manager at https://software.cisco.com/# using the Cisco provided username and password.

Step 2

Click the Inventory tab. From the Virtual Account drop-down list, select your smart account.

Step 3

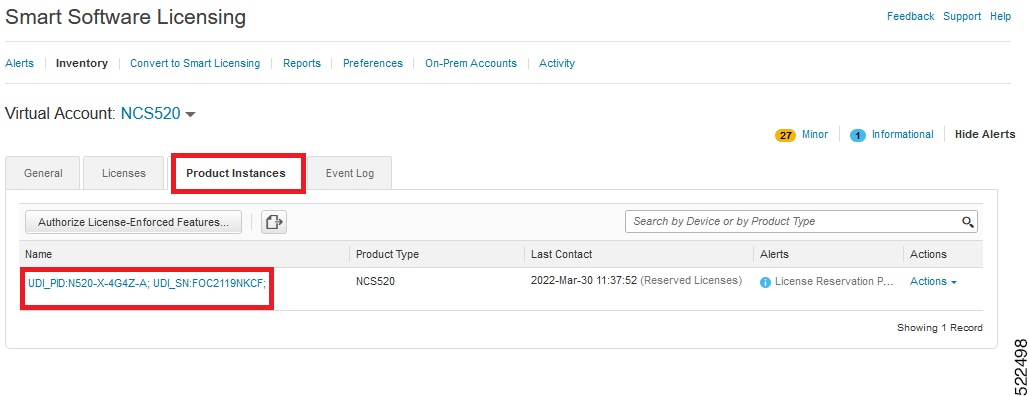
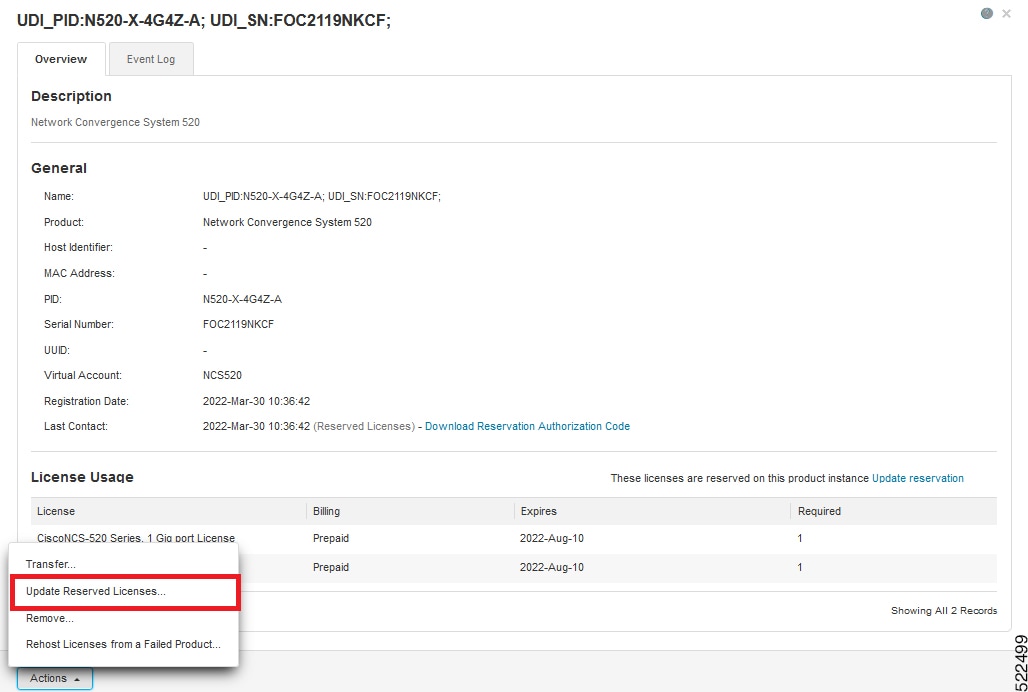
From the Product Instances tab, for the device that you want to update, click Actions.

Step 4

Click Update Reserved Licenses.

Step 5

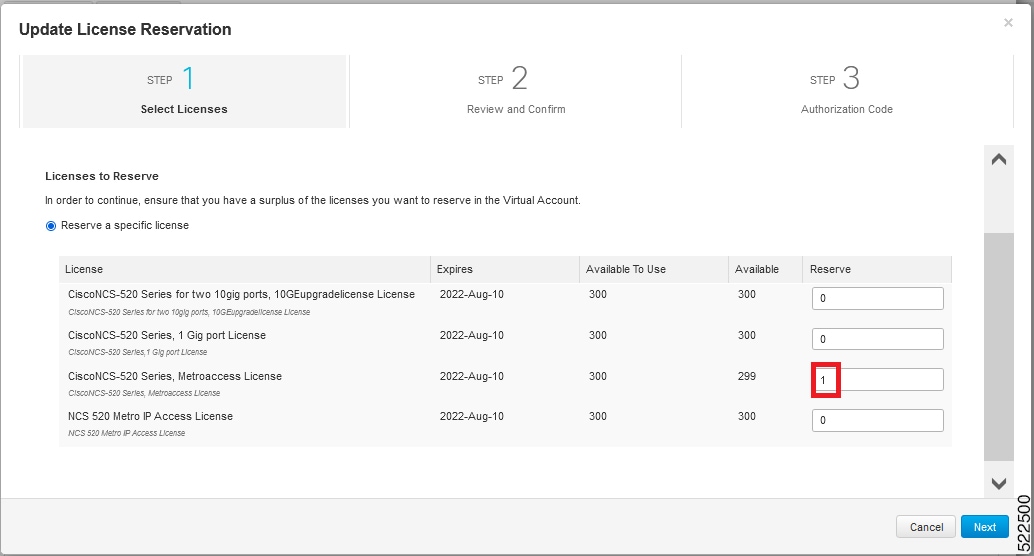
Select the license that you want to update.

Step 6

Click Next.

Step 7

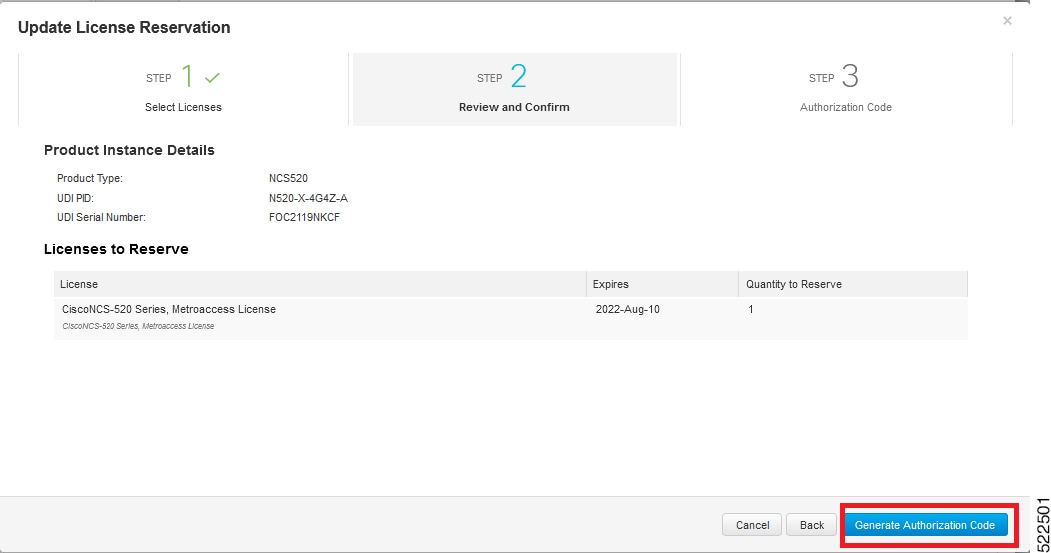
From the Review and Confirm tab, click Generate Authorization Code.

Step 8

Click the Copy to Clipboard option to copy the code, or Download as File to dowload the file.

Step 9

To Install the downloaded file on the router, run the license smart reservation install file command.

license smart reservation install file bootflash:<authfile.txt> 

This command registers the device with the new authorization code.

Example:

Router# license smart reservation install file 
bootflash:AuthorizationCode_SN_CAT1815U08H.txt
Reservation install file successful
Last Confirmation code UDI:PID:N520-X-4G4Z-A,SN:FOC2119NKCF
v56as234

Note the confirmation code that is displayed in the output.

Step 10

In CSSM, from the Authorization Code tab, click the Enter Confirmation Code button.

Enter the confirmation code that is displayed on the router.

Step 11

Click OK to complete the license reservation.


Removing License Authorization Code

Deregistering devices requires the removal of the authorization code. Installed Authorization codes must be returned to CSSM. The router moves into Eval mode on returning the code.

Procedure


Step 1

Log in to the router to generate a return code for the instance.

Step 2

Run the license smart reservation return local command to generate the code.

Router# license smart reservation return local
This command will remove the license reservation authorization code and the device will transition back to the unregistered state. Some features may not function properly.
Do you want to continue? [yes/no]: yes
Enter this return code in Cisco Smart Software Manager portal:

UDI: PID:N520-X-4G4Z-A,SN:FOC2119NKCF

CiFaL1-uFvouy-baod31-V9S6EZ-YoFfMD-2YFHro-Tywy77-FkzFF2-LMq

Step 3

Log in to Cisco Smart Software Manager at https://software.cisco.com/#.

You must log in to the portal using the Cisco provided username and password.

Step 4

Click the Inventory tab. From the Virtual Account drop-down list, select your smart account.

Step 5

From the Product Instances tab, select the device to remove license reservation, click Actions.

Step 6

Select Remove.

Step 7

Enter the return code, and click Remove Product Instance.


Removing the Authorization Code Post Factory Reset

Before performing a factory reset, you must generate the reservation return code to the Cisco Global Licensing Operations (GLO).


Note


The router may go into Unregistered state if you fail to return the code, and CSSM displays the product instance.


To remove the router instance from CSSM, do one of the following:

  • Check if authorization code is available post factory reset. Use the license smart reservation return authorization file autho_code_file command to generate return code for the router. Use this return code to remove the instance from the CSSM. See Removing License Authorization Code.

  • Contact Cisco Support to remove the router instance from CSSM.