Policy Groups

Policy Groups

Table 1. Feature History

Feature Name

Release Information

Description

Policy Groups

Cisco IOS XE Catalyst SD-WAN Release 17.12.1a

Cisco Catalyst SD-WAN Manager Release 20.12.1

This feature provides a simple, reusable, and structured approach for configuring policies in Cisco Catalyst SD-WAN. You can create a policy group, that is, a logical grouping of policies that is applied to one or more sites or devices at the site in the network. To deploy the policy group to devices, the devices must be managed by a configuration group in Cisco Catalyst SD-WAN. You can configure policies based on features that are required, recommended, or uniquely used, and then combine them to complete a policy configuration.

The Deploy Policy Group workflow in Cisco Catalyst SD-WAN provides a guided method to select previously created policy groups and deploy them to sites or devices at the site that is managed by configuration groups.

Configure Traffic and Flow Visibility for Application Priority and SLA Policy

Cisco IOS XE Catalyst SD-WAN Release 17.13.1a

Cisco Catalyst SD-WAN Manager Release 20.13.1

You can configure settings to enable traffic and flow visibility for the application priority and SLA policy in Cisco Catalyst SD-WAN. This feature allows you to monitor application and traffic flow over IPv4, IPv6, or both networks at the global hierarchy level in Cisco SD-WAN Manager.

Preferred Remote Color in AAR Policy

Cisco IOS XE Catalyst SD-WAN Release 17.15.1a

Cisco Catalyst SD-WAN Manager Release 20.15.1

You can set a remote preferred color in the AAR policy to control traffic routing based on the SLA criteria.

Information About Policy Groups

Policy groups simplify the experience of configuring and deploying various policies on Cisco IOS XE Catalyst SD-WAN devices. Policy groups are a collection of different policies that you can configure through workflows and associate with and deploy on different Cisco IOS XE Catalyst SD-WAN devices.

Overview of Policy Groups

Policy Groups provide a simple, reusable, and structured approach for configuring policies and policy objects in Cisco IOS XE Catalyst SD-WAN devices.

Policy groups are a collection of various policies and policy parameters that you can configure quickly through a simplified workflow. Policy groups allows you to configure the basic and necessary policies with defaults to get your systems up and running. The more advanced user can switch to the Advanced layout to take complete control and configure detailed policy parameters such as service-level agreement (SLA) class, Quality of Service (QoS) Maps, and Match-Action parameters pertaining to the traffic policy. After creating a policy group, you can associate it with one or more sites or a single device at the site in the network and deploy it on devices managed by configuration groups.

After you've configured a policy group, you can deploy it on Cisco IOS XE Catalyst SD-WAN devices by using the Deploy Policy Group Workflow.

For more information about Cisco Catalyst SD-WAN policy and policy architecture, see Policy Overview.

Overview of Policy Group Workflows

The policy group workflow guides you in creating a policy group for one or more sites or a single device at the site in the network that is managed by configuration groups in Cisco Catalyst SD-WAN. The workflow provides you with an improved configuration and troubleshooting experience. The workflow has the following features:

  • You can review the various configuration values on a single page within the workflow.

  • You can easily identify and fix incorrect values that appear highlighted in red. In addition, an asterisk that is adjacent to a field name helps you identify the mandatory values within the workflow.

Deploy Policy Group Workflow

You can access the workflow by choosing Workflows > Deploy Policy Group menu in Cisco SD-WAN Manager.

The Deploy Policy Group workflow enables you to associate devices with a previously created policy group and deploy the policy group to the selected devices. You can review device configurations to further add Site IDs and other variables that must be provided as part of a policy group before deploying the policy group.


Note


After you deploy a policy group, any change to the policy group is deployed to the Cisco SD-WAN Controller.


Benefits of Policy Groups

  • Simplified user experience through an intuitive UI that allows you to quickly configure the basic policies that are required to get your Cisco Catalyst SD-WAN deployments up and running.

  • Option to edit policy groups based on the changing needs of your network and save the configuration. You can choose to deploy these changes only when needed - during maintenance windows or in off-production hours.

  • A Preview CLI option to preview the difference in configuration for relevant devices such as Cisco IOS XE Catalyst SD-WAN device and Cisco SD-WAN Controller in one location.

  • Workflows to deploy policy groups.

Information About Color Preference

Minimum supported releases: Cisco IOS XE Catalyst SD-WAN Release 17.15.1a and Cisco Catalyst SD-WAN Manager Release 20.15.1

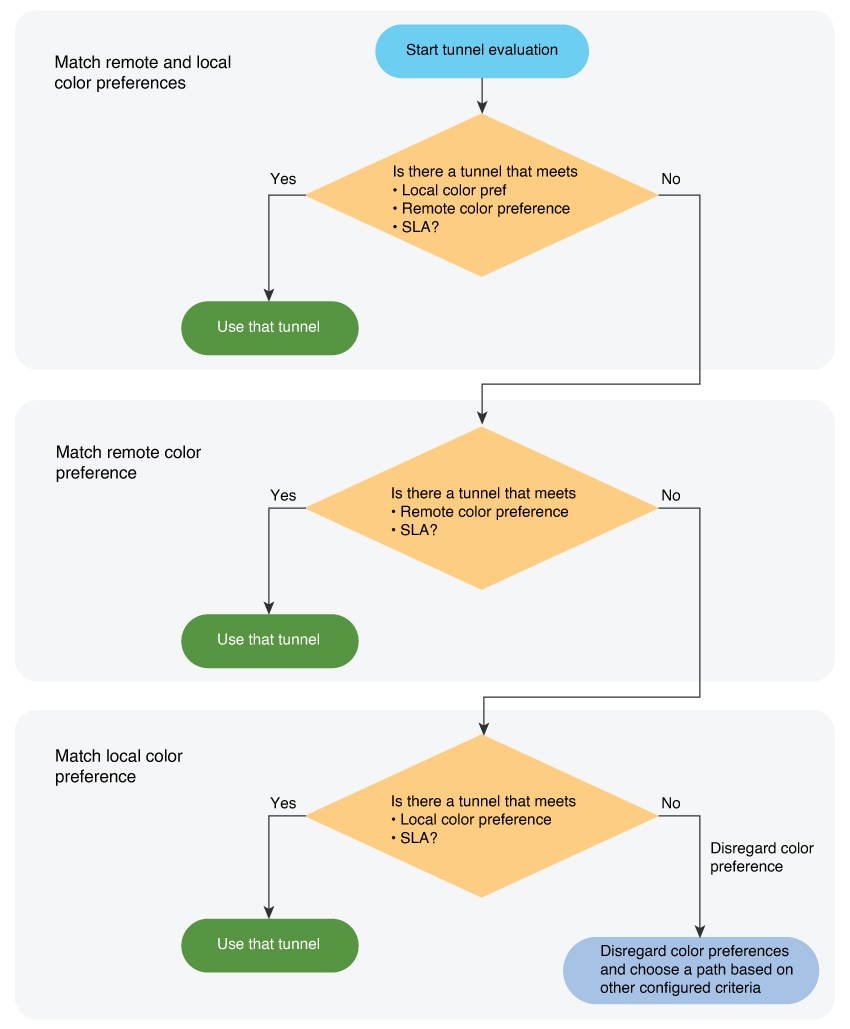
The AAR policy enables you to use TLOC color preferences to determine how a device chooses a tunnel for routing traffic. You can configure a preferred local TLOC color and a preferred remote TLOC color, referring to the local and remote TLOCs associated with a tunnel. When multiple tunnels are available, the device prioritizes tunnels according to the color preferences. This flowchart shows the logic.

Figure 1. Color Preference Logic

For more information, see Application Priority and SLA.

For configuring remote preferred color policies using Configuration > Policies see Configure Traffic Rules.

Restricting to a Color Preference

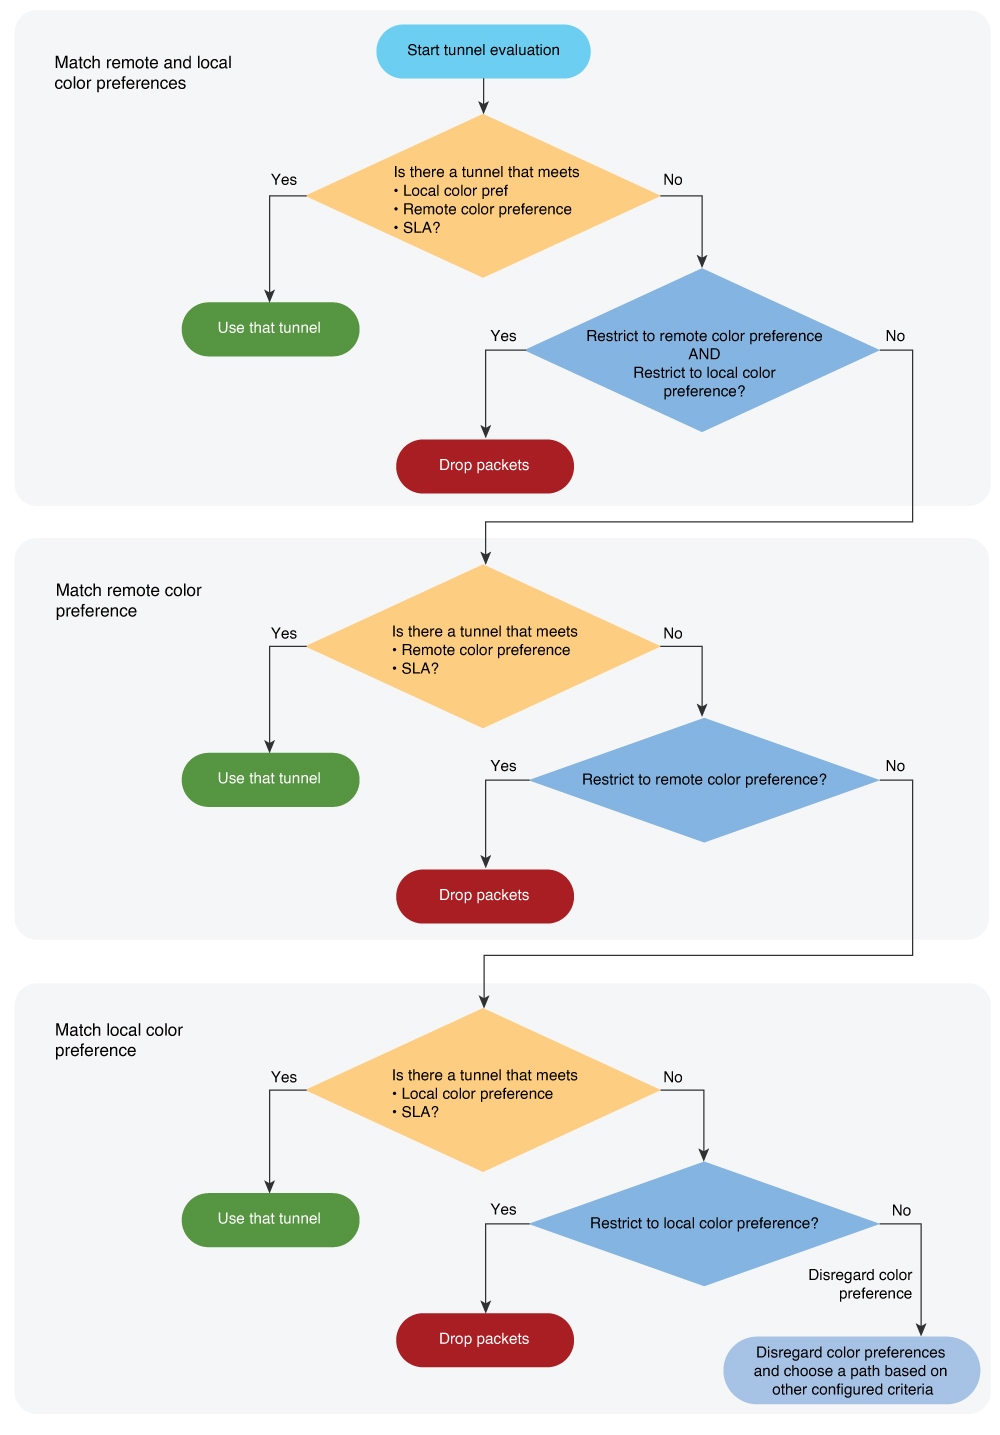
You can restrict the choice of a tunnel to include only tunnels that meet the configured color preferences. The options are Restrict to Remote Color and Restrict to Preferred Color Group. If no tunnels meet the criteria, the device drops the traffic. This flowchart shows the logic of choosing a tunnel when restricting to the color preferences.

Figure 2. Color Preference Logic, Restricting to Local or Remote Color

Supported Devices for Policy Groups

This feature is supported only on Cisco IOS XE Catalyst SD-WAN devices.

Prerequisites for Policy Groups

Before you begin configuring policy groups, ensure that the following requirements are met:

  • Minimum software version for Cisco IOS XE Catalyst SD-WAN devices: Cisco IOS XE Catalyst SD-WAN Release 17.8.1a

    Minimum software version for Cisco SD-WAN Manager: Cisco Catalyst SD-WAN Manager Release 20.12.1

  • Ensure that these devices are deployed and managed using a configurations group. For more information about creating configuration groups, see Configuration Groups and Feature Profiles.

Configure RBAC for policy groups

Ensure that the granular role-based access control (RBAC) for policy groups is specified by expanding it. With specific permissions to the usergroup, ensure that you are able to access policy groups from Configuration > Policy Groups.

  1. From the Cisco SD-WAN Manager menu, choose Administration > Manage Users > User Groups.

  2. Click Add User Group.

  3. Enter User Group Name.

  4. Select the Read or Write check box against the Policy Group and Device feature that you want to assign to a user group.

  5. Click Add.

Configure RBAC for Application Priority Policy

Ensure that the granular RBAC for the application priority policy is specified by expanding it. With the set permissions to the usergroup, ensure that you are able to access the application priority policy from Configuration > Policy Groups.

  1. From the Cisco SD-WAN Manager menu, choose Administration > Manage Users > User Groups.

  2. Click Add User Group.

  3. Enter User Group Name.

  4. Select the Read or Write check box against the following features that you want to assign to a user group:

    • Feature Profile > Application Priority > Qos Policy

    • Feature Profile > Application Priority > Traffic Policy

    • Feature Profile > Policy Object > App List

    • Feature Profile > Policy Object > SLA Class

    • Feature Profile > Policy Object > TLOC

    • Feature Profile > Policy Object > App Probe

    • Feature Profile > Policy Object > Preferred Color Group

    • Feature Profile > Policy Object > Class

    • Feature Profile > Policy Object > Data Prefix

    • Feature Profile > Policy Object > Data Ipv6

    • Feature Profile > Policy Object > Policer

  5. Click Add.

Restrictions for Policy Groups

  • The Application Priority and SLA workflow does not support custom applications.

  • You cannot deploy policy groups to devices that are not already managed by a configurations group.

  • The forwarding class in localized policy is not supported.

  • An error occurs when a duplicate parcel name (for example, Site27-VPN1) exists in another configuration group. Verify existing parcel names across all groups and modify the intended name to ensure exclusivity. Use descriptive naming conventions to prevent conflicts.

Group of Interest - Policy

Group of interest provides a list of related policy objects that you can configure and call in the match or action components of a policy. Click Group of Interest to create new objects for the policy group as described in the following sections:

Application

  1. Click Application.

  2. Click Add Application .

  3. From the Application/Application family list drop-down, choose the required applications or application families.

  4. Click Save.

A few application lists are preconfigured. You cannot edit or delete these lists.

Microsoft_Apps: Includes Microsoft applications, such as Excel, Skype, and Xbox. To display a full list of Microsoft applications, click the list in the Entries column.

Google_Apps: Includes Google applications, such as Gmail, Google Maps, and YouTube. To display a full list of Google applications, click the list in the Entries column.

App Probe Class

  1. Click Add App Probe Class.

  2. In the App Probe dialog box, specify the following:

    Field

    Description

    Probe Class Name

    Enter a name for the probe class.

    Forwarding Class

    Choose the forwarding class from the drop-down list.

    Color

    Choose the color from the drop-down list.

    DSCP

    Enter the DSCP value.

  3. You can add more entries if needed by clicking on + icon.

  4. Click Save.

Color

  1. Click Color.

  2. Click New Color List and specify the following:

    Field

    Description

    Color List Name

    Enter a name for the list.

    Select Color

    Choose one or more color lists types from the drop-down list.

  3. Click Add.

To configure multiple colors in a single list, you can choose multiple colors from the drop-down list.

Community List

A community list is used to create groups of communities to use in a match clause of a route map. A community list can be used to control which routes are accepted, preferred, distributed, or advertised. You can also use a community list to set, append, or modify the communities of a route.

  1. Click Community List.

  2. Click Add Community List and specify the following:

    Field

    Description

    Community List Name

    Enter a name of the community list.

    Add Community

    Enter one or more communities separated by commas.

    • aa:nn: Autonomous System (AS) number and network number. Each number is a 2-byte value with a range from 1 to 65535. For example, 65526.

    • internet: Routes in this community are advertised to the internet community. This community comprises all BGP-speaking networking devices.

    • local-as: Routes in this community are not advertised outside the local AS number.

    • no-advertise: Attaches the NO_ADVERTISE community to routes. Routes in this community are not advertised to other BGP peers.

    • no-export: Attaches the NO_EXPORT community to routes. Routes in this community are not advertised outside the local AS or outside a BGP confederation boundary. To configure multiple BGP communities in a single list, include multiple community options, specifying one community in each option.

  3. Click Save.

Data Prefix

  1. Click Data Prefix.

  2. Click Add Data Prefix.

  3. In the Data Prefix list dialog box, specify the following:

    Field

    Description

    Data Prefix List Name

    Enter a name for the data prefix list.

    Add Data Prefix

    Enter one or more data prefixes separated by commas.

  4. Click Save.

Data Prefix IPv6

  1. Click Data Prefix IPv6.

  2. Click Add Data Prefix IPv6.

  3. In the Data Prefix List dialog box, specify the following:

    Field

    Description

    Data Prefix List Name

    Enter a name for the IPv6 data prefix list.

    Add Data Prefix

    Enter one or more IPv6 data prefixes separated by commas.

  4. Click Save.

Expanded Community List

  1. Click Expanded Community List.

  2. Click Add Expanded Community List and specify the fiollowing:

    Field

    Description

    Community List Name

    Enter a name for the community list.

    Add Community

    Specify details of the expanded community list that is used to filter communities using a regular expression.

Forwarding Class

  1. Click Add Forwarding Class and specify the following:

    Field

    Description

    Forwarding Class

    Enter a name for the forwarding class.

    Queue

    Choose a value for the queue from the drop-down list.

  2. Click Save.

Policer

  1. Click Policer.

  2. Click Add Policer and specify the following:

    Field

    Description

    Policer List Name

    Enter a name for the policer list.

    Burst (bytes)

    Enter the maximum traffic burst size. The range is from 15,000 to 10,000,000 bytes.

    Exceed

    Choose the action to take when the burst size or traffic rate is exceeded. The options are:

    • Drop: sets the packet loss priority (PLP) to low

    • Remark: sets the packet loss priority (PLP) to high

    Rate

    Enter the maximum traffic rate, a value from 8 through 10^11 bits per second (bps).

  3. Click Save.

Preferred Color Group

  1. Click Add Preferred Color Group.

  2. In the Preferred Color Group Name field, enter a name for the preferred color group.

  3. Choose the color preference and path prefernce for the primary, secondary, and tertiary colors from the Color Preference and the Path Preference drop-down lists.

    Field

    Description

    Preferred Color Group Name

    Enter a name for the preferred color group.

    Color Preference

    Choose the color preference from the drop-down list.

    You can choose multiple colors.

    Path Preference

    Choose the path preference from the drop-down list. The options are:

    • Direct Path

    • Multi Hop Path

    • All Paths

  4. Click Save.

Prefix List

  1. Click Prefix List.

  2. Click Add Prefix List and specify the following:

    Field

    Description

    Prefix List Name

    Enter a name for the IPv4 prefix list.

    Add Prefix

    Enter one or more IPv4 prefixes separated by commas.

  3. Click Save.

Prefix List IPv6

  1. Click Prefix List IPv6.

  2. Click Add Prefix List and specify the following:

    Field

    Description

    Prefix List Name

    Enter a name for the IPv6 prefix list.

    Add Prefix

    Enter one or more IPv6 prefixes separated by commas.

  3. Click Save.

SLA Class

  1. Click SLA Class.

  2. Click Add SLA Class and specify the following:

    Field

    Description

    SLA Class List Name

    Enter a name of the SLA class list.

    Loss (%)

    Enter the maximum packet loss on the connection, a value from 0 through 100.

    Latency

    Enter the maximum packet latency on the connection, a value from 1 through 1,000 milliseconds.

    Jitter

    Enter the maximum jitter on the connection, a value from 1 through 1,000 milliseconds.

    App Probe Class

    Choose the app probe class from the drop-down list or click Create New to create one.

    Fallback Best Tunnel

    Choose this option to enable the best tunnel criteria.
  3. Click Save.

TLOC List

  1. Click TLOC List.

  2. Click Add TLOC List and specify the following:

    Field

    Description

    List Name

    Enter a name for the TLOC list.

    TLOC IP

    Specify the IP address for TLOC.

    Color

    Choose the color from the drop-down list.

    Encapsulation

    Choose the value from the drop-down list. The options are:

    • IPSec

    • GRE

    Preference

    Choose a preference to associate with the TLOC.

    The range is 0 to 4294967295.

  3. Click Save.

Add Policy Group

  1. From the Cisco SD-WAN Manager menu, choose Configuration > Policy Groups > + Add Policy Group.

  2. Enter a Policy Group Name, choose a Solution from the drop-down list and provide a description (optional).

  3. Click Create.


    Note


    If you have already created a policy group, click the policy group from the list of available policy groups to edit.


Table 2. Policy group parameters

Field

Description

Policy Group Name

Specify the name of the policy group.

This field is mandatory and can contain only uppercase and lowercase letters, the digits 0 through 9, hyphens (–), and underscores (_). It cannot contain spaces or any other characters.

Description

Provide a description for the policy group.

It can contain up to 2048 characters including spaces.

Policy

Application Priority & SLA

Choose an application priority for the policy group from the drop-down list. Click Create New to create a new application priority.

Embedded Security

Choose an embedded security policy from the drop-down list. Click Create New to create a new embedded security policy by selecting a configuration group, creating firewall policies, and other configuration settings.

Secure Internet Gateway

Configure the Secure Internet Gateway (SIG) tunnels before you apply a data policy for redirecting application traffic to an SIG. Select a Secure Internet Gateway (SIG) policy from the drop-down list. Click Create New to create a new SIG policy.

DNS Security

Select a DNS Security policy from the drop-down list. Click Create New to create a new DNS Security policy.
  1. Click Save to save your configuration.

  2. Click the pencil icon to select or unselect devices to associate or dissociate with the policy group.


    Note


    Starting from Cisco Catalyst SD-WAN Manager Release 20.15.1, click +Add adjacent to Associated field to select or unselect devices to assoicate or dissociate with the policy group. In the associate devices workflow, you can choose devices based on Regions and not just Sites.


  3. Click Deploy to select sites and deploy the policy group..

To delete a policy group, select the ellipsis icon (...) to the right of the policy group and click Delete.

Application Priority and SLA

The application priority and SLA policies allows you to configure the app route policy, data policy, and QoS Map policies that route and prioritize traffic for best performance. All the basic information is preconfigured. You can specify a name and description for a policy group and configure the basic policy values. You can quickly configure the basic values to get started with the traffic policy. Configuring this policy provides the following benefits:

  • Manage and customize bandwidth allocations.

  • Prioritize applications based on their relevance to your business.

Create an Application Priority and SLA Policy

Click + Application priority & SLA policy to create a policy and configure the values. To edit an existing policy, click the ellipsis icon (...) next to the application priority and SLA policy under Action and click Edit.

Choose one of the following options and configure the values that are based on the likely business relevance of the applications, and to give higher priority to business-relevant applications:

  • Gold (Business-relevant): Likely to be important for business operations, for example, WebEx software.

  • Silver (Default): No determination of relevance to business operations.

  • Bronze (Business-irrelevant): Unlikely to be important for business operations, for example, gaming software.

Within each of the business-relevance categories, the workflow groups the applications into application lists, such as broadcast video, multimedia conferencing, VoIP telephony, and so on.

Table 3. Cisco Catalyst SD-WAN Fabric Traffic Policy

Field

Description

Preferred Path

To configure a preferred path, choose one or more colors of the data plane tunnel or tunnels from the drop-down list. Traffic is load-balanced across all the tunnels. If no tunnels match the SLA, data traffic is sent through any available tunnel.

The preferences apply in order of priority to determine the path or color for forwarding traffic.

When SLA not met

Choose Strict/Drop to perform strict matching of the SLA class. If no data plane tunnel is available that satisfies the SLA criteria, traffic is dropped.

Choose Fallback to best path to configure the best available tunnel to avoid a packet drop. This is the default.

Backup Path: Path for traffic to use if the primary path fails.

Backup Path

To configure an alternate path for traffic flow, choose a path from the drop-down list.

Traffic Filtering

Click Edit to view and update app classification based on the business relevance. Choose a service provider class option and drag and drop the applications into different classes such as Gold or Bronze and click Save to update the configuration.

SLA

Add the SLA class in the traffic policy. Click Edit to configure the SLA class by adjusting the values for Loss (%), Latency (ms), or Jitter (ms) for the traffic policy.

QoS Queues

Click Add QoS Policy to add a QoS queue. Click Edit to configure the QoS Queues. Choose one of the following values for the QoS queuing model:
  • 4 Queues

  • 5 Queues

  • 6 Queues

  • 8 Queues

Table 4. Internet Offload Traffic

Field

Description

Secure Internet Gateway

Choose an application or application family list to tunnel traffic through a Secure Internet Gateway.

Enable Fallback to routing for traffic to undergo normal routing if the SIG tunnels are down.

Direct Internet Access

Select an application or application family list to allow direct internet access.

Enable Fallback to routing for traffic to undergo normal routing if Direct Internet Access (DIA) is not available.

Table 5. Apply Policy​

Field

Description

Target

Configure the following parameters:

  • Direction: Choose the direction for applying the policy:

    • All: Bidirection traffic flow

    • Service: Incoming traffic from service.

    • Tunnel: Incoming traffic from the tunnel.

  • VPN: Choose a target VPN from the drop-down list.

  • Interface: Specify a value or a variable for the Ethernet interface or DSL PPPoE interface type for applying the QoS policy.

Advanced Layout

The advanced view provides further options to configure the traffic policy along with rules, service level agreement (SLA) class, and QoS Map. Click the Advanced button on the top-right corner of the window to swtich to the advanced view.


Note


If you make changes to the application priority and SLA policies and switch to the advanced layout, the changes are retained. You cannot switch back to the default view.


Based on the values you configure in the workflow, a policy profile and the relevant policy objects are created in the back-end when the workflow is completed. Similarly, you can configure traffic filtering and rules by creating the match and action conditions of a policy. You can also configure the app route policy SLA class and create customized QoS queues.

Table 6. Add Traffic Policy

Field

Description

Policy Name

Specify a name for the traffic policy.

VPN

Choose a VPN from the drop-down list.

Direction

  • Choose the direction for applying the policy:

    • All: Bidirectional traffic flow

    • Service: Incoming traffic from service

    • Tunnel: Incoming traffic from tunnel

Table 7. Add Rules

Field

Description

Sequence

The sequence number of the rule.

Name

Specify a name for the rule.

Protocol

Choose a protocol from the drop-down list:

  • IPv4

  • IPv6

  • Both

Match

Choose a value for the match condition from the available options. For more information about match conditions, see the Match Condition table in the section Configure Traffic Rules in Centralized Policy.

Action

Choose a value for the action to take if the policy matches, from the available options. For more information about action values, see the Action Condition table in the section Configure Traffic Rules in Centralized Policy.

Base Action

Choose one of the following base actions for the packets based on the rules:

  • Accept

  • Drop

Table 8. Action Parameters on Policy Groups

Field

Description

Secure Service Edge

Minimum supported releases: Cisco IOS XE Catalyst SD-WAN Release 17.13.1a and Cisco Catalyst SD-WAN Manager Release 20.13.1

Redirect application traffic to a Secure Service Edge instance.

For more information on configuring Automatic tunnels on Cisco Secure Access, see Automatic Tunnels .

Check the Fallback to Routing check box to route internet-bound traffic through the Cisco SD-WAN overlay when all Secure Service Edge tunnels are down.

Remote Preferred Color

Minimum supported releases: Cisco IOS XE Catalyst SD-WAN Release 17.15.1a and Cisco Catalyst SD-WAN Manager Release 20.15.1

You can set a preferred remote color in the AAR policy to control traffic routing based on the application list.

Use the Restrict to Remote Color option to drop traffic if the selected remote color does not meet the SLA.

To rearrange match–action pairs in the route policy, drag them to the desired position and click Save Match and Actions.

Table 9. SLA Class Components

Parameter

Description

jitter milliseconds

The maximum jitter on the connection

Range: 1–1000 milliseconds

latency milliseconds

The maximum packet latency on the connection

Range: 1–1000 milliseconds

loss percentage

The maximum packet loss on the connection

Range: 1–100 percent

Starting from Cisco IOS XE Catalyst SD-WAN Release 17.14.1a, the SLA class loss, latency, and jitter values are as follows:

  • Default values: Loss 5%, latency 500 ms, jitter 500 ms

  • Business relevant values: Loss 2%, latency 300 ms, jitter 60 ms

  • Business irrelevant values: Loss 10%, latency 600 ms, jitter 600 ms

  • Bulk data values: Loss 5%, latency 500 ms, jitter 500 ms

For more information about SLA class and its components, see SLA Classes in Application-Aware Routing.

Table 10. QoS Queue

Field

Description

Queuing Model

Choose a value from the drop-down list for the queuing model.

Policy Name

Provide a name for the policy.

Interface

Specify a value for the interface.

Forwarding class

Choose a value for the forwarding class from the drop-down list.

Bandwidth %

Specify the maximum bandwidth. The range is 1–99.

Drops

Choose a value for the drop type from the following options:

  • Random Early

  • Tail

Scheduling type

Specify how to prioritize data packets for transmission to the destination by configuring the schedule type. The default is Weighted Round Robin (WRR).

For more information about QoS, see the section Cisco Catalyst SD-WAN Forwarding and QoS Overview in Forwarding and QoS.

Monitor traffic flow

Minimum supported releases: Cisco IOS XE Catalyst SD-WAN Release 17.13.1a, Cisco Catalyst SD-WAN Manager Release 20.13.1.

You can configure collectors by clicking the Additional Settings tab, which provide options to monitor traffic flow on incoming packets in the LAN for application and flow visibility over IPv4, IPv6, or both network addresses.

Before you begin, ensure that you have configured Cflowd collector details in the Cisco SD-WAN Manager menu from Configuration > Network Hierarchy > Collectors > Cflowd.


Note


The Cflowd configuration applies to the global level and not the site level.

The additional settings that you configure are applied to the Cisco SD-WAN Controllers while deploying the application priority and SLA policy. For more information about configuring Cflowd, see the section Configure Cflowd in Configure Collectors in a Network Hierarchy.


Enable traffic flow monitoring

To enable traffic flow monitoring while configuring an application priority & SLA policy, click the Additional Settings tab in the top-right corner and configure the following values:

Table 11. Additional Settings

Field

Description

Application Visibility

Monitor all the applications running in all VPNs over IPv4, IPv6, or both networks in the LAN.

Flow Visibility

Monitor traffic flow over IPv4, IPv6, or both network addresses in the LAN.