Onboarding Modular Cisco ASR 1000 Series Platforms

Cisco ASR 1006-X with an RP3 Module

Table 1. Feature History

Feature Name

Release Information

Description

Cisco Catalyst SD-WAN Support for the Cisco ASR 1006-X Platform with an RP3 Module

Cisco IOS XE Catalyst SD-WAN Release 17.5.1a

Cisco vManage Release 20.5.1

Starting from this release, Cisco Catalyst SD-WAN supports the Cisco ASR 1006-X platform with a Cisco ASR 1000 Series Route Processor 3 module installed.

Information About the Cisco ASR 1006-X with an RP3 Module

Minimum supported releases: Cisco IOS XE Catalyst SD-WAN Release 17.5.1a, Cisco vManage Release 20.5.1

Last supported releases: Cisco IOS XE Catalyst SD-WAN Release 17.12.x, Cisco Catalyst SD-WAN Control Components Release 20.12.x

Cisco Catalyst SD-WAN supports the Cisco ASR 1006-X platform with a Cisco ASR 1000 Series Route Processor 3 (Cisco ASR1000-RP3) module.


Note


Cisco Catalyst SD-WAN supports this configuration only when the Cisco ASR 1006-X and RP3 module are ordered as a unit for operation with Cisco Catalyst SD-WAN.


Hardware Configuration

The Cisco ASR 1006-X operates with Cisco Catalyst SD-WAN in the following configuration.

Table 2. Hardware Configuration

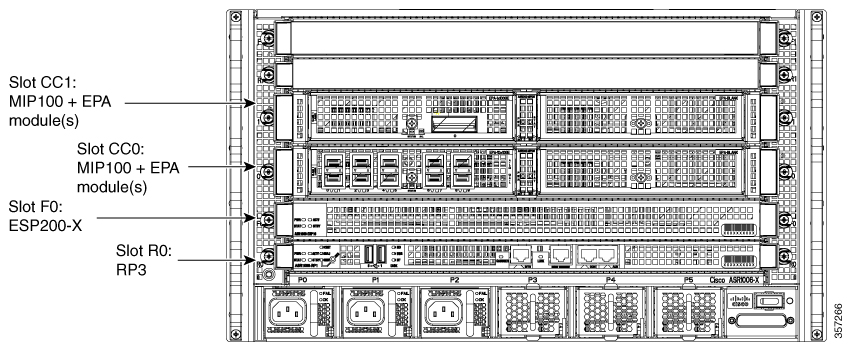
ASR 1006-X Slot

Contents

R0

Cisco ASR 1000 Series Route Processor 3 (Cisco ASR1000-RP3) module

F0

Cisco ASR 1000 Series 200-Gbps Embedded Services Processor (ASR1000-ESP200-X)

CC0

Cisco ASR1000-MIP100 carrier card + 1 or 2 EPA cards in the subslots of the carrier

Note


See below for supported EPA cards.

When using only one EPA card in the carrier, you can place the EPA card in either subslot.

CC1

Cisco ASR1000-MIP100 carrier card + 1 or 2 EPA cards in the subslots of the carrier

Note


See below for supported EPA cards.

When using only one EPA card in the carrier, you can place the EPA card in either subslot.

R1

This slot must be empty.

F1

This slot must be empty.

Figure 1. Cisco ASR 1006-X Slots and Modules

For information about installing the ASR1000-MIP100 carrier card and EPA cards, see the Cisco ASR 1000 Series Modular Interface Processor Hardware Installation Guide.

Supported Cards and Modules

The following Ethernet port adapter (EPA) cards are supported. Each ASR1000-MIP100 carrier card supports two EPA cards, and you can install a total of up to four EPA cards.

  • 10-port 10 Gigabit Ethernet (10x10G):

    EPA-10X10GE

  • 2-port 40 Gigabit Ethernet (2x40G):

    EPA-2X40GE

  • 1-port 100 Gigabit Ethernet (1x100G):

    EPA-QSFP-1X100GE

Notes and Limitations

  • Hardware redundancy

    Use only one ASR1000-RP3 and one ASR1000-ESP200-X, as described in the Hardware Configuration table above. Dual RP module or dual ESP hardware redundancy is not supported for the Cisco ASR 1006-X in this Cisco Catalyst SD-WAN use-case.

  • ISSU and OIR

    The modules and cards do not support in-service software upgrade (ISSU) or online insertion and removal (OIR).

ROM Monitor Software Version

  • For the Cisco ASR 1006-X platform, there are no specific ROM monitor (ROMmon) version requirements.

  • The RP3 module requires ROM monitor (ROMmon) software version 16.9(5r) or later.

RMA Replacement of the Cisco ASR 1006-X Chassis

Use this procedure if it is necessary to replace the Cisco ASR 1006-X chassis as part of a return material authorization (RMA) process. This procedure replaces the Cisco ASR 1006-X chassis, but keeps the current cards (RP3 module, ESP200 module, MIP100 carrier cards, EPA cards).

Before You Begin

  • The Cisco ASR 1006-X (which is now faulty) with an RP3 module has been fully onboarded in Cisco SD-WAN Manager.

  • Make note of the following serial numbers:

    • Replacement Cisco ASR 1006-X chassis serial number

    • Certificate serial number for the RP3 module

    • SUDI serial number for the RP3 module

Replace the Cisco ASR 1006-X Chassis

To replace the Cisco ASR 1006-X chassis, perform the following steps.


Note


In tables listing devices, Cisco SD-WAN Manager does not distinguish between the Cisco ASR 1006-X chassis and the RP3 module installed in the chassis. A single row in the table shows the combined information for both.


  1. (Perform this step only if you have applied a feature template to the current device (which is now faulty), and if you want to save the existing configuration to use it on the replacement device.)

    Save the device settings file for the RP3 module.

    1. From the Cisco SD-WAN Manager menu, choose Configuration > Templates.

    2. Click Device Templates.


      Note


      In Cisco vManage Release 20.7.x and earlier releases, Device Templates is called Device.


    3. Click for the template that is attached to the Cisco ASR 1006-X containing the RP3 module, and choose Export CSV to download the device settings CSV file.

  2. In the Cisco Plug and Play (PnP) Connect web portal, remove the current Cisco ASR 1006-X chassis.


    Note


    The PnP Connect web portal is linked to Cisco commerce workspace (CCW), facilitating automatic registration of the serial numbers and PIDs of purchased devices in the PnP Connect web portal. For more information see the Cisco Plug and Play Support Guide for Cisco SD-WAN Products, and the RMA topic in the Cisco Network Plug and Play Connect Capability Overview.


    Note


    The functionality of the PnP Connect web portal is subject to change, and is outside the scope of this document. For additional details, see the PnP Connect web portal documentation.


    In the PnP Connect web portal, use Devices > Delete Selected Device, or the equivalent, to remove the current Cisco ASR 1006-X chassis.

  3. In the Cisco Plug and Play (PnP) Connect web portal, add the replacement Cisco ASR 1006-X chassis.

    1. In the PnP Connect web portal, choose Devices > Add Device, or the equivalent, and select the option to enter new device details.

    2. Enter the serial number for the replacement Cisco ASR 1006-X chassis.


      Note


      You can use the show pnp version command on the Cisco ASR 1006-X router to display the serial number.


    3. Add the SUDI serial number and certificate serial number of the RP3 module.


      Note


      If the RP3 module is mounted in a working chassis, you can use the show sdwan certificate serial command to display these serial numbers.


    4. Save the update.

  4. Remove the entry for the current Cisco ASR 1006-X chassis in Cisco SD-WAN Manager.

    1. In Cisco SD-WAN Manager, detach the current device template from the current Cisco ASR 1006-X chassis.

    2. From the Cisco SD-WAN Manager menu, choose Configuration > Certificates.

    3. In the row with the current Cisco ASR 1006-X, in the Validate column, click Invalid, and OK.

      The task view indicates when the process is complete.

    4. Click Send to Controllers.

    5. From the Cisco SD-WAN Manager menu, choose Configuration > Devices.

    6. In the row with the current Cisco ASR 1006-X, click More Options () and choose Delete WAN Edge.

  5. From the Cisco SD-WAN Manager menu, choose Configuration > Devices and click Sync Smart Account.

    Cisco SD-WAN Manager loads the details of the replacement Cisco ASR 1006-X chassis from your Smart Account.

  6. If you saved a CSV file in an earlier step, edit the file to update it with the device ID of the replacement chassis.

    1. From the Cisco SD-WAN Manager menu, choose Configuration > Devices > WAN Edge List.

    2. Copy device ID of the new chassis from the Chassis Number column in the device list.

    3. Open the CSV file in a text editor or spreadsheet application, and edit the csv-deviceId value in the first column, updating it to use the device ID of the new chassis.

  7. Attach a device template to the replacement Cisco ASR 1006-X. Use the same device template that was used for previous chassis. If you saved a CSV file in an earlier step, use it in the substeps that follow.

    1. From the Cisco SD-WAN Manager menu, choose Configuration > Templates.

    2. Click Device Templates.


      Note


      In Cisco vManage Release 20.7.x and earlier releases, Device Templates is called Device.


    3. In the row of the template that was previously attached to the current chassis, click More Actions () and choose Attach Devices.

    4. In the Available Devices pane, select the replacement chassis and move it to the Selected Devices pane.

    5. Click Attach. The Configuration Templates page opens.

    6. If you saved a CSV file in an earlier step, click the up arrow button to upload a CSV file.

    7. If you saved a CSV file in an earlier step, in the Upload CSV File pop-up window, select the CSV file edited in a previous step, and click Upload. The values stored in the CSV file are copied to the device template.

    8. Click Next.

    9. Click Configure Devices to push the device template to the replacement Cisco ASR 1006-X chassis. The task status shows this task as Scheduled because the replacement device is not yet reachable.

  8. Save the device configuration file.

    1. From the Cisco SD-WAN Manager menu, choose Configuration > Devices > WAN Edge List.

    2. In the row of the Cisco ASR 1006-X, click More Options () and choose Generate Bootstrap Configuration.

    3. In the pop-up window, click the Cloud-Init radio button.

    4. Click Download to download the configuration file.

    5. Rename the downloaded file to: ciscosdwan.cfg

  9. Copy the bootstrap file (ciscosdwan.cfg) created in an earlier step, to a USB flash drive, and plug this into the current RP3 module.

  10. If the current Cisco ASR 1006-X chassis is still operating, power it down.

  11. Remove the modules and cards (RP3 module, ESP200 module, MIP100 carrier cards, EPA cards) from the current Cisco ASR 1006-X chassis.

  12. Connect the USB flash drive, which has the configuration file saved in an earlier step, to the RP3 module.

  13. Install the modules and cards in the new Cisco ASR 1006-X chassis.

    For information about RP3 module installation, see the Cisco ASR 1000 Route Processor 3 Installation and Configuration Guide.

    For information about MIP100 and EPA installation, see the Cisco ASR 1000 MIP and EPA Hardware Installation Guide.

  14. Power up the replacement Cisco ASR 1006-X router.

  15. After the router is powered up, execute the controller-mode reset command on the router to reset the RP3 module.

    When the RP3 module starts, the following occurs:

    • The RP3 module loads the configuration from the ciscosdwan.cfg file on the USB flash drive.

    • The RP3 module boots up in controller mode.


      Note


      From Cisco IOS XE Catalyst SD-WAN Release 17.13.1a, controller mode is not supported.


    • When the connection to the controller is established, the controller pushes the device template, which was in Scheduled state, to the RP3 module.

RMA Replacement of the Cisco RP3 Module

Use this procedure if it is necessary to replace the RP3 module used with the Cisco ASR 1006-X as part of a return material authorization (RMA) process.

Prerequisites

  • The Cisco ASR 1006-X with an RP3 module (which is now faulty) has been onboarded in Cisco SD-WAN Manager.

  • Make note of the following serial numbers:

    • Cisco ASR 1006-X chassis serial number

    • Certificate serial number for the replacement RP3 module

    • SUDI serial number for the replacement RP3 module

Replace the Cisco RP3 Module

To replace the Cisco RP3 module, perform the following steps.


Note


In tables listing devices, Cisco SD-WAN Manager does not distinguish between the Cisco ASR 1006-X chassis and the RP3 module installed in the chassis. A single row in the table shows the combined information for both.


  1. (Perform this step only if you have applied a feature template to the current device (which is now faulty), and if you want to save the existing configuration to use it on the replacement device.)

    Save the device settings file for the RP3 module.

    1. From the Cisco SD-WAN Manager menu, choose Configuration > Templates.

    2. Click Device Templates.


      Note


      In Cisco vManage Release 20.7.x and earlier releases, Device Templates is called Device.


    3. Click More Options () for the template that is attached to the Cisco ASR 1006-X containing the RP3 module, and choose Export CSV to download the device settings CSV file.

  2. Save the device configuration file for the RP3 module.

    1. From the Cisco SD-WAN Manager menu, choose Configuration > Devices > WAN Edge List.

    2. In the row for the Cisco ASR 1006-X containing the RP3 module, click More Options () and choose Generate Bootstrap Configuration.

    3. In the pop-up window, click the Cloud-Init radio button.

    4. Click Download to download the configuration file.

    5. Rename the downloaded file to: ciscosdwan.cfg

  3. In the Cisco Plug and Play (PnP) Connect web portal, update the SUDI serial number and certificate serial number within the Cisco ASR 1006-X entry, to use the serial numbers of the replacement RP3 module.


    Note


    The PnP Connect web portal is linked to Cisco commerce workspace (CCW), facilitating automatic registration of the serial numbers and PIDs of purchased devices in the PnP Connect web portal. For more information see the Cisco Plug and Play Support Guide for ​Cisco Catalyst SD-WAN Products, and the RMA topic in the Cisco Network Plug and Play Connect Capability Overview.


    Note


    The functionality of the PnP Connect web portal is subject to change, and is outside the scope of this document. For additional details, see the PnP Connect web portal documentation.


    1. In the PnP Connect web portal, choose Devices > Edit Device and select the Cisco ASR 1006-X entry for the device that contains the RP3 module that is being replaced.

    2. In the Cisco ASR 1006-X entry, delete the SUDI serial number and certificate serial number of any existing RP3 module entries (there may be more than one).

    3. Add the SUDI serial number and certificate serial number for the replacement RP3 module.

    4. Save the update.

  4. In Cisco SD-WAN Manager, remove the current RP3 module and add the replacement RP3 module.

    1. From the Cisco SD-WAN Manager menu, choose Configuration > Certificates.

    2. In the row with the Cisco ASR 1006-X device containing the RP3 module, in the Validate column, click Invalid, and OK.

      The task view indicates when the process is complete.

    3. Click Send to Controllers.

    4. From the Cisco SD-WAN Manager menu, choose Configuration > Devices.

    5. In the row with the Cisco ASR 1006-X device containing the RP3 module, click More Options () and choose Delete WAN Edge.

    6. From the Cisco SD-WAN Manager menu, choose Configuration > Devices and click Sync Smart Account.

      Cisco SD-WAN Manager loads the details of the replacement RP3 module. At this point, before you have physically replaced the RP3 module, the device table shows the following in the row of the Cisco ASR 1006-X device:

      • Device Model: ASR1006-X

      • Chassis Number: No change to the chassis number

      • Serial No./Token: Updated to show the serial number of the replacement RP3 module, as loaded from the Smart Account

  5. Attach a device template to the replacement Cisco ASR 1006-X. Use the same device template that was used for previous chassis. If you saved a CSV file in an earlier step, use it in the substeps that follow.

    1. From the Cisco SD-WAN Manager menu, choose Configuration > Templates.

    2. Click Device Templates.


      Note


      In Cisco vManage Release 20.7.x and earlier releases, Device Templates is called Device.


    3. In the row of the template that was previously attached to the current chassis, click More Actions () and choose Attach Devices.

    4. In the Available Devices pane, select the replacement chassis and move it to the Selected Devices pane.

    5. Click Attach. The Configuration Templates page opens.

    6. If you saved a CSV file in an earlier step, click the up arrow button to upload a CSV file.

    7. If you saved a CSV file in an earlier step, in the Upload CSV File pop-up window, select the CSV file and click Upload. The values stored in the CSV file are copied to the device template.

    8. Click Next.

    9. Click Configure Devices to push the device template to the replacement Cisco ASR 1006-X chassis. The task status shows this task as Scheduled because the replacement device is not yet reachable.

  6. Copy the bootstrap file (ciscosdwan.cfg) created in an earlier step, to a USB flash drive, and plug this into the replacement RP3 module.

  7. Remove the previous RP3 module from the Cisco ASR 1006-X chassis, and install the replacement RP3 module.

    For information about RP3 module installation, see the Cisco ASR 1000 Route Processor 3 Installation and Configuration Guide.

    When the RP3 module starts, the following occurs:

    • The RP3 module loads the configuration from the ciscosdwan.cfg file on the USB flash drive.

    • The RP3 module boots up in controller mode.


      Note


      From Cisco IOS XE Catalyst SD-WAN Release 17.13.1a, controller mode is not supported.


    • When the connection to the controller is established, the controller pushes the device template, which was in Scheduled state, to the RP3 module.