This topic provides an example of configuring a simple zone-based firewall using the CLI template or Cisco SD-WAN Manager.
Isolating Two VPNs
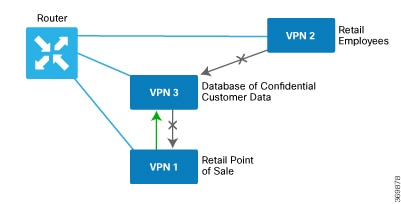
In this zone-based firewall configuration example, we have a scenario where a router is connected to three service-side networks:
-
Guest network that provides point-of-sale (PoS) services
-
Employee network
-
Network that provides shared services, including shared printers and the customer database
We want users in the employee and guest networks to be able to access the shared services, but we do not want any traffic
to be exchanged between the employee and guest networks. Similarly, we do not want any traffic that originates in the shared
services network to enter into either the employee network or the guest network. The following figure illustrates this scenario:
In this figure:
-
VPN 1 is the guest network used for PoS services.
-
VPN 2 is the network used by the enterprise's employees.
-
VPN 3 contains the shared services, including printers and customer databases.
The configuration consists of three sections:
CLI Configuration
First, we define the zones for this scenario:
vEdge(config)# policy
vEdge(config-policy)# zone pos-zone vpn 1
vEdge(config-policy)# zone employee-zone vpn 2
vEdge(config-policy)# zone services-zone vpn 3
In this simple example, each zone corresponds to a single VPN. If you were to later add a second VPN for a discrete group
of employees (let's say this is VPN 20) and you wanted this VPN to be subject to the same firewall policy, you could simply
add this VPN to the employee zone:
vEdge(config-policy)# zone employee-zone vpn 20
vEdge(config-policy)# show full-configuration
policy zone employee-zone
  vpn 2
  vpn 20
 !
!
Next, we configure the zone-based firewall policy. The policy matches all traffic that is destined for VPN 3, which is the
services zone, and which has an IP prefix of 10.2.2.0/24. Because we want the policy to allow traffic to flow from VPN 1 and
VPN 2 to VPN 3, but we do not want traffic to flow in the reverse direction, we set the action to pass.
vEdge(config-policy)# zone-based-policy vpn-isolation-policy(config-zone-based-policy)# sequence 10(config-sequence)# match destination-ip 10.2.2.0/24
vEdge(config-sequence)# action pass
We want to drop any traffic that does not match the zone-based filrewall policy:
vEdge(config-zone-based-policy)# default-action drop
In the final step of the configuration process, we apply the zone-based firewall policy to the zones. Here is the zone pairing
between the guest and PoS zone and the services zone:
vEdge(config-policy)# zone-pair pos-services-pairing
vEdge(config-zone-pair)# source-zone pos-zone
vEdge(config-zone-pair)# destination-zone services-zone
vEdge(config-zone-pair)# zone-policy vpn-isolation-policy
And here is the pairing between the employee zone and the services zone:
vEdge(config-policy)# zone-pair employee-services-pairing
vEdge(config-zone-pair)# source-zone employee-zone
vEdge(config-zone-pair)# destination-zone services-zone
vEdge(config-zone-pair)# zone-pair employee-services-pairing
Here is a view of the entire policy:
vEdge(config-policy)# show full-configuration
 policy
 zone employee-zone
  vpn 2
! zone pos-zone
  vpn 1
 ! zone services-zone
  vpn 3
!
zone-pair employee-services-pairing
  source-zone      employee-zone
  destination-zone services-zone
  zone-policy      vpn-isolation-policy
 !
zone-pair services-pairing
  source-zone      pos-zone
  destination-zone services-zone
  zone-policy      vpn-isolation-policy
 !
zone-based-policy vpn-isolation-policy
  sequence 10
   match
   destination-ip 10.2.2.0/24
  !
   action pass
  !
!
 default-action drop
!
!
Cisco SD-WAN Manager Configuration
To configure this zone-based firewall policy in Cisco SD-WAN Manager:
-
From the Cisco SD-WAN Manager menu, choose Configuration > Security.
-
Click Add Policy. The zone-based firewall configuration wizard opens.
Configure data prefix groups and zones in the Create Groups of Interest screen:
-
Click Data Prefix in the left pane.
-
In the right pane, click New Data Prefix List.
-
Enter a name for the list.
-
Enter the data prefix or prefixes to include in the list.
-
Click Add.
Configure zones in the Create Groups of Interest screen:
-
Click Zones in the left pane.
-
Click New Zone List in the right pane.
-
Enter a name for the list.
-
Enter the number of the zone or zones to include in the list. Separate numbers with a comma.
-
Click Add.
-
Click Next to move to Zone-Based Firewall in the zone-based firewall configuration wizard.
Configure zone-based firewall policies:
-
Click Add Configuration, and choose Create New.
-
Enter a name and description for the policy.
-
Click Add Sequence in the left pane.
-
Click Add Sequence Rulein the right pane.
-
Choose the desired match and action conditions.
-
Click Same Match and Actions.
-
Click Default Action in the left pane.
-
Choose the desired default action.
-
Click Save Zone-Based Policy.
Click Next to move to the Apply Configuration in the zone-based firewall configuration wizard.
-
Enter a name and description for the zone-based firewall zone pair.
-
Click Add Zone Pair.
-
In the Source Zone drop-down menu, choose the zone from which data traffic originates.
-
In the Destination Zone drop-down menu, choose the zone to which data traffic is sent.
-
Click Add.
-
Click Save Policy. The screen is then displayed, and the zone-based firewalls table includes the newly created policy.


 Feedback