Configure System Logging for Cisco IOS XE SD-WAN Devices

Table 1. Feature History

Feature Name

Release Information

Description

Ability to Send Syslog Messages over TLS

Cisco IOS XE Release Amsterdam 17.2.1r

This feature allows you to transport syslog messages to external configured hosts by establishing a Transport Layer Security (TLS) connection. Using the TLS protocol enables the content of syslog messages to remain confidential, secure, and untampered or unaltered during each hop.

System Logging

System logging operations use a mechanism similar to the UNIX syslog command to record system-wide, high-level operations that occur on Cisco SD-WAN devices in the overlay network. The log levels (priorities) of the messages are the same as standard UNIX commands, and you can configure the priority of syslog messages. Cisco SD-WAN devices can send log messages to a UNIX-style syslog service.

Cisco IOS XE SD-WAN devices and Cisco vEdge devices send syslog messages to syslog servers on configured external hosts using TCP and UDP. When these devices are sending the syslog messages, the messages might transit several hops to reach the output destination. The intermediate networks during the hops might not be trustworthy, be in a different domain, or have a different security level. Therefore, Cisco IOS XE SD-WAN devices now support sending secure syslog messages over the Transport Layer Security (TLS) as per RFC5425. To secure the syslog message content from potential tampering, the TLS protocol is used for certificate exchange, mutual authentication, and ciphers negotiation.

Cisco IOS XE SD-WAN devices supports both mutual and server authentication for sending syslog messages over TLS.

Benefits of Using TLS for Sending Syslog Messages

The benefits of using TLS for sending syslog messages are:

  • Confidentiality of message content where each TLS session begins with a handshake between the Cisco IOS XE SD-WAN device and the syslog server. The Cisco IOS XE SD-WAN device and syslog server agree on the specific security key and the encryption algorithms to be used for that session. The TLS session opposes any disclosure of the contents of the syslog message.

  • Integrity-checking of the content of each message to disable modifications to a message during transit on a hop-by-hop basis.

  • Mutual authentication between the Cisco IOS XE SD-WAN device and syslog server ensures that the syslog server accepts log messages only from authorized clients through certificate exchange.

Configure Logging in Server Authentication for TLS

In server authentication, Cisco IOS XE SD-WAN devices verify the identity of the syslog server. If the syslog server and the certificate are legitimate entities, the device establishes a TLS connection with the server. For implementing server authentication, the syslog server shares the public certificate with the Cisco IOS XE SD-WAN devices.

Prerequisite

Ensure that Cisco IOS XE SD-WAN devices have preinstalled Root Certificate Authority (CA), which you configure using cryptographic module CLIs. See Install root CA on Cisco IOS XE SD-WAN device.

To configure TLS profile for syslog server, perform the following steps:

  1. Configure logging feature template using Cisco vManage.

    1. Configure logging attributes to local disk.

    2. Configure TLS profile for server authentication.

    3. Configure syslog server for TLS.

  2. Create a device template from logging feature template.

Configure Logging in Mutual Authentication for TLS

In mutual authentication, both the syslog server and Cisco IOS XE SD-WAN device authenticate each other at the same time. Cisco IOS XE SD-WAN devices must have root or identity certificates for mutual authentication of the TLS session. To configure TLS profile for syslog server, perform the following steps:

  1. Install Syslog Root Certificate on Cisco IOS XE SD-WAN device.

  2. Configure logging feature template using Cisco vManage.

    1. Configure logging attributes to local disk.

    2. Generate Feature Certificate Signing Request and Install Feature Certificates

    3. Configure TLS profile for mutual authentication.

    4. Configure syslog server for TLS.

  3. Create a device template from logging feature template.

  4. Generate Feature Certificate Signing Request and Install Feature Certificates.

  5. Verify trustpoint configuration on Cisco IOS XE SD-WAN device.

Syslog Message Format and System Log Files

Syslog messages begin with a percent sign (%) and the two syslog message formats are structured as follows:

  • Syslog message format

    seq no:timestamp: %facility-severity-MENEMONIC:description (hostname-n)
  • Syslog message format based on RFC5424

    <pri>ver timestamp hostname appname procid msgid structured data description/msg

    Note

    In the syslog message format based on RFC5424, the optional fields such as, hostname, appname, procId, msgId, structured data are specified with a -.


The field descriptions of syslog messages are as follows:

Table 2. Field Descriptions of Syslog Message Format

Field

Description

facility

Sets the logging facility to a value other than 20, which UNIX systems expect.

severity

The importance or severity of the message is categorized by the numerical code from 0 through 7. A lower number in this range indicates greater severity of the system condition.

msg or description

A text string that describes the condition of syslog server. This portion of the syslog message sometimes includes IP addresses, interface names, port numbers, or usernames.

In syslog message formats based on RFC5424, the description represents: %facility-severity-MENEMONIC:description

Usually, the syslog messages are preceded by extra text.

  • The following is an example of a system logging message preceded by a priority value, sequence number, and time stamp:

    <45>10: polaris-user1: *Jun 21 10:76:84.100: %LINK-5-CHANGED: Interface GigabitEthernet0/0, changed state to administratively down
  • Based on RFC5424, the following is an example of a system logging message preceded by a priority value, version of syslog protocol specification, and time stamp:

    <45>1 2003-10-11T22:14:15.003Z 10.64.48.125 polaris-user1 - - - %LINK-5-CHANGED: Interface GigabitEthernet0/0, changed state to administratively down

Note

The time stamp formats are not the same in both the syslog message formats. In the message format based on RFC5424, T and Z are mandatory where T represents a separator and Z represents zero timezone.


System Log Files

Syslog messages are recorded on the local device of the syslog server in the /var/log directory.

Install Root Certificate Authority on Cisco IOS XE SD-WAN Device for Server Authentication

Before you begin

Ensure that you generate the encoded CA certificate on the syslog server. See Install Root Certificate Authority on Syslog Server for Server Authentication.

Procedure


Step 1

To configure PKI trustpoint for Certificate Authority, use these commands for authorizing and revocation of certificates in PKI.

  1. enable

    Enables privileged EXEC mode.

    Example:

    Cisco XE SD-WAN> enable
  2. config-transaction

    Enters the configuration mode.

    Example:

    Cisco XE SD-WAN# config-transaction
  3. crypto pki trustpoint name

    Declares the trustpoint and a given name and enters CA-trustpoint configuration mode.

    Example:

    Cisco XE SD-WAN (config)# crypto pki trustpoint Syslog-signing-CA
  4. enrollment [mode] [retry period minutes ] [retry count number ] url url [pem ]

    Specifies the enrollment parameters of the CA.

    Example:

    Cisco XE SD-WAN(ca-trustpoint)# enrollment terminal
  5. chain-validation [{stop | continue}[parent-trustpoint]]

    Configures the level to which a certificate chain is processed on all certificates.

    Example:

    Cisco XE SD-WAN(ca-trustpoint)# chain-validation stop
  6. revocation-check method

    (Optional) Checks the revocation status of a certificate.

    Example:

    Cisco XE SD-WAN(ca-trustpoint)# revocation-check none
  7. exit

    Returns to global configuration mode.

    Example:

    Cisco XE SD-WAN(ca-trustpoint)# exit
Step 2

Retrieve and authenticate the Root CA before the Cisco IOS XE SD-WAN device can be issued a certificate and certificate enrollment occurs.

To authenticate the CA, use the crypto pki authenticate command.

Example:

Cisco XE SD-WAN(config)# crypto pki authenticate root
Step 3

Copy the block of text containing the base 64 encoded CA certificate and paste it at the prompt.

To generate and copy the text containing the encoded CA certificate, see Install Root Certificate Authority on Syslog Server for Server Authentication.

Example:

A sample base 64 encoded CA certificate:

-----BEGIN CERTIFICATE-----
MIID9jCCAt6gAwIBAgIJAM5b3nyjDAKIMA0GCSqGSIb3DQEBCwUAMIGPMQswCQYD
VQQGEwJJTjESMBAGA1UECAwJS2FybmF0YWthMRIwEAYDVQQHDAlCYW5nYWxvcmUx
DjAMBgNVBAoMBUNpc2NvMQwwCgYDVQQLDANDU0cxGzAZBgNVBAMMEmVtYmQtbG54
LmNpc2NvLmNvbTEdMBsGCSqGSIb3DQEJARYOYW5idkBjaXNjby5jb20wHhcNMTkw
OTIwMTQ1NjAxWhcNMjIwOTE5MTQ1NjAxWjCBjzELMAkGA1UEBhMCSU4xEjAQBgNV
BAgMCUthcm5hdGFrYTESMBAGA1UEBwwJQmFuZ2Fsb3JlMQ4wDAYDVQQKDAVDaXNj
bzEMMAoGA1UECwwDQ1NHMRswGQYDVQQDDBJlbWJkLWxueC5jaXNjby5jb20xHTAb
BgkqhkiG9w0BCQEWDmFuYnZAY2lzY28uY29tMIIBIjANBgkqhkiG9w0BAQEFAAOC
AQ8AMIIBCgKCAQEAuof+Dh8EdAQ7bHJPdnXhy9ibTLAQ+OpQrMBoOqeAsU/Jru8y
3ht2Eqci35aNjlDcsTUlZyUHBNAMtL69t1HxTRVCOghOZmipzOS+q8rFykHa+bcA
FqmHyqxNwdQcW3cQFZ6rvWTFD9O46ONX3xewpdCR+s+0KFOHDd+RxpAb2NyDWIvn
/1/xwq2a4ZlwgM2d0G8sit0i0D/+6FbZuJjAf+PRTypo4IJyQjcOHpZuslLzPztM
HxLI7pOmR+8+WcInT0l0dyGdpKKHXi6lEbeiyubIym0z0Des5OckDYFejXgXpJDx
9jCVkz+r0bijqbT5PMpSAYYcjdnQ0kdH43sykwIDAQABo1MwUTAdBgNVHQ4EFgQU
OcOmN72TyBqD/Ud2qBLUwId1Yv0wHwYDVR0jBBgwFoAUOcOmN72TyBqD/Ud2qBLU
wId1Yv0wDwYDVR0TAQH/BAUwAwEB/zANBgkqhkiG9w0BAQsFAAOCAQEAUVVWJHWo
rKxfFV2w7jR7mLZSlVtEvZueMXWPvyYP+Qt09MrRqwNDUJEvggTxU7lvLwtnITPM
l/dOmpoer8GhDtnxUnjsVeVWGIR74SJCS0GU/03bEJ2sto/eAJEOzI7wDg7Fubgy
Pc3RHbk4JWTWs4JF8+E64p2UzJMuu0eLDPQWxl7p2wd3sr4DBHB3qlfbg31T3VHr
PCcuzJmOEdeZYGL1/LFvPx7NZS8lwFAohe6h8ptm3ENg7dzIeyZFZVfcq11Q1rer
+3RcM0VqjScIOZhp97dqfBlHEdqUE/QfKlBt12KU+0sj8yJJC+cuKlHQj5JGmGLI
Y6r7bMcn99Y6Rw==
-----END CERTIFICATE-----
Step 4

Type yes to confirm the acceptance of the certificate.


The Root CA certificate is successfully imported.

What to do next

Configure Logging Feature Template Using Cisco vManage

Install Root Certificate Authority on Syslog Server for Server Authentication

In this document, the following steps describe the procedure to set up syslog-ng server that supports TLS.

Procedure


Step 1

To install syslog-ng on the server, use the following command:

Example:

# apt-get install syslog-ng openssl

Step 2

To change the directory to syslog-ng folder and create folders to store the root certificates, use the following commands:

Example:

# cd /etc/syslog-ng
# mkdir cert.d
# mkdir key.d
# mkdir ca.d
# cd cert.d
# openssl req -new -x509 -out cacert.pem -days 1095 -nodes
# mv privkey.pem ../key.d
After using the openssl command, an encoded root certificate is available in cacert.pem file. The file is located in the cd/etc/syslog-ng/cert.d directory.
Step 3

Copy the content from the cacert.pem file when installing root certificate on Cisco IOS XE SD-WAN Device. See Step 3 of Install Root Certificate Authority on Cisco IOS XE SD-WAN Device for Server Authentication.


What to do next

Install Root Certificate Authority on Cisco IOS XE SD-WAN Device for Server Authentication

Install Syslog Root Certificate on Cisco IOS XE SD-WAN Device for Mutual Authentication

To configure Cisco IOS XE SD-WAN devices with Transport Layer Security (TLS) syslog protocol, the devices must have root or identity certificates for mutual authentication of TLS session. You can either use a third-party Certificate Authority (CA) to get public key infrastructure (PKI) services, or Microsoft Active Directory Certificate Services (AD CS). AD CS allows you to build a PKI and provide public key cryptography, digital certificates, and digital signature capabilities for your requirement.

Procedure


Step 1

Generate the enterprise root certificate using a third party CA or Microsoft Active Directory Certificate Services.

Step 2

Download the root CA in base 64 format, select and copy the content of root CA.

Step 3

In Cisco vManage, click Administration > Settings.

Step 4

In the Settings screen, click Edit to the right of the Enterprise Feature Certificate Authorization.

Step 5

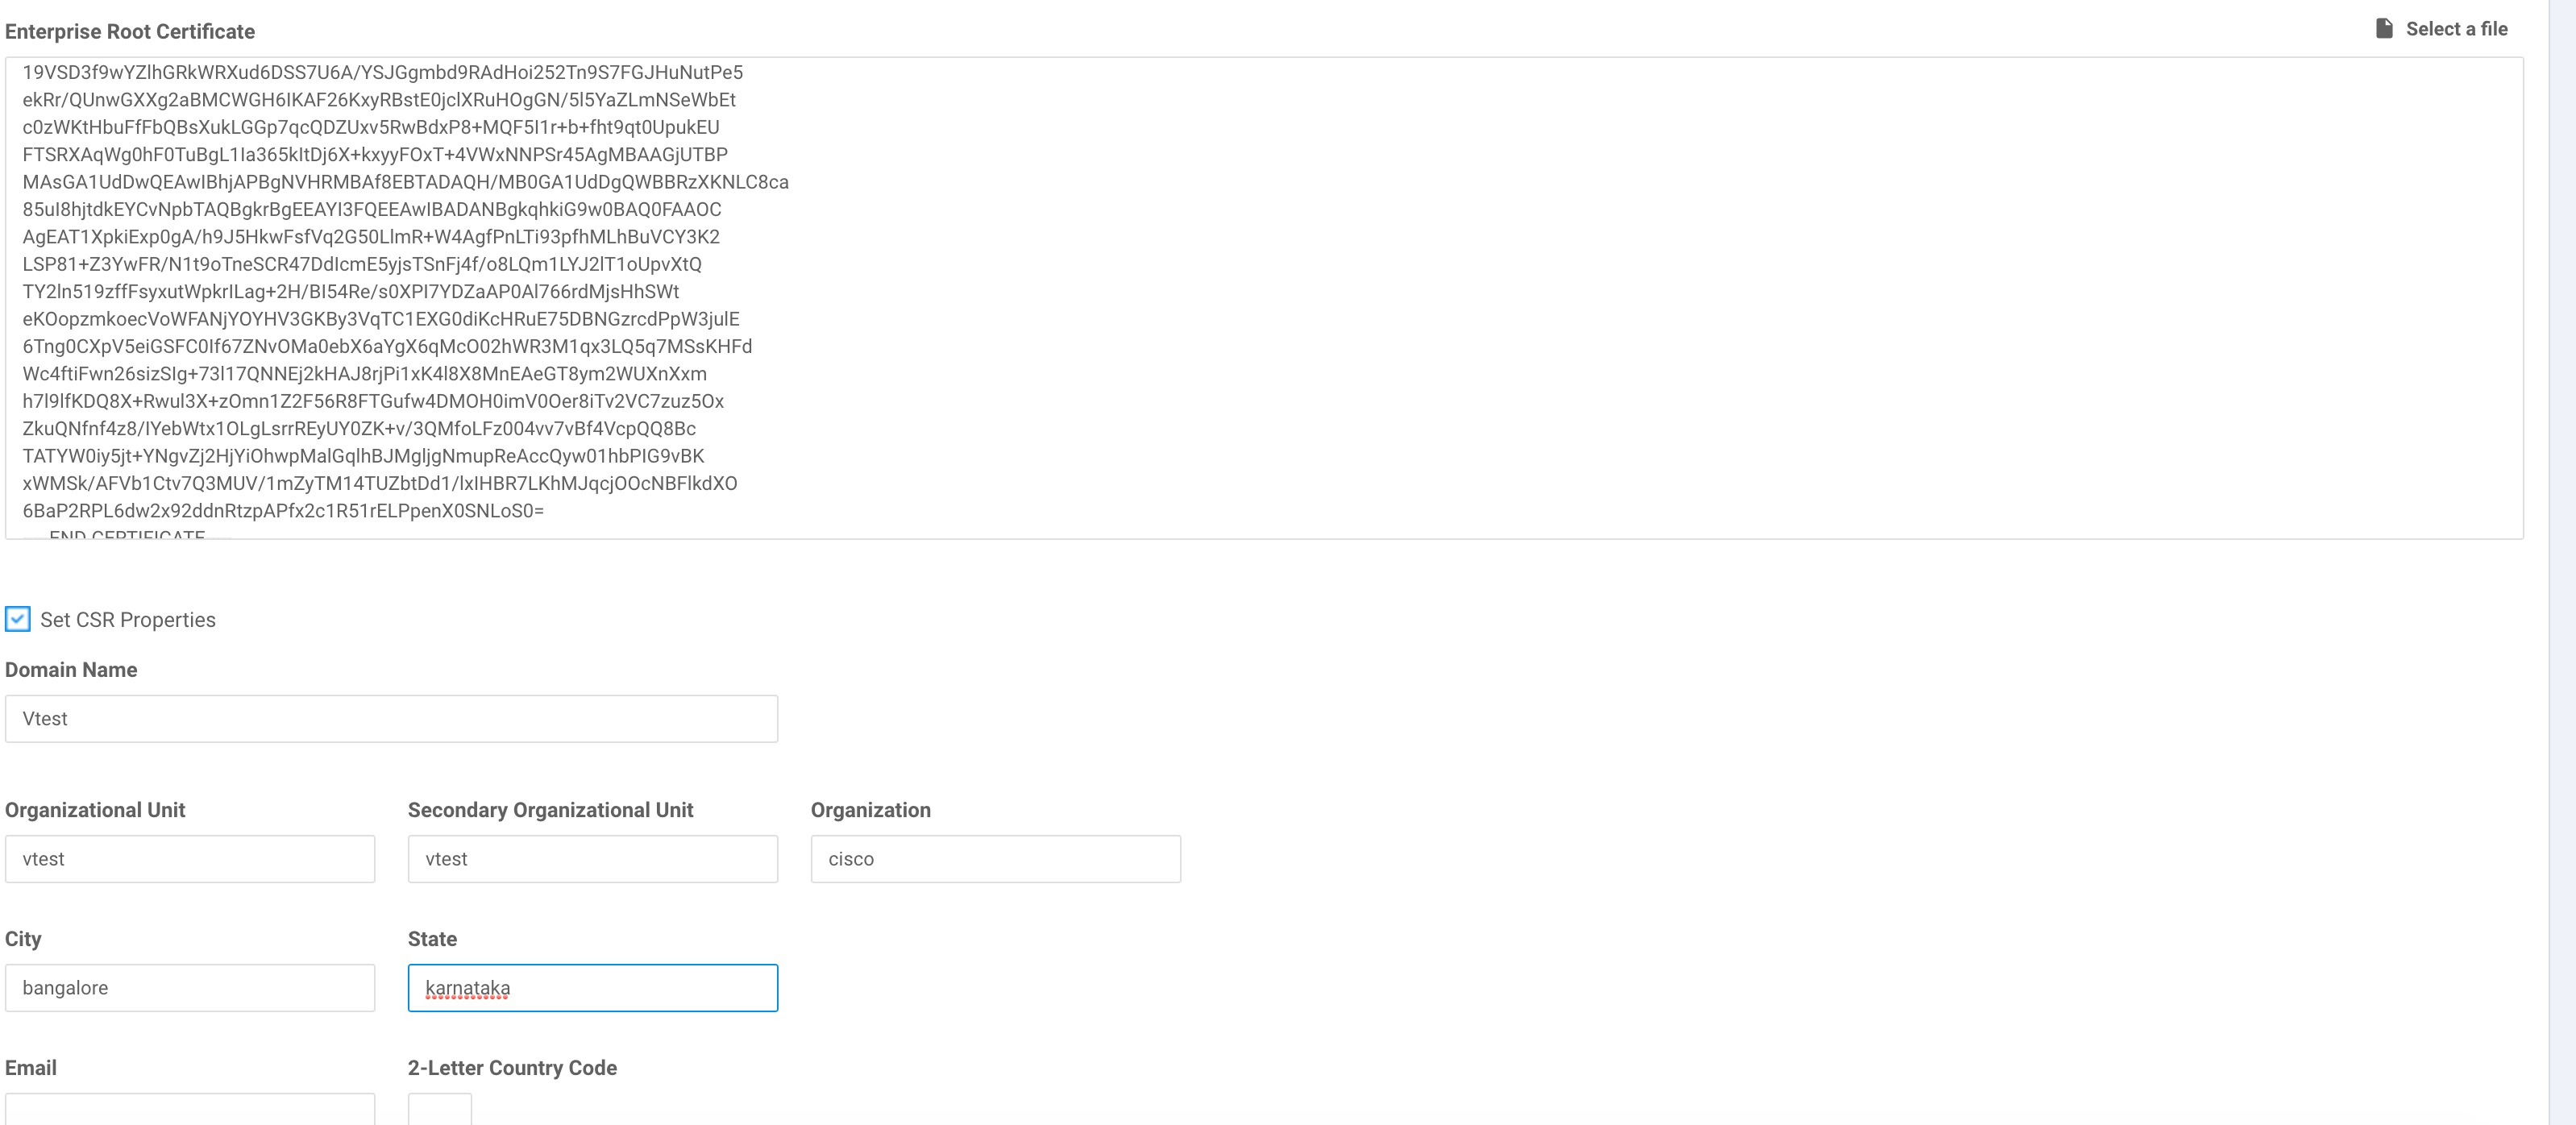
Paste the root CA content in the Enterprise Root Certificate box.

Step 6

(Optional) Check Set CSR Properties if you want to generate a Certificate Signing Request (CSR).

Step 7

Click Close.


The root CA is uploaded to Cisco vManage, and Cisco vManage saves the root certificate to the Cisco IOS XE SD-WAN device.

What to do next

Configure Logging Feature Template Using Cisco vManage

Configure Logging Feature Template Using Cisco vManage

Procedure


Step 1

In Cisco vManage, click Configuration > Templates.

Step 2

In the Feature tab, click Add Template.

Step 3

From the Select Devices drop-down, choose the type of device for which you are creating a template.

Step 4

To create a template for logging, select Cisco Logging.

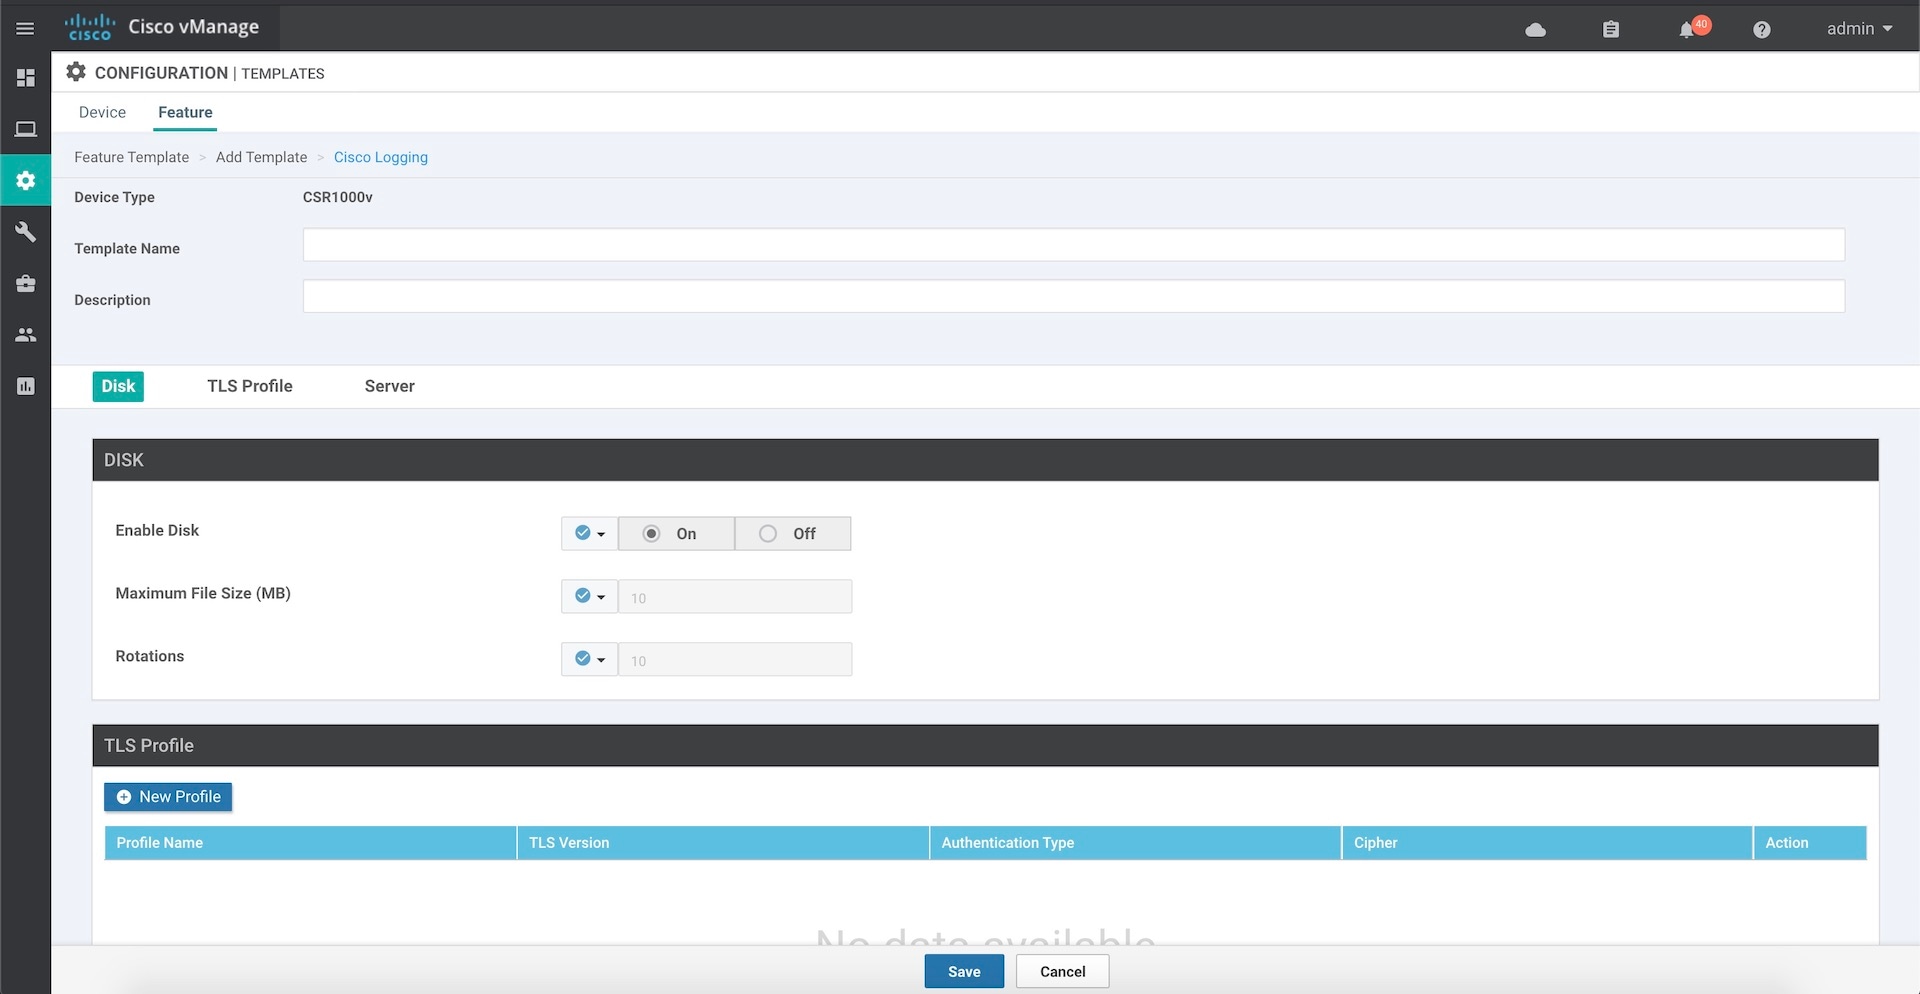
The Cisco Logging template form appears. The top of the form contains fields for naming the template, and the bottom contains fields for defining Logging parameters. Click a tab or the plus sign (+) to display other fields.

When you first open a feature template, the scope is set to Default for those parameters that have a default value. The default setting or value appears next to a parameter. To change the default or to enter a value, click the Scope drop-down to the left of the parameter field.

Figure 1. Configure Logging Feature Template
Step 5

In the Template Name field, enter a name for the template.

The name may contain up to 128 alphanumeric characters.

Step 6

In the Template Description field, enter a description of the template.

The description may contain up to 2048 alphanumeric characters.


What to do next

Configure Logging Attributes to Local Disk

Configure Logging Attributes to Local Disk

  1. Click Disk and configure the following parameters:

    Table 3. Parameter Information

    Parameter

    Description

    Enable Disk

    To save syslog messages in a file on the local hard disk, click On, or click Off to disallow saving. By default, logging to a local disk file is enabled on all devices.

    Maximum File Size

    Enter the maximum size of syslog files. The syslog files are rotated on an hourly basis based on the file size. When the file size exceeds configured value, the file is rotated and the syslogd process is notified.

    Range: 1-20 MB

    Default: 10 MB

    Rotations

    Enter the number of syslog files to create before discarding the earliest created files.

    Range: 1-10 MB

    Default: 10 MB

  2. To save the feature template, click Save.

  3. To associate the feature template with a device template, see the chapter, Create a Device Template from Feature Templates.

What to Do Next

Configure TLS Profile for Server Authentication or Configure TLS Profile for Mutual Authentication

Configure TLS Profile for Server Authentication

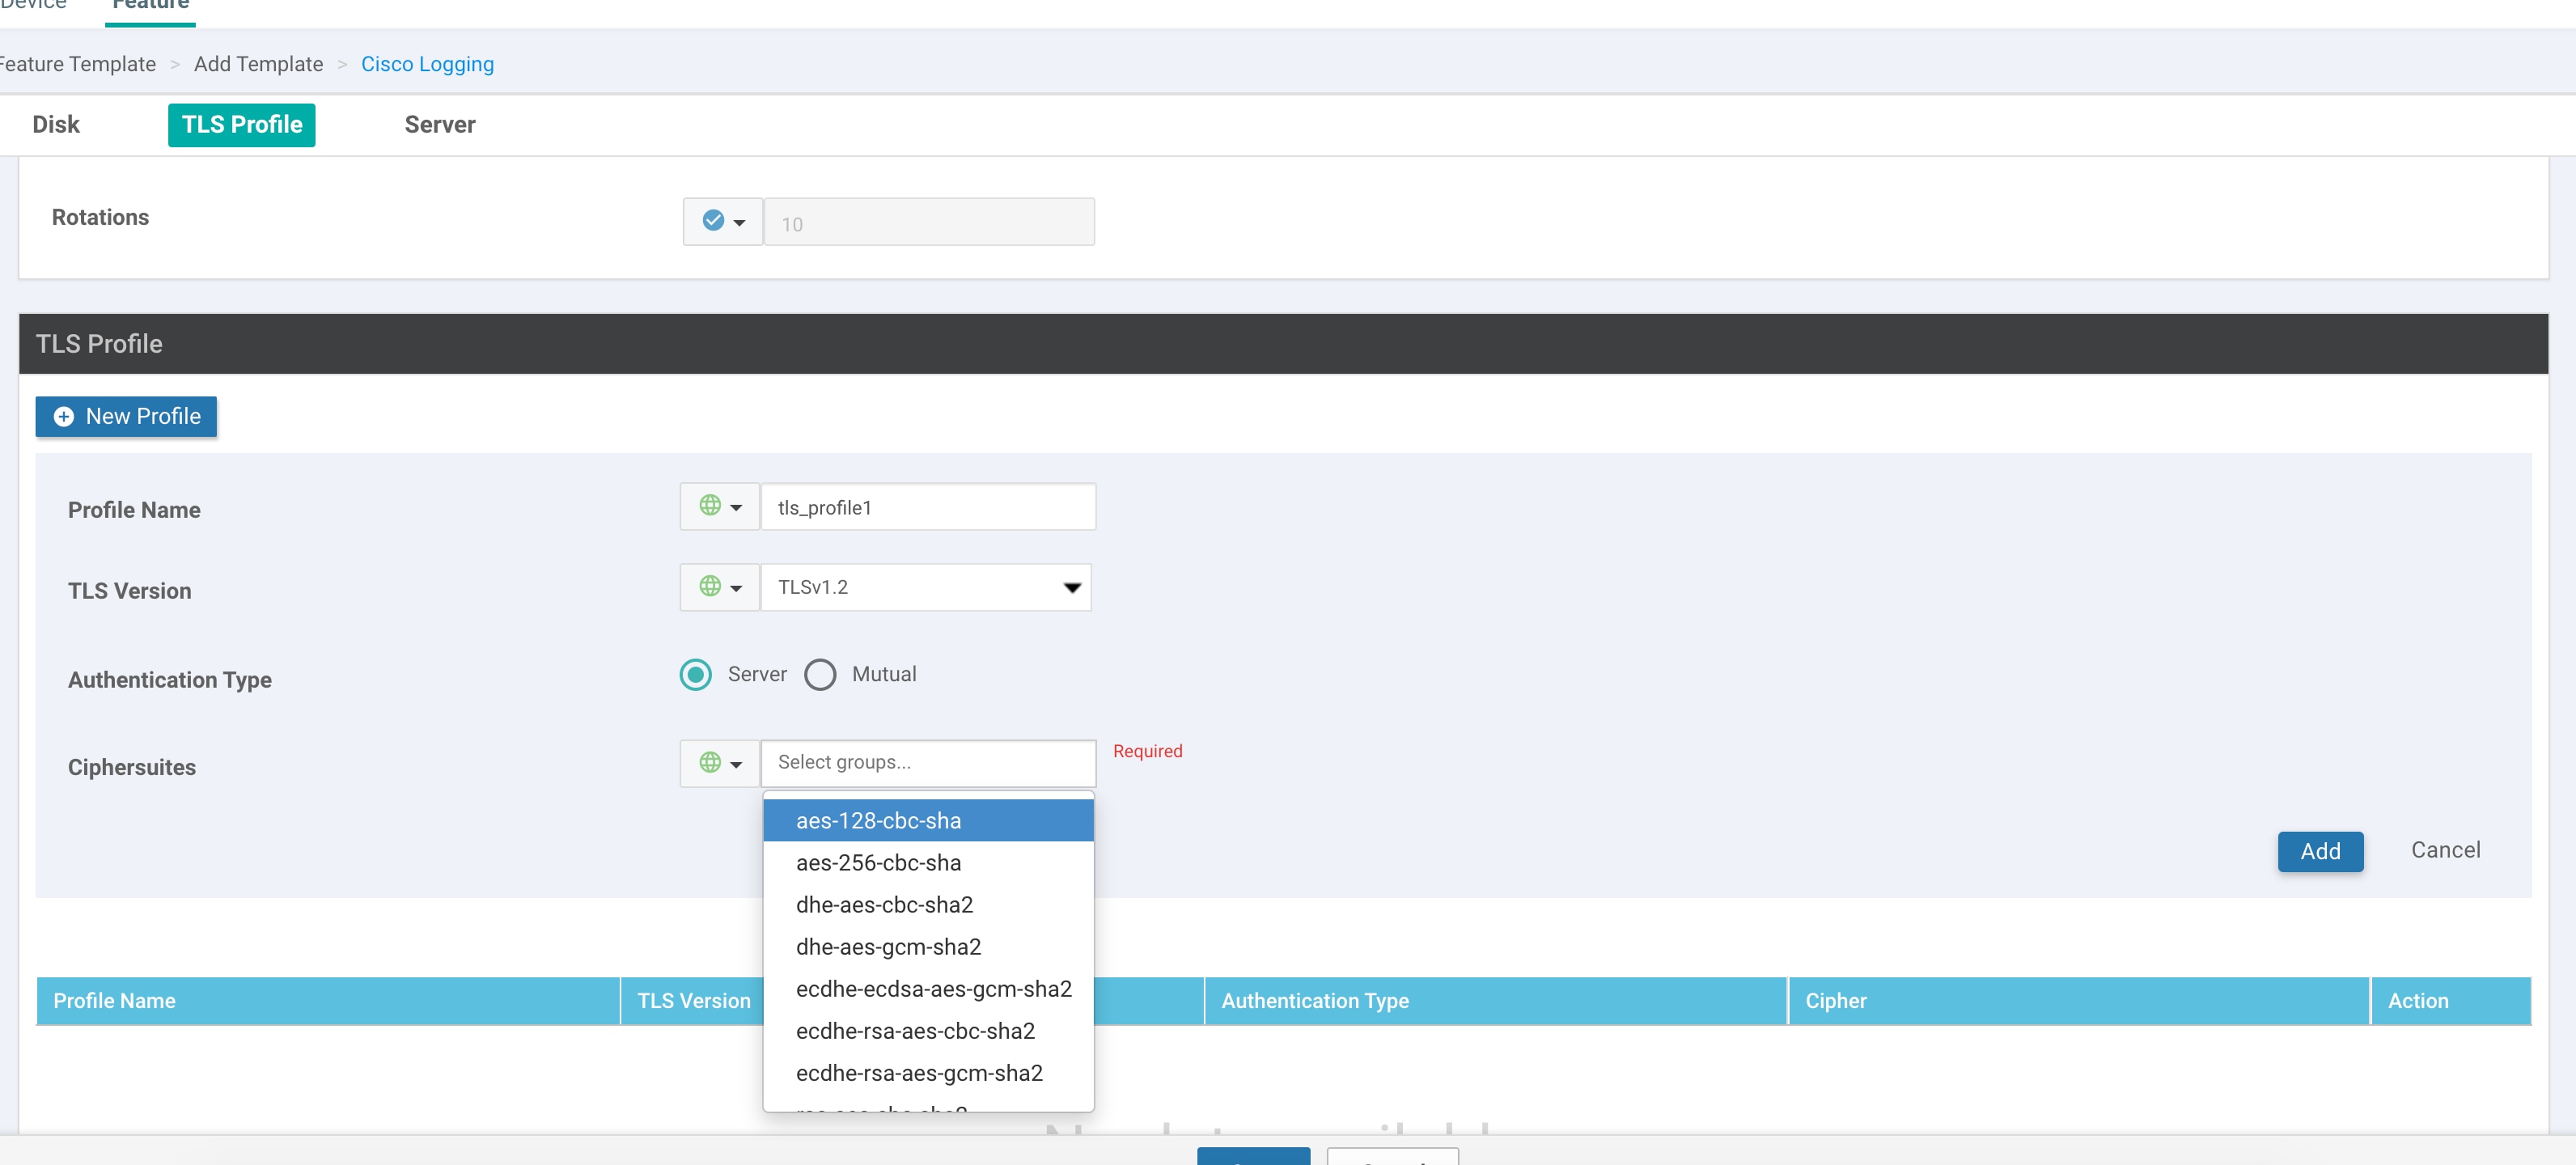
  1. Click TLS Profile.

  2. Click New Profile and configure the following parameters:

    Figure 2. TLS Profile for Server Authentication
    Table 4. Parameter Information

    Parameter Name

    Description

    Profile Name

    Enter the TLS profile name

    TLS Version

    Choose TLS versions v1.1 or v1.2

    Authentication Type

    Choose authentication types as Server.

    Ciphersuites

    Choose groups of cipher suites (encryption algorithm) based on the TLS version.

    The following are the list of cipher suites.

    • aes-128-cbc-sha Encryption type tls_rsa_with_aes_cbc_128_sha

    • aes-256-cbc-sha Encryption type tls_rsa_with_aes_cbc_256_sha

    • dhe-aes-128-cbc-sha Encryption type tls_dhe_rsa_with_aes_128_cbc_sha

    • dhe-aes-cbc-sha2 Encryption typetls_dhe_rsa_with_aes_cbc_sha2(TLS1.2 & above)

    • dhe-aes-gcm-sha2 Encryption typetls_dhe_rsa_with_aes_gcm_sha2(TLS1.2 & above)

    • ecdhe-ecdsa-aes-gcm-sha2 Encryption type tls_ecdhe_ecdsa_aes_gcm_sha2(TLS1.2 & above) SuiteB

    • ecdhe-rsa-aes-128-cbc-sha Encryption type tls_ecdhe_rsa_with_aes_128_cbc_sha

    • ecdhe-rsa-aes-cbc-sha2 Encryption type tls_ecdhe_rsa_aes_cbc_sha2(TLS1.2& above)

    • ecdhe-rsa-aes-gcm-sha2 Encryption type tls_ecdhe_rsa_aes_gcm_sha2(TLS1.2& above)

    • rsa-aes-cbc-sha2 Encryption type tls_rsa_with_aes_cbc_sha2(TLS1.2 & above)

    • rsa-aes-gcm-sha2 Encryption type tls_rsa_with_aes_gcm_sha2(TLS1.2 & above)

    You can use the following cipher suites for each TLS version:
    TLS v1.1
    aes-128-cbc-sha Encryption type tls_rsa_with_aes_cbc_128_sha
    aes-256-cbc-sha Encryption type tls_rsa_with_aes_cbc_256_sha
    TLS v1.2 and later
    dhe-aes-cbc-sha2 Encryption type tls_dhe_rsa_with_aes_cbc_sha2(TLS1.2 & above)
    dhe-aes-gcm-sha2 Encryption type tls_dhe_rsa_with_aes_gcm_sha2(TLS1.2 & above)
    
    ecdhe-ecdsa-aes-gcm-sha2 Encryption type tls_ecdhe_ecdsa_aes_gcm_sha2 (TLS1.2 & above)
    ecdhe-rsa-aes-cbc-sha2 Encryption type tls_ecdhe_rsa_aes_cbc_sha2(TLS1.2 & above)
    ecdhe-rsa-aes-gcm-sha2 Encryption type tls_ecdhe_rsa_aes_gcm_sha2(TLS1.2 & above)
     
    rsa-aes-cbc-sha2 Encryption type tls_rsa_with_aes_cbc_sha2(TLS1.2 & above) 
    rsa-aes-gcm-sha2 Encryption type tls_rsa_with_aes_gcm_sha2(TLS1.2 & above)

    The TLS profiles appear in a table.

  3. Click Add to create another profile.

  4. To edit or delete a TLS profile information, click or under Action.

  5. To save the feature template, click Save.

  6. To associate the feature template with a device template, see the chapter, Create a Device Template from Feature Templates.

When you choose the authentication type as Server, all information about TLS profiles, except the trustpoint information, is saved.

What to Do Next

Configure Syslog Servers for TLS

Configure TLS Profile for Mutual Authentication

  1. Click TLS Profile.

  2. Click New Profile and configure the following parameters:

    Figure 3. Logging Through TLS Profile
    Table 5. Parameter Information

    Parameter Name

    Description

    Profile Name

    Enter the TLS profile name

    TLS Version

    Choose TLS versions v1.1 or v1.2

    Authentication Type

    Choose authentication types as Mutual.

    Ciphersuites

    Choose groups of cipher suites (encryption algorithm) based on the TLS version that must be used for encryption.

    The following are the list of cipher suites.

    • aes-128-cbc-sha Encryption type tls_rsa_with_aes_cbc_128_sha

    • aes-256-cbc-sha Encryption type tls_rsa_with_aes_cbc_256_sha

    • dhe-aes-128-cbc-sha Encryption type tls_dhe_rsa_with_aes_128_cbc_sha

    • dhe-aes-cbc-sha2 Encryption typetls_dhe_rsa_with_aes_cbc_sha2(TLS1.2 & above)

    • dhe-aes-gcm-sha2 Encryption typetls_dhe_rsa_with_aes_gcm_sha2(TLS1.2 & above)

    • ecdhe-ecdsa-aes-gcm-sha2 Encryption type tls_ecdhe_ecdsa_aes_gcm_sha2(TLS1.2 & above) SuiteB

    • ecdhe-rsa-aes-128-cbc-sha Encryption type tls_ecdhe_rsa_with_aes_128_cbc_sha

    • ecdhe-rsa-aes-cbc-sha2 Encryption type tls_ecdhe_rsa_aes_cbc_sha2(TLS1.2& above)

    • ecdhe-rsa-aes-gcm-sha2 Encryption type tls_ecdhe_rsa_aes_gcm_sha2(TLS1.2& above)

    • rsa-aes-cbc-sha2 Encryption type tls_rsa_with_aes_cbc_sha2(TLS1.2 & above)

    • rsa-aes-gcm-sha2 Encryption type tls_rsa_with_aes_gcm_sha2(TLS1.2 & above)

    You can use the following cipher suites for each TLS version:
    TLS v1.1
    aes-128-cbc-sha Encryption type tls_rsa_with_aes_cbc_128_sha
    aes-256-cbc-sha Encryption type tls_rsa_with_aes_cbc_256_sha
    TLS v1.2 and later
    dhe-aes-cbc-sha2 Encryption type tls_dhe_rsa_with_aes_cbc_sha2(TLS1.2 & above)
    dhe-aes-gcm-sha2 Encryption type tls_dhe_rsa_with_aes_gcm_sha2(TLS1.2 & above)
    
    ecdhe-ecdsa-aes-gcm-sha2 Encryption type tls_ecdhe_ecdsa_aes_gcm_sha2 (TLS1.2 & above)
    ecdhe-rsa-aes-cbc-sha2 Encryption type tls_ecdhe_rsa_aes_cbc_sha2(TLS1.2 & above)
    ecdhe-rsa-aes-gcm-sha2 Encryption type tls_ecdhe_rsa_aes_gcm_sha2(TLS1.2 & above)
     
    rsa-aes-cbc-sha2 Encryption type tls_rsa_with_aes_cbc_sha2(TLS1.2 & above) 
    rsa-aes-gcm-sha2 Encryption type tls_rsa_with_aes_gcm_sha2(TLS1.2 & above)

    The TLS profiles appear in a table.

  3. Click Add to create another profile.

  4. To edit or delete a TLS profile information, click or under Action.

  5. To save the feature template, click Save.

  6. Associate the feature template with a device template. See the chapter, Create a Device Template from Feature Templates.

The mutually authenticated feature template is saved on the Cisco IOS XE SD-WAN devices, and trustpoint such as, SYSLOG-SIGNING-CA certificate is saved on the device. Cisco vManage can now install the certificate from Cisco IOS XE SD-WAN devices.

What to Do Next

Configure Syslog Servers for TLS

Configure Syslog Servers for TLS

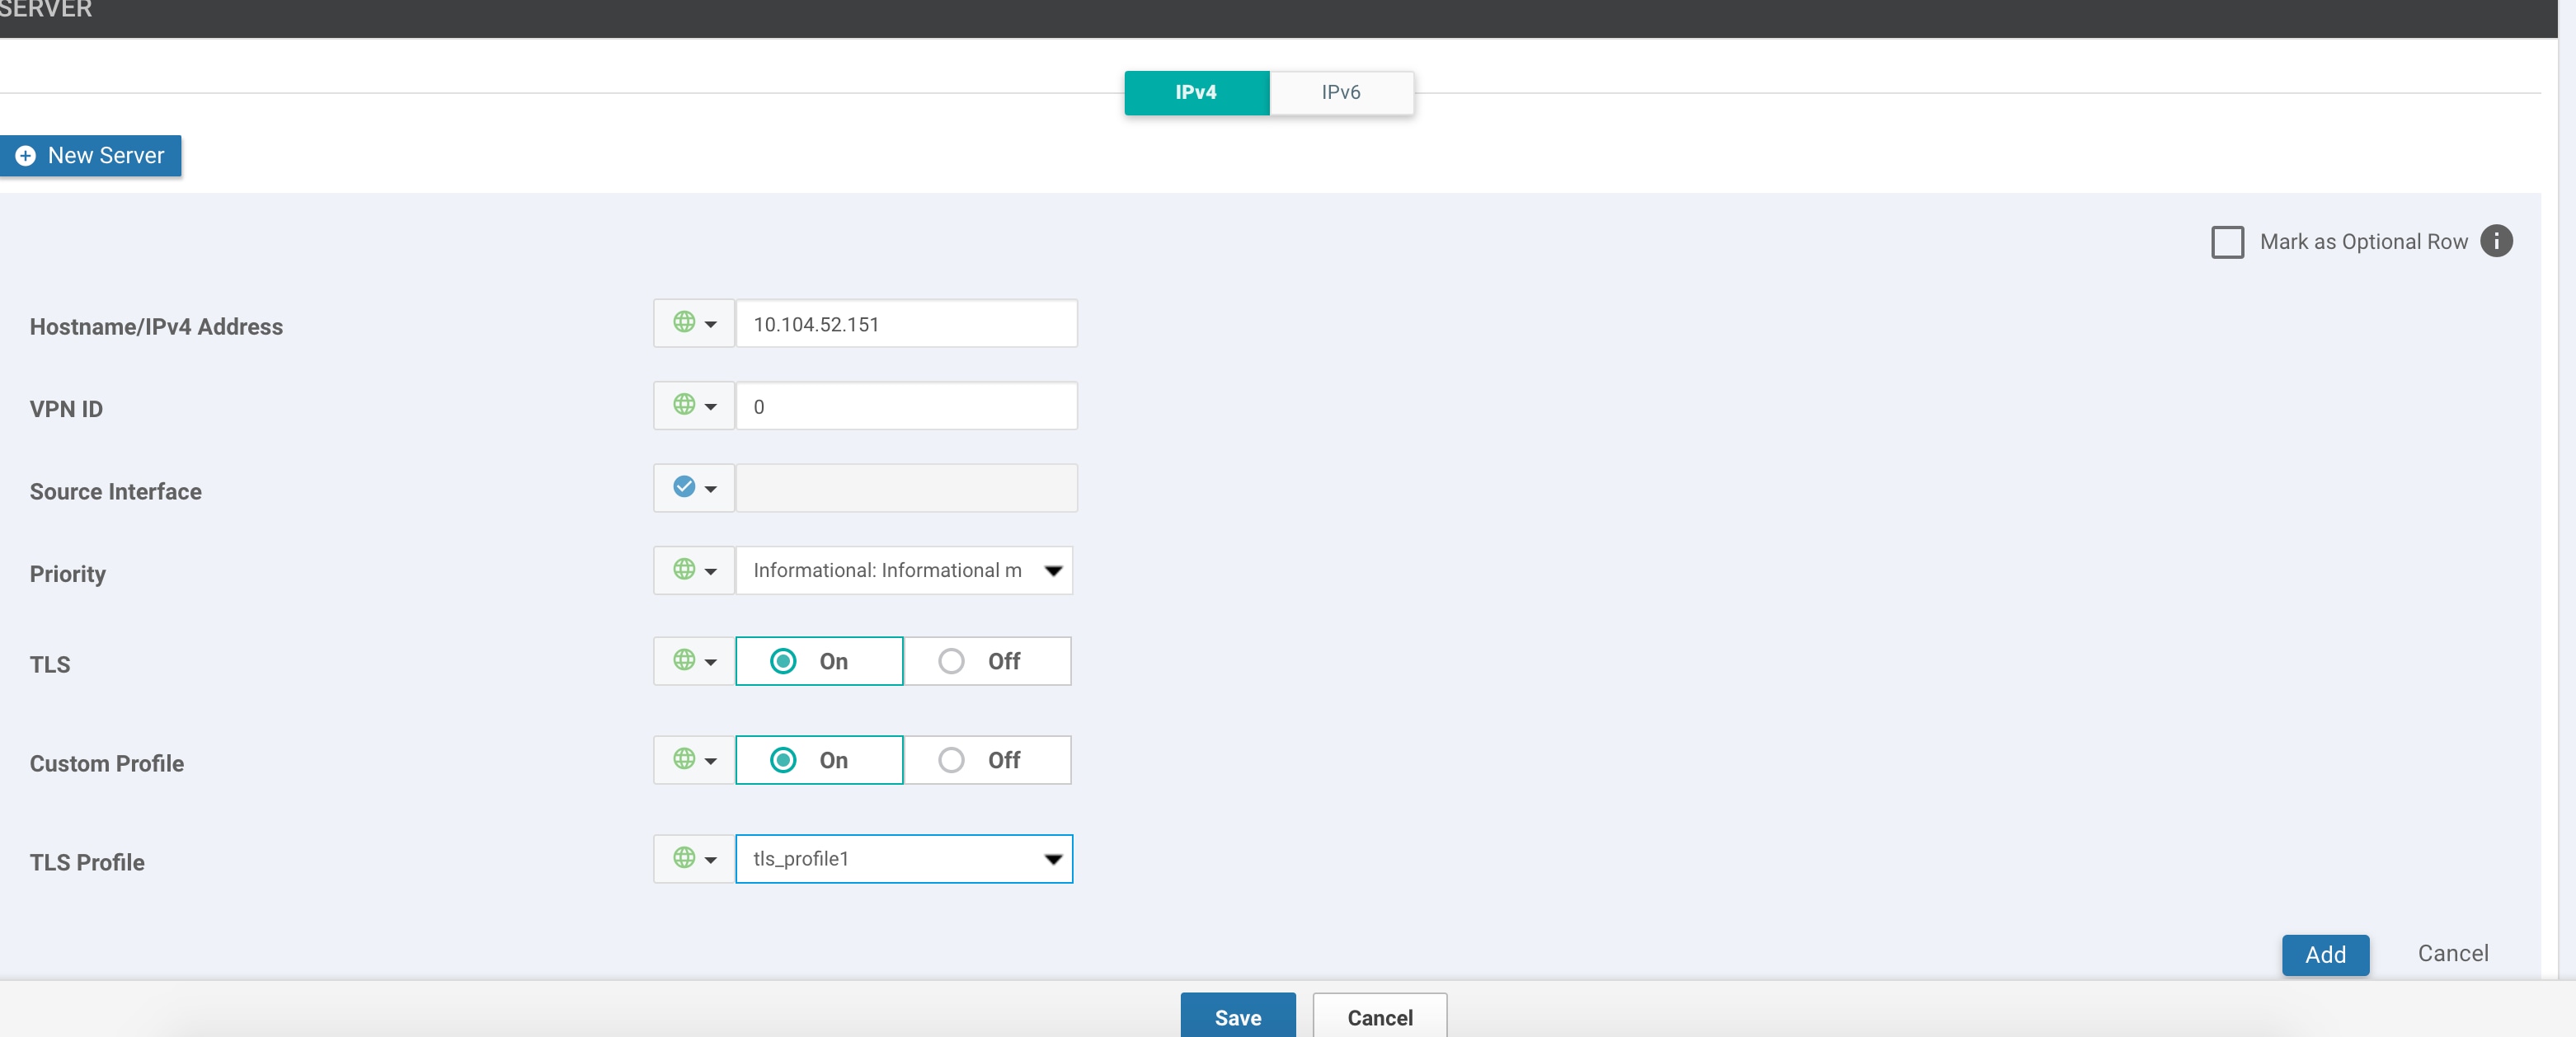
To include the TLS profile in IPV6 or IPV4 server configuration,

  1. Click the Server tab.

  2. Click Add New Server and configure the following parameters for IPv4 or IPv6:

    Figure 4. Logging Through Remote Server
    Table 6. Parameter Information

    Parameter Name

    Description

    Hostname/IP Address

    Enter the DNS name, hostname, or IPv4, IPv6 address of the system on which to store syslog messages.

    To add another syslog server, click +.

    To delete a syslog server, click .

    VPN ID

    Enter the identifier of the VPN in which the syslog server is located or through which the syslog server can be reached.

    VPN ID Range: 0-65530

    Source Interface

    Enter the specific interface to use for outgoing system log messages. The interface must be located in the same VPN as the syslog server. Otherwise, the configuration of syslog servers is ignored. If you configure multiple syslog servers, the source interface must be same for all of them.

    Priority

    Choose a severity of the syslog message to be saved. The severity indicates the seriousness of the event that generated the syslog message. The priority can be one of the following:

    • Emergency: System is unusable (corresponds to syslog severity 0).

    • Alert: Ensure that you act immediately. (corresponds to syslog severity 1).

    • Critical: A serious condition (corresponds to syslog severity 2).

    • Error: An error condition that doesn’t fully impair system usability (corresponds to syslog severity 3).

    • Warning: A minor error condition (corresponds to syslog severity 4).

    • Notice: A normal, but significant condition (corresponds to syslog severity 5).

    • Informational: Routine condition or the default condition (corresponds to syslog severity 6).

    • Debug: Issues debug messages that correspond to syslog severity 7.

    TLS

    Click On to enable syslog over TLS.

    Custom Profile

    Click On to enable choosing a TLS profile, or click Off to disable choosing a TLS profile.

    TLS Profile

    Choose a TLS profile that you have created for server or mutual authentication in IPv4 or IPv6 server configuration.

    The server entries appear in a table.

  3. Click Add to create another entry for a server.

  4. To edit a logging server, click .

  5. To remove a logging server, click .

  6. To save the feature template, click Save.

  7. To associate the feature template with a device template, see the chapter, Create a Device Template from Feature Templates.

Generate Feature Certificate Signing Request and Install Feature Certificates

To validate and authenticate Cisco IOS XE SD-WAN devices and syslog server, perform the following operation on the Cisco vManage Certificates screen. See the Cisco SD-WAN Getting Started Guide for information about enterprise certificates.

Procedure


Step 1

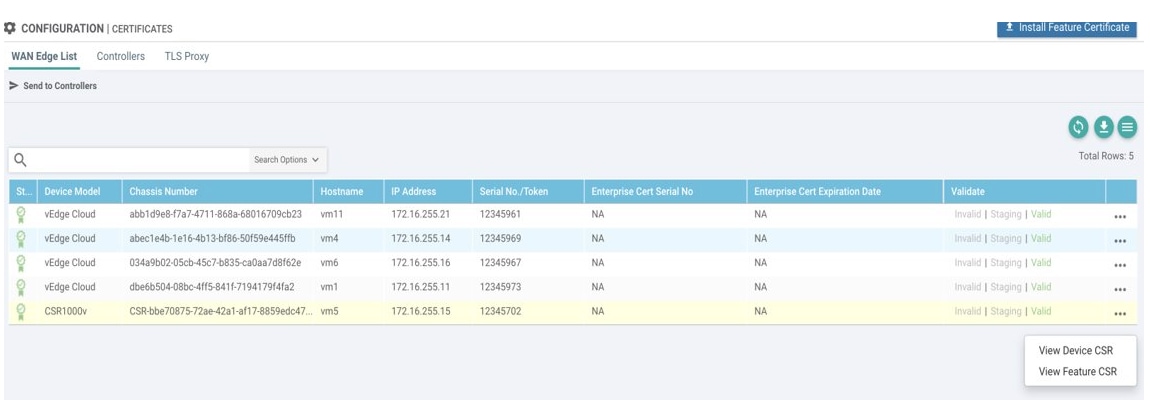
In Cisco vManage, click Configuration > Certificates.

Step 2

On the Certificates page, click a Cisco IOS XE SD-WAN device.

  1. Generate Feature Certificate Signing Request (CSR).

    After you generate the Feature CSR, the View Feature CSR and Install Feature certificate options are available. ​

    Figure 5. Generate Feature CSR
  2. View Feature CSR.

  3. To download the feature CSR, click Download.

Step 3

To sign the certificate, send the certificate to a third-party signing authority.

Step 4

To import the certificate into Cisco IOS XE SD-WAN devices, Install feature certificate.

The Install Feature Certificate screen uses the signed certificate and installs it on Cisco IOS XE SD-WAN devices.


After the feature certificate installation is successful, the Revoke Feature Certificate and View Feature Certificate options are available on Cisco vManage.

What to do next

Verify Trustpoint Configuration on Cisco IOS XE SD-WAN Device

Verify Trustpoint Configuration on Cisco IOS XE SD-WAN Device

To display the contents of syslog file with trustpoint information for Cisco IOS XE SD-WAN device, use the show crypto pki trustpoints status command.

Examples

Server authentication

Cisco XE SD-WAN# show crypto pki trustpoints status
 
crypto pki trustpoint SYSLOG-SIGNING-CA
  enrollment url bootflash:vmanage-admin/
  fqdn none
  fingerprint xxxxxx
  revocation-check none
  subject-name CN=CSR-cbc47d9d-45bf-433a-9816-1f12a8b48223_vManage Root CA

Mutual authentication

Cisco XE SD-WAN# show crypto pki trustpoints status
 
crypto pki trustpoint SYSLOG-SIGNING-CA
  enrollment url bootflash:vmanage-admin/
  fqdn none
  fingerprint xxxxxx
  revocation-check none
  rsakeypair SYSLOG-SIGNING-CA 2048
  subject-name CN=CSR-cbc47d9d-45bf-433a-9816-1f12a8b48223_vManage Root CA

Verify trustpoints on a device for a Syslog-signing-CA certificate

Cisco XE SD-WAN# show crypto pki trustpoints SYSLOG-SIGNING-CA status
 
Trustpoint SYSLOG-SIGNING-CA:                                                                                                   
 Issuing CA certificate not configured.                                                                                        
State:                                                                                                                        
Keys generated ............. No                                                                                             
 Issuing CA authenticated ....... No                                                                                         
  Certificate request(s) ..... None