Cisco SD-WAN Multitenancy

Table 1. Feature History

Feature Name

Release Information

Feature Description

Cisco SD-WAN Multitenancy

Cisco IOS XE Release 17.4.1a

Cisco vManage Release 20.4.1

With Cisco SD-WAN multitenancy, a service provider can manage multiple customers, called tenants, from Cisco vManage. In a multitenant Cisco SD-WAN deployment, tenants share Cisco vManage instances, Cisco vBond Orchestrators and Cisco vSmart Controllers. Tenant data is logically isolated on these shared resources.

Overview of Cisco SD-WAN Multitenancy

With Cisco SD-WAN multitenancy, a service provider can manage multiple customers, called tenants, from Cisco vManage. The tenants share Cisco vManage instances, Cisco vBond Orchestrators, and Cisco vSmart Controllers. The domain name of the service provider has subdomains for each tenant. For example, the multitenancy.com service provider can manage the tenants Customer1 (Customer1.multitenancy.com) and Customer2 (Customer2.multitenancy.com).

Following are the key features of Cisco SD-WAN multitenancy:

  • Full enterprise multitenancy: Cisco SD-WAN supports multitenancy and offers enterprises the flexibility of segregated roles such as service provider and tenants. Service providers can use multitenancy to provide Cisco SD-WAN service offerings to their customers.

  • Multi-tenant Cisco vManage:

    • Cisco vManage is deployed and configured by the service provider. The provider enables multitenancy and creates a Cisco vManage cluster to serve tenants. Only the provider can access a Cisco vManage instance through the SSH terminal.


      Note

      To connect to a device through SSH, use the IP address of the vmanage_system interface; this IP address is assigned by Cisco vManage. Do not use a user-configured system IP address to connect to a device through SSH.

      You can find the IP address of the vmanage_system interface from the output of the show interface description command. Alternatively, you can launch the device SSH terminal from Cisco vManage and find the vmanage_system IP address from the first line of the log-in prompt.


    • Cisco vManage offers service providers an overall view of the SD-WAN multi-tenant deployment and allows a provider to manage the shared Cisco vBond Orchestrator and Cisco vSmart Controller devices. Cisco vManage also allows service providers to monitor and manage the deployments of each tenant.

    • Cisco vManage allows tenants to monitor and manage their deployment. Through Cisco vManage, tenants can deploy and configure WAN edge devices. Tenants can also configure custom policies on assigned Cisco vSmart Controllers.

  • Multi-tenant Cisco vBond Orchestrators:

    • Cisco vBond Orchestrators are deployed and configured by the service provider. Only the provider can access a Cisco vBond Orchestrator through the SSH terminal.


      Note

      To connect to a device through SSH, use the IP address of the vmanage_system interface; this IP address is assigned by Cisco vManage. Do not use a user-configured system IP address to connect to a device through SSH.

      You can find the IP address of the vmanage_system interface from the output of the show interface description command. Alternatively, you can launch the device SSH terminal from Cisco vManage and find the vmanage_system IP address from the first line of the log-in prompt.


    • Cisco vBond Orchestrators serve WAN edge devices of multiple tenants as the devices are added to the overlay network.

  • Multi-tenant Cisco vSmart Controllers:

    • Cisco vSmart Controllers are deployed by the service provider. Only the provider can create and attach device and feature templates to Cisco vSmart Controllers, and can access a Cisco vSmart Controller through the SSH terminal.


      Note

      To connect to a device through SSH, use the IP address of the vmanage_system interface; this IP address is assigned by Cisco vManage. Do not use a user-configured system IP address to connect to a device through SSH.

      You can find the IP address of the vmanage_system interface from the output of the show interface description command. Alternatively, you can launch the device SSH terminal from Cisco vManage and find the vmanage_system IP address from the first line of the log-in prompt.


    • When a tenant is created, Cisco vManage assigns two Cisco vSmart Controllers for the tenant. The Cisco vSmart Controllers form an active-active cluster.

      Each tenant is assigned only two Cisco vSmart Controllers. Before a tenant is created, two Cisco vSmart Controllers must be available to serve the tenant.

    • Each pair of Cisco vSmart Controllers can serve a maximum of 24 tenants.

    • Tenants can configure custom policies on the Cisco vSmart Controllers assigned to them. Cisco vManage notifies the Cisco vSmart Controllers to pull the policy templates. Cisco vSmart Controllers pull the templates and deploy the policy configuration for the specific tenant.

    • Only the provider can view events, audit logs, and OMP alarms for a Cisco vSmart Controller on Cisco vManage.

  • WAN Edge Devices:

    • A tenant or the provider acting on behalf of a tenant can add WAN edge devices to the tenant network, configure the devices, and remove the devices from the tenant network, or access the device through the SSH terminal.


      Note

      To connect to a device through SSH, use the IP address of the vmanage_system interface; this IP address is assigned by Cisco vManage. Do not use a user-configured system IP address to connect to a device through SSH.

      You can find the IP address of the vmanage_system interface from the output of the show interface description command. Alternatively, you can launch the device SSH terminal from Cisco vManage and find the vmanage_system IP address from the first line of the log-in prompt.


    • A provider can manage the WAN edge devices only from provider-as-tenant view. In the provider view, Cisco vManage does not present any WAN edge device information.

    • Cisco vManage reports WAN edge device events, logs, and alarms only in the tenant and the provider-as-tenant views.

  • Overlapping VPN numbers: A particular VPN or a set of common VPNs is assigned to a specific tenant, with their own configurations and monitoring dashboard environment. These VPN numbers can overlap where they are used by other tenants.

  • On-prem and cloud deployment models: Cisco SD-WAN controllers can be deployed in an organization data center on servers running the VMware vSphere ESXi or the Kernel-based Virtual Machine (KVM) hypervisor. Cisco SD-WAN controllers can also be deployed in the cloud on Amazon Web Services (AWS) servers.
User Roles in Multitenant Environment

A multi-tenant environment includes the service provider and tenant roles. Each role has distinct privileges, views, and functions.

Provider Role

The provider role entitles system-wide administrative privileges. A user with the provider role has the default username admin. The provider user can access Cisco vManage using the domain name of the service provider or by using the Cisco vManage IP address. When using a domain name, the domain name has the format https://multitenancy.com.

The admin user is part of the user group netadmin​. Users in this group are permitted to perform all operations on the controllers and the Cisco SD-WAN devices of the tenants. You can add additional users to the netadmin group.

You cannot modify the privileges of the netadmin group. On Cisco vManage, you can view the privileges of the user group from the Administration > Manage Users > User Groups page.


Note

When you create a new provider user in Cisco vManage, including a netadmin user, by default, the user is not allowed SSH access to the Cisco vManage VM. To enable SSH access, configure SSH authentication using a AAA template and push the template to Cisco vManage. For more information on enabling SSH authentication, see SSH Authentication using vManage on Cisco IOS XE SD-WAN Devices.


For more information about configuring users and user groups, see Configure User Access and Authentication.

Cisco vManage offers two views to a provider:

  • Provider View

    When a provider user logs in to multi-tenant Cisco vManage as admin or another netadmin user, Cisco vManage presents the provider view and displays the provider dashboard.

    You can perform the following functions from the provider view:

    • Provision and manage Cisco vManage, Cisco vBond Orchestrators and Cisco vSmart Controllers.

    • Add, modify, or delete tenants.

    • Monitor the overlay network.

  • Provider-as-Tenant View

    When a provider user selects a specific tenant from the Select Tenant drop-down list at the top of the provider dashboard, Cisco vManage presents the provider-as-tenant view and displays the tenant dashboard for the selected tenant. The provider user has the same view of Cisco vManage as a tenant user would when logged in as tenantadmin. From this view, the provider can manage the tenant deployment on behalf of the tenant.

    In the provider dashboard, a table of tenants presents a status summary for each tenant. A provider user can also launch the provider-as-tenant view by clicking on a tenant name in this table.

Tenant Role

The tenant role entitles tenant administrative privileges. A user with the tenant role has the default username tenantadmin. The default password is Cisco#123@Viptela. We recommend that you change the default password on first login. For information on changing the default password, see Hardware and Software Installation.

The tenantadmin user is part of the user group tenantadmin. Users in this group are permitted to perform all operations on the WAN edge devices of the tenants. You can add additional users to the tenantadmin group.

You cannot modify the privileges of the tenantadmin group. On Cisco vManage, you can view the privileges of the user group from the Administration > Manage Users > User Groups page.

For more information about configuring users and user groups, see Configure User Access and Authentication.

A tenant user can log in to Cisco vManage using a dedicated URL and the default username tenantadmin. For example, the dedicated URL of a tenant could be https://Customer1.multitenancy.com for a provider using the domain name https://multitenancy.com. When the user logs in, Cisco vManage presents the tenant view and displays the tenant dashboard.

A tenant user with administrative privileges can perform the following functions:

  • Provision and manage tenant routers

  • Monitor overlay network of the tenant

  • Create custom policies on the assigned Cisco vSmart Controllers

  • Upgrade the software on the tenant routers.

Hardware Supported and Specifications

The following platforms support multitenancy.

Table 2. Router Models

Platform

Router Models

Cisco IOS XE SD-WAN device
  • Cisco ASR 1000 Series Aggregation Services Routers

  • Cisco ISR 1000 Series Integrated Services Routers

  • Cisco ISR 4000 Series Integrated Services Routers

  • Cisco Catalyst 8300 Series Edge Platforms

  • Cisco Catalyst 8500 Series Edge Platforms

  • Cisco Catalyst 8000V Edge Software

The following hypervisors and deployment model are supported for multitenancy.

Table 3. Deployment Model

Specification

Description

Supported hypervisors

VMware, KVM, AWS (cloud-hosted by Cisco)

Cisco vManage Deployment Model

Cluster, 3 vManage instances with each instance running all NMS services.

The supported hardware specifications for the Cisco vBond Orchestrator, Cisco vManage, and the Cisco vSmart Controllerare as follows:

Table 4. On-prem Deployment

Server

Cisco vManage

Cisco vBond Orchestrator

Cisco vSmart Controller

Deployment Model

Cluster

N/A

Non-containerized

Number of Instances

3

2

2 per 24 tenants

CPU

DRAM

Hard Disk

32 vCPU

72 GB

1 TB

4 vCPU

4 GB

10 GB

8 vCPU

16 GB

16 GB

NMS Service Distribution

Some services run on all three Cisco vManage instances in the cluster, while some services run on only one of the three instances in the cluster. Therefore, the CPU load may vary among the instances.

N/A

N/A


Note

If DPI is enabled, we recommend that the aggregated DPI data across all Cisco vManage instances not exceed 350 GB per day.


Initial Setup for Multitenancy

Before you begin

  • Download and install software versions as recommended in the following table:

    Table 5. Software Prerequisites for Cisco SD-WAN Multitenancy

    Device

    Software Version

    Cisco vManage

    Cisco vManage Release 20.4.1

    Cisco vBond Orchestrator

    Cisco SD-WAN Release 20.4.1

    Cisco vSmart Controller

    Cisco SD-WAN Release 20.4.1

    Cisco IOS XE SD-WAN Device

    Cisco IOS XE Release 17.4.1a

    A configuration in which one or more controllers, or WAN edge devices, are running software versions earlier than those mentioned in the table above is not supported.

  • Do not migrate an existing single-tenant Cisco vManage instance into multitenant mode, even if you invalidate or delete all devices from the existing Cisco vManage instance. Instead, download and install a new Cisco vManage software image.


    Note

    After you enable Cisco vManage for multitenancy, you cannot migrate it back to single tenant mode.


  • Log in to Cisco vManage as the provider admin user.

Procedure


Step 1

Create three Cisco vManage instances and associated configuration templates. See Deploy Cisco vManage.

  1. While configuring Cisco vManage instances, configure the service provider organization name (sp-organization-name) and the organization name (organization-name).

    Example:

    sp-organization-name multitenancy
    organization-name multitenancy
Step 2

Configure one of the Cisco vManage instances to support multitenancy. Enable Cisco vManage for Multitenancy.

Step 3

Create a Cisco vManage cluster consisting of three Cisco vManage instances. See Cluster Management.

  • The Cisco vManage cluster must have three Cisco vManage instances. A cluster with more than three instances or fewer than three instances is not a supported configuration for Cisco SD-WAN multitenancy.

  • While creating the Cisco vManage cluster, add the Cisco vManage instance configured to support multitenancy before adding the other two Cisco vManage instances.

Step 4

Certify all instances of Cisco vManage. See Generate vManage NMS Certificate.

Step 5

Create and configure Cisco vBond Orchestrator instances. See Deploy Cisco vBond Orchestrator.

  1. While configuring Cisco vBond Orchestrator instances, configure the service provider organization name (sp-organization-name) and the organization name (organization-name). See Configure Organization Name in Cisco vBond Orchestrator.

    Example:

    sp-organization-name multitenancy
    organization-name multitenancy
Step 6

Create Cisco vSmart Controller instances. See Deploy the Cisco vSmart Controller.

  1. Add Cisco vSmart Controllers to the overlay network.

Step 7

Onboard new tenants. See Add a New Tenant.


Enable Cisco vManage for Multitenancy

Procedure


Step 1

Log in to Cisco vManage, at the URL, https://vmanage-ip-address:port, as a user with admin credentials.

Step 2

In Cisco vManage, click Administration > Settings.

Step 3

In the Tenancy Mode bar, click the Edit button at the right.

Step 4

In the Tenancy field, click Multitenant.

Step 5

In the Domain field, enter the domain name of the service provider (for example, multitenancy.com).

Step 6

Click Save.

The default installation of Cisco vManage configures the controller to operate in single-tenant mode.
Step 7

To convert single-tenant mode to multitenant mode, click Proceed.

Cisco vManage reboots in multitenant mode and when a provider user logs in to Cisco vManage, the provider dashboard appears.


After you enable Cisco vManage for multitenancy, you cannot migrate it back to a single tenant mode.

Add Cisco vSmart Controller

Before you begin

Log in to Cisco vManage as the provider admin user.

Procedure


Step 1

In Cisco vManage, go to Configuration > Devices.

Step 2

In the Controllers tab, click Add Controller and select vSmart.

Step 3

In the Add vSmart dialog box,

  1. In the vSmart Management IP Address field, enter the system IP address of the Cisco vSmart Controller.

  2. Enter the Username and Password required to access the Cisco vSmart Controller.

  3. Select the protocol to use for control-plane connections. The default is DTLS.

    If you select TLS, enter the port number to use for TLS connections. The default is 23456.

  4. Select the Generate CSR checkbox for Cisco vManage to create a Certificate Signing Request.

  5. Click Add.

Step 4

In Cisco vManage, go to Configuration > Certificates.

For the newly added Cisco vSmart Controller, the Operation Status reads CSR Generated.

  1. For the newly added Cisco vSmart Controller, click More Options icon and click View CSR.

  2. Submit the CSR to the Certificate Authority (CA) and obtain a signed certificate.

Step 5

In Cisco vManage, go to Configuration > Certificates and click Install Certificate.

  1. In the Install Certificate dialog box, paste the Certificate Text or click Select a file upload the certificate file. Click Install.

    Cisco vManage installs the certificate on the Cisco vSmart Controller. Cisco vManage also sends the serial number of the certificate to other controllers.

    On the Configuration > Certificates page, the Operation Status for the newly added Cisco vSmart Controller reads as vBond Updated.

    On the Configuration > Devices page, the new controller is listed in the Controller table with the controller type, hostname of the controller, IP address, site ID, and other details. The Mode is set to CLI.

Step 6

Change the mode of the newly added Cisco vSmart Controller to vManage by attaching a template to the device.

  1. In Cisco vManage, go to Configuration > Templates.

  2. In the Device tab, find the template to be attached to the Cisco vSmart Controller.

  3. Click the More Options icon and click Attach Devices.

  4. In the Attach Devices dialog box, add the new controller to the Selected Device list and click Attach.

  5. Verify the Config Preview and click Configure Devices.

Cisco vManage pushes the configuration from the template to the new controller.

In the Configuration > Devices page, Mode reads vManage. The new Cisco vSmart Controller is ready to be used in your muti-tenant deployment.


Manage Tenants

Add a New Tenant

Before you begin

  • At least two Cisco vSmart Controllers must be operational and in the vManage mode before you can add new tenants.

    A Cisco vSmart Controller enters the vManage mode when you push a template onto the controller from Cisco vManage. A Cisco vSmart Controller in the CLI mode cannot serve multiple tenants.

  • Each Cisco vSmart Controller can serve a maximum of 24 tenants. Ensure that there at least two Cisco vSmart Controllers that can serve a new tenant. If no pair of Cisco vSmart Controllers in the deployment can serve a new tenant, add two Cisco vSmart Controllers and change their mode to vManage.

  • If you add a second tenant immediately after adding a tenant, Cisco vManage adds them sequentially, and not in parallel.

  • Each tenant must have a unique Virtual Account (VA) on Plug and Play Connect on Cisco Software Central. The tenant VA should belong to the same Smart Account (SA) as the provider VA.

  • For an on-premises deployment, create a Cisco vBond Orchestrator controller profile for the tenant on Plug and Play Connect. The fields in the following table, Table 1, are mandatory.

    Table 6. Controller Profile Fields

    Field

    Description/Value

    Profile Name

    Enter a name for the controller profile.

    Multi-Tenancy

    From the drop-down list, select Yes.

    SP Organization Name

    Enter the provider organization name.

    Organization Name

    Enter the tenant organization name in the format <SP Org Name>-<Tenant Org Name>.

    Primary Controller

    Enter the host details for the primary Cisco vBond Orchestrator.

    For a cloud deployment, the Cisco vBond Orchestrator controller profile is created automatically as part of the tenant creation process.

Procedure


Step 1

Log in to Cisco vManage as the provider admin user.

Step 2

In Cisco vManage, go to Administration > Tenant Management.

Step 3

Click Add Tenant. In the Add Tenant dialog box:

  1. Enter a name for the tenant.

    For a cloud deployment, the tenant name should be same as the tenant VA name on Plug and Play Connect.

  2. Enter a description of the tenant.

    The description can be up to 256 characters and can contain only alphanumeric characters.

  3. Enter the name of the organization.

    The organization name is case-sensitive. Each tenant or customer must have a unique organization name.

    Enter the organization name in the following format:
    <SP Org Name>-<Tenant Org Name>
    For example, if the provider organization name is 'multitenancy' and the tenant organization name is 'Customer1', while adding the tenant, enter the organization name as multitenancy-Customer1.
  4. In the URL Subdomain Name field, enter the fully qualified sub-domain name of the tenant.

    • The sub-domain name must include the domain name of the service provider. For example, for the multitenancy.com service provider, a valid domain name can be Customer1.multitenancy.com.

      Note 

      The service provider name is shared amongst all tenants. Hence, ensure that the URL naming convention follows the same domain name convention that was provided while enabling multitenancy from the Cisco vManage Administration > Settings > Tenancy Mode GUI navigation path.

    • For an on-premises deployment, add the fully qualified sub-domain name of the tenant to the DNS. Map the fully qualified sub-domain name to the IP addresses of the three Cisco vManage instances in the Cisco vManage cluster.

      For a cloud deployment, the fully qualified sub-domain name of the tenant is automatically added to the DNS as part of the tenant creation process. After you add a tenant, it could take up to an hour before the fully qualified sub-domain name of the tenant can be resolved by the DNS.

  5. Click Save.

    The Create Tenant screen appears, and the Status of the tenant creation reads In progress. To view status messages related to the creation of a tenant, click the > button to the left of the status.

    Cisco vManage

    • creates the tenant

    • assigns two Cisco vSmart Controllers to serve the tenant and pushes a CLI template to these controllers to configure tenant information

    • sends the tenant and Cisco vSmart Controller information to Cisco vBond Orchestrators.


What to do next

After the Status column changes to Success, you can view the tenant information on the Administration > Tenant Management page.

Modify Tenant Information

Procedure


Step 1

Log in to Cisco vManage as the provider admin user.

Step 2

In Cisco vManage, click Administration > Tenant Management.

Step 3

In the left pane, click the name of the tenant.

Step 4

To modify tenant data,

  1. In the right pane, click the icon next to the name of the tenant.

  2. In the Edit Tenant dialog box, modify the tenant name, description, or domain name.

  3. Click Save

Step 5

To delete tenant,

  1. In the right pane, click the icon next to the name of the tenant.

  2. In the Delete Tenant dialog box, enter the provider admin password and click Save.

Note 

A tenant can only be deleted after removing all the WAN edge devices from the tenant deployment.


Delete a Tenant

Before you begin

Before you delete a tenant, delete all tenant WAN edge devices. See Delete a WAN Edge Device from a Tenant Network.

Procedure


Step 1

Log in to Cisco vManage as the provider admin user.

Step 2

In Cisco vManage, click Administration > Tenant Management.

Step 3

In the left pane, click the name of the tenant.

Step 4

To delete tenant,

  1. In the right pane, click the icon next to the name of the tenant.

  2. In the Delete Tenant dialog box, enter the provider admin password and click Save.


Cisco vManage Dashboard for Multitenancy

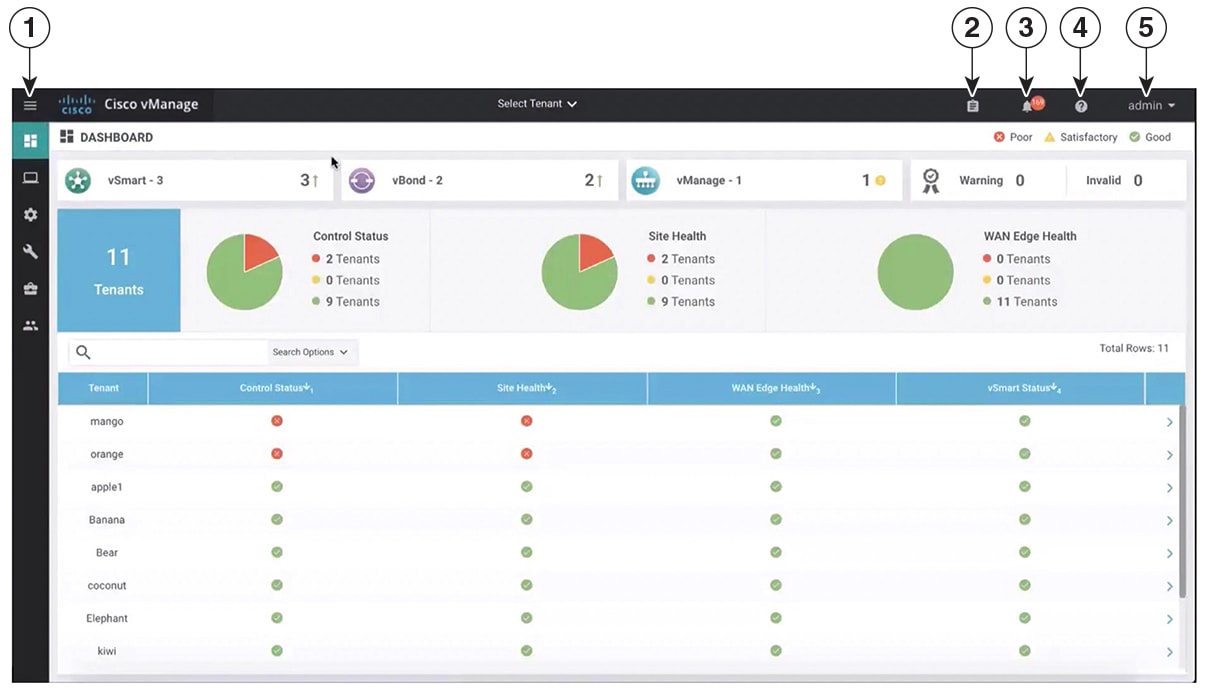
After enabling Cisco vManage for multitenancy, you can view the multitenant dashboard when you log in to Cisco vManage. Cisco vManage multitenant dashboard is a portal where the provider or tenant can view and provision the underlying system.

The top bar located at the top of every Cisco vManage multitenant screen include icons that allow smooth navigation.

Figure 1. Cisco vManage Dashboard for Multitenancy

1

Menu

2

Tasks

3

Alarms

4

Help

5

User Profile

View Tenant Activity, Device, and Network Information

When you log in to a multitenant Cisco vManage as an administrator, the provider dashboard displays the following components. To return to the provider dashboard from other Cisco vManage screens, click Dashboard at the left bar.

  • Device pane — runs across the top of the multitenant dashboard screen. The device pane displays the number of active Cisco vSmart Controllers, Cisco vBond Orchestrators, and Cisco vManage instances, the connectivity status of devices, and information on certificates that have expired or about to expire.

  • Tenants pane — displays the total number of tenants and a summary of the control status, site health, router health, and Cisco vSmart Controller status of all tenants.

  • Table of tenants in the overlay network — List of individual tenants, with separate information about the control status, site health, WAN edge device health, and Cisco vSmart Controller status for each tenant.

    To display tenant-specific status summary information,

    1. Click a tenant name from the tenant list.

      A dialog box opens on the right side of the screen that provides additional information about the status of the tenant.

    2. To access the tenant dashboard for the selected tenant, click <Tenant name> Dashboard.

      Cisco vManage presents the provider-as-tenant view and displays the tenant dashboard. To return to the provider view, click Provider at the top of page.

    3. To close the dialog box, click the tenant name from the tenant list.

View Detailed Information of a Tenant Setup

Cisco vManage displays the tenant dashboard, which provides information about a tenant deployment when

  • a provider admin user selects a specific tenant from the Select Tenant drop-down list in the provider dashboard. This view is called the provider-as-tenant view.

  • a tenantadmin user logs in to Cisco vManage. This view is called the tenant view.

View All Network Connections in the Tenant Overlay Network

The Device pane runs across the top of the tenant dashboard and displays the number of control connections from Cisco vManage to the Cisco vSmart Controllers and routers in the overlay network of a tenant.. For each WAN edge device, the Device pane shows

  • Total number of control connections between Cisco vSmart Controllers and WAN edge devices

  • Number of valid control connections between Cisco vSmart Controllers and WAN edge devices

  • Number of invalid control connections between Cisco vSmart Controllers and WAN edge devices

Click a connection number, or the Up or Down arrow, to display a table with detailed information about each connection. Click the More Actions icon at the right of each table row to access the Device Dashboard or Real Time view from the Monitor > Network screen, or access the Tools > SSH Terminal Screen.

View Information About Device Reboots

The Reboot pane displays the total number of reboots in the last 24 hours for all devices in the network. It includes soft and cold reboots and reboots that occurred as a result of power-cycling a device. For each reboot, the following information is listed:

  • System IP and hostname of the device that rebooted.

  • Time when the device was rebooted.

  • Reason for the device reboot

If the same device reboots more than once, each reboot option is reported separately.

Click the Reboot pane to open the Reboot dialog box. In the Reboot dialog box, click the Crashes tab. For all device crashes, the following information is listed:

  • System IP and hostname of the device on which the crash occurred.

  • Crash index of the device

  • Core time when the device crashed.

  • File name of the device crash log

View Network Connections

The Control Status pane displays whether Cisco vSmart Controller and WAN edge devices are connected. Each Cisco vSmart Controller must connect to all other Cisco vSmart Controllers in the network. Each WAN edge device must connect to the maximum number of configured Cisco vSmart Controllers. The Control Status pane displays three network connection counts:

  • Control Up — total number of devices with the required number of operational control plane connections to a Cisco vSmart Controller

  • Partial — total number of devices with some, but not all, operational control plane connection to Cisco vSmart Controllers.

  • Control Down — total number of devices with no control plane connection to a Cisco vSmart Controller

To display a table with device details, click a row from the Control Status dialog box. Click the More Actions icon at the right of each table row to access the Device Dashboard or Real Time view from the Monitor > Network screen.

View State of Data Connections for a Site

The Site Health pane displays the state of data connections for a site. When a site has multiple WAN edge devices, this pane displays the state for the entire site and not for individual devices. The Site Health pane displays three connectivity states:

  • Full WAN Connectivity — total number of sites where all BFD sessions on all routers are in the up state.

  • Partial WAN Connectivity — total number of sites where tunnel and all BFD sessions on all routers are in the down state. These sites still have limited data plane connectivity.

  • No WAN Connectivity — total number of sites where all BFD sessions on all routers are in the down state. These sites have no data plane connectivity.

To display a table with detailed information about each site, node, or tunnel, click a row from the Site Health dialog box. Click the More Actions icon at the right of each row in the table to access the Device Dashboard or Real Time view from the Monitor > Network screen, or access the Tools > SSH Terminal screen.

View Interface Usage for WAN Edge Interfaces

The Transport Interface Distribution pane displays interface usage in the last 24 hours for all WAN edge interfaces in VPN 0. It includes all TLOC interfaces. Click the pane to view details of interface usage in the Transport Interface Distribution dialog box.

View WAN Edge Device Counts

The WAN Edge Inventory pane provides four WAN edge device counts:

  • Total — total number of authorized serial numbers for WAN edge devices that have been uploaded on Cisco vManage. The serial number is uploaded on the Configuration > Devices screen.

  • Authorized — total number of authorized WAN edge devices in the overlay network These WAN edge devices are marked as Valid in the Configuration > Certificates > WAN Edge List screen.

  • Deployed — total number of deployed WAN edge devices. These are WAN edge devices that are marked as Valid and are now operational in the network.

  • Staging — total number of WAN edge devices you configure at a staging site before they are made a part of the overlay network. These routers do not take part in any routing decisions and do not affect network monitoring through Cisco vManage.

    Click the pane to view hostname, system IP, site ID, and other details of each router from the WAN Edge Inventory dialog box.

View Aggregated State of WAN Edge Devices

The WAN Edge Health pane offers an aggregated view of the state of WAN edge devices by providing a count of the number of devices in each state, therefore describing the health of the hardware nodes. The three WAN edge device states are:

  • Normal — number of WAN edge devices with memory, hardware, and CPU in normal state. Using less than 70% of total memory or total CPU is classified as, normal.

  • Warning — number of WAN edge devices with memory, hardware, or CPU in warning state. Using between 70% and 90% of total memory or total CPU is classified as, warning

  • Error — number of WAN edge devices with memory, hardware, or CPU in error state. Using more than 90% of total memory or total CPU is classified as, error.

    Click a number or the WAN edge device state to display a table with the last 12 or 24 hours of memory usage, CPU utilization, and hardware-related alarms, including temperature, power supply, and PIM modules. Click the More Actions icon at the right of each row in the table to access the following:

    • Hardware Environment

    • Real Time view from the Monitor > Network screen

    • Tools > SSH Terminal screen.

View WAN Edge Device Loss, Latency, Jitter

The Transport Health pane displays the aggregated average loss, latency, and jitters for all links and all combinations of colors (for example, all LTE-to-LTE links, all LTE-to-3G links).

From the Type drop-down arrow, choose loss, latency, or jitter.

Click the icon to select a time period for which to display the transport health.

Click the icon to open the Transport Health dialog box. This dialog box displays a more detailed view. To display information in a tabular format, click the Details tab. You can choose to change the displayed health type and time period.

View DPI Flow Information of WAN Edge Devices

The Top Applications pane displays DPI flow information for traffic transiting routers in the overlay network.


Note

DPI flow information is shown only for the last 24 hours. To view DPI flow information for a time before the last 24 hours, you must check the information for the specific device.


Click the icon to select a time period for which to display data. From the VPN drop-down list, select a VPN to display DPI information for all flows in that VPN.

Click the icon to open the Top Applications dialog box. This dialog box displays a more detailed view of the same information. You can change the VPN and time period.

View Tunnels Data

The Application-Aware Routing pane allows you to choose the following tunnel criteria from the Type drop-down arrow:

  • Loss

  • Latency

  • Jitter

Based on the tunnel criteria, the pane displays the 10 worst tunnels. For example, if you choose loss, the pane shows 10 tunnels with the greatest average loss over the last 24 hours.

Click the icon against a row to display a graphical representation of the data. Select a time period for which to display data or click Custom to display a drop-down arrow for specifying a custom time period.

Click the icon to open the Application-Aware Routing dialog box. This dialog box displays the 25 worst tunnels based on criteria you choose from the Type drop-down arrow, the criteria being loss, latency, and jitter.

Manage Tenant WAN Edge Devices

Add a WAN Edge Device to a Tenant Network

Before you begin

If you are a provider user and need to install a WAN edge device on behalf of a tenant,

  1. Log in to Cisco vManage as the admin user.

  2. In the provider dashboard, select the tenant from the drop-down list at the top of the page to launch the provider-as-tenant view.

If you are tenant user, log in to Cisco vManage as the tenantadmin user.

Procedure


Step 1

Upload the device serial number file to Cisco vManage.

Step 2

Validate the device and send details to controllers.

Step 3

Create a configuration template for the device and attach the device to the template.

  1. While configuring the device, configure the service provider organization name and the tenant organization name as in the following example:

    Example:

    sp-organization-name multitenancy
    organization-name multitenancy-Customer1
    Note 

    Enter the organization-name in the format <SP Org Name>-<Tenant Org Name>.

Step 4

Bootstrap the device using bootstrap configuration generated through Cisco vManage or manually create the initial configuration on the device.

Step 5

If you are using Enterprise Certificates to authenticate the device, download the CSR from Cisco vManage and get the CSR signed by the Enterprise CA. Install the certificate on Cisco vManage.


Delete a WAN Edge Device from a Tenant Network

Before you begin

If you are a provider user and need to delete a WAN edge device on behalf of a tenant,

  1. Log in to Cisco vManage as the admin user.

  2. In the provider dashboard, choose the tenant from the drop-down list at the top of the page to launch the provider-as-tenant view.

If you are tenant user, log in to Cisco vManage as the tenantadmin user.

Procedure


Step 1

Detach the device from any configuration templates.

Step 2

Delete the WAN edge device.


Tenant-Specific Policies on Cisco vSmart Controllers

A provider admin user (from the Cisco vManage provider-as-tenant view) or a tenantadmin user (from the Cisco vManage tenant view) can create and deploy tenant-specific policies on the Cisco vSmart Controllers serving the tenant. The user can configure a CLI policy or create the policy using the UI policy configuration wizard.

When you activate or deactivate a policy,

  1. Cisco vManage identifies the Cisco vSmart Controllers serving the tenant.

  2. Cisco vManage notifies the Cisco vSmart Controllers to pull the policy configuration.

  3. Cisco vSmart Controllers pull and deploy the policy configuration.

  4. Cisco vManage reports the status of the policy pull by the Cisco vSmart Controllers.

Manage Tenant Data

Back Up Tenant Data

The tenant data backup solution of Cisco vManage multitenancy provides the following functionalities:

The following factors are applicable when using data backup solution:

  • The tenant data backup solution operations can be performed by a tenant administrator over tenant view and as a provider. To know how to access tenant dashboard through different views, see User Roles in Multitenant Environment.

  • A tenant is allowed to perform the following backup operations at a particular time and must complete an operation before starting a new operation:

    • Back up a single configuration database

    • Download the backup file.

    • Restore or import backup files

    • Delete backup files.

    • List backup files

  • A tenant backup file format is as follows:

    Bkup_tenantId_MMDDYY-HHMMSS_taskIdWithoutDash.tar.gz
  • The tenant data backup operation is a readonly operation on the configuration database. However, to ensure data consistency and prevent data loss, do not perform any major changes on the network.

  • When a backup or restore operation for a specific tenant is in-progress, other tenants are allowed to perform the backup and restore operations smoothly.

  • A tenant is not allowed to perform other backup operations when the restore operation of the tenant database is in-progress. So, a tenant can perform a single backup operation and when this operation is in-progress, all new backup operation requests are rejected.

    The remaining tenants can continue with their backup operations.

  • A tenant must use the same Cisco vManage version for backup generation and restore operation.

  • A tenant can store a maximum of three backup files in Cisco vManage and can download to store them outside Cisco vManage repository. If the tenant already has three backup files, a subsequent backup operation results in the earliest backup file being deleted and a new backup file being generated.

  • Ensure that the following parameter values match in both the backup file and the setup where tenant has requested for a restore operation:

    • Tenant Id

    • Organization Name

    • SP Organization Name

  • The tenant data backup solution creates a task in the tenant view of Cisco vManage. Therefore, the tenant can monitor the progress of the operation from the task view of the tenant dashboard.

  • A provider cannot back up provider data using this solution. Therefore, the provider can back up all tenants information at once by backing up all tenants configuration database using CLI.

Create, Extract, and List Configuration Data Backup File

Procedure


Step 1

Log in to Cisco vManage with tenant username and tenantadmin privileges to access the tenant dashboard.

Step 2

In the browser, modify the URL path with dataservice for the REST API connection.

Example:

https://<tenant_URL>/dataservice
Step 3

Create a configuration backup file by using the following API.

Example:

https://<tenant_URL>/dataservice/tenantbackup/export
Step 4

If the configuration backup file has been created successfully, Cisco vManage task view indicates that the backup file has been generated. You can view the process identifier of the created process or task.

Example:

{
   "processId": "72d69805-b987-436f-9b7a-afef2f3f9061",
"status": "in-progress"
}
Step 5

Verify the task status using the obtained process identifier.

Example:

https://<tenant_URL>/dataservice/device/action/status/72d69805-b987-436f-9b7a-afef2f3f9061

The verification generates the details of the task in a JSON file format.

Step 6

After the task is completed, extract or download the backed-up file available under the data section of the JSON task file.

Example:

To extract or download the backup file, use the following API: https://<tenannt_URL>/dataservice/tenantbackup/download/1570057020772/backup_1570057020772_100919-181838.tar.gz
Step 7

List backup files stored in Cisco vManage using the following API.

Example:

https://<tenant_URL>//dataservice/tenantbackup/list

Restore and Delete Tenant Data Backup File

Before you begin

To run the restore and delete tenant data backup files API, you can download and install Postman tool or any other alternative tool for testing http applications and services. In this document, the procedure to restore and delete tenant data backup files has been explained using the Postman tool. Postman is a software tool used as an API development environment. You can download the tool from the Postman website.

Procedure


Step 1

Open Google Chrome or any browser and enable developer mode on it.

Step 2

Log in to Cisco vManage with tenant username and tenantadmin privileges to access the tenant dashboard.

Step 3

To get header information of the restore API,

  1. On the right side of the screen, click the Network tab to get the network capture view.

  2. In the network capture view, click the Name column to sort the listed items.

  3. Search and click index.html.

  4. Click the Headers tab and expand Request Headers.

  5. Choose all text under Request Headers and copy it to the clipboard.

Step 4

Import backup files through the Postman UI.

  1. Open the Postman UI.

  2. To disable SSL certificate verification, click Postman > Preferences > General > Request. Turn off SSL Certificate Verification.

  3. In the Postman UI, create a new tab.

  4. Click Headers and then click Bulk Edit.

  5. Paste the text that was copied in step 3 from the Request Headers block into an editable form.

  6. From the GET method drop-down list, choose POST.

  7. In the Paste request URL field, paste the dedicated URL of the tenant and include dataservice/tenantbackup/import.

    Example:

    https://Customer1.multitenancy.com/dataservice/tenantbackup/import
  8. Click the Body tab and select form-data.

  9. Under KEY column, enter bakup.tar.gz

  10. Under VALUE column, click Select Files and select a backup file to be imported.

  11. To run the API, click Send.

In the Response section of the Postman UI, you can view the JSON information that indicates the file that was restored.
Step 5

Monitor the restoration of backup files in either of the following ways:

  1. Use Cisco vManage task view that indicates if backup file has been imported successfully. You can view the process identifier of the created process or task.

    Example:

    {"processId": "40adb6c0-eacc-4ad4-ba6c-2c2da2e96d1d",
        "status": "Import Successfully Submitted for tenant 1579026919487"
    }
    
  2. Use the following URL to get the status, https://<tenant_URL>/dataservice/device/action/status/<processId>

    Example:

    https://Customer1.multitenancy.com/dataservice/device/action/status/40adb6c0-eacc-4ad4-ba6c-2c2da2e96d1d
    
Step 6

Delete tenant data backup file through Postman UI.

  1. In the Postman UI, create a new tab.

  2. Click Headers and then click Bulk Edit.

  3. Paste the text that was copied in step 3 from the Request Headers block into an editable form.

  4. From the GET method drop-down list, choose DELETE.

  5. In the Paste request URL field, paste the dedicated URL of the tenant and include dataservice/tenantbackup/delete?fileName='filename'. The filename can either be name of the backup file or all.

    Example:

    https://Customer1.multitenancy.com/dataservice/tenantbackup/
    delete?fileName=bkup_1579026919487_012820-180712_c09230904dfc40edb0d1e50b68b03002.tar.gz

    Example:

    https://Customer1.multitenancy.com/dataservice/tenantbackup/
    delete?fileName=all
  6. To run the API, click Send.

In the Response section of the Postman UI, you can view the JSON information that indicates the files that were deleted.
For example, the response from the Postman UI can be,
{
    "Deleted": [
        "bkup_1579026919487_012820-180712_c09230904dfc40edb0d1e50b68b03002.tar.gz"
    ]
}

View OMP Statistics per Tenant on a Cisco vSmart Controller

Procedure


Step 1

Log in to Cisco vManage as the provider admin user.

Step 2

Go to Monitor > Network.

Step 3

In the table of devices, click on the hostname of a Cisco vSmart Controller.

Step 4

In the left panel, click Real Time.

Step 5

In the Device Options field, enter OMP and select the OMP statistics you wish to view.

Step 6

In the Select Filters dialog box, click Show Filters.

Step 7

Enter the Tenant Name and click Search.


Cisco vManage displays the selected OMP statistics for the particular tenant.

View Tenants Associated with a Cisco vSmart Controller

Procedure


Step 1

Log in to Cisco vManage as the provider admin user.

Step 2

Click a vSmart connection number to display a table with detailed information about each connection.

Cisco vManage displays a table that provides a summary of the Cisco vSmart Controllers and their connections.
Step 3

For a Cisco vSmart Controller, click the More Actions icon and click Tenant List.


Cisco vManage displays a summary of tenants associated with the Cisco vSmart Controller.

Migrate Single-Tenant Cisco SD-WAN Overlay to Multitenant Cisco SD-WAN Deployment

Table 7. Feature History

Feature Name

Release Information

Description

Migrate Single-Tenant Cisco SD-WAN Overlay to Multitenant Cisco SD-WAN Deployment

Cisco IOS XE Release 17.5.1a

Cisco vManage Release 20.5.1

This feature enables you to migrate a single-tenant Cisco SD-WAN overlay to a multitenant deployment using a sequence of Cisco vManage API calls.

Before You Begin

  • Before you begin the migration,

    • Ensure that the edge devices in the single-tenant deployment can reach the Cisco vBond Orchestrator in the multitenant deployment

    • Ensure that the template, routing, and policy configuration on the edge devices is synchronized with the current configuration on Cisco vManage

    • Configure a maintenance window for the single-tenant overlay before performing this procedure. See Configure or Cancel vManage Server Maintenance Window.

  • Minimum software requirements for the single-tenant overlay to be migrated:

    Device Software Version
    Cisco vManage Cisco vManage Release 20.5.1
    Cisco vBond Orchestrator Cisco SD-WAN Release 20.5.1
    Cisco vSmart Controller Cisco SD-WAN Release 20.5.1
    Cisco IOS XE SD-WAN Device Cisco IOS XE Release 17.4.1a
  • Minimum software requirements for the multitenant deployment to which the single-tenant overlay must be migrated:

    Device Software Version
    Cisco vManage Cisco vManage Release 20.5.1
    Cisco vBond Orchestrator Cisco SD-WAN Release 20.5.1
    Cisco vSmart Controller Cisco SD-WAN Release 20.5.1
    Cisco IOS XE SD-WAN Device Cisco IOS XE Release 17.5.1a
  • We recommend that you use a custom script or a third-party application like Postman to execute the API calls.

Migration Procedure

  1. Export the single-tenant deployment and configuration data from a Cisco vManage instance controlling the overlay.

    Method POST
    URL https://ST-vManage-IP-address
    Endpoint /dataservice/tenantmigration/export
    Authorization Admin user credentials.
    Body

    Required

    Format: Raw JSON

    {
        "desc": <tenant_description>,
        "name": <tenant_name>,
        "subdomain": <tenant_name>.<domain>,
        "orgName":  <tenant_orgname >       
     }

    Field Description:

    • desc: A description of the tenant. The description can be up to 256 characters and can contain only alphanumeric characters.

    • name: Unique name for the tenant in the multitenant deployment.

    • subdomain: Fully qualified sub-domain name of the tenant. The sub-domain name must include the domain name of the service provider. For example, if multitenancy.com is the domain name of service provider, and the tenant name is Customer1, the tenant sub-domain name would be Customer1.multitenancy.com.

    • orgName: Name of the tenant organization. The organization name is case-sensitive.

    Response

    Format: JSON

    {
        "processId": <vManage_process_ID>,
    }

    While exporting the data, Cisco vManage attempts to detach any CLI templates from the edge devices in preparation for the migration to the multitenant deployment. If prompted by Cisco vManage, detach CLI templates from the edge devices and execute the export API call again.

  2. Check the status of the data export task in Cisco vManage. When the task succeeds, download the data using the URL https://ST-vManage-IP-address/dataservice/tenantmigration/download/default.tar.gz

  3. On a multitenant Cisco vManage instance, import the data exported from the single-tenant overlay.

    Method POST
    URL https://MT-vManage-IP-address
    Endpoint /dataservice/tenantmigration/import
    Authorization Provider Admin user credentials.
    Body

    Required

    Format: form-data

    Key Type: File

    Value: default.tar.gz

    Response Format: JSON
    {
        "processId": <vManage_process_ID>,
        "migrationTokenURL": <token_URL>,
    }

    When the task succeeds, on the multitenant Cisco vManage, you can view the devices, templates, and policies imported from the single-tenant overlay.

  4. Obtain the migration token using the token URL obtained in response to the API call in Step 3.

    Method GET
    URL https://MT-vManage-IP-address
    Endpoint migrationTokenURL obtained in Step 3.
    Authorization Provider Admin user credentials.
    Response The migration token as a large blob of encoded text.
  5. On the single-tenant Cisco vManage instance, initiate the migration of the overlay to the multitenant deployment.

    Method POST
    URL https://ST-vManage-IP-address
    Endpoint dataservice/tenantmigration/networkMigration
    Authorization Admin user credentials.
    Body

    Required

    Format: Raw text

    Content: Migration token obtained in Step 4.

    Response

    Format: JSON

    {
        "processId": <vManage_process_ID>,
    }

    In Cisco vManage, check the status of the migration task. As part of the migration task, the address of the multitenant vBond Orchestrator, and the service provider and tenant organization names are pushed to the WAN edge devices of the single-tenant overlay. If the task succeeds, WAN edge devices form control connections to controllers in the multitenant deployment; the WAN edge devices are no longer connected to the controllers of the single-tenant overlay.

    Attach any CLI templates detached from the edge devices (in Step 1) after migration to the multitenant deployment. Before you attach the templates, update the Cisco vBond Orchestrator IP address and the Organization name to match the configuration of the multitenant deployment.


    Note

    In the single-tenant deployment, if Cisco vManage-signed certificates are installed on cloud-based WAN edge devices, the certificates are cleared when the devices are migrated to the multitenant deployment. You must re-certify the devices on the multitenant Cisco vManage. If enterprise certificates are installed on the cloud-based WAN edge devices, the certificates are not affected by the migration. For more information, see Enterprise Certificates.