- About this Guide
-
- Clientless SSL VPN Overview
- Basic Clientless SSL VPN Configuration
- Advanced Clientless SSL VPN Configuration
- Configuring Policy Groups
- Clientless SSL VPN Remote Users
- Configuring Clientless SSL VPN Users
- Using Clientless SSL VPN with Mobile Devices
- Customizing Clientless SSL VPN
- Clientless SSL VPN Troubleshooting
- Clientless SSL VPN Licensing
- Index
Configuring an External Server for Authorization and Authentication
This chapter describes how to configure an external LDAP, RADIUS, or TACACS+ server to support AAA for the ASA. Before you configure the ASA to use an external server, you must configure the AAA server with the correct ASA authorization attributes and, from a subset of these attributes, assign specific permissions to individual users.
Understanding Policy Enforcement of Authorization Attributes
The ASA supports several methods of applying user authorization attributes (also called user entitlements or permissions) to VPN connections. You can configure the ASA to obtain user attributes from any combination of:
- a Dynamic Access Policy (DAP) on the ASA
- an external RADIUS or LDAP authentication and/or authorization server
- a group policy on the ASA
If the ASA receives attributes from all sources, the attributes are evaluated, merged, and applied to the user policy. If there are conflicts between attributes, the DAP attributes take precedence.
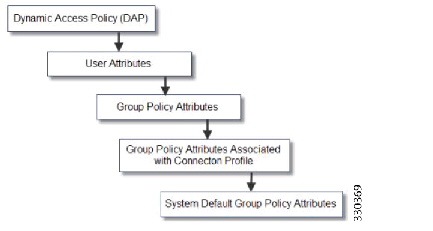
The ASA applies attributes in the following order (see Figure 13-1).
1.![]() DAP attributes on the ASA—Introduced in Version 8.0(2), these attributes take precedence over all others. If you set a bookmark or URL list in DAP, it overrides a bookmark or URL list set in the group policy.
DAP attributes on the ASA—Introduced in Version 8.0(2), these attributes take precedence over all others. If you set a bookmark or URL list in DAP, it overrides a bookmark or URL list set in the group policy.
2.![]() User attributes on the AAA server—The server returns these attributes after successful user authentication and/or authorization. Do not confuse these with attributes that are set for individual users in the local AAA database on the ASA (User Accounts in ASDM).
User attributes on the AAA server—The server returns these attributes after successful user authentication and/or authorization. Do not confuse these with attributes that are set for individual users in the local AAA database on the ASA (User Accounts in ASDM).
3.![]() Group policy configured on the ASA—If a RADIUS server returns the value of the RADIUS CLASS attribute IETF-Class-25 (OU= group-policy ) for the user, the ASA places the user in the group policy of the same name and enforces any attributes in the group policy that are not returned by the server.
Group policy configured on the ASA—If a RADIUS server returns the value of the RADIUS CLASS attribute IETF-Class-25 (OU= group-policy ) for the user, the ASA places the user in the group policy of the same name and enforces any attributes in the group policy that are not returned by the server.
For LDAP servers, any attribute name can be used to set the group policy for the session. The LDAP attribute map that you configure on the ASA maps the LDAP attribute to the Cisco attribute IETF-Radius-Class.
4.![]() Group policy assigned by the Connection Profile (called tunnel-group in the CLI)—The Connection Profile has the preliminary settings for the connection, and includes a default group policy applied to the user before authentication. All users connecting to the ASA initially belong to this group, which provides any attributes that are missing from the DAP, user attributes returned by the server, or the group policy assigned to the user.
Group policy assigned by the Connection Profile (called tunnel-group in the CLI)—The Connection Profile has the preliminary settings for the connection, and includes a default group policy applied to the user before authentication. All users connecting to the ASA initially belong to this group, which provides any attributes that are missing from the DAP, user attributes returned by the server, or the group policy assigned to the user.
5.![]() Default group policy assigned by the ASA (DfltGrpPolicy)—System default attributes provide any values that are missing from the DAP, user attributes, group policy, or connection profile.
Default group policy assigned by the ASA (DfltGrpPolicy)—System default attributes provide any values that are missing from the DAP, user attributes, group policy, or connection profile.
Figure 13-1 Policy Enforcement Flow
Defining the ASA LDAP Configuration
Authorization refers to the process of enforcing permissions or attributes. An LDAP server defined as an authentication or authorization server enforces permissions or attributes if they are configured.
Guidelines
The ASA enforces the LDAP attributes based on attribute name, not numeric ID. RADIUS attributes, are enforced by numeric ID, not by name.
For ASDM Version 7.0, LDAP attributes include the cVPN3000 prefix. For ASDM Versions 7.1 and later, this prefix was removed.
LDAP attributes are a subet of the Radius attributes, which are listed in the Radius chapter.
Active Directory/LDAP VPN Remote Access Authorization Examples
This section presents example procedures for configuring authentication and authorization on the ASA using the Microsoft Active Directory server. It includes the following topics:
- User-Based Attributes Policy Enforcement
- Placing LDAP Users in a Specific Group Policy
- Enforcing Static IP Address Assignment for AnyConnect Tunnels
- Enforcing Dial-in Allow or Deny Access
- Enforcing Logon Hours and Time-of-Day Rules
Other configuration examples available on Cisco.com include the following TechNotes.
- ASA/PIX: Mapping VPN Clients to VPN Group Policies Through LDAP Configuration Example at the following URL:
http://www.cisco.com/en/US/products/ps6120/products_configuration_example09186a008089149d.shtml
http://www.cisco.com/en/US/products/ps6120/products_configuration_example09186a00808d1a7c.shtml
User-Based Attributes Policy Enforcement
You can map any standard LDAP attribute to a well-known Vendor-Specific Attribute (VSA), and you can map one or more LDAP attribute(s) to one or more Cisco LDAP attributes.
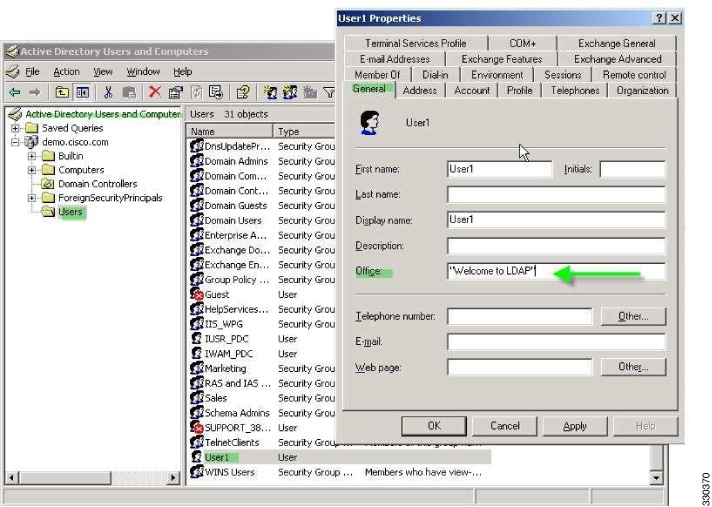
The following example shows how to configure the ASA to enforce a simple banner for a user who is configured on an AD LDAP server. On the server, use the Office field in the General tab to enter the banner text. This field uses the attribute named physicalDeliveryOfficeName. On the ASA, create an attribute map that maps physicalDeliveryOfficeName to the Cisco attribute Banner1. During authentication, the ASA retrieves the value of physicalDeliveryOfficeName from the server, maps the value to the Cisco attribute Banner1, and displays the banner to the user.
This example applies to any connection type, including the IPsec VPN client, AnyConnect SSL VPN client, or clientless SSL VPN. In the example, User1 connects through a clientless SSL VPN connection.
To configure the attributes for a user on the AD or LDAP Server, perform the following steps:
The Properties dialog box appears (see Figure 13-2).
Step 2![]() Click the General tab and enter banner text in the Office field, which uses the AD/LDAP attribute physicalDeliveryOfficeName.
Click the General tab and enter banner text in the Office field, which uses the AD/LDAP attribute physicalDeliveryOfficeName.
Figure 13-2 LDAP User Configuration
Step 3![]() Create an LDAP attribute map on the ASA.
Create an LDAP attribute map on the ASA.
The following example creates the map Banner and maps the AD/LDAP attribute physicalDeliveryOfficeName to the Cisco attribute Banner1:
Step 4![]() Associate the LDAP attribute map to the AAA server.
Associate the LDAP attribute map to the AAA server.
The following example enters the aaa server host configuration mode for the host 10.1.1.2 in the AAA server group MS_LDAP, and associates the attribute map Banner that you created in Step 3:
Step 5![]() Test the banner enforcement.
Test the banner enforcement.
The following example shows a clientless SSL connection and the banner enforced through the attribute map after the user authenticates (see Figure 13-3).

Placing LDAP Users in a Specific Group Policy
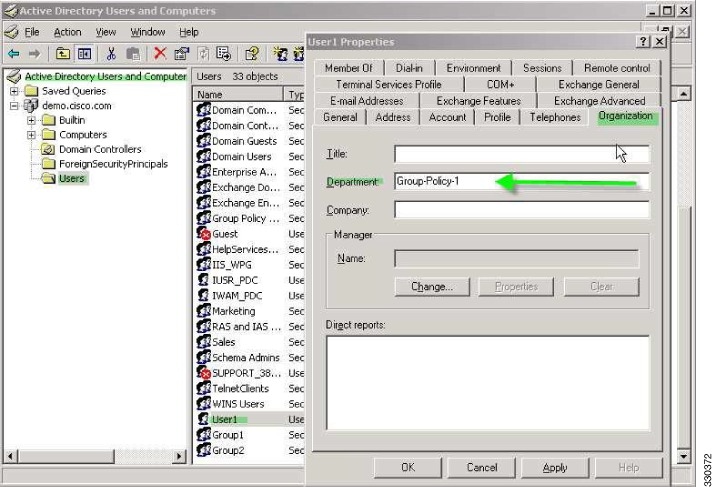
The following example shows how to authenticate User1 on the AD LDAP server to a specific group policy on the ASA. On the server, use the Department field of the Organization tab to enter the name of the group policy. Then create an attribute map, and map Department to the Cisco attribute IETF-Radius-Class. During authentication, the ASA retrieves the value of Department from the server, maps the value to the IETF-Radius-Class, and places User1 in the group policy.
This example applies to any connection type, including the IPsec VPN client, AnyConnect SSL VPN client, or clientless SSL VPN. In this example, User1 is connecting through a clientless SSL VPN connection.
To configure the attributes for the user on the AD LDAP server, perform the following steps:
The Properties dialog box appears (see Figure 13-4).
Step 2![]() Click the Organization tab and enter Group-Policy-1 in the Department field.
Click the Organization tab and enter Group-Policy-1 in the Department field.
Figure 13-4 AD/LDAP Department Attribute
Step 3![]() Define an attribute map for the LDAP configuration shown in Step 1.
Define an attribute map for the LDAP configuration shown in Step 1.
The following example shows how to map the AD attribute Department to the Cisco attribute IETF-Radius-Class.
Step 4![]() Associate the LDAP attribute map to the AAA server.
Associate the LDAP attribute map to the AAA server.
The following example enters the aaa server host configuration mode for the host 10.1.1.2 in the AAA server group MS_LDAP, and associates the attribute map group_policy that you created in Step 3:
Step 5![]() Add the new group-policy on the ASA and configure the required policy attributes that will be assigned to the user. The following example creates Group-policy-1, the name entered in the Department field on the server:
Add the new group-policy on the ASA and configure the required policy attributes that will be assigned to the user. The following example creates Group-policy-1, the name entered in the Department field on the server:
Step 6![]() Establish the VPN connection as the user would, and verify that the session inherits the attributes from Group-Policy1 (and any other applicable attributes from the default group-policy).
Establish the VPN connection as the user would, and verify that the session inherits the attributes from Group-Policy1 (and any other applicable attributes from the default group-policy).
Step 7![]() Monitor the communication between the ASA and the server by enabling the debug ldap 255 command from privileged EXEC mode. The following is sample output from this command, which has been edited to provide the key messages:
Monitor the communication between the ASA and the server by enabling the debug ldap 255 command from privileged EXEC mode. The following is sample output from this command, which has been edited to provide the key messages:
Enforcing Static IP Address Assignment for AnyConnect Tunnels
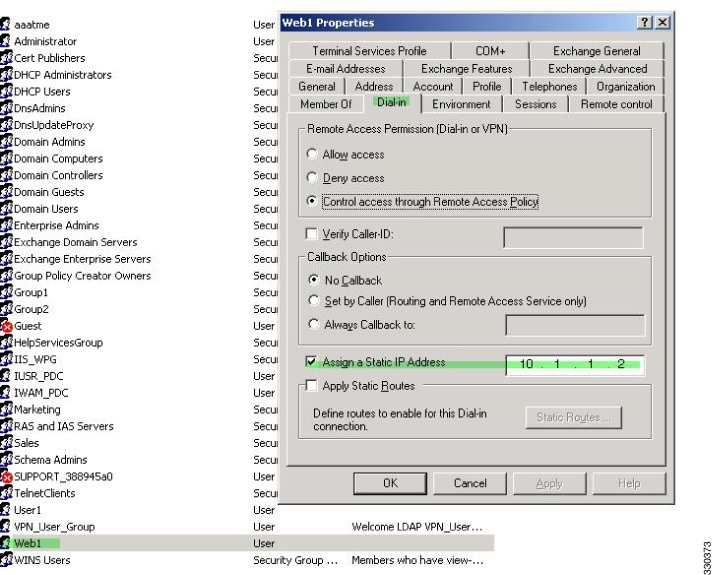
In this example, configure the AnyConnect client user Web1 to receive a static IP address. then enter the address in the Assign Static IP Address field of the Dialin tab on the AD LDAP server. This field uses the msRADIUSFramedIPAddress attribute. Create an attribute map that maps this attribute to the Cisco attribute IETF-Radius-Framed-IP-Address.
During authentication, the ASA retrieves the value of msRADIUSFramedIPAddress from the server, maps the value to the Cisco attribute IETF-Radius-Framed-IP-Address, and provides the static address to User1.
The following example applies to full-tunnel clients, including the IPsec client and the SSL VPN clients (AnyConnect client 2.x and the SSL VPN client).
To configure the user attributes on the AD /LDAP server, perform the following steps:
The Properties dialog box appears (see Figure 13-5).
Step 2![]() Click the Dialin tab, check the Assign Static IP Address check box, and enter an IP address of 10.1.1.2.
Click the Dialin tab, check the Assign Static IP Address check box, and enter an IP address of 10.1.1.2.
Figure 13-5 Assign Static IP Address
Step 3![]() Create an attribute map for the LDAP configuration shown in Step 1.
Create an attribute map for the LDAP configuration shown in Step 1.
The following example shows how to map the AD attribute msRADIUSFramedIPAddress used by the Static Address field to the Cisco attribute IETF-Radius-Framed-IP-Address:
Step 4![]() Associate the LDAP attribute map to the AAA server.
Associate the LDAP attribute map to the AAA server.
The following example enters the aaa server host configuration mode for the host 10.1.1.2, in the AAA server group MS_LDAP, and associates the attribute map static_address that you created in Step 3:
Step 5![]() Verify that the vpn-address-assignment command is configured to specify AAA by viewing this part of the configuration with the show run all vpn-addr-assign command:
Verify that the vpn-address-assignment command is configured to specify AAA by viewing this part of the configuration with the show run all vpn-addr-assign command:
Step 6![]() Establish a connection to the ASA with the AnyConnect client. Observe the following:
Establish a connection to the ASA with the AnyConnect client. Observe the following:
- The banner is received in the same sequence as a clientless connection (see Figure 13-6).
- The user receives the IP address configured on the server and mapped to the ASA (see Figure 13-7).
Figure 13-6 Verify the Banner for the AnyConnect Session

Figure 13-7 AnyConnect Session Established

Step 7![]() Use the show vpn-sessiondb svc command to view the session details and verify the address assigned:
Use the show vpn-sessiondb svc command to view the session details and verify the address assigned:
Enforcing Dial-in Allow or Deny Access
The following example creates an LDAP attribute map that specifies the tunneling protocols allowed by the user. You map the allow access and deny access settings on the Dialin tab to the Cisco attribute Tunneling-Protocol, which supports the bitmap values shown in Table 13-1 :
|
|
|
|---|---|
41 |
|
82 |
|
|
1.IPsec and L2TP over IPsec are not supported simultaneously. Therefore, the values 4 and 8 are mutually exclusive. |
Use this attribute to create an Allow Access (TRUE) or a Deny Access (FALSE) condition for the protocols, and enforce the method for which the user is allowed access.
For this simplified example, by mapping the tunnel protocol IPsec/IKEv1 (4), you can create an allow (true) condition for the Cisco VPN client. You also map WebVPN (16) and SVC/AC (32), which are mapped as a value of 48 (16+32) and create a deny (false) condition. This allows the user to connect to the ASA using IPsec, but any attempt to connect using clientless SSL or the AnyConnect client is denied.
Another example of enforcing dial-in allow access or deny access is available in the Tech Note ASA/PIX: Mapping VPN Clients to VPN Group Policies Through LDAP Configuration Example at the following URL:
http://www.cisco.com/en/US/products/ps6120/products_configuration_example09186a008089149d.shtml
To configure the user attributes on the AD/LDAP server, perform the following steps:
The Properties dialog box appears.
Step 2![]() Click the Dial-in tab, then click the Allow Access radio button (Figure 13-8).
Click the Dial-in tab, then click the Allow Access radio button (Figure 13-8).
Figure 13-8 AD/LDAP User1 - Allow Access


Note If you select the Control access through the Remote Access Policy option, then a value is not returned from the server, and the permissions that are enforced are based on the internal group policy settings of the ASA.
Step 3![]() Create an attribute map to allow both an IPsec and AnyConnect connection, but deny a clientless SSL connection.
Create an attribute map to allow both an IPsec and AnyConnect connection, but deny a clientless SSL connection.
The following example shows how to create the map tunneling_protocols, and map the AD attribute msNPAllowDialin used by the Allow Access setting to the Cisco attribute Tunneling-Protocols using the map-name command, and add map values with the map-value command:
Step 4![]() Associate the LDAP attribute map to the AAA server.
Associate the LDAP attribute map to the AAA server.
The following example enters the aaa server host configuration mode for the host 10.1.1.2, in the AAA server group MS_LDAP, and associates the attribute map tunneling_protocols that you created in Step 2:
Step 5![]() Verify that the attribute map works as configured.
Verify that the attribute map works as configured.
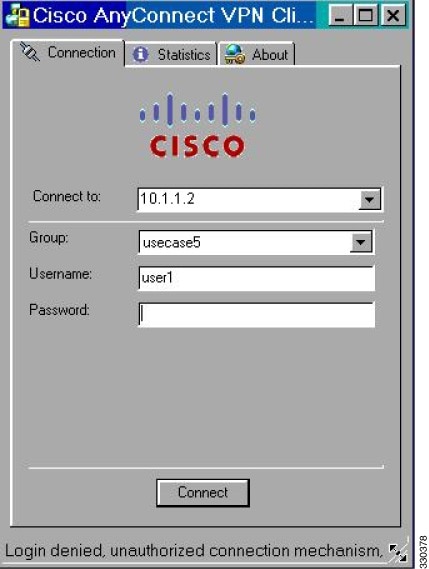
Step 6![]() Try connections using clientless SSL, the AnyConnect client, and the IPsec client. The clientless and AnyConnect connections should fail, and the user should be informed that an unauthorized connection mechanism was the reason for the failed connection. The IPsec client should connect because IPsec is an allowed tunneling protocol according to the attribute map (see Figure 13-9 and Figure 13-10).
Try connections using clientless SSL, the AnyConnect client, and the IPsec client. The clientless and AnyConnect connections should fail, and the user should be informed that an unauthorized connection mechanism was the reason for the failed connection. The IPsec client should connect because IPsec is an allowed tunneling protocol according to the attribute map (see Figure 13-9 and Figure 13-10).
Figure 13-9 Login Denied Message for Clientless User
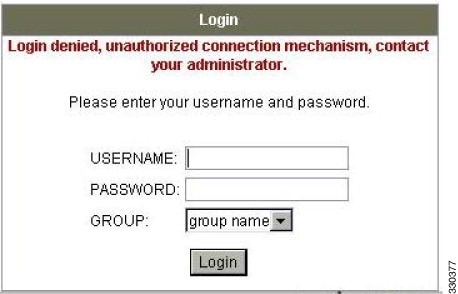
Figure 13-10 Login Denied Message for AnyConnect Client User
Enforcing Logon Hours and Time-of-Day Rules
The following example shows how to configure and enforce the hours that a clientless SSL user (such as a business partner) is allowed to access the network.
On the AD server, use the Office field to enter the name of the partner, which uses the physicalDeliveryOfficeName attribute. Then we create an attribute map on the ASA to map that attribute to the Cisco attribute Access-Hours. During authentication, the ASA retrieves the value of physicalDeliveryOfficeName and maps it to Access-Hours.
To configure the user attributes on the AD /LDAP server, perform the following steps:
The Properties dialog box appears (see Figure 13-11).
Figure 13-11 Active Directory Properties Dialog Box

Step 3![]() Create an attribute map.
Create an attribute map.
The following example shows how to create the attribute map access_hours and map the AD attribute physicalDeliveryOfficeName used by the Office field to the Cisco attribute Access-Hours.
Step 4![]() Associate the LDAP attribute map to the AAA server.
Associate the LDAP attribute map to the AAA server.
The following example enters the aaa server host configuration mode for the host 10.1.1.2, in the AAA server group MS_LDAP, and associates the attribute map access_hours that you created in Step 3:
Step 5![]() Configure time ranges for each value allowed on the server.
Configure time ranges for each value allowed on the server.
The following example configures Partner access hours from 9am to 5pm Monday through Friday:
Example of Creating a Group Policy for a Local User
Prerequisites
This procedure describes how to edit an existing user. To add a user select Configuration > Remote Access VPN > AAA/Local Users > Local Users and click Add . For more information see “Adding a User Account to the Local Database” section.
Guidelines
By default, the Inherit check box is checked for each setting on the Edit User Account screen, which means that the user account inherits the value of that setting from the default group policy, DfltGrpPolicy.
To override each setting, uncheck the Inherit check box, and enter a new value. The detailed steps that follow describe each of the settings on the Edit User Account screen.
Detailed Steps
Step 1![]() Start ASDM and select Configuration > Remote Access VPN > AAA/Local Users > Local Users .
Start ASDM and select Configuration > Remote Access VPN > AAA/Local Users > Local Users .
Step 2![]() Select the user you want configure and click Edit .
Select the user you want configure and click Edit .
The Edit User Account screen opens.
Step 3![]() In the left-hand pane, click VPN Policy .
In the left-hand pane, click VPN Policy .
Step 4![]() Specify a group policy for the user. The user policy will inherit the attributes of this group policy. If there are other fields on this screen that are set to Inherit the configuration from the Default Group Policy, the attributes specified in this group policy will take precedence over those set in the Default Group Policy.
Specify a group policy for the user. The user policy will inherit the attributes of this group policy. If there are other fields on this screen that are set to Inherit the configuration from the Default Group Policy, the attributes specified in this group policy will take precedence over those set in the Default Group Policy.
Step 5![]() Specify which tunneling protocols are available for the user, or whether the value is inherited from the group policy. Check the desired Tunneling Protocols check boxes to choose one of the following tunneling protocols:
Specify which tunneling protocols are available for the user, or whether the value is inherited from the group policy. Check the desired Tunneling Protocols check boxes to choose one of the following tunneling protocols:
- Clientless SSL VPN (VPN via SSL/TLS) uses a web browser to establish a secure remote-access tunnel to a VPN Concentrator; requires neither a software nor hardware client. Clientless SSL VPN can provide easy access to a broad range of enterprise resources, including corporate websites, web-enabled applications, NT/AD file shares (web-enabled), e-mail, and other TCP-based applications from almost any computer that can reach HTTPS Internet sites.
- The SSL VPN Client lets users connect after downloading the Cisco AnyConnect Client application. Users use a clientless SSL VPN connection to download this application the first time. Client updates then occur automatically as needed whenever the user connects.
- IPsec IKEv1—IP Security Protocol. Regarded as the most secure protocol, IPsec provides the most complete architecture for VPN tunnels. Both Site-to-Site (peer-to-peer) connections and Cisco VPN client-to-LAN connections can use IPsec IKEv1.
- IPsec IKEv2—Supported by the AnyConnect Secure Mobility Client. AnyConnect connections using IPsec with IKEv2 provide advanced features such as software updates, client profiles, GUI localization (translation) and customization, Cisco Secure Desktop, and SCEP proxy.
- L2TP over IPsec allows remote users with VPN clients provided with several common PC and mobile PC operating systems to establish secure connections over the public IP network to the ASA and private corporate networks.
Note If no protocol is selected, an error message appears.
Step 6![]() Specify which filter (IPv4 or IPv6) to use, or whether to inherit the value from the group policy. Filters consist of rules that determine whether to allow or reject tunneled data packets coming through the ASA, based on criteria such as source address, destination address, and protocol. To configure filters and rules, choose Configuration > Remote Access VPN > Network (Client) Access > Group Policies > Add/Edit > General > More Options > Filter.
Specify which filter (IPv4 or IPv6) to use, or whether to inherit the value from the group policy. Filters consist of rules that determine whether to allow or reject tunneled data packets coming through the ASA, based on criteria such as source address, destination address, and protocol. To configure filters and rules, choose Configuration > Remote Access VPN > Network (Client) Access > Group Policies > Add/Edit > General > More Options > Filter.
Click Manage to display the ACL Manager pane, on which you can add, edit, and delete ACLs and ACEs.
Step 7![]() Specify whether to inherit the Connection Profile (tunnel group) lock or to use the selected tunnel group lock, if any. Selecting a specific lock restricts users to remote access through this group only. Tunnel Group Lock restricts users by checking if the group configured in the VPN client is the same as the users assigned group. If it is not, the ASA prevents the user from connecting. If the Inherit check box is not checked, the default value is None.
Specify whether to inherit the Connection Profile (tunnel group) lock or to use the selected tunnel group lock, if any. Selecting a specific lock restricts users to remote access through this group only. Tunnel Group Lock restricts users by checking if the group configured in the VPN client is the same as the users assigned group. If it is not, the ASA prevents the user from connecting. If the Inherit check box is not checked, the default value is None.
Step 8![]() Specify whether to inherit the Store Password on Client System setting from the group. Uncheck the Inherit check box to activate the Yes and No radio buttons. Click Yes to store the login password on the client system
Specify whether to inherit the Store Password on Client System setting from the group. Uncheck the Inherit check box to activate the Yes and No radio buttons. Click Yes to store the login password on the client system![]() (potentially a less-secure option). Click No (the default) to require the user to enter the password with each connection. For maximum security, we recommend that you not allow password storage. This parameter has no effect on interactive hardware client authentication or individual user authentication for a VPN 3002.
(potentially a less-secure option). Click No (the default) to require the user to enter the password with each connection. For maximum security, we recommend that you not allow password storage. This parameter has no effect on interactive hardware client authentication or individual user authentication for a VPN 3002.
Step 9![]() Specify an Access Hours policy to apply to this user, create a new access hours policy for the user, or leave the Inherit box checked. The default value is Inherit, or, if the Inherit check box is not checked, the default value is Unrestricted.
Specify an Access Hours policy to apply to this user, create a new access hours policy for the user, or leave the Inherit box checked. The default value is Inherit, or, if the Inherit check box is not checked, the default value is Unrestricted.
Click Manage to open the Add Time Range dialog box, in which you can specify a new set of access hours.
Step 10![]() Specify the number of simultaneous logins by the user. The Simultaneous Logins parameter specifies the maximum number of simultaneous logins allowed for this user. The default value is 3. The minimum value is 0, which disables login and prevents user access.
Specify the number of simultaneous logins by the user. The Simultaneous Logins parameter specifies the maximum number of simultaneous logins allowed for this user. The default value is 3. The minimum value is 0, which disables login and prevents user access.
Note While there is no maximum limit, allowing several simultaneous connections could compromise security and affect performance.
Step 11![]() Specify the maximum connection time for the user connection time in minutes. At the end of this time, the system
Specify the maximum connection time for the user connection time in minutes. At the end of this time, the system![]() terminates the connection. The minimum is 1 minute, and the maximum is 2147483647 minutes (over 4000 years, should we all be so lucky). To allow unlimited connection time, check the Unlimited check box (the default).
terminates the connection. The minimum is 1 minute, and the maximum is 2147483647 minutes (over 4000 years, should we all be so lucky). To allow unlimited connection time, check the Unlimited check box (the default).
Step 12![]() Specify the Idle Timeout for the user in minutes. If there is no communication activity on the connection by this user in this period, the system terminates the connection. The minimum time is 1 minute, and the maximum time is 10080 minutes. This value does not apply to users of clientless SSL VPN connections.
Specify the Idle Timeout for the user in minutes. If there is no communication activity on the connection by this user in this period, the system terminates the connection. The minimum time is 1 minute, and the maximum time is 10080 minutes. This value does not apply to users of clientless SSL VPN connections.
Step 13![]() Configure the Session Alert Interval. If you uncheck the Inherit check box, the Default check box is checked automatically. This sets the session alert interval to 30 minutes. If you want to specify a new value, uncheck the Default check box and specify a session alert interval from 1 to 30 minutes in the minutes box.
Configure the Session Alert Interval. If you uncheck the Inherit check box, the Default check box is checked automatically. This sets the session alert interval to 30 minutes. If you want to specify a new value, uncheck the Default check box and specify a session alert interval from 1 to 30 minutes in the minutes box.
Step 14![]() Configure the Idle Alert Interval. If you uncheck the Inherit check box, the Default check box is checked automatically. This sets the idle alert interval to 30 minutes. If you want to specify a new value, uncheck the Default check box and specify a session alert interval from 1 to 30 minutes in the minutes box.
Configure the Idle Alert Interval. If you uncheck the Inherit check box, the Default check box is checked automatically. This sets the idle alert interval to 30 minutes. If you want to specify a new value, uncheck the Default check box and specify a session alert interval from 1 to 30 minutes in the minutes box.
Step 15![]() To set a dedicated IPv4 address for this user, enter an IPv4 address and subnet mask in the Dedicated IPv4 Address (Optional) area.
To set a dedicated IPv4 address for this user, enter an IPv4 address and subnet mask in the Dedicated IPv4 Address (Optional) area.
Step 16![]() To set a dedicated IPv6 address for this user, enter an IPv6 address with an IPv6 prefix in the Dedicated IPv6 Address (Optional) field. The IPv6 prefix indicates the subnet on which the IPv6 address resides.
To set a dedicated IPv6 address for this user, enter an IPv6 address with an IPv6 prefix in the Dedicated IPv6 Address (Optional) field. The IPv6 prefix indicates the subnet on which the IPv6 address resides.
Step 17![]() To configure clientless SSL settings, in the left-hand pane, click Clientless SSL VPN . To override each setting, uncheck the Inherit check box, and enter a new value.
To configure clientless SSL settings, in the left-hand pane, click Clientless SSL VPN . To override each setting, uncheck the Inherit check box, and enter a new value.
The changes are saved to the running configuration.
 Feedback