Attribute-Based Access Control

Attributes are customized network objects for use in your configuration. You can define and use them in ASA configurations to filter traffic associated with one or more virtual machines in an VMware ESXi environment managed by VMware vCenter. Attributes allow you to define access control lists (ACLs) to assign policies to traffic from groups of virtual machines sharing one or more attributes. You assign attributes to virtual machines within the ESXi environment and configure an attribute agent, which connects to vCenter or a single ESXi host using HTTPS. The agent then requests and retrieves one or more bindings which correlate specific attributes to the primary IP address of a virtual machine.

Attribute-based access control is supported on all hardware platforms, and on all ASA virtual platforms running on ESXi, KVM, or HyperV hypervisors. Attributes can only be retrieved from virtual machines running on an ESXi hypervisor.

Guidelines for Attribute-Based Network Objects

IPv6 Guidelines

  • IPv6 addresses not supported by vCenter for host credentials.

  • IPv6 is supported for virtual machine bindings where the primary IP address of the virtual machine is an IPv6 address.

Additional Guidelines and Limitations

  • Multi-context mode is not supported. Attribute-based network objects are supported for single-mode context only.

  • Attribute-based network objects support binding to the virtual machine's primary address only. Binding to multiple vNICs on a single virtual machine is not supported.

  • Attribute-based network objects may only be configured for objects used for access groups. Network objects for other features (NAT, etc.) are not supported.

  • Virtual machines must be running VMware Tools in order to report primary IP addresses to vCenter. The ASA is not notified of attribute changes unless vCenter knows the IP address of the virtual machine. This is a vCenter restriction.

  • Attribute-based network objects are not supported in the Amazon Web Services (AWS) or Microsoft Azure public cloud environments.
Configure Attribute-Based Access Control

The following procedure provides a general sequence for implementing attribute-based access control on managed virtual machines in a VMware ESXi environment.

Procedure


Step 1

Assign custom attribute types and values to your managed virtual machines. See Configure Attributes for vCenter Virtual Machines.

Step 2

Configure an attribute agent to connect to your vCenter Server or ESXi host. See Configure a VM Attribute Agent.

Step 3

Configure attribute-based network objects needed for your deployment scheme. See Configure Attribute-Based Network Objects.

Step 4

Configure the access control lists and rules. See Configure Access Rules Using Attribute-Based Network Objects .


Configure Attributes for vCenter Virtual Machines

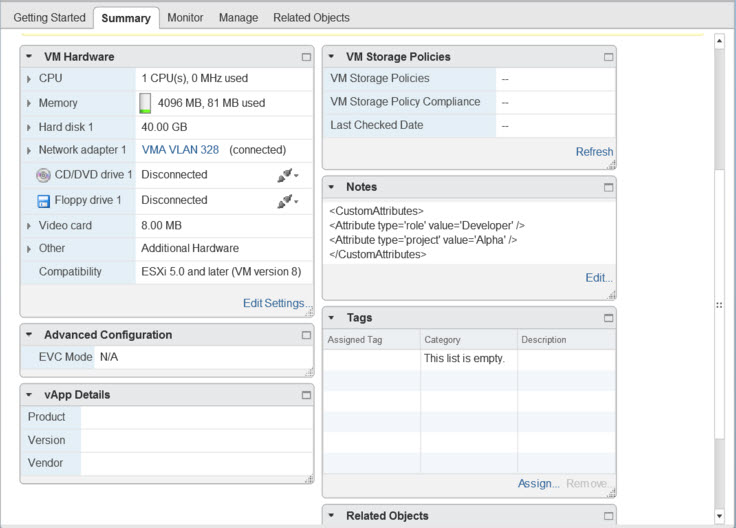
You assign custom attribute types and values to virtual machines, and associate these attributes to network objects. You can then use these attribute-based network objects to apply ACLs to a set of virtual machines with common user-defined characteristics. For example, you could isolate developer build machines from test machines, or group virtual machines by project and/or location. For the ASA to monitor virtual machines using attributes, you need to make the attributes available to vCenter from the managed virtual machines. You do this by inserting a formatted text file into the Notes field, which is found on the Summary page of virtual machines in vCenter.

You can see the Notes field in the following figure.

Figure 1. Summary Tab of a Virtual Machine in vCenter
To specify custom attributes, you copy a properly formatted XML file into the Notes field for the virtual machine. The format of the file is:

<CustomAttributes>
<Attribute type='attribute-type' value='attribute-value'/>
...
</CustomAttributes>

A single virtual machine may have multiple attributes defined by repeating the second line above. Note that each line must identify a unique attribute type. If the same attribute type is defined with multiple attribute values, each binding update for that attribute type will overwrite the previous one.

For string attribute values, the value associated with the object definition must be an exact match to the value reported to vCenter by the virtual machine. For example, an attribute value Build Machine does not match the annotation value build machine on the virtual machine. A binding would not be added to the host-map for this attribute.

You can define multiple unique attribute types in a single file.

Procedure


Step 1

Select the virtual machine from your vCenter inventory.

Step 2

Click the Summary tab for the virtual machine.

Step 3

In the Notes field, click the Edit link.

Step 4

Paste the custom attributes text file into the Edit Notes box. The text file should follow the XML template format:

Example:

<CustomAttributes>
<Attribute type='attribute-type' value='attribute-value'/>
...
</CustomAttributes>

Step 5

Click OK.


Configure a VM Attribute Agent

You configure a VM attribute agent to communicate with vCenter or a single ESXi host. When you assign attributes to virtual machines within the VMware environment, the attribute agent sends a message to vCenter indicating which attributes have been configured, and vCenter responds with a binding update for every virtual machine where a matching attribute type is configured.

The VM attribute agent and vCenter exchange binding updates as follows:

  • If the agent issues a request containing a new attribute type, vCenter responds with a binding update for every virtual machine where the attribute type is configured. After that point, vCenter only issues a new binding when an attribute value is added or changed.

  • If a monitored attribute changes for one or more virtual machines, a binding update message is received. Each binding message is identified by the IP address of the virtual machine reporting the attribute value.

  • If multiple attributes are being monitored by a single agent, a single binding update contains the current value of all monitored attributes for each virtual machine.

  • If a specific attribute being monitored by the agent is not configured on a virtual machine, the binding will contain an empty attribute value for that virtual machine.

  • If a virtual machine has not been configured with any monitored attributes, vCenter does not send a binding update.

Each attribute agent communicates with exactly one vCenter or ESXi host. A single ASA may have multiple attribute agents defined, each communicating with a different vCenter, or one or more communicating with the same vCenter.

Procedure


Step 1

Choose Configuration > Firewall > VM Attribute Agent.

Step 2

Click Add.

Step 3

In the Host Information area:

  1. Choose whether to enable IP address and authentication credentials.

  2. Enter a DNS host name or IP address.

  3. Enter a user name.

  4. Select the password type: Clear Text, UnEncrypted, or Encrypted.

  5. Enter the password.

Step 4

In the Keepalive Information area:

  1. Enter the Retry Interval. Enter a value between 1 and 65535. The default is 30.

  2. Enter the Retry Count. Enter a value between 1 and 32. The default is 3.

Step 5

Click OK.


Configure Attribute-Based Network Objects

Attribute-based network objects filter traffic according to attributes associated with one or more virtual machines in a VMware ESXi environment. You can define access control lists (ACLs) to assign policies to traffic from groups of virtual machines sharing one or more attributes.

For example, you can configure access rules that permit machines with an engineering attribute to access machines with a eng_lab attribute. A network admininstrator can add or remove engineering machines and lab servers while the security policy managed by the security administrator continues to work automatically without manual updates to the access rules.

Procedure


Step 1

Choose Configuration > Firewall > Access Rules > Advanced Options.

Step 2

Check the Enable Object Group Search Algorithm check box.

You must enable object group search to configure VM attributes.

Step 3

Choose Configuration > Firewall > Objects > Network Objects/Groups.

Step 4

Do one of the following:

  • Choose Add > Network Object Attributes to add a new attribute-based network object. Enter a name and optionally, a description.

  • Choose an existing attribute-based network object and click Edit.

Step 5

For a new attribute-based network object, enter values for the following fields:

  1. Agent Name—Click the browse button and select a VM attribute agent (or define a new one).

    If you configure a attribute-based network object to use an attribute agent which has not been configured, a placeholder agent is automatically created with no credentials and default keepalive values. This agent remains in the "No credentials available" state until host credentials are supplied.

  2. Attribute Type—This string entry defines the attribute type and must include the custom. prefix. For example, custom.role.

  3. Attribute Value—This string entry associates a value to the attribute type.

    Together, the Attribute Type and Attribute Value pair define a unique attribute. This allows you to define multiple attributes that suit your particular deployment scheme. If you define the same attribute type more than once with multiple attribute values, the last value defined overwrites the previous one.

Step 6

Click OK .


Configure Access Rules Using Attribute-Based Network Objects

To apply an access rule using attribute-based network objects, perform the following steps.

Procedure


Step 1

Choose Configuration > Firewall > Access Rules.

The rules are organized by interface and direction, with a separate group for global rules. If you configure management access rules, they are repeated on this page. These groups are equivalent to the extended ACL that is created and assigned to the interface or globally as an access group. These ACLs also appear on the ACL Manager page.

Step 2

Do any of the following:

  • To add a new rule, choose Add > Add Access Rule.

  • To insert a rule at a specific location within a container, select an existing rule and choose Add > Insert to add the rule above it, or choose Add > Insert After.

  • To edit a rule, select it and click Edit.

Step 3

Fill in the rule properties. The primary options to select are:

  • Interface—The interface to which the rule applies. Select Any to create a global rule. For bridge groups in routed mode, you can create access rules for both the Bridge Virtual Interface (BVI) and each bridge group member interface.

  • Action: Permit/Deny—Whether you are permitting (allowing) the described traffic or are denying (dropping) it.

  • Source/Destination criteria—Select the source attribute-based network object (originating object) and destination attribute-based network object (target object of the traffic flow). You can also specify a user or user group name for the source. Additionally, you can use the Service field to identify the specific type of traffic if you want to focus the rule more narrowly than all IP traffic. If you implement Trustsec, you can use security groups to define source and destination.

For detailed information on all of the available options, see Access Rule Properties.

When you are finished defining the rule, click OK to add the rule to the table.

Step 4

Click Apply to save the access rule to your configuration.


Monitoring Attribute-Based Network Objects

For attribute-based network objects, you can analyze the usage of an individual object. From their page in the Configuration > Firewall > Objects> Network Objects/Groups folder, click the Where Used button.

For attribute-based network objects, you can also click the Not Used button to find objects that are not used in any rules. This display gives you a short-cut for deleting these unused objects.

History for Attribute-Based Access Control

Feature Name

Platform Releases

Description

Support for Attribute-Based Network Objects

9.7.(1)

You can now control network access using virtual machine attributes in addition to traditional network charateristics such as IP addresses, protocols, and ports. The virtual machines must be in a VMware ESXi environment.

We introduced or modified the following screens:

Configuration > Firewall > Objects > Network Object Attributes.

We introduced the following screen: Configuration > Firewall > VM Attribute Agent.

Remove support for VM attribute-based network objects from ASA 5506-X (all models), 5508-X, 5512-X, 5516-X.

9.10(1)

You can no longer use VM-attribute based network objects on the following platforms: ASA 5506-X (all models), 5508-X, 5512-X, 5516-X.