Install an Identity Certificate for ASDM
Available Languages
Table of Contents
Install an Identity Certificate for ASDM
Run the ASDM Identity Certificate Wizard (ASDM 7.3 and Later)
Register the New Identity Certificate(s) with Java
(ASDM 7.2 and Earlier) Manually Configure the ASA for an Identity Certificate
Install an Identity Certificate for ASDM
Last Updated: September 9, 2020
When using some versions of Java, such as Version 7 update 51, the ASDM Launcher requires a trusted certificate. An easy approach to fulfill the certificate requirements is to generate a self-signed identity certificate and to configure the ASA to use it when establishing an SSL connection. After you generate the identity certificate and configure the ASA, you need to register it with the Java Control Panel on your computer.
For the ASA FirePOWER module, you can use ASDM for module management. In this case, you must create two identity certificates: one for the ASA and one for the module.
Run the ASDM Identity Certificate Wizard (ASDM 7.3 and Later)
ASDM 7.3 and later provides the ASDM Identity Certificate Wizard. The wizard makes configuring self-signed identity certificates easy.
- When you first launch ASDM and do not have a trusted certificate, you are prompted to launch ASDM with Java Web Start; the certificate wizard then starts automatically.
- If you start ASDM yourself using Java Web Start, then you can launch the wizard from the Wizards menu.
- To generate the separate ASA FirePOWER module certificate, you must re-run the wizard to generate the additional certificate.
1.![]() Launch ASDM. Use an already installed ASDM Launcher, or connect to the ASA IP address with a browser (https:// asa_ip_address /admin) to install a new Launcher. The Launcher prompts you to automatically start ASDM with Java Web Start for the purpose of running the certificate wizard.
Launch ASDM. Use an already installed ASDM Launcher, or connect to the ASA IP address with a browser (https:// asa_ip_address /admin) to install a new Launcher. The Launcher prompts you to automatically start ASDM with Java Web Start for the purpose of running the certificate wizard.
2.![]() (If the wizard did not launch automatically) Choose Wizards > ASDM Identity Certificate Wizard.
(If the wizard did not launch automatically) Choose Wizards > ASDM Identity Certificate Wizard.
3.![]() Complete the wizard. We recommend choosing the Simple Mode option.
Complete the wizard. We recommend choosing the Simple Mode option.
For clustering, we recommend Custom mode, which lets you customize the identity certificate to include the Main cluster IP address and each unit address. You can add the certificate from the wizard by clicking Manage Certificates ; see Create the Identity Certificate for more details about the fields to enter. Without the custom certificate, if you connect to the Main cluster IP address using ASDM, then a warning message about a mismatched IP address appears, because the certificate uses the Local IP address, and not the Main cluster IP address. You can ignore the message and establish the ASDM connection. However, to avoid this type of warning, you can enroll a certificate that contains the Main cluster IP address and all the Local IP addresses from the IP address pool. You can then use this certificate for each cluster member.
4.![]() (ASA FirePOWER module) Re-run the wizard, and choose the SFR Module option.
(ASA FirePOWER module) Re-run the wizard, and choose the SFR Module option.
6.![]() See Register the New Identity Certificate(s) with Java to register both certificates.
See Register the New Identity Certificate(s) with Java to register both certificates.
Register the New Identity Certificate(s) with Java
This procedure shows Java in Windows 7; your operating system may differ.
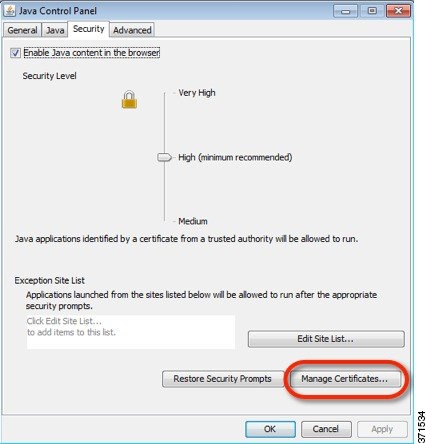
1.![]() On your computer, launch the Java Control Panel. On the Security tab, click Manage Certificates.
On your computer, launch the Java Control Panel. On the Security tab, click Manage Certificates.
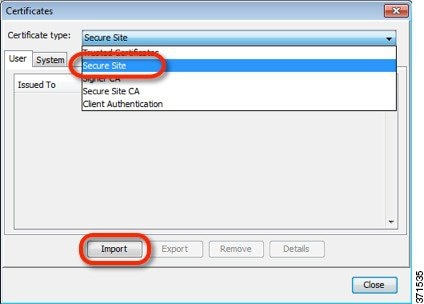
2.![]() From the Certificate type drop-down list, choose Secure Site, and click Import.
From the Certificate type drop-down list, choose Secure Site, and click Import.
Note: You must choose the Secure Site ![]() option; other categories do not work.
option; other categories do not work.
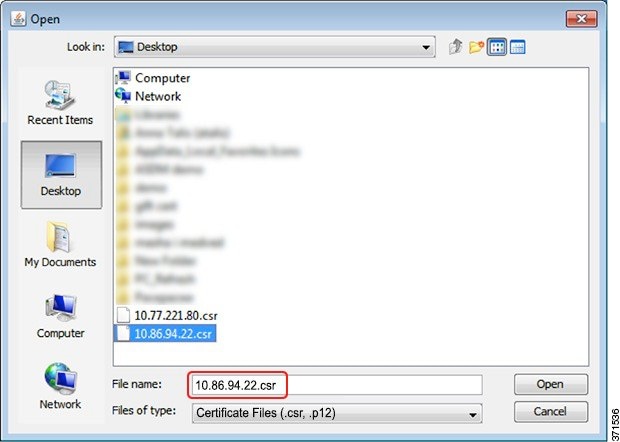
3.![]() Choose the ASA certificate you earlier exported from ASDM.
Choose the ASA certificate you earlier exported from ASDM.
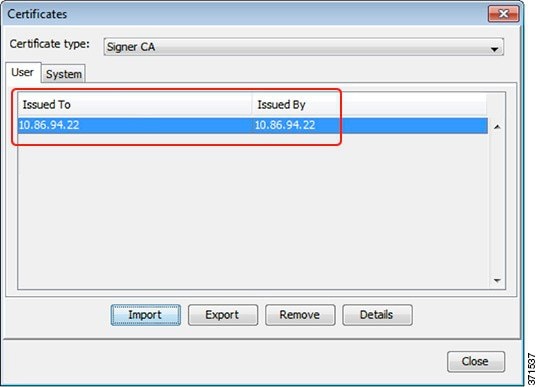
4.![]() (ASA FirePOWER module) Click Import again, and choose the module certificate that you earlier exported from ASDM.
(ASA FirePOWER module) Click Import again, and choose the module certificate that you earlier exported from ASDM.
(ASDM 7.2 and Earlier) Manually Configure the ASA for an Identity Certificate
Complete all of the following procedures for ASDM 7.2 and earlier.
Create the Identity Certificate
1.![]() In a browser, connect to the ASA (https:// asa_ip_address /admin) and launch ASDM by clicking Run ASDM.
In a browser, connect to the ASA (https:// asa_ip_address /admin) and launch ASDM by clicking Run ASDM.
2.![]() Choose Configuration > Device Management > Certificate Management > Identity Certificates, and click Add.
Choose Configuration > Device Management > Certificate Management > Identity Certificates, and click Add.
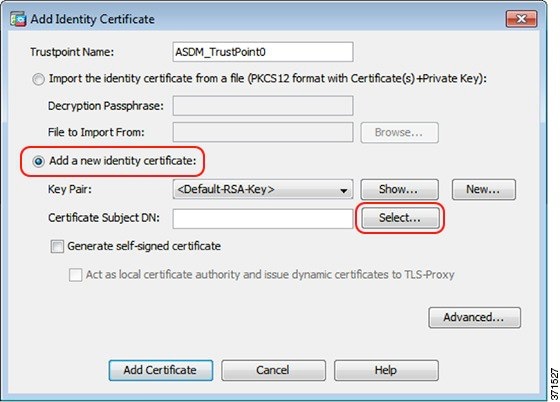
3.![]() Click the Add a new identity certificate radio button, and click Select for the Certificate Subject DN.
Click the Add a new identity certificate radio button, and click Select for the Certificate Subject DN.
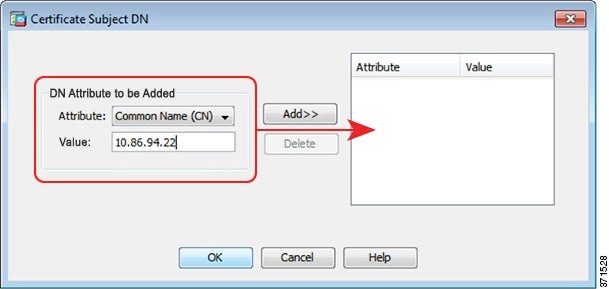
4.![]() From the Attribute drop-down list, choose Common Name (CN), enter the ASA IP address for the Value, click Add, and then click OK.
From the Attribute drop-down list, choose Common Name (CN), enter the ASA IP address for the Value, click Add, and then click OK.
For clustering, add multiple IP addresses: the Main cluster IP address and each unit address.
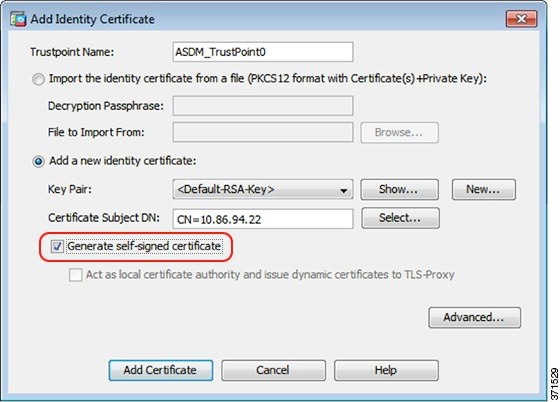
5.![]() Check the Generate self-signed certificate check box and click Add Certificate.
Check the Generate self-signed certificate check box and click Add Certificate.
Export the New Certificate
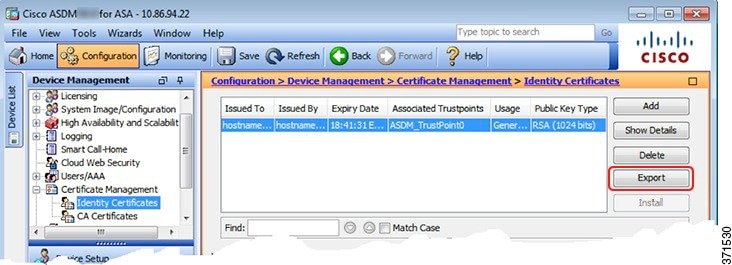
1.![]() Select the certificate, and click Export.
Select the certificate, and click Export.
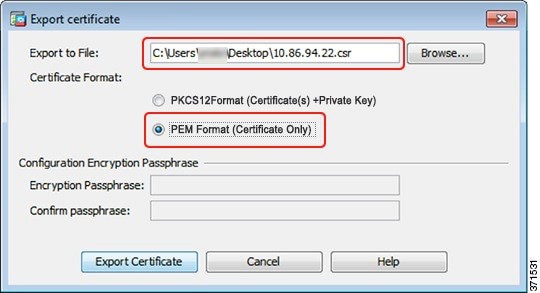
2.![]() Click Browse to choose a save location and name the certificate with the.csr extension (the Java Control Panel expects a.csr extension, so you can save yourself a step by using.csr even though this certificate is a CER file).
Click Browse to choose a save location and name the certificate with the.csr extension (the Java Control Panel expects a.csr extension, so you can save yourself a step by using.csr even though this certificate is a CER file).
3.![]() Click the PEM Format (Certificate Only) radio button, and then click Export Certificate.
Click the PEM Format (Certificate Only) radio button, and then click Export Certificate.
Set the Certificate to Be Used with SSL
1.![]() Choose Device Management > Advanced > SSL Settings. In the Certificates area, select the management interface entry, and click Edit.
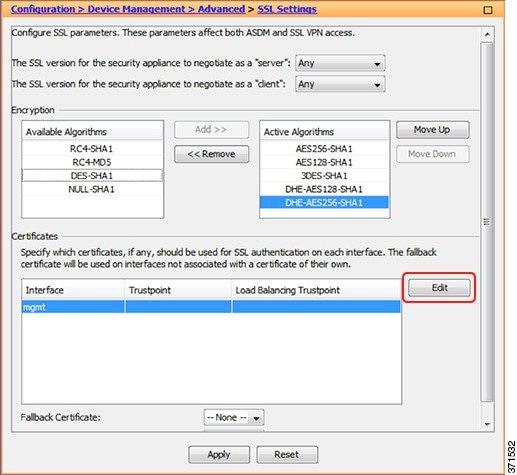
Choose Device Management > Advanced > SSL Settings. In the Certificates area, select the management interface entry, and click Edit.
2.![]() From the Primary Enrolled Certificate drop-down list, choose the newly-created certificate with the CN value of the ASA IP address, and click OK.
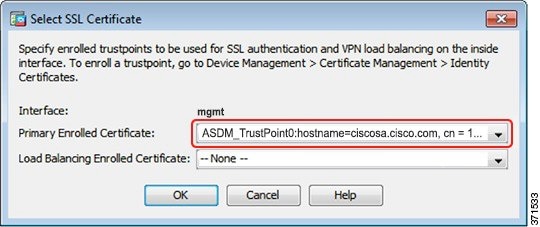
From the Primary Enrolled Certificate drop-down list, choose the newly-created certificate with the CN value of the ASA IP address, and click OK.
4.![]() See Register the New Identity Certificate(s) with Java.
See Register the New Identity Certificate(s) with Java.
Cisco and the Cisco logo are trademarks or registered trademarks of Cisco and/or its affiliates in the U.S. and other countries. To view a list of Cisco trademarks, go to this URL: www.cisco.com/go/trademarks. Third-party trademarks mentioned are the property of their respective owners. The use of the word partner does not imply a partnership relationship between Cisco and any other company. (1721R)
Contact Cisco
- Open a Support Case

- (Requires a Cisco Service Contract)
 Feedback