Analyzing, Detecting, and Fixing Policy Anomalies Using Policy Analyzer and Optimizer

About Policy Analyzer and Optimizer

Secure Firewall Threat Defense devices with extensive access control policies, especially those generated through the firewall migration process, may have numerous duplicate or shadowed rules. Such bloated policies with unoptimized rulesets can lead to excessive consumption of device memory, delayed loading of rules, long search times, resulting in inefficient security policy enforcement, reduced network speeds, and extended deployment durations.

To deal with such situations, Security Cloud Control provides Policy Analyzer and Optimizer. It is an intelligent cloud service that can analyze security policies, detect anomalies, and provide recommendations on remediations that can be performed to optimize the policies, thereby improving the firewall performance. The Policy Analyzer and Optimizer can analyze policies both in the cloud-delivered Firewall Management Center and On-Premises Firewall Management Centers that are onboarded to Security Cloud Control. In addition, this feature can:

  • provide comprehensive visualization of policy health information, including an analysis overview and policy insights based on aggregate hit counts.

  • analyze policies regularly on scheduled intervals or whenever preferred.

  • detect rule anomalies, such as duplicate rules, object overlap in rules, and expired rules.

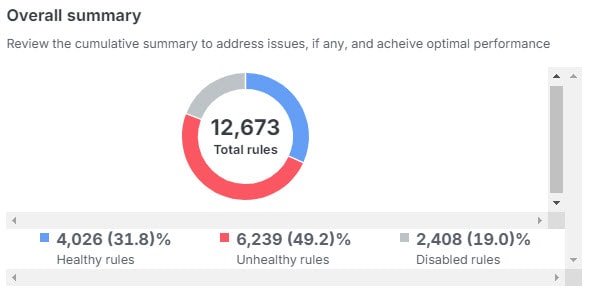
Figure 1. Analysis Summary

Note that the Policy Analyzer and Optimizer can get launched from Security Cloud Control's Services page, Insights > Policy Analyzer and Optimizer on the left pane, and on-premises management center's Access Control policies page for the administrator's convenience.

Analysis, Remediation, and Reporting

The Policy Analyzer and Optimizer performs these services: analysis, remediation, and reporting.

Analysis

The Policy Analyzer and Optimizer polls cloud-delivered Firewall Management Center and on-premises management center for policies and displays them on the Policy Analyzer and Optimizer page. To open the Policy Analyzer and Optimizer page, in the left pane, click Administration > Integrations > Firewall Management Center, select Cloud-delivered FMC or any on-premises management center, and choose Policy Analyzer and Optimizer from the right pane. Alternatively, on the Security Cloud Control left pane, choose Insights & Reports > AIOPs Insights > Policy Analyzer and Optimizer. Choose Cloud-delivered FMC or any on-premises management center from the Data Source tab on the top-left corner.

When you have created a new access control policy or imported a policy, it will take a while for the Policy Analyzer and Optimizer to identify it, after which you can manaually trigger the policy analysis. You can also wait for the auto-analysis that occurs every 24 hours. When the analysis is done, Policy Analyzer and Optimizer provides insights on the number of rules in the policy, the percentage of the policy that can be optimized, and a detailed summary that contains information such as Rule Health Summary, Rule Last Usage, Rule Hits & Dead Rules, and so on.


Note


The Optimizable percentage under Observations column is an approximation of how many rules in the policies can be optimized if the suggested remediations are applied.


Remediation

The policy analysis summary describes the health of your security policy and lets you choose which remediations suggested by the Policy Analyzer and Optimizer you want to apply to your policies. Using the suggested remediations, you could either disable or delete Duplicate Rules, Overlapping Objects, Expired Rules and merge rules that have similar allow and block settings, which can be merged into a single rule. The hit count data is listed under the Policy Insights tab. You can Apply Remediation to make the chosen remediations get applied to your policies.

Reporting

A detailed report is available for an analyzed policy. After remediation is applied on a policy, a remediation report becomes available. This report contains a consolidated list of the policy anomalies that existed and the remediations that were applied and can be downloaded as a PDF.

Prerequisites to Use Policy Analyzer and Optimizer

  • The On-Premises Firewall Management Center must be Version 7.2 or later and must be onboarded to Security Cloud Control. Ensure that the policy that you want to analyze is associated with at least one device.

  • An On-Premises Firewall Management Center Version 7.6 or later must be integrated with the Cisco Security Cloud; the On-Premises Firewall Management Center gets onboarded to the selected Security Cloud Control tenant as part of the Security Cloud integration.

Policy Analyzer and Optimizer Licensing Requirements

The Policy Analyzer and Optimizer does not require any additional licensing. It comes as part of the Security Cloud Control base subscription.

Enable Policy Analyzer and Optimizer for Cloud-delivered Firewall Management Center

The Policy Analyzer and Optimizer is enabled for the cloud-delivered Firewall Management Center by default. To use it to analyze access policies on your cloud-delivered Firewall Management Center, follow the steps below:

Procedure


Step 1

In the left pane, click Administration > Integrations > Firewall Management Center.

Step 2

The Services page opens with the cloud-delivered Firewall Management Center selected by default.

Step 3

Click Policy Analyzer and Optimizer under System on the right pane.

You should now see the access control policies on your cloud-delivered Firewall Management Center listed. You can choose one to analyze or view details for an already analyzed policy.


Enable Policy Analyzer and Optimizer for Security Cloud Control-managed On-Premises Firewall Management Center

If you have an On-Premises Firewall Management Center Version 7.2 or later, integrate it with SecureX, onboard your on-premises management center to Security Cloud Control, navigate to Administration > Integrations > Firewall Management Center, select the on-premises management center, and choose Policy Analyzer and Optimizer under System in the right pane. See Onboard an On-Premises Firewall Management Center for more information.

If you have an on-premises management center Version 7.6 and want to use Policy Analyzer and Optimizer, follow the steps below:

Procedure


Step 1

In your on-premises management center, navigate Integration > Cisco Security Cloud.

Step 2

If you have not integrated your on-premises management center with Cisco Security Cloud, click Enable Cisco Security Cloud and follow the steps. To authorize the cloud integration, you must choose an existing Security Cloud Control tenant or provision a new one, to which your on-premises management center will get onboarded, after the cloud integration is successful.

Step 3

After integrating your on-premises management center with Cisco Security Cloud, check the Enable Policy Analyzer and Optimizer checkbox and click Save.

Step 4

Go to Policies > Access Control.

Step 5

Select a policy and click Analyze Policy. Note that the Anomaly column displays In Progress and once the analysis is complete, it displays the number of anomalies and the percentage of the policy optimizable.

Step 6

Click on the percentage to be cross-launched to the Policy Analyzer and Optimizer page in the Security Cloud Control tenant to which your on-premises management center is registered.


Policy Analysis

After provisioning a cloud-delivered Firewall Management Center or onboarding an On-Premises Firewall Management Center to your Security Cloud Control tenant, and creating policies, you can start to analyze them using the Policy Analyzer and Optimizer. See Onboard an On-Premises Firewall Management Center and Enable Cloud-delivered Firewall Management Center on Your Security Cloud Control tenant, for more information.

This section covers the various ways in which you can get your policies analyzed.

Analyze Cloud-delivered Firewall Management Center Policies

If you have the cloud-delivered Firewall Management Center already provisioned on your Security Cloud Control tenant, you can readily start analyzing the policies. To provision the cloud-delivered Firewall Management Center on Security Cloud Control, see Enable Cloud-delivered Firewall Management Center on Your Security Cloud Control.


Note


When you create a new policy, it might take a while for the Policy Analyzer and Optimizer to fetch the policy details and show up on the Policy Analyzer and Optimizer. Click the refresh () button on the top-right corner to manually refresh the page to see new policies.


Procedure


Step 1

From the Security Cloud Control left navigation pane, navigate to Administration > Integrations > Firewall Management Center—the Services page comes up, with Cloud-Delivered FMC selected by default.

Step 2

Click Policy Analyzer and Optimizer under System on the right pane.

Alternatively, on the left pane, choose Insights & Reports > AIOPs Insights > Policy Analyzer and Optimizer. The Showing policy for option at the top-left corner shows which device's policies are displayed; click to switch among cloud-delivered Firewall Management Center and other On-Premises Firewall Management Centers.

Step 3

For analyzed policies, the Policy Analyzer and Optimizer provides an overview of the analysis that includes Total Rules, Observations, Anaysis Status, and Last Modified and Last Analyzed timestamps. You can also see more details on the right pane when you select a policy.

Step 4

Select the policy for which you want to view the analysis details or re-analyze.

The Policy Analyzer and Optimizer automatically analyzes all the policies every 24 hours, and there are high chances that all your policies already got analyzed and details are ready for you to review.

Step 5

Click Re-analyze Policy to manually trigger another analysis.


Analyze On-Premises Firewall Management Center Policies

To use Policy Analyzer and Optimizer to analyze policies on an On-Premises Firewall Management Center Version 7.2 or later, you need to have onboarded it to Security Cloud Control, either using Auto discover from Cisco Security Cloud or Use Credentials way of onboarding. For an On-Premises Firewall Management Center Version 7.6, you need to have integrated it to the Cisco Security Cloud, which in turn onboards your On-Premises Firewall Management Center to your Security Cloud Control tenant. Make sure that you do the following before you begin:

  • After onboarding your On-Premises Firewall Management Center, ensure that its in Active status in Administration > Integrations > Firewall Management Center.

  • Check the Enable Policy Analysis & Optimization checkbox after you integrate with the Cisco Security cloud, by navagating to Integration > Cisco Security Cloud.

  • If you have just onboarded an On-Premises Firewall Management Center or created or imported a new policy in an already onboarded On-Premises Firewall Management Center, wait until the Policy Analyzer and Optimizer fetches the policies.

  • You can trigger analysis of the policies manually or they get automatically analyzed as part of the scheduled automated analysis.

Procedure


Step 1

From the Security Cloud Control left navigation pane, navigate to Administration > Integrations > Firewall Management Center—the Services page comes up, with Cloud-Delivered FMC selected by default.

Step 2

Select the On-Premises Firewall Management Center whose policies you want to analyze.

Step 3

Click Policy Analyzer and Optimizer under System on the right pane.

Alternatively, on the left pane, choose Insights & Reports > AIOPs Insights > Policy Analyzer and Optimizer. The Showing policy for option at the top-left corner shows which device's policies are displayed; click to switch among cloud-delivered Firewall Management Center and other On-Premises Firewall Management Centers.

Step 4

For analyzed policies, the Policy Analyzer and Optimizer provides an overview of the analysis that includes Total Rules, Observations, Anaysis Status, and Last Modified and Last Analyzed timestamps. You can also see more details on the right pane when you select a policy.


Policy Reporting

When your policies are analyzed and ready, on the Policy Analyzer and Optimizer page, the Analysis Status is Completed and the Observations column displays if your policy is healthy or can be optimized.

Select the policy to see details about the analysis on the right pane. You can View Analysis Details, Download Analysis Report, and view the Remediation History.

Policy Analysis Summary

The Summary tab includes the following rule information, presented in pie charts and bar graphs:

Rule Health Summary—provides insights on how many rules are healthy, disabled, expired, and contain anomalies, using a pie chart. You can also hover over the part of the pie to view the percentage of rules.

Rule Last Usage—provides insights on the recentness on the rule usage, with time periods.

Rules with Anomalies—provides insights on how many rules have anomalies, using a bar graph. Hover over the bars to see the number of rules having anomalies.

Rule Hits & Dead Rules—provides insights on hitcount of expired rules, for rule types including allow, block, monitor, and trust.

Duplicate Rules

The Duplicate Rules tab lists shadowed and redundant rules with anomalies:

  • A Fully Shadowed Rule is one that will never evaluate network traffic because another rule that precedes it over shadows this rule.

  • A Fully Redundant Rule is one that is just a part of another larger rule, such that removing this redundant rule does not have an impact on the network traffic, because the traffic evaluation that this rule must perform is already performed by another rule.

You can choose to either disable or delete all the fully shadowed or fully redundant rules.


Note


Expand each observation to see the list of rules that are redundant because of the larger rule. Each rule in the list is displayed with a set of attributes; click the settings button on the top right to select which rule attributes you would like to see along with the rule.


After you disable the shadowed rules, you still get to Undo it before applying the changes. It is recommended that you disable the rules first to measure the impact and delete them, because when you delete them later, they get permanently deleted.

You can enable the disabled rules any time by navigating to the cloud-delivered Firewall Management Center or the On-Premises Firewall Management Center on which the rules are present.

Overlapping Objects

The Overlapping Objects tab lists objects that are either fully overlapping (the IP addresses are either the same or a complete subset) or partially overlapping (some subset of IP addresses are repeated, but not all).

For example, if a rule contains an object for 192.168.1.1 and another for 192.168.1.0/24, the 192.168.1.1 object is fully overlapped by the other object and is not needed in the rule. You can click the Remove All Fully Overlapped Objects from Rules button.

For partial overlaps, you need to evaluate each occurrence, determine if any changes can be made, and implement those changes directly by editing the objects.

Expired Rules

The Expired Rules tab lists rules that were configured with a time range and the time range has expired. You can also see rule information such as the date on which the rule expired, hit count, last hit time, and the time range.

You can choose to either Disable All Expired Rules or Delete All Expired Rules.

Mergeable Rules

The Mergeable Rules tab lists the rules that have similar allow and block settings and can be merged into a single rule. You can read the observations and click Merge All Rules at once to merge the objects in those rules, to reduce the number of rules you manage.


Note


When you merge two rules, the logging settings from the first rule are applied to the rule that the first rule is getting merged with. Therefore, the logging behavior for the merged rule will follow the settings configured on the first rule, and any unique logging configurations from other rules will be overwritten.


Policy Insights

The Policy Insights tab has a Hit Count section that initially lists any rules that have never been triggered (Never Hit Rules). The hit count information is from all devices that are assigned to the policy. You can change criteria and see other hit count information, for example, Not Hit Rules for the past 6 months, or Hit Rules over a selected time period. You can filter the rules using the actions set in the rules, hit information, and time period:

  • Never Hit Rules—Rules that have never been hit from the time they were created.

  • Hit Rules—Rules that have been hit in the selected time period.

  • Not Hit Rules—Rules that have not been hit in the selected time period.

Select the rules you want to disable or delete and click Disable Rules or Delete Rules. It is recommended that you disable the rules first to measure the impact of disabling them and then delete them.

Policy Remediation

When you choose to delete or disable rules with anomalies from the analysis summary, the Policy Analyzer and Optimizer does not immediately apply those changes. The changes that you wanted to do are staged and are applied only when you click Apply Remediation.

Note that after clicking Apply Remediation once, you cannot apply remediations again based on the same report. You must run a policy analysis again on the new policy settings and remediate the anomalies using the new report.

Apply Policy Remediation

Before you begin

  • Ensure you take a backup of all the policies before applying remediations.

  • Ensure you have a few policy remediations that are staged to be applied. If there are no staged changes, the Apply Remediation button is disabled.

  • Ensure you have verified the Policy Last Modified, Policy Last Analysed dates and timestamps, and the number of rules that you have marked for remeditation, at the top-right corner, so that you are sure which version of the policies you are applying the remediations to.

Procedure


Step 1

In the Policy Analyzer and Optimizer page, click Apply Remediation.

Step 2

Read through the confirmation pop-up, which contains a gist of all the remediations that will be applied, and ensure you are not applying remediations to policies that you do not want remediated.

Step 3

Click Apply.

Note


When you click Apply, you will see pop-up messages such as Remediations are being applied and The policy is locked for remediation.

Step 4

After the remediations are completed successfully, click Download Optimization Report.

Because the policy just got modified when the remediations were applied, you must reanalyze the newly modified set of policies to get a different analysis summary, using which you can further remediate any left-over policy anomalies.

The remediation report contains consolidated data of all the remediations applied and the rules they were applied to. When you select a policy from the Policy Analyzer and Optimizer page, you can view the Remediation History from the right pane, which includes data about the date and time of the remediation, the user who initiated the remediation, and the remediation status. You can also download the remediation report from the same pop-up.

All the remediations are recorded and are available under Remediation History, with information such as date and time of the remediation, the user who performed the remediation, and so on.

Note


For an On-Premises Firewall Management Center in which the Change Management Workflow is enabled, when policy remediations are applied, an internal workflow ticket is created and the changes are staged. The changes take effect only when the ticket is submitted or approved. See Change Management in Cisco Secure Firewall Management Center Administration Guide for more information.


What Does the Policy Remediation Report Contain?

The policy remediation report consolidates all the pieces of a completed remediation and can be downloaded as a PDF. This report contains the following the sections, based on what remediations you have performed on your policies. Each section carries information about the rule name, the remediation action taken, and any related comments. For example, if you have not remediated any duplicate rules, the report does not contain the section pertaining to the duplicate rules remediation:

  • Remediation Summary

  • Hit Count Remediation

  • Expired Rules Remediation

  • Duplicate Rules Remediation

  • Mergeable Rules Remediation


Note


To know if a policy is remediated by the Policy Analyzer and Optimizer, navigate to Policies > Access Policies and edit a policy to view the rules in the Policy Editor. When a policy is remediated by Policy Analyzer and Optimizer, a comment gets added to the rules that are optimized. You can also filter all the rules optimized by the Policy Analyzer and Optimizer using "updated by Policy Analyzer and Optimizer" to view all the rules remediated by the Policy Analyzer and Optimizer.


Troubleshooting Policy Analyzer and Optimizer

Read the following sections to troubleshoot any issues with the Policy Analyzer and Optimizer:

Policy Analyzer and Optimizer Does Not Analyze Policies

If you notice that Policy Analyzer and Optimizer is not analyzing policies despite clicking Analyze Policy, try the following:

Procedure


Step 1

Navigate Administration > Integrations > Firewall Management Center.

Step 2

Select the On-Premises Management Center or Cloud-Delivered FMC for which the policy analysis is not happening and choose Workflows under Actions on the right pane.

Step 3

If you see that the latest workflow's Current State shows up as Error, expand the workflow and scroll to the last action whose END STATE is ERROR.

Step 4

Click Error Message under the RESULT column to see a detailed error message or click Stack Trace to see the series of exceptions that occurred, which caused the error.

Step 5

Resolve the error or contact Cisco TAC for assistance.


Policy Analyzer and Optimizer Does Not Fetch Policies

If policies on your On-Premises Management Center are not displayed on the Policy Analyzer and Optimizer page on Security Cloud Control, do the following:

Procedure


Step 1

On the On-Premises Management Center, navigate Integration > Cisco Security Cloud.

Step 2

Ensure that the Enable Policy Analyzer and Optimizer checkbox is checked.

Step 3

(Optional) In the left navigation pane of your Security Cloud Control tenant, navigate Tools Services > Firewall Management Center, and ensure that the On-Premises Management Center is active and reachable.


Frequently Asked Questions About Policy Analyzer and Optimizer

Can Cisco AI Assistant analyze and remediate policies instead of manually doing it using Policy Analyzer and Optimizer?

The Cisco AI Assistant collaborates with Policy Analyzer and Optimizer to scrutinize policies with anomalies and notify users. However, the AI Assistant cannot automatically analyze and remediate policies.

Can Policy Analyzer and Optimizer detect new changes to an already-analyzed policy and run analysis again on the same policy?

No, the Policy Analyzer and Optimizer can analyze policies only when manually triggered or at a 24-hour scheduled policy analysis run.

For a shared policy, does the Policy Analyzer and Optimizer provide individual device-based reports?

No. The Policy Analyzer and Optimizer provides reports only based on the access policy analysis data.

I am an On-Premises Firewall Management Center user. Should I purchase the Security Cloud Control base license to use the Policy Analyzer and Optimizer?

No. The Policy Analyzer and Optimizer comes as part of an existing or a newly created Security Cloud Control tenant during the Cisco Security Cloud integration.

I provisioned a Security Cloud Control tenant when I integrated my On-Premises Firewall Management Center with the Cisco Security Cloud. What other features, except Policy Analyzer and Optimizer, can I leverage in Security Cloud Control?

You can only leverage Policy Analyzer and Optimizer capabilities of this Security Cloud Control tenant. To use other features of Security Cloud Control, you need to purchase the Security Cloud Control base license and other device-specific licenses.

For an On-Premises Firewall Management Center on which the change management workflow is enabled and there are policies with pending changes to be approved, can the Policy Analyzer and Optimizer still apply remediations those policies?

No. The remediation will be hindered with an error saying the policies are locked for use.

Is there a maximum number of rules that Policy Analyzer and Optimizer can analyze in a policy?

There are no such limits. The Policy Analyzer and Optimizer can analyze any number of policies and rules. However, when the policies have more number of rules, the analysis takes a long time too.

What is the difference between disable rules and delete rules? Which is the better option?

Deleting a rule removes the rule completely from the device memory. However, disabling a rule keeps it in the device memory as a backup and does not get deployed to the device.

If a policy remediation fails when it is partially done, are the changes automatically revoked by Policy Analyzer and Optimizer?

No. In such a case, you get a failure notification and a remediation report. You can read the report to know which rules were impacted by the half-done remediation, manually revoke the changes, and start the remediation all over again.