Managing SSH Devices using Cisco Defense Orchestrator

Cisco Defense Orchestrator (CDO) allows you to manage devices through SSH. These are the features we support for those devices:

  • Onboard a SSH Device. You can use the username and password of a highly privileged user stored on the SSH device to onboard the device.

  • Viewing the device configuration. You can view the device configuration file.

  • Review policy and configuration changes from device. When you read the configuration file from the SSH device, it will be saved in CDO's database.

  • Out-of-band change detection. When you enable Conflict Detection, CDO checks the device every 10 minutes for changes to the device's configuration. If there is a change, the device's status will change to Conflict Detected and you will be able to resolve the conflict.

  • Command line interface support. You can issue all SSH device commands to the device through CDO's command line interface.

  • Individual CLI commands and groups of commands can be turned into editable and reusable "macros." You can use the system-defined macros provided by CDO and create your own macros for tasks you perform often.

  • Detect and manage SSH fingerprint changes. If any credentials or properties of the device change, and that causes a change to the SSH fingerprint, CDO detects that change and gives you a chance to review and accept the new fingerprint.

  • Change Log. The change log captures all the commands you issue to the SSH device.

CDO Command Line Interface

CDO provides users with a command line interface (CLI) for managing , SSH-managed devices. Users can send commands to a single device or to multiple devices simultaneously.

Using the Command Line Interface

Procedure


Step 1

Open the Inventory page.

Step 2

Click the Devices button abobve the Inventory table.

Step 3

Use the device tabs and filter button to find the device you want to manage using the command line interface (CLI).

Step 4

Select the device.

Step 5

In the Device Actions pane, click >_Command Line Interface.

Step 6

Click the Command Line Interface tab.

Step 7

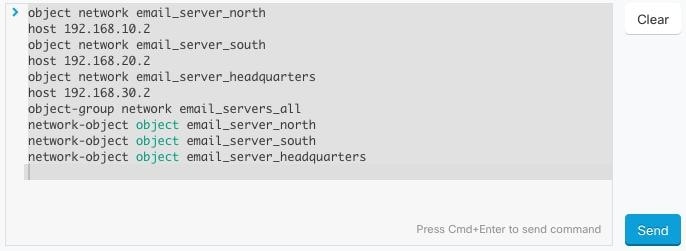
Enter your command, or commands, in the command pane and click Send. The device's response to the command(s) are displayed below in the "response pane."

Note


If there are limitations on the commands you can run, those limitations are listed above the command pane.


Entering Commands in the Command Line Interface

A single command can be entered on a single line or several commands can be entered sequentially on several lines and CDO will execute them in order. The following ASA example sends a batch of commands which creates three network objects and a network object group that contains those network objects.

Work with Command History

After you send a CLI command, CDO records that command in the history pane on the Command Line Interface page. You can rerun the commands saved in the history pane or use the commands as a template:

Procedure


Step 1

On the Inventory page, select the device you want to configure.

Step 2

Click the Devices tab to locate the device.

Step 3

Click the appropriate device type tab.

Step 4

Click >_Command Line Interface.

Step 5

Click the clock icon to expand the history pane if it is not already expanded.

Step 6

Select the command in the history pane that you want to modify or resend.

Step 7

Reuse the command as it is or edit it in the command pane and click Send. CDO displays the results of the command in the response pane.

Note


CDO displays the Done! message in the response pane in two circumstances:

  • After a command has executed successfully.

  • When the command has no results to return. For example, you may issue a show command with a regular expression searching for a configuration entry. If there is no configuration entry that meets the criteria of the regular expression, CDO returns Done!.


Bulk Command Line Interface

CDO offers users the ability to manage Secure Firewall ASA, FDM-managed Threat Defense, SSH, and Cisco IOS devices using a command-line interface (CLI). Users can send commands to a single device or to multiple devices of the same kind simultaneously. This section describes sending CLI commands to multiple devices at once.

Bulk CLI Interface


Note


CDO displays the Done! message in two circumstances:

  • After a command has executed successfully without errors.

  • When the command has no results to return. For example, you may issue a show command with a regular expression searching for a certain configuration entry. If there is no configuration entry that meets the criteria of the regular expression, CDO returns Done!.


Number

Description

1

Click the clock to expand or collapse the command history pane.

2

Command history. After you send a command, CDO records the command in this history pane so you can return to it, select it, and run it again.

3

Command pane. Enter your commands at the prompt in this pane.

4

Response pane. CDO displays the device's response to your command as well as CDO messages. If the response was the same for more than one device, the response pane displays the message "Showing Responses for X devices." Click X devices and CDO displays all the devices that returned the same response to the command.

Note


CDO displays the Done! message in two circumstances:

  • After a command has executed successfully without errors.

  • When the command has no results to return. For example, you may issue a show command with a regular expression searching for a certain configuration entry. If there is no configuration entry that meets the criteria of the regular expression, CDO returns Done!.

5

My List tab displays the devices you chose from the Inventory table and allows you to include or exclude devices you want to send a command to.

6

The Execution tab, highlighted in the figure above, displays the devices in the command that is selected in the history pane. In this example, the show run | grep user command is selected in the history pane and the Execution tab shows that it was sent to 10.82.109.160, 10.82.109.181, and 10.82.10.9.187.

7

Clicking the By Response tab shows you the list of responses generated by the command. Identical responses are grouped together in one row. When you select a row in the By Response tab, CDO displays the response to that command in the response pane.

8

Clicking the By Device tab displays individual responses from each device. Clicking one of the devices in the list allows you to see the response to the command from a specific device.

Send Commands in Bulk

Procedure


Step 1

In the navigation bar, click Inventory.

Step 2

Click the Devices tab to locate the devices.

Step 3

Select the appropriate device tab and use the filter button to find the devices you want to configure using the command line interface.

Step 4

Select the devices.

Step 5

in the Device Actions pane, click >_Command Line Interface.

Step 6

You can check or uncheck devices you want to send the commands to in the My List field.

Step 7

Enter your commands in the command pane and click Send. The command output is displayed in the response pane, the command is logged in the Change Log, and the command CDO records your command in the History pane in the Bulk CLI window.


Work with Bulk Command History

After you send a bulk CLI command, CDO records that command in the Bulk CLI page history page. You can rerun the commands saved in the history pane or use the commands as a template. The commands in the history pane are associated with the original devices on which they were run.

Procedure


Step 1

In the navigation bar, click Inventory.

Step 2

Click the Devices tab to locate devices.

Step 3

Click the appropriate device type tab and click the filter icon to find the devies you want to configure.

Step 4

Select the devices.

Step 5

Click Command Line Interface.

Step 6

Select the command in the History pane that you want to modify or resend. Note that the command you pick is associated with specific devices and not necessarily the ones you chose in the first step.

Step 7

Look at the My List tab to make sure the command you intend to send will be sent to the devices you expect.

Step 8

Edit the command in the command pane and click Send. CDO displays the results of the command in the response pane.


Work with Bulk Command Filters

After you run a bulk CLI command you can use the By Response filter and the By Device filter to continue to configure the devices.

By Response Filter

After running a bulk command, CDO populates the By Response tab with a list of responses returned by the devices that were sent the command. Devices with identical responses are consolidated in a single row. Clicking a row in the By Response tab displays the response from the device(s) in the response pane. If the response pane shows a response for more than one device, it displays the message "Showing Responses for X devices." Click X devices and CDO displays all the devices that returned the same response to the command.

To send a command to the list of devices associated with a command response, follow this procedure:

Procedure

Step 1

Click the command symbol in a row in the By Response tab.

Step 2

Review the command in the command pane and click Send to resend the command or click Clear to clear the command pane and enter a new command to send to the devices and then click Send.

Step 3

Review the responses you receive from your command.

Step 4

If you are confident that the running configuration file on the devices you chose reflects your change, type write memory in the command pane and click Send. This saves your running configuration to the startup configuration.


By Device Filter

After running a bulk command, CDO populates the the Execution tab and the By Device tab with the list of devices that were sent the command. Clicking a row in the By Device tab displays the response for each device.

To run a command on that same list of devices, follow this procedure:

Procedure

Step 1

Click the By Device tab.

Step 2

Click >_Execute a command on these devices.

Step 3

Click Clear to clear the command pane and enter a new command.

Step 4

In the My List pane, specify the list of devices you want to send the command to by checking or unchecking individual devices in the list.

Step 5

Click Send. The response to the command is displayed in the response pane. If the response pane shows a response for more than one device, it displays the message "Showing Responses for X devices." Click X devices and CDO displays all the devices that returned the same response to the command.

Step 6

If you are confident that the running configuration file on the devices you chose reflects your change, type write memory in the command pane and click Send.


Command Line Interface Macros

A CLI macro is a fully-formed CLI command ready to use, or a template of a CLI command you can modify before you run it. All macros can be run on one or more SSH devices simultaneously.

Use CLI macros that resemble templates to run the same commands on multiple devices at the same time. CLI macros promote consistency in your device configurations and management. Use fully-formed CLI macros to get information about your devices. There are different CLI macros that are immediately available for you to use on your SSH devices.

You can create CLI macros for monitoring tasks that you perform frequently. See Create a CLI Macro for more information.

CLI macros are system-defined or user-defined. System-defined macros are provided by CDO and can not be edited or deleted. User-defined macros are created by you and can be edited or deleted.


Note


You can only create macros for a device once it has been onboarded to CDO.


Using the ASA as an example, if you want to find a particular user on one of your ASAs, you could run this command:

show running-config | grep username

When you run the command, you would replace username with the username of the user you are searching for. To make a macro out of this command, use the same command and put curly braces around username.

You can name your parameters anything you want. You can also create the same macro with this parameter name:

The parameter name can be descriptive and must use alphanumeric characters and underlines. The command syntax, in this case the
show running-config | grep
part of the command, must use proper CLI syntax for the device you are sending the command to.

Create a CLI Macro from a New Command

Procedure


Step 1

Before you create a CLI macro, test the command in CDO's Command Line Interface to make sure the command syntax is correct and it returns reliable results.

Note


Step 2

In the navigation bar, click Inventory.

Step 3

Click the Devices tab to locate the device.

Step 4

Click the appropriate device type tab and select an online and synced device.

Step 5

Click >_Command Line Interface.

Step 6

Click the CLI macro favorites star to see what macros already exist.

Step 7

Click the the plus button .

Step 8

Give the macro a unique name. Provide a description and notes for the CLI macro if you wish.

Step 9

Enter the full command in the Command field.

Step 10

Replace the parts of the command that you would want to modify, when you run the command, with a parameter name surrounded by curly braces.

Step 11

Click Create. The macro you create is available for use on all the devices of that type, not just the one you initially specified.

To run the command see, Running CLI Macros on your Device.


Create a CLI Macro from CLI History or from an Existing CLI Macro

In this procedure, you are going to create a user-defined macro from a command you have already run, another user-defined macro, or from a system-defined macro.

Procedure


Step 1

In the navigation bar, click Inventory.

Note


If you want to create a user-defined macro from CLI history, select the device on which you ran the command. CLI macros are shared across devices on the same account but not CLI history.

Step 2

Click the Devices tab.

Step 3

Click the appropriate device type tab and select an online and synced device.

Step 4

Click >_Command Line Interface.

Step 5

Find the command you want to make a CLI macro from and select it. Use one of these methods:

  • Click the clock to view the commands you have run on that device. Select the one you want to turn into a macro and the command appears in the command pane.

  • Click the CLI macro favorites star to see what macros already exist. Select the user-defined or system-defined CLI macro you want to change. The command appears in the command pane.

Step 6

With the command in the command pane, click the CLI macro gold star . The command is now the basis for a new CLI macro.

Step 7

Give the macro a unique name. Provide a description and notes for the CLI macro if you wish.

Step 8

Review the command in the Command field and make the changes you want.

Step 9

Replace the parts of the command that you would want to modify, when you run the command, with a parameter name surrounded by curly braces.

Step 10

Click Create. The macro you create is available for use on all the devices of that type, not just the one you initially specified.

To run the command see, Running CLI Macros.


Run a CLI Macro

Procedure


Step 1

In the navigation bar, click Inventory.

Step 2

Click the Devices tab.

Step 3

Click the appropriate device type tab and select one or more devices.

Step 4

Click >_Command Line Interface.

Step 5

In the command panel, click the star .

Step 6

Select a CLI macro from the command panel.

Step 7

Run the macro one of two ways:

  • If the macro has no parameters to define, click Send. The response to the command appears in the response pane. You're done.

  • If the macro contains parameters, such as the Configure DNS macro below, click >_ View Parameters.

Step 8

In the Parameters pane, fill in the values for the parameters in the Parameters fields.

Step 9

Click Send. After CDO has successfully, sent the command and updated the device's configuration, you receive the message, Done!

Step 10

After you send the command you may see the message, "Some commands may have made changes to the running config" along with two links.

  • Clicking Write to Disk saves the changes made by this command, and any other change that in the running config, to the device's startup config.

  • Clicking Dismiss, dismisses the message.


Edit a CLI Macro

You can edit user-defined CLI macros but not system-defined macros. Editing a CLI macro changes it for all your SSH devices. Macros are not specific to a particular device.

Procedure


Step 1

In the navigation bar, click Inventory.

Step 2

Click the Devices tab.

Step 3

Click the appropriate device type tab.

Step 4

Select your device.

Step 5

Click Command Line Interface.

Step 6

Select the user-defined macro you want to edit.

Step 7

Click the edit icon in the macro label.

Step 8

Edit the CLI macro in the Edit Macro dialog box.

Step 9

Click Save.

See Run CLI Macros for instructions on how to run the CLI macro.


Delete a CLI Macro

You can delete user-defined CLI macros but not system-defined macros. Deleting a CLI macro deletes it for all your devices. Macros are not specific to a particular device.

Procedure


Step 1

In the navigation bar, click Inventory.

Step 2

Click the Devices tab.

Step 3

Click the appropriate device type tab.

Step 4

Select your device.

Step 5

Click >_Command Line Interface.

Step 6

Select the user-defined CLI macro you want to delete.

Step 7

Click the trash can icon in the CLI macro label.

Step 8

Confirm you want to remove the CLI macro.


Export CDO CLI Command Results

You can export the results of CLI commands issued to a standalone device, or several devices, to a comma separated value (.csv) file so you can filter and sort the information in it however you like. You can export the CLI results of a single device, or many devices at once. The exported information contains the following:

  • Device

  • Date

  • User

  • Command

  • Output

Export CLI Command Results

You can export the results of commands you have just executed in the command window to a .csv file:

Procedure


Step 1

In the navigation bar, clickInventory.

Step 2

Click the Devices tab.

Step 3

Click the appropriate device type tab.

Step 4

Select the device or devices so they are highlighted.

Step 5

In the Device Actions pane for the device, click >_Command Line Interface.

Step 6

In the command line interface pane, enter a command and click Send to issue it to the device.

Step 7

To the right of the window of entered commands, click the export icon .

Step 8

Give the .csv file a descriptive name and save the file to your local file system. When reading the command output on the .csv file, expand all the cells to see all the results of the command.


Export the Results of CLI Macros

You can export the results of macros that have been executed in the command window. Use the following procedure to export to a .csv file, the results of CLI macros executed on one or multiple devices:

Procedure


Step 1

Open the Inventory page.

Step 2

Click the Devices tab.

Step 3

Click the appropriate device type tab.

Step 4

Select the device or devices so they are highlighted.

Step 5

In the Device Actions pane for the device, click >_Command Line Interface.

Step 6

In the left pane of the CLI window, select the CLI macro favorites star .

Step 7

Click on the macro command you want to export. Fill in any appropriate parameters and click Send.

Step 8

To the right of the window of entered commands, click the export icon .

Step 9

Give the .csv file a descriptive name and save the file to your local file system. When reading the command output on the .csv file, expand all the cells to see all the results of the command.


Export the CLI Command History

Use the following procedure to export the CLI history of one or multiple devices to a .csv file:

Procedure


Step 1

In the navigation pane, click Inventory.

Step 2

Click the Devices tab.

Step 3

Click the appropriate device type tab.

Step 4

Select the device or devices so they are highlighted.

Step 5

In the Device Actions pane for the device, click >_Command Line Interface.

Step 6

Click the Clock icon to expand the history pane if it is not already expanded.

Step 7

To the right of the window of entered commands, click the export icon .

Step 8

Give the .csv file a descriptive name and save the file to your local file system. When reading the command output on the .csv file, expand all the cells to see all the results of the command.


Export the CLI Macro List

You can only export macros that have been executed ed in the command window. Use the following procedure to export the CLI macros of one or multiple devices to a .csv file:

Procedure


Step 1

In the navigation pane, click Inventory.

Step 2

Click the Devices tab.

Step 3

Click the appropriate device type tab.

Step 4

Select the device or devices so they are highlighted.

Step 5

In the Device Actions pane for the device, click >_Command Line Interface.

Step 6

In the left pane of the CLI window, select the CLI macro favorites star .

Step 7

Click on the macro command you want to export. Fill in any appropriate parameters and click Send.

Step 8

To the right of the window of entered commands, click the export icon .

Step 9

Give the .csv file a descriptive name and save the file to your local file system.


About Device Configuration Changes

In order to manage a device, CDO must have its own copy of the device's configuration stored in its local database. When CDO "reads" a configuration from a device it manages, it takes a copy of the device's configuration and saves it. The first time CDO reads and saves a copy of a device's configuration is when the device is onboarded. These choices describe reading a configuration for different purposes:

  • Discard Changes: This action is available when a device's configuration status is "Not Synced." In the Not Synced state, there are changes to the device's configuration pending on CDO. This option allows you to undo all pending changes. The pending changes are deleted and CDO overwrites its copy of the configuration with copy of the configuration stored on the device.

  • Check for Changes: This action is available if the device's configuration status is Synced. Clicking Checking for Changes directs CDO to compare its copy of the device's configuration with the copy of the configuration stored on the device. If there is a difference, CDO immediately overwrites its copy of the device's configuration with the copy stored on the device.

  • Review Conflict and Accept Without Review: If you have enabled Conflict Detection on a device, CDO checks for configuration changes made on the device every 10 minutes. If the copy of the configuration stored on the device has changed, CDO notifies you by displaying the "Conflict Detected" configuration status.

    • Review Conflict: Click Review Conflict allows you to review changes made directly on a device and accept or reject them.

    • Accept Without Review: This action overwrites CDO's copy of a device's configuration with the latest copy of the configuration stored on the device. CDO does not prompt you to confirm the differences in the two copies of the configuration before taking the overwriting action.

Read All: This is a bulk operation. You can select more than one device, in any state, and click Read All to overwrite all the devices' configurations stored on CDO with the configurations stored on the devices.

  • Deploy Changes: As you make changes to a device's configuration, CDO saves the changes you make to its own copy of the configuration. Those changes are "pending" on CDO until they are deployed to the device. When there are changes to a device's configuration that have not been deployed to the device, the device is in the Not Synced configuration state.

    Pending configuration changes have no effect on the network traffic running through the device. Only after CDO deploys the changes to the device do they have an effect. When CDO deploys changes to the device's configuration, it only overwrites those elements of the configuration that were changed. It does not overwrite the entire configuration file stored on the device. Deployments can be initiated for a single device or on more than one device simultaneously.

  • Discard All is an option that is only available after you click Preview and Deploy.... After clicking Preview and Deploy, CDO shows you a preview of the pending changes in CDO. Clicking Discard All deletes all pending changes from CDO and does not deploy anything to the selected device(s). Unlike "Discard Changes" above, deleting the pending changes is the end of the operation.

Read All Device Configurations

If a configuration change is made to a device outside of CDO, the device's configuration stored on CDO and the device's local copy of its configuration are no longer the same. You many want to overwrite CDO's copy of the device's configuration with the configuration stored on the device to make the configurations the same again. You can perform this task on many devices simultaneously using the Read All link.

See Reading, Discarding, Checking for, and Deploying Configuration Changes for more information about how CDO manages the two copies of the device's configuration.

Here are three configuration statuses where clicking Read All will overwrite CDO's copy of the device's configuration with the device's copy of the configuration.

  • Conflict Detected-If conflict detection is enabled, CDO polls the devices it manages every 10 minutes for changes made to their configurations. If CDO finds that the configuration on the device has changed, CDO displays a "Conflict detected" configuration status for the device.

  • Synced-If the device is in a synced state, and you click Read All, CDO immediately checks the devices to determine if there have been any changes made to its configurations directly. After clicking Read All, CDO confirms your intent to overwrite its copy of the device's configuration and then CDO performs the overwrite.

  • Not Synced-If the device is in the Not Synced state, and you click Read All, CDO warns you that there are pending changes made to to the device's configuration using CDO and that proceeding with the Read All operation will delete those changes and then overwrite CDO's copy of the configuration with the configuration on the device. This Read All functions like Discard Changes.

Procedure


Step 1

In the navigation bar, click Inventory.

Step 2

Click the Devices tab.

Step 3

Click the appropriate device type tab.

Step 4

(Optional) Create a change request label to identify the results of this bulk action easily in the Change Log.

Step 5

Select the devices whose configurations you want to save CDO. Notice that CDO only provides command buttons for actions that can be applied to all the selected devices.

Step 6

Click Read All.

Step 7

CDO warns you if there are configuration changes staged on CDO, for any of the devices you selected, and asks if you want to continue with the bulk reading configurations action. Click Read All to continue.

Step 8

Look at the notifications tab for the progress of the Read All configurations operation. If you want more information about how individual actions in the bulk operation succeeded or failed, click the blue Review link and you will be directed to the Jobs page.

Step 9

If you created and activated a change request label, remember to clear it so that you don't inadvertently associate other configuration changes with this event.


Read Changes from Cisco IOS or SSH to CDO

In order to manage a Cisco IOS or SSH device, CDO must have its own stored copy of the device's configuration file. The first time CDO reads and saves a copy of the device's configuration file is when the device is onboarded. Subsequently, when CDO checks the configuration from the device, it takes a copy of the device's configuration file and and completely overwrites the copy of the configuration file it maintains in its own database. For more information, see Reading, Discarding, Checking for, and Deploying Configuration Changes.

For more information on how to detect changes made directly to the Cisco IOS or SSH device outside of CDO, see Check for Changes.

For more information on how to undo configuration changes you have started to make on CDO but have not deployed to the IOS or SSH device, see Discard Changes.

Preview and Deploy Configuration Changes for All Devices

CDO informs you when you have made a configuration change to a device on your tenant, but you have not deployed that change, by displaying an orange dot on the Deploy icon . The devices affected by these changes show the status "Not Synced" in the Devices and Services page. By clicking Deploy, you can review which devices have pending changes and deploy the changes to those devices.


Note


For every new FDM or FTD network object or group that you create and make changes to, CDO creates an entry in this page for all on-prem management centers that are managed by CDO.


This deployment method is available for all supported devices.

You can use this deployment method for single configuration changes or wait and deploy multiple changes at once.

Procedure


Step 1

In the top right corner of the screen, click the Deploy icon .

Step 2

Select the devices with changes you want to deploy. If a device has a yellow caution triangle, you can not deploy changes to that device. Hover your mouse over the yellow caution triangle to find out why you can't deploy changes to that device.

Step 3

(Optional) If you want to see more information about a pending change, click the View Detailed Changelog link to open the change log associated with that change. Click the Deploy icon to return to the Devices with Pending Changes page.

Step 4

(Optional) Create a change request to track your changes without leaving the Devices with Pending Changes page.

Step 5

Click Deploy Now to deploy the changes immediately to the devices you selected. You'll see the progress in the Active jobs indicator in the Jobs tray.

Step 6

(Optional) After the deployment has finished, click Jobs in the CDO navigation bar. You will see a recent "Deploy Changes" job showing the results of the deployment.

Step 7

If you created a change request label, and you have no more configuration changes to associate with it, clear it.


What to do next

Bulk Deploy Device Configurations

If you have made changes to multiple devices, for instance by editing a shared object, you can apply those change to all of the affected devices at once:

Procedure


Step 1

In the left pane, click Inventory.

Step 2

Click the Devices tab.

Step 3

Click the appropriate device type tab.

Step 4

Select all of the devices for which you have made configuration changes on CDO. These devices should show "Not Synced" status.

Step 5

Deploy the changes using one of these methods:

  • Click the button at the top-right of the screen to view the Devices with Pending Changes window. This gives you a chance to review the pending changes on the devices you selected before you deploy them. Click Deploy Now to deploy the changes.

    Note


    If you see a yellow warning triangle next to a device on the Devices with Pending Changes screen, you cannot deploy a change to that device. Hover your mouse over the warning triangle for information about why changes cannot be deployed to that device.

  • Click Deploy All on the details pane. Review any warnings and click OK. The bulk deployment starts immediately without a review of the changes.

Step 6

(Optional) Click the Jobs icon in the navigation bar to view the results of the bulk deploy.


About Scheduled Automatic Deployments

Using CDO, you can make configuration changes to one or more of the devices it manages and then schedule the changes to be deployed to those devices at a time that is convenient for you.

You can only schedule deployments if you Enable the Option to Schedule Automatic Deployments in the Tenant Settings tab of the Settings page. Once this option is enabled, you can create, edit, or delete scheduled deployments. A scheduled deployment deploys all the staged changes saved on CDO at the date and time set. You can also view and delete scheduled deployments from the Jobs page.

If there were changes made directly to the device that have not been read to CDO, the scheduled deployment will be skipped until that conflict is resolved. The Jobs page will list any instance where a scheduled deployment fails. If Enable the Option to Schedule Automatic Deployments is turned off, all scheduled deployments are deleted.


Caution


If you schedule a new deployment for multiple devices, and some of those devices already have deployments scheduled, the new scheduled deployment overwrites the existing scheduled deployments.


Note


When you create a scheduled deployment, the schedule is created in your local time, not in the time zone of the device. Scheduled deployments do not automatically adjust for daylight savings time.


Schedule an Automatic Deployment

The deployment schedule can be a single event or a recurring event. You may find recurring automatic deployments a convenient way to line up recurring deployments with your maintenance window. Follow this procedure to schedule a one-time or a recurring deployment for a single device:


Note


If you schedule a deployment for a device that has an existing deployment scheduled, the new scheduled deployment overwrites the existing deployment.


Procedure


Step 1

In the navigation bar, click Inventory.

Step 2

Click the Devices tab.

Step 3

Click the appropriate device type tab.

Step 4

Select one ore more devices.

Step 5

In the Device Details pane, locate the Scheduled Deployments tab and click Schedule.

Step 6

Select when the deployment should occur.

  • For a one-time deployment, click the Once on option to select a date and time from the calendar.

  • For a recurring deployment, click the Every option. You can choose either a daily or once a week deployment. Select the Day and Time the deployment should occur.

Step 7

Click Save.


Edit a Scheduled Deployment

Follow this procedure to edit a scheduled deployment:

Procedure


Step 1

In the navigation bar, click Inventory.

Step 2

Click the Devices tab.

Step 3

Click the appropriate device type tab.

Step 4

Select one or more devices.

Step 5

In the Device Details pane, locate the Scheduled Deployments tab and click Edit .

Step 6

Edit the recurrence, date, or time of a scheduled deployment.

Step 7

Click Save.


Delete a Scheduled Deployment

Follow this procedure to delete a scheduled deployment:


Note


If you schedule a deployment for multiple devices, and then change or delete the schedule for some of the devices, the original scheduled deployment for the remaining devices will be preserved.


Procedure


Step 1

In the navigation bar, clickInventory.

Step 2

Click the Devices tab.

Step 3

Click the appropriate device type tab.

Step 4

Select one or more devices.

Step 5

In the Device Details pane, locate the Scheduled Deployments tab and click Delete .


What to do next

Check for Configuration Changes

Check for Changes to determine if the device's configuration has been changed directly on the device and it is no longer the same as the copy of the configuration stored on CDO. You will see the this option when the device is in the "Synced" state.

To check changes:

Procedure


Step 1

In the navigation bar, click Inventory.

Step 2

Click the Devices tab.

Step 3

Click the appropriate device type tab.

Step 4

Select the device, whose configuration you suspect may have been changed directly on the device.

Step 5

Click Check for Changes in the Synced pane on the right.

Step 6

The behavior that follows is slightly different depending on the device:

  • For device if there has been a change to the device's configuration, you will receive the message:

    Reading the policy from the device. If there are active deployments on the device, reading will start after they are finished.

    • Click OK to continue. The configuration on the device will overwrite the stored configuration on CDO.

    • Click Cancel to cancel the action.

  • For SSH device:

  1. Compare the two configurations presented to you. Click Continue. The configuration labeled Last Known Device Configuration is the configuration stored on CDO. The configuration labeled Found on Device is the configuration saved on the ASA.

  2. Select either:

    1. Reject the out-of-band changes to keep the "Last Known Device Configuration."

    2. Accept the out-of-band changes to overwrite the device's configuration stored in CDO with the configuration found on the device.

  3. Click Continue.


Discard Configuration Changes

Click Discard Changes when you want to "undo" all the undeployed configuration changes you made to a device's configuration using CDO. When you click Discard Changes, CDO completely overwrites its local copy of a device's configuration with the configuration stored on the device.

When you click Discard Changes, your device's configuration status is in a Not Synced state. After you discard your changes, the copy of the configuration on CDO will be the same as the copy of the configuration on the device and the configuration status in CDO will return to Synced.

To discard, or "undo," all of your undeployed configuration changes for a device:

Procedure


Step 1

In the navigation bar, click Inventory.

Step 2

Click the Devices tab.

Step 3

Click the appropriate device type tab.

Step 4

Select the device you have been making configuration changes to.

Step 5

Click Discard Changes in the Not Synced pane on the right.

  • For FDM-managed devices-CDO warns you that "Pending changes on CDO will be discarded and the CDO configuration for this device will be replaced with the configuration currently running on the device." Click Continue to discard your changes.

  • For Meraki devices-CDO deletes the change immediately.

  • For AWS devices-CDO displays what you are about to delete. Click Accept or Cancel.


Out-of-Band Changes on Devices

Out-of-band changes refer to changes made directly on the device without using CDO. These changes may be made using the device's command-line interface over an SSH connection or by using a local manager like the Adaptive Security Device Manager (ASDM) for the ASA, the FDM for the FDM-managed device, or for an On-Prem Firewall Management Center on the On-Prem Firewall Management Center user interface. An out-of-band change causes a conflict between the device's configuration stored on CDO and the configuration stored on the device itself.

Detecting Out-of-Band Changes on Devices

If Conflict Detection is enabled for an ASA, or an FDM-managed device, a Cisco IOS device, or an On-Prem Firewall Management Center, CDO checks the device every 10 minutes searching for any new changes made directly to the device's configuration outside of CDO.

If CDO finds that there are changes to the device's configuration that are not stored on CDO, it changes the Configuration Status of that device to the "Conflict Detected" state.

When CDO detects a conflict, one of two conditions is likely:

  • There have been configuration changes made to the device directly that have not been saved to CDO's database.

  • In the case of an FDM-managed device, there may be "pending" configuration changes on the FDM-managed device that have not been deployed.

  • In the case of an On-Prem Firewall Management Center, there may be changes made, for instance, to objects outside CDO, which are pending to be synchronized with CDO or changes made in CDO which are pending to be deployed to the On-Prem Firewall Management Center.

Synchronizing Configurations Between CDO and Device

About Configuration Conflicts

On the Inventory page, you may see devices or services have the status "Synced," "Not Synced," or "Conflict Detected." To know the status of an On-Prem Firewall Management Center that you manage using CDO, navigate Tools & Services > Firewall Management Center.

  • When a device is Synced, the configuration on CDO) and the configuration stored locally on the device are the same.

  • When a device is Not Synced, the configuration stored in CDO was changed and it is now different that the configuration stored locally on the device. Deploying your changes from CDO to the device changes the configuration on the device to match CDO's version.

  • Changes made to devices outside of CDO are called out-of-band changes. When out-of-band changes are made, you'll see the device state change to "Conflict Detected," if conflict detection is enabled for the device. Accepting the out-of-band changes, changes the configuration on CDO to match the configuration on the device.

Conflict Detection

When conflict detection is enabled, CDO polls the device for the default interval to to determine if a change has been made to the device's configuration outside of CDO. If CDO detects that a change was made, it changes the configuration status for the device to Conflict Detected. Changes made to a device outside of CDO are called "out-of-band" changes.

In the case of an On-Prem Firewall Management Center that is managed by CDO, if there are changes that are staged and the device is in Not Synced state, CDO stops polling the device to check for changes. When there are changes made outside CDO which are pending to be synchronized with CDO and changes made in CDO which are pending to be deployed to the on-prem management center, CDO declares the on-prem management center to be in the Conflict Detected state.

Once this option is enabled, you can configure how often conflicts or OOB changes are detected per device. See Schedule Polling for Device Changes for more information.

Enable Conflict Detection

Enabling conflict detection alerts you to instances where changes have been made to a device outside of CDO.

Procedure


Step 1

In the navigation bar, click Inventory.

Step 2

Click the Devices tab.

Step 3

Select the appropriate device type tab.

Step 4

Select the device or devices for which you want to enable conflict detection.

Step 5

In the Conflict Detection box at the right of the device table, select Enabled from the list.


Automatically Accept Out-of-Band Changes from your Device

You can configure CDO to automatically accept any change made directly to a managed device by enabling auto-accept changes. Changes made directly to a device without using CDO are referred to as out-of-band changes. An out-of-band change creates a conflict between the device's configuration stored on CDO and the configuration stored on the device itself.

The auto-accept changes feature is an enhancement to conflict detection. If you have auto-accept changes enabled on your device, CDO checks for changes every 10 minutes to determine if there have been any out-of-band changes made to the device's configuration. If there have been configuration changes, CDO automatically updates its local version of the device's configuration without prompting you.

CDO will not automatically accept a configuration change if there are configuration changes made on CDO that have not yet been deployed to the device. Follow the prompts on the screen to determine your next action.

To use auto-accept changes, you first enable the tenant to display the auto-accept option in the Conflict Detection menu on the Inventory page; then, you enable auto-accept changes for individual devices.

If you want CDO to detect out-of-band changes but give you the option to accept or reject them manually, enable Conflict Detection instead.

Configure Auto-Accept Changes

Procedure


Step 1

Log in to CDO using an account with Admin or Super Admin privileges.

Step 2

In the left pane, click Settings > General Settings

Step 3

In the Tenant Settings area, click the toggle to Enable the option to auto-accept device changes. This enables the Auto-Accept Changes menu option to appear in the Conflict Detection menu on the Inventory page.

Step 4

Open the Inventory page and select the device for which you want to automatically accept out-of-band changes.

Step 5

In the Conflict Detection menu, select Auto-Accept Changes in the drop-down menu.


Disabling Auto-Accept Changes for All Devices on the Tenant

Procedure


Step 1

Log-in to CDO using an account with Admin or Super Admin privileges.

Step 2

Navigate Settings > General Settings

Step 3

In the Tenant Settings area, disable the "Enable the option to auto-accept device changes" by sliding the toggle to the left so it shows a grey X. This disables Auto-Accept Changes option in the Conflict Detection menu and disables the feature for every device on your tenant.

Note


Disabling "Auto-Accept" will require you to review each device conflict before you can accept it into CDO. This includes devices previously configured to auto-accept changes.


Resolve Configuration Conflicts

This section provides information about resolving configuration conflicts that occur on the device.

Resolve the Not Synced Status

Use the following procedure to resolve a device with a "Not Synced" Configuration Status:

Procedure


Step 1

In the navigation bar, click Inventory.

Note


For an On-Prem Firewall Management Center, navigate Tools & Services > Firewall Management Center and select the FMC that is in Not Synced state and continue from Step 5.

Step 2

In the left pane, click Security Devices > All Devices.

Step 3

Click the Devices tab to locate the device or the Templates tab to locate the model device.

Step 4

Click the appropriate device type tab.

Step 5

Select the device reported as Not Synced.

Step 6

In the Not synced panel to the right, select either of the following:

  • Preview and Deploy... -If you want to push the configuration change from CDO to the device, preview and deploy the changes you made now, or wait and deploy multiple changes at once.

  • Discard Changes -If you do not want to push the configuration change from CDO to the device, or you want to "undo" the configuration changes you started making on CDO. This option overwrites the configuration stored in CDO with the running configuration stored on the device.


Resolve the Conflict Detected Status

CDO allows you to enable or disable conflict detection on each live device. If Conflict Detection is enabled and there was a change made to the device's configuration without using CDO, the device's configuration status will show Conflict Detected.

To resolve a "Conflict Detected" status, follow this procedure:

Procedure


Step 1

In the navigation bar, click Inventory.

Note


For an On-Prem Firewall Management Center, navigate Tools & Services > Firewall Management Center and select the FMC that is in Conflict Detected state and continue from Step 4.

Step 2

Click the Devices tab to locate your device.

Step 3

Click the appropriate device type tab.

Step 4

Select the device reporting the conflict and click Review Conflict in the details pane on the right.

Step 5

In the Device Sync page, compare the two configurations by reviewing the highlighted differences.

  • The panel labeled "Last Known Device Configuration" is the device configuration stored on CDO.

  • The panel labeled "Found on Device" is the configuration stored in the running configuration on the ASA.

Step 6

Resolve the conflict by selecting one of the following:

  • Accept Device changes: This will overwrite the configuration and any pending changes stored on CDO with the device's running configuration.

    Note


    As CDO does not support deploying changes to the Cisco IOS devices outside of the command line interface, your only choice for a Cisco IOS device will be to select Accept Without Review when resolving the conflict.

  • Reject Device Changes: This will overwrite the configuration stored on the device with the configuration stored on CDO.

Note


All configuration changes, rejected or accepted, are recorded in the change log.


Schedule Polling for Device Changes

If you have Conflict Detection enabled, or if you Enable the option to auto-accept device changes from the Settings page,CDO polls the device for the default interval to determine if a change has been made to the device's configuration outside of CDO. You can customize how often CDO polls for changes per device. These changes can be applied to more than one device.

If there is no selection configured for a device, the interval is automatically configured for "tenant default".


Note


Customizing the interval per device from the Inventory page overrides the polling interval selected as the Default Conflict Detection Interval from the General Settings page.


After you enable Conflict Detection from the Inventory page or Enable the option to auto-accept device changes from the Settings page, use the following procedure to schedule how often you want CDO to poll your devices:

Procedure


Step 1

In the navigation bar, click Inventory.

Step 2

Click the Devices tab to locate your device.

Step 3

Click the appropriate device type tab.

Step 4

Select the device or devices for which you want to enable conflict detection.

Step 5

In the same area as Conflict Detection, click the drop-down menu for Check every and select the desired polling interval: