Policies configuration

Create a policy

An Active Discovery policy is a list of settings which define protocols and their parameters that will be used to inspect the industrial network. The policy will be applied to an IP address, an IP range and/or a preset and used on a list of sensors and components.

Procedure


Step 1

Navigate to Admin > Active Discovery > Policies .

Step 2

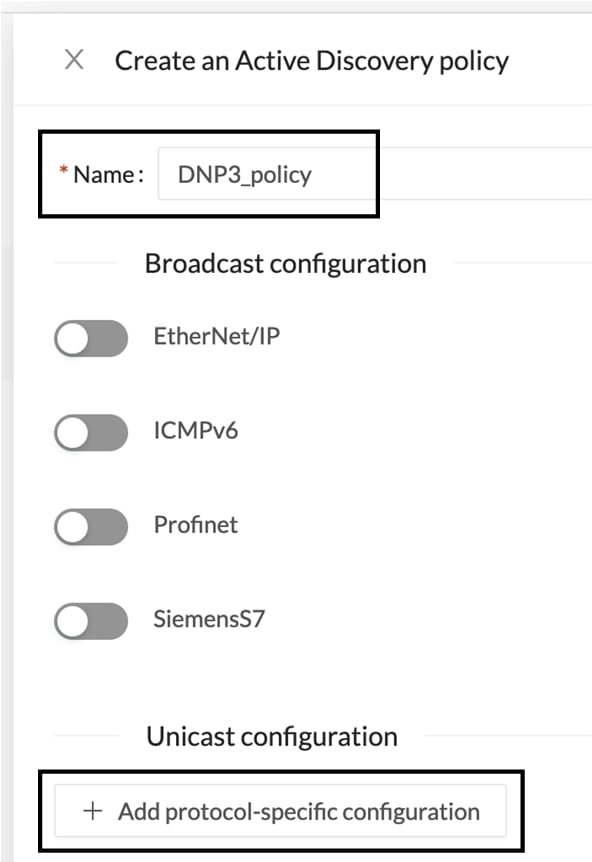
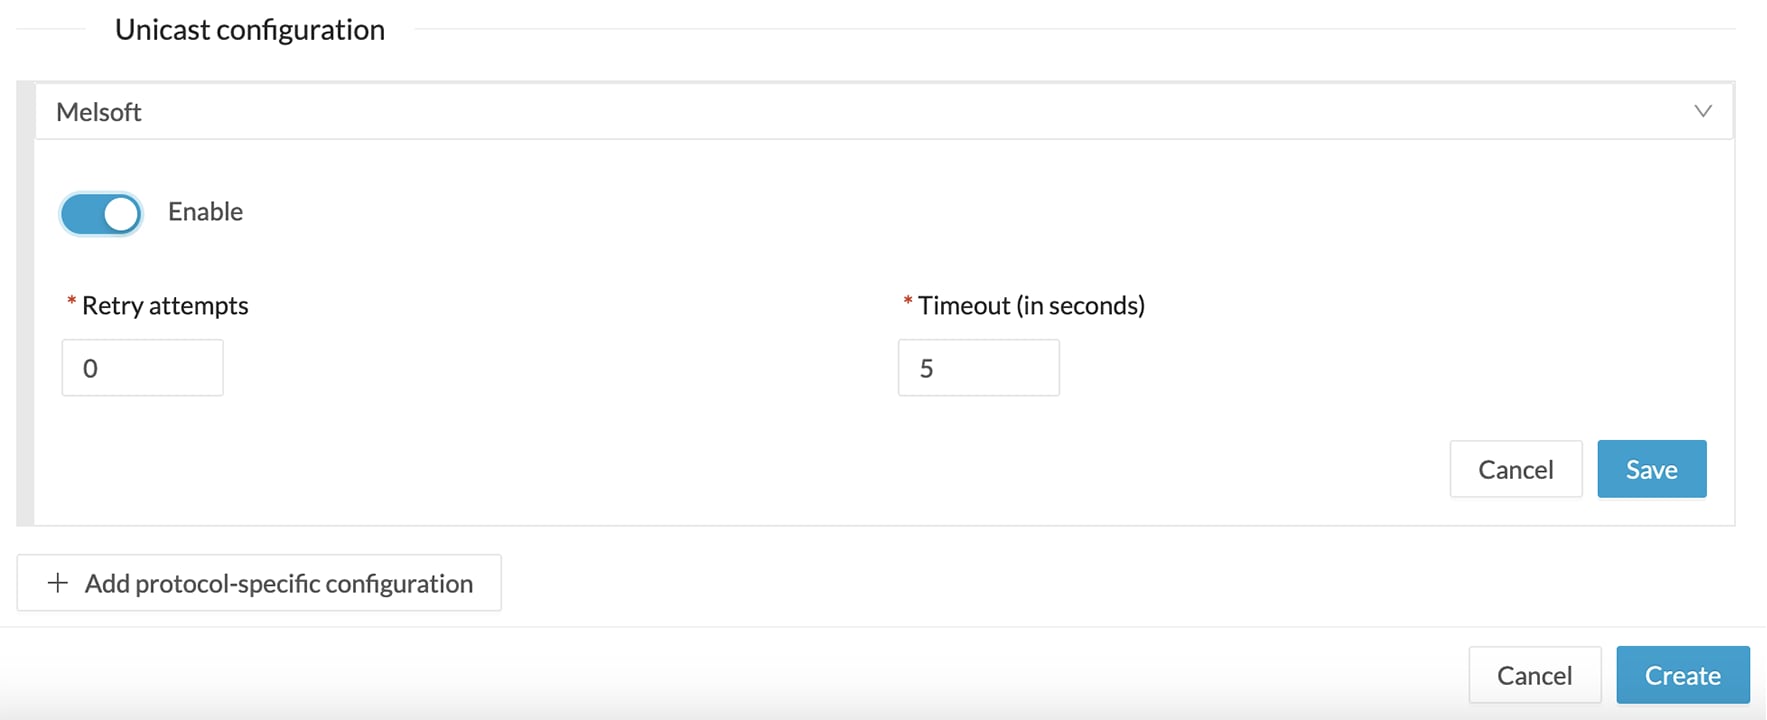
Click + Create policy.

A Create an Active Discovery policy overlay appears.


What to do next

Set Active Discovery Broadcast

Before you begin

Active Discovery is compatible with the following Broadcast protocols:

  • EtherNet/IP

  • Siemens S7

  • Profinet

  • ICMPv6

The sensor will send requests on all defined interfaces.

Procedure


Step 1

Type a policy name.

Step 2

Toggle the Broadcast protocol buttons ON to enable Active Discovery on these protocols.

Step 3

Leave the Retry and Timeout settings with the default values (3 and 10).

Retry: number of request attempts.

Timeout: waiting time in seconds for a response.

Step 4

Click Create to finish or add Unicast configurations to the policy.


What to do next

Set Active Discovery Unicast

Set Active Discovery Unicast

Before you begin

Procedure


Step 1

Give the policy a name.

Step 2

Under Unicast configuration, click + Add protocol-specific configuration.

Step 3

Click the Select protocol dropdown menu and select a protocol.


What to do next

See herebelow configurations per protocol.

Set Active Discovery Unicast BACnet

Set Active Discovery Unicast BacNet to search for devices and components with BacNet requests. All components with an IPV4 address will be queried.

Procedure


Step 1

Toggle the Enable button ON.

Step 2

Leave the Retry attempts and Timeout settings with the default values (0 and 5).

Step 3

Click Save.

The menu closes.

Step 4

Click Create.


Set Active Discovery Unicast Beckhoff

Enable Active Discovery Unicast Beckhoff to search for devices and components using AMS requests. It will check all components with an IPV4 address.

Procedure


Step 1

Toggle the Enable button ON.

Step 2

Add 5 seconds (Default value) to the timeout field.

Step 3

Enter a Beckhoff user account and password.

Step 4

Click Save.

The menu closes.

Step 5

Click Create.


Set Active Discovery Unicast DNP3

Set Active Discovery Unicast DNP3 to search for devices and components with DNP3 requests. All components with an IPV4 address will be queried.

Before you begin

Procedure


Step 1

Toggle the Enable button ON.

Step 2

Leave the Retry attempts and Timeout settings with the default values (0 and 5).

Step 3

Leave the Source Address and Max Destination Address with the default values (0 and 16).

Step 4

Click Save.

The menu closes.

Step 5

Click Create.


Set Active Discovery Unicast Ethernet/IP

Set Active Discovery Unicast Ethernet/IP to search for devices and components with Ethernet/IP requests. All components with an IPV4 address will be queried.

Procedure


Step 1

Toggle the Enable button ON.

Step 2

Leave the Retry attempts and Timeout settings with the default values (0 and 5).

Step 3

You can toggle the Backplane discovery button ON. Active Discovery will look for the different module details within the discovered chassis.

Step 4

Click Save.

The menu closes.

Step 5

Click Create.


Set Active Discovery Unicast GESRTP

Configure Active Discovery Unicast GESRTP to search for devices and components using GESRTP requests. It will check all components with an IPV4 address.

Procedure


Step 1

Toggle the Enable button ON.

Step 2

Add 5 seconds (default value) to the Timeout field.

Step 3

Click Save.

The menu closes.

Step 4

Click Create.


Set Active Discovery Unicast HTTP or HTTPS

Configure Active Discovery Unicast HTTP/HTTPS to find devices and components with HTTP/HTTPS requests. It will check all components with an IPV4 address.

Procedure


Step 1

Toggle the Enable button ON.

Step 2

Add 5 seconds (default value) to the Timeout field.

Step 3

Add HTTP and/or HTTPS port details to scan.

Step 4

Click Save.

The menu closes.

Step 5

Click Create.


Set Active Discovery Unicast Melsoft

Set Active Discovery Unicast Melsoft to search for devices and components with Melsoft requests. All Mitsubitshi components with an IPV4 address will be queried.

Procedure


Step 1

Toggle the Enable button ON.

Step 2

Leave the Retry attempts and Timeout settings with the default values (0 and 5).

Step 3

Click Save.

The menu closes.

Step 4

Click Create.


Set Active Discovery Unicast Modbus

Set Active Discovery Unicast Modbus to search for devices and components with Modbus requests. All components with an IPV4 address will be queried.

Procedure


Step 1

Toggle the Enable button ON.

Step 2

Leave the Retry attempts and Timeout settings with the default values (1 and 5).

Step 3

Click Save.

The menu closes.

Step 4

Click Create.


Set Active Discovery Unicast OMRON

Set Active Discovery Unicast OMRON to search for devices and components with FINS requests. All components with an IPV4 address will be queried.

Procedure


Step 1

Toggle the Enable button ON.

Step 2

Leave the Retry attempts and Timeout settings with the default values (1 and 5).

Step 3

Click Save.

The menu closes.

Step 4

Click Create.


Set Active Discovery Unicast SiemensS7

Set Active Discovery Unicast SiemensS7 to search for devices and components with SiemensS7 requests. SiemensS7 is a communication protocol used on Siemens PLCs. Siemens PLCs with an IPV4 address will be queried.

Procedure


Step 1

Toggle the Enable button ON.

Step 2

Leave the Retry attempts and Timeout settings with the default values (0 and 5).

Step 3

Enter a number of racks and slots to be queried.

Slot: number of modules to search for within a chassis.

Step 4

Click Save.

The menu closes.

Step 5

Click Create.


Set Active Discovery Unicast SiemensS7plus

Set Active Discovery Unicast SiemensS7plus to search for devices and components with SiemensS7plus requests. SiemensS7plus is a communication protocol used on the latest Siemens PLCs. Siemens PLCs with an IPV4 address will be queried.

Procedure


Step 1

Toggle the Enable button ON.

Step 2

Leave the Retry attempts and Timeout settings with the default values (1 and 5).

Step 3

Click Save.

The menu closes.

Step 4

Click Create.


Set Active Discovery Unicast SNMPv2c

Set Active Discovery Unicast SNMPv2c to search for devices and components with SNMPv2c requests. All components with an IPV4 address will be queried. Default OIDs are requested for all devices and some specific OIDs are requested based on the vendor and the type of components.

Procedure


Step 1

Toggle the Enable button ON.

Step 2

Leave the Retry attempts and Timeout settings with the default values (0 and 5).

Step 3

Type a community string for authentication.

The community string is defined by IT or network administrators. The value "public" is often used by default.

Step 4

You can toggle the Enable SNMPv1 fallback button ON. Active Discovery will look for PLCs and I/O chassis with module details.

Step 5

Click Save.

The menu closes.

Step 6

Click Create.


Refer to the Annex appended at the end of this document to see examples of Unicast SNMPv2c results and detailed information about packets.

Set Active Discovery Unicast SNMPv3

Set Active Discovery Unicast SNMPv3 to search for devices and components with SNMPv3 requests. All components with an IPV4 address will be queried. Default OIDs are requested for all devices and some specific OIDs are requested based on the vendor and the type of components.

Procedure


Step 1

Toggle the Enable button ON.

Step 2

Leave the Retry attempts and Timeout settings with the default values (0 and 5).

Step 3

Type a community string for authentication.

The community string is defined by IT or network administrators. The value "public" is often used by default.

Step 4

Select the proper security and privacy level based on the information provided by the IT or network administrators.

All options available on SNMPv3 are implemented in Cisco Cyber Vision. Three security levels are available:

  • Disable both authentication and privacy.

    Only a username is requested for authentication.

  • Enable authentication and disable privacy.

    Authentication will be based on HMAC-MD5 or HMAC-SHA algorithms.

    Select the algorithm to use and provide a username and an authentication password.

  • Enable both authentication and privacy.

    In addition to the previous level, a DES or AES encryption of the content is requested. Select the level of encryption to use and provide a username and an authentication password. In addition, you must provide a password used for the encryption.

Step 5

Click Save.

The menu closes.

Step 6

Click Create.


Refer to the Annex appended at the end of this document to see examples of Unicast SNMPv3 results and detailed information about packets.

Set Active Discovery Unicast WMI

Set Active Discovery Unicast WMI (Windows Management Instrumentation) to collect Windows information like local-host names and operating system versions.

Procedure


Step 1

Toggle the Enable button ON.

Step 2

Leave the Retry attempts and Timeout settings with the default values (0 and 5).

Step 3

Enter a Windows user account and password with the suitable WMI rights.

An Active Directory user account for authentication on multiple hosts with single login credentials can also be used.

Step 4

Click Save.

The menu closes.

Step 5

Click Create.


Modify a policy

Procedure


Step 1

Navigate to Admin > Active Discovery > Policies.

Step 2

Click the policy in the list you want to modify.

An overlay appears with the policy's configurations.

Step 3

Click Edit, Duplicate or Delete.

If you clicked Edit, an Edit policy overlay appears.

Step 4

You can toggle the buttons ON/OFF to enable/disable broadcast protocols.

Step 5

Click the pencil button to edit Unicast protocols settings.

The Unicast configuration panels appears below the list of Unicast protocols.

Step 6

Make the necessary modifications.

Step 7

Click Save.

The overlay closes.

Step 8

Click Update.