Configure the Center

You will need to complete two steps to configure the Center:

  1. The basic Center configuration through a VGA display and a keyboard or a console, to:

    • Set the Center and the sensor passwords.

    • Synchronize the Center to the NTP server.

    • Configure the Administration and Collection interfaces (n/a for a Global Center or a Center using a single interface).

  2. The Cisco Cyber Vision configuration, through a browser, to:

    • Create an admin account.

    • Configure the Center's data synchronization (Global Center and synchronized Centers only).

Basic Center configuration

This step will allow you to configure the Center network settings before using it with the user interface.

Required information:

  • Local NTP and DNS IP addresses.

  • The Collection interface network address (n/a for a Global Center or a Center using a single interface).

In the case of manual Administration network interface configuration:

  • Its IP address.

  • Its netmask (in a two-number format, e.g. 192.168.1.0/24).

  • Its default gateway (to reach devices located outside the local network).

Access the basic Center configuration

The Center wizard is displayed on your screen as you power on the Center. Enter Start to start configuring the Center.

Accept the End User License Agreement

Select the language to match your keyboard


Note

By default, the system is configured to work with a US QWERTY keyboard.

Select the Center type

During this procedure you will choose which type of Center to install. There are three types of Centers:

  • A Center receives metadata from sensors and store them into an internal database (Postrgresql). This Center (could be standalone or with synchronization with Global Center), is similar to a standalone Center from a functionality point of view, except for the link to a Global Center. You must install Centers with sync after the Global Center. This will enable your system to start enrollment and start push events to it.

  • A Global Center introduces a centralized architecture which collects all industrial insights and events from Centers with Global Center and aggregates it on a single global point of view. It will also allow you to manage the knowledge database (KDB) and upgrade the whole platform.

Select the type of Center you want to install.

Center

If installing a Center, select the first option.

Then you will have the opportunity to set the Center id. It can be used in case of Center restoration to reuse the same id previously set in the Global Center. Thus, some data can be retrieved.

If you're installing the Center for the first time, this id will be automatically generated. Select No. You will be directed to the next step.

If you're reinstalling the Center and want to restore it, select Yes.

Use the following command from the Global Center's CLI to get a list of all Center's id:

sbs-db exec "select name, id from center"

Type the id into the basic Center configuration UUID field.

Click OK. You will be direct to the next step.

Global Center

If installing a Global Center, select the second option.

As this step does not apply to a Global Center, select No.

You will be directed to the next step.

Configure the Center's Administration Network Interface

The Center uses a dedicated sub-network on the Administration interface. It is possible to change it if the default one doesn't fit the environment on which the Center will be connected.

The Administration network interface configuration can be done either:

  • Using a DHCP server, if there is one available on the network.

    In this case, enter OK. Settings will be adjusted automatically, and you will be directed to the next step.

  • Manually:

    Enter the Administration network interface's IP address, netmask (in a two-number format), and gateway.

Set interfaces (dual or single)

This step is not applicable to a Global Center. Select No.

Concerning a Center, it is possible to:

  • Set the Administration and Collection Network Interfaces on two distinct interfaces (recommended for security). In this case, select Yes.

  • Use a single interface. In this case, select No.

If you choose to set a dual interfaces, you will be directed to the following screens in the Configure the Center's Collection network interface subsection.

Configure the Center's DNS

Type a DNS server address and optional fallbacks.

Synchronize the Center and the sensors to NTP servers

Enter IP addresses of local or remote NTP servers (gateway configuration needed) to synchronize the Center and the sensors with a clock reference. Each address must be separated by a space.

Optionally, add a key ID and an AES A28 CMAC key value separated by a semicolon with the corresponding NTP server.

The synchronization takes a few seconds.

Check that the time is correct, or set the time manually.


Note

The time is set in the UTC standard.

Give the Center a name


Note

This name will be used in the Center certificate.

Enter the Center name provided by your administrator or type 'Default' which is a secure value.


Note

This name must match the DNS name you will use to access the Center through SSH or a browser.

Set the Center's password

The administrator account (cv-admin) password of the Center must be set for security reasons. It is hidden for confidentiality reasons.

Confirm the password.

Configure the Center's Collection network interface

Erase the network address suggested into the field to disable the DHCP server and enter OK to proceed to the next step.

Type the IP address of the Industrial network interface:

Configure the sensors' password

As this step does not apply when installing a Global Center, the following screens won't be displayed. Instead, you'll be directed to Authorize networks.

Although, if you're installing a Center, proceed as below.

The sensors' root password must be set for security reasons.

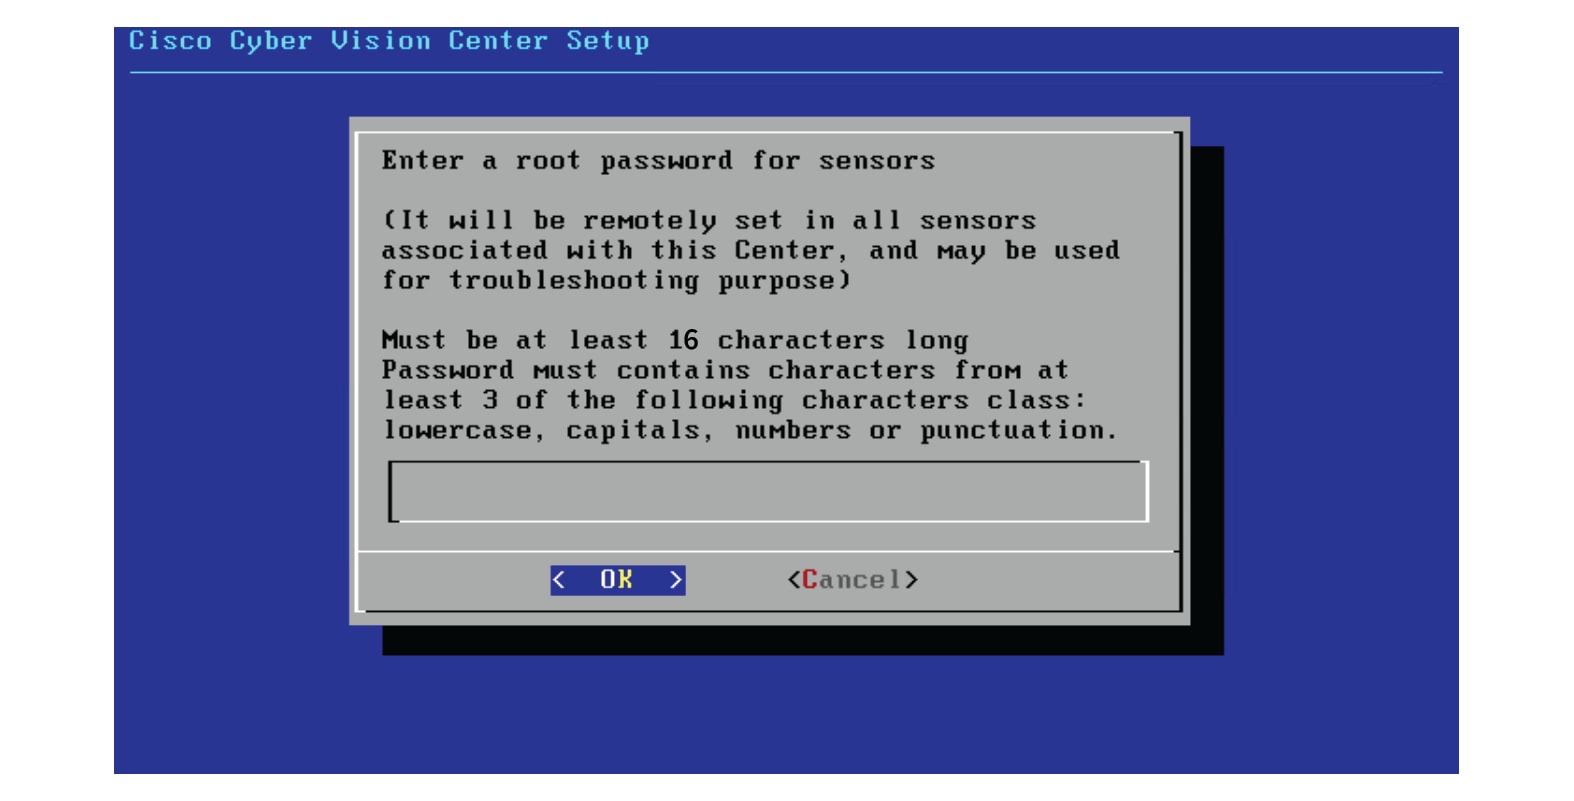
This password will be assigned once you will have enrolled the sensors on the Center. You will need this password for troubleshooting, diagnostics, and updates.

Confirm the password.

Authorize networks

This step allows you to restrict IP addresses that can connect to the Administration interface. If no IP is entered, all networks are authorized by default.

Complete the basic Center configuration

Next is the last screen of the basic Center configuration. It reminds you the addresses set to be used to download the CA certificate and access Cisco Cyber Vision. Save these addresses somewhere, you will need them later to access the user interface.

Enter OK to finish the basic Center configuration.


Note

A major change regarding the Center command line (CLI) access through serial console or SSH was made in Cisco Cyber Vision version 4.1.0. The user root is no more usable to establish the connection. A new user called ‘cv-admin’ must be used. This user has limited rights and many CLI commands will require permission elevation:

  • prefix the command with "sudo".

  • or open a root shell using "sudo -i" and enter the command.


Close the Center configuration window before proceeding with the next steps of Cisco Cyber Vision configuration.

To proceed with the Cisco Cyber Vision configuration, open your browser and go to the URL previously indicated to access the user interface.


Note

Each Cisco Cyber Vision Center includes its own PKI (Public Key Infrastructure), with a CA (Certification Authority), that will be used to establish the TLS connection with the sensors and to clients. The CA must be installed on each client browser (see the following chapters).

Cisco Cyber Vision configuration

Once the Basic Center configuration is done, you must connect through a web browser to the URL displayed on the last step of the basic configuration wizard (i.e. the Center's IP address). A message saying that the URL is not secure will appear.

Then, you will configure the Centers data synchronization (Global Center and its Centers' only).

Browser requirements:

Cisco Cyber Vision supports Chrome 54, Firefox 49 and newer versions.

Install the certificate in your browser

This task explains how to intall a Cisco Cyber Vision self-signed certificate in your browser.

Before you begin

Perform this task if you aim to install a self-signed certificate. If you're planning to use an enterprise certificate, proceed directly with Install Cisco Cyber Vision.

Procedure


Step 1

Open your browser.

Step 2

Enter 'http://<CENTERIPADDRESS>/ca.crt' inside the search bar.

The certificate is downloaded.

Step 3

Save the certificate on your computer.

Step 4

In the browser, access the settings.

Example: Chrome

Step 5

Type 'certificate' in the search bar and access the certificates management menu.

Step 6

Access the Trusted Root Certification tab and click Import.

A certificate importation wizard opens.

Step 7

Go to the next step.

Step 8

Search for the certificate you downloaded earlier.

Step 9

Go to the next step.

Step 10

Accept the default values by accessing the next step.

Step 11

The certificate is now considered as trusted by the browser. It will be imported as soon as you will click Finish.


What to do next

Install Cisco Cyber Vision

Install Cisco Cyber Vision

Access the Cisco Cyber Vision installation wizard:

Procedure


Step 1

With your browser, access https://<CENTERNAME>/.

Note 

Accessing the Center using its name enables HTTPS secure interface. Yet, this requires a DNS or local host configuration to associate the name and the IP address. The Center access through its IP address is possible but the connection is not secure.

Step 2

The setup wizard used for the first access to Cisco Cyber Vision is displayed:

Step 3

Create an admin account:

Step 4

Step 5

Enter the information required.

Note 

Email will be asked for login access.

Note 

Passwords must contain at least 6 characters and comply with the rules below. Passwords:

  • Must contain a lower case character: a-z.

  • Must contain an upper case character: A-Z.

  • Must contain a numeric character: 0-9.

  • Cannot contain the user id.

  • Must contain a special character: ~!"#$%&’()*+,-./:;<=>?@[]^_{|}.

Passwords should be changed regularly to ensure the integrity of the platform and the industrial network security.

Note 

You can reset users using the following command in the Center's CLI:

sbs-db reset-users
Step 6

Accept the software license agreement:

Step 7

Step 8

Finish the installation:

The Center is now correctly installed and Cisco Cyber Vision is ready to operate.

Step 9

Click Start to Explore.

Cisco Cyber Vision installation is now complete.


What to do next

If you aim to use an enterprise certificate, proceed with Configure the user interface security.

If you already installed a self-signed certificate, and if you are installing a Global Center or a synchronized Center, proceed with Configure Center data synchronization.

If you already installed a self-signed certificate, and if you are installing a standalone Center, you can start installing the sensors. To do so, refer to the corresponding Cisco Cyber Vision Sensor Installation Guides.

Configure the user interface security

This section explains how to configure Cisco Cyber Vision user interface security with an enterprise certificate. You will have the option to upload a .p12 or to generate a CSR.

Before you begin

Perform this task if you're planning to use an enterprise certificate. You must install Cisco Cyber Vision beforehand.

Procedure


Step 1

To use an enterprise certificate, navigate to Admin > Center certificate.

Step 2

You can upload a .p12 or generate a CSR.


Upload a p12

Before you begin

The p12 (or Microsoft pfx) file must contain a private key, a password, and the field "X509v3 Subject Alternative Name" must contain the Center DNS name.

Procedure

Step 1

Select Upload a .p12.

Click Please import a PKCS12 file and choose you pfx or p12 file generated from your certification server.

Step 2

Type the certificate password.

Step 3

Click the Import a PKCS#12 file button or drag and drop the file to import it.

Step 4

Click Save.

The following message appears:

Step 5

Click Reload.

Step 6

In your browser, use the DNS name to connect to your Cisco Cyber Vision instance.

The error message does not appear and the connection is secure.


What to do next

If you are installing a Global Center or a synchronized Center, proceed with Configure Center data synchronization.

If you are installing a standalone Center, you can start installing the sensors. To do so, refer to the corresponding Cisco Cyber Vision Sensor Installation Guides.

Generate a CSR

Procedure

Step 1

Select Generate a CSR.

Step 2

Enter the Center FQDN as registered on your DNS server.

Step 3

Click the Generate and download CSR button.

A message indicating that the CSR has been generated is displayed.

Step 4

Click the download button (1).

A <FQDN>.csr file is downloaded.

Step 5

Use the <FQDN>.csr file to generate a pem certificate from your enterprise Certification Authority.

Step 6

Once the pem certificate is generated, return to Cisco Cyber Vision and click the Import a complete PEM bundle button (2) or drag and drop it to import it.

Step 7

Click Save.

The following message appears:

Step 8

Click Reload.

Step 9

In your browser, use the DNS name to connect to your Cisco Cyber Vision instance.

The error message does not appear and the connection is secure.


What to do next

If you are installing a Global Center or a synchronized Center, proceed with Configure Center data synchronization.

If you are installing a standalone Center, you can start installing the sensors. To do so, refer to the corresponding Cisco Cyber Vision Sensor Installation Guides.

Configure Center data synchronization

This step is applicable to the Global Center and its synchronized Centers.

Once the Global Center and its synchronized Centers are installed, proceed to data synchronization, which consists of registering the Center in the Global Center and enrolling the Center to the Global Center. To do so, you need to open each's Cisco Cyber Vision's GUI.


Note

To differentiate each user interface, check the top left corner of Cisco Cyber Vision's "Global Center" or "Center".

In the Global Center's Cisco Cyber Vision GUI, navigate to Admin > System Management > Management.

Click the Register a Center button.

The window "Register a Center" pops up, ready to be filled. Now you must access the Center's GUI to retrieve its fingerprint.

In the Center's Cisco Cyber Vision GUI, navigate to Admin > System.

Scroll down to Certificate fingerprint and copy it.

In the Global Center's GUI, give a name to the Center, and paste the Center's fingerprint into the corresponding field.

Click OK.

The Center appears in the list as unenrolled.

At this point you must switch to the Center's GUI and enroll it to the Global Center.

In the Center's GUI, scroll down to Enroll a Global Center and click the Enroll button.

The Enrollment window pops up.

Copy the Global Center's fingerprint from its GUI's System administration page (same location as the Center's).

Enter the Global Center's IP address and click Enroll.

Once the synchronization is complete, it is indicated that the Center is enrolled to the Global Center.

In the Global Center's GUI, the Center status changes to Connected.

The Global Center and the Center are successfully connected.

Repeat the previous steps as many times as necessary to connect other Centers.

The next step will be to install and enroll the sensors. To do so, refer to the corresponding Cisco Cyber Vision Sensors Installation Guides.

Once a sensor will be connected it will appear in the Global Center's GUI as below: