File Reputation Filtering and File Analysis

This chapter contains the following sections:

Overview of File Reputation Filtering and File Analysis

Advanced Malware Protection protects against zero-day and targeted file-based threats in email attachments by:

  • Obtaining the reputation of known files.

  • Analyzing behavior of certain files that are not yet known to the reputation service.

  • Continuously evaluating emerging threats as new information becomes available, and notifying you about files that are determined to be threats after they have entered your network.

This feature is available for incoming messages and outgoing messages.

The file reputation and file analysis services have options for either public- or private-cloud (on-premesis).

File Threat Verdict Updates

Threat verdicts can change as new information emerges. A file may initially be evaluated as unknown or clean, and the file may therefore be released to the recipient. If the threat verdict changes as new information becomes available, you will be alerted, and the file and its new verdict appear in the AMP Verdict Updates report. You can investigate the point-of-entry message as a starting point to remediating any impacts of the threat.

Verdicts can also change from malicious to clean.

When no dynamic content is found in a file after file analysis, the verdict is Low Risk. The file is not sent for file analysis, and the message continues through the email pipeline.

When the appliance processes subsequent instances of the same file, the updated verdict is immediately applied.

Information about the timing of verdict updates is included in the file-criteria document referenced in Supported Files for File Reputation and Analysis Services.

Related Topics

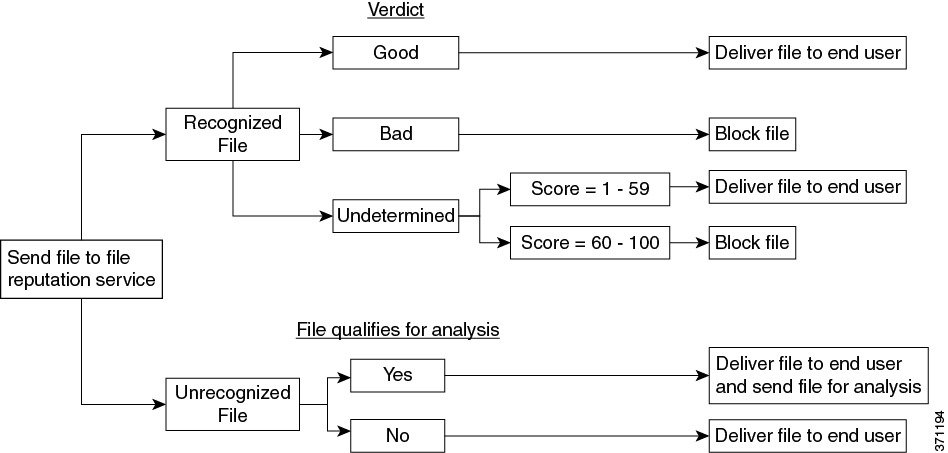
File Processing Overview

Evaluation of file reputation and sending of files for analysis occur immediately after anti-virus scanning, regardless of verdicts from previous scanning engines, unless a final action has been taken on the message.


Note


By default, if a message has malformed MIME headers, the file reputation service returns a verdict of “unscannable.” The appliance will also attempt to extract the attachments from this message. If the appliance is unable to extract the attachments, verdict will remain as “unscannable.” If the appliance is able to extract the attachments, the file reputation of the attachments is evaluated. If the attachments are malicious, the verdict is changed from “unscannable” to “malicious.”


Communications between the appliance and the file reputation service are encrypted and protected from tampering.

After a file’s reputation is evaluated:

  • If a message does not contain any attachments, the file reputation service will return a verdict of “skipped.”
  • If the file is known to the file reputation service and is determined to be clean, the message continues through the workqueue.
  • If the file reputation service returns a verdict of malicious, for any attachment in the message, then the appliance applies the action that you have specified in the applicable mail policy.
  • If the file is known to the reputation service but there is insufficient information for a definitive verdict, the reputation service returns a reputation score based on characteristics of the file such as threat fingerprint and behavioral analysis. If this score meets or exceeds the configured reputation threshold, the appliance applies the action that you have configured in the mail policy for files that contain malware .
  • If the reputation service has no information about the file, and the file does not meet the criteria for analysis (see Supported Files for File Reputation and Analysis Services), the file is considered clean and the message continues through the workqueue.
  • If you have enabled the File Analysis service, and the reputation service has no information about the file, and the file meets the criteria for files that can be analyzed (see Supported Files for File Reputation and Analysis Services), then the message can be quarantined (see Quarantining Messages with Attachments Sent for Analysis) and the file sent for analysis. If you have not configured the appliance to quarantine messages when attachments are sent for analysis, or the file is not sent for analysis, then the message is released to the user.
  • For deployments with on-premises file analysis, the reputation evaluation and file analysis occur simultaneously. If the reputation service returns a verdict, that verdict is used, as the reputation service includes inputs from a wider range of sources. If the file is unknown to the reputation service, the file the file analysis verdict is used.
  • If the file reputation verdict information is unavailable because the connection with the server timed out, the file is considered as Unscannable and the actions configured are applied.
Figure 1. Advanced Malware Protection Workflow for Public-Cloud File Analysis Deployments


If the file is sent for analysis:

  • If the file is sent to the cloud for analysis: Files are sent over HTTPS.

  • Analysis normally takes minutes, but may take longer.

  • A file that is flagged as malicious after File Analysis may not be identified as malicious by the reputation service. File reputation is determined by a variety of factors over time, not necessarily by a single file analysis verdict.

  • Results for files analyzed using an on premises Cisco Secure Endpoint Malware Analytics appliance are cached locally.

For information about verdict updates, see File Threat Verdict Updates.

Supported Files for File Reputation and Analysis Services

The reputation service evaluates most file types. File type identification is determined by file content and is not dependent on the filename extension.

Some files with unknown reputation can be analyzed for threat characteristics. When you configure the file analysis feature, you choose which file types are analyzed. New types can be added dynamically; you will receive an alert when the list of uploadable file types changes, and can select added file types to upload.

Details about what files are supported by the reputation and analysis services are available only to registered Cisco customers. For information about which files are evaluated and analyzed, see File Criteria for Advanced Malware Protection Services for Cisco Content Security Products, available from https://www.cisco.com/c/en/us/support/security/email-security-appliance/products-user-guide-list.html. The criteria for evaluating a file’s reputation and for sending files for analysis may change at any time.

In order to access this document, you must have a Cisco customer account with a support contract. To register, visit https://tools.cisco.com/RPF/register/register.do.

You should configure policies to block delivery of files that are not addressed by Advanced Malware Protection.


Note


A file (either in incoming mail or outgoing mail) that has already been uploaded for analysis from any source will not be uploaded again. To view analysis results for such a file, search for the SHA-256 from the File Analysis reporting page.

Related Topics

Archive or Compressed File Processing

If the file is compressed or archived,

  • Reputation of the compressed or archive file is evaluated.

For information about which archived and compressed files are examined, including file formats, see the information linked from Supported Files for File Reputation and Analysis Services.

In this scenario,

  • If one of the extracted files is malicious, the file reputation service returns a verdict of Malicious for the compressed or the archive file.
  • If the compressed or archive file is malicious and all the extracted files are clean, the file reputation service returns a verdict of Malicious for the compressed or the archive file.
  • If the verdict of any of the extracted files is unknown, the extracted files are optionally (if configured and the file type is supported for file analysis) sent for file analysis.
  • If the verdict of any of the extracted files or attachments is low risk, the file is not sent for file analysis.
  • If the extraction of a file fails while decompressing a compressed or an archive file, the file reputation service returns a verdict of Unscannable for the compressed or the archive file. Keep in mind that, in this scenario, if one of the extracted files is malicious, the file reputation service returns a verdict of Malicious for the compressed or the archive file (Malicious verdict takes precedence over Unscannable verdict).
  • An compressed or archive file is treated as unscannable in the following scenarios:

    • The data compression ratio is more than 20.

    • The archive file contains more than five levels of nesting.

    • The archive file contains more than 200 child files.

    • The archive file size is more than 50 MB.

    • The archive file is password protected or unreadable.


Note


Reputation of the extracted files with safe MIME types, for example, text/plain, are not evaluated.

Privacy of Information Sent to the Cloud

  • Only the SHA that uniquely identifies a file is sent to the reputation service in the cloud. The file itself is not sent.

  • If you are using the file analysis service in the cloud and a file qualifies for analysis, the file itself is sent to the cloud.

  • Information about every file that is sent to the cloud for analysis and has a verdict of "malicious" is added to the reputation database. This information is used along with other data to determine a reputation score.

    Information about files analyzed by an on premises Cisco Secure Endpoint Malware Analytics appliance is not shared with the reputation service.

Configuring File Reputation and Analysis Features

Requirements for Communication with File Reputation and Analysis Services

  • All Email Security appliances that use these services must be able to connect to them directly over the internet (excluding File Analysis services configured to use an on-premises Cisco Secure Endpoint Malware Analytics Appliance.)

  • By default, communication with file reputation and analysis services .

  • By default, communication with file reputation and cloud-based analysis services is routed through the interface that is associated with the default gateway. To route this traffic through a different interface, create a static route for each address in the Advanced section of the Security Services > File Reputation and Analysis page.

  • The following firewall ports must be open:

    Firewall Ports

    Description

    Protocol

    In/Out

    Hostname

    Appliance Interface

    32137 (default) or 443

    Access to cloud services for obtaining file reputation.

    TCP

    Out

    As configured in Security Services > Anti-Malware and Reputation, Advanced section, Cloud Server Pool parameter.

    Management, unless a static route is configured to route this traffic through a data port.

    443

    Access to cloud services for file analysis.

    TCP

    Out

    As configured in Security Services > Anti-Malware and Reputation, Advanced section.

Configuring an On-premises File Reputation Server

If you will use a Cisco AMP Virtual Private Cloud appliance as a private-cloud file analysis server:

  • You can obtain the Cisco Advanced Malware Protection Virtual Private Cloud Appliance documentation, including the Installation and Configuration of FireAMP Private Cloud guide, from http://www.cisco.com/c/en/us/support/security/fireamp-private-cloud-virtual-appliance/tsd-products-support-series-home.html

    Use that documentation to perform the tasks described in this topic.

    Additional documentation is available using the Help link in the AMP Virtual Private Cloud appliance.

  • Set up and configure the Cisco AMP Virtual Private Cloud appliance in either “proxy” or “air-gap” (on-premises) mode.

  • Ensure the Cisco AMP Virtual Private Cloud appliance software version is 2.2, which enables integration with Cisco Email Security appliance .

  • Download the AMP Virtual Private Cloud certificate and keys on that appliance for upload to this Email Security appliance

  • Use the Root Certificate option to skip standard validation when the root authority, trusted by the Email Security Appliance, does not sign the tunnel proxy server certificate.


Note


After you have set up the on-premises file-reputation server, you will configure connection to it from this Email Security appliance ; see Step 6 of Enabling and Configuring File Reputation and Analysis Services


Configuring an On-Premises File Analysis Server

If you will use a Cisco Secure Endpoint Malware Analytics Appliance as a private-cloud file analysis server:

  • Obtain the Cisco Secure Endpoint Malware Analytics Appliance Setup and Configuration Guide and the Cisco Secure Endpoint Malware Analytics Appliance Administration Guide. Cisco Secure Endpoint Malware Analytics Appliance documentation is available from http://www.cisco.com/c/en/us/support/security/amp-threat-grid-appliances/products-installation-guides%20-list.html.

    Use this documentation to perform the tasks described in this topic.

    Additional documentation is available from the Help link in the Cisco Secure Endpoint Malware Analytics appliance.

    In the Administration Guide, search for information about all of the following: integrations with other Cisco appliances, CSA, Cisco Sandbox API, ESA, and Email Security Appliances, .

  • Set up and configure the Cisco Secure Endpoint Malware Analytics Appliance.

  • If necessary, update your Cisco Secure Endpoint Malware Analytics Appliance software to version 1.2.1, which supports integration with Cisco Email Security appliances.

    See the AMP Malware Analytics documentation for instructions for determining the version number and for performing the update.

  • Ensure that your appliances can communicate with each other over your network. Cisco Email Security appliances must be able to connect to the CLEAN interface of the Cisco Secure Endpoint Malware Analytics appliance.

  • If you will deploy a self-signed certificate: Generate a self-signed SSL certificate from the Cisco Secure Endpoint Malware Analytics appliance to be used on your Email Security appliance . See instructions for downloading SSL certificates and keys in the administrator’s guide for your Cisco Secure Endpoint Malware Analytics appliance. Be sure to generate a certificate that has the hostname of your Cisco Secure Endpoint Malware Analytics appliance as CN. The default certificate from the Cisco Secure Endpoint Malware Analytics appliance does NOT work.

  • Registration of your Email Security appliance with your Malware Analytics appliance occurs automatically when you submit the configuration for File Analysis, as described in Enabling and Configuring File Reputation and Analysis Services. However, you must activate the registration as described in the same procedure.

Enabling and Configuring File Reputation and Analysis Services

Before you begin

Procedure


Step 1

Select Security Services > File Reputation and Analysis.

Step 2

Click Edit Global Settings.

Step 3

Click Enable File Reputation Filtering and optionally Enable File Analysis.

  • If Enable File Reputation Filtering is checked, you must configure the section File Reputation Server (in Step 6), by either choosing the URL of an external public-reputation cloud server, or by providing the Private reputation cloud server connection information.

  • Similarly, if Enable File Analysis is checked, you must configure the section File Analysis Server URL (in Step 7), providing either the URL of an external cloud server, or the Private analysis cloud connection information.

    Note


    New file types may be added after an upgrade and are not enabled by default. If you have enabled file analysis, and require the new file types to be included in analysis, you must enable them.

Step 4

Accept the license agreement if presented.

Step 5

In the File Analysis section, select the required file types from the appropriate file groups (for example, “Microsoft Documents”) to send for file analysis.

For information about supported file types, see the document described in Supported Files for File Reputation and Analysis Services

Note

 
Cisco periodically checks for potentially malicious file types to prevent zero day threats. If new threats are identified, details of such file types are sent to your appliance through updater servers. Select the Other potentially malicious file types option to enable this functionality. If you enable this functionality, your appliance will send such file types for analysis in addition to the file types you have selected.

Step 6

Expand the Advanced Settings for File Reputation panel and adjust the following options as needed:

Option

Description

Cloud Domain

The name of the domain to be used for file reputation queries.

File Reputation Server

Choose either: the host name of the public reputation cloud server, or Private reputation cloud.

If you choose Private reputation cloud, provide the following:

  • Server – The host name or IP address of the Cisco AMP Virtual Private Cloud appliance.

  • Public Key – Provide a valid public key for encrypted communications between this appliance and your private cloud appliance. This must be the same key used by the private cloud server: locate the key file on this appliance, and then click Upload File.

Note

 
You must have already downloaded the key file from the server to this appliance.

AMP for Endpoints Console Integration

Click Register the Appliance with AMP for Endpoints to integrate your appliance with AMP for Endpoints console. For detailed instructions, see Integrating the Appliance with AMP for Endpoints Console.

SSL Communication for File Reputation

Check Use SSL (Port 443) to communicate on port 443 instead of the default port, 32137. Refer to the Cisco AMP Virtual Private Cloud Appliance user guide for information about enabling SSH access to the server.

Note

 
SSL communication over port 32137 may require you to open that port in your firewall.

This option also allows you to configure an upstream proxy for communication with the file reputation service. If checked, provide the appropriate Server, Username and Passphrase information.

When Use SSL (Port 443) is selected, you can also check Relax Certificate Validation to skip standard certificate validation if the tunnel proxy server's certificate is not signed by a trusted root authority. For instance, select this option if using a self-signed certificate on a trusted internal tunnel proxy server.

Note

 
If you checked Use SSL (Port 443) in the SSL Communication for File Reputation section of the Advanced Settings for File Reputation, you must add the AMP on-premises reputation server CA certificate to the certificate store on this appliance, using either the CLI command certconfig > CERTAUTHORITY > CUSTOM, or Network > Certificates (Custom Certificate Authorities) in the Web interface. Obtain this certificate from the server (Configuration > SSL > Cloud server > download).

Heartbeat Interval

The frequency, in minutes, with which to ping for retrospective events.

Query Timeout

The number of elapsed seconds before the reputation query times out.

Processing Timeout

The number of elapsed seconds before the file processing times out.

File Reputation Client ID

The client ID for this appliance on the File Reputation server (read-only).

File Retrospective

Check Suppress the retrospective verdict alerts to suppress the retrospective verdict alerts for messages that are not delivered to the message recipient, dropped or quarantined.

Note

 
Do not change any other settings in this section without guidance from Cisco support.

Step 7

If you will use the cloud service for file analysis, expand the Advanced Settings for File Analysis panel and adjust the following options as needed:

Option

Description

File Analysis Server URL

Choose either: the name (URL) of an external cloud server, or Private analysis cloud.

If specifying an external cloud server, choose the server that is physically nearest to your appliance. Newly available servers will be added to this list periodically using standard update processes.

Choose Private analysis cloud to use an on-premises Cisco Secure Endpoint Malware Analytics appliance for file analysis, and provide the following:

  • TG Servers – Enter the IPv4 address or hostname of the standalone or clustered Cisco Secure Endpoint Malware Analytics appliances. You can add a maximum of seven Cisco Secure Endpoint Malware Analytics appliances.

    Note


    The Serial Number indicates the order in which you add the standalone or clustered Cisco Secure Endpoint Malware Analytics appliances. It does not denote the priority of the appliances.

    Note


    You cannot add standalone and cluster servers in one instance. It must be either standalone or cluster.

    You can add only one standalone server in an instance. If it is a cluster mode, you can add multiple servers upto seven and all the servers must belong to the same cluster. You cannot add multiple clusters.

  • Certificate Authority – Choose either Use Cisco Default Certificate Authority, or Use Uploaded Certificate Authority.

    If you choose Use Uploaded Certificate Authority, click Browse to upload a valid certificate file for encrypted communications between this appliance and your private cloud appliance. This must be the same certificate used by the private cloud server.

Note

 
If you have configured the Cisco Secure Endpoint Malware Analytics portal on your appliance for file analysis, you can access the Cisco Secure Endpoint Malware Analytics portal (for example, https://panacea.threatgrid.eu) to view and track the files submitted for file analysis. For more information on how to access the Cisco Secure Endpoint Malware Analytics portal, contact Cisco TAC.

Proxy Settings

Check Use File Reputation Proxy checkbox to use the same File Reputation tunnel proxy that you have already configured, as an upstream proxy for file analysis.

If you want to configure a different upstream proxy, uncheck the Use File Reputation Proxy checkbox and enter the appropriate Server, Port, Username, and Passphrase information.

File Analysis Client ID

The client ID for this appliance on the File Analysis server (read-only).

Step 8

(Optional) Expand the Cache Settings panel, if you want to configure the cache expiry period for File Reputation disposition values.

Step 9

Expand the Threshold Settings panel, if you want to set the upper limit for the acceptable file analysis score. The score above this threshold indicates that the file is infected. Choose any one of the following options:

  • Use value from Cloud Service (95)

  • Enter Custom Value – defaults to 95

Step 10

Submit and commit your changes.

Step 11

If you are using an on-premises Cisco Secure Endpoint Malware Analytics appliance, activate the account for this appliance on the Cisco Secure Endpoint Malware Analytics appliance.

Complete instructions for activating the “user” account are available in the Cisco Secure Endpoint Malware Analytics documentation.

  1. Note the File Analysis Client ID that appears at the bottom of the page section. This identifies the “user” that you will activate.

  2. Sign in to the Cisco Secure Endpoint Malware Analytics appliance.

  3. Select Welcome... > Manage Users and navigate to User Details.

  4. Locate the “user” account based on the File Analysis Client ID of your Email Security appliances .

  5. Activate this “user” account for your appliance.


Integrating the Appliance with AMP for Endpoints Console

You can integrate your appliance with AMP for Endpoints console, and perform the following actions in AMP for Endpoints console:

  • Create a simple custom detection list.

  • Add new malicious file SHAs to the simple custom detection list.

  • Create an application allowed list.

  • Add new file SHAs to the application allowed list.

  • Create a custom policy.

  • Attach the simple custom detection list and the application allowed list to the custom policy.

  • Create a custom group.

  • Attach the custom policy to the custom group.

  • Move your registered appliance from the default group to the custom group.

  • View the file trajectory details of a particular file SHA.

To integrate your appliance with AMP for Endpoints console, you need to register your appliance with the console.

After the integration, when a file SHA is sent to the File Reputation server, the verdict obtained for the file SHA from the File Reputation Server is overridden by the verdict already available for the same file SHA in the AMP for Endpoints console.

If a file SHA is already marked as malicious globally, and if the same file SHA is added to the blocked list in Secure Endpoint console, the file disposition is malicious.

The Advanced Malware Protection report page includes a new section - Incoming Malware Files by Category to view the percentage of block listed file SHAs received from the AMP for Endpoints console that are displayed as Custom Detection. The threat name of a block listed file SHA is displayed as Simple Custom Detection in the Incoming Malware Threat Files section of the report. You can click the link in the More Details section of the report to view the file trajectory details of a block listed file SHA in the AMP for Endpoints console.

Before you begin

Make sure you have a user account in AMP for Endpoints console with admin access rights. For more details on how to create an AMP for Endpoints console user account, contact Cisco TAC.

[For clustered configuration] In a clustered configuration, you can only register your logged-in appliance with AMP for Endpoints console. If you have already registered your appliance with AMP for Endpoints console in the standalone mode, make sure to deregister the appliance manually before you join it to a cluster.

Make sure you have enabled and configured File Reputation Filtering. See Enabling and Configuring File Reputation and Analysis Services to know how to enable and configure File Reputation Filtering.

Procedure


Step 1

Select Security Services > File Reputation and Analysis.

Step 2

Click Edit Global Settings.

Step 3

Click Register Appliance with AMP for Endpoints in the Advanced Settings panel for File Reputation in the File Reputation and File Analysis page of the web interface.

Once you click Register Appliance with AMP for Endpoints, the AMP for Endpoints console login page appears.

Step 4

Log in to the AMP for Endpoints console with your user credentials.

Step 5

Click Allow in the AMP for Endpoints authorization page to register your appliance.


What to do next

Next Steps:

  • You can go to Accounts > Applications section of the AMP for Endpoints console page, to verify whether your appliance is registered with AMP for Endpoints console. Your appliance name is displayed in the Applications section of the AMP for Endpoints console page.

  • After registration, your appliance is added to the default group (Audit Group) which has a default policy (Network Policy) attached to it. The default policy contains file SHAs that are added to the blocked list or the allowed list. If you want to customize the AMP for Endpoints settings for your appliance, and add your own file SHAs that are added to the blocked list or the allowed list, see the AMP for Endpoints user documentation at https://console.amp.cisco.com/docs.

  • Make sure that the ‘File Reputation Client ID’ value in the File Reputation Settings page and the ‘Device GUID’ value of your registered appliance in the AMP for Endpoints console portal is the same. If the values are different, the integration of your appliance with AMP for Endpoints will not work properly at the machine or cluster level. You will need to deregister and register your appliance again to use the AMP for Endpoints functionality.

  • To deregister your appliance connection from AMP for Endpoints console, you can click Deregister in the Advanced Settings for File Reputation section in your appliance, or you need to go to the AMP for Endpoints console page at https://console.amp.cisco.com/. For more information, see the AMP for Endpoints user documentation at https://console.amp.cisco.com/docs.


Note


When you change your File Reputation server to a different data center, your appliance is automatically deregistered from the AMP for Endpoints console. You must re-register your appliance with AMP for Endpoints console with the same data center selected for the File Reputation server.


Note


If you change your file reputation server at the cluster level, your logged-in appliance is automatically deregistered from the AMP for Endpoints console. Ensure that you deregister all the other machines in the cluster. You must re-register all your appliances with AMP for Endpoints console with the same data center selected for the File Reputation server


Note


If a malicious file SHA gets a clean verdict, then verify whether the same file SHA is added to the allowed list in AMP for Endpoints console.


Important! Changes Needed in File Analysis Setting

If you plan to use a new public cloud File Analysis service, make sure you read the following instructions to maintain datacenter isolation:

  • The existing appliance grouping information is not preserved in the new File Analysis server. You must regroup your appliances on the new File Analysis server.

  • Messages that are quarantined to the File Analysis Quarantine are retained until the retention period. After the quarantine retention period, the messages are released from the File Analysis Quarantine, and re-scanned by the AMP engine. The file is then uploaded to the new File Analysis server for analysis but the message is not sent to the File Analysis Quarantine again.

For more details, refer to the Cisco AMP Malware Analytics documentation from http://www.cisco.com/c/en/us/support/security/amp-threat-grid-appliances/products-installation-guides -list.html.

(Public Cloud File Analysis Services Only) Configuring Appliance Groups

To allow all content security appliances in your organization to view file analysis result details in the cloud for files sent for analysis from any appliance in your organization, you need to join all appliances to the same appliance group. You can configure appliance groups at the machine or the cluster level.

Before you begin:
  • Ensure that all the machines in the cluster are working.
  • Ensure that you have connected to the configured File Analysis server of your region and the server is working.

Note


If you load a license keys file that does not contain the 'cloud admin feature' key in the on-premises virtual email gateway, you can still perform auto-registration of Threat Group File Analysis using the Smart License Account ID.

Procedure


Step 1

Select Security Services > File Reputation and Analysis.

Step 2

Click the Click here to group or view Email Gateway for File Analysis reporting option to create the Appliance Group.

Step 3

[Applicable if Smart Licensing is disabled on your email gateway] Enter the group ID manually in the Appliance ID/Name field and click Group Now.

Or

[Applicable if Smart Licensing is enabled on your email gateway] The system automatically registers the Smart Account ID as group ID and displays it in the Appliance Group ID/Name field.

Notes:

  • An appliance can belong to only one group.
  • You can add a machine to a group at any time.
  • You can configure appliance groups at the machine and the cluster levels.
  • If this is the first appliance being added to the group, provide a useful identifier for the group. This ID is case-sensitive and cannot contain spaces.
  • The appliance group ID you provide must be identical on all appliances that will share data about files that are uploaded for analysis. However, the ID is not validated on subsequent appliances in the group.
  • If you update the appliance group ID, the change takes effect immediately, and it does not require a Commit.
  • You must configure all appliances in a group to use the same File Analysis server in the cloud.
  • If Smart Licensing is enabled, the appliances are grouped using the Smart Account ID.

Updating Appliance Group Name for File Analysis Reporting

Procedure

Step 1

Select Security Services> File Reputation and Analysis.

Step 2

Click the Click here to group or view Email Gateway for File Analysis reporting option.

Step 3

Click Change Group in the Appliance Grouping for File Analysis Reporting page.

Note

 
You can also use the ampconfig > setgroup sub command in the CLI to change the group ID.

Step 4

Enter a name or ID in the Appliance Group ID/Name field and click Group Now.

Note


You must individually update the group name for all the appliances in a specific group.


Which Appliances Are In the Analysis Group?

Procedure

Step 1

Select Security Services> File Reputation and Analysis.

Step 2

Click the Click here to group or view Email Gateway for File Analysis reporting option.

Step 3

Click View Appliances to view the appliances added in a specific File Analysis Group.


Viewing Alerts for File Analysis Grouping

The following table lists the system alerts generated for the Appliance Grouping for File Analysis reporting, including a description of the alert and the alert severity.

Component/Alert Name

Message and Description

Parameter

AMP.ENGINE.ALERT.WARN

Alert text: Failed to register the file analysis group name with Cisco Threat Grid server. Contact Cisco TAC for assistance.

Alert level: WARNING.

Description: Alert is sent when the email gateway fails to register the Appliance Group name using the Smart Account ID with the Cisco Thread Grid server.

Parameters: Reason for the failure

Configuring the Mail Policy for File Reputation Scanning and File Analysis

Procedure


Step 1

Select Mail Policies > Incoming Mail Policies or Mail Policies > Outgoing Mail Policies, whichever is applicable.

Step 2

Click the link in the Advanced Malware Protection column of the mail policy to modify.

Step 3

Choose options.

  • If you do not have an on-premises Cisco AMP Threat Grid Appliance and you do not want to send files to the cloud, for example for confidentiality reasons, uncheck Enable File Analysis.

  • Select the actions that the appliance must perform if an attachment is considered as Unscannable. Attachments are considered Unscannable when the appliance is unable to scan the file for the following reasons:

    • Message Errors:

      • Password-protected archived or compressed file

      • Messages with RFC violation.

      • Messages that contain more than 200 child files

      • Messages that contain more than five nested levels of child files

      • Messages with extraction failure

    • Rate Limit - The files that are not scanned by the File Analysis server because the appliance has reached the file upload limit.

    • AMP Service not available:

      • File Reputation service is not available

      • File Analysis service is not available

      • File reputation query timeout

      • File upload query timeout

  • You can configure any one of the following message handling actions on messages that are not scanned by the AMP engine:

    • Drop the message

    • Deliver the message as it is

    • Send the message to the policy quarantine

  • Select the following additional actions, if you choose to deliver the message:

    • Whether to archive the original message. Archived messages are stored as an mbox-format log file in the amparchive directory on the appliance. The preconfigured AMP Archive ( amparchive ) log subscription is required.

    • Whether to warn the end user by modifying the message subject, for example, [WARNING: ATTACHMENT(S) MAY CONTAIN MALWARE].

    • Whether to add a custom header to provide granular controls to the administrator.

    • Whether to modify the message recipient causing the message to be delivered to a different address. Click Yes and enter the new recipient address.

    • Whether to send the unscannable messages to an alternate destination host. Click Yes and enter an alternate IP address or hostname.

  • Select the following additional actions, if you choose to send the message to the policy quarantine:

    • Whether to select a policy quarantine from the drop-down. When flagged for quarantine, the message is placed in the quarantine when it reaches the end of the email pipeline, and is scanned by all the other engines in the email pipeline.

    • Whether to archive the original message. Archived messages are stored as an mbox-format log file in the amparchive directory on the appliance. The preconfigured AMP Archive ( amparchive ) log subscription is required.

    • Whether to warn the end user by modifying the message subject, for example, [WARNING: ATTACHMENT(S) MAY CONTAIN MALWARE].

    • Whether to add a custom header to provide granular controls to the administrator.

  • Select the actions that AsyncOS must perform if an attachment is considered Malicious. Select the following:

    • Whether to deliver or drop the message.

    • Whether to archive the original message. Archived messages are stored as an mbox-format log file in the amparchive directory on the appliance. The preconfigured AMP Archive ( amparchive ) log subscription is required.

    • Whether to deliver the message after removing the malware attachments.

    • Whether to warn the end user by modifying the message subject, for example, [WARNING: MALWARE DETECTED IN ATTACHMENT(S)].

    • Whether to add a custom header to provide granular controls to the administrator.

    • Whether to modify the message recipient causing the message to be delivered to a different address. Click Yes and enter the new recipient address.

    • Whether to send the malicious messages to an alternate destination host. Click Yes and enter an alternate IP address or hostname.

  • Select the actions that AsyncOS must perform if an attachment is sent for File Analysis. Select the following:

    • Whether to deliver or quarantine the message.

    • Whether to archive the original message. Archived messages are stored as an mbox-format log file in the amparchive directory on the appliance. The preconfigured AMP Archive ( amparchive ) log subscription is required.

    • Whether to warn the end user by modifying the message subject, for example, “ [WARNING: ATTACHMENT(S) MAY CONTAIN MALWARE] .”

    • Whether to add a custom header to provide granular controls to the administrator.

    • Whether to modify the message recipient causing the message to be delivered to a different address. Click Yes and enter the new recipient address.

    • Whether to send the messages that are sent for file analysis to an alternate destination host. Click Yes and enter an alternate IP address or hostname.

  • (For Incoming Mail Policy only) Configure the remedial actions to be performed on messages delivered to end users when the threat verdict changes to malicious. Select Enable Mailbox Auto Remediation and select one of the following actions:

    • Forward to an email address. Select this option to forward the message with malicious attachment to a specified user, for example, an email administrator.

    • Delete the message. Select this option to permanently delete the message with malicious attachment from the end user’s mailbox.

    • Forward to an email address and delete the message. Select this option to forward the message with malicious attachment to a specified user, for example, an email administrator and permanently delete that message from the end user’s mailbox.

      Note


      Messages from certain folders (for example, Deleted Items) cannot be deleted as Office 365 services do not support deletion of messages from these folders.

      Important


      Before configuring the Mailbox Auto Remediation settings, review Remediating Messages in Mailboxes

Step 4

Submit and commit your changes.


Quarantining Messages with Attachments Sent for Analysis

You can configure the appliance to quarantine files sent for analysis instead of releasing them immediately to the workqueue. Quarantined messages and their attachments are rescanned for threats upon release from quarantine. If the message is released after file analysis results are available to the reputation scanner, any identified threats will be caught during rescanning.

Procedure


Step 1

Select Mail Policies > Incoming Mail Policies or Mail Policies > Outgoing Mail Policies, whichever is applicable.

Step 2

Click the link in the Advanced Malware Protection column of the mail policy to modify.

Step 3

Under Messages with File Analysis Pending section, select Quarantine from the Action Applied to Message drop-down.

The quarantined messages are stored in the File Analysis quarantine. See Using the File Analysis Quarantine.

Step 4

(Optional) Under Messages with File Analysis Pending section, choose the following options:

  • Whether to archive the original message. Archived messages are stored as an mbox-format log file in the amparchive directory on the appliance. The preconfigured AMP Archive ( amparchive ) log subscription is required.

  • Whether to warn the end user by modifying the message subject, for example, “ [WARNING: ATTACHMENT(S) MAY CONTAIN MALWARE] .”

  • Whether to drop attachments in case of any pending file analysis verdict while delivering the final message from the appliance. The default option is ‘No’

  • Whether to add a custom header to provide granular controls to the administrator.

Note

 
The above actions mentioned in step4 are applicable only when a message is released from the quarantine and not when the message is sent to the quarantine:
  • Archiving the original message.

  • Modifying a message subject.

  • Adding a custom header.

Step 5

Submit and commit your changes.


What to do next

Related Topics

Using the File Analysis Quarantine

Using the File Analysis Quarantine

Edit File Analysis Quarantine Settings

Procedure

Step 1

Select Monitor > Policy, Virus, and Outbreak Quarantines.

Step 2

Click the File Analysis quarantine link.

Step 3

Specify the retention period.

Changing the default from one hour is not recommended.

Step 4

Specify the default action that AsyncOS must take after the retention period has passed.

Step 5

If you do not want messages in this quarantine to be processed before the end of the Retention Period you specify, even when quarantine disk space is full, deselect Free up space by applying default action on messages upon space overflow.

Step 6

If you select Release as the Default Action, optionally specify additional actions to apply to messages that are released before their retention period has passed:

Option

Information

Modify Subject

Type the text to add and specify whether to add it to the beginning or the end of the original message subject.

For example, you might want to warn the recipient that the message may contain malware attachments.

Note

 
In order for a subject with non-ASCII characters to display correctly it must be represented according to RFC 2047.

Add X-Header

An X-Header can provide a record of actions taken on a message. This can be helpful for example when handling inquiries about why a particular message was delivered.

Enter a name and value.

Example:

Name = Inappropriate-release-early

Value = True

Strip Attachments

Stripping attachments protects against malware attachments in messages.

Step 7

Specify the users who can access this quarantine:

User

Information

Local Users

The list of local users includes only users with roles that can access quarantines.

The list excludes users with Administrator privileges, because all Administrators have full access to quarantines.

Externally Authenticated Users

You must have configured external authentication.

Custom User Roles

You see this option only if you have created at least one custom user role with quarantine access.

Step 8

Submit and commit your changes.


Manually Processing Messages in the File Analysis Quarantine

Procedure

Step 1

Select Monitor > Policy, Virus, and Outbreak Quarantines.

Step 2

In the row for File Analysis quarantine, click the blue number in the Messages column of the table.

Step 3

Depending on your requirements, perform the following actions on messages:

  • Delete

  • Release

  • Delay Scheduled Exit from quarantine

  • Send a copy of messages to email addresses that you specify


Centralized File Analysis Quarantine

For information about the centralized File Analysis quarantine, see chapter "Centralized Policy, Virus and Outbreak Quarantine" of the Cisco Email Security Appliance Guide.

X-Headers for File Reputation and Analysis

You can use X-Headers to mark messages with actions and results of message processing steps. You tag messages with X-Headers in mail policies, then use content filters to choose handling options and final actions for these messages.

Values are case-sensitive.

Header Name

Possible Values (Case Sensitive)

Description

X-Amp-Result

Clean

Malicious

Unscannable

Verdict applied to messages processed by the file reputation service.

X-Amp-Original-Verdict

file unknown

verdict unknown

Verdict before adjustment based on reputation threshold. This header exists only if the original verdict is one of the possible values.

X-Amp-File-Uploaded

true

false

If any file attached to a message was sent for analysis, this header is "true."

Sending Notifications to End Users about Dropped Messages or Attachments

To send notifications to end users when a suspect attachment or its parent message has been dropped based on file reputation scanning, use an X-header or Custom Header and Content Filters.

Advanced Malware Protection and Clusters

If you use centralized management, you can enable Advanced Malware Protection and mail policies at the cluster, group and machine level.

Feature keys must be added at the machine level.

Appliance Groups should not be configured at cluster level.

Ensuring That You Receive Alerts About Advanced Malware Protection Issues

Ensure that the appliance is configured to send you alerts related to Advanced Malware Protection.

You will receive alerts when:

Alert Description

Type

Severity

You are setting up a connection to an on-premises (private cloud) Cisco Secure Endpoint Malware Analytics appliance and you need to activate the account as described in Enabling and Configuring File Reputation and Analysis Services.

Anti-Malware

Warning

Feature keys expire

(As is standard for all features)

The file reputation or file analysis service is unreachable.

Anti-Virus and AMP

Warning

Communication with cloud services is established.

Anti-Virus and AMP

Info

The reputation and analysis engine is restarted by a watchdog service

Anti-Virus and AMP

Info

A file reputation verdict changes.

Anti-Virus and AMP

Info

File types that can be sent for analysis have changed. You may want to enable upload of new file types.

Anti-Virus and AMP

Info

Analysis of some file types is temporarily unavailable.

Anti-Virus and AMP

Warning

Analysis of all supported file types is restored after a temporary outage.

Anti-Virus and AMP

Info

Invalid File Analysis service key. You need to contact Cisco TAC with the file analysis id details to fix this error.

AMP

Error

Related Topics

Configuring Centralized Reporting for Advanced Malware Protection Features

If you will centralize reporting on a Security Management appliance, see important configuration requirements in the Advanced Malware Protection sections in theemail reporting topic of the online help or user guide for your management appliance.

File Reputation and File Analysis Reporting and Tracking

Identifying Files by SHA-256 Hash

Because filenames can easily be changed, the appliance generates an identifier for each file using a Secure Hash Algorithm (SHA-256). If an appliance processes the same file with different names, all instances are recognized as the same SHA-256. If multiple appliances process the same file, all instances of the file have the same SHA-256 identifier.

In most reports, files are listed by their SHA-256 value (in an abbreviated format

File Reputation and File Analysis Report Pages

Report

Description

Advanced Malware Protection

Shows file-based threats that were identified by the file reputation service.

For files with changed verdicts, see the AMP Verdict updates report. Those verdicts are not reflected in the Advanced Malware Protection report.

If a file extracted from a compressed or archived file is malicious, only the SHA value of the compressed or archived file is included in the Advanced Malware Protection report.

The Incoming Malware Files by Category section shows the percentage of file SHAs on the blocked list received from the AMP for Endpoints console that are categorised as Custom Detection.

The threat name of file SHA on the blocked list obtained from AMP for Endpoints console is displayed as Simple Custom Detection in the Incoming Malware Threat Files section of the report.

You can click the link in the More Details section of the report to view the file trajectory details about file SHA on the blocked list in the AMP for Endpoints console.

You can view the Low Risk verdict details in the Incoming Files Handed by AMP section of the report.

Advanced Malware Protection File Analysis

Displays the time and verdict (or interim verdict) for each file sent for analysis. The appliance checks for analysis results every 30 minutes.

To view more than 1000 File Analysis results, export the data as a .csv file.

Drill down to view detailed analysis results, including the threat characteristics for each file.

You can also search for additional information about an SHA, or click the link at the bottom of the file analysis details page to view additional details on the server that analyzed the file.

Note

 
If extracted files from a compressed or an archive file are sent for file analysis, only SHA values of these extracted files are included in the File Analysis report.

Advanced Malware Protection Reputation

Because Advanced Malware Protection is focused on targeted and zero-day threats, threat verdicts can change as aggregated data provides more information.

The AMP Reputation report lists the files processed by this appliance for which the verdict has changed since the message was received. For more information about this situation, see File Threat Verdict Updates.

To view more than 1000 verdict updates, export the data as a .csv file.

In the case of multiple verdict changes for a single SHA-256, this report shows only the latest verdict, not the verdict history.

To view all affected messages for a particular SHA-256 within the maximum available time range (regardless of the time range selected for the report) click a SHA-256 link.

Viewing File Reputation Filtering Data in Other Reports

Data for file reputation and analysis is available in other reports where relevant. A Detected by Advanced Malware Protection" column may be hidden by default in applicable reports. To display additional columns, click the Columns link below the table.

About Message Tracking and Advanced Malware Protection Features

When searching for file threat information in Message Tracking, keep the following points in mind:

  • To search for malicious files found by the file reputation service, select Advanced Malware Protection Positive for the Message Event option in the Advanced section in Web Message Tracking.

  • Message Tracking includes only information about file reputation processing and the original file reputation verdicts returned at the time a transaction message was processed. For example, if a file was initially found to be clean, then a verdict update found the file to be malicious, only the clean verdict appears in Tracking results.

    In Message Tracking details, the Processing Details section shows:

    • The SHA-256 of each attachment in the message, and

    • The final Advanced Malware Protection verdict for the message as a whole, and

    • Any attachments which were found to contain malware.

  • Verdict updates are available only in the AMP Verdict Updates report. The original message details in Message Tracking are not updated with verdict changes. To see transactions messages that have a particular attachment, click a SHA-256 in the verdict updates report.

  • Information about File Analysis, including analysis results and whether or not a file was sent for analysis, are available only in the File Analysis report.

    Additional information about an analyzed file may be available from the cloud or on-premises File Analysis server. To view any available File Analysis information for a file, select Reporting Monitor > File Analysis and enter the SHA-256 to search for the file . If the File Analysis service has analyzed the file from any source, you can see the details. Results are displayed only for files that have been analyzed.

    If the appliance processed a subsequent instance of a file that was sent for analysis, those instances will appear in Message Tracking search results.

Taking Action When File Threat Verdicts Change

Procedure


Step 1

View the AMP Verdict Updates report.

Step 2

Click the relevant SHA-256 link to viewmessage tracking data for allmessages that contained that file that may have been delivered to end users.

Step 3

Using the tracking data, identify the users that may have been compromised, as well as information such as the file names involved in the breach and sender of the file.

Step 4

Check the File Analysis report to see if this SHA-256 was sent for analysis, to understand the threat behavior of the file in more detail.


What to do next

Related Topics

File Threat Verdict Updates

Troubleshooting File Reputation and Analysis

Log Files

In logs:

  • AMP and amp refer to the file reputation service or engine.

  • Retrospective refers to verdict updates.

  • VRT and sandboxing refer to the file analysis service.

Information about Advanced Malware Protection including File Analysis is logged in AMP Engine Logs.

File reputation filtering and analysis events are logged in AMP Engine logs and Mail logs.

In the log message “Response received for file reputation query” possible values for “upload action” are:

  • 1: SEND. In this case, you must send the file for File Analysis.

  • 2: DON’T SEND. In this case, you do not send the file for File Analysis.

  • 3: SEND ONLY METADATA. In this case, you send only the metadata and not the entire file for File Analysis.

  • 0: NO ACTION. In this case, no other action is required.

For “Disposition” in mail logs:

  • 1: No malware detected or presumed clean (treated as clean)

  • 2: Clean

  • 3: Malware

Spyname is threat name.

Using Trace

Trace is not available for the file reputation filtering and analysis features. Instead, send a test message from an account outside your organization.

Several Alerts About Failure to Connect to File Reputation or File Analysis Servers

Problem

You receive several alerts about failures to connect to the file reputation or analysis services in the cloud. (A single alert may indicate only a transient issue.)

Solution

  • Ensure that you have met the requirements in Requirements for Communication with File Reputation and Analysis Services.

  • Check for network issues that may prevent the appliance from communicating with the cloud services.

  • Increase the Query Timeout value:

    Select Security Services > File Reputation and Analysis. The Query Timeout value is in the Advanced settings area .

API Key Error (On-Premises File Analysis)

Problem

You receive an API key alert when attempting to view File Analysis report details, or the Email Security appliance is unable to connect to the AMP Malware Analytics server to upload files for analysis.

Solution

This error can occur if you change the hostname of the AMP Malware Analytics server and you are using a self-signed certificate from the AMP Malware Analytics server, as well as possibly under other circumstances. To resolve the issue:

  • Generate a new certificate from the AMP Malware Analytics appliance that has the new hostname.

  • Upload the new certificate to the Email Security appliance .

  • Reset the API key on the AMP Malware Analytics appliance. For instructions, see the online help on the AMP Malware Analytics appliance.

Related Topics

API Key Error (Public Cloud File Analysis)

Problem

You receive an API key alert when attempting to view or group the appliances for File Analysis reporting or when your email gateway cannot connect to the Cisco Threat Grid server to upload files for analysis.

Solution

This error can occur if the Cisco Threat Grid server is not reachable. Check the following and try to connect again:

  • You have connected to the correct Threat Grid server for your region.
  • The Threat Grid server is currently working.

Related Topics

Files are Not Uploaded As Expected

Problem

Files are not evaluated or analyzed as expected. There is no alert or obvious error.

Solution

Consider the following:

  • The file may have been sent for analysis by another appliance and thus already be present on the File Analysis server or in the cache of the appliance that is processing the file.

Alerts about File Types That Can Be Sent for Analysis

Problem

You receive alerts of severity Info about file types that can be sent for file analysis.

Solution

This alert is sent when supported file types change, or when the appliance checks to see what file types are supported. This can occur when:

  • You or another administrator changes the file types selected for analysis.
  • Supported file types change temporarily based on availability in the cloud service. In this case, support for the file types selected on the appliance will be restored as soon as possible. Both processes are dynamic and do not require any action from you.
  • The appliance restarts, for example as part of an AsyncOS upgrade.