Firepower Management Center Configuration Guide, Version 6.0
Bias-Free Language
The documentation set for this product strives to use bias-free language. For the purposes of this documentation set, bias-free is defined as language that does not imply discrimination based on age, disability, gender, racial identity, ethnic identity, sexual orientation, socioeconomic status, and intersectionality. Exceptions may be present in the documentation due to language that is hardcoded in the user interfaces of the product software, language used based on RFP documentation, or language that is used by a referenced third-party product. Learn more about how Cisco is using Inclusive Language.
The following topics
explain how to use layers in intrusion and network analysis policies:
Layer Basics
Larger organizations with many managed devices may
have many intrusion policies and network analysis policies to support the
unique needs of different departments, business units or, in some instances,
different companies. Configurations in both policy types are contained in
building blocks called
layers, which you can use to efficiently
manage multiple policies.
Layers in intrusion and network analysis policies
work in essentially the same way. You can create and edit either policy type
without consciously using layers. You can modify your policy configurations
and, if you have not added user layers to your policy, the system automatically
includes your changes in a single configurable layer that is initially named
My Changes. You can also add up to 200
layers where you can configure any combination of settings. You can copy,
merge, move, and delete user layers and, most important, share individual user
layers with other policies of the same type.
License Requirements for Network Analysis and Intrusion Policy Layers
FTD
License
Threat
Classic License
Protection
Requirements and Prerequisites for Network Analysis and Intrusion Policy Layers
Model Support
Any.
Supported Domains
Any
User Roles
Admin
Intrusion Admin
The Layer
Stack
Layer stacks are composed of the following:
User Layers
User-configurable layers. You can copy, merge, move, or delete any
user-configurable layer and set any user-configurable layer to be shared by
other policies of the same type. This layer includes the
automatically-generated layer initially named My Changes.
Built-in Layers
The read-only base policy layer. The policy in this layer can be
either a system-provided policy or a custom policy you created.
By default, a network analysis or intrusion policy includes a base
policy layer and a My Changes layer. You can add user layers as necessary.
Each policy layer contains complete configurations for either
all preprocessors in a network analysis policy or all intrusion rules and
advanced settings in an intrusion policy. The lowest, base policy layer
includes all the settings from the base policy you selected when you created
the policy. A setting in a higher layer takes precedence over the same setting
in a lower layer. Features not explicitly set in a layer
inherit their settings from the next highest layer where
they are explicitly set. The system
flattens the layers, that is, it applies only the cumulative
effect of all settings, when it handles network traffic.
Tip
You can create an intrusion or network analysis policy based
solely on the default settings in the base policy. In the case of an intrusion
policy, you can also use Firepower rule state recommendations if you want to
tailor your intrusion policy to the specific needs of your monitored network.
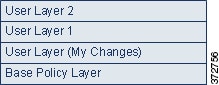
The following figure shows an example layer stack that, in
addition to the base policy layer and the initial My Changes layer, also
includes two additional user-configurable layers,
User Layer 1 and
User Layer 2. Note in the figure that each user-configurable
layer that you add is initially positioned as the highest layer in the stack;
thus, User Layer 2 in the figure was added last and is highest in the stack.
Regardless of whether you allow rule updates to modify your
policy, changes in a rule update never override changes you make in a layer.
This is because changes in a rule update are made in the base policy, which
determines the default settings in your base policy layer; your changes are
always made in a higher layer, so they override any changes that a rule update
makes to your base policy.
The Base
Layer
The base layer, also referred to as the base policy, of an
intrusion or network analysis policy defines the default settings for all
configurations in the policy, and is the lowest layer in the policy. When you
create a new policy and change a setting without adding new layers, the change
is stored in the My Changes layer, and overrides—but does not change—the
setting in the base policy.
System-Provided Base
Policies
The Firepower System provides several pairs of network analysis
and intrusion policies. By using system-provided network analysis and intrusion
policies, you can take advantage of the experience of the
Cisco Talos Intelligence Group
(Talos).
For these policies,
Talos
sets intrusion and preprocessor rule states, as well as provides the initial
configurations for preprocessors and other advanced settings. You can use these
system-provided policies as-is, or you can use them as the base for custom
policies.
If you use a system-provided policy as your base, importing rule
updates may modify settings in your base policy. However, you can configure a
custom policy so that the system does not automatically make these changes to
its system-provided base policy. This allows you to update system-provided base
policies manually, on a schedule independent of rule updates. In either case,
changes that a rule update makes to your base policy do not change or override
settings in your My Changes or any other layer.
System-provided intrusion and network analysis policies are
similarly named but contain different configurations. For example, the Balanced
Security and Connectivity network analysis policy and the Balanced Security and
Connectivity intrusion policy work together and can both be updated in
intrusion rule updates.
Custom Base
Policies
You can use a custom policy as your base. You can tune settings
in custom policies to inspect traffic in ways that matter most to you so you
can improve both the performance of your managed devices and your ability to
respond effectively to the events they generate.
If you change the custom policy that you use as the base for
another policy, those changes are automatically used as the default settings of
the policy that uses the base.
In addition, a rule update may affect your policy even if you use a
custom base policy, because all policies have a system-provided policy as the
eventual base in a policy chain. If the first custom policy in a chain (the one
that uses the system-provided policy as its base) allows rule updates to modify
its base policy, your policy may be affected.
Regardless of how changes are made to your base policy—whether
by a rule update or when you modify a custom policy that you use as a base
policy—they do not change or override settings in your My Changes or any other
layer.
The Effect of Rule
Updates on Base Policies
When you import rule updates, the system modifies system-provided intrusion, access control, and network analysis policies.
Rule updates can include:
modified network
analysis preprocessor settings
modified advanced settings in intrusion and access control policies
new and updated
intrusion rules
modified states
for existing rules
new rule
categories and default variables
Rule updates can also
delete existing rules from system-provided policies.
Changes to default variables and rule categories are handled at the system level.
When you use a system-provided policy as your intrusion or network analysis base policy, you can allow rule updates to modify
your base policy which, in this case, is a copy of the system-provided policy. If you allow rule updates to update your base
policy, a new rule update makes the same changes in your base policy that it makes to the system-provided policy that you
use as your base policy. If you have not modified the corresponding setting, a setting in your base policy determines the
setting in your policy. However, rule updates do not override changes you make in your policy.
If you do not allow rule updates to modify your base policy, you
can manually update your base policy after importing one or more rule updates.
Rule updates always delete intrusion rules that
Talos
deletes, regardless of the rule state in your intrusion policy or whether you
allow rule updates to modify your base intrusion policy.
Until you re-deploy
your changes to network traffic, rules in your currently deployed intrusion
policies behave as follows:
Disabled intrusion rules remain disabled.
Rules set to
Generate
Events continue to generate events when triggered.
Rules set to
Drop and
Generate Events continue to generate events and drop offending
packets when triggered.
Rule updates do not modify a custom base policy unless both of
the following conditions are met:
You allow rule updates to modify the system-provided base policy
of the parent policy, that is, the policy that originated the custom base
policy.
You have not made changes in the parent policy that override the
corresponding settings in the parent’s base policy.
When both conditions are met, changes in the rule update are
passed to the child policy, that is, the policy using the custom base policy,
when you save the parent policy.
For example, if a rule update enables a previously disabled
intrusion rule, and you have not modified the rule’s state in the parent
intrusion policy, the modified rule state is passed to the base policy when you
save the parent policy.
Likewise, if a rule update modifies a default preprocessor
setting and you have not modified the setting in the parent network analysis
policy, the modified setting is passed to the base policy when you save the
parent policy.
Changing the Base
Policy
You can choose a different system-provided or custom policy as
your base policy.
You can chain up to five custom policies, with four of the five
using one of the other four previously created policies as its base policy; the
fifth must use a system-provided policy as its base.
Procedure
Step 1
While editing your policy, click Policy Information in the navigation panel.
Step 2
You can configure the following choices:
Choose a base policy — Choose from the Base Policy drop-down list.
Allow rule updates to modify the base policy — Click Manage Base Policy, then check the Update when a new Rule Update is installed check box.
Tip
When you save your policy with the check box cleared and then import a rule update, an Update Now appears on the Base Policy summary page and the status message on the page updates to inform you that the policy is out of
date. If you want to update your base policy with the changes in the most recently imported rule update, click Update Now.
Step 3
To save changes you made in this policy since the last policy commit, click Policy Information, then click Commit Changes.
If you leave the policy without committing changes, changes since the last commit are discarded if you edit a different policy.
When you generate rule state recommendations in an intrusion
policy, you can choose whether to automatically modify rule states based on the
recommendations.
As seen in the following figure, using recommended rule states
inserts a read-only, built-in Firepower Recommendations layer immediately above
the base layer.
Note that this layer is unique to intrusion policies.
If you subsequently choose not to use recommended rule states,
the system removes the Firepower Recommendations layer. You cannot manually
delete this layer, but you can add and remove it by choosing to use or not use
recommended rule states.
Adding the Firepower Recommendations layer adds a Firepower
Recommendations link under Policy Layers in the navigation panel. This link
leads you to a read-only view of the Firepower Recommendations layer page where
you can access a recommendation-filtered view of the Rules page in read-only
mode.
Using recommended rule states also adds a Rules sublink beneath
the Firepower Recommendations link in the navigation panel. The Rules sublink
provides access to a read-only display of the Rules page in the Firepower
Recommendations layer. Note the following in this view:
When there is no rule state icon in the state column, the state
is inherited from the base policy.
When there is no rule state icon in the Firepower Recommendation
column in this or other Rules page views, there is no recommendation for this
rule.
Layer
Management
The Policy Layers page provides a single-page summary of the
complete layer stack for your network analysis or intrusion policy. On this
page you can add shared and unshared layers, copy, merge, move, and delete
layers, access the summary page for each layer, and access configuration pages
for enabled, disabled, and overridden configurations within each layer.
For each layer, you can view the following information:
whether the layer is a built-in, shared user, or unshared user
layer
which layers contain the highest, that is the effective,
preprocessor or advanced setting configurations, by feature name
in an intrusion policy, the number of intrusion rules whose
states are set in the layer, and the number of rules set to each rule state.
The Policy Layers page also provides a summary of the net effect
of all enabled preprocessors (network analysis) or advanced settings
(intrusion) and, for intrusion policies, intrusion rules.
The feature name in the summary for each layer indicates which
configurations are enabled, disabled, overridden, or inherited in the layer, as
follows:
When the feature is...
The feature name is...
enabled in the layer
written in plain text
disabled in the layer
struck out
overridden by the configuration in a higher layer
written in italic text
inherited from a lower layer
not present
You can add up to 200 layers to a network analysis or intrusion
policy. When you add a layer, it appears as the highest layer in your policy.
The initial state is Inherit for all features and, in an intrusion policy, no
event filtering, dynamic state, or alerting rule actions are set.
You give a user-configurable layer a unique name when you add
the layer to your policy. Later, you can change the name and, optionally, add
or modify a description that is visible when you edit the layer.
You can copy a layer, move a layer up or down within the User
Layers page area, or delete a user layer, including the initial My Changes
layer. Note the following considerations:
When you copy a layer, the copy appears as the highest layer.
Copying a shared layer creates a layer that is initially
unshared and which you can then share if you choose.
You cannot delete a shared layer; a layer with sharing enabled
that you have not shared with another policy is not a shared layer.
You can merge a user-configurable layer with another
user-configurable layer immediately beneath it. A merged layer retains all
settings that were unique to either layer, and accepts the settings from the
higher layer if both layers included settings for the same preprocessor,
intrusion rule, or advanced setting. The merged layer retains the name of the
lower layer. In the policy where you create a sharable layer that you can add
to other policies, you can merge an unshared layer immediately above the
sharable layer with the sharable layer, but you cannot merge the sharable layer
with an unshared layer beneath it. In a policy where you add a shared layer
that you created in another policy, you can merge the shared layer into an
unshared layer immediately beneath it and the resulting layer is no longer
shared; you cannot merge an unshared layer into a shared layer beneath it.
Shared
Layers
A
shared layer is a layer you add to your policy after
creating the layer in another policy where you allow it to be shared. A
sharable layer is a layer you allow to be shared.
The following figure shows an example primary policy where you create the company-wide layer and site-specific layers for
sites A and B, and allow these to be shared. You then add these as shared layers to the policies for sites A and B.
The company-wide layer in the primary policy includes settings applicable to sites A and B. The site-specific layers include
settings specific to each site. For example, in the case of a network analysis policy Site A might not have web servers on
the monitored network and would not require the protection or processing overhead of the HTTP Inspect preprocessor, but both
sites would likely require TCP stream preprocessing. You could enable TCP stream processing in the company-wide layer that
you share with both sites, disable the HTTP Inspect preprocessor in the site-specific layer that you share with Site A, and
enable the HTTP Inspect preprocessor in the site-specific layer that you share with Site B. By editing configurations in a
higher layer in the site-specific policies, you could also further tune the policy for each site if necessary with any configuration
adjustments.
It is unlikely that the flattened net settings in the example primary policy would be useful for monitoring traffic, but the
time saved in configuring and updating the site-specific policies makes this a useful application of policy layers.
Many other layer configurations are possible. For example, you
could define policy layers by company, by department, by network, or even by
user. In the case of an intrusion policy, you could also include advanced
settings in one layer and rule settings in another.
You can allow a user-configurable layer to be shared with other
policies of the same type (intrusion or network analysis). When you modify a
configuration within a sharable layer and then commit your changes, the system
updates all policies that share the layer and provides you with a list of all
affected policies. You can only change feature configurations in the policy
where you created the layer.
You cannot disable sharing for a layer that you have added to
another policy; you must first delete the layer from the other policy or delete
the other policy.
You cannot add a shared layer to a policy when
your base policy is a custom policy where the layer you want to share was
created. To do so would give the policy a circular dependency.
In a multidomain deployment, you can add shared layers from ancestor
policies to policies in descendant domains.
Managing
Layers
Procedure
Step 1
While editing your policy, click
Policy Layers in the navigation panel.
Step 2
You can take any of the following management actions on the
Policy Layers page:
Add a shared layer from another policy — Click add shared layer Add () next to User Layers, choose the layer from the Add Shared Layer drop-down list, then click OK.
Add an unshared layer — Click add layer Add () next to User Layers, enter a Name, and click OK.
Add or change the layer description — Click Edit () next to the layer, then add or change the Description.
Allow a layer to be shared with another policy — Click Edit () next to the layer, then clear the Sharing check box.
Change the layer name — Click Edit () next to the layer, then change the Name.
Copy a layer — Click Copy () for the layer.
Delete a layer — Click Delete () for the layer, then click OK.
Merge two layers — Click Merge () for the upper of the two layers, then click OK.
Move a layer — Click any open area in the layer summary and drag until the Position Arrow points to a line above or below a layer where you want to move the layer.
Step 3
To save changes you made in this policy since the last policy
commit, click
Policy Information, then click
Commit Changes.
If you leave the policy without committing changes, changes since
the last commit are discarded if you edit a different policy.
While editing your policy, click
Policy Layers in the navigation panel.
Step 2
You can take any of the following actions to navigate through
your layers:
Access a preprocessor or
advanced settings page — If you want to access a layer-level preprocessor or
advanced setting configuration page, click the feature name in the row for the
layer. Configuration pages are read-only in the base policy and in shared
layers.
Access a rule page — If you want to access a layer-level rule configuration page filtered by rule state type, click Drop and Generate Events, Generate Events, or Disabled in the summary for the layer. No rules are displayed if the layer contains no rules set to the selected rule state.
Display the Policy
Information page — If you want to display the Policy Information page, click
Policy Summary in the navigation panel.
Display a layer summary page — If you want to display the summary page for a layer, click the layer name in the row for the
layer or, alternately, click Edit () next to a user layer. You can also click View () to access the read-only summary page for a shared layer.
Step 3
To save changes you made in this policy since the last policy
commit, click
Policy Information, then click
Commit Changes.
If you leave the
policy without committing changes, changes since the last commit are discarded
if you edit a different policy.
You can view individual layer settings on the Rules page for the
layer, or view the net effect of all settings on the policy view of the Rules
page. When you modify rule settings on the policy view of the Rules page, you
are modifying the highest user-configurable layer in the policy. You can switch
to another layer using the layer drop-down list on any Rules page.
The following table describes the effects of configuring the
same type of setting in multiple layers.
Table 1. Layer Rule Settings
You can set...
Of this setting type...
To...
one
rule state
override a rule state set for the rule in a lower layer, and
ignore all thresholds, suppressions, rate-based rule states, and alerts for
that rule configured in lower layers.
If you want a rule to inherit its state from the base policy or
a lower layer, set the rule state to Inherit. Note that when you are working on
the intrusion policy Rules page, you cannot set a rule state to Inherit because
the intrusion policy Rules page is a composite view of the net effect of all
rule settings.
one
threshold SNMP alert
override a setting of the same type for the rule in a lower
layer. Note that setting a threshold overwrites any existing threshold for the
rule in the layer.
one or more
suppression rate-based rule state
cumulatively combine settings of the same type for each selected
rule down to the first layer where a rule state is set for the rule. Settings
below the layer where a rule state is set are ignored.
one or more
comment
add a comment to a rule. Comments are rule-specific, not policy-
or layer-specific. You can add one or more comments to a rule in any layer.
For example, if you set a rule state to Drop and Generate Events
in one layer and to Disabled in a higher layer, the intrusion policy Rules page
shows that the rule is disabled.
In another example, if you set a source-based suppression for a
rule to 192.168.1.1 in one layer, and you also set a destination-based
suppression for the rule to 192.168.1.2 in another layer, the Rules page shows
that the cumulative effect is to suppress events for the source address
192.168.1.1 and the destination address 192.168.1.2. Note that suppression and
rate-based rule state settings cumulatively combine settings of the same type
for each selected rule down to the first layer where a rule state is set for
the rule. Settings below the layer where a rule state is set are ignored.
Color-coding on each Rules page for a specific layer indicates
whether the effective state is in a higher, lower, or the current layer, as
follows:
red—the effective state is in a higher layer
yellow—the effective state is in a lower layer
unshaded—the effective state is in the current layer
Because the intrusion policy Rules page is a composite view of
the net effect of all rule settings, rule states are not color-coded on this
page.
Configuring
Intrusion Rules in Layers
In an intrusion policy, you can set the rule state, event
filtering, dynamic state, alerting, and rule comments for a rule in any
user-configurable layer. After accessing the layer where you want to make your
changes, you add settings on the Rules page for the layer the same as you would
on the intrusion policy Rules page.
Procedure
Step 1
While editing your intrusion policy, expand
Policy Layers in the navigation panel.
Step 2
Expand the policy layer you want to modify.
Step 3
Click
Rules immediately beneath the policy layer you want
to modify.
To delete an individual setting from an editable layer,
double-click the rule message on the Rules page for the layer to display rule
details. Click
Delete next to
the setting you want to delete, then click
OK twice.
Step 5
To save changes you made in this policy since the last policy
commit, click
Policy Information, then click
Commit Changes.
If you leave the policy without committing changes, changes since
the last commit are discarded if you edit a different policy.
You can simultaneously remove a specific type of event filter,
dynamic state, or alerting from multiple layers in your intrusion policy. The
system removes the selected setting and copies the remaining settings for the
rule to the highest editable layer in the policy.
The system removes the setting type downward through each layer
where it is set until it removes all the settings or encounters a layer where a
rule state is set for the rule. In the latter case, it removes the setting from
that layer and stops removing the setting type.
When the system encounters the setting type in a shared layer or
in the base policy, and if the highest layer in the policy is editable, the
system copies the remaining settings and rule state for the rule to that
editable layer. Otherwise, if the highest layer in the policy is a shared
layer, the system creates a new editable layer above the shared layer and
copies the remaining settings and rule state for the rule to that editable
layer.
Note
Removing rule settings derived from a shared layer or the base
policy causes any changes to this rule from lower layers or the base policy to
be ignored. To stop ignoring changes from lower layers or the base policy, set
the rule state to
Inherit on the summary page for the topmost layer.
Procedure
Step 1
While editing your intrusion policy, click
Rules immediately beneath
Policy Information in the navigation panel.
Tip
You can also choose
Policy from the
layer drop-down list on the Rules page for any layer, or click
Manage Rules on
the Policy Information page.
Step 2
Choose the rule or rules from which you want to remove multiple
settings:
Choose specific
— If you want to choose specific rules, check the check box next to each rule.
Choose all — If
you want to choose all the rules in the current list, check the check box at
the top of the column.
Step 3
Choose one of the following options:
Event
Filtering > Remove
Thresholds
Event
Filtering > Remove
Suppressions
Dynamic
State > Remove Rate-Based Rule
States
Alerting > Remove SNMP
Alerts
Note
Removing rule settings derived from a shared layer or the base
policy causes any changes to this rule from lower layers or the base policy to
be ignored. To stop ignoring changes from lower layers or the base policy, set
the rule state to
Inherit on the
summary page for the topmost layer.
Step 4
Click
OK.
Step 5
To save changes you made in this policy
since the last policy commit, click
Policy Information, then
click
Commit Changes.
If you leave the policy without committing changes, changes since
the last commit are discarded if you edit a different policy.
When a custom network analysis or intrusion policy where you
have not added layers uses another custom policy as its base policy, you must
set a rule to inherit its rule state if:
you delete an event filter, dynamic state, or SNMP alert that is
set for the rule in the base policy,
and
you want the rule to accept subsequent changes that you make to
it in the other custom policy that you use as your base policy
Procedure
Step 1
While editing your intrusion policy, expand
Policy Layers in the navigation panel.
Step 2
Expand
My Changes.
Step 3
Click the
Rules link immediately beneath
My
Changes.
Step 4
Choose the rule or rules whose settings you want to accept. You
have the following choices:
Choose specific
rules — If you want to choose specific rules, check the check box next to each
rule.
Choose all rules
— If you want to choose all the rules in the current list, check the check box
at the top of the column.
Step 5
Choose
Inherit from the
Rule State drop-down list.
Step 6
To save changes you made in this policy since the last policy
commit, click
Policy Information, then click
Commit Changes.
If you leave the
policy without committing changes, changes since the last commit are discarded
if you edit a different policy.
You use similar mechanisms to configure preprocessors in a
network analysis policy and advanced settings in an intrusion policy. You can
enable and disable preprocessors on the network analysis Settings page and
intrusion policy advanced settings on the intrusion policy Advanced Settings
page. These pages also provide summaries of the effective states for all
relevant features. For example, if the network analysis SSL preprocessor is
disabled in one layer and enabled in a higher layer, the Settings page shows it
as enabled. Changes made on these pages appear in the top layer of the policy.
Note that the Back Orifice preprocessor has no user-configurable options.
You can also enable or disable preprocessors or advanced
settings and access their configuration pages on the summary page for a
user-configurable layer. On this page you can modify the layer name and
description and configure whether to share the layer with other policies of the
same type. You can switch to the summary page for another layer by selecting
the layer name beneath
Policy Layers in the navigation panel.
When you enable a preprocessor or advanced setting, a sublink to the configuration page for that feature appears beneath the
layer name in the navigation panel, and an Edit () appears next to the feature on the summary page for the layer; these disappear when you disable the feature in the layer
or set it to Inherit.
Setting the state (enabled or disabled) for a preprocessor or
advanced setting overrides the state and configuration settings for that
feature in lower layers. If you want a preprocessor or advanced setting to
inherit its state and configuration from the base policy or a lower layer, set
it to
Inherit. Note that the Inherit selection is not
available when you are working in the Settings or Advanced Settings page. Note
also that if you inherit a feature that is currently enabled, the feature
sublink in the navigation panel and the edit icon on the configuration page no
longer appear.
The system uses the configuration in the highest layer where the
feature is enabled. Unless you explicitly modify the configuration, the system
uses the default configuration. For example, if you enable and modify the
network analysis DCE/RPC preprocessor in one layer, and you also enable but do
not modify it in a higher layer, the system uses the default configuration in
the higher layer.
Color-coding on each layer summary page indicates whether the
effective configuration is in a higher, lower, or the current layer, as
follows:
red—the effective configuration is in a higher layer
yellow—the effective configuration is in a lower layer
unshaded—the effective configuration is in the current layer
Because the Settings and Advanced Settings pages are composite
views of all relevant settings, these page do not use color coding to indicate
the positions of effective configurations.
Configuring
Preprocessors and Advanced Settings in Layers
Procedure
Step 1
While editing your policy, expand
Policy Layers in the navigation panel, then click
the name of the layer you want to modify.
Step 2
You have the following choices:
Change the layer
Name.
Add or change
the
Description.
Check or clear
the
Sharing check box to
specify whether a layer can be shared with another policy.
To access the configuration page for an enabled preprocessor/advanced setting, click Edit () or the feature sublink.
To disable a
preprocessor/advanced setting in the current layer, click
Disabled next to the feature.
To enable a
preprocessor/advanced setting in the current layer, click
Enabled next to the feature.
To inherit the
preprocessor/advanced setting state and configuration from the settings in the
highest layer below the current layer, click
Inherit.
Step 3
To save changes you made in this policy
since the last policy commit, click
Policy Information, then
click
Commit Changes.
If you leave the policy without committing changes, changes since
the last commit are discarded if you edit a different policy.


 )
) )
) )
) )
) )
)
 Feedback