An Overview of Network Analysis and Intrusion Policies

The Snort inspection engine is an integral part of the Secure Firewall Threat Defense (formerly Firepower Threat Defense) device. This chapter provides an overview of Snort 3 and the network analysis and intrusion policies. It also provides an insight into system-provided and custom network analysis and intrusion policies.

About Network Analysis and Intrusion Policies

Network analysis and intrusion policies work together as part of the intrusion detection and prevention feature.

  • The term intrusion detection generally refers to the process of passively monitoring and analyzing network traffic for potential intrusions and storing attack data for security analysis. This is sometimes referred to as "IDS."

  • The term intrusion prevention includes the concept of intrusion detection, but adds the ability to block or alter malicious traffic as it travels across your network. This is sometimes referred to as "IPS."

In an intrusion prevention deployment, when the system examines packets:

  • A network analysis policy governs how traffic is decoded and preprocessed so it can be further evaluated, especially for anomalous traffic that might signal an intrusion attempt.

  • An intrusion policy uses intrusion and preprocessor rules (sometimes referred to collectively as intrusion rules) to examine the decoded packets for attacks based on patterns. Intrusion policies are paired with variable sets, which allow you to use named values to accurately reflect your network environment.

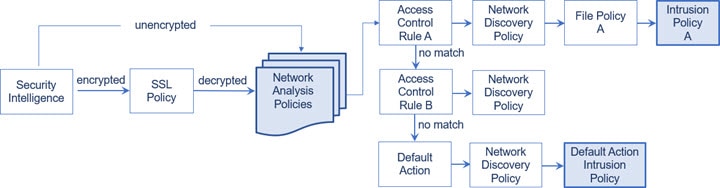
Both network analysis and intrusion policies are invoked by a parent access control policy, but at different times. As the system analyzes traffic, the network analysis (decoding and preprocessing) phase occurs before and separately from the intrusion prevention (additional preprocessing and intrusion rules) phase. Together, network analysis and intrusion policies provide broad and deep packet inspection. They can help you detect, alert on, and protect against network traffic that could threaten the availability, integrity, and confidentiality of hosts and their data.

The system is delivered with several similarly named network analysis and intrusion policies (for example, Balanced Security and Connectivity) that complement and work with each other. By using system-provided policies, you can take advantage of the experience of the Cisco Talos Intelligence Group (Talos). For these policies, Talos sets intrusion and inspector rule states, as well as provides the initial configurations for inspectors and other advanced settings.

You can also create custom network analysis and intrusion policies. You can tune settings in custom policies to inspect traffic in the way that matters most to you so that you can improve both the performance of your managed devices and your ability to respond effectively to the events they generate.

You create, edit, save, and manage network analysis and intrusion policies using similar policy editors in the web interface. When you are editing either type of policy, a navigation panel appears on the left side of the web interface; the right side displays various configuration pages.

Refer to the videos for additional support and information:

Snort Inspection Engine

The Snort inspection engine is an integral part of the Firepower Threat Defense (FTD)device. The inspection engine analyzes traffic in real time to provide deep packet inspection. Network analysis and intrusion policies together utilize the Snort inspection engine's capabilities to detect and protect against intrusions.

Snort 3

Snort 3 is the latest version of the Snort inspection engine, which has vast improvements compared to the earlier version of Snort. The older version of Snort is Snort 2. Snort 3 is more efficient, and it provides better performance and scalability.

Snort 3 is architecturally redesigned to inspect more traffic with equivalent resources when compared to Snort 2. Snort 3 provides simplified and flexible insertion of traffic parsers. Snort 3 also provides new rule syntax that makes rule writing easier and shared object rule equivalents visible.

The other significant changes with Snort 3 are:

  • Unlike Snort 2, which uses multiple Snort instances, Snort 3 associates multiple threads with a single Snort instance. This uses less memory, improves Snort reload times, and supports more intrusion rules and a larger network map. The number of Snort threads varies by platform and is the same as the number of Snort 2 instances for each platform. Usage is virtually transparent.

  • Snort version per Firepower Threat Defense—The Snort inspection engine is Firepower Threat Defense specific and not Firepower Management Center (FMC) specific. FMC can manage several Firepower Threat Defenses, each with either versions of Snort (Snort 2 and Snort 3). Although the FMC's intrusion policies are unique, the system applies Snort 2 or Snort 3 version of an intrusion policy for intrusion protection depending on the device's selected inspection engine. For more information on the inspection engine on the device, see Snort 3 Inspection Engine.

  • Decoder rules—Packet decoder rules fire only in the default intrusion policy. The system ignores decoder rules that you enable in other policies.

  • Shared object rules—Snort 3 supports some but not all shared object (SO) intrusion rules (rules with a generator ID (GID) of 3). Enabled shared object rules that are not supported do not trigger.

  • Multi-layer inspection for Security Intelligence—Snort 2 inspects two layers in multi-layer traffic. Snort 3 detects the innermost IP address regardless of the layer.

  • Platform support—Snort 3 requires FTD 7.0 or later. It is not supported with ASA FirePOWER or NGIPSv.

  • Managed Devices—An FMC with version 7.0 can simultaneously support version 6.4, 6.5, 6.6, 6.7, and 7.0 Snort 2 Firepower Threat Defenses, and version 7.0 Snort 3 Firepower Threat Defenses.

  • Traffic interruption when switching Snort versions—Switching Snort versions interrupts traffic inspection and a few packets might drop during deployment.

  • Unified policies—Irrespective of the underlying Snort engine version that is enabled in the managed Firepower Threat Defenses, the access control policies, intrusion policies, and network analysis policies configured in the FMC work seamlessly in applying the policies. All intrusion policies in FMC version 7.0 and above have two versions available, Snort 2 version and Snort 3 version. The intrusion policy is unified, which means that it has a common name, base policy, and inspection mode, although there are two versions of the policy (Snort 2 version and Snort 3 version). The Snort 2 and the Snort 3 versions of the intrusion policy can be different in terms of the rule settings. However, when the intrusion policy is applied on a device, the system automatically identifies the Snort version enabled on the device and applies the rule settings configured for that version.

  • Lightweight Security Package (LSP)—Replaces the Snort Rule Updates (SRU) for Snort 3 next-generation intrusion rule and configuration updates. Downloading updates downloads both the Snort 3 LSP and the Snort 2 SRU.

    LSP updates provide new and updated intrusion rules and inspector rules, modified states for existing rules, and modified default intrusion policy settings for FMC and Firepower Threat Defense versions 7.0 or above. When you upgrade an FMC from version 6.7 or lower to 7.0, it supports both LSPs and SRUs. LSP updates may also delete system-provided rules, provide new rule categories and default variables, and modify default variable values. For more information on LSP updates, see the Update Intrusion Rules topic in the latest version of the Firepower Management Center Configuration Guide.

  • Mapping of Snort 2 and Snort 3 rules and presets—Snort 2 and Snort 3 rules are mapped and the mapping is system-provided. However, it is not a one-to-one mapping. The system-provided intrusion base policies are pre-configured for both Snort 2 and Snort 3, and they provide the same intrusion prevention although with different rule sets. The system-provided base policies for Snort 2 and Snort 3 are mapped with each other for the same intrusion prevention settings. For more information, see View Snort 2 and Snort 3 Base Policy Mapping.

  • Synchronizing Snort 2 and Snort 3 rule override—When an Firepower Threat Defense is upgraded to 7.0, you can upgrade the inspection engine of the Firepower Threat Defense to the Snort 3 version. FMC maps all the overrides in the existing rules of the Snort 2 version of the intrusion policies to the corresponding Snort 3 rules using the mapping provided by Talos. However, if there are additional overrides performed after the upgrade or if you have installed a new Firepower Threat Defense of version 7.0, they have to be manually synchronized. For more information, see Synchronize Snort 2 Rules with Snort 3.

  • Custom intrusion rules—You can create custom intrusion rules in Snort 3. You can also import the custom intrusion rules that exist for Snort 2 to Snort 3. For more information, see Custom Rules in Snort 3.

  • Switching between Snort 2 and Snort 3 engines—Firepower Threat Defenses that support Snort3 can also support Snort 2. Switching from Snort 3 to Snort 2 is not recommended from the efficacy perspective. However, if a switch is necessary, follow the instructions in Snort 3 Inspection Engine.


    Important


    Although you can switch Snort versions freely, intrusion rule changes in one version of Snort will not be updated in the other version automatically. If you change the rule action for a rule in one version of Snort, ensure you replicate the change in the other version before switching the Snort version. System provided synchronization option only synchronizes the changes in the Snort 2 version of the intrusion policy to the Snort 3 version, and not the other way around.


Snort 2 versus Snort 3

Snort 3 is architecturally redesigned to inspect more traffic with equivalent resources when compared to Snort 2. Snort 3 provides simplified and flexible insertion of traffic parsers. Snort 3 also provides new rule syntax that makes rule writing easier and shared object rule equivalents visible.

The table below lists the differences between the Snort 2 and the Snort 3 versions in terms of the inspection engine capabilities.

Feature

Snort 2

Snort 3

Packet threads

One per process

Any number per process

Configuration memory use

Number of processes * x GB

x GB in total; more memory available for packets

Configuration reload

Slower

Faster; one thread can be pinned to separate cores

Rule syntax

Inconsistent and requires line escapes

Uniform system with arbitrary whitespace

Rule comments

Comments only

#, #begin and #end marks; C language style

Additional reference: Differences between Snort 2 and Snort 3 in Firepower.

Feature Limitations of Snort 3 for FMC-Managed FTD

The following table lists the features that are supported on Snort 2 but not supported on Snort 3 for FMC-managed Firepower Threat Defense devices.

Table 1. Feature Limitations of Snort 3

Policy/Area

Features not supported

Access Control Policy

The following application settings:

  • Safe Search

  • YouTube EDU

Intrusion Policy

  • Firepower recommendations

  • Policy layers

  • Global rule thresholding

  • Logging configuration:

    • SNMP

  • SRU rule updates as Snort 3 supports only LSP rule updates

Application Detection

In Snort 3, by default, application detection is enabled for all networks. Unlike in Snort 2, you cannot control enabling or disabling application detection to only specific networks using network filters of the network discovery policy. For more information, see the Application Detection in Snort 2 and Snort 3 topic in the latest version of the Firepower Management Center Configuration Guide.

Network Discovery/RNA

  • Host port/service identification (as seen on the network map)

  • OS fingerprinting (you cannot tune your intrusion policy to your network map)

Other features

Event logging with FQDN names

How Policies Examine Traffic For Intrusions

When the system analyzes traffic as part of your access control deployment, the network analysis (decoding and preprocessing) phase occurs before and separately from the intrusion prevention (intrusion rules and advanced settings) phase.

The following diagram shows, in a simplified fashion, the order of traffic analysis in an inline, intrusion prevention and AMP for Networks deployment. It illustrates how the access control policy invokes other policies to examine traffic, and in which order those policies are invoked. The network analysis and intrusion policy selection phases are highlighted.


Diagram of traffic flow as described above, showing that preprocessing by network analysis policies occurs after SSL inspection, but before access control rules invoke intrusion policies.

In an inline deployment (that is, where relevant configurations are deployed to devices using routed, switched, or transparent interfaces, or inline interface pairs), the system can block traffic without further inspection at almost any step in the illustrated process. Security Intelligence, the SSL policy, network analysis policies, file policies, and intrusion policies can all either drop or modify traffic. Only the network discovery policy, which passively inspects packets, cannot affect the flow of traffic.

Similarly, at each step of the process, a packet could cause the system to generate an event. Intrusion and preprocessor events (sometimes referred to collectively as intrusion events) are indications that a packet or its contents may represent a security risk.


Tip


The diagram does not reflect that access control rules handle encrypted traffic when your SSL inspection configuration allows it to pass, or if you do not configure SSL inspection. By default, the system disables intrusion and file inspection of encrypted payloads. This helps reduce false positives and improve performance when an encrypted connection matches an access control rule that has intrusion and file inspection configured.


Note that for a single connection, although the system selects a network analysis policy before an access control rule as shown in the diagram, some preprocessing (notably application layer preprocessing) occurs after access control rule selection. This does not affect how you configure preprocessing in custom network analysis policies.

Decoding, Normalizing, and Preprocessing: Network Analysis Policies

Without decoding and preprocessing, the system could not appropriately evaluate traffic for intrusions because protocol differences would make pattern matching impossible. Network analysis policies govern these traffic-handling tasks:

  • after traffic is filtered by Security Intelligence

  • after encrypted traffic is decrypted by an optional SSL policy

  • before traffic can be inspected by file or intrusion policies

A network analysis policy governs packet processing in phases. First the system decodes packets through the first three TCP/IP layers, then continues with normalizing, preprocessing, and detecting protocol anomalies:

  • The packet decoder converts packet headers and payloads into a format that can be easily used by the inspectors and later, intrusion rules. Each layer of the TCP/IP stack is decoded in turn, beginning with the data link layer and continuing through the network and transport layers. The packet decoder also detects various anomalous behaviors in packet headers.

  • In inline deployments, the inline normalization preprocessor reformats (normalizes) traffic to minimize the chances of attackers evading detection. It prepares packets for examination by other inspectors and intrusion rules, and helps ensure that the packets the system processes are the same as the packets received by the hosts on your network.

  • Various network and transport layers inspectors detect attacks that exploit IP fragmentation, perform checksum validation, and perform TCP and UDP session preprocessing.

    Note that some advanced transport and network inspector settings apply globally to all traffic handled by the target devices of an access control policy. You configure these in the access control policy rather than in a network analysis policy.

  • Various application-layer protocol decoders normalize specific types of packet data into formats that the intrusion rules engine can analyze. Normalizing application-layer protocol encodings allows the system to effectively apply the same content-related intrusion rules to packets whose data is represented differently, and to obtain meaningful results.

  • The Modbus, DNP3, CIP, and s7commplus SCADA inspectors detect traffic anomalies and provide data to intrusion rules. Supervisory Control and Data Acquisition (SCADA) protocols monitor, control, and acquire data from industrial, infrastructure, and facility processes such as manufacturing, production, water treatment, electric power distribution, airport and shipping systems, and so on.

  • Several inspectors allow you to detect specific threats, such as Back Orifice, portscans, SYN floods and other rate-based attacks.

    Note that you configure the sensitive data inspector, which detects sensitive data such as credit card numbers and Social Security numbers in ASCII text, in intrusion policies.

In a newly created access control policy, one default network analysis policy governs preprocessing for all traffic for all intrusion policies invoked by the same parent access control policy. Initially, the system uses the Balanced Security and Connectivity network analysis policy as the default, but you can change it to another system-provided or custom network analysis policy. In a more complex deployment, advanced users can tailor traffic preprocessing options to specific security zones, networks, and VLANs by assigning different custom network analysis policies to preprocess matching traffic.

Access Control Rules: Intrusion Policy Selection

After initial preprocessing, access control rules (when present) evaluate traffic. In most cases, the first access control rule that a packet matches is the rule that handles that traffic; you can monitor, trust, block, or allow matching traffic.

When you allow traffic with an access control rule, the system can inspect the traffic for discovery data, malware, prohibited files, and intrusions, in that order. Traffic not matching any access control rule is handled by the access control policy’s default action, which can also inspect for discovery data and intrusions.


Note


All packets, regardless of which network analysis policy preprocesses them, are matched to configured access control rules—and thus are potentially subject to inspection by intrusion policies—in top-down order.


The diagram in How Policies Examine Traffic For Intrusions shows the flow of traffic through a device in an inline, intrusion prevention and AMP for Networks deployment, as follows:

  • Access Control Rule A allows matching traffic to proceed. The traffic is then inspected for discovery data by the network discovery policy, for prohibited files and malware by File Policy A, and then for intrusions by Intrusion Policy A.

  • Access Control Rule B also allows matching traffic. However, in this scenario, the traffic is not inspected for intrusions (or files or malware), so there are no intrusion or file policies associated with the rule. Note that by default, traffic that you allow to proceed is inspected by the network discovery policy; you do not need to configure this.

  • In this scenario, the access control policy’s default action allows matching traffic. The traffic is then inspected by the network discovery policy, and then by an intrusion policy. You can (but do not have to) use a different intrusion policy when you associate intrusion policies with access control rules or the default action.

The example in the diagram does not include any blocking or trusting rules because the system does not inspect blocked or trusted traffic.

Intrusion Inspection: Intrusion Policies, Rules, and Variable Sets

You can use intrusion prevention as the system’s last line of defense before traffic is allowed to proceed to its destination. Intrusion policies govern how the system inspects traffic for security violations and, in inline deployments, can block or alter malicious traffic. The main function of intrusion policies is to manage which intrusion and preprocessor rules are enabled and how they are configured.

Intrusion and Inspector Rules

An intrusion rule is a specified set of keywords and arguments that detects attempts to exploit vulnerabilities on your network; the system uses an intrusion rule to analyze network traffic to check if it matches the criteria in the rule. The system compares packets against the conditions specified in each rule and, if the packet data matches all the conditions specified in a rule, the rule triggers.

The system includes the following types of rules created by Cisco Talos Intelligence Group (Talos):

  • shared object intrusion rules, which are compiled and cannot be modified (except for rule header information such as source and destination ports and IP addresses)

  • standard text intrusion rules, which can be saved and modified as new custom instances of the rule.

  • preprocessor rules, which are rules associated with inspectors and packet decoder detection options in the network analysis policy. You cannot copy or edit inspector rules. Most inspector rules are disabled by default; you must enable them to use inspectors to generate events and, in an inline deployment, drop offending packets.

When the system processes packets according to an intrusion policy, first a rule optimizer classifies all activated rules in subsets based on criteria such as: transport layer, application protocol, direction to or from the protected network, and so on. Then, the intrusion rules engine selects the appropriate rule subsets to apply to each packet. Finally, a multi-rule search engine performs three different types of searches to determine if the traffic matches the rule:

  • The protocol field search looks for matches in particular fields in an application protocol.

  • The generic content search looks for ASCII or binary byte matches in the packet payload.

  • The packet anomaly search looks for packet headers and payloads that, rather than containing specific content, violate well-established protocols.

In a custom intrusion policy, you can tune detection by enabling and disabling rules, as well as by writing and adding your own standard text rules. You can also use Firepower recommendations to associate the operating systems, servers, and client application protocols detected on your network with rules specifically written to protect those assets.


Note


When there are insufficient packets to process specific traffic against a block rule, the system continues to evaluate the remaining traffic against other rules. If any of the remaining traffic matches a rule which is set to block, then the session is blocked. However, if the system analyses the remaining traffic to be passed, then the traffic status shows pending on the rule which is stuck for want of complete packets.


Variable Sets

Whenever the system uses an intrusion policy to evaluate traffic, it uses an associated variable set. Most variables in a set represent values commonly used in intrusion rules to identify source and destination IP addresses and ports. You can also use variables in intrusion policies to represent IP addresses in rule suppressions and dynamic rule states.

The system provides a single default variable set, which is comprised of predefined default variables. Most system-provided shared object rules and standard text rules use these predefined default variables to define networks and port numbers. For example, the majority of the rules use the variable $HOME_NET to specify the protected network and the variable $EXTERNAL_NET to specify the unprotected (or outside) network. In addition, specialized rules often use other predefined variables. For example, rules that detect exploits against web servers use the $HTTP_SERVERS and $HTTP_PORTS variables.


Tip


Even if you use system-provided intrusion policies, Cisco strongly recommends that you modify key default variables in the default set. When you use variables that accurately reflect your network environment, processing is optimized and the system can monitor relevant systems for suspicious activity. Advanced users can create and use custom variable sets for pairing with one or more custom intrusion policies.


Important


If you are creating a custom variable set, do not use a number as the first character in a custom variable set name (for example, 3Snort). This will cause Snort 3 validation to fail when you deploy a configuration to FTD firewall on the FMC.


Intrusion Event Generation

When the system identifies a possible intrusion, it generates an intrusion or preprocessor event (sometimes collectively called intrusion events). Managed devices transmit their events to the FMC, where you can view the aggregated data and gain a greater understanding of the attacks against your network assets. In an inline deployment, managed devices can also drop or replace packets that you know to be harmful.

Each intrusion event in the database includes an event header and contains information about the event name and classification; the source and destination IP addresses; ports; the process that generated the event; and the date and time of the event, as well as contextual information about the source of the attack and its target. For packet-based events, the system also logs a copy of the decoded packet header and payload for the packet or packets that triggered the event.

The packet decoder, the preprocessors, and the intrusion rules engine can all cause the system to generate an event. For example:

  • If the packet decoder (configured in the network analysis policy) receives an IP packet that is less than 20 bytes, which is the size of an IP datagram without any options or payload, the decoder interprets this as anomalous traffic. If, later, the accompanying decoder rule in the intrusion policy that examines the packet is enabled, the system generates a inspector event.

  • If the IP defragmentation preprocessor encounters a series of overlapping IP fragments, the inspector interprets this as a possible attack and, when the accompanying inspector rule is enabled, the system generates a inspector event.

  • Within the intrusion rules engine, most standard text rules and shared object rules are written so that they generate intrusion events when triggered by packets.

As the database accumulates intrusion events, you can begin your analysis of potential attacks. The system provides you with the tools you need to review intrusion events and evaluate whether they are important in the context of your network environment and your security policies.

System-Provided and Custom Network Analysis and Intrusion Policies

Creating a new access control policy is one of the first steps in managing traffic flow using the system. By default, a newly created access control policy invokes system-provided network analysis and intrusion policies to examine traffic.

The following diagram shows how a newly created access control policy in an inline, intrusion-prevention deployment initially handles traffic. The preprocessing and intrusion prevention phases are highlighted.


Diagram showing how a newly created access control policy in an inline intrusion prevention deployment initially handles traffic. In order: Security Intelligence, preprocessing, access control default action, network discovery, and finally intrusion inspection.

Note how:

  • A default network analysis policy governs the preprocessing of all traffic handled by the access control policy. Initially, the system-provided Balanced Security and Connectivity network analysis policy is the default.

  • The default action of the access control policy allows all non-malicious traffic, as determined by the system-provided Balanced Security and Connectivity intrusion policy. Because the default action allows traffic to pass, the discovery feature can examine it for host, application, and user data before the intrusion policy can examine and potentially block malicious traffic.

  • The policy uses default Security Intelligence options (global Block and Do Not Block lists only), does not decrypt encrypted traffic with an SSL policy, and does not perform special handling and inspection of network traffic using access control rules.

A simple step you can take to tune your intrusion prevention deployment is to use a different set of system-provided network analysis and intrusion policies as your defaults. Cisco delivers several pairs of these policies with the system.

Or, you can tailor your intrusion prevention deployment by creating and using custom policies. You may find that the inspector options, intrusion rule, and other advanced settings configured in those policies do not address the security needs of your network. By tuning your network analysis and intrusion policies you can configure, at a very granular level, how the system processes and inspects the traffic on your network for intrusions.

System-Provided Network Analysis and Intrusion Policies

Cisco delivers several pairs of network analysis and intrusion policies with the system. By using system-provided network analysis and intrusion policies, you can take advantage of the experience of the Cisco Talos Intelligence Group (Talos). For these policies, Talos provides intrusion and inspector rule states as well as initial configurations for inspectors and other advanced settings.

No system-provided policy covers every network profile, traffic mix, or defensive posture. Each covers common cases and network setups that provide a starting point for a well-tuned defensive policy. Although you can use system-provided policies as-is, Cisco strongly recommends that you use them as the base for custom policies that you tune to suit your network.


Tip


Even if you use system-provided network analysis and intrusion policies, you should configure the system’s intrusion variables to accurately reflect your network environment. At a minimum, modify key default variables in the default set.


As new vulnerabilities become known, Talos releases intrusion rule updates also known as Lightweight Security Package (LSP). These rule updates can modify any system-provided network analysis or intrusion policy, and can provide new and updated intrusion rules and inspector rules, modified states for existing rules, and modified default policy settings. Rule updates may also delete rules from system-provided policies and provide new rule categories, as well as modify the default variable set.

If a rule update affects your deployment, the web interface marks affected intrusion and network analysis policies as out of date, as well as their parent access control policies. You must re-deploy an updated policy for its changes to take effect.

For your convenience, you can configure rule updates to automatically re-deploy affected intrusion policies, either alone or in combination with affected access control policies. This allows you to easily and automatically keep your deployment up-to-date to protect against recently discovered exploits and intrusions.

To ensure up-to-date preprocessing settings, you must re-deploy access control policies, which also deploys any associated SSL, network analysis, and file policies that are different from those currently running, and can also can update default values for advanced preprocessing and performance options.

Cisco delivers the following network analysis and intrusion policies with the system:
Balanced Security and Connectivity network analysis and intrusion policies

These policies are built for both speed and detection. Used together, they serve as a good starting point for most organizations and deployment types. The system uses the Balanced Security and Connectivity policies and settings as defaults in most cases.

Connectivity Over Security network analysis and intrusion policies

These policies are built for organizations where connectivity (being able to get to all resources) takes precedence over network infrastructure security. The intrusion policy enables far fewer rules than those enabled in the Security over Connectivity policy. Only the most critical rules that block traffic are enabled.

Security Over Connectivity network analysis and intrusion policies

These policies are built for organizations where network infrastructure security takes precedence over user convenience. The intrusion policy enables numerous network anomaly intrusion rules that could alert on or drop legitimate traffic.

Maximum Detection network analysis and intrusion policies

These policies are built for organizations where network infrastructure security is given even more emphasis than is given by the Security Over Connectivity policies, with the potential for even greater operational impact. For example, the intrusion policy enables rules in a large number of threat categories including malware, exploit kit, old and common vulnerabilities, and known in-the-wild exploits.

No Rules Active intrusion policy

In the No Rules Active intrusion policy, all intrusion rules, and all advanced settings except intrusion rule thresholds, are disabled. This policy provides a starting point if you want to create your own intrusion policy instead of basing it on the enabled rules in one of the other system-provided policies.


Note


Depending on the system-provided base policy that is selected, the settings of the policy vary. To view the policy settings, click the Edit icon next to the policy and then click the Base Policy drop-down box.


Benefits of Custom Network Analysis and Intrusion Policies

You may find that the inspector options, intrusion rules, and other advanced settings configured in the system-provided network analysis and intrusion policies do not fully address the security needs of your organization.

Building custom policies can improve the performance of the system in your environment and can provide a focused view of the malicious traffic and policy violations occurring on your network. By creating and tuning custom policies you can configure, at a very granular level, how the system processes and inspects the traffic on your network for intrusions.

All custom policies have a base policy, also called a base layer, which defines the default settings for all configurations in the policy. A layer is a building block that you can use to efficiently manage multiple network analysis or intrusion policies.

In most cases, you base custom policies on system-provided policies, but you can use another custom policy. However, all custom policies have a system-provided policy as the eventual base in a policy chain. Because rule updates can modify system-provided policies, importing a rule update may affect you even if you are using a custom policy as your base. If a rule update affects your deployment, the web interface marks affected policies as out of date.

Benefits of Custom Network Analysis Policies

By default, one network analysis policy preprocesses all unencrypted traffic handled by the access control policy. That means that all packets are decoded and preprocessed according to the same settings, regardless of the intrusion policy (and therefore intrusion rule set) that later examines them.

Initially, the system-provided Balanced Security and Connectivity network analysis policy is the default. A simple way to tune preprocessing is to create and use a custom network analysis policy as the default.

Tuning options available vary by inspector, but some of the ways you can tune inspectors and decoders include:

  • You can disable inspectors that do not apply to the traffic you are monitoring. For example, the HTTP Inspect inspector normalizes HTTP traffic. If you are confident that your network does not include any web servers using Microsoft Internet Information Services (IIS), you can disable the inspector option that looks for IIS-specific traffic and thereby reduce system processing overhead.


Note


If you disable a inspector in a custom network analysis policy, but the system needs to use that inspector to later evaluate packets against an enabled intrusion or inspector rule, the system automatically enables and uses the inspector although the inspector remains disabled in the network analysis policy web interface.


  • Specify ports, where appropriate, to focus the activity of certain inspectors. For example, you can identify additional ports to monitor for DNS server responses or encrypted SSL sessions, or ports on which you decode telnet, HTTP, and RPC traffic.

For advanced users with complex deployments, you can create multiple network analysis policies, each tailored to preprocess traffic differently. Then, you can configure the system to use those policies to govern the preprocessing of traffic using different security zones, networks, or VLANs. (Note that ASA FirePOWER modules cannot restrict preprocessing by VLAN.)


Note


Tailoring preprocessing using custom network analysis policies—especially multiple network analysis policies—is an advanced task. Because preprocessing and intrusion inspection are so closely related, you must be careful to allow the network analysis and intrusion policies examining a single packet to complement each other.


Benefits of Custom Intrusion Policies

In a newly created access control policy initially configured to perform intrusion prevention, the default action allows all traffic, but first inspects it with the system-provided Balanced Security and Connectivity intrusion policy. Unless you add access control rules or change the default action, all traffic is inspected by that intrusion policy.

To customize your intrusion prevention deployment, you can create multiple intrusion policies, each tailored to inspect traffic differently. Then, configure an access control policy with rules that specify which policy inspects which traffic. Access control rules can be simple or complex, matching and inspecting traffic using multiple criteria including security zone, network or geographical location, VLAN, port, application, requested URL, or user.

The main function of intrusion policies is to manage which intrusion and inspector rules are enabled and how they are configured, as follows:

  • Within each intrusion policy, you should verify that all rules applicable to your environment are enabled, and improve performance by disabling rules that are not applicable to your environment. You can specify which rules should drop or modify malicious packets.

  • Firepower recommendations allow you to associate the operating systems, servers, and client application protocols detected on your network with rules specifically written to protect those assets.

  • You can modify existing rules and write new standard text rules as needed to catch new exploits or to enforce your security policies.

Other customizations you might make to an intrusion policy include:

  • The sensitive data preprocessor detects sensitive data such as credit card numbers and Social Security numbers in ASCII text. Note that other inspectors that detect specific threats (back orifice attacks, several portscan types, and rate-based attacks that attempt to overwhelm your network with excessive traffic) are configured in network analysis policies.

  • Global thresholds cause the system to generate events based on how many times traffic matching an intrusion rule originates from or is targeted to a specific address or address range within a specified time period. This helps prevent the system from being overwhelmed with a large number of events.

  • Suppressing intrusion event notifications and setting thresholds for individual rules or entire intrusion policies can also can prevent the system from being overwhelmed with a large number of events.

  • In addition to the various views of intrusion events within the web interface, you can enable logging to syslog facilities or send event data to an SNMP trap server. Per policy, you can specify intrusion event notification limits, set up intrusion event notification to external logging facilities, and configure external responses to intrusion events. Note that in addition to these per-policy alerting configurations, you can globally enable or disable email alerting on intrusion events for each rule or rule group. Your email alert settings are used regardless of which intrusion policy processes a packet.

Limitations of Custom Policies

Because preprocessing and intrusion inspection are so closely related, you must be careful that your configuration allows the network analysis and intrusion policies processing and examining a single packet to complement each other.

By default, the system uses one network analysis policy to preprocess all traffic handled by managed devices using a single access control policy. The following diagram shows how a newly created access control policy in an inline, intrusion-prevention deployment initially handles traffic. The preprocessing and intrusion prevention phases are highlighted.


Diagram showing how a newly created access control policy in an inline intrusion prevention deployment initially handles traffic. In order: Security Intelligence, preprocessing, access control default action, network discovery, and finally intrusion inspection.

Notice how a default network analysis policy governs the preprocessing of all traffic handled by the access control policy. Initially, the system-provided Balanced Security and Connectivity network analysis policy is the default.

A simple way to tune preprocessing is to create and use a custom network analysis policy as the default. However, if you disable a inspector in a custom network analysis policy but the system needs to evaluate preprocessed packets against an enabled intrusion or inspector rule, the system automatically enables and uses the inspector although it remains disabled in the network analysis policy web interface.


Note


In order to get the performance benefits of disabling an inspector, you must make sure that none of your intrusion policies have enabled rules that require that inspector.


An additional challenge arises if you use multiple custom network analysis policies. For advanced users with complex deployments, you can tailor preprocessing to specific security zones, networks, and VLANs by assigning custom network analysis policies to preprocess matching traffic. (Note that ASA FirePOWER cannot restrict preprocessing by VLAN.) To accomplish this, you add custom network analysis rules to your access control policy. Each rule has an associated network analysis policy that governs the preprocessing of traffic that matches the rule.


Tip


You configure network analysis rules as an advanced setting in an access control policy. Unlike other types of rules, network analysis rules invoke—rather than being contained by—network analysis policies.


The system matches packets to any configured network analysis rules in top-down order by rule number. Traffic that does not match any network analysis rule is preprocessed by the default network analysis policy. While this allows you a great deal of flexibility in preprocessing traffic, keep in mind that all packets, regardless of which network analysis policy preprocessed them, are subsequently matched to access control rules—and thus to potential inspection by intrusion policies—in their own process. In other words, preprocessing a packet with a particular network analysis policy does not guarantee that the packet will be examined with any particular intrusion policy. You must carefully configure your access control policy so it invokes the correct network analysis and intrusion policies to evaluate a particular packet.

The following diagram shows in focused detail how the network analysis policy (preprocessing) selection phase occurs before and separately from the intrusion prevention (rules) phase. For simplicity, the diagram eliminates the discovery and file/malware inspection phases. It also highlights the default network analysis and default-action intrusion policies.


Simplified diagram showing how the network analysis policy (preprocessing) selection phase occurs before and separately from the intrusion prevention (rules) phase

In this scenario, an access control policy is configured with two network analysis rules and a default network analysis policy:

  • Network Analysis Rule A preprocesses matching traffic with Network Analysis Policy A. Later, you want this traffic to be inspected by Intrusion Policy A.

  • Network Analysis Rule B preprocesses matching traffic with Network Analysis Policy B. Later, you want this traffic to be inspected by Intrusion Policy B.

  • All remaining traffic is preprocessed with the default network analysis policy. Later, you want this traffic to be inspected by the intrusion policy associated with the access control policy’s default action.

After the system preprocesses traffic, it can examine the traffic for intrusions. The diagram shows an access control policy with two access control rules and a default action:

  • Access Control Rule A allows matching traffic. The traffic is then inspected by Intrusion Policy A.

  • Access Control Rule B allows matching traffic. The traffic is then inspected by Intrusion Policy B.

  • The access control policy’s default action allows matching traffic. The traffic is then inspected by the default action’s intrusion policy.

Each packet’s handling is governed by a network analysis policy and intrusion policy pair, but the system does not coordinate the pair for you. Consider a scenario where you misconfigure your access control policy so that Network Analysis Rule A and Access Control Rule A do not process the same traffic. For example, you could intend the paired policies to govern the handling of traffic on a particular security zone, but you mistakenly use different zones in the two rules’ conditions. This could cause traffic to be incorrectly preprocessed. For this reason, tailoring preprocessing using network analysis rules and custom policies is an advanced task.

Note that for a single connection, although the system selects a network analysis policy before an access control rule, some preprocessing (notably application layer preprocessing) occurs after access control rule selection. This does not affect how you configure preprocessing in custom network analysis policies.

Prerequisites for Network Analysis and Intrusion Policies

To allow the Snort inspection engine to process traffic for intrusion and malware analysis, you must have the IPS license enabled for the FTD device.

You must be an Admin user to manage network analysis, intrusion policies, and perform migration tasks.