A – C Commands

acknowledge fault

To acknowledge a system fault, use the acknowledge fault command.

acknowledge fault id

Syntax Description

fault id

The fault identification number. The range of valid values is 0 to 18446744073709551615.

Command Modes

Multiple modes

Command History

Release

Modification

1.1(1)

Command added.

Usage Guidelines

Use the acknowledge fault command to acknowledge the existence of a fault.

Examples

The following example shows how to acknowledge a fault:

firepower # acknowledge fault 11347599
firepower* # commit-buffer
firepower #

acknowledge server

To acknowledge a server, use the acknowledge server command.

acknowledge server { id| chassis/ blade_id}

Syntax Description

server { id| chassis/ blade_id}

To use the server identification number to identify the server to acknowledge, provide the id .

To use the chassis and blade identification numbers to identify the server to acknowledge, enter chassis/ blade_id in n/n format.

Note


The chassis ID number is always 1.

Command Modes

EXEC

scope chassis/

Command History

Release

Modification

1.1(1)

Command added.

Usage Guidelines

Use the acknowledge server command to verify the existence of a server in your network. For example, you can acknowledge a server that was recently commissioned to ensure that it exists.

In chassis mode, you can use only the id variable to identify the server to be acknowledged.

Examples

The following example shows how to acknowledge a server in module 2 while in chassis mode:

firepower# scope chassis 1
firepower /chassis # acknowledge server 2
firepower /chassis* # commit-buffer
firepower /chassis # 

acknowledge slot

To acknowledge a slot, use the acknowledge slot command.

acknowledge slot { id| chassis/ blade_id}

Syntax Description

In EXEC mode, use the chassis and blade identification numbers to identify the slot to acknowledge; enter chassis/ blade_id in n/n format.

Note


The chassis ID number is always 1.

Command Modes

EXEC

scope chassis/

scope fabric-interconnect/

Command History

Release

Modification

1.1(1)

Command added.

Usage Guidelines

Use the acknowledge slot command to verify the existence of a slot that was recently commissioned to ensure that it exists.

In chassis and fabric-interconnect mode, you can use only the id variable to identify the slot to be acknowledged.

In EXEC mode, you can use only the chassis and blade identification (chassis/ blade_id ) numbers to identify the slot to be acknowledged.

Examples

The following example shows how to acknowledge a slot while in chassis mode:

firepower# scope chassis 1
firepower /chassis # acknowledge slot 2
firepower /chassis* # commit-buffer
firepower /chassis # 

activate firmware

To activate a firmware package, use the activate firmware command.

activate firmware version

Syntax Description

version

Use its version number to specify the firmware package to be activated.

Command Modes

scope system/

Command History

Release

Modification

1.1(1)

Command added.

Usage Guidelines

As part of the activation process, all CLI sessions will be terminated.

Examples

This example shows how to activate a firmware package:

firepower# scope system
firepower /system # activate firmware 2.4(1.52)
As part of activation, all cli sessions will be terminated.
Continue with activation? (yes/no)

backup sel

To back up the system event log (SEL), use the backup sel command.

backup sel { id| chassis/ blade_id}

Syntax Description

id

The server ID. On 9300 devices, there may be up to 3 servers.

chassis/ blade_id

The appliance chassis number and blade number in x/y format.

Note


The chassis ID number is always 1.

Command Modes

Any command mode

Command History

Release

Modification

1.1(1)

Command added.

Usage Guidelines

Use this command to back up the system event log (SEL) for a server.

In the command mode of a specific server (/chassis/server), you can run this command without any options.

Examples

This example shows how to back up the SEL for server 2 in chassis 1:

firepower# backup sel 1/2
firepower* # commit-buffer
firepower# 

cancel

To cancel a reservation request, use the cancel command.

cancel

Syntax Description

This command has no arguments or keywords.

Command Modes

scope license/scope reservation/

Command History

Release

Modification

1.1(1)

Command added.

Usage Guidelines

If you have already generated the authorization code, you must install it.

Examples

This example shows how to cancel a reservation request:

firepower# scope license
firepower /license # scope reservation
firepower /license/reservation # cancel
Warning : If you have already generated the authorization code from CSSM, please abort the cancellation by issuing discard-buffer and then install the authorization code.
firepower /license/reservation* # 

clear lock-status

To clear a user’s locked-out status, use the clear lock-status command in local user mode.

clear lock-status

Syntax Description

This command has no arguments or keywords.

Command Modes

Local user (/security/local-user)

Command History

Release

Modification

1.1(1)

Command added.

Usage Guidelines

If any user (including admin users) exceeds the specified maximum number of login attempts, the user is locked out of the system and must wait the specified amount of time before being allowed to log in, unless you clear the user’s locked-out status.

Examples

This example shows how to enter local user mode and specify the amount of time that must pass before a locked-out user can log in.

FP9300-A # scope security
FP9300-A # scope local-user test_user1
FP9300-A /security/local-user # clear lock-status
FP9300-A /security/local-user* # commit-buffer
FP9300-A /security/local-user # 

clear message

To clear the current pre-login banner text, use the clear message command; the pre-login banner object itself is not deleted.

clear message

Syntax Description

This command has no arguments or keywords.

Command Modes

scope security/scope banner/scope pre-login-banner/

Command History

Release

Modification

1.1(1)

Command added.

Usage Guidelines

When you enter this command, the text in the pre-login banner is cleared; the pre-login banner object itself is not deleted.

Examples

This example shows you how to view the current pre-login banner, how to clear it, and then commit and and confirm your change:

firepower # scope security
firepower /security # scope banner
firepower /security/banner # scope pre-login-banner
firepower /security/banner/pre-login-banner # show

Pre login banner:
    Message
    -------
    Firepower-9300-2
Western Data Center

firepower /security/banner/pre-login-banner # clear message
firepower /security/banner/pre-login-banner* # commit
firepower /security/banner/pre-login-banner # show 

Pre login banner:
    Message
    -------

firepower /security/banner/pre-login-banner # 

clear password-history

To clear the password history for a local user, use the clear password-history command.

clear password-history

Syntax Description

This command has no arguments or keywords.

Command Modes

Local user (/security/local-user) mode

Command History

Release

Modification

1.1(1)

Command added.

Usage Guidelines

You must be a user with admin or AAA privileges to use this command.

Examples

This example shows how to enter local user mode and clear the password history for the user.

FP9300-A # scope security
FP9300-A /security # scope local-user test_user
FP9300-A /security/local-user # clear password history
FP9300-A /security/local-user* # commit-buffer
FP9300-A /security/local-user # 

Command

Description

create local-user

Creates a new local user account.

set password

Specifies the password for a user account.

clear sel

To clear the system event log (SEL) for a server, use the clear sel command.

clear sel { id| chassis_id/ blade_id}

Syntax Description

id

(Optional) The server ID. The 9300 devices have a maximum of 3 servers.

chassis_id/ blade_id

(Optional) The chassis number and blade number in n/n format.

Note


The chassis ID number is always 1.

Command Modes

Any command mode

Command History

Release

Modification

1.4(1)

Command added.

Usage Guidelines

Use this command to clear the system event log (SEL) for a server.

In the command mode for a specific server (/chassis/server), you can run this command without specifying a server.

Examples

This example shows how to clear system event logs for server 1 in chassis 1 while in organization mode.

FP9300-A # scope org Test
FP9300-A /org # clear sel 1/1
FP9300-A /org* # commit-buffer
FP9300-A /org # 

commit-buffer

To save or verify configuration changes, use the commit-buffer command.

commit-buffer [ verify-only]

Syntax Description

verify-only

(Optional) Verifies/validates buffer contents only; the contents are not committed.

Command Modes

Any command mode

Command History

Release

Modification

1.1(1)

Command added.

Usage Guidelines

Use this command to execute or verify all pending configuration changes. While any configuration changes are pending, an asterisk (*) appears before the command prompt. When you enter the commit-buffer command, the pending commands are committed and the asterisk disappears.

Examples

This example shows how to save configuration changes:

FP9300-A# create org 3
FP9300-A /org* # commit-buffer
FP9300-A /org #
                                         

connect adapter

To connect to the adapter command shell, use the connect command.

connect adapter { chassis/server/id| rack_server/id}

Syntax Description

chassis/server/id

Specifies the chassis, server (module) and adapter IDs (entered in n/n/n format). On the Firepower 9300, the module number can be 1, 2, or 3. On the Firepower 4100, it is 1.

Note


The chassis ID number is always 1.

rack_server/id

Specifies the rack number and module ID (entered in n/n format).

Command Modes

Any command mode

Command History

Release

Modification

1.1(1)

Command added.

Usage Guidelines

Use help to list available mezzanine adapter commands; use help command to view information about an individual command.

Refer to connect adapter: Command List for additional information.


Note


When you connect to an adapter command shell, the command-line prompt changes from your default prompt, which is the name you assigned to the appliance, to adapter n/n/n, where n/n/n is the adapterʼs chassis/server/ID combination you entered to connect.


To exit the adapter mode, type exit .

Examples

The following example shows how to connect to the adapter command shell, and view available commands:


firepower# connect adapter 1/1/1
adapter 1/1/1 # help
Available commands:
  connect             - Connect to remote debug shell
  exit                - Exit from subshell
  help                - List available commands
  history             - Show command history
  show-fwlist         - Show firmware versions on the adapter
  show-identity       - Show adapter identity
  show-phyinfo        - Show adapter phy info
  show-systemstatus   - Show adapter status
adapter 1/1/1 # exit
firepower#    

connect asa

To connect to the ASA CLI, use the connect asa command.

connect asa [ name]

Syntax Description

name

(Optional) Specifies the ASA application instance name, which is the same as the logical device name.

Command Modes

connect module/

Command History

Release

Modification

2.4(1)

Added the name argument.

1.1(4)

Command added.

Usage Guidelines

See the ASA documentation for commands available from the CLI.

To exit the ASA console, enter Ctrl-a, d

Return to the supervisor level of the FXOS CLI:

Exit the console:

Enter ~, then quit to exit the Telnet application.

Example:


asa> Ctrl-a, d
Firepower-module1> ~
telnet> quit
firepower#

Exit the Telnet session:

Enter Ctrl-], .

Example:


asa> Ctrl-a, d
Firepower-module1> Ctrl-], .
firepower#

Examples

This example shows how to connect to the ASA CLI on module 1:


firepower# connect module 1 console
Telnet escape character is '~'.
Trying 127.5.1.1...
Connected to 127.5.1.1.
Escape character is '~'.

CISCO Serial Over LAN:
Close Network Connection to Exit

Firepower-module1> connect asa
asa> 

connect cimc

To connect to the Cisco Integrated Management Controller (CIMC) command shell, use the connect cimc command.

connect cimc { chassis_id/blade_id | rack_id}

Syntax Description

chassis_id/blade_id

Specifies the chassis and module numbers (entered in n/n format).

Note


The chassis ID number is always 1.

rack_id

Specifies the rack number.

Command Modes

Any command mode

Command History

Release

Modification

1.1(1)

Command added.

Usage Guidelines

Enter help to list available CIMC firmware debug utility commands; enter help command to view information about an individual command.


Note


When you connect to the CIMC command shell, the command-line prompt changes from your default prompt, which is the name you assigned to the appliance, to [ xxx ], where xxx is the last command you entered; see the following example.


Type exit to terminate the utility.

Do not use this utility unless instructed to do so by Cisco TAC. Refer to connect cimc: Command List for additional information.

Examples

The following example shows how to connect to CIMC mode and then list the available commands:


firepower# connect cimc 1/1
Trying 127.5.1.1...
Connected to 127.5.1.1.
Escape character is '^]'.

CIMC Debug Firmware Utility Shell [ support ]
[ help ]# help
__________________________________________
          Debug Firmware Utility
__________________________________________
Command List
__________________________________________
alarms
cores
dimmbl
exit
i2cstats
images
mctools
memory
messages
mrcout
network
obfl
post
power
programmables
sensors
sel
fru
tasks
top
update
users
version
cert
sldp
help
help [COMMAND]
__________________________________________
 Notes:
"enter Key" will execute last command
"COMMAND ?" will execute help for that command
__________________________________________
[ help ]# exit
Connection closed by foreign host.
firepower#                               

connect ftd

To connect to the threat defense CLI, use the connect ftd command.

connect ftd name

Syntax Description

name

Specifies the threat defense application instance name, which is the same as the logical device name. If you have multiple application instances for an application type, you must specify the name of the instance. To view the instance names, enter the command without a name.

Command Modes

connect module/

Command History

Release

Modification

2.4(1)

Added the name argument. The escape character was changed to exit from Ctrl-a, d.

1.1(4)

Command added.

Usage Guidelines

See the threat defense documentation for commands available from the CLI.

To exit the threat defense console, enter exit. For pre-2.4(1) versions, enter Ctrl-a, d

Return to the supervisor level of the FXOS CLI:

Exit the console:

Enter ~, then quit to exit the Telnet application.

Example:


> exit
Firepower-module1> ~
telnet> quit
firepower#

Exit the Telnet session:

Enter Ctrl-], .

Example:


> exit
Firepower-module1> Ctrl-], .
firepower#

Examples

This example shows how to connect to the threat defense CLI on module 1:


firepower# connect module 1 console
Telnet escape character is '~'.
Trying 127.5.1.1...
Connected to 127.5.1.1.
Escape character is '~'.

CISCO Serial Over LAN:
Close Network Connection to Exit

Firepower-module1> connect ftd
> 

connect fxos

To connect to the FXOS command shell, use the connect fxos command.

connect fxos [ a]

Syntax Description

a

(Optional) Connects to fabric a.

Note


The fabric ID is always a. If you omit the fabric ID, you are connected to fabric A.

Command Modes

Any command mode

Command History

Release

Modification

1.1(1)

Command added.

Usage Guidelines

Type ? to list available FXOS shell commands; enter command ? to view information about an individual command.


Note


When you connect to the FXOS command shell, the command-line prompt changes from your default prompt, which is the name you assigned to the appliance, to the default prompt with (fxos) appended; see the following example.


To exit the FXOS shell, type exit .

Examples

The following example shows how to connect to the FXOS command shell, and view available commands:


firepower# connect fxos
firepower(fxos)# ?
  clear         Reset functions
  cli           CLI commands
  debug         Debugging functions
  debug-filter  Enable filtering for debugging functions
  ethanalyzer   Configure cisco packet analyzer
  no            Negate a command or set its defaults
  ntp           NTP configuration
  show          Show running system information
  system        System management commands
  terminal      Set terminal line parameters
  test          Test command
  undebug       Disable Debugging functions (See also debug)
  end           Go to exec mode
  exit          Exit from command interpreter
  pop           Pop mode from stack or restore from name
  push          Push current mode to stack or save it under name
  where         Shows the cli context you are in

firepower(fxos)# exit
firepower# 

connect local-mgmt

To connect to the local-management command shell, use the connect local-mgmt command.

connect local-mgmt [ a]

Syntax Description

a

(Optional) Connects to fabric a.

Note


The fabric ID is always a. If you omit the fabric ID, you are connected to fabric A.

Command Modes

Any command mode

Command History

Release

Modification

1.1(1)

Command added.

Usage Guidelines

Type ? to list available local-management shell commands; enter command ? to view information about an individual command.

Refer to connect local-mgmt: Command List for additional information.


Note


When you connect to the local-management command shell, the command-line prompt changes from your default prompt, which is the name you assigned to the appliance, to the default prompt with (local-mgmt) appended; see the following example.


To exit the local-management mode, type exit .

Examples

The following example shows how to connect to the local-management command shell, and view available commands:


firepower# connect local-mgmt
firepower(local-mgmt)#  ?
  cd                Change current directory
  clear             Clear managed objects
  cluster           Cluster mode
  connect           Connect to Another CLI
  copy              Copy a file
  cp                Copy a file
  delete            Delete managed objects
  dir               Show content of dir
  enable            Enable
  end               Go to exec mode
  erase             Erase
  erase-log-config  Erase the mgmt logging config file
  exit              Exit from command interpreter
  fips              FIPS compliance
  ls                Show content of dir
  mgmt-port         Management Port
  mkdir             Create a directory
  move              Move a file
  mv                Move a file
  ping              Test network reachability
  ping6             Test IPv6 network reachability
  pwd               Print current directory
  reboot            Reboots Fabric Interconnect
  restore-check     Check if in restore mode
  rm                Remove a file
  rmdir             Remove a directory
  run-script        Run a script
  show              Show system information
  shutdown          Shutdown
  ssh               SSH to another system
  tail-mgmt-log     tail mgmt log file
  telnet            Telnet to another system
  terminal          Terminal
  top               Go to the top mode
  traceroute        Traceroute to destination
  traceroute6       Traceroute to IPv6 destination
  verify            Verify Application Image

firepower(local-mgmt)# exit
firepower# 

connect module

To connect to a module command shell, use the connect module command.

connect module module_id { console| telnet}

Syntax Description

console

Connects to the serial console. The benefit of a console connection is that it is persistent.

module_id

On 9300 devices the module number can be 1, 2, or 3; on 4100 devices it is 1.

telnet

Connects using a Telnet connection. The benefits of using a Telnet connection is that you can have multiple sessions to the module at the same time, and the connection speed is faster.

Command Modes

Any command mode

Command History

Release

Modification

2.4(1)

Telnet support added.

1.1(1)

Command added.

Usage Guidelines

From the module CLI, you can connect to the application CLI using the connect application command.

Type help to list available module shell commands; enter help command to view information about an individual command. You also can use ? in place of help to view help information.


Note


When you connect to a module command shell, the command-line prompt changes from your default prompt, which is the name you assigned to the appliance, to Firepower-modulen, where n is the number of the module to which you connected; see the following example.


Refer to connect module: Command List for additional information.

Examples

The following example shows how to connect to the module 1 console, and view available commands:


firepower# connect module 1 console
Telnet escape character is '~'.
Trying 127.5.1.1...
Connected to 127.5.1.1.
Escape character is '~'.

CISCO Serial Over LAN:
Close Network Connection to Exit

Firepower-module1>?
    secure-login     => Enable blade secure login
    show             => Display system information. Enter show ? for options
    config           => Configure the system. Enter config ? for options
    terminalLength   => Terminal settings. Enter terminal ? for options
    ping             => Ping a host to check reachability
    nslookup         => Look up an IP address or host name with the DNS servers
    traceroute       => Trace the route to a remote host
    connect          => Connect to specific csp console (asa, etc)
    support          => System file operations
    help             => Get help on command syntax

Firepower-module1> ~
telnet> close
Connection closed.
firepower#


The following example shows how to connect to the module 1 using Telnet, and view available commands:


firepower# connect module 1 telnet
Type exit or Ctrl-] followed by . to quit.
Firepower-module1>?
    secure-login     => Enable blade secure login
    show             => Display system information. Enter show ? for options
    config           => Configure the system. Enter config ? for options
    terminalLength   => Terminal settings. Enter terminal ? for options
    ping             => Ping a host to check reachability
    nslookup         => Look up an IP address or host name with the DNS servers
    traceroute       => Trace the route to a remote host
    connect          => Connect to specific csp console (asa, etc)
    support          => System file operations
    exit             => Exit the session
    help             => Get help on command syntax
Firepower-module1> <Ctrl-], .>
firepower#                 

connect vdp

To connect to the Radware DefensePro (vDP) CLI, use the connect vdp command.

connect vdp [ name]

Syntax Description

name

(Optional) Specifies the vDP application instance name, which is the same as the main application logical device/application instance name.

Command Modes

connect module/

Command History

Release

Modification

2.4(1)

Added the name argument.

1.1(4)

Command added.

Usage Guidelines

See the vDP documentation for commands available from the CLI.

To exit the vDP console, enter Ctrl-], .

Return to the supervisor level of the FXOS CLI:

Exit the console:

Enter ~, then quit to exit the Telnet application.

Example:


> Ctrl-], .
Firepower-module1> ~
telnet> quit
firepower#

Exit the Telnet session:

Enter Ctrl-], .

Example:


> Ctrl-], .
Firepower-module1> Ctrl-], .
firepower#

Examples

This example shows how to connect to the vDP CLI on module 1:


firepower# connect module 1 console
Telnet escape character is '~'.
Trying 127.5.1.1...
Connected to 127.5.1.1.
Escape character is '~'.

CISCO Serial Over LAN:
Close Network Connection to Exit

Firepower-module1> connect vdp

create app-instance

To define an application instance, use the create app-instance command.

create app-instance app_type app_name

Syntax Description

app_name

The name of the application instance, between 1 and 64 characters. You will use this device name when you create the logical device for this instance.

app_type

The application type, either asa, ftd, or vdp.

Command Modes

scope ssa/scope slot/

Command History

Release Modification

2.4(1)

The app_name argument is now required.

1.1(1)

Command added.

Usage Guidelines

You can set many parameters for this application instance, including the the image version, deployment type, resource profile and mode. You can also enable, disable and restart the application.

Examples

The following example shows how to set the image version for an threat defense application instance:


firepower# scope ssa
firepower /ssa # scope slot 1
firepower /ssa/slot # create app-instance ftd MyDevice1
firepower /ssa/slot/app-instance* # set deploy-type container
firepower /ssa/slot/app-instance* # set resource-profile-name silver 1
firepower /ssa/slot/app-instance* # set startup-version 6.3.0
firepower /ssa/slot/app-instance* #

create bootstrap-key FIREWALL_MODE

To specify the firewall mode, routed or transparent, in the bootstrap configuration for the threat defense and ASA, use the create bootstrap-key FIREWALL_MODE command.

create bootstrap-key FIREWALL_MODE

Command Modes

scope ssa/create logical-device/create mgmt-bootstrap/

Command Default

The default mode is routed.

Command History

Release

Modification

2.4(1)

Added support for the ASA.

1.1(4)

Command added for FTD.

Usage Guidelines

Bootstrap settings are meant for initial deployment only, or for disaster recovery. For normal operation, you can change most values in the application CLI configuration.

Examples

The following example shows how to set the mode to routed mode:


firepower# scope ssa
firepower /ssa # create logical-device FTD1 ftd 1 standalone
Firepower /ssa/logical-device* # create mgmt-bootstrap ftd
firepower /ssa/logical-device/mgmt-bootstrap* # create bootstrap-key FIREWALL_MODE
firepower /ssa/logical-device/mgmt-bootstrap/bootstrap-key* # set value routed
firepower /ssa/logical-device/mgmt-bootstrap/bootstrap-key* # exit
firepower /ssa/logical-device/mgmt-bootstrap* #

create bootstrap-key MANAGEMENT_TYPE

To specify the manager, FMC, FDM, or CDO in the bootstrap configuration for the threat defense, use the create bootstrap-key MANAGEMENT_TYPE command.

create bootstrap-key MANAGEMENT_TYPE

Command Modes

scope ssa/create logical-device/create mgmt-bootstrap/

Command Default

The default manager is FMC.

Command History

Release

Modification

2.7(1)

Command added for FTD.

Usage Guidelines

Bootstrap settings are meant for initial deployment only, or for disaster recovery. For normal operation, you can change most values in the application CLI configuration.

Examples

The following example shows how to set the manager to FDM:


firepower# scope ssa
firepower /ssa # create logical-device FTD1 ftd 1 standalone
Firepower /ssa/logical-device* # create mgmt-bootstrap ftd
firepower /ssa/logical-device/mgmt-bootstrap* # create bootstrap-key MANAGEMENT_TYPE
firepower /ssa/logical-device/mgmt-bootstrap/bootstrap-key* # set value LOCALLY_MANAGED
firepower /ssa/logical-device/mgmt-bootstrap/bootstrap-key* # exit
firepower /ssa/logical-device/mgmt-bootstrap* #

The following example shows how to set the manager to CDO:


firepower# scope ssa
firepower /ssa # create logical-device FTD1 ftd 1 standalone
Firepower /ssa/logical-device* # create mgmt-bootstrap ftd
firepower /ssa/logical-device/mgmt-bootstrap* # create bootstrap-key MANAGEMENT_TYPE
firepower /ssa/logical-device/mgmt-bootstrap/bootstrap-key* # set value CDO
firepower /ssa/logical-device/mgmt-bootstrap/bootstrap-key* # exit
firepower /ssa/logical-device/mgmt-bootstrap* #

create bootstrap-key PERMIT_EXPERT_MODE

To permit Expert Mode from FTD SSH sessions for the threat defense, use the create bootstrap-key PERMIT_EXPERT_MODE command.

create bootstrap-key PERMIT_EXPERT_MODE

Command Modes

scope ssa/create logical-device/create mgmt-bootstrap/

Command Default

The default is no.

Command History

Release

Modification

2.4(1)

Command added.

Usage Guidelines

Expert Mode provides FTD shell access for advanced troubleshooting. By default for container instances, Expert Mode is only available to users who access the FTD CLI from the FXOS CLI. This limitation is only applied to container instances to increase isolation between instances. Use Expert Mode only if a documented procedure tells you it is required, or if the Cisco Technical Assistance Center asks you to use it. To enter this mode, use the expert command in the FTD CLI.

Examples

The following example shows how to enable Expert Mode from SSH:


firepower# scope ssa
firepower /ssa # create logical-device FTD1 ftd 1 standalone
Firepower /ssa/logical-device* # create mgmt-bootstrap ftd
firepower /ssa/logical-device/mgmt-bootstrap* # create bootstrap-key PERMIT_EXPERT_MODE
firepower /ssa/logical-device/mgmt-bootstrap/bootstrap-key* # set value yes
firepower /ssa/logical-device/mgmt-bootstrap/bootstrap-key* # exit
firepower /ssa/logical-device/mgmt-bootstrap* #

create bootstrap-key MANAGEMENT_TYPE

create bootstrap-key-Secret CDO_ONBOARD

Command Modes

scope ssa/create logical-device/create mgmt-bootstrap/

Command History

Release

Modification

2.13(1)

Command added for FTD.

Usage Guidelines

Bootstrap settings are meant for initial deployment only, or for disaster recovery. For normal operation, you can change most values in the application CLI configuration.

Examples

The following example shows how to set the CDO onboard value for the FTD device:


Firepower /SSA-5 /ssa/logical-device/mgmt-bootstrap* # create bootstrap-key-secret CDO_ONBOARD
Firepower /SSA-5 /ssa/logical-device/mgmt-bootstrap/bootstrap-key* # set value
Firepower /SSA-5 /ssa/logical-device/mgmt-bootstrap/bootstrap-key* #
Enter a value:(the string “configure manager add cisco-sapphire.app.staging.cdo.cisco.com
TuNDBm6peReVDbU kOpZCgtJ1GqWKbD30 o9B064UXEwmr3AYAEpuflf4qE2E3JKY5 <display_name>” should be
entered)
Confirm the value: (repeat the string)
Firepower /SSA-5 /ssa/logical-device/mgmt-bootstrap/bootstrap-key* # commit-buffer

create bootstrap-key-secret PASSWORD

To specify the admin password in the bootstrap configuration for the threat defense and ASA, use the create bootstrap-key-secret PASSWORD command.

create bootstrap-key-secret PASSWORD

Command Modes

scope ssa/create logical-device/create mgmt-bootstrap/

Command Default

When the admin password is not set.

Command History

Release

Modification

1.1(4)

Command added for FTD.

2.4(1)

Added support for the ASA.

Usage Guidelines

The pre-configured ASA admin user and enable password is useful for password recovery; if you have FXOS access, you can reset the admin user password if you forget it.

Examples

The following example shows how to set the mode to routed mode:


firepower# scope ssa
firepower /ssa # create logical-device FTD1 ftd 1 standalone
Firepower /ssa/logical-device* # create mgmt-bootstrap ftd
firepower /ssa/logical-device/mgmt-bootstrap/bootstrap-key* # create bootstrap-key-secret PASSWORD  
firepower /ssa/logical-device/mgmt-bootstrap/bootstrap-key* # set value
Enter a value: floppylampshade
Confirm the value: floppylampshade
Firepower /ssa/logical-device/mgmt-bootstrap/bootstrap-key-secret* # exit
Firepower /ssa/logical-device/mgmt-bootstrap* #

create bootstrap-key-secret REGISTRATION_KEY

To specify a registration key to be shared between the threat defense device and management center in the bootstrap configuration, use the create bootstrap-key-secret REGISTRATION_KEY command.

create bootstrap-key-secret REGISTRATION_KEY

Command Modes

scope ssa/create logical-device/create mgmt-bootstrap/

Command Default

The registered key is not generated.

Command History

Release

Modification

1.1(4)

Command added for FTD.

Usage Guidelines

You can choose any passphrase for this registration key between 1 and 37 characters; you will enter the same key on the FMC when you add the FTD. Bootstrap settings are meant for initial deployment only, or for disaster recovery. For normal operation, you can change most values in the application CLI configuration.

Examples

The following example shows how to set the value for the registration key:


firepower# scope ssa
firepower /ssa # create logical-device FTD1 ftd 1 standalone
Firepower /ssa/logical-device* # create mgmt-bootstrap ftd
firepower /ssa/logical-device/mgmt-bootstrap/bootstrap-key* # create bootstrap-key-secret REGISTRATION_KEY  
Firepower /ssa/logical-device/mgmt-bootstrap/bootstrap-key-secret* # set value
Enter a value: gratuitousapples
Confirm the value: gratuitousapples
Firepower /ssa/logical-device/mgmt-bootstrap/bootstrap-key-secret* # exit
Firepower /ssa/logical-device/mgmt-bootstrap* #

create bootstrap-key DNS_SERVERS

To specify a comma-separated list of DNS servers for the threat defense, use the create bootstrap-key DNS_SERVERS command.

create bootstrap-key DNS_SERVERS

Command Modes

scope ssa/create logical-device/create mgmt-bootstrap/

Command Default

The default is no.

Command History

Release

Modification

2.4(1)

Command added.

Usage Guidelines

The FTD uses DNS if you specify a hostname for the FMC.

Examples

The following example shows how to specify a hostname:


firepower# scope ssa
firepower /ssa # create logical-device FTD1 ftd 1 standalone
Firepower /ssa/logical-device* # create mgmt-bootstrap ftd
Firepower /ssa/logical-device/mgmt-bootstrap* # create bootstrap-key DNS_SERVERS
Firepower /ssa/logical-device/mgmt-bootstrap/bootstrap-key* # set value 10.9.8.7,10.9.6.5
Firepower /ssa/logical-device/mgmt-bootstrap/bootstrap-key* # exit
Firepower /ssa/logical-device/mgmt-bootstrap* #

create bootstrap-key FIREPOWER_MANAGER_IP

To specify the IP address or hostname or NAT ID of the managing Firepower Management Center, use the create bootstrap-key FIREPOWER_MANAGER_IP command.

create bootstrap-key FIREPOWER_MANAGER_IP

Command Modes

scope ssa/create logical-device/create mgmt-bootstrap/

Command Default

The default is no.

Command History

Release

Modification

2.4(1)

Command added.

Usage Guidelines

Normally, you need both IP addresses (along with a registration key) for both routing purposes and for authentication: the FMC specifies the device IP address, and the device specifies the FMC IP address. However, if you only know one of the IP addresses, which is the minimum requirement for routing purposes, then you must also specify a unique NAT ID on both sides of the connection to establish trust for the initial communication and to look up the correct registration key. You can specify any text string as the NAT ID, from 1 to 37 characters. The FMC and device use the registration key and NAT ID (instead of IP addresses) to authenticate and authorize for initial registration.

Examples

The following example shows how to enable Expert Mode from SSH:


firepower# scope ssa
firepower /ssa # create logical-device FTD1 ftd 1 standalone
Firepower /ssa/logical-device* # create mgmt-bootstrap ftd
Firepower /ssa/logical-device/mgmt-bootstrap* # create bootstrap-key FIREPOWER_MANAGER_IP
Firepower /ssa/logical-device/mgmt-bootstrap/bootstrap-key* # set value 10.10.10.7
Firepower /ssa/logical-device/mgmt-bootstrap/bootstrap-key* # exit
Firepower /ssa/logical-device/mgmt-bootstrap* #

create bootstrap-key SEARCH_DOMAINS

To specify a comma-separated list of search domains, use the create bootstrap-key SEARCH_DOMAINS command.

create bootstrap-key SEARCH_DOMAINS

Command Modes

scope ssa/create logical-device/create mgmt-bootstrap/

Command Default

The default is no.

Command History

Release

Modification

2.4(1)

Command added.

Examples

The following example shows how to enable Expert Mode from SSH:


firepower# scope ssa
firepower /ssa # create logical-device FTD1 ftd 1 standalone
Firepower /ssa/logical-device* # create mgmt-bootstrap ftd
Firepower /ssa/logical-device/mgmt-bootstrap* # create bootstrap-key SEARCH_DOMAINS
Firepower /ssa/logical-device/mgmt-bootstrap/bootstrap-key* # set value cisco.com,example.com
Firepower /ssa/logical-device/mgmt-bootstrap/bootstrap-key* # exit
Firepower /ssa/logical-device/mgmt-bootstrap* #

create breakout

To create a breakout port, use the create breakout command. If a breakout with the specified slot and port IDs already exists, the command will fail.

To add or enter a breakout port, utilize the enter breakout command. If the specified breakout does not exist, it is created and entered; if the breakout port exists, it is entered.

You also can use the scope form of this command to enter an existing breakout port to view properties.

To delete an existing breakout port, use the delete form of this command.

create breakout slot_ID port_ID

Syntax Description

slot_ID

Use its slot number to identify the port module to be broken out.

port_ID

Assign an ID number to this breakout port.

Command Modes

scope cabling/scope fabric a/

Command History

Release Modification

1.1.1

Command added.

Usage Guidelines

In conjunction with the use of a breakout cable, you can use this command to “break out” a 40-Gigabit Ethernet port, creating up to four unconfigured 10-Gigabit ports.

Hardware bypass-capable interfaces cannot be configured as breakout ports.


Note


Because configuring breakout on a port causes a system reboot, we recommend you break out all required ports before committing the changes.


Examples

The following example shows how to create four breakout ports on slot 2:

firepower# scope cabling
firepower /cabling/fabric/ # scope fabric
firepower /cabling/fabric/ # create breakout 2 1
Warning: This action will reboot the system and any existing configurations on 40G port will be erased.!
firepower /cabling/fabric/breakout* # up
firepower /cabling/fabric/ # create breakout 2 2
Warning: This action will reboot the system and any existing configurations on 40G port will be erased.!
firepower /cabling/fabric/breakout* # up
firepower /cabling/fabric/ # create breakout 2 3
Warning: This action will reboot the system and any existing configurations on 40G port will be erased.!
firepower /cabling/fabric/breakout* # up
firepower /cabling/fabric/ # create breakout 2 4
Warning: This action will reboot the system and any existing configurations on 40G port will be erased.!
firepower /cabling/fabric/breakout* # commit-buffer
firepower /cabling/fabric/breakout # 

create certreq

To add a new keyring certificate request, use the create certreq command. If a request already exists for the current keyring, the command will fail.

To edit an existing certificate request, use the enter certreq command.

You also can use the scope form of this command to enter an existing certificate request to assign or change properties.

To delete an existing certificate request, use the delete form of this command.

create certreq [ ip| subject-name]

delete certreq

enter certreq

scope certreq

Syntax Description

ip ip_address

(Optional) Enter the ip keyword and the IPv4 address of the domain on which this device resides. You will be asked to enter and confirm a password for the request. This parameter applies only to the create certreq form of the command.

subject-name name

(Optional) Enter the subject-name keyword and an identifier for this request; for example, the appliance host name. You will be asked to enter and confirm a password for the request. This parameter applies only to the create certreq form of the command.

Command Modes

scope security/scope keyring/

Command History

Release

Modification

1.1(1)

Command added.

Usage Guidelines

When you create a new keyring certificate request, you are automatically entered into certificate request mode (security/keyring/certreq) with an asterisk indicating the new certificate request is not yet defined and committed. You also can scope into certificate request mode for an existing keyring.

Use the set command in certificate request mode to specify certificate request parameters.


Note


Before you create or commit a new certificate request, you must set the RSA key modulus (SSL key length) using set modulus.


Examples

This example shows how to create a new keyring and its certificate request:

firepower # scope security
firepower /security # create keyring test-ring2
firepower /security/keyring* # create certreq ip 209.165.201.20
Certificate request password:
Confirm certificate request password:
firepower /security/keyring* # scope certreq
firepower /security/keyring/certreq* # 
firepower /security/keyring/certreq* # set ?
  country        Country name (2 letter code) 
  dns            DNS name (subject alternative name) 
  e-mail         E-mail name 
  fi-a-ip        Certificate request FI A ip address 
  fi-a-ipv6      Certificate request FI A ipv6 address 
  fi-b-ip        Certificate request FI B ip address 
  fi-b-ipv6      Certificate request FI B ipv6 address 
  ip             Certificate request ip address 
  ipv6           Certificate request ipv6 address 
  locality       Locality name (eg, city) 
  org-name       Organisation name (eg, company) 
  org-unit-name  Organisational Unit Name (eg, section) 
  password       Certificate request password 
  state          State, province or county (full name) 
  subject-name   Certificate request subject name 

firepower /security/keyring/certreq* # set 

create class

To add a new class of statistics to a statistics threshold policy, use the create class command. If a class with the specified name already exists, the command will fail.

To add or edit an statistics class, use the enter class command. If the specified class does not exist, it is created and entered; if the class exists, it is entered.

You also can use the scope form of this command to enter an existing class to assign or change properties. Generally, “scoping into” an object is more convenient than entering it, since the objectʼs name is usually all that is needed, whereas the enter form of the command often requires entering all its definition parameters.

To delete an existing class of statistics, use the delete form of this command.

create class type

delete class type

enter class type

scope class type

Syntax Description

type

Specify the desired statistics class.

Available classes depend on the statistics threshold policy in your current mode. For example, in eth-server/ mode, available classes include chassis-stats and ether-error-stats. In eth-uplink/ mode, available classes include ether-rx-stats and ether-rx-stats. In org/ mode, available classes include cpu-env-stats and ethernet-port-err-stats.

Use the create class ? command to view a list of classes available for the current statistics threshold policy.

Command Modes

scope eth-server/scope stats-threshold-policy/

scope eth-uplink/scope stats-threshold-policy/

scope org/scope stats-threshold-policy/

Command History

Release

Modification

1.1(1)

Command added.

Usage Guidelines

Use classes to place thresholds on specific sets of statistics. For example, you might want to define a threshold on a port that raises a fault if the average number of packets dropped exceeds a certain amount. For this class, you would create threshold properties for Ethernet error statistics.

You can configure multiple classes for a statistics threshold policy.

Use the set collection-interval command to define how frequently statistics are collected, and use the set reporting-interval command to define how frequently the statistics are reported. These intervals define a statistics collection policy.


Note


There is one default statistics threshold policy each for Ethernet server ports or Ethernet uplink ports. You cannot create additional statistics collection policies and you cannot delete the existing default policies for these components—you can only modify the default policies. However, you can create and delete statistics threshold policies in organization mode (scope org/).


Examples

This example shows how to scope into the Ethernet server statistics threshold policy class, create a chassis statistics class, create an input power (Watts) property, specify that the normal power is 8 kW, create an above normal warning threshold of 11 kW, and then commit the class:

firepower # scope eth-server
firepower /eth-server # scope stats-threshold-policy default
firepower /eth-server/stats-threshold-policy # create class chassis-stats
firepower /eth-server/stats-threshold-policy/class* # create property input-power
firepower /eth-server/stats-threshold-policy/class/property* # set normal-value 8000.0
firepower /eth-server/stats-threshold-policy/class/property* # create threshold-value above-normal warning
firepower /eth-server/stats-threshold-policy/class/property/threshold-value* # set escalating 11000.0
firepower /eth-server/stats-threshold-policy/class/property/threshold-value* # commit-buffer
firepower /eth-server/stats-threshold-policy/class/property/threshold-value #

This example shows how to scope into organization mode, create a new statistics threshold policy for server and server component statistics, create a threshold policy class for CPU environment statistics, create a CPU temperature property, specify that the normal CPU temperature is 48.5° C, create an above normal warning threshold of 50° C, and commit the entire transaction:

firepower # scope org
firepower /org # create stats-threshold-policy ServStatsPolicy
firepower /org/stats-threshold-policy* # create class cpu-env-stat
firepower /org/stats-threshold-policy/class* # create property temperature
firepower /org/stats-threshold-policy/class/property* # set normal-value 48.5
firepower /org/stats-threshold-policy/class/property* # create threshold-value above-normal warning
firepower /org/stats-threshold-policy/class/property/threshold-value* # set escalating 50.0
firepower /org/stats-threshold-policy/class/property/threshold-value* # commit-buffer
firepower /org/stats-threshold-policy/class/property/threshold-value #

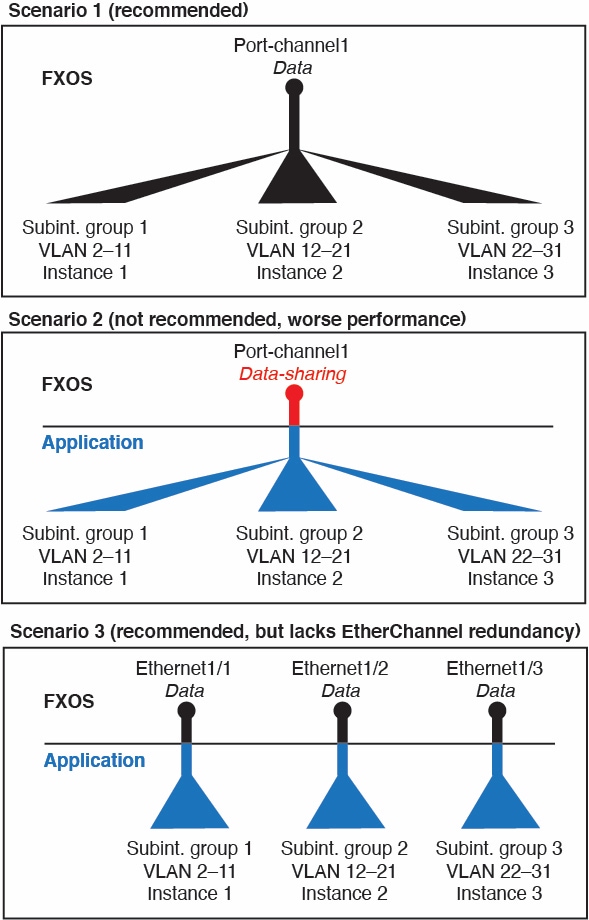
create connection

To add a new IPSec connection, use the create connection command. If a connection with the specified name already exists, the command will fail.

To add or edit an IPSec connection, use the enter connection command. If the specified connection does not exist, it is created and entered; if the connection exists, it is entered.

You also can use the scope form of this command to enter an existing connection to assign or change properties. Generally, “scoping into” an object is more convenient than entering it, since the objectʼs name is usually all that is needed, whereas the enter form of the command often requires entering all its definition parameters.

To delete an existing connection, use the delete form of this command.

create connection name

enter connection name

delete connection name

scope connection name

Syntax Description

name

The connection name; can be up to 16 alphanumeric characters.

Command Modes

scope security/scope ipsec/

Command History

Release

Modification

1.1(1)

Command added.

Usage Guidelines

When you create a new IPSec connection, you are automatically entered into security/ipsec/connection mode with an asterisk indicating the new connection is not yet committed. You can configure the connection before committing it.

After you create a connection, the name cannot be changed. You must delete the connection and create a new one.

Examples

This example shows how to create and enter a new IPSec connection:

firepower # scope security
firepower /security # scope ipsec
firepower /security/ipsec # enter connection ipsec_conn2
firepower /security/ipsec/connection* #

create destination

To add a new Smart Call Home destination, use the create destination command. If a destination with the specified name already exists, the command will fail.

To add or edit a Smart Call Home destination, use the enter destination command. If the specified destination does not exist, it is created and entered; if the destination exists, it is entered.

You also can use the scope form of this command to enter an existing destination to assign or change properties. Generally, “scoping into” an object is more convenient than entering it, since the objectʼs name is usually all that is needed, whereas the enter form of the command often requires entering all its definition parameters.

To delete an existing destination, use the delete form of this command.

create destination name

delete destination name

enter destination name

scope destination name

Syntax Description

name

The name identifying the Smart Call Home destination.

Command Modes

scope monitoring/scope callhome/scope profile/

Command History

Release

Modification

1.4(1)

Command added.

Usage Guidelines

When you create a new Smart Call Home destination, you are automatically entered into callhome/profile mode (monitoring/callhome/profile) with an asterisk indicating the new destination is not yet committed. You can set the destination parameters—transport protocol and an email address—and then commit the new destination information.


Note


An email address is the only allowed destination address in a callhome profile.


After you create a Smart Call Home destination, the destination name cannot be changed. You must delete the destination and create a new one.

Examples

This example shows how to create, enter and configure a Smart Call Home destination:

firepower # scope monitoring
firepower /monitoring # scope callhome
firepower /monitoring/callhome # scope profile SLProfile
firepower /monitoring/callhome/profile # enter destination TestDest
firepower /monitoring/callhome/profile/destination* # set address user1@test.com
firepower /monitoring/callhome/profile/destination* # set protocol email
firepower /monitoring/callhome/profile/destination* # commit-buffer
firepower /monitoring/callhome/profile/destination #

create dns

To create DNS name server in FXOS, use the create dns command.

create dns

Syntax Description

create dns

This command is used to create a DNS name server in FXOS.

Command Modes

scope system/scope services

Command History

Release Modification

1.1(1)

Command added.

Usage Guidelines

By default, this command creates the DNS name server in FXOS.

Examples

This example shows how to create a DNS name server:

firepower# scope system; scope services
firepower /system /services # create dns 192.0.2.1
firepower /system /services* # commit

create hw-crypto

To create a TLS crypto acceleration configuration on a container instance, use the create hw-crypto command. For more information about TLS crypto acceleration, see the Management Center Configuration Guide.

create hw-crypto

Command Modes

connect module

Command History

Release

Modification

2.7.1

This command was introduced.

Usage Guidelines

This command deletes a TLS crypto acceleration configuration for a container instance. If TLS crypto acceleration is enabled on the container instance, the command disables it before deleting the configuration.

Examples

Following is an example of creating a TLS crypto acceleration configuration:

scope ssa
/ssa # show app-instance

App Name   Identifier Slot ID    Admin State Oper State       Running Version Startup Version Deploy Type Turbo Mode Profile Name Cluster State   Cluster Role
---------- ---------- ---------- ----------- ---------------- --------------- --------------- ----------- ---------- ------------ --------------- ------------
ftd        FTD-FDM    1          Enabled     Online           6.5.0.1159      6.5.0.1159      Native      No                      Not Applicable  None
ftd        ftd2       2          Enabled     Online           6.5.0.1159      6.5.0.1159      Container   No         Default-Small Not Applicable  None

/ssa # sc slot 2
/ssa/slot # scope app-instance ftd ftd2
/ssa/slot/app-instance # create hw-crypto
/ssa/slot/app-instance* # commit-buffer

create ip-block

To add a new block of IPv4 addresses for service access, use the create ip-block command. If an address block with the specified properties already exists, the command will fail.

To add or edit a block of IPv4 addresses, use the enter ip-block command. If the specified address block does not exist, it is created and entered; if the address block exists, it is entered.

You also can use the scope form of this command to enter an existing address block to assign or change properties.

To delete an existing address block, use the delete form of this command.

create ip-block ip_address prefix_length { https| snmp| ssh}

delete ip-block ip_address prefix_length { https| snmp| ssh}

enter ip-block ip_address prefix_length { https| snmp| ssh}

scope ip-block ip_address prefix_length { https| snmp| ssh}

Syntax Description

ip_address

The starting address for the IPv4 address block.

prefix_length

The prefix length; determines the number of addresses in the block. Value can be 0 to 32.

https| snmp| ssh

The service (HTTPS, SNMP, or SSH) to which the address block is assigned.

Command Modes

scope system/scope services/

Command History

Release

Modification

1.1(1)

Command added.

Usage Guidelines

Use this command to assign a block of IPv4 addresses to provide access to a specified service (HTTPS, SNMP, or SSH).

When you create a new IP block, you are automatically entered into ip-block mode (system/services/ip-block) with an asterisk indicating the new block assignment is not yet committed.

On FXOS versions 2.3.1 and earlier, up to 25 different blocks can be configured for each service. On FXOS versions 2.4.1 and later, up to 100 different blocks can be configured for each service. An address of 0.0.0.0 and a prefix of 0 allows unrestricted access to a service. Each block of addresses is identified by its starting IPv4 address.

Examples

This example shows how to create, enter and verify an IPv4 address block to provide SSH access:

firepower # scope system
firepower /system # scope services
firepower /system/services # enter ip-block 192.168.200.101 32 ssh
firepower /system/services/ip-block* # commit-buffer
firepower /system/services/ip-block # up
firepower /system/services # show ip-block

Permitted IP Block:
    IP Address      Prefix Length Protocol
    --------------- ------------- --------
    0.0.0.0                     0 https
    0.0.0.0                     0 snmp
    0.0.0.0                     0 ssh
    192.168.200.101            32 ssh
firepower /system/services # 

create ipv6-block

To add a new block of IPv6 addresses for service access, use the create ipv6-block command. If an address block with the specified properties already exists, the command will fail.

To add or edit a block of IPv6 addresses, use the enter ipv6-block command. If the specified address block does not exist, it is created and entered; if the address block exists, it is entered.

You also can use the scope form of this command to enter an existing address block to assign or change properties.

To delete an existing address block, use the delete form of this command.

create ipv6-block ipv6_address prefix_length { https| snmp| ssh}

delete ipv6-block ipv6_address prefix_length { https| snmp| ssh}

enter ipv6-block ipv6_address prefix_length { https| snmp| ssh}

scope ipv6-block ipv6_address prefix_length { https| snmp| ssh}

Syntax Description

ipv6_address

The starting address for the IPv6 address block.

prefix_length

The prefix length; determines the number of addresses in the block. Value can be 0 to 128.

https| snmp| ssh

The service (HTTPS, SNMP, or SSH) to which the address block is assigned.

Command Modes

scope system/scope services/

Command History

Release

Modification

1.1(1)

Command added.

Usage Guidelines

Use this command to assign a block of IPv6 addresses to provide access to a specified service (HTTPS, SNMP, or SSH).

When you create a new IPv6 block, you are automatically entered into ipv6-block mode (system/services/ipv6-block) with an asterisk indicating the new block assignment is not yet committed.

On FXOS versions 2.3.1 and earlier, up to 25 different blocks can be configured for each service. On FXOS versions 2.4.1 and later, up to 100 different blocks can be configured for each service. An address of 0:0:0:0:0:0:0:0 and a prefix of 0 allows unrestricted access to a service. Each block of addresses is identified by its starting IPv6 address.

Examples

This example shows how to create, enter and verify an IPv6 address block to provide SSH access:

firepower # scope system
firepower /system # scope services
firepower /system/services # create ipv6-block 2001:DB8:1::1 64 ssh
firepower /system/services/ipv6-block* # commit-buffer
firepower /system/services/ipv6-block # up
firepower /system/services # show ipv6-block

Permitted IPv6 Block:
    IPv6 Address Prefix Length Protocol
    ------------ ------------- --------
    ::                       0 https
    ::                       0 snmp
    ::                       0 ssh
    2001:DB8:1::1
                            64 ssh
firepower /system/services # 

create keyring

To add a new RSA keyring, use the create keyring command. If a keyring with the specified name already exists, the command will fail.

To edit an existing keyring, use the enter keyring command.

You also can use the scope form of this command to enter an existing keyring to assign or change properties.

To delete an existing keyring, use the delete form of this command.

create keyring name

delete keyring name

enter keyring name

scope keyring name

Syntax Description

name

The name identifying the keyring; can be between 1 and 16 characters.

Command Modes

scope security/

Command History

Release

Modification

1.1(1)

Command added.

Usage Guidelines

When you create a new keyring, you are automatically entered into keyring mode (security/keyring) with an asterisk indicating the new keyring is not yet committed. You can create a keyring certificate request, and set keyring parameters such as RSA key modulus and certificate authority trustpoint, and then commit the new keyring information.

Examples

This example shows how to create and enter a new RSA keyring:

firepower # scope security
firepower /security # enter keyring test_keyring
firepower /security/keyring* # set ?
  cert        Keyring certificate 
  modulus     RSA key modulus 
  regenerate  Regenerate keyring 
  trustpoint  Trustpoint CA 

firepower /security/keyring* # set

create local-user

To add a new local user account, use the create local-user command. If a local user account with the specified name already exists, the command will fail.

To add or edit a local user account, use the enter local-user command. If the specified account does not exist, it is created and entered; if the account exists, it is entered.

You also can use the scope form of this command to enter an existing local user account to assign or change properties.

To delete an existing local user account, use the delete form of this command.

create local-user user_name

delete local-user user_name

enter local-user user_name

scope local-user user_name

Syntax Description

user_name

The ID to be used when logging into this local user account. Note the following guidelines and restrictions when entering a user name:

  • The name can contain between 1 and 32 characters, including the following:

    • Any alphabetic character

    • Any numeral

    • _ (underscore)

    • - (dash)

    • . (dot)

  • The name must be unique.

  • The name must start with an alphabetic character. It cannot start with a number or a special character, such as an underscore.

  • The name is case-sensitive.

  • You cannot create an all-number name.

After you create a user account, you cannot change its name. You must delete the user account and create a new one.

Command Modes

scope security/

Command History

Release

Modification

1.1(1)

Command added.

Usage Guidelines

You can configure up to 48 local user accounts. Each account must have a unique user name and password.

When you create a new user account, you are automatically entered into local user mode (/security/local-user) with an asterisk indicating the new account is not yet committed. You can specify additional user account information such as password, first and last names, and so on, and then commit the new account information.

After you create the user account, the account name cannot be changed. You must delete the user account and create a new one.

Examples

This example shows how to enter security mode, enter a local user account (simultaneously creating the new account since it does not exist), and then assigning first and last names to the account:

firepower # scope security
firepower /security # enter local-user test_user
firepower /security/local-user* # set firstname test
firepower /security/local-user* # set lastname user
firepower /security/local-user* # commit-buffer
firepower /security/local-user # 

create member-port

To create a port-channel member port, use the create member-port command. If a member port with the specified ID already exists, the command will fail.

To add or enter a member port, utilize the enter member-port command. If the specified member port does not exist, it is created and entered; if the member port exists, it is entered.

You also can use the scope form of this command to enter an existing member port to assign or change properties..

To delete an existing member port, use the delete form of this command.

create member-port interface_id

Syntax Description

interface_id

Identify the interface to be added to this port-channel using one of the following formats:

  • slot_id port_id – The port location in the chassis in terms of slot number and port number.

  • Ethernetslot_id/port_id – The Ethernet port label.

Command Modes

scope eth-uplink/scope fabric a/port-channel

Command History

Release Modification

1.1.1

Command added.

Usage Guidelines

You must create or enter a port-channel before you can use this command.

When you create a new member port, you are automatically entered into member-port mode (eth-uplink/fabric/port-channel/member-port) with an asterisk indicating the new member port is not yet committed.

Examples

The following example shows how to create a new port-channel, enable it and add member ports:

firepower # scope eth-uplink
firepower /eth-uplink/fabric # scope fabric a
firepower /eth-uplink/fabric # create port-channel 4
firepower /eth-uplink/fabric/port-channel* # enable
firepower /eth-uplink/fabric/port-channel* # create member-port Ethernet1/1
firepower /eth-uplink/fabric/port-channel/member-port* # exit
firepower /eth-uplink/fabric/port-channel* # create member-port Ethernet1/2
firepower /eth-uplink/fabric/port-channel/member-port* # exit
firepower /eth-uplink/fabric/port-channel* # create member-port Ethernet1/3
firepower /eth-uplink/fabric/port-channel/member-port* # exit
firepower /eth-uplink/fabric/port-channel* # create member-port Ethernet1/4
firepower /eth-uplink/fabric/port-channel/member-port* # exit
firepower /eth-uplink/fabric/port-channel* # commit-buffer
firepower /eth-uplink/fabric/port-channel # 

create ntp-server

To create NTP server in FXOS, use the create ntp-server command.

create ntp-server

Syntax Description

create ntp-server

This command is used to create an NTP server in FXOS.

Command Modes

scope system/scope services/

Command History

Release Modification

1.1(1)

Command added.

Usage Guidelines

By default, this command creates the NTP server in FXOS.

Examples

The following example shows how to create the NTP server:


firepower# scope system;scope services

firepower /system/services # create ntp-server 192.0.2.1
firepower /system/services # commit 

firepower /system/services/ntp-server # set 
  ntp-sha1-key-id      NTP SHA-1 key id   <=========== [Optional] Configure NTP authentication key ID
  ntp-sha1-key-string  NTP SHA-1 key string  <=========== [Optional] Configure NTP authentication key string
 
firepower /system/services/ntp-server # commit 

create policy (callhome)

To add a new Smart Call Home and Smart Licensing policy, use the create policy command. If a policy with the specified name already exists, the command will fail.

To add or edit an IPSec connection, use the enter policy command. If the specified policy does not exist, it is created and entered; if the policy exists, it is entered.

You also can use the scope form of this command to enter an existing policy to assign or change properties.

To delete an existing policy, use the delete form of this command.

create policy event

delete policy event

enter policy event

scope policy event

Syntax Description

event

The fault or system event type. See Usage Guidelines below for event options.

Command Modes

scope monitoring/scope callhome/

Command History

Release

Modification

1.1(1)

Command added.

Usage Guidelines

When you create a new Smart Call Home policy, you are automatically entered into callhome/policy mode (monitoring/callhome/policy) with an asterisk indicating the new policy is not yet committed. You can set property values and enable/disable services, and then commit the new policy.

After you create a Smart Call Home policy, the policy name cannot be changed. You must delete the policy and create a new one.

Use this command to create an instance of a policy for an existing type of fault or system event. The available keywords for Call Home policy event types are:

  • adaptor-mismatch

  • arp-targets-config-error

  • association-failed

  • configuration-failure

  • connectivity-problem

  • election-failure

  • equipment-degraded

  • equipment-disabled

  • equipment-inaccessible

  • equipment-inoperable

  • equipment-offline

  • equipment-problem

  • equipment-removed

  • fru-problem

  • health-led-amber

  • health-led-amber-blinking

  • identity-unestablishable

  • inventory-failed

  • license-graceperiod-expired

  • limit-reached

  • link-down

  • management-services-failure

  • management-services-unresponsive

  • memory-error

  • mgmtif-down

  • ndisc-targets-config-error

  • near-max-limit

  • port-failed

  • power-problem

  • psu-insufficient

  • psu-mixed-mode

  • thermal-problem

  • version-incompatible

  • vif-ids-mismatch

  • voltage-problem

Examples

This example shows how to create, enter and enable a Call Home policy instance for link-down events:

firepower # scope monitoring
firepower /monitoring # scope callhome
firepower /monitoring/callhome # enter policy link-down
firepower /monitoring/callhome/policy* # set admin-state enabled
firepower /monitoring/callhome/policy* # commit-buffer
firepower /monitoring/callhome/policy #

create policy (flow control)

To add a new named flow-control policy, use the create policy command. If a policy with the specified name already exists, the command will fail.

To add or edit a named flow-control policy, use the enter policy command. If the specified policy does not exist, it is created and entered; if the policy exists, it is entered.

You also can use the scope form of this command to enter an existing policy to assign or change properties.

To delete an existing policy, use the delete form of this command.

create policy name

delete policy name

enter policy name

scope policy name

Syntax Description

name

A name to identify the flow-control policy. The name can be from 1 to 16 characters.

Command Modes

scope eth-uplink/scope flow-control/

Command History

Release

Modification

1.1(1)

Command added.

Usage Guidelines

Flow-control policies determine whether the uplink Ethernet ports in an appliance domain send and receive IEEE 802.3x pause frames when the receive buffer for a port reaches full capacity. These pause frames request that the transmitting port stop sending data for a few milliseconds until the buffer clears. For flow control to work between devices, you must enable the corresponding send and receive flow-control parameters for both devices.

The default flow-control policy disables send and receive control, and sets the priority to auto-negotiate.

When you create a new flow-control policy, you are automatically entered into flow-control/policy mode (eth-uplink/flow-control/policy) with an asterisk indicating the new policy is not yet committed. You can set policy property values and then commit the new policy.

After you create a flow-control policy, the policy name cannot be changed. You must delete the policy and create a new one.

Examples

This example shows how to create and enter a named policy for flow control:

firepower # scope eth-uplink
firepower /eth-uplink # scope flow-control
firepower /eth-uplink/flow-control # enter policy FCpolicy1
firepower /eth-uplink/flow-control/policy* # commit-buffer
firepower /eth-uplink/flow-control/policy #

create port-channel

To create an EtherChannel (also known as a port-channel), use the create port-channel command. If a port-channel with the specified ID already exists, the command will fail.

To add or enter a port-channel, utilize the enter port-channel command. If the specified port-channel does not exist, it is created and entered; if the port-channel exists, it is entered.

You also can use the scope form of this command to enter an existing port-channel to assign or change properties..

To delete an existing port-channel, use the delete form of this command.

create port-channel id

Syntax Description

id

Assign an ID number to this port-channel.

Command Modes

scope eth-uplink/scope fabric a/

Command History

Release Modification

1.1.1

Command added.

Usage Guidelines

When you create a new port-channel, you are automatically entered into port-channel mode (eth-uplink/fabric/port-channel) with an asterisk indicating the new port-channel is not yet committed. You can set the port-channel parameters and then commit the new port-channel.

After creating a new port-channel, enable it and add member ports.

When the Firepower 4100/9300 chassis creates an EtherChannel, the EtherChannel stays in a Suspended state until you assign it to a logical device, even if the physical link is up. The EtherChannel will be brought out of this Suspended state in the following situations:

  • The EtherChannel is added as a data or management port for a standalone logical device.

  • The EtherChannel is added as a management or CCL port for a logical device that is part of a cluster.

  • The EtherChannel is added as a data port for a logical device that is part of a cluster and at least one security module has joined the cluster.

Note that the EtherChannel does not come up until you assign it to a logical device. If the EtherChannel is removed from the logical device or the logical device is deleted, the EtherChannel will revert to a Suspended state.


Note


The Firepower 4100/9300 chassis only supports EtherChannels in Active Link Aggregation Control Protocol (LACP) mode. We suggest setting the connecting switch ports to Active mode for the best compatibility.


Examples

The following example shows how to create a new port-channel, enable it and add member ports:

firepower # scope eth-uplink
firepower /eth-uplink/fabric # scope fabric a
firepower /eth-uplink/fabric # create port-channel 4
firepower /eth-uplink/fabric/port-channel* # enable
firepower /eth-uplink/fabric/port-channel* # create member-port Ethernet1/1
firepower /eth-uplink/fabric/port-channel/member-port* # exit
firepower /eth-uplink/fabric/port-channel* # create member-port Ethernet1/2
firepower /eth-uplink/fabric/port-channel/member-port* # exit
firepower /eth-uplink/fabric/port-channel* # create member-port Ethernet1/3
firepower /eth-uplink/fabric/port-channel/member-port* # exit
firepower /eth-uplink/fabric/port-channel* # create member-port Ethernet1/4
firepower /eth-uplink/fabric/port-channel/member-port* # exit
firepower /eth-uplink/fabric/port-channel* # commit-buffer
firepower /eth-uplink/fabric/port-channel # 

create pre-login-banner

To create a banner that is presented prior to the log-in screen, use the create pre-login-banner command. If a pre-login banner already exists, the command will fail.

To add or edit the pre-login banner, use the enter pre-login-banner command. If a banner does not exist, it is created and entered; if the banner exists, it is entered.

You also can use the scope form of this command to enter an existing pre-login banner to set or clear the message.

To delete an existing banner, use the delete form of this command.

create pre-login-banner

Syntax Description

This command has no arguments or keywords.

Command Modes

scope security/scope banner/

Command History

Release

Modification

1.1(1)

Command added.

Usage Guidelines

When you create a new pre-login banner, it is initially blank and you are automatically entered into pre-login-banner mode (security/banner/pre-login-banner) with an asterisk indicating the banner is not yet specified and committed.

Use the set message command to enter the pre-login banner text. You must enter ENDOFBUF (must be all capital letters) to terminate the banner message.

If a pre-login banner already exists when you enter this command, the command will fail with the message Error: Managed object already exists.

Examples

This example shows how to create and specify a pre-login banner, then commit and view it:

firepower # scope security
firepower /security # scope banner
firepower /security/banner # create pre-login-banner
firepower /security/banner/pre-login-banner* # set message
Enter lines one at a time. Enter ENDOFBUF to finish. Press ^C to abort.
Enter prelogin banner:
>Firepower-9300-2
>Western Data Center
>ENDOFBUF
firepower /security/banner/pre-login-banner* # commit
firepower /security/banner/pre-login-banner # show 

Pre login banner:
    Message
    -------
    Firepower-9300-2
Western Data Center

firepower /security/banner/pre-login-banner # 

create profile

To add a new Smart Call Home and Smart Licensing destination profile, use the create profile command. If a profile with the specified name already exists, the command will fail.

To add or edit a destination profile, use the enter profile command. If the specified profile does not exist, it is created and entered; if the profile exists, it is entered.

You also can use the scope form of this command to enter an existing profile to assign or change properties. If the profile does not exist, the command will fail.

To delete an existing profile, use the delete form of this command.

create profile name

delete profile name

enter profile name

scope profile name

Syntax Description

name

The name identifying the destination profile.

Command Modes

scope monitoring/scope callhome/

Command History

Release

Modification

1.1(1)

Command added.

Usage Guidelines

When you create a new Smart Call Home profile, you are automatically entered into callhome/profile mode (monitoring/callhome/profile) with an asterisk indicating the new profile is not yet committed. You can define the profile, and then commit the new profile information.

After you create a Smart Call Home destination profile, the profile name cannot be changed. You must delete the profile and create a new one.

Examples

This example shows how to create and enter a Smart Call Home destination profile:

firepower # scope monitoring
firepower /monitoring # scope callhome
firepower /monitoring/callhome # enter profile TestProfile
firepower /monitoring/callhome/profile* # commit-buffer
firepower /monitoring/callhome/profile #

create property

To add a new property to a network statistics threshold policy class, use the create property command. If a property with the specified name already exists, the command will fail.

To add or edit a statistics threshold property, use the enter property command. If the specified property does not exist, it is created and entered; if the property exists, it is entered.

You also can use the scope form of this command to enter an existing property to assign or change parameters. Generally, “scoping into” an object is more convenient than entering it, since the objectʼs name is usually all that is needed, whereas the enter form of the command often requires entering all its definition parameters.

To delete an existing property, use the delete form of this command.

create property property-name

delete property property-name

enter property property-name

scope property property-name

Syntax Description

property-name

Specify the desired statistics property.

Available properties depend on the current mode and the defined class of statistics. For example, for the chassis-stats class in eth-server mode, input-power and output-power options are available. In the ether-rx-stats class in eth-uplink mode, properties such as broadcast-packets-delta and total-bytes-delta are available.

Use the create property ? command to view a list of properties available for the current class of statistics.

Command Modes

scope eth-server/scope stats-threshold-policy/scope class/

scope eth-uplink/scope stats-threshold-policy/scope class/

scope org/scope stats-threshold-policy/scope class/

Command History

Release

Modification

1.1(1)

Command added.

Usage Guidelines

Use classes to place thresholds on specific sets of statistics. Use properties to define particular values and statistics thresholds for a policy class. For example, you might want to define a threshold on a port that raises a fault if the average number of packets dropped exceeds a certain amount. For this class, you would create threshold properties for the Ethernet error statistics class.

You can configure multiple properties for a policy class.


Note


There is one default statistics threshold policy each for Ethernet server ports or Ethernet uplink ports. You cannot create additional statistics collection policies and you cannot delete the existing default policies for these components—you can only modify the default policies. However, you can create and delete statistics threshold policies in organization mode (scope org/).


Examples

This example shows how to scope into the default Ethernet uplink statistics threshold policy, create an error statistics class, create a cyclic redundancy check (CRC) error count property, specify that the normal CRC error count per polling interval is 1000, create an above normal warning threshold of 1250, and then commit the class:

firepower # scope eth-uplink
firepower /eth-uplink # scope stats-threshold-policy default
firepower /eth-uplink/stats-threshold-policy # create class ether-error-stats
firepower /eth-uplink/stats-threshold-policy/class* # create property crc-delta
firepower /eth-uplink/stats-threshold-policy/class/property* # set normal-value 1000
firepower /eth-uplink/stats-threshold-policy/class/property* # create threshold-value above-normal warning
firepower /eth-uplink/stats-threshold-policy/class/property/threshold-value* # set escalating 1250
firepower /eth-uplink/stats-threshold-policy/class/property/threshold-value* # commit-buffer
firepower /eth-uplink/stats-threshold-policy/class/property/threshold-value #

create resource-profile

To add a resource profile for use with container instances, use the create resource-profile command.

create resource-profile name

Syntax Description

name

Sets the name of the profile between 1 and 64 characters. Note that you cannot change the name of this profile after you add it.

Command Modes

scope ssa/

Command History

Release

Modification

2.4(1)

Command added.

Usage Guidelines

To specify resource usage per container instance, create one or more resource profiles. When you deploy the logical device/application instance, you specify the resource profile that you want to use. The resource profile sets the number of CPU cores; RAM is dynamically allocated according to the number of cores, and disk space is set to 40 GB per instance.

  • The minimum number of cores is 6.

  • You cannot specify 8 cores due to internal architecture.

  • You can assign cores as an even number (6, 10, 12, 14 etc.) up to the maximum.

  • The maximum number of cores available depends on the security module/chassis model.

The chassis includes a default resource profile called "Default-Small," which includes the minimum number of cores. You can change the definition of this profile, and even delete it if it is not in use. Note that this profile is created when the chassis reloads and no other profile exists on the system.

You cannot change the resource profile settings if it is currently in use. You must disable any instances that use it, then change the resource profile, and finally reenable the instance. If you resize instances in an established High Availability pair, then you should make all members the same size as soon as possible.

If you change the resource profile settings after you add the threat defense instance to the management center, update the inventory for each unit on the Devices > Device Management > Device > System > Inventory dialog box.

Examples

The following example adds three resource profiles.


firepower# scope ssa
firepower /ssa # enter resource-profile basic
firepower /ssa/resource-profile* # set description "lowest level"
firepower /ssa/resource-profile* # set cpu-core-count 6
firepower /ssa/resource-profile* # exit
firepower /ssa # enter resource-profile standard
firepower /ssa/resource-profile* # set description "middle level"
firepower /ssa/resource-profile* # set cpu-core-count 10
firepower /ssa/resource-profile* # exit
firepower /ssa # enter resource-profile advanced
firepower /ssa/resource-profile* # set description "highest level"
firepower /ssa/resource-profile* # set cpu-core-count 12
firepower /ssa/resource-profile* # commit-buffer
firepower /ssa/resource-profile #

create server (scope ldap)

To create a Lightweight Directory Access Protocol (LDAP) server object, use the create server command in security/ldap mode. If a server with the specified name already exists, the command will fail.

To add or edit an LDAP server, use the enter server command in security/ldap mode. If the specified server does not exist, it is created and entered; if the server exists, it is entered.

You also can use the scope form of this command to enter an existing server to assign or change properties.

To delete an existing server, use the delete form of this command.

create server id

Syntax Description

id Provide the server ID, using its host name, fully qualified domain name (FQDN), or IP address (can be an IPv4 or IPv6 address).

Command Modes

scope security/scope ldap/

Command History

Release Modification

1.1.1

Command added.

Usage Guidelines

If you use a host name or FQDN to specify the server id , a DNS server must also be configured.

If SSL is enabled, the server id must exactly match a Common Name (CN) in the LDAP serverʼs security certificate.

When you create a new LDAP server, you are automatically entered into security/ldap/server mode with an asterisk indicating the new server is not yet committed. You can configure the server before committing it.


Note


The FXOS supports a maximum of 16 LDAP providers.


Examples

The following example creates a new LDAP server and commits the transaction:

firepower # scope security
firepower # scope ldap
firepower /security/ldap # create server 192.168.100.112
Warning: LDAP server name has to be DNS name in Secure LDAP connection. It has to match the LDAP server certificate SAN field.
firepower /security/ldap/server* # commit-buffer
firepower /security/ldap/server # 

create snmp-trap

To create a Simple Network Management Protocol (SNMP) trap host, use the create snmp-trap command. If a trap with the specified name already exists, the command will fail.

To add or edit an SNMP trap, use the enter snmp-trap command. If the specified trap does not exist, it is created and entered; if the trap exists, it is entered.

You also can use the scope form of this command to enter an existing trap to assign or change properties. Generally, “scoping into” an object is more convenient than entering it, since the objectʼs name is usually all that is needed, whereas the enter form of the command often requires entering all its definition parameters.

To delete an existing trap, use the delete form of this command.

create snmp-trap destination

Syntax Description

destination Specify the trap destination server, using its host name or IP address (can be an IPv4 or IPv6 address).

Command Modes

scope monitoring/

Command History

Release Modification

1.1.1

Command added.

Usage Guidelines

You must enable SNMP (enable snmp ), and create an SNMP community (set snmp community ), before you create an SNMP trap.

When you create a new SNMP trap, you are automatically entered into monitoring/snmp-trap mode with an asterisk indicating the new trap is not yet committed.


Note


You can create up to eight SNMP traps.


Examples

The following example creates a new SNMP trap and commits the transaction:

firepower # scope monitoring
firepower /monitoring/ # enable snmp
firepower /monitoring/ # create snmp-trap 192.168.100.112
firepower /monitoring/snmp-trap* # commit-buffer
firepower /monitoring/snmp-trap # 

create snmp-user

To create a new SNMPv3 user, utilize the create snmp-user command. If a user with the specified name already exists, the command will fail.

To add or edit an SNMP user, utilize the enter snmp-user command. If the specified user does not exist, it is created and entered; if the user exists, it is entered.

You also can use the scope form of this command to enter an existing user to assign or change properties. Generally, “scoping into” an object is more convenient than entering it, since the objectʼs name is usually all that is needed, whereas the enter form of the command often requires entering all its definition parameters.

To delete an existing user, use the delete form of this command.

create snmp-user user_name

Syntax Description

user_name

Specify the SNMPv3 user name; can be a maximum of 32 alphanumeric characters, and underscore (_), dot (.), at-sign (@), and dash (-).

Command Modes

scope monitoring/

Command History

Release Modification

1.1.1

Command added.

Usage Guidelines

You must enable SNMP (enable snmp ), and create an SNMP community (set snmp community ), before you create an SNMP user.

When you create a new SNMP user, you are asked to create a password for the user. This password must be at least eight characters long; it is not displayed as you enter it.

When you create a new SNMP user, you are automatically entered into monitoring/snmp-user mode with an asterisk indicating the new user is not yet committed.

Examples

The following example shows how to create an SNMPv3 user:

firepower # scope monitoring
firepower /monitoring/ # enable snmp
firepower /monitoring/ # create snmp-user test1
Password:
firepower /monitoring/snmp-user* # commit-buffer
firepower /monitoring/snmp-user #

create ssh-server

To create a new SSH host key, use the create ssh-server command with the host-key keyword.

To delete the existing SSH host key, use the delete ssh-server command with the host-key keyword.

create ssh-server host-key

create ssh-server host-key

Syntax Description

This command has no additional arguments.

Command Modes

scope system/scope services/

Command History

Release

Modification

1.1(1)

Command added.

Usage Guidelines

Use the create form of this command to generate a new SSH host key.

Use the delete form of this command to destroy an existing SSH host key before generating a new one.

Examples

This example shows how to generate a new SSH host key:

firepower # scope system
firepower /system # scope services
firepower /system/services # create ssh-server host-key
firepower /system/services* # commit-buffer
firepower /system/services # 

This example shows how to delete the existing SSH host key and confirm its deletion:

firepower # scope system
firepower /system # scope services
firepower /system/services # delete ssh-server host-key
firepower /system/services* # commit-buffer
firepower /system/services # show ssh-server host-key
Host Key Size: 2048
Deleted: Yes
firepower /system/services # 

create stats-threshold-policy

To create a new statistics threshold policy in organization mode, use the create stats-threshold-policy command. If a policy with the specified name already exists, the command will fail.

To add or edit an threshold policy in organization mode, use the enter stats-threshold-policy command. If the specified policy does not exist, it is created and entered; if the policy exists, it is entered.

You also can use the scope form of this command to enter an existing statistics threshold policy in organization mode to assign or change properties. Generally, “scoping into” an object is more convenient than entering it, since the objectʼs name is usually all that is needed, whereas the enter form of the command often requires entering all its definition parameters.

To delete an existing policy, use the delete form of this command.

create stats-threshold-policy policy-name

Syntax Description

policy-name

The name of the new statistics threshold policy.

Note


You cannot create or delete the default statistics threshold policy for Ethernet server ports (scope eth-server/) or Ethernet uplink ports (scope eth-uplink/).

Command Modes

scope org/

Command History

Release

Modification

1.1(1)

Command added.

Usage Guidelines

A statistics threshold policy monitors statistics about certain aspects of the system and generates an event if a specified threshold is crossed. You can set both minimum and maximum thresholds. For example, you can configure the policy to raise an alarm if the CPU temperature exceeds a certain value, or if a server is overutilized or underutilized.

You can create, enter and delete additional statistics threshold policies in organization mode only. You cannot create additional statistics threshold policies for Ethernet server ports or Ethernet uplink ports, and you cannot delete the existing default policies for those components—you can only modify the default policies.


Note


Use the set collection-interval command to define how frequently statistics are collected, and use the set reporting-interval command to define how frequently the statistics are reported. These intervals define a statistics collection policy.


Examples

This example shows how to scope into organization mode, create a new statistics threshold policy for server and server component statistics, create a threshold policy class for CPU environment statistics, create a CPU temperature property, specify that the normal CPU temperature is 48.5° C, create an above normal warning threshold of 50° C, and commit the entire transaction:

firepower # scope org
firepower /org # create stats-threshold-policy ServStatsPolicy
firepower /org/stats-threshold-policy* # create class cpu-env-stat
firepower /org/stats-threshold-policy/class* # create property temperature
firepower /org/stats-threshold-policy/class/property* # set normal-value 48.5
firepower /org/stats-threshold-policy/class/property* # create threshold-value above-normal warning
firepower /org/stats-threshold-policy/class/property/threshold-value* # set escalating 50.0
firepower /org/stats-threshold-policy/class/property/threshold-value* # commit-buffer
firepower /org/stats-threshold-policy/class/property/threshold-value #

create subinterface

To add a subinterface to a physical or EtherChannel interface for use with container instances, use the create subinterface command.

create subinterface id

Syntax Description

id

Sets the ID between 1 and 4294967295. This ID will be appended to the parent interface ID as interface_id.subinterface_id. For example, if you add a subinterface to Ethernet1/1 with the ID of 100, then the subinterface ID will be: Ethernet1/1.100. This ID is not the same as the VLAN ID, although you can set them to match for convenience.

Command Modes

scope eth-uplink/scope fabric a/scope interface/

scope eth-uplink/scope fabric a/create port-channel/

Command History

Release

Modification

2.4(1)

Command added.

Usage Guidelines

You can add up to 500 subinterfaces to your chassis.

For standalone instances, subinterfaces are supported on data or data-sharing type interfaces only. For multi-instance clustering, you can only add subinterfaces to the Cluster-type interface; subinterfaces on data interfaces are not supported.

VLAN IDs per interface must be unique, and within a container instance, VLAN IDs must be unique across all assigned interfaces. You can reuse VLAN IDs on separate interfaces as long as they are assigned to different container instances. However, each subinterface still counts towards the limit even though it uses the same ID.

For native instances, you can create VLAN subinterfaces within the application only. For container instances, you can also create VLAN subinterfaces inside the application on interfaces that do not have FXOS VLAN subinterfaces defined, and these subinterfaces are not subject to the FXOS limit. Choosing in which operating system to create subinterfaces depends on your network deployment and personal preference. For example, to share a subinterface, you must create the subinterface in FXOS. Another scenario that favors FXOS subinterfaces comprises allocating separate subinterface groups on a single interface to multiple instances. For example, you want to use Port-Channel1 with VLAN 2-11 on instance A, VLAN 12-21 on instance B, and VLAN 22-31 on instance C. If you create these subinterfaces within the application, then you would have to share the parent interface in FXOS, which may not be desirable. See the following illustration that shows the three ways you can accomplish this scenario:

VLAN subinterface scenario

You cannot add a subinterface to a physical interface that is currently allocated to a logical device. If other subinterfaces of the parent are allocated, you can add a new subinterface as long as the parent interface itself is not allocated.

Examples

The following example creates 3 subinterfaces on Ethernet 1/1, and sets them to be data-sharing interfaces.


firepower# scope eth-uplink
firepower /eth-uplink # scope fabric a
firepower /eth-uplink/fabric # scope interface Ethernet1/1
firepower /eth-uplink/fabric/interface # create subinterface 10
firepower /eth-uplink/fabric/interface/subinterface* # set vlan 10
firepower /eth-uplink/fabric/interface/subinterface* # set port-type data-sharing
firepower /eth-uplink/fabric/interface/subinterface* # exit
firepower /eth-uplink/fabric/interface # create subinterface 11
firepower /eth-uplink/fabric/interface/subinterface* # set vlan 11
firepower /eth-uplink/fabric/interface/subinterface* # set port-type data-sharing
firepower /eth-uplink/fabric/interface/subinterface* # exit
firepower /eth-uplink/fabric/interface # create subinterface 12
firepower /eth-uplink/fabric/interface/subinterface* # set vlan 12
firepower /eth-uplink/fabric/interface/subinterface* # set port-type data-sharing
firepower /eth-uplink/fabric/interface/subinterface* # commit-buffer
firepower /eth-uplink/fabric/interface/subinterface # 

create theshold-value

To add an above- or below-normal threshold for a class property, use the create theshold-value command. If a threshold with the specified name already exists, the command will fail.

To add or edit a threshold value, use the enter theshold-value command. If the specified theshold value does not exist, it is created and entered; if the threshold exists, it is entered.

You also can use the scope form of this command to enter an existing theshold value to assign or change parameters. Generally, “scoping into” an object is more convenient than entering it, since the objectʼs name is usually all that is needed, whereas the enter form of the command often requires entering all its definition parameters.

To delete an existing theshold value, use the delete form of this command.

create theshold-value { above-normal| below-normal event_type}

Syntax Description

above-normal| below-normal

Specify the type of threshold: above-normal or below-normal. This determines whether the specified event_type is logged when the monitored value (set separately) increases or decreases sufficiently relative to the related normal value (also set separately).

event_type

Specify the type of event logged:

  • cleared

  • condition

  • critical

  • info

  • major

  • minor

  • warning

Command Modes

scope eth-server/scope stats-threshold-policy/scope class/scope property/

scope eth-uplink/scope stats-threshold-policy/scope class/scope property/

scope org/scope stats-threshold-policy/scope class/scope property/

Command History

Release

Modification

1.1(1)

Command added.

Usage Guidelines

Use classes to place thresholds on specific sets of statistics. Use properties to define particular values, including normal values and threshold values, for a policy class. For example, you might want to define a threshold on a port that raises a fault if the average number of packets dropped exceeds a certain amount. For this class, you would create threshold properties for the Ethernet error statistics class.

You can configure multiple properties for a policy class, and you can create multiple threshold values for a property.


Note


There is one default statistics threshold policy each for Ethernet server ports or Ethernet uplink ports. You cannot create additional statistics collection policies and you cannot delete the existing default policies for these components—you can only modify the default policies. However, you can create and delete statistics threshold policies in organization mode (scope org/).


Examples

This example shows how to scope into the default Ethernet server statistics threshold policy class, create a chassis statistics class, create an input power (Watts) property, specify that the normal power level is 8 kW, create an above normal warning threshold of 11 kW, and then commit the class:

firepower # scope eth-server
firepower /eth-server # scope stats-threshold-policy default
firepower /eth-server/stats-threshold-policy # create class chassis-stats
firepower /eth-server/stats-threshold-policy/class* # create property input-power
firepower /eth-server/stats-threshold-policy/class/property* # set normal-value 8000.0
firepower /eth-server/stats-threshold-policy/class/property* # create threshold-value above-normal warning
firepower /eth-server/stats-threshold-policy/class/property/threshold-value* # set escalating 11000.0
firepower /eth-server/stats-threshold-policy/class/property/threshold-value* # commit-buffer
firepower /eth-server/stats-threshold-policy/class/property/threshold-value #

create trustpoint

To add a new trustpoint for validation of a certificate during Internet Key Exchange (IKE) authentication, use the create trustpoint command. If a connection with the specified name already exists, the command will fail.

To add or edit a trustpoint, use the enter trustpoint command. If the specified trustpoint does not exist, it is created and entered; if the trustpoint exists, it is entered.

You also can use the scope form of this command to enter an existing trustpoint to assign or change properties.

To delete an existing trustpoint, use the delete form of this command.

create trustpoint name

delete trustpoint name

enter trustpoint name

scope trustpoint name

Syntax Description

name

The trustpoint name; can be up to 32 alphanumeric characters.

Command Modes

scope security/

Command History

Release

Modification

1.1(1)

Command added.

Usage Guidelines

Use this command to identify trustpoints that will be used to validate certificates during Internet Key Exchange (IKE) authentication.

When you create a new trustpoint, you are automatically entered into security/trustpoint mode with an asterisk indicating the new trustpoint is not yet committed. After you create a trustpoint, the name cannot be changed. You must delete the trustpoint and create a new one.

Examples

This example shows how to create and enter a trustpoint:

firepower # scope security
firepower /security # enter trustpoint tPoint4
firepower /security/trustpoint* #

cycle

To power-cycle a security module/server, use one of the cycle commands.

cycle { cycle-immediate | cycle-wait}

Syntax Description

cycle-immediate

Power-cycles the module immediately.

cycle-wait

The system waits up to five minutes for the application running on the module to shut down before power-cycling the module.

Command Modes

scope service-profile/

Command History

Release

Modification

1.1(1)

This command was introduced.

Examples

This example shows how to power-cycle a module after its running application is shut down:

firepower # scope service-profile server 1/1
firepower /org/service-profile # cycle cycle-wait
firepower /org/service-profile* # commit-buffer
firepower /org/service-profile #