Palo Alto Networks Firewall to Threat Defense Migration Workflow

End-to-End Procedure

The following flowchart illustrates the workflow for migrating a Palo Alto Networks firewall to threat defense using the Secure Firewall migration tool.

Workspace

Steps

Local Machine

Download the latest version of Secure Firewall migration tool from Cisco.com. For detailed steps, see Download the Secure Firewall migration tool from Cisco.com.

Local Machine

Launch the Secure Firewall migration tool on your local machine, see Launch the Secure Firewall Migration Tool.

Palo Alto Networks Firewall

Export the Configuration File: To export the configuration from Palo Alto Networks Firewall, see Export the Configuration from Palo Alto Networks.

Secure Firewall Migration Tool

During this step, you can specify the destination parameters for the migration. For detailed steps, see Specify Destination Parameters for the Secure Firewall Migration Tool.

CDO

(Optional) This step is optional and only required if you have selected cloud-delivered Firewall Management Center as destination management center. For detailed steps, see Specify Destination Parameters for the Secure Firewall Migration Tool, step 1.

Secure Firewall Migration Tool

Navigate to where you downloaded the pre migration report and review the report. For detailed steps, see Review the Pre-Migration Report.

Secure Firewall Migration Tool

To ensure that the PAN configuration is migrated correctly, map the PAN interfaces to the appropriate threat defense interface objects, security zones and interface groups. For detailed steps, see Map PAN Firewall Configurations with Secure Firewall Device Manager Threat Defense Interfaces

Secure Firewall Migration Tool

Map the PAN interfaces to the appropriate security zones, see Map PAN interfaces to security zones for detailed steps.

Secure Firewall Migration Tool

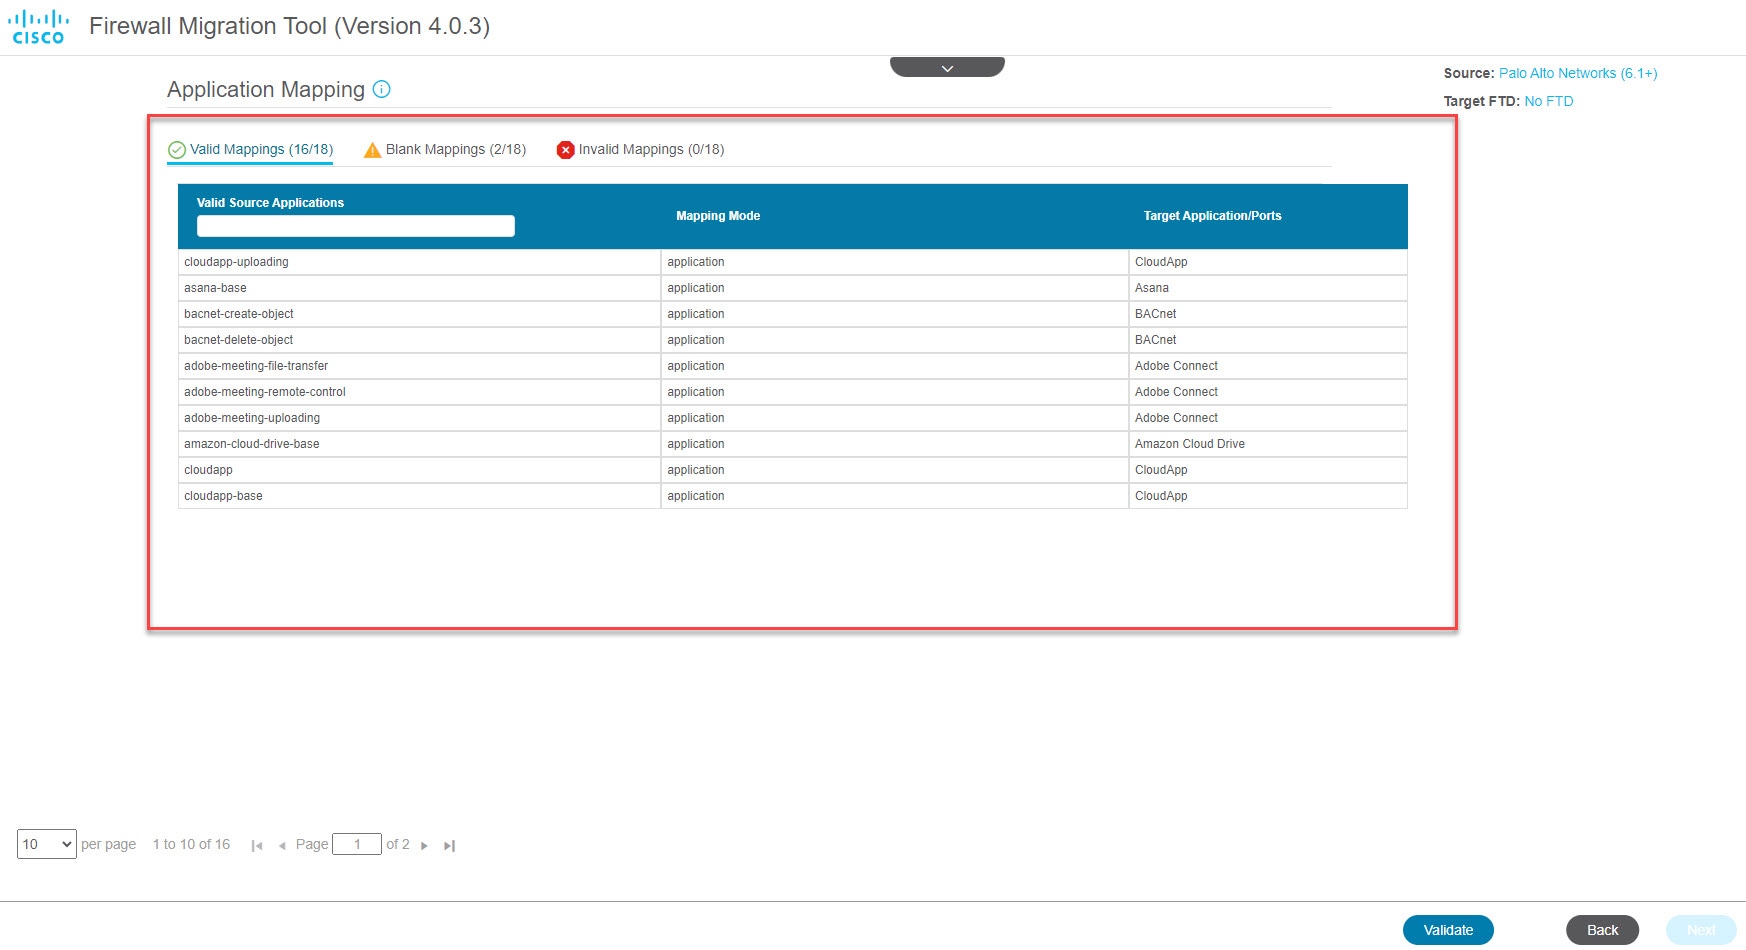
You can map PAN configuration to the corresponding target applications, see Map Configurations with Applications for detailed steps.

Secure Firewall Migration Tool

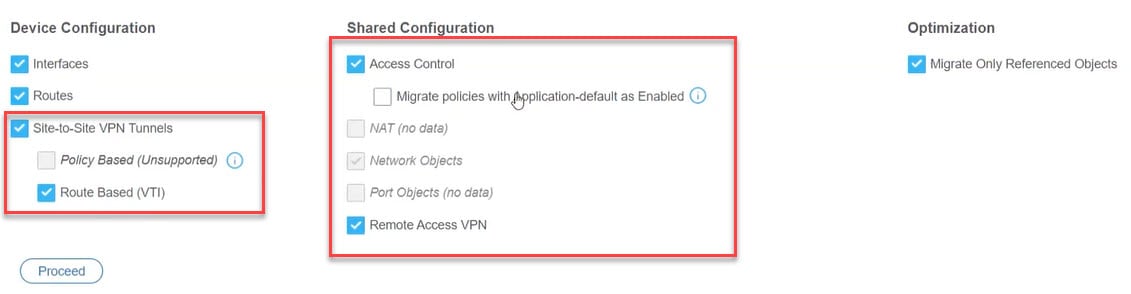
Optimize and review the configuration carefully and validate that it is correct and matches how you want to configure the threat defense device. For detailed steps, see Optimize, Review and Validate the Configuration to be Migrated.

Secure Firewall Migration Tool

This step in the migration process sends the migrated configuration to management center and allows you to download the post-migration report. For detailed steps, see Push the Migrated Configuration to Management Center.

Local Machine

Navigate to where you downloaded the post migration report and review the report. For detailed steps, see Review the Post-Migration Report and Complete the Migration.

Management Center

Deploy the migrated configuration from the management center to threat defense. For detailed steps, see Review the Post-Migration Report and Complete the Migration.

Prerequisites for Migration

Before you migrate your PAN configuration, execute the following activities:

Download the Secure Firewall Migration Tool from Cisco.com

Before you begin

You must have a Windows 10 64-bit or macOS version 10.13 or higher machine with an internet connectivity to Cisco.com.

Procedure


Step 1

On your computer, create a folder for the Secure Firewall migration tool.

We recommend that you do not store any other files in this folder. When you launch the Secure Firewall migration tool, it places the logs, resources, and all other files in this folder.

Note

 
Whenever you download the latest version of the Secure Firewall migration tool, ensure, you create a new folder and not use the existing folder.

Step 2

Browse to https://software.cisco.com/download/home/286306503/type and click Firewall Migration Tool.

The above link takes you to the Secure Firewall migration tool under Firewall NGFW Virtual. You can also download the Secure Firewall migration tool from the threat defense device download areas.

Step 3

Download the most recent version of the Secure Firewall migration tool into the folder that you created.

Download the appropriate executable of the Secure Firewall migration tool for Windows or macOS machines.


Run the Migration

Launch the Secure Firewall Migration Tool

This task is applicable only if you are using the desktop version of the Secure Firewall migration tool. If you are using the cloud version of the migration tool hosted on CDO, skip to Export the Configuration from Palo Alto Networks Firewall .


Note


When you launch the Secure Firewall migration tool a console opens in a separate window. As you go through the migration, the console displays the progress of the current step in the Secure Firewall migration tool. If you do not see the console on your screen, it is most likely to be behind the Secure Firewall migration tool.

Before you begin

Procedure


Step 1

On your computer, navigate to the folder where you downloaded the Secure Firewall migration tool.

Step 2

Do one of the following:

  • On your Windows machine, double-click the Secure Firewall migration tool executable to launch it in a Google Chrome browser.

    If prompted, click Yes to allow the Secure Firewall migration tool to make changes to your system.

    The Secure Firewall migration tool creates and stores all related files in the folder where it resides, including the log and resources folders.

  • On your Mac move, the Secure Firewall migration tool *.command file to the desired folder, launch the Terminal application, browse to the folder where the Secure Firewall migration tool is installed and run the following commands:

    # chmod 750 Firewall_Migration_Tool-version_number.command

    # ./Firewall_Migration_Tool-version_number.command

    The Secure Firewall migration tool creates and stores all related files in the folder where it resides, including the log and resources folders.

    Tip

     
    When you try to open the Secure Firewall migration tool, you get a warning dialog because the Secure Firewall migration tool is not registered with Apple by an identified developer. For information on opening an application from an unidentified developer, see Open an app from an unidentified developer.

    Note


    Use MAC terminal zip method.

Step 3

On the End User License Agreement page, click I agree to share data with Cisco Success Network if you want to share telemetry information with Cisco, else click I'll do later.

When you agree to send statistics to Cisco Success Network, you are prompted to log in using your Cisco.com account. Local credentials are used to log in to the Secure Firewall migration tool if you choose not to send statistics to Cisco Success Network.

Step 4

On the Secure Firewall migration tool's login page, do one of the following:

  • To share statistics with Cisco Success Network, click the Login with CCO link to log in to your Cisco.com account using your single sign-on credentials. If you do not have a Cisco.com account, create it on the Cisco.com login page.

    Proceed to step 8, if you have used your Cisco.com account to log in.

  • If you have deployed your firewall in an air-gapped network that does not have internet access, contact Cisco TAC to receive a build that works with administrator credentials. Note that this build does not send usage statistics to Cisco, and TAC can provide you the credentials.

Step 5

On the Reset Password page, enter the old password, your new password, and confirm the new password.

The new password must have 8 characters or more and must include upper and lowercase letters, numbers, and special characters.

Step 6

Click Reset.

Step 7

Log in with the new password.

Note

 
If you have forgotten the password, delete all the existing data from the <migration_tool_folder> and reinstall the Secure Firewall migration tool.

Step 8

Review the pre-migration checklist and make sure you have completed all the items listed.

If you have not completed one or more of the items in the checklist, do not continue until you have done so.

Step 9

Click New Migration.

Step 10

On the Software Update Check screen, if you are not sure you are running the most recent version of the Secure Firewall migration tool, click the link to verify the version on Cisco.com.

Step 11

Click Proceed.


What to do next

You can proceed to the following step:

Using the Demo Mode in the Secure Firewall Migration Tool

When you launch the Secure Firewall Migration tool and are on the Select Source Configuration page, you can choose to start performing a migration using Start Migration or enter the Demo Mode.

The demo mode provides an opportunity to perform a demo migration using dummy devices and visualize how an actual migration flow would look like. The migration tool triggers the demo mode based on the selection you make in the Source Firewall Vendor drop-down; you can also upload a configuration file or connect to a live device and continue with the migration. You can proceed performing the demo migration by selecting demo source and target devices such as demo FMC and demo FTD devices.


Caution


Choosing Demo Mode erases existing migration workflows, if any. If you use the demo mode while you have an active migration in Resume Migration, your active migration is lost and needs to be restarted from first, after you use the demo mode.


You can also download and verify the pre-migration report, map interfaces, map security zones, map interface groups, and perform all other actions like you would in an actual migration workflow. However, you can only perform a demo migration up to validation of the configurations. You cannot push the configurations to the demo target devices you selected because this is only a demo mode. You can verify the validation status and the summary and click Exit Demo Mode to go the Select Source Configuration page again to start your actual migration.


Note


The demo mode lets you leverage the whole feature set of the Secure Firewall Migration Tool, except pushing of configurations, and do a trial run of the end-to-end migration procedure before performing your actual migration.


Export the Configuration from Palo Alto Networks Firewall

You can export the configuration file in the following ways:

Configuration File from Palo Alto Firewall (Not Managed by Panorama)

Follow these steps to extract the configuration from the gateway:
Procedure

Step 1

Navigate to Device > Setup > Operations, and select Save Named Configuration <file_name.xml>.

Step 2

Click Ok.

Step 3

Navigate to Device > Setup > Operations, and click Export Named Configuration.

Step 4

Select the <file_name.xml> file.

Step 5

Click Ok.

Step 6

Select the XML file that contains your running configuration <file_name.xml>, and click Ok to export the configuration file.

Step 7

Save the exported file to a location, external to the firewall. You can use this backup to upload to the Secure Firewall migration tool to migrate the configuration to threat defense.

Step 8

(Optional) If you have a NAT policy where the destination NAT has the same source and destination zones, perform these steps:

  1. Run the show routing route command from CLI on the firewall.

  2. Copy the routing table to a .txt file.

  3. Add the .txt file to the folder where you will zip the .txt and the .xml files with the panconfig.xml.

These steps are not mandatory for migration. If you do not perform these steps, the destination zones will not be mapped during the Secure Firewall migration tool migration and will be included in the Migration Reports.

Note


Use the show routing route command to extract the routing table details. Paste the extracted output in a notepad.


Configuration File from Palo Alto Firewall (Managed by Panorama)

The configuration must be extracted from the gateway if your device is managed by panorama. Merge the panorama configuration with the gateway and extract the configuration.

In the Secure Firewall migration tool user interface, do the following:

Before you begin
Log in to the Palo Alto Firewall web UI using super-user account.
Procedure

Step 1

Navigate to Device > Support > Tech Support File.

Step 2

Click Generate Tech Support File.

Step 3

Click Download Tech Support File once the generated file is available.

Step 4

Unzip and Untar the file and then navigate to the path \opt\pancfg\mgmt\saved-configs\ to retreive the merged-running-config.xml file.


What to do next
Zip the Exported Files

Zip the Exported Files

Export the panconfig.xml for the Palo Alto Gateway firewall and route.txt (if you have the NAT rules with the same source zone and destination zone).

Specify Destination Parameters for the Secure Firewall Migration Tool

Before you begin

If you are using the cloud version of the migration tool hosted on CDO, skip to Step 3.

  • Obtain the IP address for the management center for On-Prem Firewall Management Center.

  • From Secure Firewall Migration Tool 3.0 onwards, you can select between On-Prem Firewall Management Center or Cloud-delivered Firewall Management Center.

  • For Cloud-delivered Firewall Management Center, region and API token have to be provided. For more information, see Supported Target Management Center for Migration.

  • (Optional) If you want to migrate device-specific configurations like interfaces and routes, add the target threat defense to the management center. See Adding Devices to the Firewall Management Center

  • If it requires you to apply IPS or file policy to ACL in the Review and Validate page, we highly recommend you create a policy on the management center before migration. Use the same policy, as the Secure Firewall migration tool fetches the policy from the connected management center. Creating a new policy and assigning it to multiple access control lists may degrade the performance and may also result in a push failure.

Procedure


Step 1

On the Select Target screen, in the Firewall Management section, do the following: you can choose to migrate to an On-Prem Firewall Management Center or Cloud-delivered Firewall Management Center:

  • For migrating to an On-Prem Firewall Management Center, do the following:

  1. Click the On-Prem FMC radio button.

  2. Enter the IP address or Fully-Qualified Domain Name (FQDN) for the management center.

  3. In the Domain drop-down list, select the domain to which you are migrating.

    If you want to migrate to a threat defense device, you can only migrate to the threat defense devices available in the selected domain.

  4. Click Connect and proceed to Step 2.

  • For migrating to a Cloud-delivered Firewall Management Center, do the following:

  1. Click the Cloud-delivered FMC radio button.

  2. Choose the region and paste the CDO API token. For generating the API token. from CDO, follow the below steps:

    1. Log in to CDO portal.

    2. Navigate to Settings > General Settings and copy the API Token.

  3. Click Connect and proceed to Step 2.

Step 2

In the Firewall Management Center Login dialog box, enter the username and password of the dedicated account for the Secure Firewall migration tool, and click Login.

The Secure Firewall migration tool logs in to the management center and retrieves a list of threat defense devices that are managed by that management center. You can view the progress of this step in the console.

Step 3

Click Proceed.

Step 4

In the Choose Threat Defense section, do one of the following:

  • Click the Select Firewall Threat Defense Device drop-down list and check the device where you want to migrate the configuration.

    The devices in the selected management center domain are listed by IP Address and Name.

    Note

     
    At minimum, the native threat defense device you choose must have the same number of physical or port channel interfaces as the configuration that you are migrating. At minimum, the container instance of the threat defense device must have the same number of physical or port channel interfaces and subinterfaces. You must configure the device with the same firewall mode as the configuration. However, these interfaces do not have to have the same names on both devices.

    Note


    Only when the supported target threat defense platform is Firewall 1010 with management center version 6.5 or later.6.5, FDM 5505 migration support is applicable for shared policies and not for device specific policies. When you proceed without threat defense, the Secure Firewall migration tool will not push any configurations or the policies to the threat defense. Thus, interfaces and routes, and site-to-site VPN which are threat defense device-specific configurations will not be migrated. However, all the other supported configurations (shared policies and objects) such as NAT, ACLs, and port objects will be migrated. Remote Access VPN is a shared policy and can be migrated even without threat defense.

    Palo Alto Networks firewall migration to management center or threat defense 6.7 or later with the Remote deployment enabled is supported by the Secure Firewall migration tool. Migration of Interface and Routes must be done manually.

  • Click Proceed without FTD to migrate the configuration to the management center.

    When you proceed without threat defense, the Secure Firewall migration tool will not push any configurations or the policies to threat defense. Thus, interfaces and routes, and site-to-site VPN which are threat defense device-specific configurations will not be migrated and need to be manually configured on management center. However, all the other supported configurations (shared policies and objects) such as NAT, ACLs, and port objects will be migrated. Remote Access VPN is a shared policy and can be migrated even without threat defense.

Step 5

Click Proceed.

Depending on the destination that you are migrating to, the Secure Firewall migration tool allows you to select the features that you want to migrate.

Step 6

Click the Select Features section to review and select the features that you want to migrate to the destination.

  • If you are migrating to a destination threat defense device, the Secure Firewall migration tool automatically selects the features available for migration from the configuration in the Device Configuration and Shared Configuration sections. You can further modify the default selection, according to your requirements.
  • If you are migrating to a management center, the Secure Firewall migration tool automatically selects the features available for migration from the configuration in the Device Configuration, Shared Configuration, and Optimization sections. You can further modify the default selection, according to your requirements.
  • For PAN, under Shared Configuration, select the relevant Access Control option:

    Migrate policies with Application-Default as Enabled—When you select this option, the PAN application will be migrated. You can view Migrate policies with Application-Default as Enabled option only if you select this check box.

    Note

     
    Application Mapping is enabled only when policies are selected for migration.

    If you are migrating configuration from a VPN-configured Palo Alto Networks firewall, you can choose to select or deselect Site-to-Site VPN Tunnels under Device Configuration pane and Remote Access VPN under Shared Configuration pane. Note that policy-based site-to-site VPN configuration is not supported because Palo Alto Networks firewall does not support it.

    Policies with service as "Application-Default”

    Policies with service as “application-default” and application that has a member or group that is referenced, is migrated as per the choices you made on the Feature Selection page. management center does not have the equivalent of application-default, so such policies are pushed with service “any”. If you replicate the similar functionality as application-default, then find out the ports that are used by the application from the Palo Alto Networks firewall, and configure the ports under the port section of Policy in management center.

    For example, a policy having “web-browsing” and service as "application-default" is migrated as application HTTP (the equivalent of web-browsing) and port as "any". To replicate the same functionality as "application-default", configure the port as TCP/80 and TCP/8080. Web-browsing uses port TCP 80 and TCP 8080. If a policy has multiple applications, configure the ports that are used by each application.

    In case of multiple applications in a policy, we recommend you to split the policy before configuring the ports, as it might allow additional access to other applications.

    Policies with an application configured as "any" and service as “application-default” is migrated as disabled, irrespective of the choices available on the Feature Selection page (the application as “any” and service as “any”). If this is an acceptable behavior, enable the application and commit the changes. Otherwise, select the required application or service, and enable the policy.

    Split Access Control Lists with Applications Per Rule

    When migrating access control lists containing one rule configured to several applications, you can choose to split the ACLs, which splits the rule into multiple rules with one application per rule. You can do this by checking the Split ACLs with applications per rule checkbox. However, the checkbox does not appear if the configuration you are trying to migrate does not contain multiple applications configured per access rule.

    Each rule gets converted into multiple rules with one application per rule, which you can review in the Optimize, Review, and Validate Configuration page.

  • The Secure Firewall migration tool supports migration of Remote Access VPN if the target management center is 7.2 or later. Remote Access VPN is a shared policy that can be migrated without threat defense. If migration is selected with threat defense, the threat defense version should be 7.0 or later.

  • (Optional) In the Optimization section, select Migrate only referenced objects to migrate only those objects that are referenced in an access control policy and a NAT policy.

    Note

     
    When you select this option, unreferenced objects in the configuration will not be migrated. This optimizes migration time and cleans out unused objects from the configuration.

Step 7

Click Proceed.

Step 8

In the Rule Conversion/ Process Config section, click Start Conversion to initiate the conversion.

Step 9

Review the summary of the elements that the Secure Firewall migration tool converted.

To check whether your configuration file is successfully uploaded and parsed, download and verify the Pre-Migration Report before you continue with the migration.

Step 10

Click Download Report and save the Pre-Migration Report.

A copy of the Pre-Migration Report is also saved in the Resources folder in the same location as the Secure Firewall migration tool.


Review the Pre-Migration Report

If you have missed to download the Pre-Migration Reports during migration, use the following link to download:

Pre-Migration Report Download Endpoint—http://localhost:8888/api/downloads/pre_migration_summary_html_format


Note


You can download the reports only when the Secure Firewall migration tool is running.

Procedure


Step 1

Navigate to where you downloaded the Pre-Migration Report.

A copy of the Pre-Migration Report is also saved in the Resources folder in the same location as the Secure Firewall migration tool.

Step 2

Open the Pre-Migration Report and carefully review its contents to identify any issues that can cause the migration to fail.

The Pre-Migration Report includes the following information:

  • A summary of the supported configuration elements that can be successfully migrated to threat defense and specific features selected for migration.

  • Configuration Lines with Errors—Details of configuration elements that cannot be successfully migrated because the Secure Firewall migration tool could not parse them. Correct these errors on the configuration, export a new configuration file, and then upload the new configuration file to the Secure Firewall migration tool before proceeding.

  • Partially Supported Configuration—Details of configuration elements that can be only partially migrated. These configuration elements include rules and objects with advanced options where the rule or the object can be migrated without the advanced options. Review these lines, verify whether the advanced options are supported in management center, and if so, plan to configure those options manually after you complete the migration with the Secure Firewall migration tool.

  • Unsupported Configuration—Details of configuration elements that cannot be migrated because the Secure Firewall migration tool does not support migration of those features. Review these lines, verify whether each feature is supported in management center, and if so, plan to configure the features manually after you complete the migration with the Secure Firewall migration tool.

  • Ignored Configuration—Details of configuration elements that are ignored because they are not supported by the management center or the Secure Firewall migration tool. The Secure Firewall migration tool does not parse these lines. Review these lines, verify whether each feature is supported in management center, and if so, plan to configure the features manually.

For more information about supported features in management center and threat defense, see Management Center Configuration Guide.

Step 3

If the Pre-Migration Report recommends corrective actions, complete those corrections on the interface, export the configuration file again and upload the updated configuration file before proceeding.

Step 4

After your configuration file is successfully uploaded and parsed, return to the Secure Firewall migration tool, and click Next to continue the migration.


What to do next

Map PAN Interfaces with Firepower Threat Defense Interfaces

Map PAN Firewall Configurations with Threat Defense Interfaces

The threat defense device must have an equal or greater number of physical and port channel interfaces than those used by configuration. These interfaces do not have to have the same names on both devices. You can choose how you want to map the interfaces.

The mapping of interface to the threat defense interface differs based on the threat defense device type:

  • If the target threat defense is of native type:

    • The threat defense must have equal or a greater number of used PAN interfaces or port channel (PC) data interfaces or subinterfaces (excluding management-only in the PAN configuration). If the number is less, add the required type of interface on the target threat defense.

    • Subinterfaces are created by the secure Firewall migration tool based on physical interface or port channel mapping.

  • If the target threat defense is of container type:

    • The threat defense must have equal or a greater number of used PAN interfaces, physical subinterfaces, port channel, or port channel subinterfaces (excluding management-only in configuration). If the number is less, add the required type of interface on the target threat defense. For example, if the number of physical interfaces and physical subinterface on the target threat defense is 100 less than that of PAN then you can create the additional physical or physical subinterfaces on the target threat defense.

Before you begin

Make sure you have connected to the management center and chosen the destination as threat defense. For more information, see Specify Destination Parameters for the Secure Firewall Migration Tool.


Note


This step is not applicable if you are migrating to a management center without a threat defense device.

Procedure


Step 1

If you want to change an interface mapping, click the drop-down list in the FTD Interface Name and choose the interface that you want to map to that interface.

You cannot change the mapping of the management interfaces. If a threat defense interface has already been assigned to an interface, you cannot choose that interface from the drop-down list. All assigned interfaces are greyed out and unavailable.

You do not need to map subinterfaces. The Secure Firewall migration tool maps subinterfaces on the threat defense device for all subinterfaces in the configuration.

Note

 
If the number of interfaces on the source firewall is more than that of the target firewall, then create subinterfaces on the target firewall and retry the migration.

Step 2

When you have mapped each interface to a threat defense interface, click Next.


What to do next

Map the PAN interfaces to the appropriate threat defense interface objects and security zones. For more information, see Map PAN Interfaces to Security Zones.

Map PAN Interfaces to Security Zones Interface Groups

To ensure that the configuration is migrated correctly, map the interfaces to the appropriate threat defense interface objects, security zones. In an configuration, access control policies and NAT policies use interface names (nameif). In management center, those policies use interface objects. In addition, management center policies group interface objects into the following:

  • Security zones—An interface can belong to only one security zone.

The Secure Firewall migration tool allows one-to-one mapping of interfaces with security zones; when a security zone is mapped to an interface, it is not available for mapping to other interfaces although the management center allows it. For more information about security zones in management center, see Security Zones and Interface Groups in Cisco Secure Firewall Management Center Device Configuration Guide.

Procedure


Step 1

On the Map Security Zones screen, review the available interfaces, and security zones.

Step 2

To map interfaces to security zones and interface groups that exist in management center, or that is available in configuration files as Security Zone type objects and is available in the drop-down list, do the following:

  1. In the Security Zones column, choose the security zone for the interface.

  2. In the Interface Groups column, choose the interface group for the interface.

Step 3

To map interfaces to security zones that exist in management center, in the Security Zones column, choose the security zone for that interface.

Step 4

You can manually map or auto-create the security zones.

To map the security zones manually, perform the following:

  1. Click Add SZ & IG.

  2. In the Add SZ & IG dialog box, click Add to add a new security zone.

  3. Enter the security zone name in the Security Zone column. The maximum characters allowed is 48.

  4. Click Close.

To map the security zones through auto-creation, perform the following:

  1. Click Auto-Create.

  2. In the Auto-Create dialog box, check Zone Mapping.

  3. Click Auto-Create.

Once you click Auto-Create, the source firewall zones are mapped automatically. If the same name zones already exist on management center, then the zone will be re-used. The mapping page will display "(A)" against the re-used zone. For example, inside "(A)".

Step 5

When you have mapped all interfaces to the appropriate security zones, click Next.


Map Configurations with Applications

You can map applications to the corresponding target applications. You can migrate rules that are based on application.

A list of pre-defined applications from the management center and some of the applications from the configuration files are listed in this tab. Some of the pre-defined mappings that exist in the management center is mapped.


Note


You will not be able to edit a pre-defined mapping.

The Application Mapping page displays the following tabs:

  • Invalid Mappings—View the list of invalid mappings for that migration.

    A mapping is termed Invalid under the following scenarios:

    • When the Mapping Mode is selected to either Application or Port, but the Target is empty.

    • When the Mapping Mode is Port and the syntax of the port is incorrect. To proceed with the migration, Invalid Mapping must be zero.


    Note


    The Next button is disabled until there is a correct validation.

    When you get the pre-defined list of mappings from the source, there are pre-defined applications that will be mapped automatically. If there are applications that are not mapped, you must map them manually to the port or application.

  • Blank Mappings—Displays the Unmapped application and requires user action. The Application must be mapped to either Application or Port.


    Note


    We recommend you to map all the Application entries, but it is not mandatory.

    When the mapping mode is selected, and the target application has valid data, then it is a valid mapping.


    Note


    By default, all the pre-defined mappings are available in the Valid Mappings tab.
  • Valid Mappings—Displays the correct mapping. The Secure Firewall migration tool has its own database of pre-defined mapping with PAN and threat defense application for commonly used applications. If PAN application matches the pre-defined mapping DB, those applications will be mapped automatically and will be displayed under valid mapping.

    Once an Application is mapped to Application or Port in the Blank Mapping , it is moved to Valid Mapping after validation.


    Note


    Pre-defined mapping is not editable.

The count for invalid, valid, and blank mapping keeps changing based on the migration.

The following table displays the Application Mapping properties.

Table 1. Application Mapping Table Properties

Field

Description

Source Application

Displays the list of application that is used on your Palo Alto Networks firewall.

Mapping Mode

Choose the Mapping mode that is either Application or Port(s).

  • Application—Choose from the list of available target application for mapping. You can map only one application.

  • Port(s)—Choose from the list of available ports for mapping. When you select Ports, enter the relevant port information in the format that is specified. For example, tcp/80 and udp/80.

    Note

     
    Spaces between characters are not allowed.

Target Application

Displays a list of target applications or ports that are based on the mapping mode.

ICMP and Ping applications will be migrated as ICMP and ping services. This is done automatically by the Secure Firewall migration tool and hence will not be displayed in the Application Mapping page.

Procedure


Step 1

Click Valid Mappings tab to view the number of valid mappings for that migration. Map the Valid Source Application with the valid Mapping Mode and the Target Application.

When a mapping becomes valid, you can view the increase in the count of the valid mappings.

Step 2

Click Blank Mappings to view the list of blank mapping for that migration. Map the Blank Source Application with the valid Mapping Mode and the Target Application.

For example, if you select the mapping mode and save it without entering the target destination, the number of counts for the blank mapping increases. Review the tab, map it correctly, and then proceed with the migration.

Note

 
Even if there is a blank mapping, you can still proceed with the migration.

Step 3

Click Invalid Mappings tab, to view the list of invalid mappings. Perform the following:

  1. Invalid Application—Displays the invalid mapping during the migration.

  2. Mapping Mode—Choose the mapping mode that is either Application or Port.

  3. Target Application—Choose the target application for the application mapping.

For example, if you have selected the mapping mode but, mapped it with a different target destination, you cannot proceed with the other tabs. Review the Invalid Mappings tab, enter the correct target application, and then perform the application mapping.

Step 4

Click Validate in each tab to validate the invalid, blank, or valid mappings for that migration.

Step 5

Click Next to proceed further.

Step 6

Click Clear Mapped Data to clear the mappings that you performed manually, before validating. It is recommended that you click Validate only when you are entirely sure about the mappings you are doing, because you cannot undo the mapping after you click on validate and the mapping becomes valid.


What to do next

Review and Validate the Configuration to be Migrated

Optimize, Review and Validate the Configuration

Before you push the migrated configuration to management center, optimize and review the configuration carefully and validate that it is correct and matches how you want to configure the threat defense device. A flashing tab indicates that you must take the next course of action.


Note


If you close the Secure Firewall migration tool at the Optimize, Review and Validate Configuration screen, it saves your progress and allows you to resume the migration later. If you close the Secure Firewall migration tool before this screen, your progress is not saved. If there is a failure after parsing, relaunching the Secure Firewall migration tool resumes from the Interface Mapping screen.


Here, the Secure Firewall migration tool fetches the Intrusion Prevention System (IPS) policies and file policies, which are already present on the management center and allows you to associate those to the access control rules you are migrating.

A file policy is a set of configurations that the system uses to perform Advanced Malware Protection for networks and file control, as part of your overall access control configuration. This association ensures that before the system passes a file in traffic that matches the conditions of the access control rule, it first inspects the file.

Similarly, you can use an IPS policy as the system’s last line of defense before traffic is allowed to proceed to its destination. Intrusion policies govern how the system inspects traffic for security violations and, in inline deployments, can block or alter malicious traffic. Whenever the system uses an intrusion policy to evaluate traffic, it uses an associated variable set. Most variables in a set represent values commonly used in intrusion rules to identify source and destination IP addresses and ports. You can also use variables in intrusion policies to represent IP addresses in rule suppression and dynamic rule states.

To search for specific configuration items on a tab, enter the item name in the field at the top of the column. The table rows are filtered to display only items that match the search term.


Note


By default, the Inline Grouping option is enabled.

If you close the Secure Firewall migration tool at the Optimize, Review and Validate Configuration screen, it saves your progress and allows you to resume the migration later. If you close the before this screen, your progress is not saved. If there is a failure after parsing, relaunching the Secure Firewall migration tool resumes from the Interface Mapping screen.

Secure Firewall Migration Tool ACL Optimization Overview

The Secure Firewall migration tool provides support to identify and segregate ACLs that can be optimized (disabled or deleted) from the firewall rule base without impacting the network functionality.

The ACL optimization supports the following ACL types:

  • Redundant ACL—When two ACLs have the same set of configurations and rules, then removing the non-base ACL will not impact the network. For example, if any two rule allows FTP and IP traffic on the same network with no rules that are defined for denying access, the first rule can be deleted.

  • Shadow ACL—The first ACL completely shadows the configurations of the second ACL. If two rules have similar traffic, the second rule is not applied to any traffic as it appears later in the access list. If the two rules specify different actions for traffic, you can either move the shadowed rule or edit any one of the rules to implement the required policy. For example, the base rule may deny the IP traffic, and the shadowed rule may allow FTP traffic for a given source or destination.

The Secure Firewall migration tool uses the following parameters while comparing rules for ACL optimization:


Note


Optimization is available for the PAN only for ACP rule action.


  • The disabled ACLs are not considered during the optimization process.

  • The source ACLs are expanded into the corresponding ACEs (inline values), and then compared for the following parameters:

    • Source and Destination Zones

    • Source and Destination Network

    • Source and Destination Port

Click Download Report to review the ACL name and the correponding redundant and shadowed ACLs tabulated in an Excel file. Use the Detailed ACL Information sheet to view more ACL information.

Dynamic IP/Port Fallback Interface

When reviewing the NAT configurations on the Optimize, Review and Validate Configuration page for a Palo Alto Networks to threat defense migration, you can check whether the NAT rule has a Dynamic IP/Port-Fallback configuration and also if the rule is migrated or dropped.

The Secure Firewall migration tool migrates the NAT rule if the configured dynamic IP or the port fallback interface address is same as the destination zone address. If it is different, the rule is not migrated and is listed as unsupported, because the Secure Firewall Management Center can have only the destination address as the dynamic IP or port fallback interface. If the NAT rule does not have a fallback configuration, the migration happens without any validation and is listed as Not applicable in the Dynamic IP/Port-fallback column.

Procedure


Step 1

On the Optimize, Review and Validate Configuration screen, click Access Control Rules and do the following:

  1. For each entry in the table, review the mappings and veriy that they are correct.

  2. If you do not want to migrate one or more access control list policies, choose the rows by checking the box against the policy, choose Actions > Do not migrate and then click Save.

    All rules that you choose not to migrate are grayed out in the table.

  3. If you want to apply a management center file policy to one or more access control policies, check the box for the appropriate rows, choose Actions > File Policy.

    In the File Policy dialog, select the appropriate file policy and apply it to the selected access control policies and click Save.

  4. If you want to apply a management center IPS policy to one or more access control policies, check the box for the appropriate rows, choose Actions > IPS Policy.

    In the IPS Policy dialog, select the appropriate IPS policy and its corresponding variable set and apply it to the selected access control policies and click Save.

  5. If you want to change the logging options for an access control rule which has logging enabled, check the box for the appropriate row and choose Actions > Log.

    In the Log dialog, you can enable logging events either at the beginning or end of a connection or both. If you enable logging, you must opt to send the connection events either to the Event Viewer or to the Syslog or both. When you opt to send connection events to a syslog server, you can choose the syslog policies that are already configured on the management center from the Syslog drop-down menu.

  6. If you want to change the actions for the migrated access control rules in the Access Control table, check the box for the appropriate row and choose Actions > Rule Action.

    Tip

     
    The IPS and file policies that are attached to an access control rule are automatically removed for all rule actions except for the Allow option.

    You can filter the ACE counts in the ascending, descending, equal, greater than, and lesser than filtering order sequence.

    To clear the existing filter criteria, and to load a new search, click Clear Filter.

    Note

     
    The order that you sort the ACL based on ACE is for viewing only. The ACLs are pushed based on the chronological order in which they occur.

Step 2

Click the following tabs and review the configuration items:

  • Access Control

  • Objects (Network Objects, Port Objects, URL Objects)

  • NAT

  • Interfaces

  • Routes

  • Site-to-Site VPN Tunnels

  • Remote Access VPN

Note


For site-to-site and remote access VPN configurations, VPN filter configurations and extended access list objects pertaining to them are migrated and can be reviewed under the respective tabs.

If you do not want to migrate one or more NAT rules or route interfaces, check the box for the appropriate rows, choose Actions > Do not migrate, and then click Save.

All rules that you choose not to migrate are grayed out in the table.

Step 3

(Optional) While reviewing your configuration, you can rename one or more network or port objects in the Network Objects or the Port Objects tab by selecting the object and choosing Actions > Rename.

Access rules and NAT policies that reference the renamed objects are also updated with new object names.

Step 4

You can view routes from the Routes area and select the routes that you do not want to migrate, by selecting an entry and choosing Actions > Do not migrate.

Step 5

In the Site-to-Site VPN Tunnels section, the VPN tunnels from the source firewall configurations are listed. Review the VPN tunnel data such as Source Interface, VPN Type, and IKEv1 and IKEv2 configurations for each row and ensure that you provide the preshared key values for all the rows.

Step 6

In the Remote Access VPN section, all objects corresponding to remote access VPN are migrated from Palo Alto Networks firewall to the management center, and are displayed:

  • Policy Assignment: Review and validate your connection profiles, their VPN protocols, targeted devices, and the names of the VPN interfaces. To rename a connection profile, select the corresponding entry and choose Actions > Rename.

  • IKEV2: Review and validate your IKEv2 protocol configurations, if any, and the source interfaces mapped with them.

  • Anyconnect Packages: Retreive the AnyConnect packages and AnyConnect profiles should be retrieved from the source device for migration.

    As part of the premigration activity, upload all the AnyConnect packages to the management center. You can upload AnyConnect profiles either directly to the management center or from the Secure Firewall migration tool.

    Select pre-existing AnyConnect, Hostscan, or external browser packages retrieved from the management center.​ You must select atleast one AnyConnect package. You must also select the Hostscan, dap.xml, data.xml, or external browser, if they are available in the source configuration. AnyConnect profiles are optional.

    Ensure that the correct Dap.xml file is retrieved from the source firewall. Validations are performed on the dap.xml file that are available in the configuration file. You must select all the files that are required for validation and upload them. Failure to update marks as incomplete and the Secure Firewall migration tool does not proceed with validation.

  • Address Pool—Review all the IPv4 and IPv6 pools that are displayed here.

  • Group-Policy—Select or remove the user profile, management profile, and client module profile from this area, which displays group policies with client profiles, management profiles, client modules, and group policies without profiles. If a profile was added in the AnyConnect file area, it is displayed as preselected. You can select or remove the user profile, management profile, and client module profile.

  • Connection Profile—Review all connection profiles/tunnel groups that are displayed here.

  • Trustpoints—Trustpoint or PKI object migration from the PAN firewall to the management center is part of the premigration activity and is required for successful migration of remote access VPN. Map the trustpoint for Global SSL, IKEv2, and interfaces in the Remote Access Interface section to proceed with the migration.

    If a Security Assertion Markup Language (SAML) object exists, the trustpoint for the SAML IDP and SP can be mapped in the SAML section. SP certificate upload is optional. Trustpoints can be overridden for a specific tunnel group. If the overriden SAML trustpoint configuration is available in the source , it can be selected under Override SAML.

Step 7

(Optional) To download the details for each configuration item in the grid, click Download.

Step 8

After you have completed your review, click Validate. Note that the mandatory fields that need your attention keeps flickering until you enter values in them. The Validate button gets enabled only after all the mandatory fields are filled.

During validation, the Secure Firewall migration tool connects to management center, reviews the existing objects, and compares those objects to the list of objects to be migrated. If an object already exists in management center, the Secure Firewall migration tool does the following:

  • If the object has the same name and configuration, the Secure Firewall migration tool reuses the existing object and does not create a new object in management center.

  • If the object has the same name but a different configuration, the Secure Firewall migration tool reports an object conflict.

You can view the validation progress in the console.

Step 9

When the validation is complete, if the Validation Status dialog box shows one or more object conflicts, do the following:

  1. Click Resolve Conflicts.

    The Secure Firewall migration tool displays a warning icon on either or both of the Network Objects or Port Objects tab, depending upon where the object conflicts were reported.

  2. Click the tab and review the objects.

  3. Check the entry for each object that has a conflict and choose Actions > Resolve Conflicts.

  4. In the Resolve Conflicts window, complete the recommended action.

    For example, you might be prompted to add a suffix to the object name to avoid a conflict with the existing management center object. You can accept the default suffix or replace it with one of your own.

  5. Click Resolve.

  6. When you have resolved all object conflicts on a tab, click Save.

  7. Click Validate to revalidate the configuration and confirm that you have resolved all object conflicts.

Step 10

When the validation is complete and the Validation Status dialog box displays the message Successfully Validated, continue with Push the Migrated Configuration to Management Center.


Push the Migrated Configuration to Management Center

You cannot push the migrated configuration to management center if you have not successfully validated the configuration and resolved all object conflicts.

This step in the migration process sends the migrated configuration to management center. It does not deploy the configuration to the threat defense device. However, any existing configuration on the threat defense is erased during this step.


Note


Do not make any configuration changes or deploy to any device while the Secure Firewall migration tool is sending the migrated configuration to management center.

Procedure


Step 1

In the Validation Status dialog box, review the validation summary.

Step 2

Click Push Configuration to send the migrated configuration to management center.

The Secure Firewall migration tool displays a summary of the progress of the migration. You can view detailed, line-by-line progress of which the components that are being pushed to management center in the console.

Step 3

After the migration is complete, click Download Report to download and save the post-migration report.

Copy of the Post-Migration Report is also saved in the Resources folder in the same location as the Secure Firewall migration tool.

Step 4

If your migration failed, review the post-migration report, log file, and unparsed file carefully to understand what caused the failure.

You can also contact the support team for troubleshooting.

Migration Failure Support

If the migration is unsuccessful, contact Support.

  1. On the Complete Migration screen, click the Support button.

    The Help support page appears.

  2. Check the Support Bundle check box and then select the configuration files to download.

    Note

     
    The Log and dB files are selected for download by default.
  3. Click Download.

    The support bundle file is downloaded as a .zip to your local path. Extract the Zip folder to view the log files, DB, and the Configuration files.

  4. Click Email us to email the failure details for the technical team.

    You can also attach the downloaded support files to your email.

  5. Click Visit TAC page to create a TAC case in the Cisco support page.

    Note

     
    You can open a TAC case at any time during the migration from the support page.

Review the Post-Migration Report and Complete the Migration

The Post-migration report provides details on ACL count under various categories, ACL optimization, and the overall view of optimization performed on the configuration file. For more information, see Optimize, Review and Validate the Configuration

Review and verify the objects:

  • Category

    • Total ACL rules (Source Configuration)

    • Total ACL rules considered for Optimization. For example, Redundant, Shadow, and so on.

  • ACL Count for optimization gives the total number of ACL rules counted before and after Optimization.

If you have missed to download the Post-Migration Reports during migration, use the following link to download:

Post-Migration Report Download Endpoint—http://localhost:8888/api/downloads/post_migration_summary_html_format


Note


You can download the reports only when the Secure Firewall migration tool is running.

Procedure


Step 1

Navigate to where you downloaded the Post-Migration Report.

Step 2

Open the post-migration report and carefully review its contents to understand how your configuration was migrated:

  • Migration Summary—A summary of the configuration that was successfully migrated from to threat defense, including information about the interface, management center hostname and domain, target threat defense device (if applicable), and the successfully migrated configuration elements.

  • Selective Policy Migration—Details of the specific feature selected for migration are available within three categories - Device Configuration Features, Shared Configuration Features, and Optimization.

  • Interface to Threat Defense Interface Mapping—Details of the successfully migrated interfaces and how you mapped the interfaces on the configuration to the interfaces on the threat defense device. Confirm that these mappings match your expectations.

    Note

     
    This section is not applicable for migrations without a destination threat defense device or if Interfaces are not selected for migration.
  • Source Interface Names to Threat Defense Security Zones—Details of the successfully migrated PAN logical interfaces and name and how you mapped them to security zones in threat defense. Confirm that these mappings match your expectations.

    Note

     
    This section is not applicable if Access Control Lists and NAT are not selected for migration.
  • Object Conflict Handling—Details of the objects that were identified as having conflicts with existing objects in management center. If the objects have the same name and configuration, the Secure Firewall migration tool reused the management center object. If the objects have the same name but a different configuration, you renamed those objects. Review these objects carefully and verify that the conflicts were appropriately resolved.

  • Access Control Rules, NAT, and Routes You Chose Not to Migrate—Details of the rules that you choose not to migrate with the Secure Firewall migration tool. Review these rules that were disabled by the Secure Firewall migration tool and were not migrated. Review these lines and verify that all the rules you choose are listed in this section. If desired, you can configure these rules manually.

  • Partially Migrated Configuration—Details of the rules that were only partially migrated, including rules with advanced options where the rule could be migrated without the advanced options. Review these lines, verify whether the advanced options are supported in management center, and if so, configure these options manually.

  • Unsupported Configuration—Details of configuration elements that were not migrated because the Secure Firewall migration tool does not support migration of those features. Review these lines, verify whether each feature is supported in threat defense. If so, configure those features manually in management center.

  • Expanded Access Control Policy Rules—Details of access control policy rules that were expanded from a single Point rule into multiple threat defense rules during migration.

  • Actions Taken on Access Control Rules

    • Access Rules You Chose Not to Migrate—Details of the access control rules that you choose not to migrate with the Secure Firewall migration tool. Review these lines and verify that all the rules you choose are listed in this section. If desired, you can configure these rules manually.

    • Access Rules with Rule Action Change—Details of all Access Control Policy Rules that had ‘Rule Action’ changed using the Secure Firewall migration tool. The Rule Action values are - Allow, Trust, Monitor, Block, Block with reset. Review these lines and verify that all the rules you choose are listed in this section. If desired, you can configure these rules manually.

    • Access Control Rules that have IPS Policy and Variable Set Applied—Details of all access control policy rules that have IPS Policy applied. Review these rules carefully and determine whether the feature is supported in threat defense.

    • Access Control Rules that have File Policy Applied—Details of all access control policy rules that have File Policy applied. Review these rules carefully and determine whether the feature is supported in threat defense.

    • Access Control Rules that have Rule ‘Log’ Setting Change—Details of the access control rules that had ‘Log setting' changed using the Secure Firewall migration tool. The Log Setting values are - False, Event Viewer, Syslog. Review these lines and verify that all the rules you choose are listed in this section. If desired, you can configure these rules manually.

Note

 
An unsupported rule that was not migrated causes issues with unwanted traffic getting through your firewall. We recommend that you configure a rule in management center to ensure that this traffic is blocked by threat defense.

Note


If it requires you to apply IPS or file policy to ACL in the Review and Validate page, you are highly recommended to create a policy on the management center before migration. Use the same policy, as the Secure Firewall migration tool fetches the policy from the connected management center. Creating a new policy and assigning it to multiple policies may degrade the performance and may also result in a push failure.

For more information about supported features in management center and threat defense, see Management Center Configuration Guide, Version 6.2.3.

Step 3

Open the Pre-Migration Report and make a note of any configuration items that you must migrate manually on the threat defense device.

Step 4

In management center, do the following:

  1. Review the migrated configuration for the threat defense device to confirm that all expected rules and other configuration items, including the following, were migrated:

    • Access control lists (ACL)

    • Network Address Translation rules

    • Port and network objects

    • Routes

    • Interfaces

    • Dynamic Route objects

  2. Configure all partially supported, unsupported, ignored, and disabled configuration items and rules that were not migrated.

    For information on how to configure these items and rules, see the Management Center Configuration Guide. The following are examples of configuration items that require manual configuration:

Step 5

After you have completed your review, deploy the migrated configuration from management center to the threat defense device.

Verify that the data is reflected correctly in the Post-Migration Report for unsupported and partially supported rules.

The Secure Firewall migration tool assigns the policies to the threat defense device. Verify that the changes are reflected in the running configuration. To help you to identify the policies that are migrated, the description of those policies includes the hostname of the configuration.


Parse Summary

Parse summary displays the number of objects, interfaces, NAT, policy, and application. The summary has three components: Pre-parse Summary, Parse Summary and Pre-push Summary.

  • Pre-parse Summary—Pre-parse summary is displayed after the configuration is uploaded. At this stage, the Secure Firewall migration tool displays the count of various components. Only custom applications or applications that are used in the group is displayed. If a configuration is multi-vsys, the interface count will be displayed for the complete vsys. Pre-parse summary does not show all the applications because, the application that is called directly in policy is not counted. So, application count is different than the Parse summary. Similar behavior is applicable on NAT. Few components of the Pre-parse summary may display zero count but that does not mean that these configurations have zero configurations elements.

  • Parse Summary—Parse summary is displayed after you click start conversion. At this stage, the Secure Firewall migration tool has taken the action on the configuration and all the unsupported configuration is removed from the summary count. The unsupported policies are part of the count, as unsupported policies are migrated to the management center as disabled. Every component of the configuration is parsed. The count that is displayed at the Parse summary is the exact configuration count that is going to get migrated.

  • Pre-push Summary—Pre-push summary is displayed before you are prompted to push the configuration to the management center. The Pre-parse summary count may be different from the parse summary as per the action taken by the Secure Firewall migration tool. Directly referenced IP in NAT will be pushed as objects. If applications are mapped to ports, service count increases and the application will go down. If application mapping is left blank, the application count reduces. If the static route has a duplicate entry, that will be removed and the count will decrease.

Migration Failures

The following are the parsing failures during migration:

  • Parse Failure—Parse failure occurs after the configuration is uploaded to the Secure Firewall migration tool. Due to the misconfiguration of the interface. If multiple IPs are configured or a /32 or /128 IP is assigned to interface, that leads to a parsing failure.

    If an interface has multiple IP assigned or tunneled, loopback, or VLAN interface are part of routing, that leads to a push failure.

    Workaround—Download the Pre-Migration Report and refer to Configuration lines with errors section of the Migration Report. This section displays the details of the configuration that is causing the issue. You must rectify the issue and reupload the configuration to Secure Firewall migration tool.

    If push failure is caused by tunnel, loopback, or VLAN interface in the routes, you must delete such routes and retry the migration, as such interfaces are not supported on the management center.

  • Push Failure—Push failure occurs when Secure Firewall migration tool has migrated the configuration and is being pushed to the management center. Push failures are captured in the Post-Migration Report.

    Workaround—Download the Post-Migration Report and refer to Error Reporting section of the Migration Report. This section displays the details of the configuration that causes the issue. You must rectify the issue on the Review and Validation page by choosing do not migrate option for the section that shows the failure or you can fix the issue in the source configuration and reupload the configuration to Secure Firewall migration tool.

Uninstall the Secure Firewall Migration Tool

All components are stored in the same folder as the Secure Firewall migration tool.

Procedure


Step 1

Navigate to the folder where you placed the Secure Firewall migration tool.

Step 2

If you want to save the logs, cut or copy and paste the log folder to a different location.

Step 3

If you want to save the pre-migration reports and the post-migration reports, cut or copy and paste the resources folder to a different location.

Step 4

Delete the folder where you placed the Secure Firewall migration tool.

Tip

 
The log file is associated with the console window. If the console window for the Secure Firewall migration tool is open, the log file and the folder cannot be deleted.

Sample Migration: PAN to Threat Defense 2100


Note


Create a test plan that you can run on the target device after you complete the migration.


Pre-Maintenance Window Tasks

Before you begin

Make sure you have installed and deployed a management center. For more information, see the appropriate Management Center Hardware Installation Guide and the appropriate Management Center Getting Started Guide.

Procedure


Step 1

Deploy the Firepower 2100 series device in your network, connect the interfaces and power on the appliance.

For more information, see Cisco Threat Defense for the 2100 Series Using Management Center Quick Start Guide.

Step 2

Register the Firepower 2100 series device to be managed by the management center.

For more information, see Add Devices to the Management Center.

Step 3

Download and run the most recent version of the Secure Firewall migration tool from https://software.cisco.com/download/home/286306503/type.

For more information, see Download the Secure Firewall Migration Tool from Cisco.com.

Step 4

When you launch the Secure Firewall migration tool, and specify destination parameters, make sure that you select the Firepower 2100 series device that you registered to the management center.

For more information, see Specify Destination Parameters for the Secure Firewall Migration Tool.

Step 5

Map the interfaces with the threat defense interfaces.

Note

 
The Secure Firewall migration tool allows you to map an interface type to the threat defense interface type.

For more information, see Map the Interfaces with Threat Defense Interfaces.

Step 6

While mapping logical interfaces to security zones, click Auto-Create to allow the Secure Firewall migration tool to create new security zones. To use existing security zones, manually map the logical interfaces to the security zones.

For more information, see Map ASA Logical Interfaces to Security Zones and Interface Groups.

Step 7

Follow the instructions of this guide to sequentially review and validate the configuration to be migrated, and then push the configuration to the management center.

Step 8

Review the Post Migration report, manually setup and deploy other configurations to the threat defense and complete the migration.

For more information, see .

Step 9

Test the Firepower 2100 series device using the test plan that you would have created while planning for migration.


Maintenance Window Tasks

Before you begin

Make sure you have completed all the tasks that must be performed before the maintenance window. See Pre-Maintenance Window Tasks.

Procedure


Step 1

Clear the Address Resolution Protocol (ARP) cache on the surrounding switching infrastructure.

Step 2

Perform basic ping tests from surrounding switching infrastructure to the Firepower 2100 series device interface IP addresses, to make sure that they are accessible.

Step 3

Perform basic ping tests from devices which require layer 3 routing to Firepower 2100 series device interface IP addresses.

Step 4

If you are assigning a new IP address to the Firepower 2100 series device and not reusing the IP address assigned to the perform the following steps:

  1. Update any static routes which refer to the IP address, so that they now point to the Firepower 2100 series device IP address.

  2. If you are using routing protocols, ensure that neighbors see the Firepower 2100 series device IP address as the next hop for expected destinations.

Step 5

Run a comprehensive test plan and monitor logs within the managing management center for your Firepower 2100 device.