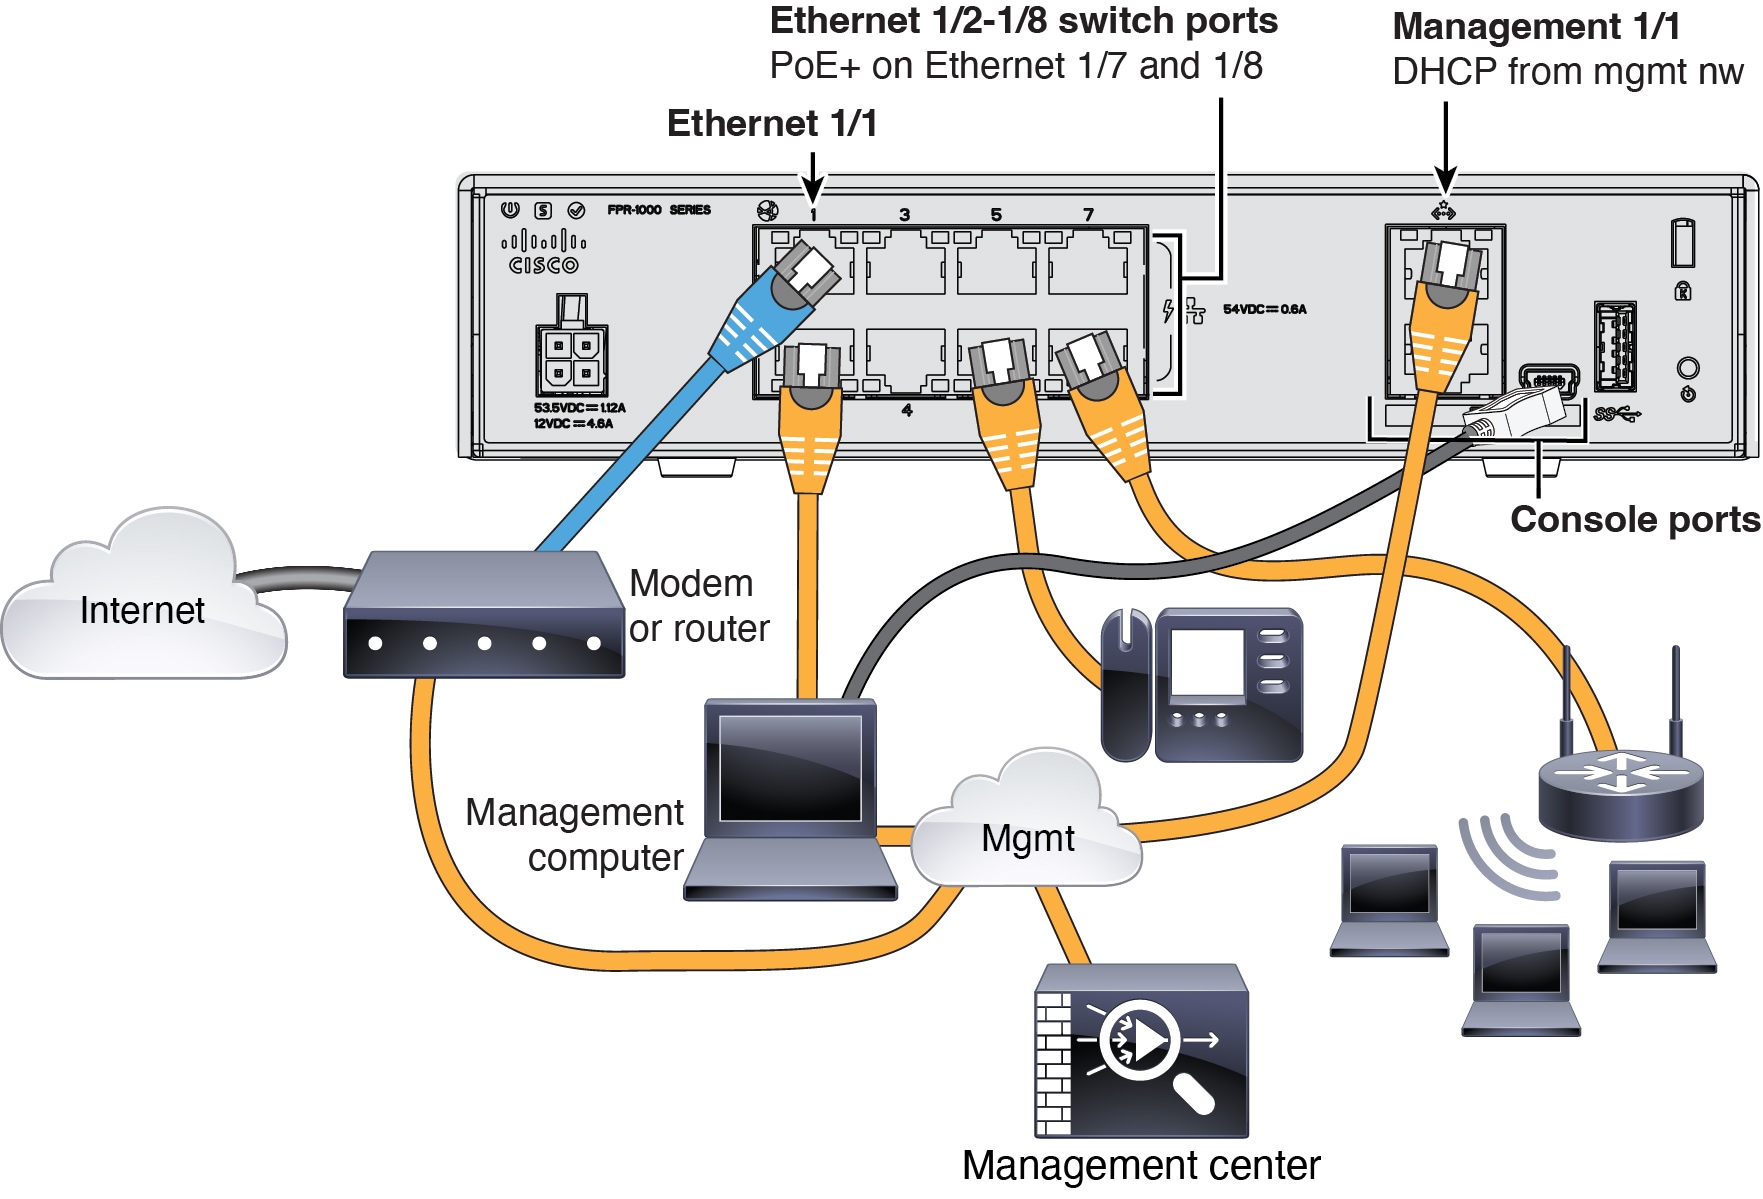
Cable and Register the Firewall

Cable the firewall and then register the firewall to the management center.

Cable the Firewall

Connect the management center to the dedicated Management 1/1 interface. The management network needs access to the internet for updates. For example, you can connect the management network to the internet through the firewall itself (for example, by connecting to the inside network).

See the hardware installation guide for more information.

Cabling the Management Network

Perform Initial Configuration

Perfom initial configuration of the firewall using the Secure Firewall device manager or using the CLI.

Initial Configuration: Device Manager

Using this method, after you register the firewall, the following interfaces will be preconfigured in addition to the Management interface:

  • Ethernet 1/1—outside, IP address from DHCP, IPv6 autoconfiguration

  • VLAN1inside, 192.168.95.1/24

  • Default route—Obtained through DHCP on the outside interface

  • Additional interfaces—Any interface configuration from the device manager is preserved.

Other settings, such as the DHCP server on inside, access control policy, or security zones, are not preserved.

Procedure


Step 1

Connect your computer to the inside interface (Ethernet 1/2 through 1/8).

Step 2

Log into the device manager.

  1. Go to https://192.168.95.1.

  2. Log in with the username admin and the default password Admin123.

  3. You are prompted to read and accept the General Terms and change the admin password.

Step 3

Use the setup wizard.

Figure 1. Device Setup
Device Setup

Note


The exact port configuration depends on your model.

  1. Configure the outside and management interfaces.

    Figure 2. Connect firewall to internet
    Connect firewall to internet
    1. Outside Interface Address—Use a static IP address if you plan for high availability. You cannot configure PPPoE using the setup wizard; you can configure PPPoE after you complete the wizard.

    2. Management Interface—Setting the Management interface IP address is not part of the setup wizard, but you can set the following options. If you need to use a static IP address, see Step Step 4.

      DNS Servers—The DNS server for the system's management address. The default is the OpenDNS public DNS servers.

      Firewall Hostname

  2. Configure the Time Setting (NTP) and click Next.

    Figure 3. Time Setting (NTP)
    Connect firewall to internet
  3. Select Start 90 day evaluation period without registration.

    Connect firewall to internet

    Do not register the threat defense with the Smart Software Manager; all licensing is performed on the management center.

  4. Click Finish.

    Figure 4. What's Next
    Connect firewall to internet
  5. Choose Standalone Device, and then Got It.

Step 4

(Optional) Configure the Management interface with a static IP address. See the Management interface on Device > Interfaces.

Step 5

If you want to configure additional interfaces, choose Device, and then click the link in the Interfaces summary.

Step 6

Register with the management center by choosing Device > System Settings > Central Management and clicking Proceed

Configure the Management Center/CDO Details.

Figure 5. Management Center/CDO Details
Management Center/CDO Details
  1. For Do you know the Management Center/CDO hostname or IP address, click Yes if you can reach the management center using an IP address or hostname or No if the management center is behind NAT or does not have a public IP address or hostname.

  2. If you chose Yes, enter the Management Center/CDO Hostname/IP Address.

  3. Specify the Management Center/CDO Registration Key.

    This key is a one-time registration key of your choice that you will also specify on the management center when you register the firewall. The registration key must not exceed 37 characters. Valid characters include alphanumerical characters (A–Z, a–z, 0–9) and the hyphen (-). This ID can be used for multiple firewalls registering to the management center.

  4. Specify a NAT ID.

    This ID is a unique, one-time string of your choice that you will also specify on the management center. We recommend that you specify the NAT ID even if you know the IP addresses of both devices. The NAT ID must not exceed 37 characters. Valid characters include alphanumerical characters (A–Z, a–z, 0–9) and the hyphen (-). This ID cannot be used for any other firewalls registering to the management center. The NAT ID is used in combination with the IP address to verify that the connection is coming from the correct device; only after authentication of the IP address/NAT ID will the registration key be checked.

Step 7

Configure the Connectivity Configuration.

  1. Specify the Threat Defense Hostname.

  2. Specify the DNS Server Group.

    Although you already set this: Choose an existing group, or create a new one. The default DNS group is called CiscoUmbrellaDNSServerGroup, which includes the OpenDNS servers.

  3. For the Management Center/CDO Access Interface, click Management Interface.

Step 8

Click Connect.

The Registration Status dialog box shows the current status of the management center registration.

Figure 6. Successful Connection
Successful Connection

Step 9

After the Saving Management Center/CDO Registration Settings step on the status screen, go to the management center and add the firewall. See Register the Firewall with the Management Center.


Initial Configuration: CLI

Set the dedicated Management IP address, gateway, and other basic networking settings using the CLI setup script.

Procedure


Step 1

Connect to the console port and access the threat defense CLI. See Access the Threat Defense CLI.

Step 2

Complete the CLI setup script for the Management interface settings.

Note


You cannot repeat the CLI setup script unless you clear the configuration, for example, by reimaging. However, all of these settings can be changed later at the CLI using configure network commands. See Cisco Secure Firewall Threat Defense Command Reference.


You must accept the EULA to continue.
Press <ENTER> to display the EULA:                 
Cisco General Terms
[...]

Please enter 'YES' or press <ENTER> to AGREE to the EULA:

System initialization in progress.  Please stand by.
You must configure the network to continue.
Configure at least one of IPv4 or IPv6 unless managing via data interfaces.
Do you want to configure IPv4? (y/n) [y]:
Do you want to configure IPv6? (y/n) [y]: n

Guidance: Enter y for at least one of these types of addresses.

Configure IPv4 via DHCP or manually? (dhcp/manual) [manual]:
Enter an IPv4 address for the management interface [192.168.45.61]: 10.89.5.17
Enter an IPv4 netmask for the management interface [255.255.255.0]: 255.255.255.192

Enter the IPv4 default gateway for the management interface [data-interfaces]: 10.10.10.1
Enter a fully qualified hostname for this system [firepower]: 1010-3
Enter a comma-separated list of DNS servers or 'none' [208.67.222.222,208.67.220.220,2620:119:35::35]:
Enter a comma-separated list of search domains or 'none' []: cisco.com
If your networking information has changed, you will need to reconnect.
Disabling IPv6 configuration: management0
Setting DNS servers: 208.67.222.222,208.67.220.220,2620:119:35::35
Setting DNS domains:cisco.com
Setting hostname as 1010-3
Setting static IPv4: 10.89.5.17 netmask: 255.255.255.192 gateway: data on management0
Updating routing tables, please wait...
All configurations applied to the system. Took 3 Seconds.
Saving a copy of running network configuration to local disk.
For HTTP Proxy configuration, run 'configure network http-proxy'

Manage the device locally? (yes/no) [yes]: no

Guidance: Enter no to use the management center.

Setting hostname as 1010-3
Setting static IPv4: 10.89.5.17 netmask: 255.255.255.192 gateway: data on management0
Updating routing tables, please wait...
All configurations applied to the system. Took 3 Seconds.
Saving a copy of running network configuration to local disk.
For HTTP Proxy configuration, run 'configure network http-proxy'
Configuring firewall mode ...


Device is in OffBox mode - disabling/removing port 443 from iptables.
Update policy deployment information
    - add device configuration
    - add network discovery
    - add system policy

You can register the sensor to a Firepower Management Center and use the
Firepower Management Center to manage it. Note that registering the sensor
to a Firepower Management Center disables on-sensor Firepower Services
management capabilities.

When registering the sensor to a Firepower Management Center, a unique
alphanumeric registration key is always required.  In most cases, to register
a sensor to a Firepower Management Center, you must provide the hostname or
the IP address along with the registration key.
'configure manager add [hostname | ip address ] [registration key ]'

However, if the sensor and the Firepower Management Center are separated by a
NAT device, you must enter a unique NAT ID, along with the unique registration
key.
'configure manager add DONTRESOLVE [registration key ] [ NAT ID ]'

Later, using the web interface on the Firepower Management Center, you must
use the same registration key and, if necessary, the same NAT ID when you add
this sensor to the Firepower Management Center.
>

Step 3

Identify the management center.

configure manager add {hostname | IPv4_address | IPv6_address | DONTRESOLVE} reg_key nat_id

  • {hostname | IPv4_address | IPv6_address | DONTRESOLVE}—Specifies either the FQDN or IP address of the management center. If the management center is not directly addressable, use DONTRESOLVE, in which case the firewall must have a reachable IP address or hostname.

  • reg_key—Specifies a one-time registration key of your choice that you will also specify on the management center when you register the threat defense. The registration key must not exceed 37 characters. Valid characters include alphanumerical characters (A–Z, a–z, 0–9) and the hyphen (-).

  • nat_id—Specifies a unique, one-time string of your choice that you will also specify on the management center. The NAT ID must not exceed 37 characters. Valid characters include alphanumerical characters (A–Z, a–z, 0–9) and the hyphen (-). This ID cannot be used for any other devices registering to the management center.

Example:


> configure manager add fmc-1.example.com regk3y78 natid56
Manager successfully configured.

Register the Firewall with the Management Center

Register the firewall to the management center.

Procedure


Step 1

Log into the management center.

  1. Enter the following URL.

    https://fmc_ip_address

  2. Enter your username and password.

  3. Click Log In.

Step 2

Choose Devices > Device Management.

Step 3

From the Add drop-down list, choose Add Device.

Figure 7. Add Device Using a Registration Key
Add Device Using a Registration Key

Set the following parameters:

  • Host—Enter the IP address or hostname of the firewall you want to add, if available. Leave this field blank if it is not available.

  • Display Name—Enter the name for the firewall as you want it to display in the management center. You cannot change this name later.

  • Registration Key—Enter the same registration key that you specified in the firewall initial configuration.

  • Domain—Assign the device to a leaf domain if you have a multidomain environment.

  • Group—Assign it to a device group if you are using groups.

  • Access Control Policy—Choose an initial policy. Unless you already have a customized policy you know you need to use, choose Create new policy, and choose Block all traffic. You can change this later to allow traffic; see Configure an Access Control Rule.

    Figure 8. New Policy
    New Policy
  • Smart Licensing—Assign the Smart Licenses you need for the features you want to deploy. Note: You can apply the Secure Client remote access VPN license after you add the device, from the System > Licenses > Smart Licenses page.

  • Unique NAT ID—Specify the NAT ID that you specified in the firewall initial configuration.

  • Transfer Packets—Check the Transfer Packets check box so that for each intrusion event, the device transfers the packet to the management center for inspection.

    This option is enabled by default. For each intrusion event, the device sends event information and the packet that triggered the event to the management center for inspection. If you disable it, only event information will be sent to the management center; the packet will not be sent.

Step 4

Click Register.

If the threat defense fails to register, check the following items:

  • Ping—Access the threat defense CLI (see Access the Threat Defense CLI), and ping the management center IP address using the following command:

    ping system fmc_ip_address

    If the ping is not successful, check your network settings using the show network command. If you need to change the firewall Management IP address, use the configure network {ipv4 | ipv6} manual command.

  • Registration key, NAT ID, and the management center IP address—Make sure you are using the same registration key and NAT ID on both devices. You can set the registration key and NAT ID on the firewall using the configure manager add command.

For more troubleshooting information, see https://cisco.com/go/fmc-reg-error.