FireSIGHT System Malware Storage Pack Guide: Version 5.3 or greater
Available Languages
Table of Contents
FireSIGHT System Malware Storage Pack Guide: Version 5.3 or greater
Malware Storage Pack Kit for 1U Devices
Malware Storage Pack Kit for 2U Devices
Installing a Malware Storage Pack
Installing a Malware Storage Pack During an Upgrade
Installing a Malware Storage Pack on a Version 5.3 Device
Instructions for the 81xx Family Devices
81xx Family Chassis Front View
Instructions for the 82xx Family and 83xx Family Devices
Removing a Malware Storage Pack
Monitoring a Malware Storage Pack
FireSIGHT System Malware Storage Pack Guide: Version 5.3 or greater
You can install a malware storage pack in Sourcefire 8000 Series devices running Version 5.3 or greater of the FireSIGHT System. A malware storage pack is an optional second solid-state drive (SSD) for expanded local file storage of suspected malware.
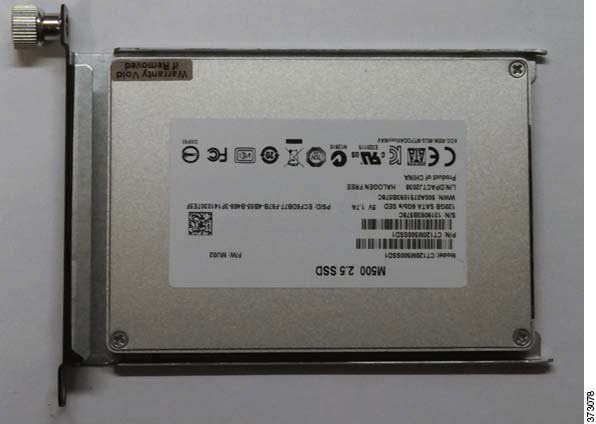
A malware storage pack kit, available from Sourcefire, contains everything you need to install a malware storage pack in your device. Each kit includes a malware storage pack mounted in a chassis-compatible SSD tray and an installation tool. You remove the empty second SSD tray and replace it with the compatible malware storage pack.

Caution Do not attempt to install a hard drive that was not supplied by Sourcefire in your device. Installing an unsupported hard drive may damage the device. Malware storage pack kits are available for purchase only from Sourcefire, and are for use only with Version 5.3 or greater of the FireSIGHT System. Contact Sourcefire Support if you require assistance with malware storage packs.
This document is for use with Sourcefire 8000 Series devices running Version 5.3 or greater of the FireSIGHT System, and contains the following sections:
Malware Storage Pack Overview
Sourcefire 8000 Series devices ship with a solid-state drive (SSD) that functions as the primary system drive used for the operating system, the FireSIGHT System software, and local file storage of events and configuration files. As part of the advanced malware protection feature, you can configure the FireSIGHT System to detect, store, track, analyze, and optionally block malware files being transmitted on your network. On detection, the file storage feature allows a device to store an eligible file to the hard drive.
When you configure a device to store files, it allocates a set portion of the primary hard drive’s space solely to captured file storage. Based on your file policy configuration, your device may store a substantial amount of files to the hard drive.
The malware storage pack provides expanded local file storage of suspected malware and is available as an optional feature on the 8000 Series devices running Version 5.3 or greater of the FireSIGHT System. When you install a malware storage pack in a device and configure the device to store files, the device allocates the entire malware storage pack for storing captured files, allowing more room on the primary hard drive to store events and configuration files.

Note
Certain aspects of advanced malware protection and file control require that you enable specific licensed capabilities on target devices. See the FireSIGHT System User Guide for more information. Certain aspects of advanced malware protection and file control require that you enable specific licensed capabilities on target devices. See the FireSIGHT System User Guide for more information.
This document explains the following concepts and procedures:
Supported Devices
You can install a malware storage pack in 8000 Series devices running Version 5.3 or greater of the FireSIGHT System. For complete information on 8000 Series devices, please refer to the FireSIGHT System Installation Guide.
The following 8000 Series devices support the malware storage pack:
- 81xx Family devices (3D8120, 3D8130, 3D8140, but not the AMP8150)
- 82xx Family devices (3D8250, 3D8260, 3D8270, 3D8290)
- 83xx Family devices (3D8350, 3D8360, 3D8370, 3D8390)
You must be running Version 5.3 of the FireSIGHT System software before you install the malware storage pack. See the FireSIGHT System Installation Guide for more information or, for additional guidance, contact Sourcefire Support.

Caution Before you update any part of the FireSIGHT System, you must read the release notes or advisory text that accompanies the update. The release notes provide important information, including supported platforms, compatibility, prerequisites, warnings, and specific installation and uninstallation instructions.
Before You Begin
Before you install a malware storage pack in a Sourcefire 8000 Series device, take a moment to examine the contents of your malware storage pack installation kit and the device where the malware storage pack will be installed. Your malware storage pack installation kit contains the following items:
- a malware storage pack mounted in a chassis-compatible SSD tray
- an installation tool
- an instruction guide (this document)
There are two types of installation kits. The 1U chassis kit fits the 81xx Family of devices, and the 2U chassis kit fits both the 82xx Family and 83xx Family of devices.
Examine both your kit and your device to ensure that you have the appropriate malware storage pack kit for your device. Contact Sourcefire Support if you have any questions or concerns about your kit. See the following sections for more information:
Installing a Malware Storage Pack
You can install a malware storage pack to an 8000 Series device already deployed in the field. Use the instructions in this guide to handle the following scenarios:
- installing a malware storage pack during a customer upgrade, where you install the malware storage pack and reimage the FireSIGHT System to Version 5.3 or greater
- installing a malware storage pack after a customer upgrade, where you reimage the FireSIGHT System to Version 5.3 or greater first, and then install the malware storage pack

Note
For information on how to safely shut down or restart the device, see the Managing Devices chapter in the Sourcefire 3D System User Guide. For information on how to safely shut down or restart the device, see the Managing Devices chapter in the Sourcefire 3D System User Guide.
Installing a Malware Storage Pack During an Upgrade
Use the following procedure to install a malware storage pack in a device in the field and reimage the FireSIGHT System to Version 5.3 or greater.
To install a malware storage pack during a customer upgrade:
Step 3
Install the malware storage pack:
- For 81xx Family devices, refer to Instructions for the 81xx Family Devices.
- For 82xx Family and 83xx Family devices, refer to Instructions for the 82xx Family and 83xx Family Devices.
Step 4
Reimage the device to Version 5.3 or greater. Follow the instructions in the FireSIGHT System
Installation Guide and the release notes or advisory text that accompanies the software update.
Refer to Post Installation for information on restarting a device after a malware storage pack has been installed.
Installing a Malware Storage Pack on a Version 5.3 Device
Use the following procedure to install a malware storage pack in a device already configured and running FireSIGHT System Version 5.3 or greater.
To install malware storage pack in a device running Version 5.3 or greater:
Step 3
Install the malware storage pack:
- For 81xx Family devices, refer to Instructions for the 81xx Family Devices.
- For 82xx Family and 83xx Family devices, refer to Instructions for the 82xx Family and 83xx Family Devices.
- Refer to Post Installation for information on restarting a device after a second SSD has been installed.
Instructions for the 81xx Family Devices
The following section describes how to install a malware storage pack in the 81xx Family of devices, which includes the 3D8120, 3D8130, and 3D8140 devices. Note that the malware storage pack is not supported on the AMP8150 device.
81xx Family Chassis Front View
The SSD trays are located on the front of the 81xx Family chassis.
Figure 1-1 81xx Family (Chassis: CHAS-1U-AC/DC) Front View


The following steps describe how to install a malware storage pack in the 81xx Family of devices. Install the malware storage pack in the SSD bay labeled Malware Storage Pack . Remove the empty SSD tray and replace it with the appropriate malware storage pack.

Note
Use proper electrostatic discharge (ESD) practices such as wrist straps and an ESD work surface. Use proper electrostatic discharge (ESD) practices such as wrist straps and an ESD work surface.
Step 1
Ensure the device is powered off before you begin to install or remove a malware storage pack.
Step 2
Use the T8 Torx driver to remove the Torx screw on the right side of the second SSD tray. Retain the screw.
Step 3
Unscrew and pull on the thumbscrew to remove the empty SSD tray from the device.

Note
Retain the empty SSD tray. If you need to remove the malware storage pack at any time, reinstall the empty tray in the device. Retain the empty SSD tray. If you need to remove the malware storage pack at any time, reinstall the empty tray in the device.

Step 4
Remove the malware storage pack from its packaging.

Step 5
Align the malware storage pack with the SSD bay and insert the malware storage pack into the device.

Step 6
Tighten the thumb screw on the malware storage pack to secure the storage pack into the device.
Step 7
Use the T8 Torx driver to replace the screw removed in Step 1.
Refer to Post Installation for information on restarting a device after a malware storage pack has been installed.
Instructions for the 82xx Family and 83xx Family Devices
The following sections describe how to install a malware storage pack SSD in the following 8000 Series devices with 2U chassis:
82xx Family Chassis Rear View
The SSD trays are located on the rear of the 82xx Family chassis.
Figure 1-3 82xx Family Rear View

83xx Family Chassis Rear View
The SSD trays are located on the rear of the 83xx Family chassis.
Figure 1-4 83xx Family Rear View


The following steps describe how to install a malware storage pack in the 82xx Family and the 83xx Family of devices. Install the malware storage pack in the SSD bay labeled Malware Storage Pack . Remove the empty SSD tray and replace it with the appropriate malware storage pack.

Note
Use proper electrostatic discharge (ESD) practices such as wrist straps and an ESD work surface. Use proper electrostatic discharge (ESD) practices such as wrist straps and an ESD work surface.
Step 1
Ensure the device is powered off before you begin to install or remove a malware storage pack.
Step 2
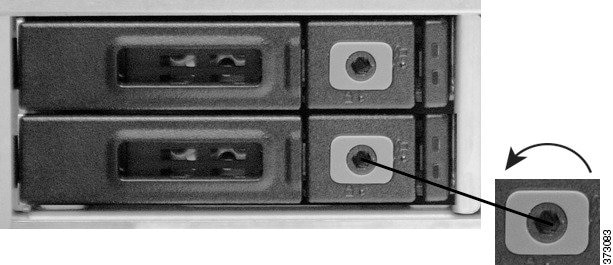
Use the 3 mm hex wrench to unlock the latch release on the bottom SSD tray by turning the hex screw one quarter turn counter-clockwise, towards the unlock icon (
).

Step 3
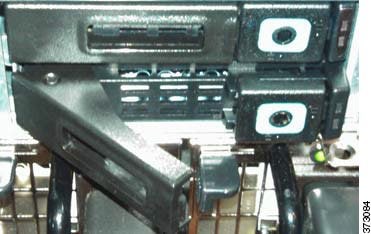
Press the latch lock to release the latch handle.
The latch handle opens toward you.

Step 4
Pull the latch handle to remove the SSD tray from the device.

Note
Retain the empty SSD tray. If you need to remove the malware storage pack at any time, re-install the empty tray in the device. Retain the empty SSD tray. If you need to remove the malware storage pack at any time, re-install the empty tray in the device.

Step 5
Remove the malware storage pack from its packaging.
Step 6
Press the latch lock to release the latch handle.
The latch handle opens toward you.

Note
If the latch release is locked, use the 3 mm hex wrench to unlock the latch release on the malware storage pack by turning the hex screw one quarter turn counter-clockwise, towards the unlock icon ( If the latch release is locked, use the 3 mm hex wrench to unlock the latch release on the malware storage pack by turning the hex screw one quarter turn counter-clockwise, towards the unlock icon (
).

Step 7
Align the malware storage pack with the SSD bay and insert the malware storage pack into the appliance.
Step 8
Push the latch handle on the SSD tray to secure the malware storage pack into the appliance.
Step 9
Use the 3 mm hex wrench to lock the latch release on the malware storage pack by turning the hex screw one quarter turn clockwise, towards the lock icon (
).

Refer to Post Installation for information on restarting a device after a malware storage pack has been installed.
Post Installation
After installation of a malware storage pack is completed, you can restart the device to resume normal operation.

Note
For information on how to safely restart or shut down the device, see the Managing Devices chapter in the FireSIGHT System User Guide. For information on how to safely restart or shut down the device, see the Managing Devices chapter in the FireSIGHT System User Guide.
When you restart the device, the FireSIGHT System automatically checks for the addition of the new storage pack. Before you restart the device, be aware of the following conditions:
- If a new (unformatted/unused) malware storage pack is detected, the FireSIGHT System formats and mounts the disk for storage of suspected malware files and configures the malware storage pack with one partition that uses the entire drive space for file storage.

Note
The FireSIGHT System alerts you via a console message that the storage pack is being formatted. Depending on the storage capacity of the malware storage pack, formatting and configuration of a malware storage pack can take five or more minutes. Do not reboot or otherwise interrupt this process. The FireSIGHT System alerts you via a console message that the storage pack is being formatted. Depending on the storage capacity of the malware storage pack, formatting and configuration of a malware storage pack can take five or more minutes. Do not reboot or otherwise interrupt this process.
- If you add a malware storage pack to an 8000 Series device that has already been used to capture files on the primary SSD, the FireSIGHT System moves the files stored on the primary SSD to the new malware storage pack in an effort to preserve the files and to recover space previously used on the primary SSD.

Note
The FireSIGHT System alerts you via a console warning message that file capture data is being transferred from the primary SSD. The file transfer process can take five or more minutes. Do not reboot or otherwise interrupt this process. The FireSIGHT System alerts you via a console warning message that file capture data is being transferred from the primary SSD. The file transfer process can take five or more minutes. Do not reboot or otherwise interrupt this process.
Note that you can remove a malware storage pack from a device at any time. A malware storage pack with file capture data can be relocated to another compatible device running FireSIGHT System Version 5.3 or greater. Any file capture data on the primary drive will be transferred to the relocated malware storage pack, and any existing data on the malware storage pack from the previous device will remain intact in its original directory structure. Also, you can use the Sourcefire 3D System to monitor the usage and health of a malware storage pack.
Removing a Malware Storage Pack
You can remove a malware storage pack from a device and you can relocate a malware storage pack to another device.
To remove a malware storage pack from a device:
Step 3
Remove the malware storage pack:
- For 81xx Family devices, refer to Instructions for the 81xx Family Devices (in reverse order).
- For 82xx Family and 83xx Family devices, refer to Instructions for the 82xx Family and 83xx Family Devices (in reverse order).
Removing a malware storage pack will trigger a health alert. For more information, see the Using Health Monitoring chapter in the FireSIGHT System User Guide.
Monitoring a Malware Storage Pack
Use the FireSIGHT System to monitor your malware storage pack. The FireSIGHT System provides information on usage, including the percentage of space used on the malware storage pack and the capacity of the malware storage pack. The FireSIGHT System also provides many useful monitoring features to assist you in the daily administration of your system, including health modules. For more information, see the FireSIGHT System User Guide.

Cisco and the Cisco logo are trademarks or registered trademarks of Cisco and/or its affiliates in the U.S. and other countries. To view a list of Cisco trademarks, go to this URL: www.cisco.com/go/trademarks . Third-party trademarks mentioned are the property of their respective owners. The use of the word partner does not imply a partnership relationship between Cisco and any other company. (1110R)
Any Internet Protocol (IP) addresses and phone numbers used in this document are not intended to be actual addresses and phone numbers. Any examples, command display output, network topology diagrams, and other figures included in the document are shown for illustrative purposes only. Any use of actual IP addresses or phone numbers in illustrative content is unintentional and coincidental.
Contact Cisco
- Open a Support Case

- (Requires a Cisco Service Contract)


 Printed in the USA on recycled paper containing 10% postconsumer waste.
 Feedback