Certificate Management in Cisco ISE-PIC

A certificate is an electronic document that identifies an individual, a server, a company, or other entity and associates that entity with a public key. Public Key Infrastructure (PKI) is a cryptographic technique that enables secure communication and verifies the identity of a user using digital signatures. Certificates are used in a network to provide secure access. Certificates can be self-signed or they can be digitally signed by an external Certificate Authority (CA). A self-signed certificate is signed by its own creator. A CA-signed digital certificate is considered industry standard and more secure. ISE-PIC can act as an external CA for pxGrid, digitally signing pxGrid certificates for the pxGrid subscribers.

Cisco ISE-PIC uses certificates for internode communication (each node presents its certificate to the other node in order to communicate with each other), and for communicating with pxGrid (ISE-PIC and pxGrid present certificates to each other). One certificate can be generated per node for each of these two purposes. Certificates identify a Cisco ISE node to pxGrid and secure the communication between pxGrid and the Cisco ISE node.

At installation, ISE-PIC automatically generates self-signed certificates for each ISE-PIC node (during installation, the administrator is prompted to accept the certificate that has been created for the secondary node automatically from the primary node) and certificates for the pxGrid services that are digitally signed by the primary ISE-PIC node. Thereafter, you can generate certificates for pxGrid subscribers in order to guarantee mutual trust between pxGrid and the subscribers, thereby ultimately enabling user identities to be passed from ISE-PIC to the subscribers. The Certificate menus in ISE-PIC are available in order to enable you to view the certificates, to generate additional ISE-PIC certificates and to perform some advanced tasks.


Note


While an administrator has the ability to use an enterprise certificate, ISE-PIC has been designed by default to use the internal authority for issuance of pxGrid certificates for subscribers.


Certificate Matching in Cisco ISE-PIC

When you set up Cisco ISE-PIC nodes in a deployment, the nodes communicate with each other. The system checks the FQDN of each Cisco ISE-PIC node to ensure that they match (for example ise1.cisco.com and ise2.cisco.com or if you use wildcard certificates then *.cisco.com). In addition, when an external machine presents a certificate to a Cisco ISE-PIC server, the external certificate that is presented for authentication is checked (or matched) against the certificate in the Cisco ISE-PIC server. If the two certificates match, the authentication succeeds.

Cisco ISE-PIC checks for a matching subject name as follows:

  1. Cisco ISE-PIC looks at the subject alternative name extension of the certificate. If the subject alternative name contains one or more DNS names, then one of the DNS names must match the FQDN of the Cisco ISE node. If a wildcard certificate is used, then the wildcard domain name must match the domain in the Cisco ISE node’s FQDN.

  2. If there are no DNS names in the subject alternative name, or if the subject alternative name is missing entirely, then the common name in the Subject field of the certificate or the wildcard domain in the Subject field of the certificate must match the FQDN of the node.

  3. If no match is found, the certificate is rejected.

Wildcard Certificates

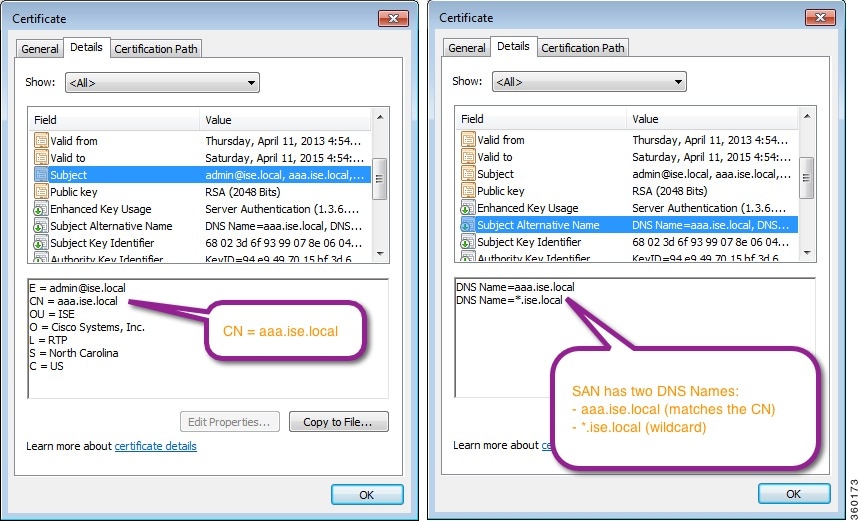
A wildcard certificate uses a wildcard notation (an asterisk and period before the domain name) and the certificate can be shared across multiple hosts in an organization. For example, the CN value for the certificate subject would be a generic hostname such as aaa.ise.local and the SAN field would include the same generic hostname and a wildcard notation such as DNS.1=aaa.ise.local and DNS.2=*.ise.local.

If you configure a wildcard certificate to use *.ise.local, you can use the same certificate to secure any other host whose DNS name ends with “.ise.local,” such as psn.ise.local.

Wildcard certificates secure communication in the same way as a regular certificate, and requests are processed using the same validation methods.

The following figure is an example of a wildcard certificate that is used to secure a website.

Figure 1. Example of Wildcard Certificate
Example of Wildcard Certificate

Using an asterisk (*) in the SAN field allows you to share a single certificate with all of your nodes (if you have installed more than one node) and helps prevent certificate name mismatch warnings. However, the use of wildcard certificates is considered less secure than assigning a unique server certificate for each Cisco ISE node separately.


Note


Some of the examples for FQDN are taken from a full Cisco ISE installation and therefore may be different than addresses relevant to the ISE-PIC installation.


Advantages of Using Wildcard Certificates

  • Cost savings: Certificates that are signed by third-party CAs are expensive, especially as the number of servers increases. Wildcard certificates can be used on multiple nodes in the Cisco ISE deployment.

  • Operational efficiency: Wildcard certificates allow all PSNs to share the same certificate for EAP and web services. In addition to significant cost savings, certificate administration is also simplified by creating the certificate once and applying it on all the PSNs.

  • Reduced authentication errors: Wildcard certificates address issues seen with Apple iOS devices when the client stores trusted certificates within the profile and does not follow the iOS keychain where the signing root is trusted. When an iOS client first communicates with a PSN, it does not explicitly trust the PSN certificate, although a trusted CA has signed the certificate. Using a wildcard certificate, the certificate is the same across all PSNs, so the user only has to accept the certificate once and successive authentications to different PSNs proceed without errors or prompts.

  • Simplified supplicant configuration: For example, a Microsoft Windows supplicant with PEAP-MSCHAPv2 and a trusted server certificate requires that you specify each of the server certificate to trust, or the user may be prompted to trust each PSN certificate when the client connects using a different PSN. With wildcard certificates, a single server certificate can be trusted rather than individual certificates from each PSN.

  • Wildcard certificates result in an improved user experience with less prompting and more seamless connectivity.

Disadvantages of Using Wildcard Certificates

The following are some of the security considerations that are related to the use of wildcard certificates:
  • Loss of auditability and nonrepudiation.

  • Increased exposure of the private key.

  • Not common or understood by administrators.

Wildcard certificates are considered less secure than using a unique server certificate in each Cisco ISE node. But cost and other operational factors outweigh the security risk.

Security devices such as Cisco Adaptive Security Appliance also support wildcard certificates.

You must be careful when deploying wildcard certificates. For example, if you create a certificate with *.company.local and an attacker is able to recover the private key, that attacker can spoof any server in the company.local domain. Therefore, it is considered a best practice to partition the domain space to avoid this type of compromise.

To address this possible issue and to limit the scope of use, wildcard certificates may also be used to secure a specific subdomain of your organization. Add an asterisk (*) in the subdomain area of the common name where you want to specify the wildcard.

For example, if you configure a wildcard certificate for *.ise.company.local, that certificate may be used to secure any host whose DNS name ends in “.ise.company.local”, such as:

  • psn.ise.company.local

  • mydevices.ise.company.local

  • sponsor.ise.company.local

Wildcard Certificate Compatibility

Wildcard certificates are usually created with the wildcard listed as the common name of the certificate subject. Cisco ISE supports this type of construction. However, not all endpoint supplicants support the wildcard character in the certificate subject.

All the Microsoft native supplicants that were tested (including Windows Mobile which is now discontinued) do not support wildcard character in the certificate subject.

You can use another supplicant, such as Network Access Manager that might allow the use of wildcard characters in the Subject field.

You can also use special wildcard certificates such as DigiCert's Wildcard Plus that is designed to work with incompatible devices by including specific subdomains in the Subject Alternative Name of the certificate.

Although the Microsoft supplicant limitation appears to be a deterrent to using wildcard certificates, there are alternative ways to create the wildcard certificate that allow it to work with all the devices tested for secure access, including the Microsoft native supplicants.

To do this, instead of using the wildcard character in the Subject, you must use the wildcard character in the Subject Alternative Name field instead. The Subject Alternative Name field maintains an extension that is designed for checking the domain name (DNS name). See RFC 6125 and RFC 2128 for more information.

Certificate Hierarchy in ISE-PIC

In ISE-PIC, view the certificate hierarchy or the certificate trust chain of all certificates. The certificate hierarchy includes the certificate, all the intermediate CA certificates, and the root certificate. For example, when you choose to view a system certificate from the ISE-PIC, the details of the corresponding system certificate are displayed. The certificate hierarchy is displayed at the top of the certificate. Click a certificate in the hierarchy to view its details. The self-signed certificate does not have any hierarchy or trust chain.

In the certificate listing windows, you will see one of the following icons in the Status column:

  • Green icon: Indicates a valid certificate (valid trust chain).

  • Red icon: Indicates an error (for example, trust certificate missing or expired).

  • Yellow icon: Warns that a certificate is about to expire and prompts renewal.

System Certificates

Cisco ISE-PIC system certificates are server certificates that identify a Cisco ISE-PIC node to other nodes in the deployment and to client applications. To access system certificates, choose Administration > System > Certificates > System Certificates. System certificates are:

  • Used for inter-node communication in a Cisco ISE-PIC deployment. Check the Admin check box in the Usage area of these certificates.

  • Used to communicate with the pxGrid controller. Check the pxGrid check box in the Usage area of these certificates.

Install valid system certificates on each node in your Cisco ISE-PIC deployment. By default, two self-signed certificates and one signed by the internal Cisco ISE CA are created on a Cisco ISE-PIC node during installation time:

  • A self-signed server certificate designated for Admin and pxGrid use (it has a key size of 2048 and is valid for one year).

  • A self-signed SAML server certificate that can be used to secure communication with a SAML identity provider (it has a key size of 2048 and is valid for one year).

  • An internal Cisco ISE CA-signed server certificate that can be used to secure communication with pxGrid clients (it has a key size of 4096 and is valid for one year).

When you set up a deployment and register a secondary node, the certificate that is designated for pxGrid controller is automatically replaced with a certificate that is signed by the primary node's CA. Thus, all pxGrid certificates become part of the same PKI trust hierarchy.

For supported key and cipher information for your release, see the appropriate version of the Cisco Identity Services Engine Network Component Compatibility guide.

We recommend that you replace the self-signed certificate with a CA-signed certificate for greater security. To obtain a CA-signed certificate, you must:

  1. Create a Certificate-Signing Request and Submit it to a Certificate Authority

  2. Import a Root Certificate into the Trusted Certificate Store

  3. Bind a CA-Signed Certificate to a Certificate Signing Request

View System Certificates

The System Certificate window lists all the system certificates added to Cisco ISE-PIC.

Procedure


Step 1

In the ISE-PIC GUI, click the Menu icon () and choose Certificates > System Certificates.

Step 2

The following columns are displayed in the System Certificates window:

  • Friendly Name: Name of the certificate.

  • Usage: The services for which this certificate is used.

  • Portal group tag: Applicable only for certificates that are designated for portal use. This field specifies which certificate has to be used for portals.

  • Issued To: Common Name of the certificate subject.

  • Issued By: Common Name of the certificate issuer

  • Valid From: Date on which the certificate was created, also known as the "Not Before" certificate attribute.

  • Valid To (Expiration): Expiration date of the certificate, also known as the "Not After" certificate attribute. The following icons are displayed next to the expiration date:

    • Green icon: Expiring in more than 90 days.

    • Blue icon: Expiring in 90 days or less.

    • Yellow icon: Expiring in 60 days or less.

    • Orange icon: Expiring in 30 days or less.

    • Red icon: Expired.


Import a System Certificate

You can import a system certificate for any Cisco ISE-PIC node from the administration portal.


Note


Changing the certificate of the admin role certificate on a primary PAN node restarts services on all other nodes. The system restarts one node at a time, after the primary PAN restart is complete.


Before you begin

  • Ensure that you have the system certificate and the private key file on the system that is running on the client browser.

  • If the system certificate that you import is signed by an external CA, import the relevant root CA and intermediate CA certificates into the Trusted Certificates store (Certificates > Trusted Certificates).

  • If the system certificate that you import contains basic constraints extension with the CA flag set to true, ensure that the key usage extension is present, and the keyEncipherment bit or the keyAgreement bit or both are set.

Procedure


Step 1

Choose Certificates > System Certificates.

Step 2

Click Import.

The Import Server Certificate window is displayed.

Step 3

Enter the values for the certificate that you are going to import.

Step 4

Click Submit.


Generate a Self-Signed Certificate

Add a new local certificate by generating a self-signed certificate. Cisco recommends that you only employ self-signed certificates for your internal testing and evaluation needs. If you plan to deploy Cisco ISE-PIC in a production environment, use CA-signed certificates whenever possible to ensure more uniform acceptance around a production network.


Note


If you use a self-signed certificate and you want to change the hostname of your Cisco ISE-PIC node, log in to the Cisco ISE-PIC node, delete the self-signed certificate that has the old hostname, and generate a new self-signed certificate. Otherwise, Cisco ISE-PIC continues to use the self-signed certificate with the old hostname.


Procedure


Step 1

In the ISE-PIC GUI, click the Menu icon () and choose Certificates > System Certificates.

Step 2

Click Generate Self Signed Certificate and enter the details in the window displayed.

Step 3

Check the Allow Wildcard Certificates check box to generate a self-signed wildcard certificate (a certificate that contains an asterisk (*) in any Common Name in the Subject or the DNS name in the Subject Alternative Name. For example, the DNS name that is assigned to the SAN can be *.amer.cisco.com.

Step 4

Check the check boxes in the Usage area based on the service for which you want to use this certificate.

Step 5

Click Submit to generate the certificate.

To restart the secondary nodes, from the CLI, enter the following commands in the following order:

  1. application stop ise

  2. application start ise


Edit a System Certificate

Use this window to edit a system certificate and to renew a self-signed certificate. When you edit a wildcard certificate, the changes are replicated to all the nodes in the deployment. If you delete a wildcard certificate, that wildcard certificate is removed from all the nodes in the deployment.

Procedure


Step 1

Choose Certificates > System Certificates.

Step 2

Check the check box next to the certificate that you want to edit, and click Edit.

Step 3

To renew a self-signed certificate, check the Renewal Period check box and enter the expiration Time to Live (TTL) in days, weeks, months, or years. Choose the required value from the drop-down lists.

Step 4

Click Save.

If the Admin check box is checked, then the application server on the Cisco ISE-PIC node restarts.


Delete a System Certificate

Although you can delete multiple certificates from the System Certificates store at a time, you must have at least one certificate to use for Admin authentication. Also, you cannot delete any certificate that is in use for Admin or pxGrid controller. However, you can delete the pxGrid certificate when the service is disabled.

If you choose to delete a wildcard certificate, the certificate is removed from all the Cisco ISE nodes in the deployment.

Procedure


Step 1

In the ISE-PIC GUI, click the Menu icon () and choose Certificates > System Certificates.

Step 2

Check the check boxes next to the certificates that you want to delete, and click Delete.

A warning message is displayed.

Step 3

Click Yes to delete the certificate.


Export a System Certificate

You can export a system certificate or a certificate and its associated private key. If you export a certificate and its private key for backup purposes, you can reimport them later if needed.

Procedure


Step 1

In the ISE-PIC GUI, click the Menu icon () and choose Certificates > System Certificates. .

Step 2

Check the check box next to the certificate that you want to export and click Export.

Step 3

Choose whether to export only the certificate, or the certificate and its associated private key.

Tip


We do not recommend exporting the private key that is associated with a certificate because its value may be exposed. If you must export a private key (for example, when you export a wildcard system certificate to be imported into the other Cisco ISE nodes for inter-node communication), specify an encryption password for the private key. You must specify this password while importing this certificate into another Cisco ISE-PIC node to decrypt the private key.

Step 4

Enter the password if you have chosen to export the private key. The password should be at least eight characters long.

Step 5

Click Export to save the certificate to the file system that is running your client browser.

If you export only the certificate, the certificate is stored in the PEM format. If you export both the certificate and private key, the certificate is exported as a .zip file that contains the certificate in the PEM format and the encrypted private key file.


Trusted Certificates Store

The Trusted Certificates store contains X.509 certificates that are used for trust and for Simple Certificate Enrollment Protocol (SCEP).

X.509 certificates imported to Cisco ISE must be in PEM or Distinguished Encoding Rule format. Files containing a certificate chain, a system certificate along with the sequence of trust certificates that sign it, are imported, subject to certain restrictions.

When assigning public wildcard certificates to the guest portal and importing sub-CA with root-CA certificates, the certificate chain is not sent until the Cisco ISE services restart.

X.509 certificates are only valid until a specific date. When a trusted certificate expires, the Cisco ISE functionality that depends on the certificate is impacted. Cisco ISE notifies you about the pending expiration of a system certificate when the expiration date is within 90 days. This notification appears in several ways:

  • Colored expiration status icons are displayed in the System Certificates window.

  • Expiration messages appear in the Cisco ISE System Diagnostic report (Operations > Reports > Reports > Diagnostics > System Diagnostic.

  • Expiration alarms are generated 90 days, 60 days, and 30 days before expiration, and every day in the final 30 days before expiration.

If the expiring certificate is a self-signed certificate, you can extend its expiration date by editing the certificate. For a CA-signed certificate, allow sufficient time to acquire the replacement certificate from your CA.

Cisco ISE uses the trusted certificates for the following purposes:

  • To verify client certificates used for authentication by endpoints, and by Cisco ISE administrators accessing ISE-PICusing certificate-based administrator authentication.

  • To enable secure communication between Cisco ISE-PIC nodes in a deployment. The Trusted Certificates store must contain the chain of CA certificates needed to establish trust with the system certificate on each node in a deployment.

    • If a self-signed certificate is used for the system certificate, the self-signed certificate from each node must be placed in the Trusted Certificates store of the PAN.

    • If a CA-signed certificate is used for the system certificate, the CA root certificate, and any intermediate certificates in the trust chain, must be placed in the Trusted Certificates store of the PAN.

At installation, the Trusted Certificate store is populated with automatically generated trusted certificates. The Root certificate (Cisco Root CA) signs the Manufacturing (Cisco CA Manufacturing) certificate.

Trusted Certificate Naming Constraints

A trusted certificate in CTL may contain a name constraint extension. This extension defines a namespace for values of all subject name and subject alternative name fields of subsequent certificates in a certificate chain. Cisco ISE does not check constraints that are specified in a root certificate.

Cisco ISE supports the following name constraints:

  • Directory name

    The directory name constraint should be a prefix of the directory name in the subject or subject alternative name field. For example:

    • Correct subject prefix:

      CA certificate name constraint: Permitted: O=Cisco

      Client certificate subject: O=Cisco,CN=Salomon

    • Incorrect subject prefix:

      CA certificate name constraint: Permitted: O=Cisco

      Client certificate subject: CN=Salomon,O=Cisco

  • DNS

  • Email

  • URI (The URI constraint must start with a URI prefix such as http://, https://, ftp://, or ldap://).

Cisco ISE does not support the following name constraints:

  • IP Address

  • OtherName

When a trusted certificate contains a constraint that is not supported and the certificate that is being verified does not contain the appropriate field, Cisco ISE rejects the certificate because it cannot verify unsupported constraints.

The following is an example of the name constraints definition within the trusted certificate:


X509v3 Name Constraints: critical
                Permitted:
                  othername:<unsupported>
                  email:.abcde.at
                  email:.abcde.be
                  email:.abcde.bg
                  email:.abcde.by
                  DNS:.dir
                  DirName: DC = dir, DC = emea
                  DirName: C = AT, ST = EMEA, L = AT, O = ABCDE Group, OU = Domestic
                  DirName: C = BG, ST = EMEA, L = BG, O = ABCDE Group, OU = Domestic
                  DirName: C = BE, ST = EMEA, L = BN, O = ABCDE Group, OU = Domestic
                  DirName: C = CH, ST = EMEA, L = CH, O = ABCDE Group, OU = Service Z100
                  URI:.dir
                  IP:172.23.0.171/255.255.255.255
                Excluded:
                  DNS:.dir
                  URI:.dir

An acceptable client certificate subject that matches the above definition is as follows:


           Subject: DC=dir, DC=emea, OU=+DE, OU=OU-Administration, OU=Users, OU=X1, 			CN=cwinwell

View Trusted Certificates

The Trusted Certificates window lists all the trusted certificates that are available in Cisco ISE-PIC.

Procedure


Step 1

To view all the certificates, choose Choose Certificates > Trusted Certificates. The Trusted Certificates window displayed, listing all the trusted certificates.

Step 2

Check the check box of the trusted certificate and click Edit, View, Export, or Delete to perform the required task.


Change the Status of a Certificate in Trusted Certificates Store

The status of a certificate must be enabled so that Cisco ISE-PIC can use the certificate for establishing trust. When a certificate is imported into the Trusted Certificates store, it is automatically enabled.

Procedure


Step 1

In the ISE-PIC GUI, click the Menu icon () and choose Certificates > Trusted Certificates.

Step 2

Check the check box next to the certificate you want to enable or disable, and click Edit.

Step 3

Choose the status from the Status drop-down list.

Step 4

Click Save.


Add a Certificate to Trusted Certificates Store

The Trusted Certificate store window allows you to add CA certificates to Cisco ISE-PIC.

Before you begin

  • The certificate that you want to add must be in the file system of the computer where your browser is running. The certificate must be in PEM or DER format.

  • To use the certificate for Admin or EAP authentication, define the basic constraints in the certificate and set the CA flag to true.

Procedure


Step 1

In the ISE-PIC GUI, click the Menu icon () and choose Certificates > Trusted Certificates.

Step 2

Click Import.

Step 3

Configure the field values as necessary.

To use any sub-CA certificate in the certificate chain for EAP authentication or certificate-based administrator authentication, check the Trust for client authentication and Syslog check box while importing all the certificates in the certificate chain up until the root CA. You can import more than one CA certificate with the same subject name. For certificate-based administrator authentication, check the Trust for certificate based admin authentication check box when adding a trusted certificate. You cannot check the Trust for certificate based admin authentication check box for a certificate in the trusted certificate store if there is another certificate in the store with the same subject, and has the Trust for certificate based admin authentication check box enabled.

When you change the authentication type from password-based authentication to certificate-based authentication, Cisco ISE-PIC restarts the application server on each node in your deployment, starting with the application server on the PAN.


Edit a Trusted Certificate

After you add a certificate to the Trusted Certificates store, you can further edit it by using the Edit options.

Procedure


Step 1

In the ISE-PIC GUI, click the Menu icon () and choose Certificates > Trusted Certificates.

Step 2

Check the check box next to the certificate that you want to edit, and click Edit.

Step 3

(Optional) Enter a name for the certificate in the Friendly Name field. If you do not specify a friendly name, a default name is generated in the following format:

common-name#issuer#nnnnn

Step 4

Define the usage of the certificate by checking the necessary check boxes in the Trusted For area.

Step 5

(Optional) Enter a description for the certificate in the Description field.

Step 6

Click Save.


Delete a Trusted Certificate

You can delete trusted certificates that you no longer need. However, you must not delete Cisco ISE-PIC internal CA certificates. Cisco ISE-PIC internal CA certificates can be deleted only when you replace the Cisco ISE-PIC root certificate chain for the entire deployment.

Procedure


Step 1

In the ISE-PIC GUI, click the Menu icon () and choose Certificates > Trusted Certificates.

Step 2

Check the check boxes next to the certificates that you want to delete, and click Delete.

A warning message is displayed. To delete the Cisco ISE-PIC Internal CA certificates, click one of the following options:

  • Delete: To delete the Cisco ISE-PIC internal CA certificates. All endpoint certificates that are signed by the Cisco ISE-PIC internal CA become invalid and the endpoints cannot join the network. To allow the endpoints on the network again, import the same Cisco ISE-PIC internal CA certificates into the Trusted Certificates store.
  • Delete & Revoke: Deletes and revokes the Cisco ISE-PIC internal CA certificates. All endpoint certificates that are signed by the Cisco ISE-PIC internal CA become invalid and the endpoints cannot get on to the network. This operation cannot be undone. You must replace the Cisco ISE-PIC root certificate chain for the entire deployment.

Step 3

Click Yes to delete the certificate.


Export a Certificate from Trusted Certificates Store

Before you begin

To perform the following task, you must be a Super Admin or System Admin.


Note


If you export certificates from the internal CA and plan to use the exported certificates to restore from backup, use the CLI command application configure ise. See Export Cisco ISE CA Certificates and Keys.


Procedure


Step 1

Check the check box next to the certificate that you want to export, and click Export. You can export only one certificate at a time.

Step 2

The chosen certificate downloads in the PEM format into the file system that is running your client browser.


Import a Root Certificate into the Trusted Certificate Store

When you import the root CA and intermediate CA certificates, specify the services for which the trusted CA certificates are to be used.

When you import an external root CA certificate, enable the Trust for certificate based admin authentication usage option in Step 5 of the following task.

Before you begin

You must have the root certificate and other intermediate certificates from the CA that signed your certificate signing requests and returned the digitally signed CA certificates.

Procedure


Step 1

Click Import.

Step 2

In the Import a new Certificate into the Certificate Store window, click Choose File to select the root CA certificate that is signed and returned by your CA.

Step 3

Enter a Friendly Name.

If you do not enter a Friendly Name, Cisco ISE-PIC autopopulates this field with a name of the format common-name#issuer#nnnnn, where nnnnn is a unique number. You can also edit the certificate later to change the Friendly Name.

Step 4

Check the check boxes next to the services for which you want to use this trusted certificate.

Step 5

(Optional) In the Description field, enter a description for your certificate.

Step 6

Click Submit.


What to do next

Import the intermediate CA certificates into the Trusted Certificates store (if applicable).

Certificate Chain Import

You can import multiple certificates from a single file that contains a certificate chain received from a Certificate store. All certificates in the file must be in the PEM format, and the certificates must be arranged in the following order:

  • The last certificate in the file must be the client or server certificate issued by the CA.

  • All preceding certificates must be the root CA certificate plus any intermediate CA certificates in the signing chain for the issued certificate.

Importing a certificate chain is a two-step process:

  1. Import the certificate chain file into the Trusted Certificate store in the Cisco ISE administration portal. This operation imports all certificates from the file except the last one into the Trusted Certificates store.

  2. Import the certificate chain file using the Bind a CA-Signed Certificate operation. This operation imports the last certificate from the file as a local certificate.

Trusted Certificate Import Settings

The following table describes the fields in the Trusted Certificate Import window, which you can use to add CA certificates to Cisco ISE-PIC. To view this window, click the Menu icon () and choose Certificates > Trusted Certificates > Import.

Table 1. Trusted Certificate Import Settings

Field Name

Description

Certificate File

Click Browse to choose the certificate file from the computer that is running the browser.

Friendly Name

Enter a friendly name for the certificate. If you do not specify a name, Cisco ISE-PIC automatically creates a name in the format <common name># <issuer># <nnnnn>, where <nnnnn> is a unique five-digit number.

Trust for authentication within ISE

Check the check box if you want this certificate to be used to verify server certificates (from other ISE-PIC nodes or LDAP servers).

Trust for client authentication and Syslog

(Applicable only if you check the Trust for authentication within ISE-PIC check box) Check the check box if you want this certificate to be used to:

  • Authenticate endpoints that connect to ISE-PIC using the EAP protocol

  • Trust a Syslog server

Trust for authentication of Cisco Services

Check this check box if you want this certificate to be used to trust external Cisco services such as the feed service.

Validate Certificate Extensions

(Only if you check both the Trust for client authentication and Enable Validation of Certificate Extensions options) Ensure that the “keyUsage” extension is present and the “keyCertSign” bit is set, and that the basic constraints extension is present with the CA flag set to true.

Description

Enter an optional description.

Certificate-Signing Requests

For a CA to issue a signed certificate, you must create a certificate signing request and submit it to the CA.

The list of certificate-signing requests that you have created is available in the Certificate-Signing Requests window. To view this window, click the Menu icon () and chooseAdministration > System > Certificates > Certificate-Signing Requests. To obtain signatures from a CA, you must export the certificate-signing request and then send the certificates to the CA. The CA signs and returns your certificates.

You can manage the certificates centrally from the Cisco ISE administration portal. You can create certificate-signing requests for all the nodes in your deployment and export them. Then, you should submit the certificate-signing requests to a CA, obtain the signed certificates from the CA, import the root and intermediary CA certificates given by the CA into the Trusted Certificates store, and bind the CA-signed certificates to the certificate-signing requests.

Create a Certificate-Signing Request and Submit it to a Certificate Authority

You can generate a certificate-signing request to obtain a CA-signed certificate for the nodes in your deployment. You can generate the certificate-signing request for a specific node in the deployment or for all the nodes in your deployment.

Procedure


Step 1

In the ISE-PIC GUI, click the Menu icon () and choose Certificates > Certificate-Signing Requests.

Step 2

Click Generate Certificate-Signing Requests (CSR) to generate the certificate-signing request.

Step 3

Enter the values for generating a certificate-signing request. See Trusted Certificate Settings for information on each of the fields in the window displayed.

Step 4

(Optional) Check the check box of the signing request that you want to download and and click Export to download the request.

Step 5

Copy all the text from “-----BEGIN CERTIFICATE REQUEST-----” through “-----END CERTIFICATE REQUEST-----.” and paste the contents of the request in the certificate request of the chosen CA.

Step 6

Download the signed certificate.

Some CAs might email the signed certificate to you. The signed certificate is in the form of a .zip file that contains the newly issued certificate and the public signing certificates of the CA that you must add to the Cisco ISE-PIC trusted certificates store. The digitally-signed CA certificate, root CA certificate, and other intermediate CA certificate (if applicable) can be downloaded to the local system running your client browser.


Bind a CA-Signed Certificate to a Certificate Signing Request

After the CA returns the digitally signed certificate, you must bind it to the certificate-signing request. You can perform the bind operation for all the nodes in your deployment, from the Cisco ISE administration portal.

Before you begin

  • You must have the digitally signed certificate, and the relevant root intermediate CA certificates sent by the CA.

  • Import the relevant root and intermediate CA certificates to the Trusted Certificates store (Certificates > Trusted Certificates. ).

Procedure


Step 1

In the ISE-PIC GUI, click the Menu icon () and choose Certificates > Certificate-Signing Requests.

Step 2

Check the check box next to the certificate signing request you must bind with the CA-signed certificate.

Step 3

Click Bind Certificate.

Step 4

In the Bind CA Signed Certificate window displayed, click Choose File to choose the CA-signed certificate.

Step 5

Enter a value in the Friendly Name field.

Step 6

Check the Validate Certificate Extensions check box if you want Cisco ISE-PIC to validate certificate extensions.

If you enable the Validate Certificate Extensions option, and the certificate that you import contains a basic constraints extension with the CA flag set to True, ensure that the key usage extension is present, and that the keyEncipherment bit or the keyAgreement bit, or both, are also set.

Note


Cisco ISE requires EAP-TLS client certificates to have digital signature key usage extension.

Step 7

(Optional) Check the services for which this certificate will be used in the Usage area.

This information is autopopulated if you have enabled the Usage option while generating the certificate signing request. You can also choose to edit the certificate at a later time to specify the usage.

Changing the Admin usage certificate on a primary PAN restarts the services on all the other nodes. The system restarts one node at a time, after the primary PAN restarts.

Step 8

Click Submit to bind the certificate-signing request with the CA-signed certificate.

If this certificate is marked for Cisco ISE-PIC internode communication usage, the application server on the Cisco ISE-PIC node restarts.

Repeat this process to bind the certificate-signing request with the CA-signed certificate on the other nodes in the deployment.


What to do next

Import a Root Certificate into the Trusted Certificate Store

Export a Certificate-Signing Request

Procedure


Step 1

In the ISE-PIC GUI, click the Menu icon () and choose Certificates > Certificate-Signing Requests.

Step 2

Check the check box next to the certificates that you want to export, and click Export.

Step 3

The certificate-signing request is downloaded to your local file system.


Certificate-Signing Request Settings

Cisco ISE-PIC allows you to generate certificate-signing requests for the nodes in your deployment from the administration portal in a single request. Also, you can choose to generate the certificate signing request for a single node or nodes in the deployment. If you choose to generate a certificate signing request for a single node, ISE automatically substitutes the Fully Qualified Domain Name (FQDN) of that particular node in the CN field of the certificate subject. If you enter a domain name other than the FQDN of that node in the CN field, Cisco ISE rejects authentication with that certificate. If you choose to include an entry in the Subject Alternative Name (SAN) field of the certificate, you must enter the FQDN of the ISE-PIC node in addition to other SAN attributes. If necessary, you can also add additional FQDNs in the SAN field. If you choose to generate certificate signing requests for both nodes in your deployment, check the Allow Wildcard Certificates check box and enter the wildcard FQDN notation in the SAN field (DNS name), for example, *.amer.example.com. If you plan to use the certificate for EAP Authentication, do not enter the wildcard value in the CN= field.

With the use of wildcard certificates, you no longer have to generate a unique certificate for each Cisco ISE-PIC node. Also, you no longer have to populate the SAN field with multiple FQDN values to prevent certificate warnings. Using an asterisk (*) in the SAN field allows you to share a single certificate across nodes in a deployment and helps prevent certificate name mismatch warnings. However, use of wildcard certificates is considered less secure than assigning a unique server certificate for each Cisco ISE-PIC node.

The following table describes the fields in the certificate-signing request window, which you can use to generate a certificate-signing request that can be signed by a Certificate Authority (CA). To view this window, click the Menu icon () and choose Certificates > Certificate Management > Certificate-Signing Request.

Table 2. Certificate-Signing Request Settings
Field Usage Guidelines

Certificate(s) will be used for

Choose the service for which you are going to use the certificate:

Cisco ISE Identity Certificates

  • Multi-Use: Used for multiple services (Admin, EAP-TLS Authentication, pxGrid). Multi-use certificates use both client and server key usages. The certificate template on the signing CA is often called a Computer or Machine certificate template. This template has the following properties:

    • Key Usage: Digital Signature (Signing)

    • Extended Key Usage: TLS Web Server Authentication (1.3.6.1.5.5.7.3.1) and TLS Web Client Authentication (1.3.6.1.5.5.7.3.2)

  • Admin: Used for server authentication (to secure communication with the Admin portal and between ISE-PIC nodes in a deployment). The certificate template on the signing CA is often called a Web Server certificate template. This template has the following properties:

    • Key Usage: Digital Signature (Signing)

    • Extended Key Usage: TLS Web Server Authentication (1.3.6.1.5.5.7.3.1)

  • ISE Messaging Service: Used by the feature Syslog Over Cisco ISE Messaging, which enables MnT WAN survivability for built-in UDP syslog collection targets (LogCollector and LogCollector2).

    • Key Usage: Digital Signature (Signing)

    • Extended Key Usage: TLS Web Server Authentication (1.3.6.1.5.5.7.3.1)

  • pxGrid: Used for both client and server authentication (to secure communication between the pxGrid client and server). The certificate template on the signing CA is often called a Computer or Machine certificate template. This template has the following properties:

    • Key Usage: Digital Signature (Signing)

    • Extended Key Usage: TLS Web Server Authentication (1.3.6.1.5.5.7.3.1) and TLS Web Client Authentication (1.3.6.1.5.5.7.3.2)

  • SAML: Server certificate used to secure communication with the SAML Identity Provider (IdP). A certificate designated for SAML use cannot be used for any other service such as Admin, EAP authentication, and so on.

    • Key Usage: Digital Signature (Signing)

    • Extended Key Usage: TLS Web Server Authentication (1.3.6.1.5.5.7.3.1)

Note

 
We recommend that you do not use a certificate that contains the value of 2.5.29.37.0 for the Any Purpose object identifier in the Extended Key Usage attribute. If you use a certificate that contains the value of 2.5.29.37.0 for the Any Purpose object identifier in the Extended Key Usage attribute, the certificate is considered invalid and the following error message is displayed:
source=local ; type=fatal ; message="unsupported certificate"

Cisco ISE Certificate Authority Certificates

  • ISE Root CA: (Applicable only for the internal CA service ) Used for regenerating the entire internal CA certificate chain including the root CA on the Primary PAN and subordinate CAs on the PSNs.

  • ISE Intermediate CA: (Applicable only for the internal CA service when ISE-PIC acts as an intermediate CA of an external PKI) Used to generate an intermediate CA certificate on the Primary PAN and subordinate CA certificates on the PSNs. The certificate template on the signing CA is often called a Subordinate Certificate Authority. This template has the following properties:

    • Basic Constraints: Critical, Is a Certificate Authority

    • Key Usage: Certificate Signing, Digital Signature

    • Extended Key Usage: OCSP Signing (1.3.6.1.5.5.7.3.9)

  • Renew ISE OCSP Responder Certificates: (Applicable only for the internal CA service) Used to renew the ISE-PIC OCSP responder certificate for the entire deployment (and is not a certificate signing request). For security reasons, we recommend that you renew the ISE-PIC OCSP responder certificates every six months.

Allow Wildcard Certificates

Check this check box to use a wildcard character (*) in the CN and/or the DNS name in the SAN field of the certificate. If you check this check box, all the nodes in the deployment are selected automatically. You must use the asterisk (*) wildcard character in the left-most label position. If you use wildcard certificates, we recommend that you partition your domain space for greater security. For example, instead of *.example.com, you can partition it as *.amer.example.com. If you do not partition your domain, it might lead to security issues.

Generate CSRs for these Nodes

Check the check boxes next to the nodes for which you want to generate the certificate. To generate a CSR for select nodes in the deployment, you must uncheck the Allow Wildcard Certificates option.

Common Name (CN)

By default, the common name is the FQDN of the ISE-PIC node for which you are generating the certificate signing request. $FQDN$ denotes the FQDN of the ISE-PIC node. When you generate certificate signing requests for multiple nodes in the deployment, the Common Name field in the certificate signing requests is replaced with the FQDN of the respective ISE nodes.

Organizational Unit (OU)

Organizational Unit name. For example, Engineering.

Organization (O)

Organization name. For example, Cisco.

City (L)

(Do not abbreviate) City name. For example, San Jose.

State (ST)

(Do not abbreviate) State name. For example, California.

Country (C)

Country name. You must enter the two-letter ISO country code. For example, US.

Subject Alternative Name (SAN)

An IP address, DNS name, Uniform Resource Identifier (URI), or Directory Name that is associated with the certificate.

  • DNS Name: If you choose the DNS name, enter the fully qualified domain name of the ISE-PIC node. If you have enabled the Allow Wildcard Certificates option, specify the wildcard notation (an asterisk and a period before the domain name). For example, *.amer.example.com.

  • IP Address: IP address of the ISE-PIC node to be associated with the certificate.

  • Uniform Resource Identifier: A URI that you want to associate with the certificate.

  • Directory Name: A string representation of distinguished name(s) (DNs) defined per RFC 2253. Use a comma (,) to separate the DNs. For “dnQualifier” RDN, escape the comma and use backslash-comma “\,” as separator. For example, CN=AAA,dnQualifier=O=Example\,DC=COM,C=IL

Key Type

Specify the algorithm to be used for creating the public key: RSA or ECDSA.

Key Length

Specify the bit size for the public key.

The following options are available for RSA:

  • 512

  • 1024

  • 2048

  • 4096

The following options are available for ECDSA:

  • 256

  • 384

Note


RSA and ECDSA public keys might have different key length for the same security level.

Choose 2048 or greater if you plan to get a public CA-signed certificate or deploy Cisco ISE-PIC as a FIPS-compliant policy management system.

Digest to Sign With

Choose one of the following hashing algorithm: SHA-1 or SHA-256.

Certificate Policies

Enter the certificate policy OID or list of OIDs that the certificate should conform to. Use comma or space to separate the OIDs.

Cisco ISE CA Service

Certificates can be self-signed or digitally signed by an external Certificate Authority (CA). ISE-PIC can act as an external Certificate Authority (CA) for pxGrid, digitally signing the pxGrid certificate. A CA-signed digital certificate is considered industry standard and more secure. The ISE-PIC CA offers the following functionalities:

  • Certificate Issuance: Validates and signs Certificate Signing Requests (CSRs) for endpoints that connect to your network.

  • Key Management: Generates and securely stores keys and certificates.

  • Certificate Storage: Stores certificates issued to users and devices.

  • Online Certificate Status Protocol (OCSP) Support: Provides an OCSP responder to check for the validity of certificates.

When a CA Service is disabled on the primary administrative node, the CA service is still seen as running on the secondary administration node's CLI. Ideally, the CA service should be seen as disabled. This is a known Cisco ISE issue.

Elliptical Curve Cryptography Certificates Support

Cisco ISE-PIC CA service supports certificates that are based on Elliptical Curve Cryptography (ECC) algorithms. ECC offers more security and better performance than other cryptographic algorithms even when using a much smaller key size.

The following table compares the key sizes of ECC and RSA and security strength.

ECC Key Size (in bits) RSA Key Size (in bits)
160 1024
224 2048
256 3072
384 7680
521 15360

Because of the smaller key size, encryption is quicker.

Cisco ISE-PIC supports the following ECC curve types. The higher the curve type or key size, the greater is the security.

  • P-192

  • P-256

  • P-384

  • P-521

ISE-PIC does not support explicit parameters in the EC part of a certificate. If you try to import a certificate with explicit parameters, you get the error: Validation of certificate failed: Only named ECParameters supported.

You can generate ECC certificates from the Certificate Provisioning Portal.

Cisco ISE-PIC Certificate Authority Certificates

The Certificate Authority (CA) Certificates page lists all the certificates related to the internal Cisco ISE-PIC CA. These certificates are listed node wise in this page. You can expand a node to view all the ISE-PIC CA certificates of that particular node. The Primary and Secondary Administration nodes have the root CA, node CA, subordinate CA, and OCSP responder certificates. The other nodes in the deployment have the endpoint subordinate CA and OCSP certificates.

When you enable the Cisco ISE-PIC CA service, these certificates are generated and installed on all the nodes automatically. Also, when you replace the entire ISE-PIC Root CA Chain, these certificates are regenerated and installed on all the nodes automatically. There is no manual intervention required.

The Cisco ISE-PIC CA certificates follow the following naming convention: Certificate Services <Endpoint Sub CA/Node CA/Root CA/OCSP Responder>-<node_hostname>#certificate_number.

From the CA Certificates page, you can edit, import, export, delete, and view the Cisco ISE-PIC CA certificates.

Edit a Cisco ISE-PIC CA Certificate

After you add a certificate to the Cisco ISE-PIC CA Certificates Store, you can further edit it by using the edit settings.

Procedure

Step 1

In the ISE-PIC GUI, click the Menu icon () and choose Certificates > Certificate Authority > Certificate Authority Certificates.

Step 2

Check the check box next to the certificate that you want to edit, and click Edit.

Step 3

Modify the editable fields as required. See Trusted Certificate Settings for a description of the fields.

Step 4

Click Save to save the changes you have made to the certificate store.


Export a Cisco ISE CA Certificate

To export the Cisco ISE root CA and node CA certificates:

Before you begin

To perform the following task, you must be a Super Admin or System Admin.

Procedure

Step 1

In the ISE-PIC GUI, click the Menu icon () and choose Certificates > Certificate Authority > Certificate Authority Certificates.

Step 2

Check the check box next to the certificate that you want to export, and click Export. You can export only one certificate at a time.

Step 3

Save the privacy-enhanced mail file to the file system that is running your client browser.


Import a Cisco ISE-PIC CA Certificate

If a client tries to authenticate to your network using a certificate issued by Cisco ISE-PIC CA from another deployment, you must import the Cisco ISE-PIC root CA, node CA, and endpoint sub CA certificates from that deployment in to the Cisco ISE-PIC Trusted Certificates store.

Before you begin
  • Export the ISE-PIC root CA, node CA, and endpoint sub CA certificates from the deployment where the endpoint certificate is signed and store it on the file system of the computer where your browser is running.

Procedure

Step 1

Choose Certificates > Trusted Certificates.

Step 2

Click Import.

Step 3

Configure the field values as necessary. See Trusted Certificate Import Settings for more information.

If client certificate-based authentication is enabled, then Cisco ISE-PIC will restart the application server on each node in your deployment, starting with the application server on the PAN.


Trusted Certificate Settings

The following table describes the fields in the Edit window of a Trusted Certificate. Edit the CA certificate attributes in this window. To view this window, click the Menu icon () and choose Administration > System > Certificates > Trusted Certificates. Check the check box for the Trusted Certificate you want to edit, and click Edit.

Table 3. Trusted Certificate Edit Settings

Field Name

Usage Guidelines

Certificate Issuer

Friendly Name

Enter a friendly name for the certificate. This is an optional field. If you do not enter a friendly name, a default name is generated in the following format:

common-name#issuer#nnnnn

Status

Choose Enabled or Disabled from the drop-down list. If the certificate is disabled, Cisco ISE will not use the certificate for establishing trust.

Description

(Optional) Enter a description.

Usage

Trust for authentication within ISE

Check this check box if you want this certificate to verify server certificates (from other Cisco ISE nodes or LDAP servers).

Trust for client authentication and Syslog

(Applicable only if you check the Trust for authentication within ISE check box) Check the check box if you want this certificate to be used to:

  • Authenticate endpoints that connect to Cisco ISE using the EAP protocol.

  • Trust a Syslog server.

Trust for certificate based admin authentication

You can check this check box only when Trust for client authentication and Syslog is selected.

Check this check box to enable usage for certificate-based authentications for admin access. Import the required certificate chains into the Trusted Certificate store.

Trust for authentication of Cisco Services

Check this check box if you want this certificate to be used to trust external Cisco services such as the Feed Service.

Certificate Status Validation

Cisco ISE supports two ways of checking the revocation status of a client or server certificate that is issued by a particular CA. The first way is to validate the certificate using the Online Certificate Status Protocol (OCSP), which makes a request to an OCSP service maintained by the CA. The second way is to validate the certificate against a CRL which is downloaded from the CA into Cisco ISE. Both of these methods can be enabled, in which case OCSP is used first and only if a status determination cannot be made then the CRL is used.

Validate Against OCSP Service

Check the check box to validate the certificate against OCSP services. You must first create an OCSP Service to be able to check this box.

Reject the request if OCSP returns UNKNOWN status

Check the check box to reject the request if certificate status is not determined by the OCSP service. If you check this check box, an unknown status value that is returned by the OCSP service causes Cisco ISE to reject the client or server certificate currently being evaluated.

Reject the request if OCSP Responder is unreachable

Check the check box for Cisco ISE to reject the request if the OCSP Responder is not reachable.

Download CRL

Check the check box for the Cisco ISE to download a CRL.

CRL Distribution URL

Enter the URL to download the CRL from a CA. This field is automatically populated if it is specified in the certificate authority certificate. The URL must begin with “http”, “https”, or “ldap.”

Retrieve CRL

The CRL can be downloaded automatically or periodically. Configure the time interval between downloads.

If download failed, wait

Configure the time interval that Cisco ISE must wait Cisco ISE tries to download the CRL again.

Bypass CRL Verification if CRL is not Received

Check this check box, for the client requests to be accepted before the CRL is received. If you uncheck this check box, all client requests that use certificates signed by the selected CA will be rejected until Cisco ISE receives the CRL file.

Ignore that CRL is not yet valid or expired

Check this check box if you want Cisco ISE to ignore the start date and expiration date and continue to use the not yet active or expired CRL and permit or reject the EAP-TLS authentications based on the contents of the CRL.

Uncheck this check box if you want Cisco ISE to check the CRL file for the start date in the Effective Date field and the expiration date in the Next Update field. If the CRL is not yet active or has expired, all authentications that use certificates signed by this CA are rejected.

Backup and Restoration of Cisco ISE-PIC CA Certificates and Keys

You must back up the Cisco ISE-PIC CA certificates and keys securely to be able to restore them back on a Secondary Administration Node in case of a PAN failure and you want to promote the Secondary Administration Node to function as the root CA or intermediate CA of an external PKI. The Cisco ISE-PIC configuration backup does not include the CA certificates and keys. Instead, you should use the Command Line Interface (CLI) to export the CA certificates and keys to a repository and to import them. The application configure ise command now includes export and import options to backup and restore CA certificates and keys.

The following certificates from the Trusted Certificates Store are restored on the Secondary Administration Node:

  • Cisco ISE Root CA certificate

  • Cisco ISE Sub CA certificate

  • Cisco ISE Endpoint RA certificate

  • Cisco ISE OCSP Responder certificate

You must back up and restore Cisco ISE CA certificates and keys when you:

  • Have a Secondary Administration Node in the deployment

  • Replace the entire Cisco ISE-PIC CA root chain

  • Configure Cisco ISE-PIC root CA to act as a subordinate CA of an external PKI

  • Restore data from a configuration backup. In this case, you must first regenerate the Cisco ISE-PIC CA root chain and then back up and restore the ISE CA certificates and keys.


Note


Whenever the Cisco ISE internal CA is replaced in a deployment, then the ISE messaging service must also be refreshed that time to retrieve the complete certificate chain.


Export Cisco ISE CA Certificates and Keys

You must export the CA certificates and keys from the PAN to import them on the Secondary Administration Node. This option enables the Secondary Administration Node to issue and manage certificates for endpoints when the PAN is down and you promote the Secondary Administration Node to be the PAN.

Before you begin

Ensure that you have created a repository to store the CA certificates and keys.

Procedure

Step 1

Enter application configure ise command from the Cisco ISE CLI.

Step 2

Enter 7 to export the certificates and keys.

Step 3

Enter the repository name.

Step 4

Enter an encryption key.

A success message appears with the list of certificates that were exported, along with the subject, issuer, and serial number.

Example:
 The following 4 CA key pairs were exported to repository 'sftp' at 'ise_ca_key_pairs_of_ise-vm1':
        Subject:CN=Cisco ISE Self-Signed CA of ise-vm1
        Issuer:CN=Cisco ISE Self-Signed CA of ise-vm1
        Serial#:0x621867df-568341cd-944cc77f-c9820765

        Subject:CN=Cisco ISE Endpoint CA of ise-vm1
        Issuer:CN=Cisco ISE Self-Signed CA of ise-vm1
        Serial#:0x7027269d-d80a406d-831d5c26-f5e105fa

        Subject:CN=Cisco ISE Endpoint RA of ise-vm1
        Issuer:CN=Cisco ISE Endpoint CA of ise-vm1
        Serial#:0x1a65ec14-4f284da7-9532f0a0-8ae0e5c2

        Subject:CN=Cisco ISE OCSP Responder Certificate of ise-vm1
        Issuer:CN=Cisco ISE Self-Signed CA of ise-vm1
        Serial#:0x6f6d4097-21f74c4d-8832ba95-4c320fb1
ISE CA keys export completed successfully

Import Cisco ISE-PIC CA Certificates and Keys

After you register the Secondary Administration Node, you must export the CA certificates and keys from the PAN and import them in to the Secondary Administration Node.

Procedure

Step 1

Enter application configure ise command from the Cisco ISE-PIC CLI.

Step 2

Enter 8 to import the CA certificates and keys.

Step 3

Enter the repository name.

Step 4

Enter the name of the file that you want to import. The file name should be in the format ise_ca_key_pairs_of_<vm hostname>.

Step 5

Enter the encryption key to decrypt the file.

A success message appears.

Example:
The following 4 CA key pairs were imported:
        Subject:CN=Cisco ISE Self-Signed CA of ise-vm1
        Issuer:CN=Cisco ISE Self-Signed CA of ise-vm1
        Serial#:0x21ce1000-8008472c-a6bc4fd9-272c8da4

        Subject:CN=Cisco ISE Endpoint CA of ise-vm1
        Issuer:CN=Cisco ISE Self-Signed CA of ise-vm1
        Serial#:0x05fa86d0-092542b4-8ff68ed4-f1964a56

        Subject:CN=Cisco ISE Endpoint RA of ise-vm1
        Issuer:CN=Cisco ISE Endpoint CA of ise-vm1
        Serial#:0x77932e02-e8c84b3d-b27e2f1c-e9f246ca

        Subject:CN=Cisco ISE OCSP Responder Certificate of ise-vm1
        Issuer:CN=Cisco ISE Self-Signed CA of ise-vm1
        Serial#:0x5082017f-330e412f-8d63305d-e13fd2a5

Stopping ISE Certificate Authority Service...
Starting ISE Certificate Authority Service...
ISE CA keys import completed successfully

Note


Encryption of exported keys file was introduced in Cisco ISE Release 2.6. The export of keys from Cisco ISE Release 2.4 and earlier versions and import of keys in Cisco ISE Release 2.6 and later versions will not be successful.


Generate Root CA and Subordinate CAs

When you set up the deployment, Cisco ISE-PIC generates a root CA on the node. However, when you change the domain name or the hostname of the node, you must regenerate root CA on the primary PAN and sub CAs on the PSNs respectively.


Note


PXgrid and IMS certificates will not be replaced by Internal CA while regenerating root CA if the respective certificate is externally signed.

If you want to change the signing by Internal CA for PXgrid certificate, generate a self-signed Pxgrid certificate and regenerate the root CA.

If you want to change the signing by Internal CA for Cisco ISE Messaging Services certificate, regenerate the Cisco ISE Messaging Services certificate from the CSR page.


Procedure


Step 1

In the ISE-PIC GUI, click the Menu icon () and choose Certificates > Certificate Signing Requests.

Step 2

Click Generate Certificate Signing Requests (CSR).

Step 3

Choose ISE Root CA from the Certificate(s) will be used for drop-down list.

Step 4

Click Replace ISE Root CA Certificate chain.

The root CA and subordinate CA certificates get generated for all the nodes in your deployment.


Configure Cisco ISE-PIC Root CA as Subordinate CA of an External PKI

If you want the root CA on the primary PAN to act as a subordinate CA of an external PKI, generate an ISE-PIC intermediate CA certificate signing request, send it to the external CA, obtain the root and CA-signed certificates, import the root CA certificate in to the Trusted Certificates Store, and bind the CA-signed certificate to the CSR. In this case, the external CA is the root CA, the node is a subordinate CA of the external CA, and the PSNs are subordinate CAs of the node.

Procedure


Step 1

Choose Certificates > Certificate Signing Requests.

Step 2

Click Generate Certificate Signing Requests (CSR).

Step 3

Choose ISE Intermediate CA from the Certificate(s) will be used for drop-down list.

Step 4

Click Generate.

Step 5

Export the CSR, send it to the external CA, and obtain the CA-signed certificate.

Step 6

Import the root CA certificate from the external CA in to the Trusted Certificates store.

Step 7

Bind the CA-signed certificate with the CSR.


OCSP Services

The Online Certificate Status Protocol (OCSP) is a protocol that is used for checking the status of x.509 digital certificates. This protocol is an alternative to the Certificate Revocation List (CRL) and addresses issues that result in handling CRLs.

Cisco ISE has the capability to communicate with OCSP servers over HTTP to validate the status of certificates in authentications. The OCSP configuration is configured in a reusable configuration object that can be referenced from any certificate authority (CA) certificate that is configured in Cisco ISE.

You can configure CRL and/or OCSP verification per CA. If both are selected, then Cisco ISE first performs verification over OCSP. If a communication problem is detected with both the primary and secondary OCSP servers, or if an unknown status is returned for a given certificate, Cisco ISE switches to checking the CRL.

Cisco ISE CA Service Online Certificate Status Protocol Responder

The Cisco ISE CA OCSP responder is a server that communicates with OCSP clients. The OCSP clients for the Cisco ISE CA include the internal Cisco ISE OCSP client and OCSP clients on the Adaptive Security Appliance (ASA). The OCSP clients should communicate with the OCSP responder using the OCSP request/response structure defined in RFC 2560, 5019.

The Cisco ISE CA issues a certificate to the OCSP responder. The OCSP responder listens on port 2560 for any incoming requests. This port is configured to allow only OCSP traffic.

The OCSP responder accepts a request that follows the structure defined in RFC 2560, 5019. Nonce extension is supported in the OCSP request. The OCSP responder obtains the status of the certificate and creates an OCSP response and signs it. The OCSP response is not cached on the OCSP responder, although you can cache the OCSP response on the client for a maximum period of 24 hours. The OCSP client should validate the signature in the OCSP response.

The self-signed CA certificate (or the intermediate CA certificate if ISE acts as an intermediate CA of an external CA) on the PAN issues the OCSP responder certificate. This CA certificate on the PAN issues the OCSP certificates on the PAN and PSNs. This self-signed CA certificate is also the root certificate for the entire deployment. All the OCSP certificates across the deployment are placed in the Trusted Certificates Store for ISE to validate any response signed using these certificates.


Note


Cisco ISE receives from OCSP responder servers a thisUpdate value, which indicates the time since the last certificate revocation. If the thisUpdate value is greater than 7 days, the OCSP certificate verification fails in Cisco ISE.


OCSP Certificate Status Values

OCSP services return the following values for a given certificate request:

  • Good—Indicates a positive response to the status inquiry. It means that the certificate is not revoked, and the state is good only until the next time interval (time to live) value.

  • Revoked—The certificate was revoked.

  • Unknown—The certificate status is unknown. OCSP service returns this value if the certificate was not issued by the CA of this OCSP responder.

  • Error—No response was received for the OCSP request.

OCSP High Availability

Cisco ISE has the capability to configure up to two OCSP servers per CA, and they are called primary and secondary OCSP servers. Each OCSP server configuration contains the following parameters:

  • URL—The OCSP server URL.

  • Nonce—A random number that is sent in the request. This option ensures that old communications cannot be reused in replay attacks.

  • Validate response—Cisco ISE validates the response signature that is received from the OCSP server.

In case of timeout (which is 5 seconds), when Cisco ISE communicates with the primary OCSP server, it switches to the secondary OCSP server.

Cisco ISE uses the secondary OCSP server for a configurable amount of time before attempting to use the primary server again.

OCSP Failures

The three general OCSP failure scenarios are as follows:

  • Failed OCSP cache or OCSP client side (Cisco ISE) failures.

  • Failed OCSP responder scenarios, for example:

    The first primary OCSP responder not responding, and the secondary OCSP responder responding to the Cisco ISE OCSP request.

    Errors or responses not received from Cisco ISE OCSP requests.

    An OCSP responder may not provide a response to the Cisco ISE OCSP request or it may return an OCSP Response Status as not successful. OCSP Response Status values can be as follows:

    • tryLater

    • signRequired

    • unauthorized

    • internalError

    • malformedRequest

      There are many date-time checks, signature validity checks and so on, in the OCSP request. For more details, refer to RFC 2560 X.509 Internet Public Key Infrastructure Online Certificate Status
Protocol - OCSP which describes all the possible states, including the error states.

  • Failed OCSP reports

Add OCSP Client Profiles

You can use the OCSP Client Profile page to add new OCSP client profiles to Cisco ISE.

Before you begin

If the Certificate Authority (CA) is running the OCSP service on a nonstandard port (other than 80 or 443), you must configure ACLs on the switch to allow for communication between Cisco ISE and the CA on that port. For example:

permit tcp <source ip> <destination ip> eq <OCSP port number>

Procedure


Step 1

In the ISE-PIC GUI, click the Menu icon () and choose Certificates > OCSP Client Profile.

Step 2

Enter the values to add an OCSP Client Profile.

Step 3

Click Submit.


OCSP Statistics Counters

Cisco ISE uses OCSP counters to log and monitor the data and health of the OCSP servers. Logging occurs every five minutes. Cisco ISE sends a syslog message to the Monitoring node and it is preserved in the local store. The local store contains data from the previous five minutes. After Cisco ISE sends the syslog message, the counters are recalculated for the next interval. This means, after five minutes, a new five-minute window interval starts again.

The following table lists the OCSP syslog messages and their descriptions.

Table 4. OCSP Syslog Messages

Message

Description

OCSPPrimaryNotResponsiveCount

The number of nonresponsive primary requests

OCSPSecondaryNotResponsiveCount

The number of nonresponsive secondary requests

OCSPPrimaryCertsGoodCount

The number of ‘good’ certificates that are returned for a given CA using the primary OCSP server

OCSPSecondaryCertsGoodCount

The number of ‘good’ statuses that are returned for a given CA using the primary OCSP server

OCSPPrimaryCertsRevokedCount

The number of ‘revoked’ statuses that are returned for a given CA using the primary OCSP server

OCSPSecondaryCertsRevokedCount

The number of ‘revoked’ statuses that are returned for a given CA using the secondary OCSP server

OCSPPrimaryCertsUnknownCount

The number of ‘Unknown’ statuses that are returned for a given CA using the primary OCSP server

OCSPSecondaryCertsUnknownCount

The number of ‘Unknown’ statuses that are returned for a given CA using the secondary OCSP server

OCSPPrimaryCertsFoundCount

The number of certificates that were found in cache from a primary origin

OCSPSecondaryCertsFoundCount

The number of certificates that were found in cache from a secondary origin

ClearCacheInvokedCount

How many times clear cache was triggered since the interval

OCSPCertsCleanedUpCount

How many cached entries were cleaned since the t interval

NumOfCertsFoundInCache

Number of the fulfilled requests from the cache

OCSPCacheCertsCount

Number of certificates that were found in the OCSP cache