Cisco Secure Firewall Management Center Snort 3 Configuration Guide, Version 7.2
Bias-Free Language
The documentation set for this product strives to use bias-free language. For the purposes of this documentation set, bias-free is defined as language that does not imply discrimination based on age, disability, gender, racial identity, ethnic identity, sexual orientation, socioeconomic status, and intersectionality. Exceptions may be present in the documentation due to language that is hardcoded in the user interfaces of the product software, language used based on RFP documentation, or language that is used by a referenced third-party product. Learn more about how Cisco is using Inclusive Language.
This chapter provides an insight into network analysis policy basics, perquisites, and how to manage network analysis policies.
It also provides information on custom network analysis policy creation and network analysis policy settings.
Overview of Network Analysis Policies
Network analysis policies govern many traffic preprocessing options, and are invoked by advanced settings in your access control policy. Network analysis-related
preprocessing occurs after Security Intelligence matching and SSL decryption, but before intrusion or file inspection begins.
By default, the system uses the Balanced Security and Connectivity network analysis policy to preprocess all traffic handled by an access control policy. However, you can choose a different
default network analysis policy to perform this preprocessing. For your convenience, the system provides a choice of several
non-modifiable network analysis policies, which are tuned for a specific balance of security and connectivity by the Cisco Talos Intelligence Group
(Talos). You can also create a custom network analysis policy with custom preprocessing settings.
Tip
System-provided intrusion and network analysis policies are similarly named but contain different configurations. For example,
the Balanced Security and Connectivity network analysis policy and the Balanced Security and Connectivity intrusion policy
work together and can both be updated in intrusion rule updates. However, the network analysis policy governs mostly preprocessing
options, whereas the intrusion policy governs mostly intrusion rules. Network analysis and intrusion policies work together
to examine your traffic.
You can also tailor traffic preprocessing options to specific security zones, networks, and VLANs by creating multiple custom
network analysis policies, then assigning them to preprocess different traffic. (Note that ASA FirePOWER cannot restrict preprocessing by VLAN.)
Manage Network Analysis Policies
In a multidomain deployment, the system displays policies created in the current domain, which you can edit. It also displays
policies created in ancestor domains, which you cannot edit. To view and edit policies created in a lower domain, switch to
that domain.
Under your user name in the toolbar, the system displays a tree of available domains. To switch domains, choose the domain
you want to access.
Procedure
Step 1
Choose one of the following paths to access the network analysis policy.
Policies > Access Control, then click Network Analysis
Policy
Policies > Access Control > Intrusion, then click Network Analysis
Policies
Policies > Intrusion > Network Analysis Policies
Note
If your custom user role limits access to the first path listed here, use the second path to access the policy.
Step 2
Manage your network analysis policy:
Compare—Click Compare Policies; see Comparing Policies in the Cisco Secure Firewall Management Center Configuration Guide.
Note
You can compare Snort 2 policies only.
Create—If you want to create a new network analysis policy, click Create Policy.
Two versions of the network analysis policy are created, a Snort 2 Version and a Snort 3 Version.
For the Snort 2 version, see Custom Network Analysis Policy Creation for Snort 2 in the Cisco Secure Firewall Management Center Configuration Guide.
Delete—If you want to delete a network analysis policy, click the Delete icon, then confirm that you want to delete the policy. You cannot delete a network analysis policy if an access control policy
references it.
If the controls are dimmed, the configuration belongs to an ancestor domain, or you do not have permission to modify the
configuration.
Edit—If you want to edit an existing network analysis policy, click the Edit icon.
If View () appears instead, the configuration belongs to an ancestor
domain, or you do not have permission to modify the
configuration.
Report—Click the Report icon; see Generating Current Policy Reports in the Cisco Secure Firewall Management Center Configuration Guide.
Snort 3 Definitions and Terminologies for Network Analysis Policy
The following table lists the Snort 3 concepts and terms used in the Network Analysis Policy.
Table 1. Snort 3 Definitions and Terminologies for Network Analysis Policy
Term
Description
Inspectors
Inspectors are plugins that process packets (similar to the Snort 2 preprocessor).
Binder inspector
Binder inspector defines the flow when a particular inspector has to be accessed and taken into consideration.
When the traffic matches the conditions defined in the binder inspector, only then do the values/configurations for that inspector
come into effect.
Singleton inspectors contain one instance. These inspectors do not support adding more instances like multiton inspectors.
Settings of singleton inspector are applied to the entire traffic matching that inspector and not to a specific traffic segment.
Multiton inspectors contain multiple instances which you can configure as needed. These inspectors support configuring settings
based on specific conditions, such as network, port, and VLAN. One set of supported settings is called an instance.
The schema file is based on the OpenAPI JSON specification, and it validates the content that you upload or download. You
can download the schema file and open it using any third-party JSON editor, such as Swagger editor. The schema file helps
you to identify what parameters can be configured for inspectors with their corresponding allowed values, range, and accepted
patterns to be used.
You can download the entire inspector configurations in a single file.
All information regarding the inspector configuration is available in this file.
The full configuration is a merged configuration of the default configuration (rolled out as a part of the LSP updates by
Cisco Talos) and the custom NAP inspector configurations.
In the Snort 3 Version of the network analysis policy page:
Under Actions > Upload, you can click Overridden Configuration to upload the JSON file that contains the overridden configuration.
Under Actions > Download, you can click Overridden Configuration to download the inspector configuration that has been overridden.
If you have not overridden any inspector configuration, then this option is disabled. When you override the inspector configuration,
then this option is enabled automatically to allow you to download.
Prerequisites for Network Analysis and Intrusion Policies
To allow the Snort inspection engine to process traffic for intrusion and malware analysis, you must have the IPS license
enabled for the Threat Defense device.
You must be an Admin user to manage network analysis, intrusion policies, and perform migration tasks.
Custom Network Analysis Policy Creation for Snort 3
The default network analysis policy is tuned for typical network requirements and optimal performance. Usually, the default
network analysis policy suffices most network requirements and you might not need to customize the policy. However, when you
have a specific network requirement or when you are facing performance issues, the default network analysis policy can be
customized. Note that customizing the network analysis policy is an advanced configuration that should be done only by advanced
users or Cisco support.
Network analysis policy configuration for Snort 3 is a data-driven model, which is based on JSON and JSON Schema. Schema is
based on the OpenAPI specification, and it helps you get a view of the supported inspectors, settings, settings type, and
valid values. The Snort 3 inspectors are plugins that process packets (similar to the Snort 2 preprocessor). Network analysis
policy configuration is available to download in the JSON format.
In Snort 3, the list of inspectors and settings are not in a one-to-one mapping with the Snort 2 list of preprocessors and
settings. Also, the number of inspectors and settings available in management center is a subset of the inspectors and settings that Snort 3 supports. See https://snort.org/snort3 for more information on Snort 3. See https://www.cisco.com/go/snort3-inspectors for more information on the inspectors available in management center.
Note
While upgrading the management center to the 7.0 release, the changes that were done in the Snort 2 version of the network analysis policy are not migrated to
Snort 3 after the upgrade.
Unlike the intrusion policy, there is no option to synchronize Snort 2 network analysis policy settings to Snort 3.
Default Inspector Updates
Lightweight Security Package (LSP) updates may contain new inspectors or modifications to integer ranges for existing inspector
configurations. Following the installation of an LSP, new inspectors and/or updated ranges will be available under Inspectors in the Snort 3 Version of your network analysis policy.
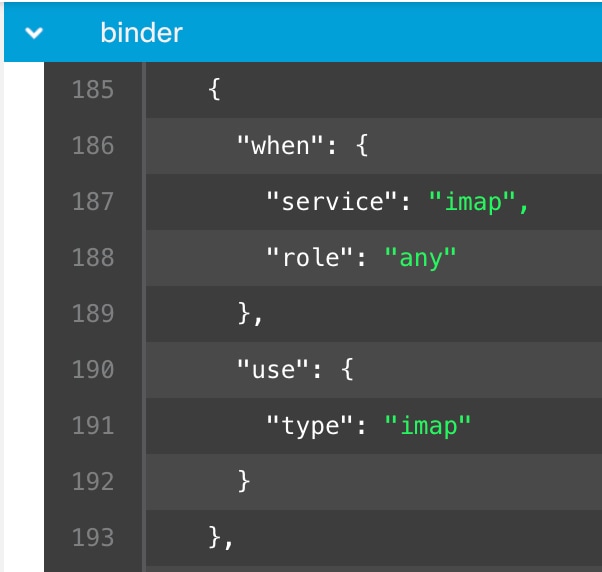
Binder Inspector
Binder inspector defines the flow when a particular inspector has to be accessed and taken into consideration. When the traffic
matches the conditions defined in the binder inspector, only then the values/configurations for that inspector come into effect.
For example:
For the imap inspector, the binder defines the following condition when it has to be accessed. That is when:
Service is equal to imap.
Role is equal to any.
If these conditions are met, then use the type imap.
Singleton Inspectors
Singleton inspectors contain a single instance. These inspectors do not support adding more instances like multiton inspectors.
Settings of singleton inspector are applied to the entire traffic and not to a specific traffic segment.
Multiton inspectors contain multiple instances which you can configure as needed. These inspectors support configuring settings
based on specific conditions, such as network, port, and VLAN. One set of supported settings is called an instance. There
is a default instance, and you can also add additional instances based on specific conditions. If the traffic matches that
condition, the settings from that instance are applied. Otherwise, the settings from the default instance are applied. Also,
the name of the default instance is the same as the inspector's name.
For a multiton inspector, when you upload the overridden inspector configuration, you also need to include/define a matching
binder condition (conditions under when the inspector has to be accessed or used) for each instance in the JSON file, otherwise,
the upload will result in an error. You can also create new instances, but make sure that you include a binder condition for
every new instance that you create to avoid errors.
For example:
Multiton inspector where the default instance is modified.
For network analysis policies, Cisco Talos provides mapping information, which is used to find the corresponding Snort 2 version of the policies for the Snort 3 version.
This mapping ensures that the Snort 3 version of policies has its equivalent Snort 2 version.
View Network Analysis Policy Mapping
Procedure
Step 1
Go to Policies > Intrusion > Network Analysis Policies.
Step 2
Click NAP Mapping.
Step 3
Expand the arrow for View Mappings.
The Snort 3 network analysis policies that are automatically mapped to a Snort 2 equivalent policy are displayed.
Step 4
Click OK.
Create a Network Analysis Policy
All the existing network analysis policies are available in management center with their corresponding Snort 2 and Snort 3 versions. When you create a new network analysis policy, it is created with
both the Snort 2 version and the Snort 3 version.
Procedure
Step 1
Go to Policies > Intrusion > Network Analysis Policies.
Step 2
Click Create Policy.
Step 3
Enter the Name and Description.
Step 4
Choose the Inspection Mode from the available choices.
Detection
Prevention
Step 5
Select a Base Policy and click Save.
Note
Configure Network Analysis Policy (NAP) in Prevention mode if you are using Snort 3 and SSL Decryption or TLS Server Identity.
The new network analysis policy is created with its corresponding Snort 2 Version and Snort 3 Version.
Modify the Network Analysis Policy
You can modify the network analysis policy to change its name, description, or the base policy.
Procedure
Step 1
Go to Policies > Intrusion > Network Analysis Policies.
Step 2
Click Edit to change the name, description, inspection mode, or the base policy.
Note
If you edit the network analysis policy name, description, base policy, and inspection mode, the edits are applied to both
the Snort 2 and Snort 3 versions. If you want to change the inspection mode for a specific version, then you can do that from
within the network analysis policy page for that respective version.
Step 3
Click Save.
Search for an Inspector on the Network Analysis Policy Page
On the Snort 3 version of the network analysis policy page, you may need to search for an inspector by entering any relevant
text in the search bar.
Procedure
Step 1
Go to Policies > Intrusion > Network Analysis Policies.
Step 2
Go to the Snort 3 Version of the network analysis policy.
Step 3
Enter an inspector's name or any relevant text to search for in the Search bar.
All the inspectors matching the text you search for are displayed.
For example, if you enter pop, then the pop inspector and the binder inspector are shown as matching results on the screen.
Copy the Inspector Configuration
You can copy the inspector configuration for the Snort 3 version of the network analysis policy according to your requirements.
Procedure
Step 1
Go to Policies > Intrusion > Network Analysis Policies.
Step 2
Go to the Snort 3 Version of the network analysis policy.
Step 3
Under Inspectors, expand the required inspector for which you want to copy the configuration.
The default configuration is displayed on the left column and the overridden configuration is displayed on the right column
under the inspector.
Step 4
Click the Copy to clipboard icon to copy the inspector configuration to the clipboard for one or both of the following.
Default Configuration in the left column
Overridden Configuration in the right column
Step 5
Paste the copied inspector configuration to a JSON editor to make any edits you may require.
Customize the Network Analysis Policy
You can customize the Snort 3 version of the network analysis policy according to your requirements.
Procedure
Step 1
Go to Policies > Intrusion > Network Analysis Policies.
Step 2
Go to the Snort 3 Version of the network analysis policy.
Step 3
Click the Actions drop-down menu.
The following options are displayed:
View Schema
Download Schema / Download Sample File / Template
Download Full Configuration
Download Overridden Configuration
Upload Overridden Configuration
Step 4
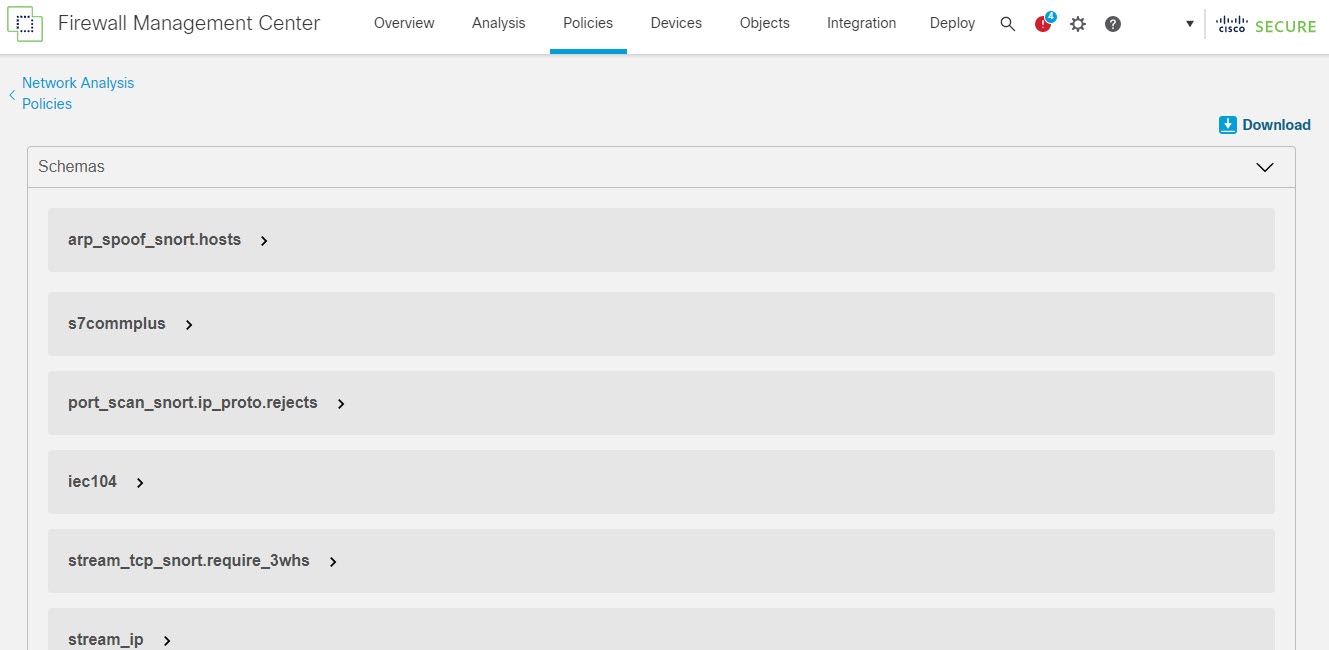
Click View Schema to open the schema file directly in a browser.
Step 5
You can download the schema file, sample file / template, full configuration, or overridden configuration as needed.
These options provide you an insight about the allowed values, range, and patterns, existing and default inspector configurations,
and overridden inspector configurations.
Click Download Schema to download the schema file.
The schema file validates the content that you upload or download. You can download the schema file and open it using any
third-party JSON editor. The schema file helps you to identify what parameters can be configured for inspectors with their
corresponding allowed values, range, and accepted patterns to be used.
For example, for the arp_spoof_snort inspector, you can configure the hosts. The hosts include the mac and ip address values. The schema file shows the following accepted pattern for these values.
mac – pattern: ^([0-9A-Fa-f]{2}[:-]){5}([0-9A-Fa-f]{2})$
ip – pattern: ^([0-9]{1,3}.[0-9]{1,3}.[0-9]{1,3}.[0-9]{1,3}(/[0-9]{1,2}){0,1})$
You must provide the values, range, patterns according to the accepted ones in the schema file to be able to successfully
override the inspector configuration, otherwise, you get an error message.
Click Download Sample File / Template to use a pre-existing template that contains example configurations to help you with configuring the inspectors.
You can refer to the example configurations included in the sample file and make any changes that you may require.
Click Download Full Configuration to download the entire inspector configurations in a single JSON file.
Instead of expanding the inspectors separately, you can download the full configuration to look out for the information you
need. All information regarding the inspector configuration is available in this file.
Click
Download Overridden Configuration to download the inspector configuration that has been overridden.
Step 6
To override the existing configuration, follow the steps.
You can choose to override an inspector configuration using the following ways.
Make inline edits for an inspector directly on the management center. See the topic Make Inline Edit for an Inspector to Override Configuration in the Getting Started with Network Analysis Policies chapter of the Cisco Secure Firewall Management Center Snort 3 Configuration Guide.
Continue to follow the current procedure of using the Actions drop-down menu to upload the overridden configuration file.
If you chose to make inline edits directly in the management center, then you don't need to follow the current procedure further. Otherwise, you must follow this procedure completely.
Under Inspectors, expand the required inspector for which you want to override the default configuration.
The default configuration is displayed on the left column and the overridden configuration is displayed on the right column
under the inspector.
You may need to search for an inspector by entering any relevant text in in the search bar.
Click the Copy to clipboard icon to copy the default inspector configuration to the clipboard.
Create a JSON file and paste the default configuration in it.
Keep the inspector configuration that you want to override, and remove all the other configuration and instances from the
JSON file.
You can also use the Sample File / Template to understand how to override the default configuration. This is a sample file that includes JSON snippets explaining how
you can customize the network analysis policy for Snort 3.
Make changes to the inspector configuration as needed.
Validate the changes and make sure they conform to the schema file. For multiton inspectors, make sure that the binder conditions
for all instances are included in the JSON file. See Multiton Inspectors in the topic Custom Network Analysis Policy Creation for Snort 3 in the Cisco Secure Firewall Management Center Snort 3 Configuration Guide for more information.
If you are copying any further default inspector configurations, append that inspector configuration to the existing file
that contains the overridden configuration.
Note
The copied inspector configuration must comply with the JSON standards.
Save the overridden configuration file to your system.
Step 7
From the Actions drop-down menu, choose Upload Overridden Configuration to upload the JSON file that contains the overridden configuration.
Caution
Upload only the changes that you require. You should not upload the entire configuration as it makes the overrides sticky
in nature and therefore, any subsequent changes to the default configuration as part of the LSP updates would not be applied.
You can drag and drop a file or click to browse to the JSON file saved in your system that contains the overridden inspector
configuration.
Merge inspector overrides – Content in the uploaded file is merged with the existing configuration if there is no common inspector. If there are common
inspectors, then the content in the uploaded file (for common inspectors) takes precedence over the previous content, and
it replaces the previous configuration for those inspectors.
Replace inspector overrides – Removes all previous overrides and replaces them with the new content in the uploaded file.
Attention
Choosing this option deletes all the previous overrides. Make an informed decision before you override the configuration using
this option.
If any error occurs while uploading the overridden inspectors, you see the error in the Upload Overridden Configuration File pop-up window. You can also download the file with the error, fix the error, and reupload the file.
Step 8
In the Upload Overridden Configuration File pop-up window, click Import to upload the overridden inspector configuration.
After you upload the overridden inspector configuration, you will see an orange icon next to the inspector that signifies
that it is an overridden inspector.
Also, the Overridden Configuration column under the inspector shows the overridden value.
You can also view all the overridden inspectors using the Show Overrides Only checkbox adjacent to the Search bar.
Note
Make sure that you always download the overridden configuration, open the JSON file, and append any new changes/overrides
to the inspector configurations to this file. This action is needed so that you do not lose the old overridden configurations.
Step 9
(Optional) Take a backup of the overridden configuration file on your system before making any new inspector configuration
changes.
Tip
We recommend that you take the backup from time to time as you override the inspector configuration.
Make Inline Edit for an Inspector to Override Configuration
For the Snort 3 version of the network analysis policy, you can make an inline edit for the inspector configuration to override
the configuration according to your requirements.
Alternatively, you can also use the Actions drop-down menu to upload the overridden configuration file. See Customize the Network Analysis Policy for more information.
Procedure
Step 1
Go to Policies > Intrusion > Network Analysis Policies.
Step 2
Go to the Snort 3 Version of the network analysis policy.
Step 3
Under Inspectors, expand the required inspector for which you want to override the default setting.
The default configuration is displayed on the left column and the overridden configuration is displayed on the right column
under the inspector.
Step 4
Under the Overridden Configuration in the right column, click Edit Inspector (Pencil) icon to make changes to the inspector configuration.
The Override Configuration pop-up appears where you can make the required edits.
Note
Make sure that you keep only those settings that you want to override. If you leave a setting with the same value, that field
becomes sticky. This means if that setting is changed in the future by Talos, the current value will be retained.
If you are adding or deleting any custom instance, make sure that you add or delete a binder rule for that instance in the
binder inspector as well.
Step 5
Click OK.
If there are any errors according to the JSON standards, it shows you an error message.
Step 6
Click Save to save the changes.
If the changes conform to the OpenAPI schema specification, the management center allows you to save the configuration, otherwise, the Error saving overridden configuration pop-up appears that shows the errors. You can also download the file with the errors.
Revert Unsaved Changes during Inline Edits
While making inline edits to override the configuration for an inspector , you can revert any unsaved changes. Note that this
action reverts all unsaved changes to the most recently saved value, but does not revert the configuration to the default
configuration for an inspector.
Procedure
Step 1
Go to Policies > Intrusion > Network Analysis Policies.
Step 2
Go to the Snort 3 Version of the network analysis policy.
Step 3
Under Inspectors, expand the required inspector for which you want to revert the unsaved changes.
The default configuration is displayed in the left column and the overridden configuration is displayed in the right column
under the inspector.
Step 4
Under the Overridden Configuration on the right column, click the Cross (X) icon to revert any unsaved changes for the inspector.
Alternatively, you can click Cancel to cancel the changes.
If you do not have any unsaved changes to the inspector configuration, then this option is not visible.
View the List of Inspectors with Overrides
You can view a list of all the overridden inspectors.
Procedure
Step 1
Go to Policies > Intrusion > Network Analysis Policies.
Step 2
Go to the Snort 3 Version of the network analysis policy.
Step 3
Check the Show Overrides Only checkbox adjacent to the Search bar to view the list of overridden inspectors.
All the overridden inspectors are shown with an orange icon next to their names to help you identify them.
Revert Overridden Configuration to Default Configuration
You can revert any changes that you made to override the default configuration for an inspector. This action reverts the overridden
configuration to the default configuration for an inspector.
Procedure
Step 1
Go to Policies > Intrusion > Network Analysis Policies.
Step 2
Go to the Snort 3 Version of the network analysis policy.
Step 3
Under Inspectors, expand the required inspector for which you want to revert the overridden configuration.
The overridden inspectors are shown with the orange icon next to their name.
The default configuration is displayed on the left column and the overridden configuration is displayed on the right column
under the inspector. Under the Overridden Configuration on the right column, click Revert to default configuration (back arrow) icon to revert the overridden configuration for the inspector to the default configuration.
If you did not make any changes to the default configuration for the inspector, then this option is disabled.
Step 4
Click Revert to confirm the decision.
Step 5
Click Save to save the changes.
If you do not want to save the changes, you can click Cancel or the Cross (X) icon.
Validate Snort 3 Policies
To validate the Snort 3 policies, here is a list of basic information that user can make note of:
Current version of the management center can manage multiple threat
defense versions.
Current version of management center supports NAP configurations which are not applicable to previous version of threat
defense devices.
Current NAP Policy and validations will work based on the current version support.
Changes may include content which is not valid for previous versions of threat
defenses.
Policy configuration changes are accepted if they are valid configuration for the current version and which is performed using
current Snort 3 binary and NAP schema.
For previous version threat
defenses, validation is performed during deployment using NAP schema and Snort 3 binary for that specific version. If there is any
configuration which is not applicable for the given version, user is provided information or warning that we will not deploy
the configuration which is not supported on the given version and remaining configuration will get deployed.
In this procedure, when we associate the NAP policy to an Access Control Policy and deploy it on a device, for example any
inspector like rate filter configuration is applied to validate the Snort 3 policies.
Procedure
Step 1
Steps to Override NAP Policy Configuration: Under Inspectors in the Snort 3 Version of the network analysis policy, expand the required inspector for which you want to override the default setting.
The default configuration is displayed on the left column and the overridden configuration is displayed on the right column
under the inspector.
Step 2
Under the Overridden Configuration on the right column, click Edit Inspector (Pencil) icon to make changes to any inspector like rate_filter.
The Override Configuration pop-up appears where you can make the required edits to the rate_filter inspector.
Step 3
Click OK.
Step 4
Click Save to save the changes.
Alternatively, you can also use the Actions drop-down menu to upload the overridden configuration file.
Step 5
Click the Actions drop-down menu in the Snort 3 Version of the network analysis policy.
Step 6
Under Upload you can click Overridden Configuration to upload the JSON file that contains the overridden configuration.
Caution
Upload only the changes that you require. You should not upload the entire configuration as it makes the overrides sticky
in nature and therefore, any subsequent changes to the default configuration as part of the LSP updates will not be applied.
You can drag and drop a file or click to browse to the JSON file saved in your system that contains the overridden inspector
configuration.
Merge inspector overrides – Content in the uploaded file is merged with the existing configuration if there is no common inspector. If there are common
inspectors, then the content in the uploaded file (for common inspectors) takes precedence over the previous content, and
it replaces the previous configuration for those inspectors.
Replace inspector overrides – Removes all previous overrides and replaces them with the new content in the uploaded file.
Attention
As choosing this option deletes all the previous overrides, make an informed decision before you override the configuration
using this option.
If any error occurs while uploading the overridden inspectors, you see the error on the Upload Overridden Configuration File pop-up window. You can also download the file with the error, then fix the error and reupload the file.
Step 7
Steps to Associate NAP Policy to Access Control Policy: In the access control policy editor, click Advanced, then click Edit next to the Network Analysis and Intrusion Policies section.
Step 8
From the Default Network Analysis Policy drop-down list, select a default network analysis policy.
If you choose a user-created policy, you can click Edit to edit the policy in a new window. You cannot edit system-provided policies.
Step 9
Click OK.
Step 10
Click Save to save the policy.
Step 11
Alternatively, in the access control policy editor, click Advanced, then click Edit next to the Network Analysis and Intrusion Policies section.
Step 12
Click Add Rule.
Step 13
Configure the rule's conditions by clicking the conditions you want to add.
Step 14
Click Network Analysis and choose the Network Analysis Policy you want to use to preprocess the traffic matching this rule.
Step 15
Click Add.
Step 16
Deployment: On the management center menu bar, click Deploy and then select Deployment.
Step 17
Identify and choose the devices on which you want to deploy configuration changes.
Search—Search for the device name, type, domain, group, or status in the search box.
Expand—Click Expand Arrow to view device-specific configuration changes to be deployed.
By selecting the device check box, all the changes for the device, which are listed under the device, are pushed for deployment.
However, you can use the Policy Selection to select individual policies or configurations to deploy while withholding the remaining changes without deploying them.
Optionally, use Show or Hide Policy to selectively view or hide the associated unmodified policies.
Step 18
Click Deploy.
Step 19
If the system identifies errors or warnings in the changes to be deployed, it displays them in the Validation Messages window. To view complete details, click the arrow icon before the warnings or errors.
Note
It shows a warning that Snort 3 Network analysis policy contains inspectors or attributes that are not valid for this threat
defense version, following the invalid settings will be skipped in deployment: Invalid inspectors are : [“rate_filter”] only for
devices lower than 7.1 version.
Examples of Custom Network Analysis Policy Configuration
This is a sample file that includes JSON snippets explaining how you can customize the network analysis policy for Snort 3.
You can choose to override an inspector configuration using the following ways:
Before you choose any of these options, review all the following details and examples that will help you in defining the network
analysis policy overrides successfully. You must read and understand the examples for various scenarios explained here to
avoid any risks and errors.
If you choose to override an inspector configuration from the Actions drop-down menu, you need to construct a JSON file for the network analysis policy overrides and upload the file.
For overriding an inspector configuration in the network analysis policy, you must upload only the changes that you require.
You should not upload the entire configuration because it makes the overrides sticky in nature and therefore, any subsequent
changes to the default values or configuration as part of the LSP updates would not be applied.
Here are the examples for various scenarios:
Enabling a Singleton Inspector when the Default State in the Base Policy is Disabled
Configuring Binder Rules when Multi-Hierarchy Network Analysis Policy is Used
This example illustrates adding a new custom instance in child policy and the way binder rules should be written. Binder rules
are defined as a list and therefore, it is important to pick up the rules defined in the parent policy and build the new rules
on top of it as rules will not be merged automatically. The binder rules available in child policy are a source of truth in
totality.
On the threat
defense, the default Cisco Talos policy rules are appended on these user-defined overrides.
Parent Policy:
We have defined a custom instance by the name telnet_parent_instance and the corresponding binder rule.
This network analysis policy has the aforementioned policy as its base policy. We have defined a custom instance by the name
telnet_child_instance and have also defined the binder rules for this instance. The binder rules from parent policy need to be copied here, and
then child policy binder rules can be prepended or appended on top of it based on the nature of the rule.
While changing overrides for any attribute of type list, it is important to pass the full contents rather than partial override.
This means if a base policy attributes are defined as:
You can understand this configuration by taking the trimmed values of the alt_max_command_line_len attribute in the smtp inspector. Suppose the default (base) policy configuration for smtp inspector is as follows:
Configuring Overrides when Multi-Hierarchy Network Analysis Policy is used in Multiton Inspector
This example illustrates overriding attributes in child policy and how the merged configuration will be used in the child
policy for any instance. Any overrides defined in the child policy will be merged with the parent policy. Thus, if attribute1
and attribute2 are overridden in parent policy and attribute2 and attribute3 are overridden in the child policy, the merged
configurations are for child policy. This means that attribute1 (defined in parent policy), attribute2 (defined in child policy),
and attribute3 (defined in child policy) will be configured on the device.
Parent Policy:
Here we have defined a custom instance by the name telnet_parent_instance and overridden 2 attributes namely, normalize and encrypted_traffic in the custom instance.
This network analysis policy has the aforementioned policy as its base policy. We have overridden attribute encrypted_traffic from parent policy and also overridden new attribute ayt_attack_thresh.
This example illustrates details for the custom network analysis policy. The same behavior is also exhibited in the default
instance. Also, a similar merging would be done for Singleton inspectors.
Removing all the Inspector Overrides for the Network Analysis Policy:
Whenever you want to remove all the overrides for a specific network analysis policy, you can upload an empty JSON. While
uploading the overrides, choose the option Replace inspector overrides.
{
}
Network Analysis Policy Settings and Cached Changes
When you create a new network analysis policy, it has the same settings as its base policy.
When tailoring a network analysis policy, especially when disabling inspectors, keep in mind that some inspectors and intrusion
rules require that traffic first be decoded or preprocessed in a certain way. If you disable a required inspector, the system
automatically uses it with its current settings, although the inspector remains disabled in the network analysis policy web
interface.
Note
Because preprocessing and intrusion inspection are so closely related, the network analysis and intrusion policies examining
a single packet must complement each other. Tailoring preprocessing, especially using multiple custom network analysis policies, is an advanced task.
The system caches one network analysis policy per user. While editing a network analysis policy, if you select any menu or
other path to another page, your changes stay in the system cache even if you leave the page.

 )
)

 Feedback