- Preface
-
- Getting Started with Security Manager
- Preparing Devices for Management
- Managing the Device Inventory
- Managing Activities
- Managing Policies
- Managing Policy Objects
- Managing FlexConfigs
- Managing Deployment
- Troubleshooting Device Communication and Deployment
- Managing the Security Manager Server
- Configuring Security Manager Administrative Settings
-
- Introduction to Firewall Services
- Managing Identity-Aware Firewall Policies
- Managing TrustSec Firewall Policies
- Managing Firewall AAA Rules
- Managing Firewall Access Rules
- Managing Firewall Inspection Rules
- Managing Firewall Web Filter Rules
- Managing Firewall Botnet Traffic Filter Rules
- Working with ScanSafe Web Security
- Managing Zone-based Firewall Rules
- Managing Traffic Zones
- Managing Transparent Firewall Rules
- Configuring Network Address Translation
-
- Managing Site-to-Site VPNs: The Basics
- Configuring IKE and IPsec Policies
- GRE and DM VPNs
- Easy VPN
- Group Encrypted Transport (GET) VPNs
- Managing Remote Access VPNs: The Basics
- Managing Remote Access VPNs on ASA and PIX 7.0+ Devices
- Managing Dynamic Access Policies for Remote Access VPNs (ASA 8.0+ Devices)
- Managing Remote Access VPNs on IOS and PIX 6.3 Devices
- Configuring Policy Objects for Remote Access VPNs
- Using Map View
-
- Getting Started with IPS Configuration
- Managing IPS Device Interfaces
- Configuring Virtual Sensors
- Defining IPS Signatures
- Configuring Event Action Rules
- Managing IPS Anomaly Detection
- Configuring Global Correlation
- Configuring Attack Response Controller for Blocking and Rate Limiting
- Managing IPS Sensors
- Configuring IOS IPS Routers
-
- Managing Firewall Devices
- Configuring Bridging Policies on Firewall Devices
- Configuring Device Administration Policies on Firewall Devices
- Configuring Device Access Settings on Firewall Devices
- Configuring Failover
- Configuring Hostname, Resources, User Accounts, and SLAs
- Configuring Server Access Settings on Firewall Devices
- Configuring Logging Policies on Firewall Devices
- Configuring Multicast Policies on Firewall Devices
- Configuring Routing Policies on Firewall Devices
- Configuring Security Policies on Firewall Devices
- Configuring Service Policy Rules on Firewall Devices
- Configuring Security Contexts on Firewall Devices
- User Preferences
- Index
Managing Traffic Zones
You can assign multiple interfaces to a traffic zone, which lets traffic from an existing flow exit or enter the ASA on any interface within the zone. This capability allows Equal-Cost Multi-Path (ECMP) routing on the ASA as well as external load balancing of traffic to the ASA across multiple interfaces.
The Adaptive Security Algorithm takes into consideration the state of a packet when deciding to permit or deny the traffic. One of the enforced parameters for the flow is that traffic enters and exits the same interface. Any traffic for an existing flow that enters a different interface is dropped by the ASA.
Traffic zones let you group multiple interfaces together so that traffic entering or exiting any interface in the zone fulfills the Adaptive Security Algorithm security checks.
Why Use Zones?
In the following scenario, a connection was established between an inside host and an outside host through ISP 1 on the Outside1 interface. Due to asymmetric routing on the destination network, return traffic arrived from ISP 2 on the Outside2 interface.
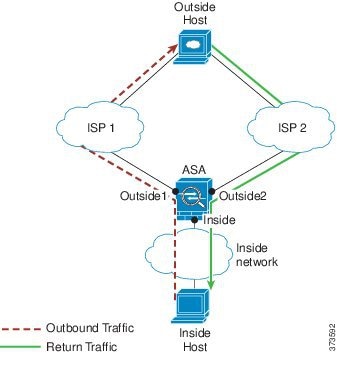
Non-Zoned Problem : The ASA maintains the connection tables on a per-interface basis. When the returning traffic arrives at Outside2, it will not match the connection table and will be dropped.
Zoned Solution : The ASA maintains connection tables on a per-zone basis. If you group Outside1 and Outside2 into a zone, then when the returning traffic arrives at Outside2, it will match the per-zone connection table, and the connection will be allowed.
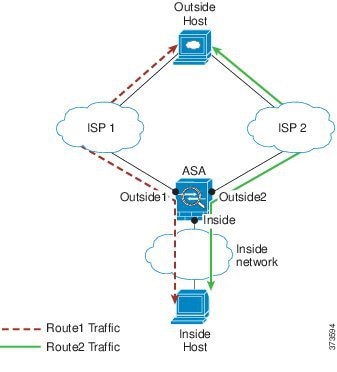
In the following scenario, a connection was established between an inside host and an outside host through ISP 1 on the Outside1 interface. Due to a lost or moved route between Outside1 and ISP 1, traffic needs to take a different route through ISP 2.

Non-Zoned Problem : The connection between the inside and outside host will be deleted; a new connection must be established using a new next-best route. For UDP, the new route will be used after a single packet drop, but for TCP, a new connection has to be reestablished.
Zoned Solution : The ASA detects the lost route and switches the flow to the new path through ISP 2. Traffic will be seamlessly forwarded without any packet drops.
In the following scenario, a connection was established between an inside host and an outside host through ISP 1 on the Outside1 interface. A second connection was established through an equal cost route through ISP 2 on Outside2.
Non-Zoned Problem : Load-balancing across interfaces is not possible; you can only load-balance with equal cost routes on one interface.
Zoned Solution : The ASA load-balances connections across up to eight equal cost routes on all the interfaces in the zone.
ECMP Routing
The ASA supports Equal-Cost Multi-Path (ECMP) routing.
Without zones, you can have up to three equal cost static or dynamic routes per interface. For example, you can configure three default routes on the outside interface that specify different gateways:
In this case, traffic is load-balanced on the outside interface between 10.1.1.2, 10.1.1.3, and 10.1.1.4. Traffic is distributed among the specified gateways based on an algorithm that hashes the source and destination IP addresses.
ECMP is not supported across multiple interfaces, so you cannot define a route to the same destination on a different interface. The following route is disallowed when configured with any of the routes above:
With zones, you can have up to 8 equal cost static or dynamic routes across up to 8 interfaces within a zone. For example, you can configure three default routes across three interfaces in the zone:
Similarly, your dynamic routing protocol can automatically configure equal cost routes. The ASA load-balances traffic across the interfaces with a more robust load balancing mechanism.
When a route is lost, the ASA seamlessly moves the flow to a different route.
How Connections Are Load-Balanced
The ASA load balances connections across equal cost routes using a hash made from the packet 6-tuple (source and destination IP address, source and destination port, protocol, and ingress interface). Unless the route is lost, a connection will stay on the chosen interface for its duration.
Packets within a connection are not load-balanced across routes; a connection uses a single route unless that route is lost.
The ASA does not consider the interface bandwidth or other parameters when load balancing. You should make sure all interfaces within the same zone have the same characteristics such as MTU, bandwidth, and so on.
The load-balancing algorithm is not user configurable.
Falling Back to a Route in Another Zone
When a route is lost on an interface, if there are no other routes available within the zone, then the ASA will use a route from a different interface/zone. If this backup route is used, then you may experience packet drops as with non-zoned routing support.
Understanding Traffic Zones
Interface-Based Security Policy
Zones allow traffic to and from any interface in the zone, but the security policy itself (access rules, NAT, and so on) is still applied per interface, not per zone. If you configure the same security policy for all interfaces within the zone, then you can successfully implement ECMP and load balancing for that traffic. For more information about required parallel interface configuration, see Prerequisites for Traffic Zones.
Supported Services for Traffic Zones
The following services are supported with zones:
You can also configure to- and from-the-box services (see below), although full zoned support is not available.
Do not configure other services (such as VPN or Botnet Traffic Filter) for interfaces in a traffic zone; they may not function or scale as expected.

Note For detailed information about how to configure the security policy, see Prerequisites for Traffic Zones.
The first interface that you add to a zone determines the security level of the zone. All additional interfaces must have the same security level. To change the security level for interfaces in a zone, you must remove all but one interface, and then change the security levels, and re-add the interfaces.
Primary and Current Interface for the Flow
Each connection flow is built based on the initial ingress and egress interfaces. These interfaces are the primary interfaces.
If a new egress interface is used because of route changes or asymmetric routing, then the new interfaces are the current interfaces.
When you assign an interface to a zone, any connections on that interface are deleted. The connections must be reestablished.
If you remove an interface from a zone, any connections that have the interface as the primary interface are deleted. The connections must be reestablished. If the interface is the current interface, the ASA moves the connections back to the primary interface. The zone route table is also refreshed.
- You cannot add management-only or management-access interfaces to a zone.
- For management traffic on regular interfaces in a zone, only asymmetric routing on existing flows is supported; there is no ECMP support.
- You can configure a management service on only one zone interface, but to take advantage of asymmetric routing support, you need to configure it on all interfaces. Even when the configurations are parallel on all interfaces, ECMP is not supported.
- The ASA supports the following to- and from-the-box services in a zone:
Overlapping IP Addresses Within a Zone
For non-zoned interfaces, the ASA supports overlapping IP address networks on interfaces so long as you configure NAT properly. However, overlapping networks are not supported on interfaces in the same zone.
Prerequisites for Traffic Zones
- Configure all interface parameters including the name, IP address, and security level. Note that the security level must match for all interfaces in the zone. You should plan to group together like interfaces in terms of bandwidth and other Layer 2 properties.
- Configure the following services to match on all zone interfaces:
– Access Rules—Apply the same access rule to all zone member interfaces, or use a global access rule.
– NAT—Configure the same NAT policy on all member interfaces of the zone or use a global NAT rule.
Interface PAT is not supported.
Note When you use interface-specific NAT and PAT pools, the ASA cannot switch connections over in case of the original interface failure.
If you use interface-specific PAT pools, multiple connections from the same host might load-balance to different interfaces and use different mapped IP addresses. Internet services that use multiple concurrent connections may not work correctly in this case.
– Service Rules—Use the global service policy, or assign the same policy to each interface in a zone.
QoS traffic policing is not supported.
Note For VoIP inspections, zone load balancing can cause increased out-of-order packets. This situation can occur because later packets might reach the ASA before earlier packets that take a different path. Symptoms of out-of-order packets include:
–Higher memory utilization at intermediate nodes (firewall and IDS) and the receiving end nodes if queuing is used.
–Poor video or voice quality.
To mitigate these effects, we recommend that you use IP addresses only for load distribution for VoIP traffic.
Guidelines for Traffic Zones
Supported in routed firewall mode only. Does not support transparent firewall mode.
- You cannot add the failover or state link to a zone.
- In Active/Active failover mode, you can assign an interface in each context to an asymmetrical routing (ASR) group. This service allows traffic returning on a similar interface on the peer unit to be restored to the original unit. You cannot configure both ASR groups and traffic zones within a context. If you configure a zone in a context, none of the context interfaces can be part of an ASR group.
- Only the primary interfaces for each connection are replicated to the standby unit; current interfaces are not replicated. If the standby unit becomes active, it will assign a new current interface if necessary.
You cannot add the cluster control link to a zone.
- You can create a maximum of 256 zones.
- You can only add physical interfaces to a zone.
- An interface can be a member of only one zone.
- You can include up to 8 interfaces per zone.
- The first interface that you add to a zone determines the security level of the zone. All additional interfaces must have the same security level.
- For ECMP, you can add up to 8 equal cost routes per zone, across all zone interfaces. You can also configure multiple routes on a single interface as part of the 8 route limit.
Configuring Traffic Zones
You can assign multiple interfaces to a traffic zone, which lets traffic from an existing flow exit or enter the ASA on any interface within the zone. This capability allows Equal-Cost Multi-Path (ECMP) routing on the ASA as well as external load balancing of traffic to the ASA across multiple interfaces.
- Understanding Interface Role Objects
- Chapter 22, “Managing Traffic Zones”
- Why Use Zones?
- ECMP Routing
- Understanding Traffic Zones
- Prerequisites for Traffic Zones
- Guidelines for Traffic Zones
Step 1 Do one of the following:
- (Device view) Select Firewall > Settings > Zone from the Policy selector.
- (Policy view) Select Firewall > Settings > Zone from the Policy Type selector. Select an existing policy or create a new one.
Step 2 Click the Add Row button beneath the Zone table to open the Zone dialog box.
Step 3 Enter the name of an interface role that identifies the interfaces that belong to the traffic zone you are configuring and then click OK . For more information about interface role object, see Understanding Interface Role Objects.

Tip You can click Select to select the interface role from a list of interface role objects or to define a new interface role object.
Step 4 Click Save to save the changes.
 Feedback