High Availability Installation Guide for Cisco Security Manager 4.14
Bias-Free Language
The documentation set for this product strives to use bias-free language. For the purposes of this documentation set, bias-free is defined as language that does not imply discrimination based on age, disability, gender, racial identity, ethnic identity, sexual orientation, socioeconomic status, and intersectionality. Exceptions may be present in the documentation due to language that is hardcoded in the user interfaces of the product software, language used based on RFP documentation, or language that is used by a referenced third-party product. Learn more about how Cisco is using Inclusive Language.
- Updated:
- January 3, 2016
Chapter: VMware HA Requirements and Specs
High Availability and Disaster Recovery in Virtual Machines
This document explains how to install Cisco Security Management Suite (Security Manager) in a VMware based high availability (HA) or disaster recovery (DR) environment. Security Manager supports the following scenarios:
The steps to configure Security Manager in the above scenarios are described as follows:
Host-based Failover (Local HA)
In this configuration Security Manager is installed on a virtual machine on an ESXi host within a VMware cluster. In the event of a hardware failure on the existing ESXi host, the host-based failover configuration automatically starts up the same virtual machine (VM) on another host within the VMware cluster.
The VMware HA agent monitors the heartbeats, which are sent every second (by default), between the primary and the secondary hosts to detect host failure. It is recommended that you configure redundant heartbeat networks. This allows reliable detection of failures and helps to prevent isolation conditions from occurring.
The same primary VM, with the same Operating System and Application Volume, is started on a different ESXi host. The hostname and IP address remain the same in host-based failover configuration. This configuration works with shared SAN infrastructure between the physical hosts. This process of failover to another host may take few minutes.

Note The following configuration is meant for reference only. You must refer to the VMware documentation for the specific steps to set up the VMware infrastructure. The steps described in this chapter are not Security Manager specific steps.
Prerequisites for Creating VMware HA Clusters
The following prerequisites must be met for creating VMware clusters:
- All virtual machines and their configuration files must reside on shared storage, such as a Storage Area Network (SAN).
- The ESXi hosts must be configured to have access to the same virtual machine network.
- Each host in the VMware HA cluster must have a host name assigned to it and a static IP address.
- There must be CPU compatibility between the hosts. An ideal cluster is a cluster with exactly the same hardware and memory size.
- It is recommended that you use redundant Service Console and VMkernel networking configuration.
Configuring Security Manager for Host-based Failover
Follow these steps to configure Security Manager for host-based failover:
Step 1 Configure two physical hosts that meet the requirements described in the Deployment Planning Guide for Cisco Security Manager 4.13.
Note The CPUs on each of the hosts must be compatible.
Step 2 Install VMware ESXi on each of the hosts that you created in Step 1.
Step 3 Create a VMware cluster and add the hosts to the cluster.
Step 4 Configure vSphere HA settings on the ESXi hosts. See VMware documentation for more information.
Step 5 Create a VM on one of the ESXi hosts. See Deployment Planning Guide for Cisco Security Manager 4.13 for more information.
Step 6 Install Security Manager on the VM you created in Step 5. See Installation Guide for Cisco Security Manager 4.13 for more information.
Step 7 Start Security Manager.
In the event of a hardware failure on the ESXi host on which Security manager is installed on a VM, the VM is moved to the other ESXi host within the cluster and the VM is started. This movement takes a few minutes to complete and hence there is a downtime.
Limitations
The following limitations exist in the host-based failover configuration:
- You need to manually restart the virtual machine on the failed host.
- If an application stops running on the VM on a failed host and the application data becomes corrupt, then even though the VM is manually restarted after the failover, the application may still remain unusable.
- If a host in the VMware cluster loses its connection to the heartbeat network but the host itself is running, it is isolated from the cluster. In this event, VMware High Availability solution waits for 12 seconds before it decides that the host is isolated from the cluster.
Note Application-based monitoring is not supported in Security Manager. This means that if a Security Manager process stops running, it will not be restarted automatically. You must manually resolve the problem and restart the process, and then manually restart Security Manager.
Fault Tolerance
In the VMware Fault Tolerance configuration, when a hardware failure is detected on a host, a second VM is created on a different host and Security Manager starts running on the second VM without an interruption of service. VMware Fault Tolerance enables a new level of guest redundancy. VMware Fault Tolerance implies that two copies of the VM are maintained, each on separate hosts. This feature can be enabled by turning on Fault Tolerance on the VM on which Security Manager has been installed.
The key difference between VMware’s Fault Tolerance and Host-based Failover (HA) solutions is in the interruption to the VM operation in the event of an ESX/ESXi host failure. Fault tolerant systems instantly transition to a new host, whereas high-availability systems see the VMs fail on the host before restarting on another host. The VM on the host that has failed is called the Primary VM and the VM that takes over is the Secondary VM. The failover from the Primary to Secondary VM is dynamic with the Secondary VM continuing to run from the exact point where the Primary VM left. This process happens automatically with no data loss, downtime, or interruption of services. After the dynamic failover, the Secondary VM becomes the new Primary VM and a new Secondary VM is spawned automatically.
Note The following configuration is meant for reference only. You must refer to the VMware documentation for the specific steps to set up the VMware infrastructure. The steps described in this chapter are not Security Manager specific steps.
Creating Fault Tolerant Systems
The following prerequisites must be met to be able to create Fault Tolerance systems:
- Make sure that all versions of the VMware software used in a Fault Tolerant environment are compatible as per the list in the vSphere Compatibility Matrix. See VMware Compatibility Guide for more information.
- On a hardware and guest Operating System level, only certain processors and Operating Systems are supported. For information about the support, see the VMware Guest OS Compatibility Guide at www.vmware.com . Further, to check whether your existing VMware setup is suitable for Fault Tolerance, run the site survey at https://www.vmware.com/support/shared_utilities
- Enable Hardware Virtualization in the BIOS for each host in the cluster. Since the process for enabling Hardware Virtualization differs for each BIOS, contact your hardware vendor for specific instructions on enabling Hardware Virtualization.
- Make sure that all ESX hosts used by VMware Fault Tolerance are members of a VMware High Availability (HA) cluster. You must enable VMware HA for VMware Fault Tolerance to function. For information about enabling VMware HA see the vSphere Availability Guide at www.vmware.com .
- Make sure that the ESX hosts that run the primary and secondary Fault Tolerance nodes are running the same build of ESX. Additionally, make sure to apply the patches that have been released as the patches contain improvements to the VMware Fault Tolerance features.
- Make sure you have configured the following for your environment to enable VMware Fault Tolerance:
– The virtual machine must reside on shared storage, that is, storage that is visible to all ESX hosts in the cluster.
– Storage must be FC SAN, iSCSI or NFS, and not local storage.
– Virtual machines muct not have snapshots. If there are snapshots, you must commit them before proceeding.
- Make sure to perform the following tasks to configure networking in your Fault Tolerance environment:
– Define a separate VMkernel port group for Fault Tolerance logging. See the ESX Configuration Guide for instructions to create the port group.
– Define the Fault Tolerance logging and VMotion port groups and assign a physical network card for uplink. This network card must be of at least 1GB size. It is recommended that you use a 10GB network card.
– Enable use of Jumbo Frames for the Fault Tolerance logging. For detailed steps, see the Advanced Networking section of the ESX Configuration Guide.
– VMware recommends enabling fully redundant NICs to ensure availability, although Fault Tolerance can function without it.
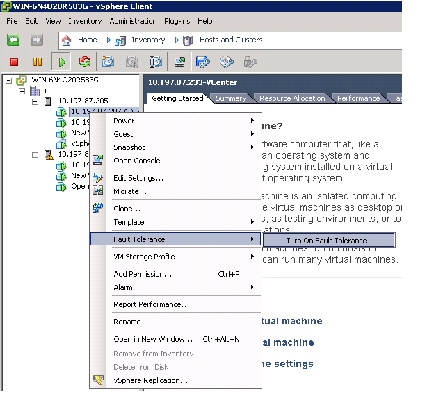
After you have configured your environment as per the list of prerequisites, make sure you turn ON Fault Tolerance as shown in the following figure.
Figure 5-1 Turning on Fault Tolerance
Note Security Manager must have a minimum of six virtual CPUs for Small Deployment, with VMware ESXi version 5.102 up to ESXi version 6.0. See Cisco Security Manager Deployment Planning Guide for more information.
Note Fault tolerant virtual machine on vCenter Server version 5.x supports one virtual CPU per protected virtual machine. vCenter Server version 6.0 supports up to four virtual CPUs depending on the licensing.
Disaster Recovery
Security Manager uses the VMware vCenter Site Recovery Manager tool with VMware vSphere Replication for disaster recovery and management.
Site Recovery Manager integrates natively with VMware vSphere Replication and supports a broad set of high-performance array-based replication products to reliably copy virtual machines across sites according to business requirements. Site Recovery Manager is an extension to VMware vCenter Server that delivers a disaster recovery solution that helps to plan, test, and run the recovery of virtual machines. Site Recovery Manager can discover and manage replicated datastores, and automate migration of inventory between vCenter Server instances.
Hardware Requirements
For hardware requirements, see the VMware Site Recovery Manager 6.1 Documentation Center at www.vmware.com
Software Requirements
Following are the high level software requirements for setting up the VMware Site Recovery Manager solution for Disaster Recovery:
- Virtual Center 6.0 license applied on both the primary (protected) and recovery sites.
- ESXi Server 6.0 licenses applied on both primary and recovery sites.
- VSphere SRM 6.0 license applied on both primary and recovery sites.
- SQL Server Database for Site Recovery Manager installed on both primary and recovery sites.
Note All VMware tools must be on version 6.0.
Note VMware Disaster Recovery solution has been tested with VMware Site Recovery Manager. However, other VMware solutions might also work with Security Manager.
Configuring VMware Site Recovery Manager
Follow these steps to install Site Recovery Manager on the vCenter server:
Step 1 Start the installation of Site Recovery Manager by clicking install.exe.
Step 2 Accept the VMware End User License Agreement.
Step 3 On the VMware vCenter Site Recovery Manager—vSphere Replication window, select Install vSphere Replication and then click Next.
Step 4 Enter the vCenter Server Address, Port (81, by default), Username, and Password.
Step 5 Accept the security warning.
Step 6 On the VMware vCenter Site Recovery Manager—Certificate Type Selection window, select the Certificate Source as Automatically Generate a Certificate.
Step 7 Enter the vCenter Server information:
On the VMware vCenter Site Recovery Manager Extension window, enter the following:
- Local Site name—The VCenter site Fully Qualified Domain Name.
- Administrator Email—The Administrator’s email as per your organizational requirements.
- Additional Email—Any additional email ID that you may wish to enter.
- Local Host—Current Host IP Address; this is automatically populated.
- Listener Ports
Step 8 The Site Recovery Manager Server requires its own database, which it uses to store data such as recovery plans and inventory information.The Site Recovery Manager database is a critical part of a Site Recovery Manager installation. You must create the Site Recovery Manager database and establish a database connection before you can install Site Recovery Manager.
On the VMware vCenter Site Recovery Manager—Database Configuration window, enter the following, and then click Next:
- Select Database Client type from the drop-down list.
- Enter or select Data Source Name. Click ODBC DSN Setup... to set up a System DSN.
- Enter the Database Username and Password.
- Enter the Connection Count and Maximum Connections.
Figure 5-2 Database Configuration


Step 9 Click Next to complete the installation of Site Recovery Manager.
Note Each Site Recovery Manager site requires its own instance of the Site Recovery Manager database. Use a different database server instance to run the individual Site Recovery Manager databases for each site. If you use the same database server instance to run the databases for both the sites, and if the database server experiences a problem, neither Site Recovery Manager site will work and you will not be able to perform a recovery.
Configuring vCenter
Follow these steps to configure vCenter on the Protected Site.
The vCenter server details are those that you provided in Enter the vCenter Server information:. The Site Recovery Manager 5.5 Plug-in Manager will be enabled after you provide the vCenter server information.
Step 1 From the Plug-in Manager, download and install the VMware vCenter Site Recovery Manager extension.
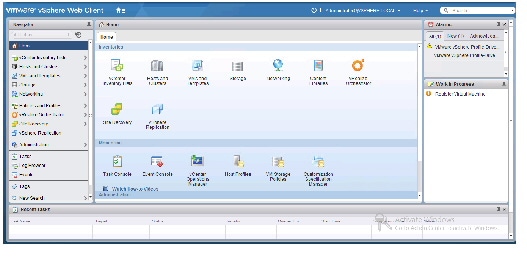
Note The above step is applicable only for Site Recovery Manager version 5.5. For Site Recovery Manager version 6.0 you no longer need to install the Plug-in as it supports vSphere web client.

Step 2 To configure and manage Site Recovery Manager, click Site Recovery on the Home page.
Note The above step is applicable only for Site Recovery Manager version 5.5. For Site Recovery Manager version 6.0 you no longer need to install the Plug-in as it supports vSphere web client.
Figure 5-5 Site Recovery Manager 5.5

The following image shows the vSphere web client that you can use to access Site Recovery Manager version 6.0:
Figure 5-6 VMware vSphere Web Client
Configuring the Recovery Site
Perform the tasks described in Configuring VMware Site Recovery Managerand Configuring vCenteron the Recovery Site.
Configuring Replication
Perform the following tasks on the Protected Site and Recovery Site. These steps are applicable for site Recovery Manager versions 5.5 and 6.0:
- Configure the Protection and Replication sites
- Configure the Inventory
- Install and configure the vSphere Replication
- Configure Protection Groups
- Configure Recovery Plans
See the VMware User Guide at the VMware vCenter Site Recovery Manager versions 5.5 and 6.0 Documentation Center for more information.
Installing Security Manager in Disaster Recovery Environment
After configuring Site Recovery Manager on both the Protected and Recovery sites, you must install Security Manager on the VM of the Protected site. To install Security Manager, see Installation Guide for Cisco Security Manager 4.13 .
The VMware Site Recovery Manager tool replicates the installation onto the Recovery site. The synchronization between the Protected and recovery sites is performed based on the bandwidth and data size of the Protected site. After enabling Site Recovery Manager on the Protected site host, vSphere Replication performs an initial full synchronization of the source VM and its replica to the Recovery site.
After a full synchronization is completed for the first time, vSphere Replication is performed based on the Recovery Point Objective (RPO) time interval configured in the Site Recovery Manager.
Note You must configure the RPO time interval based on the environment, that is, the bandwidth and data size.

Note If Security Manager is integrated with Access Control Server (ACS), for authentication purposes, you must provide the IP addresses of both the Protected and Recovery sites (where Security Manager has been installed) as AAA client to the ACS server.
 Feedback