- New and Changed Information
- Fabric Overview
- Configuring and Managing VSANs
- Creating Dynamic VSANs
- Configuring and Managing Zones
- Distributing Device Alias Services
- Configuring Fibre Channel Routing Services and Protocols
- Configuring Dense Wavelength Division Multiplexing
- Managing FLOGI, Name Server, FDMI, and RSCN Databases
- Discovering SCSI Targets
- Configuring FICON
- Advanced Features and Concepts
- Configuring Fibre Channel Common Transport Management Security
- About FICON
- FICON Port Numbering
- Default FICON Port Numbering Scheme
- Port Addresses
- Implemented and Unimplemented Port Addresses
- About the Reserved FICON Port Numbering Scheme
- Installed and Uninstalled Ports
- FICON Port Numbering Guidelines
- Assigning FICON Port Numbers to Slots
- Displaying the FICON Port Number Assignments
- About Port Numbers for FCIP and PortChannel
- Reserving FICON Port Numbers for FCIP and PortChannel Interfaces
- FC ID Allocation
- Configuring FICON
- About Enabling FICON on a VSAN
- Enabling FICON on the Switch
- Setting Up a Basic FICON Configuration
- Manually Enabling FICON on a VSAN
- Configuring the code-page Option
- Allowing the Host to Move the Switch Offline
- Allowing the Host to Change FICON Port Parameters
- Allowing the Host to Control the Timestamp
- Clearing the Time Stamp
- Configuring SNMP Control of FICON Parameters
- About FICON Device Allegiance
- Clearing FICON Device Allegiance
- Automatically Saving the Running Configuration
- Configuring FICON Ports
- FICON Configuration Files
- Port Swapping
- FICON Tape Acceleration
- Configuring XRC Acceleration
- Moving a FICON VSAN to an Offline State
- CUP In-Band Management
- Displaying FICON Information
- Receiving FICON Alerts
- Displaying FICON Port Address Information
- Displaying FICON Configuration File Information
- Displaying the Configured FICON State
- Displaying a Port Administrative State
- Displaying Buffer Information
- Viewing the History Buffer
- Displaying FICON Information in the Running Configuration
- Displaying FICON Information in the Startup Configuration
- Displaying FICON-Related Log Information
- Default Settings
Configuring FICON
Fibre Connection (FICON) interface capabilities enhance the Cisco MDS 9000 Family by supporting both open systems and mainframe storage network environments. The control unit port (CUP) also is supported which allows in-band management of the switch from FICON processors.
This chapter includes the following sections:
- About FICON
- FICON Port Numbering
- Configuring FICON
- Configuring FICON Ports
- FICON Configuration Files
- Port Swapping
- FICON Tape Acceleration
- Configuring XRC Acceleration
- Moving a FICON VSAN to an Offline State
- CUP In-Band Management
- Displaying FICON Information
- Default Settings
About FICON
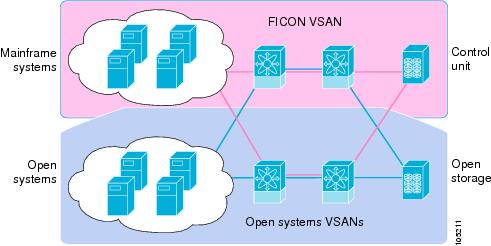
The Cisco MDS 9000 Family supports the Fibre Channel Protocol (FCP), FICON, iSCSI, and FCIP capabilities within a single, high-availability platform (see Figure 1).
The FICON feature is not supported on:
-
Cisco MDS 9120 switches
-
Cisco MDS 9124 switches
-
Cisco MDS 9140 switches
-
The 32-port Fibre Channel switching module
-
Cisco Fabric Switch for HP c-Class BladeSystem
-
Cisco Fabric Switch for IBM BladeSystem
FCP and FICON are different FC4 protocols and their traffic is independent of each other. Devices using these protocols should be isolated using VSANs.
The fabric binding feature helps prevent unauthorized switches from joining the fabric or disrupting current fabric operations (refer to the Cisco MDS 9000 Family NX-OS Security Configuration Guide ). The Registered Link Incident Report (RLIR) application provides a method for a switch port to send an LIR to a registered Nx port.
This section includes the following topics:
FICON Requirements
The FICON feature has the following requirements:
-
You can implement FICON features in the following switches:
- Any switch in the Cisco MDS 9500 Series
- Any switch in the Cisco MDS 9200 Series (including the Cisco MDS 9222i Multiservice Modular Switch)
- Cisco MDS 9134 Multilayer Fabric Switch
- MDS 9000 Family 18/4-Port Multiservice Module
- You need the MAINFRAME_PKG license to configure FICON parameters.
- To extend your FICON configuration over a WAN link using FCIP, you need the appropriate SAN_EXTN_OVER_IP license for the module you are using. For more information, refer to the Cisco NX-OS Family Licensing Guide .
MDS-Specific FICON Advantages
This section explains the additional FICON advantages in Cisco MDS switches and includes the following topics:
- Fabric Optimization with VSANs
- FCIP Support
- PortChannel Support
- VSANs for FICON and FCP Mixing
- Cisco MDS-Supported FICON Features
Fabric Optimization with VSANs
Generally, separate physical fabrics have a high level of switch management and have a higher implementation cost. The ports in each island also may be over-provisioned depending on the fabric configuration.
By using the Cisco MDS-specific VSAN technology, you can have greater efficiency between these physical fabrics by lowering the cost of over-provisioning and reducing the number of switches to be managed. VSANs also help you to move unused ports nondisruptively and provide a common redundant physical infrastructure (see Figure 1).
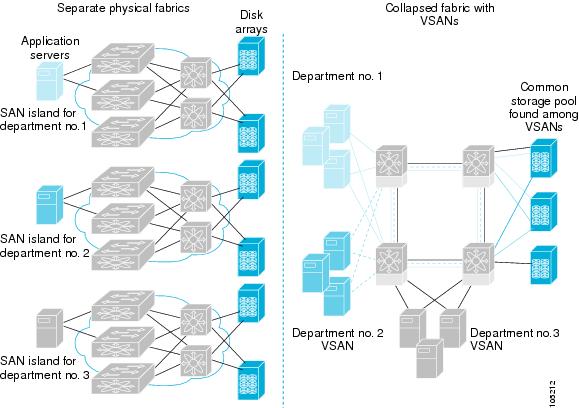
VSANs enable global SAN consolidation by allowing you to convert existing SAN islands into virtual SAN islands on a single physical network. It provides hardware-enforced security and separation between applications or departments to allow coexistence on a single network. It also allows virtual rewiring to consolidate your storage infrastructure. You can move assets between departments or applications without the expense and disruption of physical relocation of equipment.
 Note | While you can configure VSANs in any Cisco MDS switch, you only can enable FICON inupto eight of these VSANs. The number of VSANs configured depends on the platform. |
Mainframe users can think of VSANs as being like FICON LPARs in the MDS SAN fabric. You can partition switch resources into FICON LPARs (VSANs) that are isolated from each other, in much the same way that you can partition resources on a zSeries or DS8000. Each VSAN has its own set of fabric services (such as fabric server and name server), FICON CUP, domain ID, Fabric Shortest Path First (FSPF) routing, operating mode, IP address, and security profile.FICON LPARs can span line cards and are dynamic in size. For example, one FICON LPAR with 10 ports can span 10 different line cards. FICON LPARs can also include ports on more than one switch in a cascaded configuration. The consistent fairness of the Cisco MDS 9000 switching architecture means that “all ports are created equal,” simplifying provisioning by eliminating the “local switching” issues seen on other vendors’ platforms.Addition of ports to a FICON LPAR is a nondisruptive process. The maximum number of ports for a FICON LPAR is 255 due to FICON addressing limitations.
FCIP Support
The multilayer architecture of the Cisco MDS 9000 Family enables a consistent feature set over a protocol-agnostic switch fabric. Cisco MDS 9500 Series and 9200 Series switches transparently integrate Fibre Channel, FICON, and Fibre Channel over IP (FCIP) in one system. The FICON over FCIP feature enables cost-effective access to remotely located mainframe resources. With the Cisco MDS 9000 Family platform, storage replication services such as IBM PPRC and XRC can be extended over metro to global distances using ubiquitous IP infrastructure which simplifies business continuance strategies.
Refer to the Cisco MDS 9000 Family NX-OS IP Services Configuration Guide .
PortChannel Support
The Cisco MDS implementation of FICON provides support for efficient utilization and increased availability of Inter-Switch Links (ISLs) necessary to build stable large-scale SAN environments. PortChannels ensure an enhanced ISL availability and performance in Cisco MDS switches.
Refer to the Cisco MDS 9000 Family NX-OS Interfaces Configuration Guide for more information on PortChannels.
VSANs for FICON and FCP Mixing
Cisco MDS 9000 Family FICON-enabled switches simplify deployment of even the most complex mixed environments. Multiple logical FICON, Z-Series Linux/FCP, and Open-Systems Fibre Channel Protocol (FCP) fabrics can be overlaid onto a single physical fabric by simply creating VSANs as required for each service. VSANs provide both hardware isolation and protocol specific fabric services, eliminating the complexity and potential instability of zone-based mixed schemes.
By default, the FICON feature is disabled in all switches in the Cisco MDS 9000 Family. When the FICON feature is disabled, FC IDs can be allocated seamlessly. Mixed environments are addressed by the Cisco NX-OS software. The challenge of mixing FCP and FICON protocols are addressed by Cisco MDS switches when implementing VSANs.
Switches and directors in the Cisco MDS 9000 Family support FCP and FICON protocol mixing at the port level. If these protocols are mixed in the same switch, you can use VSANs to isolate FCP and FICON ports.
 Tip | When creating a mixed environment, place all FICON devices in one VSAN (other than the default VSAN) and segregate the FCP switch ports in a separate VSAN (other than the default VSAN). This isolation ensures proper communication for all connected devices. |
Cisco MDS-Supported FICON Features
The Cisco MDS 9000 Family FICON features include:
-
Flexibility and investment protection—The Cisco MDS 9000 Family shares common switching and service modules across the Cisco MDS 9500 Series and the 9200 Series.
Refer to the Cisco MDS 9500 Series Hardware Installation Guide and the Cisco MDS 9200 Series Hardware Installation Guide.
-
High-availability FICON-enabled director—The Cisco MDS 9500 Series combines nondisruptive software upgrades, stateful process restart and failover, and full redundancy of all major components for a new standard in director-class availability. It supports up to 528 autosensing, 4/2/1-Gbps, 10-Gbps, FICON or FCP ports in any combination in a single chassis. Refer to the Cisco MDS 9000 Family NX-OS High Availability and Redundancy Configuration Guide.
-
Infrastructure protection—Common software releases provide infrastructure protection across all Cisco MDS 9000 platforms. Refer to the Cisco MDS 9000 Family NX-OS Software Upgrade and Downgrade Guide
-
VSAN technology—The Cisco MDS 9000 Family provides VSAN technology for hardware-enforced, isolated environments within a single physical fabric for secure sharing of physical infrastructure and enhanced FICON mixed support. See Configuring and Managing VSANs
-
Port-level configurations—There are BB_credits, beacon mode, and port security for each port. Refer to the Cisco MDS 9000 Family NX-OS Interfaces Configuration Guide for information about buffer-to-buffer credits, beacon LEDs, and trunking.
-
Alias name configuration—Provides user-friendly aliases instead of the WWN for switches and attached node devices. See
-
Comprehensive security framework—The Cisco MDS 9000 Family supports RADIUS and TACACS+ authentication, Simple Network Management Protocol Version 3 (SNMPv3), role-based access control, Secure Shell Protocol (SSH), Secure File Transfer Protocol (SFTP), VSANs, hardware-enforced zoning, ACLs, fabric binding, Fibre Channel Security Protocol (FC-SP), LUN zoning, read-only zones, and VSAN-based access control. Refer to the Cisco MDS 9000 Family NX-OS Security Configuration Guide for information about RADIUS, TACACS+, FC-SP, and DHCHAP.
Note
LUN zoning and read-only zones are not supported from Cisco MDS NX-OS Release 5.x and later. -
Traffic encryption—IPSec is supported over FCIP. You can encrypt FICON and Fibre Channel traffic that is carried over FCIP. Refer to the Cisco MDS 9000 Family NX-OS Security Configuration Guide
Local accounting log—View the local accounting log to locate FICON events. For more information about MSCHAP authentication, and local AAA services, refer to the Cisco MDS 9000 Family NX-OS Security Configuration Guide
.-
Unified storage management—Cisco MDS 9000 FICON-enabled switches are fully IBM CUP standard compliant for in-band management using the IBM S/A OS/390 I/O operations console. See the CUP In-Band Management.
-
Port address-based configurations—Configure port name, blocked or unblocked state, and the prohibit connectivity attributes can be configured on the ports. See the Configuring FICON Ports.
-
You can display the following information:
-
Individual Fibre Channel ports, such as the port name, port number, Fibre Channel address, operational state, type of port, and login data.
-
Nodes attached to ports.
-
Port performance and statistics.
-
-
Configuration files—Store and apply configuration files. See the FICON Configuration Files.
-
FICON and Open Systems Management Server features if installed. —See the VSANs for FICON and FCP Mixing.
-
Enhanced cascading support—See the CUP In-Band Management.
-
Date and time—Set the date and time on the switch. See the Allowing the Host to Control the Timestamp.
-
Configure SNMP trap recipients and community names—See the Configuring SNMP Control of FICON Parameters.
-
Call Home configurations—Configure the director name, location, description, and contact person. Refer to the Cisco MDS 9000 Family NX-OS System Management Configuration Guide.
-
Configure preferred domain ID, FC ID persistence, and principal switch priority—For information about configuring domain parameters, refer to the Cisco MDS 9000 Family NX-OS System Management Configuration Guide .
-
Sophisticated SPAN diagnostics—The Cisco MDS 9000 Family provides industry-first intelligent diagnostics, protocol decoding, and network analysis tools as well as integrated Call Home capability for added reliability, faster problem resolution, and reduced service costs. For information about monitoring network traffic using SPAN, refer to the Cisco MDS 9000 Family NX-OS System Management Configuration Guide
-
Configure R_A_TOV, E_D_TOV— See the “Fibre Channel Time-Out Values” section on page 11-1 .
-
Director-level maintenance tasks—Perform maintenance tasks for the director including maintaining firmware levels, accessing the director logs, and collecting data to support failure analysis. For information about monitoring system processes and logs refer to the Cisco MDS 9000 Family NX-OS System Management Configuration Guide
-
Port-level incident alerts—Display and clear port-level incident alerts. See the Clearing RLIR Information.
FICON Cascading
The Cisco MDS NX-OS software allows multiple switches in a FICON network. To configure multiple switches, you must enable and configure fabric binding in that switch and refer to the Cisco MDS 9000 Family NX-OS Security Configuration Guide ).
FICON VSAN Prerequisites
To ensure that a FICON VSAN is operationally up, be sure to verify the following requirements:
-
Set the default zone to permit, if you are not using the zoning feature. See the .
-
Enable in-order delivery on the VSAN. See Configuring Fibre Channel Routing Services and Protocols
-
Enable (and if required, configure) fabric binding on the VSAN. For more information about Fabric Binding, refer to the Cisco MDS 9000 Family NX-OS Security Configuration Guide .
-
Verify that conflicting persistent FC IDs do not exist in the switch. For information about configuring domain parameters, refer to the Cisco MDS 9000 Family NX-OS System Management Configuration Guide .
-
Verify that the configured domain ID and requested domain ID match. For information about configuring domain parameters, refer to the Cisco MDS 9000 Family NX-OS System Management Configuration Guide .
-
Add the CUP (area FE) to the zone, if you are using zoning. See the CUP In-Band Management.
If any of these requirements are not met, the FICON feature cannot be enabled.
FICON Port Numbering
With reference to the FICON feature, ports in Cisco MDS switches are identified by a statically defined 8-bit value known as the port number. A maximum of 255 port numbers are available. You can use the following port numbering schemes:
This section includes the following topics:
Note | You must enable FICON on the switch before reserving FICON port number (see the About Enabling FICON on a VSAN). |
- Default FICON Port Numbering Scheme
- Port Addresses
- Implemented and Unimplemented Port Addresses
- About the Reserved FICON Port Numbering Scheme
- Installed and Uninstalled Ports
- FICON Port Numbering Guidelines
- Assigning FICON Port Numbers to Slots
- Displaying the FICON Port Number Assignments
- About Port Numbers for FCIP and PortChannel
- Reserving FICON Port Numbers for FCIP and PortChannel Interfaces
- FC ID Allocation
Default FICON Port Numbering Scheme
Default FICON port numbers are assigned by the Cisco MDS NX-OS software based on the module and the slot in the chassis. The first port in a switch always starts with a zero (0) (see Figure 1).
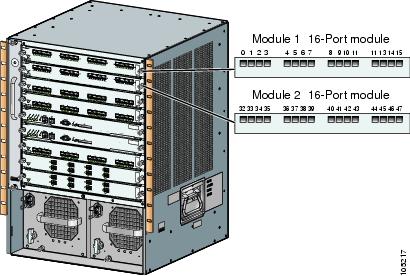
The default FICON port number is assigned based on the front panel location of the port and is specific to the slot in which the module resides. Thirty-two (32) port numbers are assigned to each slot on all Cisco MDS 9000 Family switches except for the Cisco MDS 9513 Director, which has 16 port numbers assigned for each slot. These default numbers are assigned regardless of the module’s physical presence in the chassis, the port status (up or down), or the number of ports on the module (4, 12, 16, 24, or 48). If a module has fewer ports than the number of port numbers assigned to the slot, then the excess port numbers are unused. If a module has more ports than the number of port numbers assigned to the slot, the excess ports cannot be used for FICON traffic unless you manually assign the port numbers.
Note | You can use the ficon slot assign port-numbers command to make use of any Follow the steps in Assigning FICON Port Numbers to Slots to make use of excess ports by manually assigning more port numbers to the slots. Before doing this, however, we recommend that you review the default port number assignments for Cisco MDS 9000 switches shown in Table 1 Table 1, and that you read the following sections to gain a complete understanding of FICON port numbering: About the Reserved FICON Port Numbering Scheme, FICON Port Numbering Guidelines, and Assigning FICON Port Numbers to Slots. |
Note | Only Fibre Channel, PortChannel, and FCIP ports are mapped to FICON port numbers. Other types of interfaces do not have a corresponding port number. |
Table 1 lists the default port number assignment for the Cisco MDS 9000 Family of switches and directors.
|
Product |
Slot Number |
Implemented Port Allocation |
To PortChannel/FCIP |
Unimplemented Ports |
|
|---|---|---|---|---|---|
|
To Ports |
Notes |
||||
|
Cisco MDS 9200 Series |
Slot 1 |
0 through 31 |
64 through 89 |
90 through 253 and port 255 |
Similar to a switching module. |
|
Slot 2 |
32 through 63 |
||||
|
Cisco MDS 9222i Series |
Slot 1 |
0 through 31 |
64 through 89 |
90 through 253 and port 255 |
The first 4, 12, 16, or 24 port numbers in a 4-port, 12-port, 16-port, or 24-port module are used and the rest remain unused. Extra 16 ports on 48-port modules are not allocated numbers. |
|
Slot 2 |
32 through 63 |
||||
|
Cisco MDS 9506 Director |
Slot 1 |
0 through 31 |
128 through 153 |
154 through 253 and port 255 |
Supervisor modules are not allocated port numbers. |
|
Slot 2 |
32 through 63 |
||||
|
Slot 3 |
64 through 95 |
||||
|
Slot 4 |
96 through 127 |
||||
|
Slot 5 |
None |
||||
|
Slot 6 |
None |
||||
|
Cisco MDS 9134 Director |
Slot 1 |
0 through 33 |
34 through 59 |
60 through 253 and port 255 |
|
|
Cisco MDS 9509 Director |
Slot 1 |
0 through 31 |
224 through 249 |
250 through 253 and port 255 |
The first 4, 12, 16, or 24 port numbers in a 4-port, 12-port, 16-port, or 24-port module are used and the rest remain unused. Extra 16 ports on 48-port modules are not allocated port numbers. |
|
Slot 2 |
32 through 63 |
||||
|
Slot 3 |
64 through 95 |
||||
|
Slot 4 |
96 through 127 |
||||
|
Slot 5 |
None |
Supervisor modules are not allocated port numbers. |
|||
|
Slot 6 |
None |
||||
|
Slot 7 |
128 through 159 |
The first 4, 12, 16, or 24 port numbers are used for a 4-port, 12-port,16-port, or 24-port module and the rest remain unused. Extra 16 ports on 48-port modules are not allocated port numbers. |
|||
|
Slot 8 |
160 through 191 |
||||
|
Slot 9 |
192 through 223 |
||||
|
Cisco MDS 9513 Director |
Slot 1 |
0 through 15 |
224 through 249 |
250 through 253 and port 255 |
The first 4, 12 or 16 port numbers are used for a 4-port, 12-port or 16-port module and the rest remain unused. Extra ports on 24-port, 32-port, and 48-port modules are not allocated port numbers. |
|
Slot 2 |
16 through 31 |
||||
|
Slot 3 |
32 through 47 |
||||
|
Slot 4 |
48 through 63 |
||||
|
Slot 5 |
64 through 79 |
||||
|
Slot 6 |
80 through 95 |
||||
|
Slot 7 |
None |
Supervisor modules are not allocated port numbers. |
|||
|
Slot 8 |
None |
||||
|
Slot 9 |
96 through 111 |
The first 4 or 12 port numbers are used for a 4-port or 12-port module and the rest remain unused. Extra ports on 24-port, 32-port, and 48-port modules are not allocated port numbers. |
|||
|
Slot 10 |
112 through 127 |
||||
|
Slot 11 |
128 through 143 |
||||
|
Slot 12 |
144 through 159 |
||||
|
Slot 13 |
160 through 175 |
Port Addresses
By default, port numbers are the same as port addresses. You can swap the port addresses (see the Port Swapping).
You can swap the port addresses by issuing the ficon swap portnumber command.
Implemented and Unimplemented Port Addresses
An implemented port refers to any port address that is assigned by default to a slot in the chassis (see Default Settings). An unimplemented port refers to any port address that is not assigned by default to a slot in the chassis (see Default Settings).
About the Reserved FICON Port Numbering Scheme
A range of 250 port numbers are available for you to assign to all the ports on a switch. Default Settings shows that you can have more than 250 physical ports on a switch and the excess ports do not have port numbers in the default numbering scheme. When you have more than 250 physical ports on your switch, you can have ports without a port number assigned if they are not in a FICON VSAN, or you can assign duplicate port numbers if they are not used in the same FICON VSAN. For example, you can configure port number 1 on interface fc1/1 in FICON VSAN 10 and fc10/1 in FICON VSAN 20.
Note | A VSAN can have a maximum of 250 port numbers. |
Note | FICON port numbers are not changed for ports that are active. You must first disable the interfaces using the shutdown command. |
Note | You can configure port numbers even when no module is installed in the slot. |
Installed and Uninstalled Ports
An installed port refers to a port for which all required hardware is present. A specified port number in a VSAN can be implemented, and yet not installed, if any of the following conditions apply:
- The module is not present—For example, if module 1 is not physically present in slot 1 in a Cisco MDS 9509 Director, ports 0 to 31 are considered uninstalled.
- The small form-factor pluggable (SFP) port is not present—For example, if a 16-port module is inserted in slot 2 in a Cisco MDS 9509 Director, ports 48 to 63 are considered uninstalled.
- For slot 1, ports 0 to 31, or 0 to 15 have been assigned. Only the physical port fc1/5 with port number 4 is in VSAN 2. The rest of the physical ports are not in VSAN 2. The port numbers 0 to 249 are considered implemented for any FICON-enabled VSAN. Therefore, VSAN 2 has port numbers 0 to 249 and one physical port, fc1/4. The corresponding physical ports 0 to 3,and 5 to 249 are not in VSAN 2. When the FICON VSAN port address is displayed, those port numbers with the physical ports not in VSAN 2 are not installed (for example, ports 0 to 3, or 5 to 249).
Another scenario is if VSANs 1 through 5 are FICON-enabled, and trunking-enabled interface fc1/1 has VSANs 3 through 10, then port address 0 is uninstalled in VSAN 1 and 2.
- The port is part of a PortChannel—For example, if interface fc 1/1 is part of PortChanne1 5, port address 0 is uninstalled in all FICON VSANs. See Default Settings.
FICON Port Numbering Guidelines
The following guidelines apply to FICON port numbers:
- Supervisor modules do not have port number assignments.
- Port numbers do not change based on TE ports. Since TE ports appear in multiple VSANs, chassis-wide unique port numbers should be reserved for TE ports.
- Each PortChannel must be explicitly associated with a FICON port number.
- When the port number for a physical PortChannel becomes uninstalled, the relevant PortChannel configuration is applied to the physical port.
- Each FCIP tunnel must be explicitly associated with a FICON port number. If the port numbers are not assigned for PortChannels or for FCIP tunnels, then the associated ports will not come up.
Assigning FICON Port Numbers to Slots
You can use the show ficon port-number assign and show ficon first-available port-number commands to determine which port numbers to use.
 Caution | When you assign, change, or release a port number, the port reloads. |
To assign FICON port numbers to a slot, follow these steps:
Displaying the FICON Port Number Assignments
Use the show ficon port-numbers assign command to display the port numbers assigned on the switch.
switch# show ficon port-numbers assign
ficon slot 1 assign port-numbers 0-31
ficon slot 2 assign port-numbers 32-63
ficon slot 3 assign port-numbers 64-95
ficon slot 4 assign port-numbers 96-127
ficon logical-port assign port-numbers 128-153
Use the show ficon port-numbers assign slot command to display the port numbers assigned to a specific slot.
switch# show ficon port-numbers assign slot 2
ficon slot 2 assign port-numbers 32-63
Use the show ficon port-numbers assign command to display the port numbers reserved for logical ports.
switch# show ficon port-numbers assign logical-port
ficon logical-port assign port-numbers 128-153
About Port Numbers for FCIP and PortChannel
FCIP and PortChannels cannot be used in a FICON-enabled VSAN unless they are explicitly bound to a port number.
See the Configuring FICON Ports, and the Reserving FICON Port Numbers for FCIP and PortChannel Interfaces, and the Binding Port Numbers to FCIP Interfaces.
You can use the default port numbers if they are available (see Table 1) or if you reserve port numbers from the pool of port numbers that are not reserved for Fibre Channel interfaces (see the About the Reserved FICON Port Numbering Scheme).
To find the first available port number to bind an FCIP or PortChannel interface, use the show ficon first-available port-number command (see Displays the Available Port Numbers).
Tip | The show ficon vsan portaddress brief command displays the port number to interface mapping. You can assign port numbers in the PortChannel/FCIP range that are not already assigned to a PortChannel or FCIP interface (see Displays Port Address Information in a Brief Format). |
Reserving FICON Port Numbers for FCIP and PortChannel Interfaces
You must reserve port numbers for logical interfaces, such as FCIP and PortChannels, if you plan to use them.
To reserve FICON port numbers for logical interfaces, follow these steps:
| Step 1 | switch#
config
t
switch(config)# Enters configuration mode. | ||
| Step 2 | switch(config)#
ficon
logical-port
assign
port-numbers
230-249
Reserves port numbers 230 through 249 for FCIP and PortChannel interfaces. | ||
| Step 3 | switch(config)#
ficon
logical-port
assign
port-numbers
0xe6-0xf9
Reserves port numbers 0xe6 through 0xf9 for FCIP and PortChannel interfaces.
| ||
| Step 4 | switch(config)#
no
ficon
logical-port
assign
port-numbers
230-249
Releases the port numbers.
|
FC ID Allocation
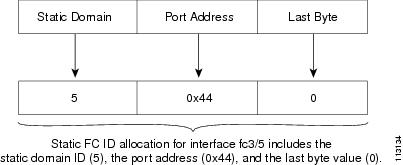
FICON requires a predictable and static FC ID allocation scheme. When FICON is enabled, the FC ID allocated to a device is based on the port address of the port to which it is attached. The port address forms the middle byte of the fabric address. Additionally, the last byte of the fabric address should be the same for all devices in the fabric. By default, the last byte value is 0 and can be configured.
Note | You cannot configure persistent FC IDs in FICON-enabled VSANs. |
Cisco MDS switches have a dynamic FC ID allocation scheme. When FICON is enabled or disabled on a VSAN, all the ports are shut down and restarted to switch from the dynamic to static FC IDs and vice versa (see Figure 1).
Configuring FICON
By default FICON is disabled in all switches in the Cisco MDS 9000 Family. You can enable FICON on a per VSAN basis by using the Device Manager.
This section includes the following topics:
- About Enabling FICON on a VSAN
- Enabling FICON on the Switch
- Setting Up a Basic FICON Configuration
- Manually Enabling FICON on a VSAN
- Configuring the code-page Option
- Allowing the Host to Move the Switch Offline
- Allowing the Host to Change FICON Port Parameters
- Allowing the Host to Control the Timestamp
- Clearing the Time Stamp
- Configuring SNMP Control of FICON Parameters
- About FICON Device Allegiance
- Clearing FICON Device Allegiance
- Automatically Saving the Running Configuration
About Enabling FICON on a VSAN
By default FICON is disabled in all VSANs on the switch.
You can enable FICON on a per VSAN basis in one of the following ways:
See the Setting Up a Basic FICON Configuration.
See the About FICON.
- Use Device Manager.
When you enable the FICON feature in Cisco MDS switches, the following restrictions apply:
- You cannot disable in-order delivery for the FICON-enabled VSAN.
- You cannot disable fabric binding or static domain ID configurations for the FICON-enabled VSAN.
- The load balancing scheme is changed to Source ID (SID)—Destination ID (DID). You cannot change it back to SID—DID—OXID.
- The IPL configuration file is automatically created.
See the About FICON Configuration Files.
Tip | Using Device Manager, FICON auto-save can be invoked by multiple users logged on to the same FICON-enabled switch. Device Manager performs a periodic auto-save on any FICON-enabled switch causing increments in the FICON key counter. These increments highlight a change that has actually not occurred. To avoid this we recommend that only one instance of Device Manager monitor a FICON-enabled switch. |
Enabling FICON on the Switch
By default FICON is disabled in all switches in the Cisco MDS 9000 Family. You can enable FICON on the switch either explicitly or implicitly by enabling FICON on a VSAN. However, disabling FICON on all VSANs does not disable FICON on the switch. You must explicitly disable FICON.
To explicitly enable or disable FICON globally on the switch, follow these steps:
Setting Up a Basic FICON Configuration
This section steps you through the procedure to set up FICON on a specified VSAN in a Cisco MDS 9000 Family switch.
Note | Press Ctrl-C at any prompt to skip the remaining configuration options and proceed with what is configured until that point. |
Tip | If you do not want to answer a previously configured question, or if you want to skip answers to any questions, press Enter. If a default answer is not available (for example, switch name), the switch uses what was previously configured and skips to the next question. |
To enable and set up FICON, follow these steps:
| Step 1 | Enter the
setup
ficon command at the EXEC command mode.
switch# setup ficon
                --- Ficon Configuration Dialog ---
This setup utility will guide you through basic Ficon Configuration
on the system.
Press Enter if you want to skip any dialog. Use ctrl-c at anytime
to skip all remaining dialogs.
| ||
| Step 2 | Enter
yes (the default is
yes) to enter the basic FICON configuration
setup.
Would you like to enter the basic configuration dialog (yes/no) [yes]: yes The FICON setup utility guides you through the basic configuration process. Press Ctrl-C at any prompt to end the configuration process. | ||
| Step 3 | Enter the VSAN number for which FICON should be
enabled.
Enter vsan [1-4093]:2 | ||
| Step 4 | Enter
yes (the default is
yes) to create a VSAN.
vsan 2 does not exist, create it? (yes/no) [yes]: yes | ||
| Step 5 | Enter
yes (the default is
yes) to confirm your VSAN choice:
Enable ficon on this vsan? (yes/no) [yes]: yes
| ||
| Step 6 | Enter the domain ID number for the specified FICON
VSAN.
Configure domain-id for this ficon vsan (1-239):2 | ||
| Step 7 | Enter
yes (the default is
no) to set up FICON in cascaded mode. If
you enter
no, skip to step 8 (see the
CUP In-Band Management).
Would you like to configure ficon in cascaded mode: (yes/no) [no]: yes | ||
| Step 8 | Enter
yes
(the default is
yes) to allow SNMP permission to modify
existing port connectivity parameters (see the
Configuring SNMP Control of FICON Parameters).
Enable SNMP to modify port connectivity parameters? (yes/no) [yes]: yes | ||
| Step 9 | Enter
no
(the default is
no) to allow the host (mainframe) to modify
the port connectivity parameters, if required (see the
Allowing the Host to Change FICON Port Parameters).
Disable Host from modifying port connectivity parameters? (yes/no) [no]: no | ||
| Step 10 | Enter
yes (the default is
yes) to enable the
active
equals
saved
feature (see the
Automatically Saving the Running Configuration).
Disable Host from modifying port connectivity parameters? (yes/no) [no]: no | ||
| Step 11 | Enter
yes (the default is
yes) if you wish to configure additional
FICON VSANs.
Disable Host from modifying port connectivity parameters? (yes/no) [no]: no | ||
| Step 12 | Review and edit the configuration that you have just entered. | ||
| Step 13 | Enter no (the default is
no) if you are satisfied with the
configuration.
The following configuration will be applied: fcdomain domain 2 static vsan 1 fcdomain restart disruptive vsan 1 fabric-binding database vsan 1 swwn 11:00:02:01:aa:bb:cc:00 domain 4 fabric-binding activate vsan 1 zone default-zone permit vsan 1 ficon vsan 1 no host port control fcdomain domain 3 static vsan 2 fcdomain restart disruptive vsan 2 fabric-binding activate vsan 2 force zone default-zone permit vsan 2 ficon vsan 2 no host port control no active equals saved vsan database vsan 3 fcdomain domain 5 static vsan 3 fcdomain restart disruptive vsan 3 fabric-binding activate vsan 3 force zone default-zone permit vsan 3 ficon vsan 3 no snmp port control no active equals saved Would you like to edit the configuration? (yes/no) [no]: no | ||
| Step 14 | Enter yes (the default is
yes) to use and save this configuration.
The implemented commands are displayed. After FICON is enabled for the
specified VSAN, you are returned to the EXEC mode switch prompt.
Use this configuration and apply it? (yes/no) [yes]: yes
`fcdomain domain 2 static vsan 1`
`fcdomain restart disruptive vsan 1`
`fabric-binding database vsan 1`
`swwn 11:00:02:01:aa:bb:cc:00 domain 4`
`fabric-binding activate vsan 1`
`zone default-zone permit vsan 1`
`ficon vsan 1`
`no host port control`
`fcdomain domain 3 static vsan 2`
`fcdomain restart disruptive vsan 2`
`fabric-binding activate vsan 2 force`
`zone default-zone permit vsan 2`
`ficon vsan 2`
`no host port control`
`no active equals saved`
`vsan database` `vsan 3` `in-order-guarantee vsan 3` `fcdomain domain 2 static vsan 3` `fcdomain restart disruptive vsan 3` `fabric-binding activate vsan 3 force` `zone default-zone permit vsan 3` `ficon vsan 3` `no snmp port control` Performing fast copy config...done. switch# |
Manually Enabling FICON on a VSAN
Note | This section describes the procedure to manually enable FICON on a VSAN. If you have already enabled FICON on the required VSAN using the automated setup (recommended), skip to the Automatically Saving the Running Configuration. |
To manually enable FICON on a VSAN, follow these steps:
| Step 1 | switch#
config
t
switch(config)# Enters configuration mode. |
| Step 2 | switch(config)#
vsan
database
switch(config-vsan-db)# vsan 5
switch(config-vsan-db)# do show vsan usage
4 vsan configured
configured vsans:1-2,5,26
vsans available for configuration:3-4,6-25,27-4093
switch(config-vsan-db)# exit
Enables VSAN 5. |
| Step 3 | switch(config)#
in-order-guarantee
vsan
5
Activates in-order delivery for VSAN 5. See Configuring Fibre Channel Routing Services and Protocols |
| Step 4 | switch(config)#
fcdomain
domain
2
static
vsan
2
Configures the domain ID for VSAN 2. For information about configuring domain parameters, refer to the Cisco MDS 9000 Family NX-OS System Management Configuration Guide . |
| Step 5 | switch(config)#
fabric-binding
activate
vsan
2
force
Activates fabric binding on VSAN 2. Refer to the Cisco MDS 9000 Family NX-OS Security Configuration Guide |
| Step 6 | switch(config)#
zone
default-zone
permit
vsan
2
Sets the default zone to permit for VSAN 2. See the CUP In-Band Management. |
| Step 7 | switch(config)#
ficon
vsan
2
switch(config-ficon)# Enables FICON on VSAN 2. |
| Step 8 | switch(config)#
no
ficon
vsan
6
Disables the FICON feature on VSAN 6. |
| Step 9 | switch(config-ficon)#
no
host
port
control
Prohibits mainframe users from moving the switch to an offline state. |
Configuring the code-page Option
FICON strings are coded in Extended Binary-Coded Decimal Interchange Code (EBCDIC) format. Refer to your mainframe documentation for details on the code page options.
Cisco MDS switches support international-5, france, brazil, germany, italy, japan, spain-latinamerica, uk, and us-canada (default) EBCDIC format options.
Tip | This is an optional configuration. If you are not sure of the EBCDIC format to be used, we recommend retaining the us-canada (default) option. |
To configure the code-page option in a VSAN, follow these steps:
Allowing the Host to Move the Switch Offline
By default, hosts are allowed to move the switch to an offline state. To do this, the host sends a "Set offline" command (x'FD') to the CUP.
To allow the host to move the switch to an offline state, follow these steps:
Allowing the Host to Change FICON Port Parameters
By default, mainframe users are not allowed to configure FICON parameters on Cisco MDS switches—they can only query the switch.
Use the host port control command to permit mainframe users to configure FICON parameters.
To allow the host (mainframe) to configure FICON parameters on the Cisco MDS switch, follow these steps:
Allowing the Host to Control the Timestamp
By default, the clock in each VSAN is the same as the switch hardware clock. Each VSAN in a Cisco MDS 9000 Family switch represents a virtual director. The clock and time present in each virtual director can be different.To maintain separate clocks for each VSAN, the Cisco NX-OS software maintains the difference of the VSAN-specific clock and the hardware-based director clock. When a host (mainframe) sets the time, the Cisco NX-OS software updates this difference between the clocks. When a host reads the clock, it computes the difference between the VSAN-clock and the current director hardware clock and presents a value to the mainframe.
The VSAN-clock current time is reported in the output of show ficon vsan vsan-id, show ficon, and show accounting log commands.
To configure host control of the timestamp, follow these steps:
Clearing the Time Stamp
Note | You can clear time stamps only from the Cisco MDS switch—not the mainframe. |
Use the clear ficon vsan vsan-id timestamp command in EXEC mode to clear the VSAN clock.
switch# clear ficon vsan 20 timestamp
Configuring SNMP Control of FICON Parameters
To configure SNMP control of FICON parameters, follow these steps:
About FICON Device Allegiance
FICON requires serialization of access among multiple mainframes, CLI, and SNMP sessions be maintained on Cisco MDS 9000 Family switches by controlling device allegiance for the currently executing session. Any other session is denied permission to perform configuration changes unless the required allegiance is available.
Caution | This task discards the currently executing session. |
Clearing FICON Device Allegiance
You can clear the current device allegiance by issuing the clear ficon vsan vsan-id allegiance command in EXEC mode.
switch# clear ficon vsan 1 allegiance
Automatically Saving the Running Configuration
Cisco MDS NX-OS provides an option to automatically save any configuration changes to the startup configuration. This ensures that the new configuration is present after a switch reboot. By default, the Active=Saved active equals saved option is automatically enabled on any FICON VSAN.
Table 1 displays the results of the Active = Saved option active equals saved command and the implicit copy from the running configuration to the startup configuration (copy running start)copy running-config startup-config command in various scenarios.
When the Active=Saved option active equals saved command is enabled in any FICON-enabled VSAN in the fabric, then the following apply (see Number 1 and 2 in Table 1):
- All configuration changes (FICON-specific or not) are automatically saved to persistent storage (implicit copy running start) and stored in the startup configuration.
- FICON-specific configuration changes are immediately saved to the IPL file (see the FICON Configuration Files).
If the Active=Saved option active equals saved command is not enabled in any FICON-enabled VSAN in the fabric, then FICON-specific configuration changes are not saved in the IPL file and an implicit copy running startup command is not issued, you must explicitly save the running configuration to the startup configurationissue the copy running start command explicitly (see number 3 in Table 1).
|
Number |
FICON-enabled VSAN? |
active equals saved Enabled? |
Implicit copy running start Issued? |
Notes |
|---|---|---|---|---|
|
1 |
Yes |
Yes (in all FICON VSANs) |
Implicit |
FICON changes written to the IPL file. Non-FICON changes saved to startup configuration and persistent storage. |
|
2 |
Yes |
Yes (even in one FICON VSAN) |
Implicit |
FICON changes written to IPL file for only the VSAN that has active equals saved option enabled. Non-FICON changes saved to startup configuration and persistent storage. |
|
3 |
Yes |
Not in any FICON VSAN |
Not implicit |
FICON changes are not written to the IPL file. Non-FICON changes are saved in persistent storage—only if you explicitly issue the copy running start command. |
|
4 |
No |
Not applicable |
Note | If active equals saved is enabled, the Cisco NX-OS software ensures that you do not have to perform the copy running startup command for the FICON configuration as well. If your switch or fabric consists of multiple FICON-enabled VSANs, and one of these VSANs have active equals saved enabled, changes made to the non-FICON configuration results in all configurations being saved to the startup configuration. |
To automatically save the running configuration, follow these steps:
Configuring FICON Ports
You can perform FICON configurations on a per-port address basis in the Cisco MDS 9000 Family switches.
Even if a port is uninstalled, the port address-based configuration is accepted by the Cisco MDS switch. This configuration is applied to the port when the port becomes installed.
This section includes the following topics:
- Binding Port Numbers to PortChannels
- Binding Port Numbers to FCIP Interfaces
- Configuring Port Blocking
- Port Prohibiting
- Assigning a Port Address Name
- About RLIR
- Specifying an RLIR Preferred Host
- Displaying RLIR Information
- Clearing RLIR Information
Binding Port Numbers to PortChannels
Caution | All port number assignments to PortChannels or FCIP interfaces are lost (cannot be retrieved) when FICON is disabled on all VSANs. |
You can bind (or associate) a PortChannel with a FICON port number to bring up that interface.
To bind a PortChannel with a FICON port number, follow these steps:
Binding Port Numbers to FCIP Interfaces
You can bind (or associate) an FCIP interface with a FICON port number to bring up that interface.
To bind an FCIP interface with a FICON port number, follow these steps:
Configuring Port Blocking
If you block a port, the port is retained in the operationally down state. If you unblock a port, a port initialization is attempted. When a port is blocked, data and control traffic are not allowed on that port.
Physical Fibre Channel port blocks will continue to transmit an Off-line state (OLS) primitive sequence on a blocked port.
Note | The zoning devices within a FICON VSAN can conflict with currently prohibited FICON ports and should not be used. IBM does not recommend using zoning and port prohibition within the same VSAN. |
Caution | You cannot block or prohibit the CUP port (0XFE). |
If a port is shut down, unblocking that port does not initialize the port.
Note | The shutdown/no shutdown port state is independent of the block/no block port state. |
To block or unblock port addresses in a VSAN, follow these steps:
Port Prohibiting
To prevent implemented ports from talking to each other, configure prohibits between two or more ports. If you prohibit ports, the specified ports are prevented from communicating with each other.
Tip | You cannot prohibit a PortChannel or FCIP interface. |
Unimplemented ports are always prohibited. In addition, prohibit configurations are always symmetrically applied—if you prohibit port 0 from talking to port 15, port 15 is automatically prohibited from talking to port 0.
Note | If an interface is already configured in E or TE mode and you try to prohibit that port, your prohibit configuration is rejected. Similarly, if a port is not up and you prohibit that port, the port is not allowed to come up in E mode or in TE mode. |
Configuring the Default State for Port Prohibiting
By default, port prohibiting is disabled on the implemented interfaces on the switch. As of Cisco MDS SAN-OS Release 3.0(2), you can change the default port prohibiting state to enabled in VSANs that you create and then selectively disable port prohibiting on implemented ports, if desired. Also, only the FICON configuration files created after you change the default have the new default setting (see the FICON Configuration Files).
To change the default port prohibiting setting for all implemented interfaces on the switch, follow these steps:
Configuring Port Prohibiting
To prohibit port addresses in a VSAN, follow these steps:
Assigning a Port Address Name
To assign a port address name, follow these steps:
About RLIR
The Registered Link Incident Report (RLIR) application provides a method for a switch port to send an Link Incident Record (LIR) to a registered Nx port.
When an LIR is detected in FICON-enabled switches in the Cisco MDS 9000 Family from a RLIR Extended Link Service (ELS), the switch sends that record to the members in its Established Registration List (ERL).
In case of multiswitch topology, a Distribute Registered Link Incident Record (DRLIR) Inter-Link Service (ILS) is sent to all reachable remote domains along with the RLIR ELS. On receiving the DRLIR ILS, the switch extracts the RLIR ELS and sends it to the members of the ERL.
The Nx ports interested in receiving the RLIR ELS send the Link Incident Record Registration (LIRR) ELS request to the management server on the switch. The RLIRs are processed on a per-VSAN basis.
The RLIR data is written to persistent storage when you enter the copy running-config startup-config command.
The RLIR data is written to persistent storage when you copy the running configuration to the startup configuration.
Specifying an RLIR Preferred Host
As of Cisco MDS SAN-OS Release 3.0(3), you can specify a preferred host to receive RLIR frames. The MDS switch sends RLIR frames to the preferred host only if it meets the following conditions:
- No host in the VSAN is registered for RLIR with the registration function set to “always receive.” If one or more hosts in the VSAN are registered as “always receive,” then RLIR sends only to these hosts and not to the configured preferred host.
- The preferred host is registered with the registration function set to “conditionally receive.”
Note | If all registered hosts have the registration function set to “conditionally receive,” then the preferred host receives the RLIR frames. |
You can specify only one RLIR preferred host per VSAN. By default, the switch sends RLIR frames to one of the hosts in the VSAN with the register function set to “conditionally receive” if no hosts have the register function set to “always receive.”
To specify the RLIR preferred host for a VSAN, follow these steps:
| Step 1 | switch#
config
terminal
switch(config)# Enters configuration mode. |
| Step 2 | switch(config)#
rlir
preferred-cond
fcid
0x772c00
vsan
5
Specifies FC ID 0x772c00 as the RLIR preferred host in VSAN 5. (FC ID 0x772c00 is used here as an example.) |
| Step 3 | switch(config)#
no
rlir
preferred-cond
fcid
0x654321
vsan
2
(Optional) Removes FC ID 0x772c00 as the RLIR preferred host for VSAN 5. To display the RLIR preferred host configuration, use the show rlir erl command. switch# show rlir erl Established Registration List for VSAN: 5 ---------------------------------------------- FC-ID LIRR FORMAT REGISTERED FOR ---------------------------------------------- 0x772c00 0x18 conditional receive(*) 0x779600 0x18 conditional receive 0x779700 0x18 conditional receive 0x779800 0x18 conditional receive Total number of entries = 4 (*) - Denotes the preferred host |
Displaying RLIR Information
The show rlir statistics command displays the complete statistics of LIRR, RLIR, and DRLIR frames. It lists the number of frames received, sent, and rejected. Specify the VSAN ID to obtain VSAN statistics for a specific VSAN. If you do not specify the VSAN ID, then the statistics are shown for all active VSANs (see Examples Displays RLIR Statistics for All VSANs and Displays RLIR Statistics for a Specified VSAN).
Displays RLIR Statistics for All VSANs
switch# show rlir statistics
Statistics for VSAN: 1
------------------------
Number of LIRR received      = 0
Number of LIRR ACC sent      = 0
Number of LIRR RJT sent      = 0
Number of RLIR sent          = 0
Number of RLIR ACC received  = 0
Number of RLIR RJT received  = 0
Number of DRLIR received     = 0
Number of DRLIR ACC sent     = 0
Number of DRLIR RJT sent     = 0
Number of DRLIR sent         = 0
Number of DRLIR ACC received = 0
Number of DRLIR RJT received = 0
Statistics for VSAN: 100
-------------------------
Number of LIRR received      = 26
Number of LIRR ACC sent      = 26
Number of LIRR RJT sent      = 0
Number of RLIR sent          = 815
Number of RLIR ACC received  = 815
Number of RLIR RJT received  = 0
Number of DRLIR received     = 417
Number of DRLIR ACC sent     = 417
Number of DRLIR RJT sent     = 0
Number of DRLIR sent         = 914
Number of DRLIR ACC received = 828
Number of DRLIR RJT received = 0
Displays RLIR Statistics for a Specified VSAN
switch# show rlir statistics vsan 4
Statistics for VSAN: 4
-------------------------
Number of LIRR received      = 0
Number of LIRR ACC sent      = 0
Number of LIRR RJT sent      = 0
Number of RLIR sent          = 0
Number of RLIR ACC received  = 0
Number of RLIR RJT received  = 0
Number of DRLIR received     = 0
Number of DRLIR ACC sent     = 0
Number of DRLIR RJT sent     = 0
Number of DRLIR sent         = 0
Number of DRLIR ACC received = 0
Number of DRLIR RJT received = 0
The show rlir erl command shows the list of Nx ports that are registered to receive the RLIRs with the switch. If the VSAN ID is not specified, the details are shown for all active VSANs (see Examples Displays All ERLs and Displays ERLs for the Specified VSAN).
Displays All ERLs
switch# show rlir erl
Established Registration List for VSAN: 2
----------------------------------------------
FC-ID       LIRR FORMAT    REGISTERED FOR
----------------------------------------------
0x0b0200    0x18           always receive
Total number of entries = 1
Established Registration List for VSAN: 100
----------------------------------------------
FC-ID       LIRR FORMAT    REGISTERED FOR
----------------------------------------------
0x0b0500    0x18           conditional receive
0x0b0600    0x18           conditional receive
Total number of entries = 2
In Displays All ERLs, if the Registered For column states that an FC ID is conditional receive, the source port is registered as a valid recipient of subsequent RLIRs. This source port is selected as an RLIR recipient only if no other ERL recipient is selected.
In Displays All ERLs, if the Registered For column states that an FC ID is always receive, the source port is registered as a valid recipient of subsequent RLIRs. This source port is always selected as an LIR recipient.
Note | If an always receive RLIR is not registered for any N port or if the delivery of an RLIR fails for one of those ports, then the RLIR is sent to a port registered to conditional receive RLIRs. |
Displays ERLs for the Specified VSAN
switch# show rlir erl vsan 100
Established Registration List for VSAN: 100
----------------------------------------------
FC-ID       LIRR FORMAT    REGISTERED FOR
----------------------------------------------
0x0b0500    0x18           conditional receive
0x0b0600    0x18           conditional receive
Total number of entries = 2
Note | In Displays the LIR History, through Displays Recent LIRs for a Specified Port Number, if the host time stamp (marked by the *) is available, it is printed along with the switch time stamp. If the host time stamp is not available, only the switch time stamp is printed. |
Displays the LIR History
switch# show rlir history
Link incident history
----------------------------------------------------------------------------
*Host Time Stamp
 Switch Time Stamp          Port   Interface   Link Incident
----------------------------------------------------------------------------
*Sun Nov 30 21:47:28 2003
 Sun Nov 30 13:47:55 2003     2        fc1/2   Implicit Incident
*Sun Nov 30 22:00:47 2003
 Sun Nov 30 14:01:14 2003     2        fc1/2   NOS Received
*Sun Nov 30 22:00:55 2003
 Sun Nov 30 14:01:22 2003     2        fc1/2   Implicit Incident
*Mon Dec 1 20:14:26 2003
 Mon Dec  1 12:14:53 2003     4        fc1/4   Implicit Incident
*Mon Dec 1 20:14:26 2003
 Mon Dec  1 12:14:53 2003     4        fc1/4   Implicit Incident
*Thu Dec 4 04:43:32 2003
 Wed Dec  3 20:43:59 2003     2        fc1/2   NOS Received
*Thu Dec 4 04:43:41 2003
 Wed Dec  3 20:44:08 2003     2        fc1/2   Implicit Incident
*Thu Dec 4 04:46:53 2003
 Wed Dec  3 20:47:20 2003     2        fc1/2   NOS Received
*Thu Dec 4 04:47:05 2003
 Wed Dec  3 20:47:32 2003     2        fc1/2   Implicit Incident
*Thu Dec 4 04:48:07 2003
 Wed Dec  3 20:48:34 2003     2        fc1/2   NOS Received
*Thu Dec 4 04:48:39 2003
 Wed Dec  3 20:49:06 2003     2        fc1/2   Implicit Incident
*Thu Dec 4 05:02:20 2003
 Wed Dec  3 21:02:47 2003     2        fc1/2   NOS Received
...
Displays Recent LIRs for a Specified Interface
switch# show rlir recent interface fc1/1-4
Recent link incident records
-------------------------------------------------------------------------------
Host Time Stamp          Switch Time Stamp        Port Intf   Link Incident
-------------------------------------------------------------------------------
Thu Dec 4 05:02:29 2003  Wed Dec 3 21:02:56 2003   2   fc1/2  Implicit Incident
Thu Dec 4 05:02:54 2003  Wed Dec 3 21:03:21 2003   4   fc1/4  Implicit Incident
Displays Recent LIRs for a Specified Port Number
switch# show rlir recent portnumber 1-4
Recent link incident records
--------------------------------------------------------------------------------
Host Time Stamp          Switch Time Stamp        Port Intf    Link Incident
--------------------------------------------------------------------------------
Thu Dec 4 05:02:29 2003  Wed Dec 3 21:02:56 2003   2   fc1/2   Implicit Incident
Thu Dec 4 05:02:54 2003  Wed Dec 3 21:03:21 2003   4   fc1/4   Implicit Incident
As of Cisco SAN-OS Release 3.0(3), the show rlir history command output includes remote link incidents that are received as DRLIRs from other switches. RLIRs are generated as a result of DRLIRs as in previous Cisco NX-OS releases (see Displays the LIR History as of Cisco SAN-OS Release 3.0(3)).
Displays the LIR History as of Cisco SAN-OS Release 3.0(3)
switch# show rlir history
Link incident history
----------------------------------------------------------------------------------------------------------------
 Host Time Stamp         Switch Time Stamp       VSAN   Domain   Port    Intf        Link Incident       Loc/Rem
----------------------------------------------------------------------------------------------------------------
 Sep 20 12:42:44 2006    Sep 20 12:42:44 2006    ****    ****    0x0b    fc1/12      Loss of sig/sync     LOC
 Reported Successfully to: [0x640001] [0x640201]
 Sep 20 12:42:48 2006    Sep 20 12:42:48 2006    ****    ****    0x0b    fc1/12      Loss of sig/sync     LOC
 Reported Successfully to: [0x640001] [0x640201]
 *** ** **:**:** ****    Sep 20 12:42:51 2006    1001    230     0x12    ****        Loss of sig/sync     REM
 Reported Successfully to: [0x640001] [0x640201]
 Sep 20 12:42:55 2006    Sep 20 12:42:55 2006    ****    ****    0x0b    fc1/12      Loss of sig/sync     LOC
 Reported Successfully to: None [No Registrations]
 *** ** **:**:** ****    Sep 20 12:45:56 2006    1001    230     0x12    ****        Loss of sig/sync     REM
 Reported Successfully to: None [No Registrations]
 *** ** **:**:** ****    Sep 20 12:45:56 2006    1001    230     0x12    ****        Loss of sig/sync     REM
 Reported Successfully to: None [No Registrations]
 Sep 20 12:52:45 2006    Sep 20 12:52:45 2006    ****    ****    0x0b    fc1/12      Loss of sig/sync     LOC
 Reported Successfully to: None [No Registrations]
**** - Info not required/unavailable
Clearing RLIR Information
Use the clear rlir statistics command to clear all existing statistics for a specified VSAN.
switch# clear rlir statistics vsan 1
Use the clear rlir history command to clear the RLIR history where all link incident records are logged for all interfaces.
switch# clear rlir history
Use the clear rlir recent interface command to clear the most recent RLIR information for a specified interface.
switch# clear rlir recent interface fc 1/2
Use the clear rlir recent portnumber command to clear the most recent RLIR information for a specified port number.
switch# clear rlir recent portnumber 16
FICON Configuration Files
You can save up to 16 FICON configuration files on each FICON-enabled VSAN (in persistent storage). The file format is proprietary to IBM. These files can be read and written by IBM hosts using the in-band CUP protocol. Additionally, you can use the Cisco MDS CLI to operate on these FICON configuration files.
Note | Multiple FICON configuration files with the same name can exist in the same switch, provided they reside in different VSANs. For example, you can create a configuration file named XYZ in both VSAN 1 and VSAN 3. |
When you enable the FICON feature in a VSAN, the switches always use the startup FICON configuration file, called IPL. This file is created with a default configuration as soon as FICON is enabled in a VSAN.
Caution | When FICON is disabled on a VSAN, all the FICON configuration files are irretrievably lost. |
FICON configuration files contain the following configuration for each implemented port address:
- Block
- Prohibit mask
- Port address name
Note | Normal configuration files used by Cisco MDS switches include FICON-enabled attributes for a VSAN, port number mapping for PortChannels and FCIP interfaces, port number to port address mapping, port and trunk allowed VSAN configuration for ports, in-order guarantee, static domain ID configuration, and fabric binding configuration. |
Refer to the Cisco MDS 9000 Family NX-OS Fundamentals Configuration Guide for details on the normal configuration files used by Cisco MDS switches.
This section includes the following topics:
- About FICON Configuration Files
- Applying the Saved Configuration Files to the Running Configuration
- Editing FICON Configuration Files
- Displaying FICON Configuration Files
- Copying FICON Configuration Files
About FICON Configuration Files
Only one user can access the configuration file at any given time:
- If this file is being accessed by user 1, user 2 cannot access this file.
- If user 2 does attempt to access this file, an error is issued to user 2.
- If user 1 is inactive for more than 15 seconds, the file is automatically closed and available for use by any other permitted user.
FICON configuration files can be accessed by any host, SNMP, or CLI user who is permitted to access the switch. The locking mechanism in the Cisco NX-OS software restricts access to one user at a time per file. This lock applies to newly created files and previously saved files. Before accessing any file, you must lock the file and obtain the file key. A new file key is used by the locking mechanism for each lock request. The key is discarded when the lock timeout of 15 seconds expires. The lock timeout value cannot be changed.
Applying the Saved Configuration Files to the Running Configuration
You can apply the configuration from the saved files to the running configuration using the ficon vsan number apply file filename command.
switch# ficon vsan 2 apply file SampleFile
Editing FICON Configuration Files
The configuration file submode allows you to create and edit FICON configuration files. If a specified file does not exist, it is created. Up to 16 files can be saved. Each file name is restricted to eight alphanumeric characters.
To edit the contents of a specified FICON configuration file, follow these steps:
| Step 1 | switch#
config
t
switch(config)# Enters configuration mode. | ||
| Step 2 | switch(config)#
ficon
vsan
2
switch(config-ficon)# Enables FICON on VSAN 2. | ||
| Step 3 | switch(config-ficon)#
file
IplFile1
switch(config-ficon-file)# Accesses the FICON configuration file called IplFile1 for VSAN 2. If this file does not exist, it is created.
| ||
| Step 4 | switch(config-ficon)#
no
file
IplFileA
(Optional) Deletes a previously created FICON configuration file. | ||
| Step 5 | switch(config-ficon-file)#
portaddress
3
switch(config-ficon-file-portaddr)# Enters the submode for port address 3 to edit the contents of the configuration file named IplFile1.
| ||
| Step 6 | switch(config-ficon-file-portaddr)#
prohibit
portaddress
5
Edits the content of the configuration file named IplFile1 by prohibiting port address 5 from accessing port address 3. | ||
| Step 7 | switch(config-ficon-file-portaddr)#
block
Edits the content of the configuration file named IplFile1 by blocking a range of port addresses and retaining them in the operationally down state. | ||
| Step 8 | switch(config-ficon-file-portaddr)#
name
P3
Edits the content of the configuration file named IplFile1 by assigning the name P3 to port address 3. If the name did not exist, it is created. If it existed, it is overwritten. |
Displaying FICON Configuration Files
Use the show ficon vsan vsan-id file all command to display the contents of all FICON configuration files.
switch# show ficon vsan 2 file all
File IPL      is locked
FICON configuration file IPLFILEA in vsan 2
Description:
    Port address 0(0)
        Port name is
        Port is not blocked
        Prohibited port addresses are 250-253,255(0xfa-0xfd,0xff)
    Port address 1(0x1)
        Port name is
        Port is not blocked
        Prohibited port addresses are 250-253,255(0xfa-0xfd,0xff)
Port address 2(0x2)
        Port name is
        Port is not blocked
        Prohibited port addresses are 250-253,255(0xfa-0xfd,0xff)
    Port address 3(0x3)
        Port name is P3
        Port is blocked
        Prohibited port addresses are 5,250-253,255(0x5,0xfa-0xfd,0xff)
..
Use the show ficon vsan vsan-id file name command to display the contents of a specific FICON configuration file.
switch# show ficon vsan 2 file name IPLfilea
FICON configuration file IPLFILEA in vsan 2
Description:
    Port address 0(0)
        Port name is
        Port is not blocked
        Prohibited port addresses are 250-253,255(0xfa-0xfd,0xff)
    Port address 1(0x1)
        Port name is
        Port is not blocked
        Prohibited port addresses are 250-253,255(0xfa-0xfd,0xff)
    Port address 2(0x2)
        Port name is
        Port is not blocked
        Prohibited port addresses are 250-253,255(0xfa-0xfd,0xff)
    Port address 3(0x3)
        Port name is P3
        Port is blocked
        Prohibited port addresses are 5,250-253,255(0x5,0xfa-0xfd,0xff)
Use the show ficon vsan vsan-id file name filename portaddress command to display the FICON configuration file information for a specific FICON port.
switch# show ficon vsan 2 file name IPLfilea portaddress 3
FICON configuration file IPLFILEA in vsan 2
Description:
    Port address 3(0x3)
        Port name is P3
        Port is blocked
        Prohibited port addresses are 5,250-253,255(0x5,0xfa-0xfd,0xff)
Copying FICON Configuration Files
Use the ficon vsan vsan-id copy file existing-file-name save-as-file-name command in EXEC mode to copy an existing FICON configuration file.
switch# ficon vsan 20 copy file IPL IPL3
You can see the list of existing configuration files by issuing the show ficon vsan vsan-id command.
switch# show
 ficon vsan 20
Ficon information for VSAN 20
  Ficon is online
  VSAN is active
  Host port control is Enabled
  Host offline control is Enabled
  User alert mode is Disabled
  SNMP port control is Enabled
  Host set director timestamp is Enabled
  Active=Saved is Enabled
  Number of implemented ports are 250
  Key Counter is 5
  FCID last byte is 0
  Date/Time is same as system time (Wed Dec 3 20:10:45.924591 2003)
  Device Allegiance not locked
  Codepage is us-canada
  Saved configuration files
    IPL
    IPL3
Port Swapping
The FICON port-swapping feature is only provided for maintenance purposes.
The FICON port-swapping feature causes all configurations associated with old-port-number and new port-number to be swapped, including VSAN configurations.
Cisco MDS switches allow port swapping for nonexistent ports as follows:
- Only FICON-specific configurations (prohibit, block, and port address mapping) are swapped.
- No other system configuration is swapped.
- All other system configurations are only maintained for existing ports.
- If you swap a port in a module that has unlimited oversubscription ratios enabled with a port in a module that has limited oversubscription ratios, then you may experience a degradation in bandwidth.
Tip | If you check the Active=Saved check box active equals saved is enabled on any FICON VSAN, then the swapped configuration is automatically saved to startup. Otherwise, you must explicitly save the running configuration immediately after swapping the ports. |
Once you swap ports, the switch automatically performs the following actions:
- Shuts down both the old and new ports.
- Swaps the port configuration.
If you attempt to bring the port up, you must explicitly shut down the port to resume traffic.
Note | To view the latest FICON information, you must click the Refresh button. See the Automatically Saving the Running Configuration. |
The ficon swap portnumber command is only associated with the two ports concerned. You must issue this VSAN-independent command from EXEC mode. Cisco MDS NX-OS checks for duplicate port numbers in a VSAN before performing the port swap.
If you attempt to bring the port up by specifying the ficon swap portnumber old-port-number new-port-number after swap noshut command, you must explicitly issue the no shutdown command to resume traffic.
This section includes the following topics:
About Port Swapping
Be sure to follow these guidelines when using the FICON port swapping feature:
- Port swapping is not supported for logical ports (PortChannels, FCIP links). Neither the old-port-number nor the new-port-number can be a logical port.
- Port swapping is not supported between physical ports that are part of a PortChannel. Neither the old-port-number nor the new-port-number can be a physical port that is part of a PortChannel.
- Before performing a port swap, the Cisco NX-OS software performs a compatibility check. If the two ports have incompatible configurations, the port swap is rejected with an appropriate reason code. For example, if a port with BB_credits as 25 is being swapped with an OSM port for which a maximum of 12 BB_credits is allowed (not a configurable parameter), the port swapping operation is rejected.
- Before performing a port swap, the Cisco NX-OS software performs a compatibility check to verify the extended BB_credits configuration.
- If ports have default values (for some incompatible parameters), then a port swap operation is allowed and the ports retain their default values.
- Port tracking information is not included in port swapping. This information must be configured separately (refer to the Cisco MDS 9000 Family NX-OS Quality of Service Configuration Guide ).
Note | The 32-port module guidelines also apply for port swapping configurations (Refer to the Cisco MDS 9000 Family NX-OS Interfaces Configuration Guide ). |
Swapping Ports
If there are no duplicate port numbers on the switch, you can swap physical Fibre Channel ports, except the port numbers, by following these steps:
| Step 1 | Issue the
ficon
swap
portnumber
old-port-number
new-port-number command in EXEC mode.
The specified ports are operationally shut down. | ||
| Step 2 | Physically swap the front panel port cables between the two ports. | ||
| Step 3 | Issue the
no
shutdown command on each port to enable traffic
flow.
|
Swapping Ports on the Switch with Duplicate Port Numbers
If there are duplicate port numbers on the switch, you can swap physical Fibre Channel ports, including the port numbers, by following these steps:
| Step 1 | Issue the
ficon
swap
interface
old-interface
new-interface command in EXEC mode.
The specified interfaces are operationally shut down. | ||
| Step 2 | Physically swap the front panel port cables between the two ports. | ||
| Step 3 | Issue the
no
shutdown command on each port to enable traffic
flow.
|
FICON Tape Acceleration
The sequential nature of tape devices causes each I/O operation to the tape device over an FCIP link to incur the latency of the FCIP link. Throughput drastically decreases as the round-trip time through the FCIP link increases, leading to longer backup windows. Also, after each I/O operation, the tape device is idle until the next I/O arrives. Starting and stopping of the tape head reduces the lifespan of the tape, except when I/O operations are directed to a virtual tape.
Cisco MDS NX-OS software provides acceleration for the following FICON tape write operations:
-
The link between mainframe and native tape drives (both IBM and Sun/STK)
-
The back-end link between the VSM (Virtual Storage Management) and tape drive (Sun/STK)
FICON tape acceleration over FCIP provides the following advantages:
-
Efficiently utilizes the tape device by decreasing idle time
-
More sustained throughput as latency increases
-
Similar to FCP tape acceleration, and does not conflict with it
Note | FICON tape read acceleration over FCIP is supported from Cisco MDS NX-OS Release 5.0(1). For more information refer to the Configuring FICON Tape Read Acceleration. |
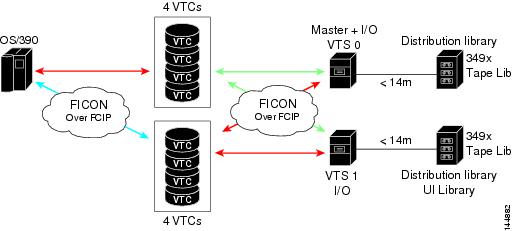
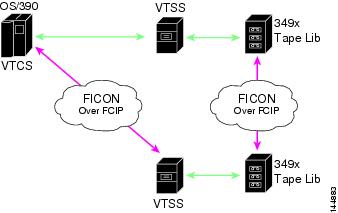
Figure 1 through Figure 4 show supported configurations:


Note | For information about FCIP tape acceleration, refer to the Cisco MDS 9000 Family NX-OS IP Services Configuration Guide . |
Configuring FICON Tape Acceleration
FICON tape acceleration has the following configuration considerations:
- In addition to the normal FICON configuration, FICON tape acceleration must be enabled on both ends of the FCIP interface. If only one end has FICON tape acceleration enabled, acceleration does not occur.
- FICON tape acceleration is enabled on a per VSAN basis.
- FICON tape acceleration cannot function if multiple ISLs are present in the same VSAN (PortChannels or FSPF load balanced).
- You can enable both Fibre Channel write acceleration and FICON tape acceleration on the same FCIP interface.
- Enabling or disabling FICON tape acceleration disrupts traffic on the FCIP interface.
To configure FICON tape acceleration, follow these steps:
| Step 1 | switch#
config
t
switch(config)# Enters configuration mode. |
| Step 2 | switch(config)#
interface
fcip
2
switch(config-if)# Specifies an FCIP interface and enters interface configuration submode. |
| Step 3 | switch(config-if)#
ficon-tape-accelerator
vsan
100
This configuration change will disrupt all traffic on the FCIP interface in all
VSANs.  Do you wish to continue? [no] y
Enables FICON tape acceleration over an FCIP interface. |
| Step 4 | switch(config-if)#
no
ficon-tape-accelerator
vsan
100
This configuration change will disrupt all traffic on the FCIP interface in all
VSANs.  Do you wish to continue? [no] y
Disables (default) FICON tape acceleration over an FCIP interface. |
What to Do Next
Use the show running-config command to verify the FICON tape acceleration over FCIP configuration.
switch# show running-config | begin "interface fcip"
interface fcip2
  ficon-tape-accelerator vsan 100
  no shutdown
...
Configuring FICON Tape Read Acceleration
All the configuration guidelines and restrictions applicable for FICON tape acceleration are also applicable for FICON tape read acceleration. Both FICON tape acceleration and FICON tape read acceleration can coexist.
To configure FICON tape read acceleration, follow these steps:
| Step 1 | switch#
config
t
switch(config)#
Enters configuration mode. |
| Step 2 | switch(config)#
interface
fcip
2
switch(config-if)#
Specifies an FCIP interface and enters interface configuration submode. |
| Step 3 | switch(config-if)#
ficon-tape-read-accelerator
This configuration change will disrupt all traffic on the FCIP interface in all
VSANs.  Do you wish to continue? [no]
Enables FICON tape read acceleration over an FCIP interface. |
| Step 4 | switch(config-if)#
no
ficon-tape-read-accelerator
This configuration change will disrupt all traffic on the FCIP interface in all
VSANs.  Do you wish to continue? [no]
Disables (default) FICON tape read acceleration over an FCIP interface. |
Configuring XRC Acceleration
IBM z/OS Global Mirror eXtended Remote Copy (XRC) is supported on the MSM-18+4 modules. For XRC to function, XRC acceleration must be enabled on the FCIP tunnel interfaces on both ends. XRC acceleration is disabled by default.
To enable XRC acceleration, follow these steps:
| Step 1 | switch#
config
t
switch(config)#
Enters the configuration mode. | ||
| Step 2 | switch(config)#
interface
fcip
2
switch(config)#
Specifies an FCIP tunnel interface and enters interface configuration submode. | ||
| Step 3 | switch(config-if)#
ficon-xrc-emulator
switch(config)#
Enables XRC acceleration over the FCIP interface. | ||
| Step 4 | switch(config-if)#
no
ficon-xrc-emulator
switch(config)#
Disables (default) XRC acceleration over the FCIP tunnel interface.
|
Moving a FICON VSAN to an Offline State
Issue the ficon vsan vsan-id offline command in EXEC mode to log out all ports in the VSAN that need to be suspended.
Issue the EXEC-level ficon vsan vsan-id online command in EXEC mode to remove the offline condition and to allow ports to log on again.
Note | This command can be issued by the host if the host is allowed to do so (see the Allowing the Host to Move the Switch Offline). |
CUP In-Band Management
The CUP protocol configures access control and provides unified storage management capabilities from a mainframe computer. Cisco MDS 9000 FICON-enabled switches are fully IBM CUP standard compliant for in-band management using the IBM S/A OS/390 I/O operations console.
Note | The CUP specification is proprietary to IBM. |
CUP is supported by switches and directors in the Cisco MDS 9000 Family. The CUP function allows the mainframe to manage the Cisco MDS switches.
Host communication includes control functions such as blocking and unblocking ports, as well as monitoring and error reporting functions.
This section includes the following topics:
Placing CUPs in a Zone
To place the CUP in a zone, follow these steps:
| Step 1 | Set the default zone to permit for the required
VSAN.
switch# config terminal switch(config)# zone default-zone permit vsan 20 | ||
| Step 2 | Issue the
show
fcns
database command for the required VSAN and
obtain the required FICON CUP WWN.
switch# show fcns database vsan 20
VSAN 20:
--------------------------------------------------------------------------
FCID        TYPE  PWWN                    (VENDOR)        FC4-TYPE:FEATURE
--------------------------------------------------------------------------
0x0d0d00    N     50:06:04:88:00:1d:60:83 (EMC)           FICON:CU
0x0dfe00    N     25:00:00:0c:ce:5c:5e:c2
 (Cisco)         FICON:CUP
0x200400    N     50:05:07:63:00:c2:82:d3 (IBM)           scsi-fcp FICON:CU f..
0x200800    N     50:05:07:64:01:40:15:0f (IBM)           FICON:CH
0x20fe00    N     20:00:00:0c:30:ac:9e:82 (Cisco)         FICON:CUP
Total number of entries = 5
| ||
| Step 3 | Add the identified FICON:CUP WWN to the zone
database.
switch(config)# zone name Zone1 vsan 20 switch(config-zone)# member pwwn 25:00:00:0c:ce:5c:5e:c2 |
Displaying Control Unit Information
Displays Control Unit Information displays configured control device information.
Displays Control Unit Information
switch# show ficon control-device sb3
Control Unit Image:0x80b9c2c
VSAN:20 CU:0x20fe00 CUI:0 CUD:0 CURLP:(nil)
ASYNC LP:(nil) MODE:1 STATE:1 CQ LEN:0 MAX:0
PRIMARY LP:   VSAN:0 CH:0x0 CHI:0 CU:0x0 CUI:0
ALTERNATE LP: VSAN:0 CH:0x0 CHI:0 CU:0x0 CUI:0
Logical Path:0x80b9fb4
VSAN:20 CH:0x200600 CHI:15 CU:0x20fe00 CUI:0 STATE:1 FLAGS:0x1
LINK: OH:0x0 OC:0x0 IH:0x0 IC:0x0
DEV:  OH:0x0 OC:0x0 IH:0x0 IC:0x0
SENSE: 00 00 00 00 00 00 00 46
       30 20 00 00 00 00 00 00
       00 00 00 00 00 00 00 00
       00 00 00 00 00 00 00 00
IUI:0x0 DHF:0x0 CCW:0x0 TOKEN:0x0 PCCW:0x0 FCCW:0x0 PTOKEN:0x0 FTOKEN:0x0
CMD:0x0 CCW_FLAGS:0x0 CCW_COUNT:0 CMD_FLAGS:0x0 PRIO:0x0 DATA_COUNT:0
STATUS:0x0 FLAGS:0x0 PARAM:0x0 QTP:0x0 DTP:0x0
CQ LEN:0 MAX:0 DESTATUS:0x0
Displaying FICON Information
This section includes the following topics:
- Receiving FICON Alerts
- Displaying FICON Port Address Information
- Displaying FICON Configuration File Information
- Displaying the Configured FICON State
- Displaying a Port Administrative State
- Displaying Buffer Information
- Viewing the History Buffer
- Displaying FICON Information in the Running Configuration
- Displaying FICON Information in the Startup Configuration
- Displaying FICON-Related Log Information
Receiving FICON Alerts
In Displays Configured FICON Information, the user alert mode is Enabled output confirms that you will receive an alert to indicate any changes in the FICON configuration.
Displays Configured FICON Information
switch# show ficon
Ficon information for VSAN 20
  Ficon is online
  VSAN is active
  Host port control is Enabled
  Host offline control is Enabled
  User alert mode is Enabled
  SNMP port control is Enabled
  Host set director timestamp is Enabled
  Active=Saved is Disabled
  Number of implemented ports are 250
  Key Counter is 73723
  FCID last byte is 0
  Date/Time is set by host to Sun Jun 26 00:04:06.991999 1904
  Device allegiance is locked by Host
  Codepage is us-canada
  Saved configuration files
    IPL
    _TSIRN00
Displaying FICON Port Address Information
Examples Displays Port Address Information to Displays Port Address Counter Information display FICON Port Address information.
Displays Port Address Information
switch# show ficon vsan 2 portaddress
Port Address 1 is not installed in vsan 2
    Port number is 1, Interface is fc1/1
    Port name is
    Port is not admin blocked
    Prohibited port addresses are 0,241-253,255
Port Address 2 is not installed in vsan 2
    Port number is 2, Interface is fc1/2
    Port name is
    Port is not admin blocked
    Prohibited port addresses are 0,241-253,255
...
Port Address 249 is not installed in vsan 2
    Port name is
    Port is not admin blocked
    Prohibited port addresses are 0,241-253,255
Port Address 250 is not installed in vsan 2
    Port name is
    Port is not admin blocked
    Prohibited port addresses are 0,241-253,255
Displays the Available Port Numbers
switch# show ficon first-available port-number
Port number 129(0x81) is available
In Displays Port Address Information in a Brief Format, the interface column is populated with the corresponding interface if the port number is installed. If the port number is uninstalled, this space remains blank and indicates an unbound port number. For example, 56 is an unbound port number in Displays Port Address Information in a Brief Format.
Displays Port Address Information in a Brief Format
switch# show ficon vsan 2 portaddress 50-55 brief
-------------------------------------------------------------------------------
Port    Port    Interface          Admin     Status           Oper   FCID
Address Number                     Blocked                    Mode
-------------------------------------------------------------------------------
50      50      fc2/18              on        fcotAbsent       --     --
51      51      fc2/19              off       fcotAbsent       --     --
52      52      fc2/20              off       fcotAbsent       --     --
53      53      fc2/21              off       fcotAbsent       --     --
54      54      fc2/22              off       notConnected     --     --
55      55      fc2/23              off       up               FL     0xea0000
56      56                          off       up               FL     0xea0000
Displays Port Address Counter Information displays the counters in FICON version format 1 (32-bit format)
Displays Port Address Counter Information
switch# show ficon vsan 20 portaddress 8 counters
Port Address 8(0x8) is up in vsan 20
    Port number is 8(0x8), Interface is fc1/8
    Version presented 1, Counter size 32b
    242811 frames input, 9912794 words
      484 class-2 frames, 242302 class-3 frames
      0 link control frames, 0 multicast frames
      0 disparity errors inside frames
      0 disparity errors outside frames
      0 frames too big, 0 frames too small
      0 crc errors, 0 eof errors
      0 invalid ordered sets
      0 frames discarded c3
      0 address id errors
    116620 frames output, 10609188 words
      0 frame pacing time
    0 link failures
    0 loss of sync
    0 loss of signal
    0 primitive seq prot errors
    0 invalid transmission words
    1 lrr input, 0 ols input, 5 ols output
    0 error summary
Displaying FICON Configuration File Information
Examples Displays the Contents of the Specified FICON Configuration File to Displays the Specified Port Addresses for a FICON Configuration File display FICON configuration file information.
Displays the Contents of the Specified FICON Configuration File
switch# show ficon vsan 3 file IPL
FICON configuration file IPL      in vsan 3
    Port address 1
        Port name is
        Port is not blocked
        Prohibited port addresses are 0,81-253,255
    Port address 2
        Port name is
        Port is not blocked
        Prohibited port addresses are 0,81-253,255
    Port address 3
        Port name is
        Port is not blocked
        Prohibited port addresses are 0,81-253,255
    Port address 4
        Port name is
        Port is not blocked
        Prohibited port addresses are 0,81-253,255
...
Port address 80
        Port name is
        Port is not blocked
        Prohibited port addresses are 0,81-253,255
    Port address 254
        Port name is
        Port is not blocked
        Prohibited port addresses are 0,81-253,255
Displays All FICON Configuration Files
switch# show ficon vsan 2
Ficon information for VSAN 2
  Ficon is enabled
  VSAN is active
  Host control is Enabled
  Host offline control is Enabled
  Clock alert mode is Disabled
  User alert mode is Disabled
  SNMP control is Disabled
  Active=Saved is Disabled
  Number of implemented ports are 250
  Key Counter is 9
  FCID last byte is 0
  Date/Time is same as system time(Sun Dec 14 01:26:30.273402 1980)
  Device Allegiance not locked
  Codepage is us-canada
  Saved configuration files
    IPL
    IPLFILE1
Displays the Specified Port Addresses for a FICON Configuration File
switch# show ficon vsan 2 file iplfile1 portaddress 1-7
FICON configuration file IPLFILE1 in vsan 2
    Port address 1
        Port name is
        Port is not blocked
        Prohibited port addresses are 0,241-253,255
    Port address 2
        Port name is
        Port is not blocked
        Prohibited port addresses are 0,241-253,255
    Port address 3
        Port name is P3
        Port is not blocked
        Prohibited port addresses are 0,241-253,255
...
    Port address 7
        Port name is
        Port is not blocked
        Prohibited port addresses are 0,241-253,255
Displaying the Configured FICON State
If FICON is enabled on a VSAN, you can display the port address information for that VSAN (see Displays the Specified Port Address When FICON Is Enabled).
Displays the Specified Port Address When FICON Is Enabled
switch# show ficon
 vsan 2 portaddress 55
Port Address 55 is not installed in vsan 2
    Port number is 55, Interface is fc2/23
    Port name is
    Port is not admin blocked
    Prohibited port addresses are 0,241-253,255
    Admin port mode is FL
    Port mode is FL, FCID is 0xea0000
Displaying a Port Administrative State
Examples Displays an Administratively Unblocked Port to Displays an Administratively Unblocked Port display the administrative state of a FICON port. If the port is blocked, the show ficon vsan number portaddress number command displays the blocked state of the port. If a specific port is prohibited, this command also displays the specifically prohibited port (3) along with the ports that are prohibited by default (0, 241 to 253, and 255). If a name is assigned, that name is also displayed.
Displays an Administratively Unblocked Port
switch# show ficon vsan 2 portaddress 2
Port Address 2(0x2) is not installed in vsan 2
    Port number is 2(0x2), Interface is fc1/2
    Port name is
    Port is not admin blocked
    Prohibited port addresses are 0,241-253,255(0,0xf1-0xfd,0xff)
    Admin port mode is auto
    Peer is Unknown
Displays an Administratively Blocked Port
switch# show ficon vsan 2 portaddress 1
Port Address 2(0x2) is not installed in vsan 2
    Port number is 2(0x2), Interface is fc1/2
    Port name is SampleName
    Port is admin blocked
    Prohibited port addresses are 0,241-253,255(0,0xf1-0xfd,0xff)
    Admin port mode is auto
    Peer is Unknown
Displaying Buffer Information
In Displays the History Buffer for the Specified VSAN, the Key Counter column displays the 32-bit value maintained by Cisco MDS switches. This value is incremented when any port changes state in that VSAN. The key counter (a 32-bit value) is incremented when a FICON-related configuration is changed. Host programs can increment this value at the start of the channel program and then perform operations on multiple ports. The director history buffer keeps a log of which port address configuration was changed for each key-counter value.
The director history buffer provides a mechanism to determine the change in the port state from the previous time when a value was contained in the key counter.
Displays the History Buffer for the Specified VSAN
switch# show ficon vsan 20 director-history
Director History Buffer for vsan 20
---------------------------------------------
Key Counter           Ports Address
                      Changed
---------------------------------------------
74556                 43
74557                 44
74558                 45
74559                 46
74560                 47
74561                 48
74562                 49
74563                 50
74564                 51
74565                 52
74566                 53
74567                 54
74568                 55
74569                 56
74570                 57
74571                 58
74572                 59
74573                 60
74574                 61
74575                 62
74576                 63
74577                 64
74578
74579
74580                 1-3,5,10,12,14-16,34-40,43-45,47-54,56-57,59-64
74581                 3,5
74582                 64
74583
74584                 1-3,10,12,14-16,34-40,43-45,47-54,56-57,59-64
74585                 1
74586                 2
74587                 3
Viewing the History Buffer
In the directory history buffer, the Key Counter column displays the 32-bit value maintained by Cisco MDS switches. This value is incremented when any port changes state in that VSAN. The key counter (a 32-bit value) is incremented when a FICON-related configuration is changed. Host programs can increment this value at the start of the channel program and then perform operations on multiple ports. The director history buffer keeps a log of which port address configuration was changed for each key-counter value.
The director history buffer provides a mechanism to determine the change in the port state from the previous time when a value was contained in the key counter.
Displaying FICON Information in the Running Configuration
Displays the Running Configuration Information displays the FICON-related information in the running configuration.
Displays the Running Configuration Information
switch# show running-config
Building Configuration ...
in-order-guarantee
vsan database
  vsan 11 name “FICON11” loadbalancing src-dst-id
  vsan 75 name “FICON75” loadbalancing src-dst-id
fcdomain domain 11 static vsan 11
fcdomain domain 119 static vsan 75
fcdroplatency network 100 vsan 11
fcdroplatency network 500 vsan 75
feature fabric-binding
fabric-binding database vsan 11
  swwn 20:00:00:0d:ec:01:20:c0 domain 10
fabric-binding database vsan 75
  swwn 20:00:00:0d:ec:00:d6:40 domain 117
fabric-binding activate vsan 11
fabric-binding activate vsan 75
ficon vsan 75
interface port-channel 1
  ficon portnumber 0x80
  switchport mode E
snmp-server user mblair network-admin auth md5 0x688fa3a2e51ba5538211606e59ac292
7 priv 0x688fa3a2e51ba5538211606e59ac2927 localizedkey
snmp-server user wwilson network-admin auth md5 0x688fa3a2e51ba5538211606e59ac29
27 priv 0x688fa3a2e51ba5538211606e59ac2927 localizedkey
snmp-server host 171.71.187.101 traps version 2c public udp-port 1163
snmp-server host 172.18.2.247 traps version 2c public udp-port 2162
vsan database
  vsan 75 interface fc1/1
...
interface mgmt0
  ip address 172.18.47.39 255.255.255.128
  switchport speed 100
  switchport duplex full
no system health
ficon vsan 75
  file IPL
Displaying FICON Information in the Startup Configuration
Displays the Startup Configuration displays the FICON-related information in the startup configuration.
Displays the Startup Configuration
switch# show startup-config
...
ficon vsan 2
file IPL
Displays the Startup Configuration Status displays the switch response to an implicitly-issued copy running start command. In this case, only a binary configuration is saved until you explicitly issue the copy running start command again (seeTable 1 )
Displays the Startup Configuration Status
switch# show startup-config
No ASCII config available since configuration was last saved internally
on account of 'active=saved' mode.
Please perform an explicit 'copy running startup` to get ASCII configuration
Displaying FICON-Related Log Information
Displays Logging Levels for the FICON Feature and Displays FICON-Related Log File Contents display the logging information for FICON-related configurations.
Displays Logging Levels for the FICON Feature
switch# show logging level ficon
Facility        Default Severity        Current Session Severity
--------        ----------------        ------------------------
ficon                   2                       2
0(emergencies)          1(alerts)       2(critical)
3(errors)               4(warnings)     5(notifications)
6(information)          7(debugging)
Displays FICON-Related Log File Contents
switch# show logging logfile
...
2004 Feb 25 15:38:50 vegas6 %PORT-5-IF_UP: %$VSAN 75: 2004 Wed Feb 25 13:22:04.
131183%$ Interface fc1/8 is up in mode F
 2004 Feb 25 15:38:50 vegas6 %PORT-5-IF_UP: %$VSAN 75: 2004 Wed Feb 25 13:22:04.
131217%$ Interface fc1/9 is up in mode F
...
2004 Feb 25 15:39:09 vegas6 %PORT-5-IF_TRUNK_UP: %$VSAN 75: 2004 Wed Feb 25 13:
22:23.131121%$ Interface fc2/1, vsan 75 is up
 2004 Feb 25 15:39:09 vegas6 %PORT-5-IF_TRUNK_UP: %$VSAN 75: 2004 Wed Feb 25 13:
22:23.131121%$ Interface fc2/2, vsan 75 is up
 2004 Feb 25 15:39:09 vegas6 %PORT-5-IF_TRUNK_UP: %$VSAN 75: 2004 Wed Feb 25 13:
...
2004 Feb 25 23:22:36 vegas6 %PORT-5-IF_UP: %$VSAN 75: 2004 Wed Feb 25 21:05:42.
99916%$ Interface fc3/6 is up in mode F
 2004 Feb 25 23:22:37 vegas6 %PORT-5-IF_UP: %$VSAN 75: 2004 Wed Feb 25 21:05:43.
...
Default Settings
Table 1 lists the default settings for FICON features.
|
Parameters |
Default |
|---|---|
|
FICON feature |
Disabled. |
|
Port numbers |
Same as port addresses. |
|
FC ID last byte value |
0 (zero). |
|
EBCDIC format option |
US-Canada. |
|
Switch offline state |
Hosts are allowed to move the switch to an offline state. |
|
Mainframe users |
Allowed to configure FICON parameters on Cisco MDS switches. |
|
Clock in each VSAN |
Same as the switch hardware clock. |
|
Host clock control |
Allows host to set the clock on this switch. |
|
SNMP users |
Configure FICON parameters. |
|
Port address |
Not blocked |
|
Prohibited ports |
Ports90–253 and 255 for the Cisco MDS 9200 Series switches. Ports250–253 and 255 for the Cisco MDS 9500 Series switches. |
 Feedback