- New and Changed Information
- Preface
- Overview
- Configuring FIPS
- Common Roles
- Configuring Security Features on an External AAA Server
- Configuring IPv4 and IPv6 Access Control Lists
- Configuring Certificate Authorities and Digital Certificates
- Configuring IPSec Network Security
- Configuring FC-SP and DHCHAP
- Configuring Port Security
- Configuring Fibre Channel Common Transport Management Security
- Configuring Fabric Binding
- Configuring Cisco TrustSec Fibre Channel Link Encryption
- Switch Management Security
- Switch AAA Functionalities
- LDAP Authentication and Authorization
- Guidelines and Limitations for LDAP
- Prerequisites for LDAP
- Default Settings
- Enabling LDAP
- Configuring LDAP Server Hosts
- Configuring the RootDN for an LDAP Server
- Configuring LDAP Server Groups
- Configuring the Global LDAP Timeout Interval
- Configuring the Timeout Interval for an LDAP Server
- Configuring the Global LDAP Server Port
- Configuring TCP Ports
- Configuring LDAP Search Maps
- Configuring the LDAP Dead-Time Interval
- Configuring AAA Authorization on LDAP Servers
- Disabling LDAP
- Configuration Examples for LDAP
- About RADIUS Server Default Configuration
- Setting the RADIUS Server Address
- About the Default RADIUS Server Encryption Type and Preshared Key
- Configuring the Default RADIUS Server Encryption Type and Preshared Key
- Setting the RADIUS Server Timeout Interval
- Setting the Default RADIUS Server Timeout Interval and Retransmits
- Configuring RADIUS Server Monitoring Parameters
- About RADIUS Servers
- About Validating a RADIUS Server
- Sending RADIUS Test Messages for Monitoring
- Allowing Users to Specify a RADIUS Server at Login
- About Vendor-Specific Attributes
- Displaying RADIUS Server Details
- Displaying RADIUS Server Statistics
- About TACACS+
- About TACACS+ Server Default Configuration
- About the Default TACACS+ Server Encryption Type and Preshared Key
- Enabling TACACS+
- Setting the TACACS+ Server Address
- Setting the Global Secret Key
- Setting the Default TACACS+ Server Timeout Interval and Retransmits
- Setting the Timeout Value
- About TACACS+ Servers
- Configuring TACACS+ Server Monitoring Parameters
- Sending TACACS+ Test Messages for Monitoring
- Password Aging Notification through TACACS+ Server
- About Validating a TACACS+ Server
- About Users Specifying a TACACS+ Server at Login
- Allowing Users to Specify a TACACS+ Server at Login
- Defining Roles on the Cisco Secure ACS 5.x GUI
- Defining Custom Attributes for Roles
- Displaying TACACS+ Server Details
- Clearing TACACS+ Server Statistics
Configuring Security Features on an External AAA Server
The authentication, authorization, and accounting (AAA) feature verifies the identity of, grants access to, and tracks the actions of users managing a switch. All Cisco MDS 9000 Family switches use Remote Access Dial-In User Service (RADIUS) or Terminal Access Controller Access Control device Plus (TACACS+) protocols to provide solutions using remote AAA servers.
Based on the user ID and password combination provided, switches perform local authentication or authorization using the local database or remote authentication or authorization using a AAA server. A preshared secret key provides security for communication between the switch and AAA servers. This secret key can be configured for all AAA servers or for only a specific AAA server. This security feature provides a central management capability for AAA servers.
This chapter includes the following sections:
- Switch Management Security
- Switch AAA Functionalities
- Configuring AAA Server Monitoring Parameters Globally
- Configuring LDAP
- Configuring RADIUS Server Monitoring Parameters
- One-Time Password Support
- Configuring TACACS+ Server Monitoring Parameters
- Configuring Server Groups
- AAA Server Distribution
- CHAP Authentication
- MSCHAP Authentication
- Local AAA Services
- Configuring Accounting Services
- Configuring Cisco Access Control Servers
- Default Settings
Switch Management Security
Management security in any switch in the Cisco MDS 9000 Family provides security to all management access methods, including the command-line interface (CLI) or Simple Network Management Protocol (SNMP).
This section includes the following topics:
CLI Security Options
You can access the CLI using the console (serial connection), Telnet, or Secure Shell (SSH).
See the “Configuring RADIUS Server Monitoring Parameters” section
See the “Configuring TACACS+ Server Monitoring Parameters” section
See the “Local AAA Services” section.
These security features can also be configured for the following scenarios:
See the Cisco MDS 9000 Family NX-OS IP Services Configuration Guide Cisco Fabric Manager IP Services Configuration Guide.
SNMP Security Options
The SNMP agent supports security features for SNMPv1, SNMPv2c, and SNMPv3. Normal SNMP security features apply to all applications that use SNMP (for example, Cisco MDS 9000 Fabric Manager).
SNMP security options also apply to the Fabric Manager and Device Manager.
See the Cisco MDS 9000 NX-OS Family System Management Configuration Guide for more information on the SNMP security options.
Refer to the Cisco Fabric Manager Fundamentals Configuration Guide for information on Fabric Manager and Device Manager.
Switch AAA Functionalities
Using the CLI or Fabric Manager, or an SNMP application, you can configure AAA switch functionalities on any switch in the Cisco MDS 9000 Family.
This section includes the following topics:
- Authentication
- Authorization
- Accounting
- Remote AAA Services
- Remote Authentication Guidelines
- Server Groups
- AAA Service Configuration Options
- Authentication and Authorization Process
Authentication
Authentication is the process of verifying the identity of the person or device accessing the switch. This identity verification is based on the user ID and password combination provided by the entity trying to access the switch. Cisco MDS 9000 Family switches allow you to perform local authentication (using the local lookup database) or remote authentication (using one or more RADIUS or TACACS+ servers).

Note![]() Fabric Manager does not support AAA passwords with trailing white space, for example “passwordA.”
Fabric Manager does not support AAA passwords with trailing white space, for example “passwordA.”
Authorization
The following authorization roles exist in all Cisco MDS switches:
- Network operator (network-operator)—Has permission to view the configuration only. The operator cannot make any configuration changes.
- Network administrator (network-admin)— Has permission to execute all commands and make configuration changes. The administrator can also create and customize up to 64 additional roles.
- Default-role—Has permission to use the GUI (Fabric Manager and Device Manager). This access is automatically granted to all users for accessing the GUI.
These roles cannot be changed or deleted. You can create additional roles and configure the following options:
- Configure role-based authorization by assigning user roles locally or using remote AAA servers.
- Configure user profiles on a remote AAA server to contain role information. This role information is automatically downloaded and used when the user is authenticated through the remote AAA server.
Note![]() If a user belongs only to one of the newly created roles and that role is subsequently deleted, then the user immediately defaults to the network-operator role.
If a user belongs only to one of the newly created roles and that role is subsequently deleted, then the user immediately defaults to the network-operator role.
Accounting
The accounting feature tracks and maintains a log of every management configuration used to access the switch. This information can be used to generate reports for troubleshooting and auditing purposes. Accounting logs can be stored locally or sent to remote AAA servers.
Remote AAA Services
Remote AAA services provided through RADIUS and TACACS+ protocols have the following advantages over local AAA services:
- User password lists for each switch in the fabric can be managed more easily.
- AAA servers are already deployed widely across enterprises and can be easily adopted.
- The accounting log for all switches in the fabric can be centrally managed.
- User role mapping for each switch in the fabric can be managed more easily.
Remote Authentication Guidelines
If you prefer using remote AAA servers, follow these guidelines:
- A minimum of one AAA server should be IP reachable.
- Be sure to configure a desired local AAA policy as this policy is used if all AAA servers are not reachable.
- AAA servers are easily reachable if an overlay Ethernet LAN is attached to the switch (see the Cisco Fabric Manager IP Services Configuration Guide and the Cisco MDS 9000 Family NX-OS Configuration Guide). We recommend this method.
- SAN networks connected to the switch should have at least one gateway switch connected to the Ethernet LAN reaching the AAA servers.
Server Groups
You can specify remote AAA servers for authentication, authorization, and accounting using server groups. A server group is a set of remote AAA servers implementing the same AAA protocol. The purpose of a server group is to provide for failover servers in case a remote AAA server fails to respond. If the first remote server in the group fails to respond, the next remote server in the group is tried until one of the servers sends a response. If all the AAA servers in the server group fail to respond, then that server group option is considered a failure. If required, you can specify multiple server groups. If the Cisco MDS switch encounters errors from the servers in the first group, it tries the servers in the next server group.
AAA Service Configuration Options
AAA configuration in Cisco MDS 9000 Family switches is service based. You can have separate AAA configurations for the following services:
- Telnet or SSH login (Fabric Manager and Device Manager login)
- Console login
- iSCSI authentication (See the Cisco Fabric Manager IP Services Configuration Guide and the Cisco MDS 9000 Family NX-OS IP Services Configuration Guide)
- FC-SP authentication (See Chapter 8, “Configuring FC-SP and DHCHAP”)
- Accounting
In general, server group, local, and none are the three options that can be specified for any service in an AAA configuration. Each option is tried in the order specified. If all the options fail, local is tried.

Note![]() Even if local is not specified as one of the options, it is tried by default if all AAA servers configured for authentication are unreachable. User has the flexibility to disable this fallback.
Even if local is not specified as one of the options, it is tried by default if all AAA servers configured for authentication are unreachable. User has the flexibility to disable this fallback.
When RADIUS times out, local login is attempted depending on the fallback configuration. For this local login to be successful, a local account for the user with the same password should exist, and the RADIUS timeout and retries should take less than 40 seconds. The user is authenticated if the username and password exist in the local authentication configuration.
Table 4-1 provides the related CLI command for each AAA service configuration option.
|
|
|
|---|---|
Telnet or SSH login (Cisco Fabric Manager and Device Manager login) |
|
Note If we do not configure any authentication method for the console, the default authentication method will be applied for both console and Telnet or SSH.
Error-Enabled Status
When you log in, the login is processed by rolling over to local user database if the remote AAA servers do not respond. In this situation, the following message is displayed on your screen if you have enabled the error-enabled feature:
To enable this message display, use the aaa authentication login error-enable command.
To disable this message display, use the no aaa authentication login error-enable command.
To view the current display status, use the show aaa authentication login error-enable command (see Example 4-1).
Example 4-1 Displays AAA Authentication Login Information
AAA Server Monitoring
An unresponsive AAA server introduces a delay in the processing of AAA requests. An MDS switch can periodically monitor an AAA server to check whether it is responding (or alive) to save time in processing AAA requests. The MDS switch marks unresponsive AAA servers as dead and does not send AAA requests to any dead AAA servers. An MDS switch periodically monitors dead AAA servers and brings them to the alive state once they are responding. This monitoring process verifies that an AAA server is in a working state before real AAA requests are sent its way. Whenever an AAA server changes to the dead or alive state, an SNMP trap is generated and the MDS switch warns the administrator that a failure is taking place before it can impact performance. See Figure 4-1 for AAA server states.
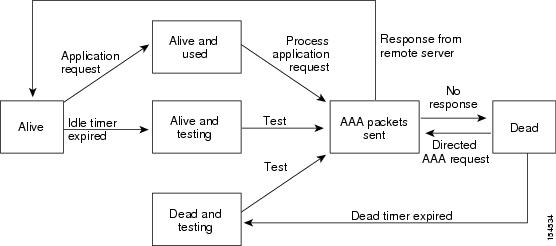
Note![]() The monitoring interval for alive servers and dead servers is different and can be configured by the user. The AAA server monitoring is performed by sending a test authentication request to the AAA server.
The monitoring interval for alive servers and dead servers is different and can be configured by the user. The AAA server monitoring is performed by sending a test authentication request to the AAA server.
The user name and password to be used in the test packet can be configured.
See the “Configuring RADIUS Server Monitoring Parameters” section“Configuring RADIUS Server Monitoring Parameters” section and“Displaying RADIUS Server Details” section.
Authentication and Authorization Process
Authentication is the process of verifying the identity of the person managing the switch. This identity verification is based on the user ID and password combination provided by the person managing the switch. The Cisco MDS 9000 Family switches allow you to perform local authentication (using the lookup database) or remote authentication (using one or more RADIUS servers or TACACS+ servers).
Authorization provides access control. It is the process of assembling a set of attributes that describe what the user is authorized to perform. Based on the user ID and password combination, the user is authenticated and authorized to access the network as per the assigned role. You can configure parameters that can prevent unauthorized access by an user, provided the switches use the TACACS+ protocol.
AAA authorization is the process of assembling a set of attributes that describe what the user is authorized to perform. Authorization in the Cisco NX-OS software is provided by attributes that are downloaded from AAA servers. Remote security servers, such as RADIUS and TACACS+, authorize users for specific rights by associating attribute-value (AV) pairs, which define those rights with the appropriate user.
The following steps explain the authorization and authentication process:
Step 1![]() Log in to the required switch in the Cisco MDS 9000 Family, using the Telnet, SSH, Fabric Manager or Device Manager, or console login options.
Log in to the required switch in the Cisco MDS 9000 Family, using the Telnet, SSH, Fabric Manager or Device Manager, or console login options.
Step 2![]() When you have configured server groups using the server group authentication method, an authentication request is sent to the first AAA server in the group.
When you have configured server groups using the server group authentication method, an authentication request is sent to the first AAA server in the group.
- If the AAA server fails to respond, then the next AAA server is contacted and so on until the remote server responds to the authentication request.
- If all AAA servers in the server group fail to respond, then the servers in the next server group are contacted.
- If all configured methods fail, then by default local database is used for authentication. The next section will describe the way to disable this fallback.
Step 3![]() When you are successfully authenticated through a remote AAA server, then the following possible actions are taken:
When you are successfully authenticated through a remote AAA server, then the following possible actions are taken:
- If the AAA server protocol is RADIUS, then user roles specified in the cisco-av-pair attribute are downloaded with an authentication response.
- If the AAA server protocol is TACACS+, then another request is sent to the same server to get the user roles specified as custom attributes for the shell.
- If user roles are not successfully retrieved from the remote AAA server, then the user is assigned the network-operator role if the show aaa user default-role command is enabled. You are denied access if this command is disabled.
Step 4![]() When your user name and password are successfully authenticated locally, you are allowed to log in, and you are assigned the roles configured in the local database.
When your user name and password are successfully authenticated locally, you are allowed to log in, and you are assigned the roles configured in the local database.
Figure 4-2 shows a flow chart of the authorization and authentication process.
Figure 4-2 Switch Authorization and Authentication Flow
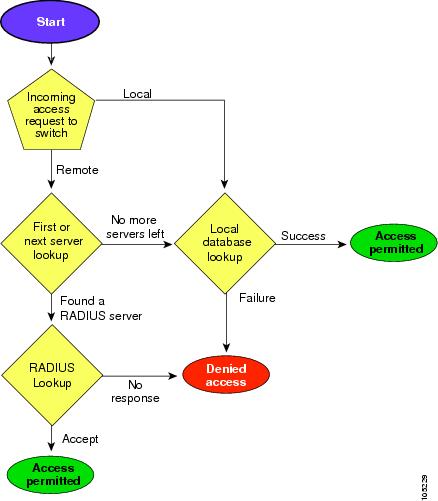
Note![]() No more server groups left = no response from any server in all server groups.
No more server groups left = no response from any server in all server groups.
No more servers left = no response from any server within this server group.
To configure role-based authorization on TACACS+ server, follow these steps:
Note ●![]() Authorization configuration is provided only for authentication done using TACACS+ server.
Authorization configuration is provided only for authentication done using TACACS+ server.
- The ‘none’ option from aaa authorization methods has been deprecated. If you did an upgrade from 4.x image and ‘none’ was configured as one of the authorization methods, it is be replaced with local. The functionality remains the same.
- Command authorization disables user role-based authorization control (RBAC), including the default roles.
You can use the show commands to display information on the AAA authorization and the default user roles assigned for remote authentication. (see to ).
Example 4-2 Displays aaa Authorization Information Details
Example 4-3 Displays Default User Role for Remote Authentication
Configuring Fallback Mechanism for Authentication
You can enable/disable fallback to local database in case the remote authentication is set and all AAA servers are unreachable (authentication error). The fallback is set to local by default in case of an authentication error. You can disable this fallback for both console and ssh/telnet login. Disabling this fallback will tighten the security of authentication.
The CLI syntax and behavior is as follows:
Verifying Authorization Profile
You can verify the authorizing profile for different commands. When enabled, all commands are directed to the Access Control Server (ACS) for verification. The verification details are displayed once the verification is completed.
Note![]() This command only verifies the commands and does not enable the configuration.
This command only verifies the commands and does not enable the configuration.
Testing Authorization
You can test the authorization settings for any command.
To test the authorization of a command, use the test aaa authorization command-type command.
Configuring AAA Server Monitoring Parameters Globally
The AAA server monitoring parameters can be configured globally for all servers or individually for a specific server. This section explains how the global configuration can be set. The global configurations will apply to all servers that do not have individual monitoring parameters defined. For any server, the individual test parameter defined for that particular server will always get precedence over the global settings.
Use the following commands to configure the global monitoring parameters for RADIUS servers:
|
|
|
|
|---|---|---|
switch(config)# radius-server test username username password password idle-time time |
||
switch(config)# radius-server test username username password password no |
Note![]() Replace “radius” with “tacacs” in the steps above to get equivalent commands for TACACS server global test parameter configurations.
Replace “radius” with “tacacs” in the steps above to get equivalent commands for TACACS server global test parameter configurations.
The Global AAA Server Monitoring Parameters observe the following behavior:
- When a new AAA server is configured it is monitored using the global test parameters, if defined.
- When global test parameters are added or modified, all the AAA servers, which do not have any test parameters configured, start getting monitored using the new global test parameters.
- When the server test parameters are removed for a server or when the idle-time is set to zero (default value) it starts getting monitored using the global test parameters, if defined.
- If global test parameters are removed or global idle-time is set to zero, servers for which the server test parameters are present will not be affected. However monitoring will stop for all other servers which were previously being monitored using global parameters.
- If the server monitoring fails with the user specified server test parameters, the server monitoring does not fall back to global test parameters.
Configuring LDAP
The Lightweight Directory Access Protocol (LDAP) provides centralized validation of users attempting to gain access to a Cisco NX-OS device. LDAP services are maintained in a database on an LDAP daemon running, typically, on a UNIX or Windows NT workstation. You must have access to and must configure an LDAP server before the configured LDAP features on your Cisco NX-OS device are available.
LDAP provides for separate authentication and authorization facilities. LDAP allows for a single access control server (the LDAP daemon) to provide each service-authentication and authorization-independently. Each service can be tied into its own database to take advantage of other services available on that server or on the network, depending on the capabilities of the daemon.
The LDAP client/server protocol uses TCP (TCP port 389) for transport requirements. Cisco NX-OS devices provide centralized authentication using the LDAP protocol.
Note![]() If you are familiar with the Cisco IOS CLI, be aware that the Cisco NX-OS commands for this feature might differ from the Cisco IOS commands that you would use.
If you are familiar with the Cisco IOS CLI, be aware that the Cisco NX-OS commands for this feature might differ from the Cisco IOS commands that you would use.
This section includes the following topics:
- LDAP Authentication and Authorization
- Guidelines and Limitations for LDAP
- Prerequisites for LDAP
- Default Settings
- Enabling LDAP
- Configuring LDAP Server Hosts
- Configuring the RootDN for an LDAP Server
- Configuring LDAP Server Groups
- Configuring the Global LDAP Timeout Interval
- Configuring the Timeout Interval for an LDAP Server
- Configuring the Global LDAP Server Port
- Configuring TCP Ports
- Configuring LDAP Search Maps
- Configuring the LDAP Dead-Time Interval
- Configuring AAA Authorization on LDAP Servers
- Disabling LDAP
- Configuration Examples for LDAP
LDAP Authentication and Authorization
Clients establish a TCP connection and authentication session with an LDAP server through a simple bind (username and password). As part of the authorization process, the LDAP server searches its database to retrieve the user profile and other information.
You can configure the bind operation to first bind and then search, where authentication is performed first and authorization next, or to first search and then bind. The default method is to first search and then bind.
The advantage of searching first and binding later is that the distinguished name (DN) received in the search result can be used as the user DN during binding rather than forming a DN by prepending the username (cn attribute) with the baseDN. This method is especially helpful when the user DN is different from the username plus the baseDN. For the user bind, the bindDN is constructed as baseDN + append-with-baseDN, where append-with-baseDN has a default value of cn=$userid.
Note![]() As an alternative to the bind method, you can establish LDAP authentication using the compare method, which compares the attribute values of a user entry at the server. For example, the user password attribute can be compared for authentication. The default password attribute type is userPassword.
As an alternative to the bind method, you can establish LDAP authentication using the compare method, which compares the attribute values of a user entry at the server. For example, the user password attribute can be compared for authentication. The default password attribute type is userPassword.
Guidelines and Limitations for LDAP
LDAP has the following guidelines and limitations:
- You can configure a maximum of 64 LDAP servers on the Cisco NX-OS device.
- Cisco NX-OS supports only LDAP version 3.
- Cisco NX-OS supports only these LDAP servers:
- LDAP over Secure Sockets Layer (SSL) supports only SSL version 3 and Transport Layer Security (TLS) Version 1.0, Version 1.1, and Version 1.2.
- If you have a user account configured on the local Cisco NX-OS device that has the same name as a remote user account on an AAA server, the Cisco NX-OS software applies the user roles for the local user account to the remote user, not the user roles configured on the AAA server.
- A Cisco MDS switch will assign a local role to remote users when LDAP uses remote authentication protocol, if all the following conditions are met:
–![]() The remote username on the LDAP server has the same name as the local user on the Cisco MDS switch. (For example, “test” is the username on the AD server and “test” is the username created on the local Cisco MDS switch).
The remote username on the LDAP server has the same name as the local user on the Cisco MDS switch. (For example, “test” is the username on the AD server and “test” is the username created on the local Cisco MDS switch).
–![]() The LDAP server is configured as AAA authentication on the Cisco MDS switch.
The LDAP server is configured as AAA authentication on the Cisco MDS switch.
–![]() The role assigned for the local user and the remote user is different.
The role assigned for the local user and the remote user is different.
Consider the following example where the LDAP server has the username "test" which is a member of the AD group "testgroup". The Cisco MDS switch has a role configured with the name "testgroup" which has certain permit roles assigned to it. This role is created in the Cisco MDS switch for remote users who login into switch using LDAP. The Cisco MDS switch also has a local username "test" and it has "network-admin" as the assigned role. The Cisco MDS switch is configured for AAA authentication and uses LDAP as an authentication protocol. In this scenario, if a user logs into the Cisco MDS switch using the username "test", the switch authenticates the user using LDAP authentication (it uses the password of the user "test" created on the AD server). But, it assigns the role "network-admin", which is assigned to the local user "test", and not the "testgroup" role that is assigned to the remote authenticated user.
Prerequisites for LDAP
Default Settings
Table 4-2 lists the default settings for LDAP parameters.
|
|
|
|---|---|
Enabling LDAP
By default, the LDAP feature is disabled on the Cisco NX-OS device. You must explicitly enable the LDAP feature to access the configuration and verification commands for authentication.
To enable LDAP, follow these steps:
|
|
|
|
|---|---|---|
(Optional) Copies the running configuration to the startup configuration. |
Configuring LDAP Server Hosts
To access a remote LDAP server, you must configure the IP address or the hostname for the LDAP server on the Cisco NX-OS device. You can configure up to 64 LDAP servers.
Note![]() By default, when you configure an LDAP server IP address or hostname on the Cisco NX-OS device, the LDAP server is added to the default LDAP server group. You can also add the LDAP server to another LDAP server group.
By default, when you configure an LDAP server IP address or hostname on the Cisco NX-OS device, the LDAP server is added to the default LDAP server group. You can also add the LDAP server to another LDAP server group.
To configure LDAP server hosts, follow these steps:
Configuring the RootDN for an LDAP Server
You can configure the root designated name (DN) for the LDAP server database. The rootDN is used to bind to the LDAP server to verify its state.
To configure the RootDN for an LDAP server, follow these steps:
Configuring LDAP Server Groups
You can specify one or more remote AAA servers to authenticate users using server groups. All members of a group must be configured to use LDAP. The servers are tried in the same order in which you configure them.
You can configure these server groups at any time, but they take effect only when you apply them to an AAA service.
Starting from Cisco MDS NX-OS Release 6.2(1), Cisco MDS 9000 Series switches support group-based user roles. You can create a group on the LDAP servers and also create a group with the exact same name on the Cisco MDS switch and then add users to the group. The user role attribute is inherited by the user from the group that is configured. This can be accomplished using the Microsoft LDAP Server's built-in memberOf attribute. If you wish to use the memberOf attribute, ensure that you create a role name on the switch. The role name must be the same as the group name on the LDAP server.
Note ●![]() A user can be part of only one group that is available on the switch.
A user can be part of only one group that is available on the switch.
- A user can be part of multiple groups, but only one group should be part of the switch role.
- A group name cannot have a space.
To configure the LDAP server groups, follow these steps:
Configuring the Global LDAP Timeout Interval
You can set a global timeout interval that determines how long the Cisco NX-OS device waits for responses from all LDAP servers before declaring a timeout failure.
To configure the global LDAP timeout interval, follow these steps:
Configuring the Timeout Interval for an LDAP Server
You can set a timeout interval that determines how long the Cisco NX-OS device waits for responses from an LDAP server before declaring a timeout failure.
To configure the timeout interval for an LDAP server, follow these steps:
Configuring the Global LDAP Server Port
You can configure a global LDAP server port through which clients initiate TCP connections. By default, Cisco NX-OS devices use port 389 for all LDAP requests.
To configure the global LDAP server port, follow these steps:
Configuring TCP Ports
You can configure another TCP port for the LDAP servers if there are conflicts with another application. By default, Cisco NX-OS devices use port 389 for all LDAP requests.
To configure the TCP ports, follow these steps:
Configuring LDAP Search Maps
You can configure LDAP search maps to send a search query to the LDAP server. The server searches its database for data meeting the criteria specified in the search map.
To configure the LDAP search maps, follow these steps:
Configuring the LDAP Dead-Time Interval
You can configure the dead-time interval for all LDAP servers. The dead-time interval specifies the time that the Cisco NX-OS device waits, after declaring that an LDAP server is dead, before sending out a test packet to determine if the server is now alive.
Note![]() When the dead-time interval is 0 minutes, LDAP servers are not marked as dead even if they are not responding. You can configure the dead-time interval per group.
When the dead-time interval is 0 minutes, LDAP servers are not marked as dead even if they are not responding. You can configure the dead-time interval per group.
To configure the LDAP dead-time interval, follow these steps:
Configures the global dead-time interval. The default value is 0 minutes. The range is from 1 to 60 minutes. |
||
(Optional) Copies the running configuration to the startup configuration. |
Configuring AAA Authorization on LDAP Servers
You can configure the default AAA authorization method for LDAP servers.
To configure the AAA authorization on LDAP servers, follow these steps:
Disabling LDAP
When you disable LDAP, all related configurations are automatically discarded.
To disable LDAP, follow these steps:
(Optional) Copies the running configuration to the startup configuration. |
For detailed information about the fields in the output from this command, see the Cisco MDS 9000 Family Command Reference, Release 5.0(1a).
Configuration Examples for LDAP
The following example shows how to configure an LDAP server host and server group:
The following example shows how to configure an LDAP search map:
The following example shows how to configure AAA authorization with certificate authentication for an LDAP server:
Configuring RADIUS Server Monitoring Parameters
Cisco MDS 9000 Family switches can use the RADIUS protocol to communicate with remote AAA servers. You can configure multiple RADIUS servers and server groups and set timeout and retry counts.
RADIUS is a distributed client/server protocol that secures networks against unauthorized access. In the Cisco implementation, RADIUS clients run on Cisco MDS 9000 Family switches and send authentication requests to a central RADIUS server that contains all user authentication and network service access information.
This section defines the RADIUS operation, identifies its network environments, and describes its configuration possibilities.
About RADIUS Server Default Configuration
Fabric Manager allows you to set up a default configuration that can be used for any RADIUS server that you configure the switch to communicate with. The default configuration includes:
Setting the RADIUS Server Address
You can add up to 64 RADIUS servers. RADIUS keys are always stored in encrypted form in persistent storage. The running configuration also displays encrypted keys.
To specify the host RADIUS server IPv4 address and other options, follow these steps:
To specify the host RADIUS server IPv6 address and other options, follow these steps:
To specify the host RADIUS server DNS name and other options, follow these steps:
About the Default RADIUS Server Encryption Type and Preshared Key
You need to configure the RADIUS preshared key to authenticate the switch to the RADIUS server. The length of the key is restricted to 64 characters and can include any printable ASCII characters (white spaces are not allowed). You can configure a global key to be used for all RADIUS server configurations on the switch.
You can override this global key assignment by explicitly using the key option when configuring an individual RADIUS server in the radius-server host command.
Configuring the Default RADIUS Server Encryption Type and Preshared Key
To configure the RADIUS preshared key, follow these steps:
Setting the RADIUS Server Timeout Interval
You can configure a global timeout value between transmissions for all RADIUS servers.
Note![]() If timeout values are configured for individual servers, those values override the globally configured values.
If timeout values are configured for individual servers, those values override the globally configured values.
To specify the timeout values between retransmissions to the RADIUS servers, follow these steps:
Setting the Default RADIUS Server Timeout Interval and Retransmits
By default, a switch retries transmission to a RADIUS server only once before reverting to local authentication. You can increase this number up to a maximum of five retries per server. You can also configure the timeout value for the RADIUS server.
To specify the number of times that RADIUS servers should try to authenticate a user, follow these steps:
|
|
|
|
|---|---|---|
Configures the number of times (3) the switch tries to connect to a RADIUS server(s) before reverting to local authentication. |
||
Configuring RADIUS Server Monitoring Parameters
You can configure parameters for monitoring RADIUS servers. You can configure this option to test the server periodically, or you can run a one-time only test.
Configuring the Test Idle Timer
The test idle timer specifies the interval during which a RADIUS server receives no requests before the MDS switch sends out a test packet.
Note![]() The default idle timer value is 0 minutes. When the idle time interval is 0 minutes, periodic RADIUS server monitoring is not performed.
The default idle timer value is 0 minutes. When the idle time interval is 0 minutes, periodic RADIUS server monitoring is not performed.
To configure the idle timer, follow these steps:
Configuring Test User Name
You can configure a username and password for periodic RADIUS server status testing. You do not need to configure the test username and password to issue test messages to monitor RADIUS servers. You can use the default test username (test) and default password (test).
Note![]() We recommend that the test username not be the same as an existing username in the RADIUS database for security reasons.
We recommend that the test username not be the same as an existing username in the RADIUS database for security reasons.
To configure the optional username and password for periodic RADIUS server status testing, follow these steps:
Configuring the Dead Timer
The dead timer specifies the interval that the MDS switch waits, after declaring that a RADIUS server is dead, before sending out a test packet to determine if the server is now alive.
Note![]() The default dead timer value is 0 minutes. When the dead timer interval is 0 minutes, RADIUS server monitoring is not performed unless the RADIUS server is part of a server group and the dead-time interval for the group is greater than 0 minutes. (See the “Server Groups” section).
The default dead timer value is 0 minutes. When the dead timer interval is 0 minutes, RADIUS server monitoring is not performed unless the RADIUS server is part of a server group and the dead-time interval for the group is greater than 0 minutes. (See the “Server Groups” section).
Note![]() If the dead timer of a dead RADIUS server expires before it is sent a RADIUS test message, that server is marked as alive again even if it is still not responding. To avoid this scenario, configure a test user with a shorter idle time than the dead timer time.
If the dead timer of a dead RADIUS server expires before it is sent a RADIUS test message, that server is marked as alive again even if it is still not responding. To avoid this scenario, configure a test user with a shorter idle time than the dead timer time.
To configure the dead timer, follow these steps:
|
|
|
|
|---|---|---|
Configures the dead timer interval value in minutes. The valid range is 1 to 1440 minutes. |
||
About RADIUS Servers
You can add up to 64 RADIUS servers. RADIUS keys are always stored in encrypted form in persistent storage. The running configuration also displays encrypted keys. When you configure a new RADIUS server, you can use the default configuration or modify any of the parameters to override the default RADIUS configuration.
Configuring the Test Idle Timer
The test idle timer specifies the interval during which a RADIUS server receives no requests before the MDS switch sends out a test packet.
Note![]() The default idle timer value is 0 minutes. When the idle time interval is 0 minutes, periodic RADIUS server monitoring is not performed.
The default idle timer value is 0 minutes. When the idle time interval is 0 minutes, periodic RADIUS server monitoring is not performed.
To configure the test idle timer, see Configuring RADIUS Server Monitoring Parameters.
Configuring Test User Name
You can configure a username and password for periodic RADIUS server status testing. You do not need to configure the test username and password to issue test messages to monitor RADIUS servers. You can use the default test username (test) and default password (test).
Note![]() We recommend that the test username not be the same as an existing username in the RADIUS database for security reasons.
We recommend that the test username not be the same as an existing username in the RADIUS database for security reasons.
To configure the optional username and password for periodic RADIUS server status testing, see Configuring RADIUS Server Monitoring Parameters.
About Validating a RADIUS Server
As of Cisco SAN-OS Release 3.0(1), you can periodically validate a RADIUS server. The switch sends a test authentication to the server using the username and password that you configure. If the server does not respond to the test authentication, then the server is considered non responding.
Note![]() For security reasons we recommend that you do not use a username that is configured on your RADIUS server as a test username.
For security reasons we recommend that you do not use a username that is configured on your RADIUS server as a test username.
You can configure this option to test the server periodically, or you can run a one-time only test.
Sending RADIUS Test Messages for Monitoring
You can manually send test messages to monitor a RADIUS server.
To send the test message to the RADIUS server, follow this step:
|
|
|
|
|---|---|---|
Sends a test message to a RADIUS server using the default username (test) and password (test). |
||
Sends a test message to a RADIUS server using a configured test username (testuser) and password (Ur2Gd2BH). Note A configured username and password is optional (see the “Configuring Test User Name” section). |
Allowing Users to Specify a RADIUS Server at Login
By default, an MDS switch forwards an authentication request to the first server in the RADIUS server group. You can configure the switch to allow the user to specify which RADIUS server to send the authenticate request by enabling the directed request option. If you enable this option, the user can log in as username@hostname, where the hostname is the name of a configured RADIUS server.
Note![]() User specified logins are supported only for Telnet sessions.
User specified logins are supported only for Telnet sessions.
To allow users logging into an MDS switch to select a RADIUS server for authentication, follow these steps:
You can use the show tacacs-server directed-request command to display the RADIUS directed request configuration.
About Vendor-Specific Attributes
The Internet Engineering Task Force (IETF) draft standard specifies a method for communicating vendor-specific attributes (VSAs) between the network access server and the RADIUS server. The IETF uses attribute 26. VSAs allow vendors to support their own extended attributes that are not suitable for general use. The Cisco RADIUS implementation supports one vendor-specific option using the format recommended in the specification. The Cisco vendor ID is 9, and the supported option is vendor type 1, which is named cisco-avpair. The value is a string with the following format:
Where protocol is a Cisco attribute for a particular type of authorization, separator is = (equal sign) for mandatory attributes, and * (asterisk) is for optional attributes.
When you use RADIUS servers to authenticate yourself to a Cisco MDS 9000 Family switch, the RADIUS protocol directs the RADIUS server to return user attributes, such as authorization information, along with authentication results. This authorization information is specified through VSAs.
VSA Format
The following VSA protocol options are supported by the Cisco NX-OS software:
- Shell protocol—Used in Access-Accept packets to provide user profile information.
- Accounting protocol—Used in Accounting-Request packets. If a value contains any white spaces, it should be put within double quotation marks.
The following attributes are supported by the Cisco NX-OS software:
- roles —This attribute lists all the roles to which the user belongs. The value field is a string storing the list of group names delimited by white space. For example, if you belong to roles vsan-admin and storage-admin, the value field would be “ vsan-admin storage-admin”. This subattribute is sent in the VSA portion of the Access-Accept frames from the RADIUS server, and it can only be used with the shell protocol value. These are two examples using the roles attribute:
shell:roles=“network-admin vsan-admin”
shell:roles*“network-admin vsan-admin”
When an VSA is specified as shell:roles*“network-admin vsan-admin”, this VSA is flagged as an optional attribute, and other Cisco devices ignore this attribute.
- accountinginfo —This attribute stores additional accounting information besides the attributes covered by a standard RADIUS accounting protocol. This attribute is only sent in the VSA portion of the Account-Request frames from the RADIUS client on the switch, and it can only be used with the accounting protocol-related PDUs.
Specifying SNMPv3 on AAA Servers
The vendor/custom attribute cisco-av-pair can be used to specify user’s role mapping using the format:
Note![]() When you log in to a Cisco MDS switch successfully using the Fabric Manager or Device Manager through Telnet or SSH and if that switch is configured for AAA server-based authentication, a temporary SNMP user entry is automatically created with an expiry time of one day. The switch authenticates the SNMPv3 protocol data units (PDUs) with your Telnet or SSH login name as the SNMPv3 user. The management station can temporarily use the Telnet or SSH login name as the SNMPv3 auth and priv passphrase. This temporary SNMP login is only allowed if you have one or more active MDS shell sessions. If you do not have an active session at any given time, your login is deleted and you will not be allowed to perform SNMPv3 operations.
When you log in to a Cisco MDS switch successfully using the Fabric Manager or Device Manager through Telnet or SSH and if that switch is configured for AAA server-based authentication, a temporary SNMP user entry is automatically created with an expiry time of one day. The switch authenticates the SNMPv3 protocol data units (PDUs) with your Telnet or SSH login name as the SNMPv3 user. The management station can temporarily use the Telnet or SSH login name as the SNMPv3 auth and priv passphrase. This temporary SNMP login is only allowed if you have one or more active MDS shell sessions. If you do not have an active session at any given time, your login is deleted and you will not be allowed to perform SNMPv3 operations.
If the role option in the cisco-av-pair attribute is not set, the default user role is network-operator.
The VSA format optionally specifies your SNMPv3 authentication and privacy protocol attributes also as follows:
The SNMPv3 authentication protocol options are SHA and MD5. The privacy protocol options are AES-128 and DES. If these options are not specified in the cisco-av-pair attribute on the ACS server, MD5 and DES are used by default.
Displaying RADIUS Server Details
Use the show radius-server command to display configured RADIUS parameters as shown in Example 4-4.
Example 4-4 Displays Configured RADIUS Information
Example 4-5 Displays Configured RADIUS Server-Group Order
Displaying RADIUS Server Statistics
You can display RADIUS server statistics using the show radius-server statistics command.
Example 4-6 Displays RADIUS Server Statistics
You can clear RADIUS server statistics using the clear radius-server statistics 10.1.3.2 command.
One-Time Password Support
A one-time password (OTP) is a password that is valid for a single login session or transaction. OTPs avoid a number of disadvantages that are associated with usual (static) passwords. The most vital disadvantage that is addressed by OTPs is that, they are not at risk to replay attacks. If an intruder manages to record an OTP that was already used to log into a service or to conduct an operation, it will not be misused as it will no longer be valid.
One Time Password is applicable only to RADIUS and TACACS protocol daemons. With a RADIUS protocol daemon, there is no configuration required from the switch side. With a TACACS protocol, ascii authentication mode needs to be enabled, which can be done by the following command:
Configuring TACACS+ Server Monitoring Parameters
A Cisco MDS switch uses the Terminal Access Controller Access Control System Plus (TACACS+) protocol to communicate with remote AAA servers. You can configure multiple TACACS+ servers and set timeout values.
This section includes the following topics:
- About TACACS+
- About TACACS+ Server Default Configuration
- About the Default TACACS+ Server Encryption Type and Preshared Key
- Enabling TACACS+
- Setting the Default RADIUS Server Timeout Interval and Retransmits
- Setting the TACACS+ Server Address
- Setting the Global Secret Key
- Setting the Default TACACS+ Server Timeout Interval and Retransmits
- Setting the Timeout Value
- About TACACS+ Servers
- Configuring TACACS+ Server Monitoring Parameters
- About Validating a TACACS+ Server
- Displaying RADIUS Server Statistics
- Sending TACACS+ Test Messages for Monitoring
- Password Aging Notification through TACACS+ Server
- About Users Specifying a TACACS+ Server at Login
- Allowing Users to Specify a TACACS+ Server at Login
- Defining Custom Attributes for Roles
- Supported TACACS+ Server Parameters
- Displaying TACACS+ Server Details
About TACACS+
TACACS+ is a client/server protocol that uses TCP (TCP port 49) for transport requirements. All switches in the Cisco MDS 9000 Family provide centralized authentication using the TACACS+ protocol. The TACACS+ has the following advantages over RADIUS authentication:
- Provides independent, modular AAA facilities. Authorization can be done without authentication.
- Uses the TCP transport protocol to send data between the AAA client and server, making reliable transfers with a connection-oriented protocol.
- Encrypts the entire protocol payload between the switch and the AAA server to ensure higher data confidentiality. The RADIUS protocol only encrypts passwords.
About TACACS+ Server Default Configuration
Fabric Manager allows you to set up a default configuration that can be used for any TACACS+ server that you configure the switch to communicate with. The default configuration includes:
About the Default TACACS+ Server Encryption Type and Preshared Key
You need to configure the TACACS+ preshared key to authenticate the switch to the TACACS+ server. The length of the key is restricted to 64 characters and can include any printable ASCII characters (white spaces are not allowed). You can configure a global key to be used for all TACACS+ server configurations on the switch.
You can override this global key assignment by explicitly using the key option when configuring and individual TACACS+ server.
Enabling TACACS+
By default, the TACACS+ feature is disabled in all switches in the Cisco MDS 9000 Family. You must explicitly enable the TACACS+ feature to access the configuration and verification commands for fabric authentication. When you disable this feature, all related configurations are automatically discarded.
To enable TACACS+ for a Cisco MDS switch, follow these steps:
|
|
|
|
|---|---|---|
Setting the TACACS+ Server Address
If a secret key is not configured for a configured server, a warning message is issued if a global key is not configured. If a server key is not configured, the global key (if configured) is used for that server (see the “Setting the Default TACACS+ Server Timeout Interval and Retransmits” section).
Note![]() You can use the dollar sign ($) and the percent sign (%) in global secret keys.
You can use the dollar sign ($) and the percent sign (%) in global secret keys.
To configure the TACACS+ server IPv4 address and other options, follow these steps:
To configure the TACACS+ server IPv6 address and other options, follow these steps:
To configure the TACACS+ server DNS name and other options, follow these steps:
Setting the Global Secret Key
You can configure global values for the secret key for all TACACS+ servers.
Note![]() If secret keys are configured for individual servers, those keys override the globally configured key.
If secret keys are configured for individual servers, those keys override the globally configured key.
Note![]() You can use the dollar sign ($) and the percent sign (%) in global secret keys.
You can use the dollar sign ($) and the percent sign (%) in global secret keys.
To set the secret key for TACACS+ servers, follow these steps:
Setting the Default TACACS+ Server Timeout Interval and Retransmits
By default, a switch retries a TACACS+ server only once. This number can be configured. The maximum is five retries per server. You can also configure the timeout value for the TACACS+ server.
Setting the Timeout Value
You can configure a global timeout value between transmissions for all TACACS+ servers.
Note![]() If timeout values are configured for individual servers, those values override the globally configured values.
If timeout values are configured for individual servers, those values override the globally configured values.
To set the global timeout value for TACACS+ servers, follow these steps:
About TACACS+ Servers
By default, the TACACS+ feature is disabled in all switches in the Cisco MDS 9000 Family. Fabric Manager or Device Manager enables the TACACS+ feature automatically when you configure a TACACS+ server.
If a secret key is not configured for a configured server, a warning message is issued if a global key is not configured. If a server key is not configured, the global key (if configured) is used for that server.
Note![]() Prior to Cisco MDS SAN-OS Release 2.1(2), you can use the dollar sign ($) in the key but the key must be enclosed in double quotes, for example “k$”. The percent sign (%) is not allowed. In Cisco MDS SAN-OS Release 2.1(2) and later, you can use the dollar sign ($) without double quotes and the percent sign (%) in global secret keys.
Prior to Cisco MDS SAN-OS Release 2.1(2), you can use the dollar sign ($) in the key but the key must be enclosed in double quotes, for example “k$”. The percent sign (%) is not allowed. In Cisco MDS SAN-OS Release 2.1(2) and later, you can use the dollar sign ($) without double quotes and the percent sign (%) in global secret keys.
You can configure global values for the secret key for all TACACS+ servers.
Note![]() If secret keys are configured for individual servers, those keys override the globally configured key.
If secret keys are configured for individual servers, those keys override the globally configured key.
Configuring TACACS+ Server Monitoring Parameters
You can configure parameters for monitoring TACACS+ servers.
Configuring the TACACS+ Test Idle Timer
The test idle timer specifies the interval during which a TACACS+ server receives no requests before the MDS switch sends out a test packet.
Note![]() The default idle timer value is 0 minutes. When the idle time interval is 0 minutes, periodic TACACS+ server monitoring is not performed.
The default idle timer value is 0 minutes. When the idle time interval is 0 minutes, periodic TACACS+ server monitoring is not performed.
To configure the idle timer, follow these steps:
Configuring Test Username
You can configure a username and password for periodic TACACS+ server status testing. You do not need to configure the user name and password to monitor TACACS+ servers. You can use the default test username (test) and default password (test).
To configure the optional username and password for periodic TACACS+ server status testing, follow these steps:
Configuring the Dead Timer
The dead timer specifies the interval that the MDS switch waits, after declaring a TACACS+ server is dead, before sending out a test packet to determine if the server is now alive.
Note![]() The default dead timer value is 0 minutes. TACACS+ server monitoring is not performed if the dead timer interval is 0 minutes, unless the TACACS+ server is a part of a bigger group with the dead-time interval greater than 0 minutes. (See “Configuring RADIUS Server Monitoring Parameters” section).
The default dead timer value is 0 minutes. TACACS+ server monitoring is not performed if the dead timer interval is 0 minutes, unless the TACACS+ server is a part of a bigger group with the dead-time interval greater than 0 minutes. (See “Configuring RADIUS Server Monitoring Parameters” section).
Note![]() If the dead timer of a dead TACACS+ server expires before it is sent a TACACS+ test message, that server is marked as alive again even if it is still not responding. To avoid this scenario, configure a test user with a shorter idle time than the dead timer time.
If the dead timer of a dead TACACS+ server expires before it is sent a TACACS+ test message, that server is marked as alive again even if it is still not responding. To avoid this scenario, configure a test user with a shorter idle time than the dead timer time.
To configure the dead timer, follow these steps:
|
|
|
|
|---|---|---|
Configures the dead-time interval value in minutes. The valid range is 1 to 1440 minutes. |
||
Reverts to the default value (0 minutes). Note When the dead-time interval is 0 minutes, TACACS+ server monitoring is not performed unless the TACACS+ server is part of a server group and the dead-time interval for the group is greater than 0 minutes. (See the “Configuring RADIUS Server Monitoring Parameters” section). |
Sending TACACS+ Test Messages for Monitoring
You can manually send test messages to monitor a TACACS+ server.
To send the test message to the TACACS+ server, follow these steps:
|
|
|
|---|---|
Sends a test message to a TACACS+ server using the default username (test) and password (test). |
|
Sends a test message to a TACACS+ server using a configured test username and password. A configured username and password is optional (see the “Configuring Test Username” section). |
Password Aging Notification through TACACS+ Server
Password aging notification is initiated when the user authenticates to a Cisco MDS 9000 switch via a TACACS+ account. The user is notified when a password is about to expire or has expired. If the password has expired, user is prompted to change the password.
Note![]() As of Cisco MDS SAN-OS Release 3.2(1), only TACACS+ supports password aging notification. If you try to use RADIUS servers by enabling this feature, RADIUSs will generate a SYSLOG message and authentication will fall back to the local database.
As of Cisco MDS SAN-OS Release 3.2(1), only TACACS+ supports password aging notification. If you try to use RADIUS servers by enabling this feature, RADIUSs will generate a SYSLOG message and authentication will fall back to the local database.
Password aging notification facilitates the following:
- Password change—You can change your password by entering a blank password.
- Password aging notification—Notifies password aging. Notification happens only if the AAA server is configured and MSCHAP and MSCHAPv2 is disabled.
- Password change after expiration—Initiates password change after the old password expires. Initiation happens from the AAA server.
Note![]() Password aging notification fails if you do not disable MSCHAP and MSCHAPv2 authentication.
Password aging notification fails if you do not disable MSCHAP and MSCHAPv2 authentication.
To enable the password aging option in the AAA server, enter the following command:
To determine whether or not password aging notification is enabled or disabled in the AAA server, enter the following command:
About Validating a TACACS+ Server
As of Cisco SAN-OS Release 3.0(1), you can periodically validate a TACACS+ server. The switch sends a test authentication to the server using the test username and test password that you configure. If the server does not respond to the test authentication, then the server is considered nonresponding.
Note![]() We recommend that you do not configure the test user on your TACACS+ server for security reasons.
We recommend that you do not configure the test user on your TACACS+ server for security reasons.
You can configure this option to test the server periodically, or you can run a one-time only test.
Periodically Validating a TACACS+ Server
To configure the switch to periodically test a TACACS+ server using Fabric Manager, see the “Configuring TACACS+ Server Monitoring Parameters” section.
About Users Specifying a TACACS+ Server at Login
By default, an MDS switch forwards an authentication request to the first server in the TACACS+ server group. You can configure the switch to allow the user to specify which TACACS+ server to send the authenticate request. If you enable this feature, the user can log in as username@hostname, where the hostname is the name of a configured TACACS+ server.
Note![]() User specified logins are supported only for Telnet sessions
User specified logins are supported only for Telnet sessions
Allowing Users to Specify a TACACS+ Server at Login
To allow users logging into an MDS switch to select a TACACS+ server for authentication, follow these steps:
You can use the show tacacs-server directed-request command to display the TACACS+ directed request configuration.
Defining Roles on the Cisco Secure ACS 5.x GUI
Enter the following in the GUI under Policy Elements:
|
|
|
|
|---|---|---|
Defining Custom Attributes for Roles
Cisco MDS 9000 Family switches use the TACACS+ custom attribute for service shells to configure roles to which a user belongs. TACACS+ attributes are specified in name=value format. The attribute name for this custom attribute is cisco-av-pair. The following example illustrates how to specify roles using this attribute:
cisco-av-pair=shell:roles=”network-admin vsan-admin”
You can also configure optional custom attributes to avoid conflicts with non-MDS Cisco switches using the same AAA servers.
network-admin vsan-admin"
Additional custom attribute shell:roles are also supported:
network-admin vsan-admin"
network-admin vsan-admin”
Note![]() TACACS+ custom attributes can be defined on an Access Control Server (ACS) for various services (for example, shell). Cisco MDS 9000 Family switches require the TACACS+ custom attribute for the service shell to be used for defining roles.
TACACS+ custom attributes can be defined on an Access Control Server (ACS) for various services (for example, shell). Cisco MDS 9000 Family switches require the TACACS+ custom attribute for the service shell to be used for defining roles.
Supported TACACS+ Server Parameters
The Cisco NX-OS software currently supports the following parameters for the listed TACACS+ servers:
Displaying TACACS+ Server Details
Use the show aaa and show tacacs-server commands to display information about TACACS+ server configuration in all switches in the Cisco MDS 9000 Family as shown in Examples 4-7 to 4-12 .
Example 4-7 Displays Configured TACACS+ Server Information
Example 4-8 Displays AAA Authentication Information
Example 4-9 Displays AAA Authentication Login Information
Example 4-10 Displays Configured TACACS+ Server Group s
Example 4-11 Displays All AAA Server Groups
Example 4-12 Displays TACACS+ Server Statistics
Clearing TACACS+ Server Statistics
You can clear all the TACACS+ server statistics using the clear tacacs-server statistics 10.1.2.3 command.
Configuring Server Groups
You can specify one or more remote AAA servers to authenticate users using server groups. All members of a group must belong to the same protocol, either RADIUS or TACACS+. The servers are tried in the same order in which you configure them.
The AAA server monitoring feature can mark an AAA server as dead. You can configure a period of time in minutes to elapse before the switch sends requests to a dead AAA server. (See the “AAA Server Monitoring” section).
This section includes the following topics:
About Configuring Server Groups
You can configure these server groups at any time but they only take effect when you apply them to an AAA service. You configure AAA policies for CLI users or Fabric Manager or Device Manager users.
To configure a RADIUS server group, follow these steps:
|
|
|
|
|---|---|---|
Creates a server group named RadServer and enters the RADIUS server group configuration submode for that group. |
||
Deletes the server group called RadServer from the authentication list. |
||
Configures the RADIUS server at IPv4 address 10.71.58.91 to be tried first within the server group RadServer. |
||
Configures the RADIUS server at IPv6 address 2001:0DB8:800:200C::417A to be tried first within the server group RadServer. |
||
Removes the RADIUS server at IPv6 address 2001:0DB8:800:200C::417A from the server group RadServer. |
||
Creates a server group named RadiusServer and enters the RADIUS server group configuration submode for that group. |
||
Configures ServerA to be tried first within the server group called the RadiusServer1. |
||
Configures ServerB to be tried second within the server group RadiusServer1. |
||
Configures the monitoring dead time to 30 minutes. The range is 0 through 1440. Note If the dead-time interval for an individual RADIUS server is greater than 0, that value takes precedence over the value set for the server group. |
||
Reverts to the default value (0 minutes). Note If the dead-time interval for both the RADIUS server group and an individual TACACS+ server in the RADIUS server group is set to 0, the switch does not mark the RADIUS server as dead when it is found to be unresponsive by periodic monitoring. Also, the switch does not perform dead server monitoring for that RADIUS server. (See the “Configuring RADIUS Server Monitoring Parameters” section). |
To verify the configured server group order, use the show radius-server groups command:
To configure a TACACS+ server group, follow these steps:
|
|
|
|
|---|---|---|
Creates a server group named TacacsServer1 and enters the submode for that group. |
||
Deletes the server group called TacacsServer1 from the authentication list. |
||
Configures ServerA to be tried first within the server group called the TacacsServer1. |
||
Configures ServerB to be tried second within the server group TacacsServer1. |
||
Configures the monitoring dead time to 30 minutes. The range is 0 through 1440. Note If the dead-time interval for an individual TACACS+ server is greater than 0, that value takes precedence over the value set for the server group. |
||
Reverts to the default value (0 minutes). Note If the dead-time interval for both the TACACS+ server group and an individual TACACS+ server in the TACACS+ server group is set to 0, the switch does not mark the TACACS+ server as dead when it is found to be unresponsive by periodic monitoring. Also, the switch does not perform dead server monitoring for that TACACS+ server. (See the Configuring TACACS+ Server Monitoring Parameters). |
Note![]() Configuration of a TACACS+ group fails if MSCHPv2 authentication is not disabled.
Configuration of a TACACS+ group fails if MSCHPv2 authentication is not disabled.
About Bypassing a Nonresponsive Server
As of Cisco SAN-OS Release 3.0(1), you can bypass a nonresponsive AAA server within a server group. If the switch detects a nonresponsive server, it will bypass that server when authenticating users. Use this feature to minimize login delays caused by a faulty server. Instead of sending a request to a nonresponsive server and waiting for the authentication request to timeout, the switch sends the authentication request to the next server in the server group. If there are no other responding servers in the server group, the switch continues to attempt authentications against the nonresponsive server.
AAA Server Distribution
Configuration for RADIUS and TACACS+ AAA on an MDS switch can be distributed using the Cisco Fabric Services (CFS). The distribution is disabled by default (see the Cisco MDS 9000 Family NX-OS System Management Configuration Guide and the Cisco Fabric Manager System Management Configuration Guide).
After enabling the distribution, the first server or global configuration starts an implicit session. All server configuration commands entered thereafter are stored in a temporary database and applied to all switches in the fabric (including the originating one) when you explicitly commit the database. The various server and global parameters are distributed, except the server and global keys. These keys are unique secrets to a switch and should not be shared with other switches.
Note![]() Server group configurations are not distributed.
Server group configurations are not distributed.
This section includes the following topics:
- Enabling AAA Server Distribution
- Starting a Distribution Session on a Switch
- Displaying the Session Status
Note![]() For an MDS switch to participate in AAA server configuration distribution, it must be running Cisco MDS SAN-OS Release 2.0(1b) or later, or Cisco NX-OS Release 4.1(1).
For an MDS switch to participate in AAA server configuration distribution, it must be running Cisco MDS SAN-OS Release 2.0(1b) or later, or Cisco NX-OS Release 4.1(1).
Enabling AAA Server Distribution
Only switches where distribution is enabled can participate in the distribution activity.
To enable RADIUS server distribution, follow these steps:
|
|
|
|
|---|---|---|
Disables RADIUS configuration distribution in this switch (default). |
To enable TACACS+ server distribution, follow these steps:
|
|
|
|
|---|---|---|
Disables TACACS+ configuration distribution in this switch (default). |
Starting a Distribution Session on a Switch
A distribution session starts the moment you begin a RADIUS/TACACS+ server or global configuration. For example, the following tasks start an implicit session:
- Specifying the global timeout for RADIUS servers.
- Specifying the global timeout for TACACS+ servers.
Note![]() After you issue the first configuration command related to AAA servers, all server and global configurations that are created (including the configuration that caused the distribution session start) are stored in a temporary buffer, not in the running configuration.
After you issue the first configuration command related to AAA servers, all server and global configurations that are created (including the configuration that caused the distribution session start) are stored in a temporary buffer, not in the running configuration.
Displaying the Session Status
Once the implicit distribution session has started, you can check the session status from Fabric Manager by expanding Switches > Security > AAA, and selecting RADIUS or TACACS+.
Use the show radius command to see the distribution status on the CFS tab.
Once the implicit distribution session has started, you can check the session status using the show tacacs+ distribution status command.
Displaying the Pending Configuration to be Distributed
To display the RADIUS or TACACS+ global and/or server configuration stored in the temporary buffer use the show radius pending command, follow these steps:
To display the TACACS+ global and/or server configuration stored in the temporary buffer, use the show tacacs+ pending command.
Committing the Distribution
The RADIUS or TACACS+ global and/or server configuration stored in the temporary buffer can be applied to the running configuration across all switches in the fabric (including the originating switch).
To commit RADIUS configuration changes, follow these steps:
|
|
|
|
|---|---|---|
Commits the RADIUS configuration changes to the running configuration. |
To commit TACACS+ configuration changes, follow these steps:
|
|
|
|
|---|---|---|
Commits the TACACS+ configuration changes to the running configuration. |
Discarding the Distribution Session
Discarding the distribution of a session in progress causes the configuration in the temporary buffer to be dropped. The distribution is not applied.
To discard the RADIUS session in-progress distribution, follow these steps:
|
|
|
|
|---|---|---|
Discards the RADIUS configuration changes to the running configuration. |
To discard the TACACS+ session in-progress distribution, follow these steps:
|
|
|
|
|---|---|---|
Discards the TACACS+ configuration changes to the running configuration. |
Clearing Sessions
To clear the ongoing CFS distribution session (if any) and to unlock the fabric for the RADIUS feature, enter the clear radius session command from any switch in the fabric.
To clear the ongoing CFS distribution session (if any) and to unlock the fabric for the TACACS+ feature, enter the clear tacacs+ session command from any switch in the fabric.
Merge Guidelines for RADIUS and TACACS+ Configurations
The RADIUS and TACACS+ server and global configuration are merged when two fabrics merge. The merged configuration is applied to CFS distribution-enabled switches.
When merging the fabric, be aware of the following conditions:
- The server groups are not merged.
- The server and global keys are not changed during the merge.
- The merged configuration contains all servers found on all CFS enabled switches.
- The timeout and retransmit parameters of the merged configuration are the largest values found per server and global configuration.
Note![]() The test parameter will be distributed through CFS for TACACS+ Daemon only. If the fabric contains only NX-OS Release 5.0 switches, then the test parameters will be distributed. If the fabric contains switches running 5.0 versions and some running NX-OS 4.x release, the test parameters will be not distributed.
The test parameter will be distributed through CFS for TACACS+ Daemon only. If the fabric contains only NX-OS Release 5.0 switches, then the test parameters will be distributed. If the fabric contains switches running 5.0 versions and some running NX-OS 4.x release, the test parameters will be not distributed.
Use the show radius distribution status command to view the status of the RADIUS fabric merge as shown in Example 4-13.
Example 4-13 Displays the RADIUS Fabric Merge Status
Use the show tacacs+ distribution status command to view the status of the TACACS+ fabric merge as shown in Example 4-14.
Example 4-14 Displays the TACACS+ Fabric Merge Status
CHAP Authentication
CHAP (Challenge Handshake Authentication Protocol) is a challenge-response authentication protocol that uses the industry-standard Message Digest 5 (MD5) hashing scheme to encrypt the response. CHAP is used by various vendors of network access servers and clients. A server running routing and Remote Access supports CHAP so that remote access clients that require CHAP are authenticated. CHAP is supported as an authentication method in this release.
Enabling CHAP Authentication
To enable CHAP authentication, follow these steps:
|
|
|
|
|---|---|---|
You can use the show aaa authentication login chap command to display the CHAP authentication configuration.
MSCHAP Authentication
Microsoft Challenge Handshake Authentication Protocol (MSCHAP) is the Microsoft version of CHAP.
Cisco MDS 9000 Family switches allow user logins to perform remote authentication using different versions of MSCHAP. MSCHAP is used for authentication on a RADIUS or TACACS+ server, while MSCHAPv2 is used for authentication on a RADIUS server.
About Enabling MSCHAP
By default, the switch uses Password Authentication Protocol (PAP) authentication between the switch and the remote server. If you enable MSCHAP, you need to configure your RADIUS server to recognize the MSCHAP vendor-specific attributes. See the “About Vendor-Specific Attributes” section. Table 4-4 shows the RADIUS vendor-specific attributes required for MSCHAP.
Enabling MSCHAP Authentication
To enable MSCHAP authentication, follow these steps:
|
|
|
|
|---|---|---|
To enable MSCHAPv2 authentication, follow these steps:
|
|
|
|
|---|---|---|
Note![]() Password aging, MSCHAPv2 and MSCHAP authentication can fail if one of these authentication is not disabled.
Password aging, MSCHAPv2 and MSCHAP authentication can fail if one of these authentication is not disabled.
Note![]() A warning message is issued when you execute a command to enable MSCHAPv2 authentication on the TACACS+ server, and the configuration fails.
A warning message is issued when you execute a command to enable MSCHAPv2 authentication on the TACACS+ server, and the configuration fails.
You can use the show aaa authentication login mschap command to display the MSCHAP authentication configuration.
You can use the show aaa authentication login mschapv2 command to display the MSCHAPv2 authentication configuration.
Local AAA Services
The system maintains the username and password locally and stores the password information in encrypted form. You are authenticated based on the locally stored user information.
Use the username command to configure local users and their roles.
Use the show accounting log command to view the local accounting log as shown in Example 4-15.
Example 4-15 Displays the Accounting Log Information
Disabling AAA Authentication
You can turn off password verification using the none option. If you configure this option, users can log in without giving a valid password. But the user should at least exist locally on the Cisco MDS 9000 Family switch.
Use the none option in the aaa authentication login command to disable password verification.
A user created by entering the username command will exist locally on the Cisco MDS 9000 Family switch.
Displaying AAA Authentication
The show aaa authentication command displays the configured authentication methods as shown in Example 4-16.
Example 4-16 Displays Authentication Information
Configuring Accounting Services
Accounting refers to the log information that is kept for each management session in a switch. This information may be used to generate reports for troubleshooting and auditing purposes. Accounting can be implemented locally or remotely (using RADIUS). The default maximum size of the accounting log is 250,000 bytes and cannot be changed.

Tip![]() The Cisco MDS 9000 Family switch uses interim-update RADIUS accounting-request packets to communicate accounting log information to the RADIUS server. The RADIUS server must be appropriately configured to log the information communicated in these packets. Several servers typically have log update/watchdog packets flags in the AAA client configuration. Turn on this flag to ensure proper RADIUS accounting.
The Cisco MDS 9000 Family switch uses interim-update RADIUS accounting-request packets to communicate accounting log information to the RADIUS server. The RADIUS server must be appropriately configured to log the information communicated in these packets. Several servers typically have log update/watchdog packets flags in the AAA client configuration. Turn on this flag to ensure proper RADIUS accounting.
Note![]() Configuration operations are automatically recorded in the accounting log if they are performed in configuration mode. Additionally, important system events (for example, configuration save and system switchover) are also recorded in the accounting log.
Configuration operations are automatically recorded in the accounting log if they are performed in configuration mode. Additionally, important system events (for example, configuration save and system switchover) are also recorded in the accounting log.
Displaying Accounting Configuration
To display configured accounting information use show accounting command. See Examples 4-17 to 4-19 . To specify the size of the local accounting log to be displayed, use the show accounting log command. By default approximately 250 KB of the accounting log is displayed.
Example 4-17 Displays Two Samples of Configured Accounting Parameters
Example 4-18 Displays 60,000 Bytes of the Accounting Log
Example 4-19 Displays the Entire Log File
Clearing Accounting Logs
To clear out the contents of the current log, use the clear accounting log command.
Configuring Cisco Access Control Servers
The Cisco Access Control Server (ACS) uses TACACS+ and RADIUS protocols to provide AAA services that ensure a secure environment.When using the AAA server, user management is normally done using Cisco ACS. Figure 4-3, Figure 4-4, Figure 4-5, and Figure 4-6 display ACS server user setup configurations for network-admin roles and multiple roles using either RADIUS or TACACS+.
Figure 4-3 Configuring the network-admin Role When Using RADIUS

Figure 4-4 Configuring Multiple Roles with SNMPv3 Attributes When Using RADIUS
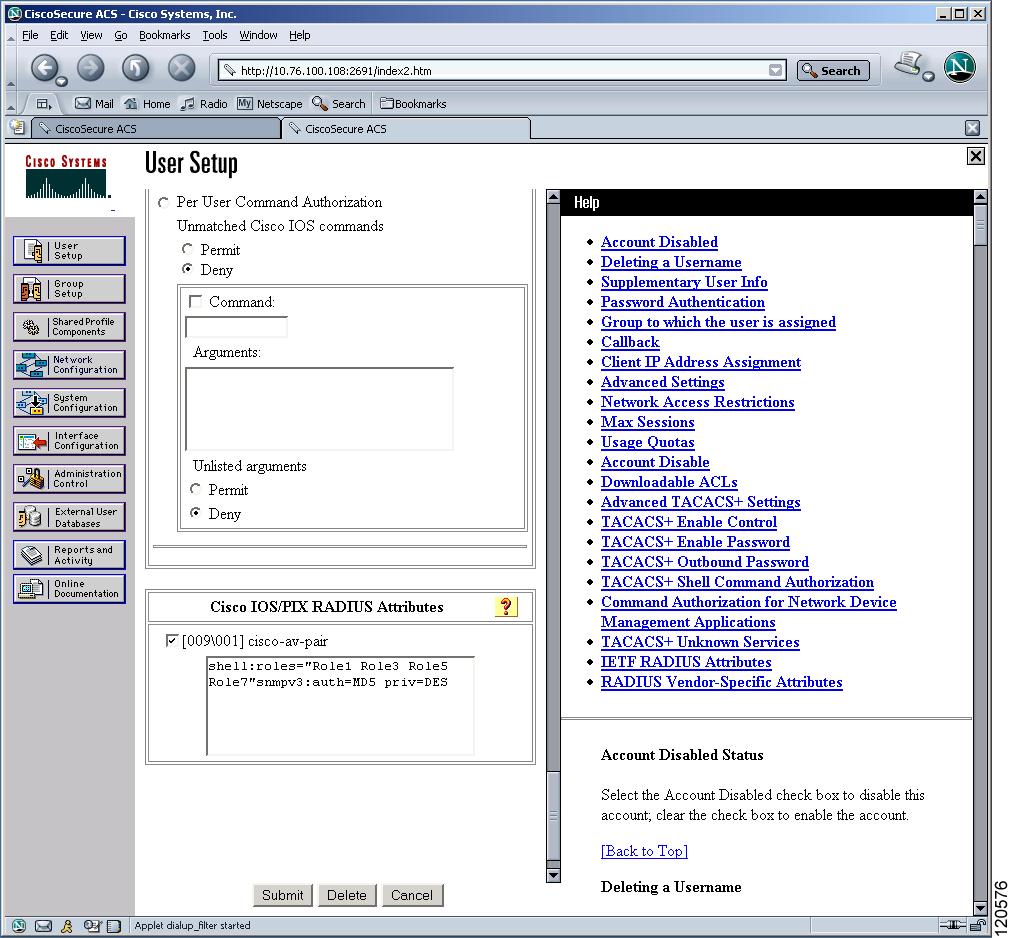
Figure 4-5 Configuring the network-admin Role with SNMPv3 Attributes When Using TACACS+
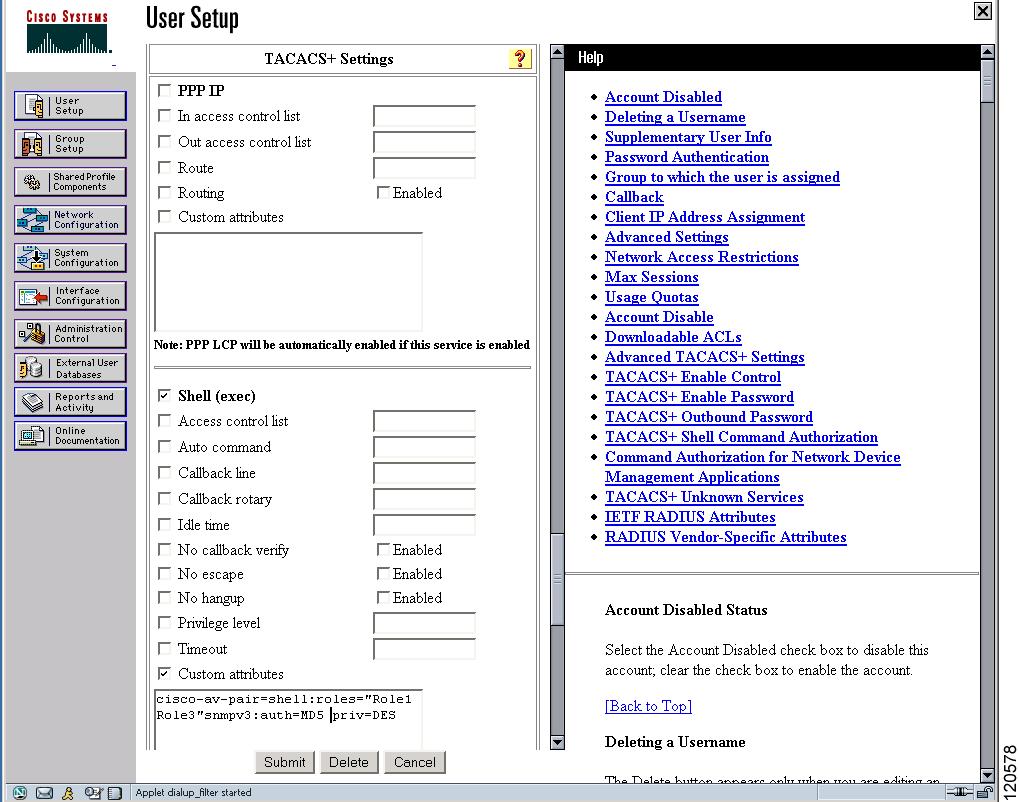
Figure 4-6 Configuring Multiple Roles with SNMPv3 Attributes When Using TACACS+

Default Settings
Table 4-5 lists the default settings for all switch security features in any switch.
|
|
|
|---|---|
 Feedback