- Enabling or Disabling TACACS+
- Configuring Shared Keys
- Configuring a TACACS+ Server Host
- Configuring a TACACS+ Server Group
- Enabling TACACS+ Server Directed Requests
- Setting the TACACS+ Global Timeout Interval
- Setting a Timeout Interval for an Individual TACACS+ Host
- Configuring the TCP Port for a TACACS+ Host
- Configuring Monitoring for a TACACS+ Host
- Configuring the TACACS+ Global Dead-Time Interval
Configuring TACACS+
This chapter contains the following sections:
- Information About TACACS+
- Prerequisites for TACACS+
- Guidelines and Limitations for TACACS+
- Default Settings for TACACS+
- Configuring TACACS+
- Displaying Statistics for a TACACS+ Host
- Configuration Example for TACACS+
- Feature History for TACACS+
Information About TACACS+
The TACACS+ security protocol provides centralized validation of users who are attempting to gain access to a device. TACACS+ services are maintained in a database on a TACACS+ daemon that is running, typically, on a UNIX or Windows NT workstation. You must have access to and must configure a TACACS+ server before the configured TACACS+ features on your device are available.
TACACS+ provides for separate authentication, authorization, and accounting services. The TACACS+ daemon provides each service independently. Each service can be tied into its own database to take advantage of other services available on that server or on the network, depending on the capabilities of the daemon.
The TACACS+ client/server protocol uses TCP (TCP port 49) for transport requirements. Centralized authentication is provided using the TACACS+ protocol.
- TACACS+ Operation for User Login
- Default TACACS+ Server Encryption Type and Preshared Key
- TACACS+ Server Monitoring
- Vendor-Specific Attributes
TACACS+ Operation for User Login
The following sequence of events take place when you attempt to log in to a TACACS+ server using the Password Authentication Protocol (PAP):
-
When a connection is established, the TACACS+ daemon is contacted to obtain the username and password.

Note
TACACS+ allows an arbitrary conversation between the daemon and the user until the daemon receives enough information to authenticate the user. This action is usually done by prompting for a username and password combination, but might include prompts for additional information, such as your mother’s maiden name. -
The TACACS+ daemon provides one of the following responses:
- ACCEPT—User authentication succeeds and service begins. If user authorization is needed, authorization begins.
- REJECT—User authentication failed. The TACACS+ daemon either denies further access to the user or prompts the user to retry the login sequence.
- ERROR—An error occurred at some time during authentication either at the daemon or in the network connection. If an ERROR response is received, the device tries to use an alternative method for authenticating the user.
- If TACACS+ authorization is required, the TACACS+ daemon is contacted and it returns an ACCEPT or REJECT authorization response. An ACCEPT response contains attributes that are used to direct the EXEC or NETWORK session for that user and determines the services that the user can access. Services include the following:
Default TACACS+ Server Encryption Type and Preshared Key
You must configure the TACACS+ preshared key to authenticate to the TACACS+ server. A preshared key is a secret text string shared between the device and the TACACS+ server host. The length of the key is restricted to 63 characters and can include any printable ASCII characters (white spaces are not allowed). You can configure a global preshared secret key for all TACACS+ server configurations.
You can override the global preshared key assignment by explicitly using the key option when configuring an individual TACACS+ server.
TACACS+ Server Monitoring
Unresponsive TACACS+ servers are marked as dead and are not sent AAA requests. Dead TACACS+ servers are periodically monitored and brought back alive once they respond. This process confirms that a TACACS+ server is in a working state before real AAA requests are sent its way. The following figure shows how a TACACS+ server state change generates a Simple Network Management Protocol (SNMP) trap and an error message showing the failure before it impacts performance.
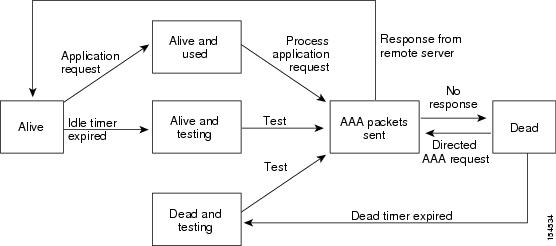
Note |
The monitoring interval for alive servers and dead servers are different and can be configured by the user. The TACACS+ server monitoring is performed by sending a test authentication request to the TACACS+ server. |
Vendor-Specific Attributes
The Internet Engineering Task Force (IETF) draft standard specifies a method for communicating vendor-specific attributes (VSAs) between the network access server and the TACACS+ server. The IETF uses attribute 26. VSAs allow vendors to support their own extended attributes that are not suitable for general use.
Cisco VSA Format
The Cisco TACACS+ implementation supports one vendor-specific option using the format recommended in the IETF specification. The Cisco vendor ID is 9, and the supported option is vendor type 1, which is named cisco-av-pair. The value is a string with the following format:
protocol : attribute separator value *
The protocol is a Cisco attribute for a particular type of authorization. The separator is = (equal sign) for mandatory attributes, and * (asterisk) indicates optional attributes.
When you use TACACS+ servers for authentication, the TACACS+ protocol directs the TACACS+ server to return user attributes, such as authorization information, with authentication results. This authorization information is specified through VSAs.
The following VSA protocol options are supported:
- Shell—Protocol used in access-accept packets to provide user profile information.
- Accounting—Protocol used in accounting-request packets. If a value contains any white spaces, you should enclose the value within double quotation marks.
The following attributes are other supported:
- roles—Lists all the roles to which the user belongs. The value consists of a string that lists the role names delimited by white space. This subattribute, which the TACACS+ server sends in the VSA portion of the Access-Accept frames, can only be used with the shell protocol value.
- accountinginfo—Stores accounting information in addition to the attributes covered by a standard TACACS+ accounting protocol. This attribute is sent only in the VSA portion of the Account-Request frames from the TACACS+ client on the switch. It can be used only with the accounting protocol data units (PDUs).
Prerequisites for TACACS+
Guidelines and Limitations for TACACS+
Default Settings for TACACS+
Parameters |
Default |
|---|---|
TACACS+ |
Disabled |
Dead timer interval |
0 minutes |
Timeout interval |
5 seconds |
Idle timer interval |
0 minutes |
Periodic server monitoring username |
test |
Periodic server monitoring password |
test |
Configuring TACACS+
The following flowchart steps you through configuring TACACS+
Note |
Be aware that the Cisco Nexus 1000V commands might differ from the Cisco IOS commands. |


- Enabling or Disabling TACACS+
- Configuring Shared Keys
- Configuring a TACACS+ Server Host
- Configuring a TACACS+ Server Group
- Enabling TACACS+ Server Directed Requests
- Setting the TACACS+ Global Timeout Interval
- Setting a Timeout Interval for an Individual TACACS+ Host
- Configuring the TCP Port for a TACACS+ Host
- Configuring Monitoring for a TACACS+ Host
- Configuring the TACACS+ Global Dead-Time Interval
Enabling or Disabling TACACS+
By default, TACACS+ is disabled. You must explicitly enable the TACACS+ feature to access the configuration and verification commands that support TACACS+ authentication.
 Caution |
When you disable TACACS+, all related configurations are automatically discarded. |
Before beginning this procedure, you must be logged in to the CLI in EXEC mode.
1. switch# configure terminal
2. switch(config)# [no] tacacs+ enable
3. switch(config)# exit
4. switch(config)# copy running-config startup-config
DETAILED STEPS
switch# configure terminal
switch(config)# tacacs+ enable
switch(config)# exit
switch# copy running-config startup-config
Configuring Shared Keys
By default, no global key is configured.
Use this procedure to configure the following:
1. switch# configure terminal
2. switch(config)# tacacs-server key [ 0 | 7 ] global_key
3. switch(config)# tacacs-server host { ipv4-address | host-name} key [0 | 7] shared_key
4. switch(config)# exit
5. (Optional) switch# show tacacs-server
6. (Optional) switch(config)# copy running-config startup-config
DETAILED STEPS
switch# configure terminal
switch(config)# tacacs-server key 0 QsEFtkI#
switch(config)# exit
switch# show tacacs-server
Global TACACS+ shared secret:********
timeout value:5
deadtime value:0
total number of servers:1

following TACACS+ servers are configured:
        10.10.2.2:
                available on port:49
switch# copy running-config startup-config
Configuring a TACACS+ Server Host
All TACACS+ server hosts are added to the default TACACS+ server group.
Before beginning this procedure, you must have done the following:
1. switch# configure terminal
2. switch(config)# tacacs-server host {ipv4-address | host-name}
3. switch(config)# exit
4. (Optional) switch(config)# show tacacs-server
5. (Optional) switch(confgi)# copy running-config startup-config
DETAILED STEPS
| Command or Action | Purpose | |
|---|---|---|
| Step 1 | switch# configure terminal | Places you into global configuration mode. |
| Step 2 | switch(config)# tacacs-server host {ipv4-address | host-name} | Configures the server IP address or hostname as a TACACS+ server host. |
| Step 3 | switch(config)# exit | Exits the global configuration mode and returns you to EXEC mode. |
| Step 4 | switch(config)# show tacacs-server | (Optional) Displays the TACACS+ server configuration. |
| Step 5 | switch(confgi)# copy running-config startup-config | (Optional) Copies the running configuration to the startup configuration |
switch# configure terminal
switch(config)# tacacs-server host 10.10.2.2
switch(config)# exit
switch# show tacacs-server
timeout value:5
deadtime value:0
total number of servers:1

following TACACS+ servers are configured:
        10.10.2.2:
                available on port:49
switch# copy running-config startup-config
Configuring a TACACS+ Server Group
Use this procedure to configure a TACACS+ server group whose member servers share authentication functions.
After you configure the TACACS+ server group, the server members are tried in the same order in which you configured them.
A TACACS+ server group can provide a failover if one server fails to respond. If the first server in the group fails, the next server in the group is tried until a server responds. Multiple server groups can provide failovers for each other in this same way.
Before beginning this procedure, you must be sure of the following:
1. switch# configure terminalt
2. switch(config)# aaa group server tacacs+ group-name
3. switch(config-tacacs+)# server { ipv4-address | host-name}
4. (Optional) switch(config-tacacs+)# deadtime minutes
5. (Optional) switch(config-tacacs+)# use-vrf vrf-name
6. (Optional) switch(config-tacacs+)# source-interface {interface-type} {interface-number}
7. (Optional) switch(config-tacacs+)# show tacacs-server groups
8. (Optional) switch(config-tacacs+)# copy running-config startup-config
DETAILED STEPS
| Command or Action | Purpose | |||
|---|---|---|---|---|
| Step 1 | switch# configure terminalt | Places you into global configuration mode. |
||
| Step 2 | switch(config)# aaa group server tacacs+ group-name | Creates a TACACS+ server group with the specified name and places you into the TACACS+ configuration mode for that group. |
||
| Step 3 | switch(config-tacacs+)# server { ipv4-address | host-name} | Configures the TACACS+ server hostname or IP address as a member of the TACACS+ server group. If the specified TACACS+ server is not found, configure it using the tacacs-server host command and retry this command.
|
||
| Step 4 | switch(config-tacacs+)# deadtime minutes | (Optional) Configures the monitoring dead time for this TACACS+ group. The default is 0 minutes. The range is from 0 through 1440.
|
||
| Step 5 | switch(config-tacacs+)# use-vrf vrf-name | (Optional) Specifies the virtual routing and forwarding instance (VRF) to use to contact this server group |
||
| Step 6 | switch(config-tacacs+)# source-interface {interface-type} {interface-number} | (Optional) Specifies a source interface to be used to reach the TACACS+ server. |
||
| Step 7 | switch(config-tacacs+)# show tacacs-server groups | (Optional) Displays the TACACS+ server group configuration |
||
| Step 8 | switch(config-tacacs+)# copy running-config startup-config | (Optional) Copies the running configuration to the startup configuration. |
switch# config terminal
switch(config)# aaa group server tacacs+ TacServer
switch(config-tacacs+)# server 10.10.2.2
switch(config-tacacs+)# deadtime 30
switch(config-tacacs+)# use-vrf management
switch(config-tacacs+)# source-interface mgmt0
switch(config-tacacs+)# show tacacs-server groups
total number of groups:1

following TACACS+ server groups are configured:
        group TacServer:
                server 10.10.2.2 on port 49
                deadtime is 30
                vrf is management
switch# copy running-config startup-config
Enabling TACACS+ Server Directed Requests
This procedure allows you to designate the TACACS+ server to send their authentication request to. This is called a directed-request.
Note |
User-specified logins are only supported for Telnet sessions. |
Before beginning this procedure, be sure you have done the following:
1. switch# configure terminal
2. switch(config)# tacacs-server directed-request
3. switch(config)# exit
4. (Optional) switch(config)# show tacacs-server directed-request
5. switch(config)# copy running-config startup-config
DETAILED STEPS
| Command or Action | Purpose | |
|---|---|---|
| Step 1 | switch# configure terminal | Places you into global configuration mode. |
| Step 2 | switch(config)# tacacs-server directed-request | Enables use of directed requests for specifying the TACACS+ server to send an authentication request to when logging in. The default is disabled. |
| Step 3 | switch(config)# exit | Exits the global configuration mode and returns you to EXEC mode. |
| Step 4 | switch(config)# show tacacs-server directed-request | (Optional) Displays the TACACS+ directed request configuration. |
| Step 5 | switch(config)# copy running-config startup-config | Copies the running configuration to the startup configuration |
switch# config terminal
switch(config)# tacacs-server directed-request
switch(config)# exit
switch# show tacacs-server directed-request
enabled
switch# copy running-config startup-config
Setting the TACACS+ Global Timeout Interval
Use this procedure to set the interval in seconds that the Cisco Nexus 1000V waits for a response from any TACACS+ server before declaring a timeout.
The timeout specified for an individual TACACS+ server overrides the global timeout interval. To set the timeout for an individual server.
Before beginning this procedure, you must be sure you have done the following:
1. switch# configure terminal
2. switch(config)# tacacs-server timeout seconds
3. switch(confi)# exit
4. (Optional) switch(config)# show tacacs-server
5. (Optional) switch(confi)# copy running-config startup-config
DETAILED STEPS
| Command or Action | Purpose | |
|---|---|---|
| Step 1 | switch# configure terminal | Places you into global configuration mode. |
| Step 2 | switch(config)# tacacs-server timeout seconds | Specifies the interval in seconds that the Cisco Nexus 1000V waits for a response from a server. The default timeout interval is 5 seconds. The range is from 1 to 60 seconds. |
| Step 3 | switch(confi)# exit | Exits the global configuration mode and returns you to EXEC mode. |
| Step 4 | switch(config)# show tacacs-server | (Optional) Displays the TACACS+ server configuration. |
| Step 5 | switch(confi)# copy running-config startup-config | (Optional) Copies the running configuration to the startup configuration |
switch# configure terminal
switch(config)# tacacs-server timeout 10
switch(config)# exit
switch# n1000v# show tacacs-server
Global TACACS+ shared secret:********
timeout value:10
deadtime value:0
total number of servers:1

following TACACS+ servers are configured:
        10.10.2.2:
                available on port:49
switch# copy running-config startup-config
Setting a Timeout Interval for an Individual TACACS+ Host
Use this procedure to set the interval in seconds that the Cisco Nexus 1000V waits for a response from a specific TACACS+ server before declaring a timeout. This setting is configured per TACACS+ host.
The timeout setting for an individual TACACS+ server overrides the global timeout interval.
Before beginning this procedure, you must be sure you have done the following:
1. switch# configure terminal
2. switch(config)# tacacs-server host {ipv4-address | host-name} timeout seconds
3. switch(config)# exit
4. (Optional) switch(config)# show tacacs-server
5. (Optional) switch(config)# copy running-config startup-config
DETAILED STEPS
| Command or Action | Purpose | |
|---|---|---|
| Step 1 | switch# configure terminal | Places you into global configuration mode. |
| Step 2 | switch(config)# tacacs-server host {ipv4-address | host-name} timeout seconds | Specifies the timeout interval for a specific server. The default is the global timeout interval.. |
| Step 3 | switch(config)# exit | Exits the global configuration mode and returns you to EXEC mode. |
| Step 4 | switch(config)# show tacacs-server | (Optional) Displays the TACACS+ server configuration. |
| Step 5 | switch(config)# copy running-config startup-config | (Optional) Copies the running configuration to the startup configuration |
switch# config terminal
switch(config)#  tacacs-server host 10.10.2.2 timeout 10
switch(config)# exit
switch# n1000v# show tacacs-server
Global TACACS+ shared secret:********
timeout value:10
deadtime value:0
total number of servers:1

following TACACS+ servers are configured:
        10.10.2.2:
                available on port:49
                timeout:10
switch# copy running-config startup-config
Configuring the TCP Port for a TACACS+ Host
Use this procedure to configure a TCP port other than port 49 (the default for TACACS+ requests).
Before beginning this procedure, you must be sure you have done the following:
1. switch# configure terminal
2. switch(config)# tacacs-server host {ipv4-address | host-name} port tcp-port
3. switch(config)# exit
4. (Optional) switch(config)# show tacacs-server
5. (Optional) switch(config)# copy running-config startup-config
DETAILED STEPS
| Command or Action | Purpose | |
|---|---|---|
| Step 1 | switch# configure terminal | Places you into global configuration mode. |
| Step 2 | switch(config)# tacacs-server host {ipv4-address | host-name} port tcp-port | Specifies the TCP port to use. The allowable port range: 1 to 65535 The default is 49. |
| Step 3 | switch(config)# exit | Exits the global configuration mode and returns you to EXEC mode. |
| Step 4 | switch(config)# show tacacs-server | (Optional) Displays the TACACS+ server configuration. |
| Step 5 | switch(config)# copy running-config startup-config | (Optional) Copies the running configuration to the startup configuration |
switch# configure terminal
switch(config)# tacacs-server host 10.10.2.2 port 2
switch(config)# exit
switch# show tacacs-server
Global TACACS+ shared secret:********
timeout value:10
deadtime value:0
total number of servers:1

following TACACS+ servers are configured:
        10.10.2.2:
                available on port:2
                timeout:10
switch# copy running-config startup-config
Configuring Monitoring for a TACACS+ Host
You should know the following information:
Before beginning this procedure, you must be sure you have done the following:
1. switch# configure terminal
2. switch(config)# tacacs-server host { ipv4-address | host-name } test { idle-time minutes | password password [ idle-time minutes] | username name [ password password [ idle-time minutes] ] }
3. switch(config)# tacacs-server dead-time minutes
4. switch(config)# exit
5. (Optional) switch(config)# show tacacs-server
6. (Optional) switch(config)# copy running-config startup-config
DETAILED STEPS
| Command or Action | Purpose | |||||
|---|---|---|---|---|---|---|
| Step 1 | switch# configure terminal | Places you into global configuration mode. |
||||
| Step 2 | switch(config)# tacacs-server host { ipv4-address | host-name } test { idle-time minutes | password password [ idle-time minutes] | username name [ password password [ idle-time minutes] ] } | Configures server monitoring. The keywords and arguments are as follows:
|
||||
| Step 3 | switch(config)# tacacs-server dead-time minutes | Specifies the duration of time in minutes before checking a TACACS+ server that was previously unresponsive. The default value is 0 minutes and the valid range is from 0 to 1440 minutes. |
||||
| Step 4 | switch(config)# exit | Exits the global configuration mode and returns you to EXEC mode. |
||||
| Step 5 | switch(config)# show tacacs-server | (Optional) Displays the TACACS+ server configuration. |
||||
| Step 6 | switch(config)# copy running-config startup-config | (Optional) Copies the running configuration to the startup configuration |
switch# configure terminal
switch(config)# tacacs-server host 10.10.2.2 test username pvk2 password a3z9yjqz7 idle-time 3
switch(config)# tacacs-server dead-time 5
switch(config)# exit
switch# show tacacs-server
Global TACACS+ shared secret:********
timeout value:10
deadtime value:5
total number of servers:1

following TACACS+ servers are configured:
        10.10.2.2:
                available on port:2
                timeout:10
switch# copy running-config startup-config
Configuring the TACACS+ Global Dead-Time Interval
Use this procedure to configure the interval to wait before sending a test packet to a previously unresponsive server.
When the dead-timer interval is 0 minutes, TACACS+ servers are not marked as dead even if they are not responding. You can configure the dead time per group.
Before beginning this procedure, you must be sure you have done the following:
1. switch# configure terminal
2. switch(config)# tacacs-server deadtime minutes
3. switch(config)# exit
4. (Optional) switch(config)# show tacacs-server
5. (Optional) switch(config)# copy running-config startup-config
DETAILED STEPS
| Command or Action | Purpose | |
|---|---|---|
| Step 1 | switch# configure terminal | Places you into global configuration mode. |
| Step 2 | switch(config)# tacacs-server deadtime minutes | Configures the global dead-time interval. The default value is 0 minutes. The range is from 1 to 1440 minutes |
| Step 3 | switch(config)# exit | Exits the global configuration mode and returns you to EXEC mode. |
| Step 4 | switch(config)# show tacacs-server | (Optional) Displays the TACACS+ server configuration. |
| Step 5 | switch(config)# copy running-config startup-config | (Optional) Copies the running configuration to the startup configuration |
switch# configure terminal
switch(config)#  tacacs-server deadtime 5
switch(config)# exit
switch# show tacacs-server
Global TACACS+ shared secret:********
timeout value:10
deadtime value:5
total number of servers:1

following TACACS+ servers are configured:
        10.10.2.2:
                available on port:2
                timeout:10
switch# copy running-config startup-config
Displaying Statistics for a TACACS+ Host
Use the following command to display statistics for a TACACS+ host.
Command |
Description |
|---|---|
show tacacs-server statistics {hostname | ipv4-address} |
Displays the statistics for a TACACS+ host. |
Configuration Example for TACACS+
The following example shows a TACACS+ configuration:
switch# configure terminal
switch(config)# feature tacacs+
switch(config-tacacs+)# tacacs-server key 7 "ToIkLhPpG"
switch# (config-tacacs+)# tacacs-server host 10.10.2.2 key 7 "ShMoMhTl"
switch# (config-tacacs+)# aaa group server tacacs+ TacServer
    server 10.10.2.2
Feature History for TACACS+
This table only includes updates for those releases that have resulted in additions to the feature.
Feature Name |
Releases |
Feature Information |
|---|---|---|
TACACS+ |
Release 5.2(1)IC1(1.1) |
This feature was introduced. |
 Feedback